Tel Rehov

 (left) Aerial View of Tel Rehov from the northwest
Areas C (left) and D (right, down the slope) are seen in the foreground and Areas B (left) and G (right) in the background
Used with permission from BibleWalks.com
(right) Aerial view of Tel Rehov from the southeast showing erosion that has taken place on this side of the Tel
Click on Image for high resolution magnifiable image
Drone photos taken by Jefferson Williams on 11 June 2023
| Transliterated Name | Source | Name |
|---|---|---|
| Tel Rehov | Hebrew | תל רחוב |
| Tell al-Sarem | Arabic | تل الصارم |
| Ro-ob | Greek | Pσωβ |
| Rihib |
- Fig. 1.1 Location Map
for Tel Rehov from Mazar et. al. (2020 v.5)
 Fig. 1.1
Map of the geographic sub-regions, main Bronze and Iron Age sites and roads in the Central Jordan Valley. Key to sub-regions:
- Kinnarot Valley
- NE Beth-Shean Valley
- Northern Beth-Shean Valley
- Central Beth-Shean Valley
- Southern Beth-Shean Valley
- SE Beth-Shean Valley
- Harod Valley
Mazar et. al. (2020 v.5) - Location Map for Tel Rehov
from biblewalks.com

- Fig. 1.1 Location Map
for Tel Rehov from Mazar et. al. (2020 v.5)
Fig. 1.1
Map of the geographic sub-regions, main Bronze and Iron Age sites and roads in the Central Jordan Valley. Key to sub-regions:
- Kinnarot Valley
- NE Beth-Shean Valley
- Northern Beth-Shean Valley
- Central Beth-Shean Valley
- Southern Beth-Shean Valley
- SE Beth-Shean Valley
- Harod Valley
Mazar et. al. (2020 v.5) - Location Map for Tel Rehov
from biblewalks.com
- Annotated Satellite View of
Tel Rehov and environs from biblewalks.com
 Annotated Satellite Image (google) of Tel Rehov and environs
Used with permission from BibleWalks.com - Annotated Satellite View of
Tel Rehov showing excavation areas from biblewalks.com
 Annotated Satellite Image (google) of Tel Rehov showing excavation areas
Used with permission from BibleWalks.com - Photo 3.1 Aerial Photo from
1945 showing Tel Rehov and vicinity from Mazar et. al. (2020 v.1)
 Photo 3.1
Tel Rehov and its surroundings
- the tell is in the center
- the village of Fawarna (the location of Byzantine Rehob [Ro-ob (Pσωβ) of Eusebius]) is in the upper left
- the line of modern Route 90 is seen in the upper left
(aerial photo taken by the British Royal Air Force in 1945; courtesy of the Department of Geography, the Hebrew University of Jerusalem)
Mazar et. al. (2020 v.1) - Aerial View of Tel Rehov
from biblewalks.com
Aerial View of Tel Rehov from the northwest
JW from Mazar: Areas C (left) and D (right, down the slope) are seen in the foreground and Areas B (left) and G (right) in the background
Used with permission from BibleWalks.com - Wide Aerial View of Tel Rehov
from the northwest from Jefferson Williams
 Wide Aerial View of Tel Rehov from the northwest
Click on Image for high resolution magnifiable image
Drone photos taken by Jefferson Williams on 11 June 2023 - Photo 3.7 Aerial Photo of Tel
Rehov showing eroded ravine on the eastern slope from Mazar et. al. (2020 v.1)
 Photo 3.7
Tel Rehov, looking northwest towards Beth-Shean and the Harod Valley. Note the ravine between the upper and lower mound and the damaged area on the eastern part of the upper mound; note also the hump on the western part of the upper mound, where the Early Bronze fortification and the Islamic village are located
(Photo: Albatross; 2003)
Mazar et. al. (2020 v.1) - Photo 3.8 Another Aerial Photo
of Tel Rehov showing eroded ravine on the eastern slope from Mazar et. al. (2020 v.1)
 Photo 3.8
Tel Rehov, looking west towards the Gilboa ridge. Note the ravine between the upper and lower mound and the damaged area on the eastern part of the upper mound. The green area on the far right marks the spring closest to the mound
(Photo: Albatross; 2003)
Mazar et. al. (2020 v.1) - Tel Rehov in Google Earth
 Tel Rehov
click on image to explore this site on a new tab in Google Earth - Tel Rehov on govmap.gov.il
 Tel Rehov
click on image to explore this site on a new tab in govmap.gov.il

- Annotated Satellite View of
Tel Rehov and environs from biblewalks.com
Annotated Satellite Image (google) of Tel Rehov and environs
Used with permission from BibleWalks.com - Annotated Satellite View of
Tel Rehov showing excavation areas from biblewalks.com
Annotated Satellite Image (google) of Tel Rehov showing excavation areas
Used with permission from BibleWalks.com - Photo 3.1 Aerial Photo from
1945 showing Tel Rehov and vicinity from Mazar et. al. (2020 v.1)
Photo 3.1
Tel Rehov and its surroundings
- the tell is in the center
- the village of Fawarna (the location of Byzantine Rehob [Ro-ob (Pσωβ) of Eusebius]) is in the upper left
- the line of modern Route 90 is seen in the upper left
(aerial photo taken by the British Royal Air Force in 1945; courtesy of the Department of Geography, the Hebrew University of Jerusalem)
Mazar et. al. (2020 v.1) - Aerial View of Tel Rehov
from biblewalks.com
Aerial View of Tel Rehov from the northwest
JW from Mazar: Areas C (left) and D (right, down the slope) are seen in the foreground and Areas B (left) and G (right) in the background
Used with permission from BibleWalks.com - Wide Aerial View of Tel Rehov
from the northwest from Jefferson Williams
Wide Aerial View of Tel Rehov from the northwest
Click on Image for high resolution magnifiable image
Drone photos taken by Jefferson Williams on 11 June 2023 - Photo 3.7 Aerial Photo of Tel
Rehov showing eroded ravine on the eastern slope from Mazar et. al. (2020 v.1)
Photo 3.7
Tel Rehov, looking northwest towards Beth-Shean and the Harod Valley. Note the ravine between the upper and lower mound and the damaged area on the eastern part of the upper mound; note also the hump on the western part of the upper mound, where the Early Bronze fortification and the Islamic village are located
(Photo: Albatross; 2003)
Mazar et. al. (2020 v.1) - Photo 3.8 Another Aerial Photo
of Tel Rehov showing eroded ravine on the eastern slope from Mazar et. al. (2020 v.1)
Photo 3.8
Tel Rehov, looking west towards the Gilboa ridge. Note the ravine between the upper and lower mound and the damaged area on the eastern part of the upper mound. The green area on the far right marks the spring closest to the mound
(Photo: Albatross; 2003)
Mazar et. al. (2020 v.1) - Tel Rehov in Google Earth
Tel Rehov
click on image to explore this site on a new tab in Google Earth - Tel Rehov on govmap.gov.il
Tel Rehov
click on image to explore this site on a new tab in govmap.gov.il
- Fig. 3.7 Map of the site
showing grid and excavation areas from Mazar et. al. (2020 v.1)
 Figure 3.7
Topographic map of Tel Rehov showing the grid and excavated areas. Note that levels are given in actual elevation below sea level followed by the relative levels used by our excavation
(triangulation point -116.26 considered as +100m)
(topography and grid by Mabat, Digital Mapping, Jerusalem; areas added by Jay Rosenberg)
Mazar et. al. (2020 v.1)
- Fig. 3.7 Map of the site
showing grid and excavation areas from Mazar et. al. (2020 v.1)
Figure 3.7
Topographic map of Tel Rehov showing the grid and excavated areas. Note that levels are given in actual elevation below sea level followed by the relative levels used by our excavation
(triangulation point -116.26 considered as +100m)
(topography and grid by Mabat, Digital Mapping, Jerusalem; areas added by Jay Rosenberg)
Mazar et. al. (2020 v.1)
- Fig. 12.7
Plan of Stratum C-2 from Mazar et. al. (2020 v.2)
 Fig. 12.7
Plan of Stratum C-2 (1:250); for the continuation of this stratum in Area D, see Fig. 15.28
Mazar et. al. (2020 v.2) - Fig. 12.18
Plan of Stratum C-1b from Mazar et. al. (2020 v.2)
 Fig. 12.18
Plan of Stratum C-1b (1:200)
Mazar et. al. (2020 v.2) - Fig. 12.19
Plan of Stratum C-1a from Mazar et. al. (2020 v.2)
 Fig. 12.19
Plan of Stratum C-1a (1:200)
Mazar et. al. (2020 v.2) - Fig. 12.23
Isometric view of Area C, Stratum C-1a, looking northwest from Mazar et. al. (2020 v.2)
 Fig. 12.23
Isometric view of Area C, Stratum C-1a, looking northwest
Mazar et. al. (2020 v.2)
- Fig. 12.7
Plan of Stratum C-2 from Mazar et. al. (2020 v.2)
Fig. 12.7
Plan of Stratum C-2 (1:250); for the continuation of this stratum in Area D, see Fig. 15.28
Mazar et. al. (2020 v.2) - Fig. 12.18
Plan of Stratum C-1b from Mazar et. al. (2020 v.2)
Fig. 12.18
Plan of Stratum C-1b (1:200)
Mazar et. al. (2020 v.2) - Fig. 12.19
Plan of Stratum C-1a from Mazar et. al. (2020 v.2)
Fig. 12.19
Plan of Stratum C-1a (1:200)
Mazar et. al. (2020 v.2) - Fig. 12.23
Isometric view of Area C, Stratum C-1a, looking northwest from Mazar et. al. (2020 v.2)
Fig. 12.23
Isometric view of Area C, Stratum C-1a, looking northwest
Mazar et. al. (2020 v.2)
- Fig. 15.1
Location of section drawings on superimposed plan of Strata D-11–D-2 from Mazar et. al. (2020 v. 3: Chapter 15)
 Figure 15.1
Location of section drawings on superimposed plan of Strata D-11–D-2
Mazar et. al. (2020 v.3) - Fig. 15.2
Schematic section of Area D from Mazar et. al. (2020 v. 3: Chapter 15)
 Figure 15.2
Schematic section of Area D
Mazar et. al. (2020 v.3) - Fig. 15.3
Plan of Stratum D-11b from Mazar et. al. (2020 v. 3: Chapter 15)
 Figure 15.3
Plan of Stratum D-11b
Mazar et. al. (2020 v.3) - Fig. 15.4
Plan of Stratum D-11a from Mazar et. al. (2020 v. 3: Chapter 15)
 Figure 15.4
Plan of Stratum D-11a
Mazar et. al. (2020 v.3) - Fig. 15.5
Plan of Stratum D-10 constructional fills from Mazar et. al. (2020 v. 3: Chapter 15)
 Figure 15.5
Plan of Stratum D-10 constructional fills
Mazar et. al. (2020 v.3) - Fig. 15.6
Plan of Stratum D-10 from Mazar et. al. (2020 v. 3: Chapter 15)
 Figure 15.6
Plan of Stratum D-10
Mazar et. al. (2020 v.3) - Fig. 15.7
Plan of Stratum D-9b from Mazar et. al. (2020 v. 3: Chapter 15)
 Figure 15.7
Plan of Stratum D-9b
Mazar et. al. (2020 v.3) - Fig. 15.8
Plan of Stratum D-9a from Mazar et. al. (2020 v. 3: Chapter 15)
 Figure 15.8
Plan of Stratum D-9a
Mazar et. al. (2020 v.3) - Fig. 15.9
Plan of Stratum D-8 from Mazar et. al. (2020 v. 3: Chapter 15)
 Figure 15.9
Plan of Stratum D-8
Mazar et. al. (2020 v.3) - Fig. 15.10
Plan of Stratum D-8' from Mazar et. al. (2020 v. 3: Chapter 15)
 Figure 15.10
Plan of Stratum D-8'
Mazar et. al. (2020 v.3) - Fig. 15.11
Plan of post Stratum D-8 fills from Mazar et. al. (2020 v. 3: Chapter 15)
 Figure 15.11
Plan of post Stratum D-8 fills
Mazar et. al. (2020 v.3) - Fig. 15.12
Plan of Stratum D-7b from Mazar et. al. (2020 v. 3: Chapter 15)
 Figure 15.12
Plan of Stratum D-7b
Mazar et. al. (2020 v.3) - Fig. 15.13
Plan of Stratum D-7a (encircled numbers denote foundation deposits as listed in the text) from Mazar et. al. (2020 v. 3: Chapter 15)
 Figure 15.13
Plan of Stratum D-7a (encircled numbers denote foundation deposits as listed in the text)
Mazar et. al. (2020 v.3) - Fig. 15.14
Plan of Stratum D-7a' from Mazar et. al. (2020 v. 3: Chapter 15)
 Figure 15.14
Plan of Stratum D-7a'
Mazar et. al. (2020 v.3) - Fig. 15.15
Plan of Stratum D-6b from Mazar et. al. (2020 v. 3: Chapter 15)
 Figure 15.15
Plan of Stratum D-6b
Mazar et. al. (2020 v.3) - Fig. 15.16
Plan of Stratum D-6a from Mazar et. al. (2020 v. 3: Chapter 15)
 Figure 15.16
Plan of Stratum D-6a
Mazar et. al. (2020 v.3) - Fig. 15.22
Plan of Stratum D-5 from Mazar et. al. (2020 v. 3: Chapter 15)
 Figure 15.22
Plan of Stratum D-5
Mazar et. al. (2020 v.3) - Fig. 15.23
Plan of Stratum D-4b from Mazar et. al. (2020 v. 3: Chapter 15)
 Figure 15.23
Plan of Stratum D-4b
Mazar et. al. (2020 v.3) - Fig. 15.24
Plan of Stratum D-4a from Mazar et. al. (2020 v. 3: Chapter 15)
 Figure 15.24
Plan of Stratum D-4a
Mazar et. al. (2020 v.3) - Fig. 15.25a
Iron IB remains in Areas D and C from Mazar et. al. (2020 v. 3: Chapter 15)
 Figure 15.25a
Schematic plan of Iron IB remains in Areas D and C, showing possible correlation: Strata D-5 and C-3b
Mazar et. al. (2020 v.3) - Fig. 15.25b
Iron IB remains in Areas D and C from Mazar et. al. (2020 v. 3: Chapter 15)
 Figure 15.25b
Schematic plan of Iron IB remains in Areas D and C, showing possible correlation: Strata D-4b and C-3a
Mazar et. al. (2020 v.3) - Fig. 15.26
Plan of Stratum D-3, lower pits from Mazar et. al. (2020 v. 3: Chapter 15)
 Figure 15.26
Plan of Stratum D-3, lower pits
Mazar et. al. (2020 v.3) - Fig. 15.27
Plan of Stratum D-3, upper pits from Mazar et. al. (2020 v. 3: Chapter 15)
 Figure 15.27
Plan of Stratum D-3, upper pits
Mazar et. al. (2020 v.3) - Fig. 15.28
Plan of Stratum D-2 from Mazar et. al. (2020 v. 3: Chapter 15)
 Figure 15.28
Plan of Stratum D-2
Mazar et. al. (2020 v.3) - Fig. 15.29
Plan of Stratum D-1c from Mazar et. al. (2020 v. 3: Chapter 15)
 Figure 15.29
Plan of Stratum D-1c
Mazar et. al. (2020 v.3) - Fig. 15.30
Plan of Stratum D-1b from Mazar et. al. (2020 v. 3: Chapter 15)
 Figure 15.30
Plan of Stratum D-1b
Mazar et. al. (2020 v.3) - Fig. 15.31
Plan of Stratum D-1a from Mazar et. al. (2020 v. 3: Chapter 15)
 Figure 15.31
Plan of Stratum D-1a
Mazar et. al. (2020 v.3)
- Fig. 15.1
Location of section drawings on superimposed plan of Strata D-11–D-2 from Mazar et. al. (2020 v. 3: Chapter 15)
Figure 15.1
Location of section drawings on superimposed plan of Strata D-11–D-2
Mazar et. al. (2020 v.3) - Fig. 15.2
Schematic section of Area D from Mazar et. al. (2020 v. 3: Chapter 15)
Figure 15.2
Schematic section of Area D
Mazar et. al. (2020 v.3) - Fig. 15.3
Plan of Stratum D-11b from Mazar et. al. (2020 v. 3: Chapter 15)
Figure 15.3
Plan of Stratum D-11b
Mazar et. al. (2020 v.3) - Fig. 15.4
Plan of Stratum D-11a from Mazar et. al. (2020 v. 3: Chapter 15)
Figure 15.4
Plan of Stratum D-11a
Mazar et. al. (2020 v.3) - Fig. 15.5
Plan of Stratum D-10 constructional fills from Mazar et. al. (2020 v. 3: Chapter 15)
Figure 15.5
Plan of Stratum D-10 constructional fills
Mazar et. al. (2020 v.3) - Fig. 15.6
Plan of Stratum D-10 from Mazar et. al. (2020 v. 3: Chapter 15)
Figure 15.6
Plan of Stratum D-10
Mazar et. al. (2020 v.3) - Fig. 15.7
Plan of Stratum D-9b from Mazar et. al. (2020 v. 3: Chapter 15)
Figure 15.7
Plan of Stratum D-9b
Mazar et. al. (2020 v.3) - Fig. 15.8
Plan of Stratum D-9a from Mazar et. al. (2020 v. 3: Chapter 15)
Figure 15.8
Plan of Stratum D-9a
Mazar et. al. (2020 v.3) - Fig. 15.9
Plan of Stratum D-8 from Mazar et. al. (2020 v. 3: Chapter 15)
Figure 15.9
Plan of Stratum D-8
Mazar et. al. (2020 v.3) - Fig. 15.10
Plan of Stratum D-8' from Mazar et. al. (2020 v. 3: Chapter 15)
Figure 15.10
Plan of Stratum D-8'
Mazar et. al. (2020 v.3) - Fig. 15.11
Plan of post Stratum D-8 fills from Mazar et. al. (2020 v. 3: Chapter 15)
Figure 15.11
Plan of post Stratum D-8 fills
Mazar et. al. (2020 v.3) - Fig. 15.12
Plan of Stratum D-7b from Mazar et. al. (2020 v. 3: Chapter 15)
Figure 15.12
Plan of Stratum D-7b
Mazar et. al. (2020 v.3) - Fig. 15.13
Plan of Stratum D-7a (encircled numbers denote foundation deposits as listed in the text) from Mazar et. al. (2020 v. 3: Chapter 15)
Figure 15.13
Plan of Stratum D-7a (encircled numbers denote foundation deposits as listed in the text)
Mazar et. al. (2020 v.3) - Fig. 15.14
Plan of Stratum D-7a' from Mazar et. al. (2020 v. 3: Chapter 15)
Figure 15.14
Plan of Stratum D-7a'
Mazar et. al. (2020 v.3) - Fig. 15.15
Plan of Stratum D-6b from Mazar et. al. (2020 v. 3: Chapter 15)
Figure 15.15
Plan of Stratum D-6b
Mazar et. al. (2020 v.3) - Fig. 15.16
Plan of Stratum D-6a from Mazar et. al. (2020 v. 3: Chapter 15)
Figure 15.16
Plan of Stratum D-6a
Mazar et. al. (2020 v.3) - Fig. 15.22
Plan of Stratum D-5 from Mazar et. al. (2020 v. 3: Chapter 15)
Figure 15.22
Plan of Stratum D-5
Mazar et. al. (2020 v.3) - Fig. 15.23
Plan of Stratum D-4b from Mazar et. al. (2020 v. 3: Chapter 15)
Figure 15.23
Plan of Stratum D-4b
Mazar et. al. (2020 v.3) - Fig. 15.24
Plan of Stratum D-4a from Mazar et. al. (2020 v. 3: Chapter 15)
Figure 15.24
Plan of Stratum D-4a
Mazar et. al. (2020 v.3) - Fig. 15.25a
Iron IB remains in Areas D and C from Mazar et. al. (2020 v. 3: Chapter 15)
Figure 15.25a
Schematic plan of Iron IB remains in Areas D and C, showing possible correlation: Strata D-5 and C-3b
Mazar et. al. (2020 v.3) - Fig. 15.25b
Iron IB remains in Areas D and C from Mazar et. al. (2020 v. 3: Chapter 15)
Figure 15.25b
Schematic plan of Iron IB remains in Areas D and C, showing possible correlation: Strata D-4b and C-3a
Mazar et. al. (2020 v.3) - Fig. 15.26
Plan of Stratum D-3, lower pits from Mazar et. al. (2020 v. 3: Chapter 15)
Figure 15.26
Plan of Stratum D-3, lower pits
Mazar et. al. (2020 v.3) - Fig. 15.27
Plan of Stratum D-3, upper pits from Mazar et. al. (2020 v. 3: Chapter 15)
Figure 15.27
Plan of Stratum D-3, upper pits
Mazar et. al. (2020 v.3) - Fig. 15.28
Plan of Stratum D-2 from Mazar et. al. (2020 v. 3: Chapter 15)
Figure 15.28
Plan of Stratum D-2
Mazar et. al. (2020 v.3) - Fig. 15.29
Plan of Stratum D-1c from Mazar et. al. (2020 v. 3: Chapter 15)
Figure 15.29
Plan of Stratum D-1c
Mazar et. al. (2020 v.3) - Fig. 15.30
Plan of Stratum D-1b from Mazar et. al. (2020 v. 3: Chapter 15)
Figure 15.30
Plan of Stratum D-1b
Mazar et. al. (2020 v.3) - Fig. 15.31
Plan of Stratum D-1a from Mazar et. al. (2020 v. 3: Chapter 15)
Figure 15.31
Plan of Stratum D-1a
Mazar et. al. (2020 v.3)
- Fig. 17.1
Schematic plan of Areas E and F; Iron IIA Stratum F-1 in black from Mazar et. al. (2020 v. 3: Chapter 17)
 Figure 17.1
Schematic plan of Areas E and F; Iron IIA Stratum F-1 in black
Mazar et. al. (2020 v.3) - Fig. 17.2a
Plan of Stratum E-3 (Square E/15) from Mazar et. al. (2020 v. 3: Chapter 17)
 Figure 17.2a
Plan of Stratum E-3 (Square E/15)
Mazar et. al. (2020 v.3) - Fig. 17.2b
Plan of Stratum E-2 from Mazar et. al. (2020 v. 3: Chapter 17)
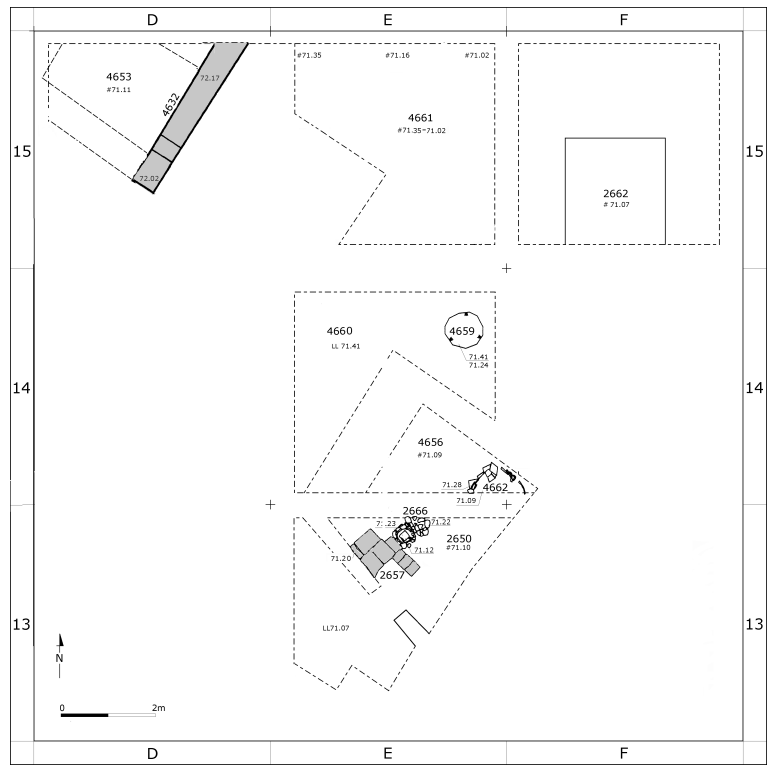 Figure 17.2b
Plan of Stratum E-2
Mazar et. al. (2020 v.3) - Fig. 17.3
Plan of Stratum E-1b in Squares D–F/13–16 from Mazar et. al. (2020 v. 3: Chapter 17)
 Figure 17.3
Plan of Stratum E-1b in Squares D–F/13–16
Mazar et. al. (2020 v.3) - Fig. 17.4
Schematic plan of Stratum E-1a, marked with location of sub-plans from Mazar et. al. (2020 v. 3: Chapter 17)
 Figure 17.4
Schematic plan of Stratum E-1a, marked with location of sub-plans
Mazar et. al. (2020 v.3) - Fig. 17.5
General plan of Stratum E-1a from Mazar et. al. (2020 v. 3: Chapter 17)
 Figure 17.5
General plan of Stratum E-1a
Mazar et. al. (2020 v.3)
- Fig. 17.1
Schematic plan of Areas E and F; Iron IIA Stratum F-1 in black from Mazar et. al. (2020 v. 3: Chapter 17)
Figure 17.1
Schematic plan of Areas E and F; Iron IIA Stratum F-1 in black
Mazar et. al. (2020 v.3) - Fig. 17.2a
Plan of Stratum E-3 (Square E/15) from Mazar et. al. (2020 v. 3: Chapter 17)
Figure 17.2a
Plan of Stratum E-3 (Square E/15)
Mazar et. al. (2020 v.3) - Fig. 17.2b
Plan of Stratum E-2 from Mazar et. al. (2020 v. 3: Chapter 17)
Figure 17.2b
Plan of Stratum E-2
Mazar et. al. (2020 v.3) - Fig. 17.3
Plan of Stratum E-1b in Squares D–F/13–16 from Mazar et. al. (2020 v. 3: Chapter 17)
Figure 17.3
Plan of Stratum E-1b in Squares D–F/13–16
Mazar et. al. (2020 v.3) - Fig. 17.4
Schematic plan of Stratum E-1a, marked with location of sub-plans from Mazar et. al. (2020 v. 3: Chapter 17)
Figure 17.4
Schematic plan of Stratum E-1a, marked with location of sub-plans
Mazar et. al. (2020 v.3) - Fig. 17.5
General plan of Stratum E-1a from Mazar et. al. (2020 v. 3: Chapter 17)
Figure 17.5
General plan of Stratum E-1a
Mazar et. al. (2020 v.3)
- Fig. 20.1
Plan of Stratum G-2b from Mazar et. al. (2020 v. 3: Chapter 20)
 Figure 20.1
Plan of Stratum G-2b
Mazar et. al. (2020 v.3) - Fig. 20.2a
Plan of Stratum G-2a from Mazar et. al. (2020 v. 3: Chapter 20)
 Figure 20.2a
Plan of Stratum G-2a
Mazar et. al. (2020 v.3) - Fig. 20.2b
Plan of Stratum G-2a' from Mazar et. al. (2020 v. 3: Chapter 20)
 Figure 20.2a
Plan of Stratum G-2a'
Mazar et. al. (2020 v.3) - Fig. 20.3
Plan of wooden beams in the foundations of Stratum G-1 walls from Mazar et. al. (2020 v. 3: Chapter 20)
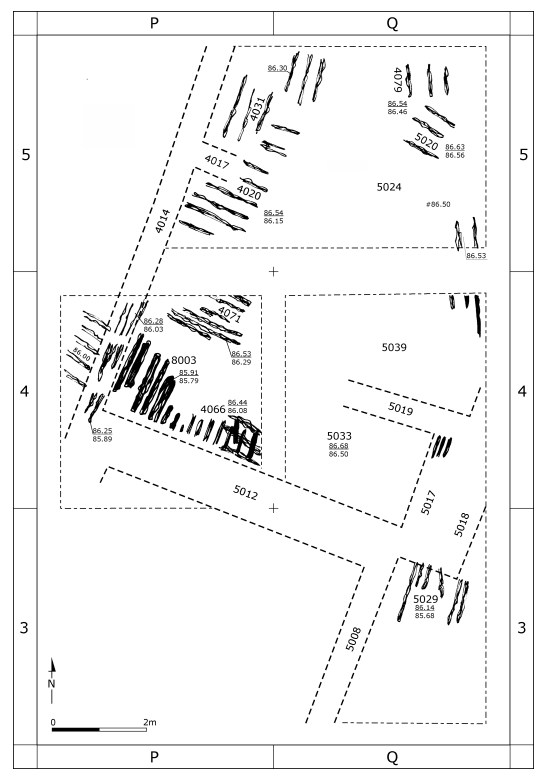 Figure 20.3
Plan of wooden beams in the foundations of Stratum G-1 walls
Mazar et. al. (2020 v.3) - Fig. 20.4
Plan of Stratum G-1b from Mazar et. al. (2020 v. 3: Chapter 20)
 Figure 20.4
Plan of Stratum G-1b
Mazar et. al. (2020 v.3) - Fig. 20.5
Plan of Stratum G-1a from Mazar et. al. (2020 v. 3: Chapter 20)
 Figure 20.5
Plan of Stratum G-1a
Mazar et. al. (2020 v.3)
- Fig. 20.1
Plan of Stratum G-2b from Mazar et. al. (2020 v. 3: Chapter 20)
Figure 20.1
Plan of Stratum G-2b
Mazar et. al. (2020 v.3) - Fig. 20.2a
Plan of Stratum G-2a from Mazar et. al. (2020 v. 3: Chapter 20)
Figure 20.2a
Plan of Stratum G-2a
Mazar et. al. (2020 v.3) - Fig. 20.2b
Plan of Stratum G-2a' from Mazar et. al. (2020 v. 3: Chapter 20)
Figure 20.2a
Plan of Stratum G-2a'
Mazar et. al. (2020 v.3) - Fig. 20.3
Plan of wooden beams in the foundations of Stratum G-1 walls from Mazar et. al. (2020 v. 3: Chapter 20)
Figure 20.3
Plan of wooden beams in the foundations of Stratum G-1 walls
Mazar et. al. (2020 v.3) - Fig. 20.4
Plan of Stratum G-1b from Mazar et. al. (2020 v. 3: Chapter 20)
Figure 20.4
Plan of Stratum G-1b
Mazar et. al. (2020 v.3) - Fig. 20.5
Plan of Stratum G-1a from Mazar et. al. (2020 v. 3: Chapter 20)
Figure 20.5
Plan of Stratum G-1a
Mazar et. al. (2020 v.3)
- from Chapter 2 - The Geology and Morphology of the Beth-Shean Valley and Tel Rehov ( Zilberman in Mazar et. al., 2020 v. 1)
- If you don't want to spend time reading, go through the Figures - they tell much of the story
- Figure 2.1 - Digital Terrain Map
showing locations and faults from Mazar et. al. (2020 v.1)
 Figure 2.1
The escarpment of the Western Marginal Fault of the Dead Sea Rift (dashed line). This escarpment forms the morphological and tectonic border between the Beth-Shean Valley and the Central Jordan Valley.
(DTM map by J.K.Hall, 1994)
Mazar et. al. (2020 v.1) - Figure 2.5 - Drawing of geological and
morphological structure of the Beth-Shean Valley from Mazar et. al. (2020 v.1)
 Figure 2.5
Schematic block diagram illustrating the geological and morphological structure of the Beth-Shean Valley. The drainage systems are delineated by dashed lines.
Mazar et. al. (2020 v.1) - Figure 2.6 - Map of the main surface and
subsurface structural elements in the Beth-Shean area from Mazar et. al. (2020 v.1)
 Figure 2.6
Schematic illustration of the main surface and subsurface structural elements in the Beth-Shean area
(after Shaliv,Mimran and Hatzor 1991; Gardosh and Bruner 1998; Zilberman et al. 2004; Meiler et al. 2008)
Mazar et. al. (2020 v.1) - Figure 2.7a - Air Photo showing surface scarps
(in black) and subsurface trace (in yellow) of the marginal fault along with (in red) traces of the west to east seismic lines GP-5037 (to the north) and GP-5036 (to the south)
 Figure 2.7a
The surface scarp system and subsurface trace of the underlying marginal fault of the DSR (dashed line), as detected in geophysical surveys by Gardosh and Bruner 1998 and Bruner, Zilberman and Amit 2002. The traces of seismic lines GP-5036 and GP-5037 are marked on the aerial photo.
Mazar et. al. (2020 v.1) - Figure 2.7b - West to east seismic line
GP-5037 (the northern line)
 Figure 2.7b
The subsurface marginal fault as interpreted from seismic line GP-5037.
Mazar et. al. (2020 v.1) - Figure 2.7c - West to east seismic line
GP-5036 (the southern line)
 Figure 2.7c
The subsurface marginal fault as interpreted from seismic line GP-5036.
Mazar et. al. (2020 v.1)
Explanation : The deep faults labeled as "Fault Zone" in the seismic sections (2.7 b and c) were used to help draw the location of the marginal fault (in yellow) on the Air photo (2.7a).
Tel Rehov Paleoseismic Trench - The location of the Tel Rehov Paleoseismic Trench is pointed to by a yellow arrow in the Air photo (2.7a). Its extent is shown as a white double arrow (labeled Trench TR-1) on GP-5036 (2.7c). This Earthquake Encyclopedia has a webpage for the Tel Rehov Trench. Clicking on the link to the left will open it's page in a new tab.
Figures 2.7 a-c all come from Mazar et. al. (2020 v.1) - Figure 2.11 - Subsurface structure of Tel Rehov
interpreted from a N-S seismic line - from Mazar et. al. (2020 v.1)
 Figure 2.11
The subsurface structure of Tel Rehov as demonstrated by the N–S oriented seismic line 136.
- Velocity-Depth model of lower tufa sediments
- Velocity-Depth model of upper anthropogenic sediments
(Note the small hill under the higher mound) - Diffraction Stack illustrating the waves diffracted from the fault traces
- the interpreted faults under the mound - the fault between stations 40 and 60 [2nd fault from the right] underlies the step between the higher and lower mounds.
(from Zilberman et al. 2002:13; Fig. 4)
Mazar et. al. (2020 v.1) - Figure 2.12 - Seismic interpretation of the top
of the lower tufa layer along with subsurface faults - from Mazar et. al. (2020 v.1)
 Figure 2.12
A subsurface map of the tufa hill, which underlies the anthropogenic sediments of Tel Rehov. The faults are reconstructed from the seismic survey. The survey lines are marked in red.
(from Zilberman et al. 2002:16; Fig. 5)
Seismic Survey lines (not shown here) are in Fig. 2.10 of Mazar et. al. (2020 v.1:28)
Mazar et. al. (2020 v.1) - Figure 2.13 - Buried Fault Scarp (exposed in a trench)
which bounds the western part of the mound - from Mazar et. al. (2020 v.1)
 Figure 2.13
The west-facing scarp of the fault that bounds the western part of the Rehov mound uplifted block (view to the east, toward the mound). The fault was detected by seismic line 134 and was exposed in a trench. Notice the different colors of the displaced sediment (light brown) and the overlying, undisturbed younger sediments (dark brown)
Mazar et. al. (2020 v.1) - Figure 2.10 - Topography of
Tel, Excavation Areas, and location of seismic lines - from Mazar et. al. (2020 v.1)
 Figure 2.10
Detailed topographic map of Tel Rehov. The seismic lines are marked on the map.
Mazar et. al. (2020 v.1)
- from Chapter 3 - Introduction to the Site and the Excavations ( Mazar in Mazar et. al., 2020 v. 1:42-51)
- Photo 3.7 - Aerial Photo
of Tel Rehov showing eroded ravine on the eastern slope from Mazar et. al. (2020 v.1)
Photo 3.7
Tel Rehov, looking northwest towards Beth-Shean and the Harod Valley. Note the ravine between the upper and lower mound and the damaged area on the eastern part of the upper mound; note also the hump on the western part of the upper mound, where the Early Bronze fortification and the Islamic village are located
(Photo: Albatross; 2003)
Mazar et. al. (2020 v.1) - Photo 3.8 - Another Aerial Photo
of Tel Rehov showing eroded ravine on the eastern slope from Mazar et. al. (2020 v.1)
Photo 3.8
Tel Rehov, looking west towards the Gilboa ridge. Note the ravine between the upper and lower mound and the damaged area on the eastern part of the upper mound. The green area on the far right marks the spring closest to the mound
(Photo: Albatross; 2003)
Mazar et. al. (2020 v.1) - Figure 3.4 - Plan View
and Section Views
 Photo 3.4
Schematic sections through the tell, showing the present topography. Location map of sections and sections a–a to d–d. Levels in m below sea level (these differ from the levels used in the excavation report; see text)
(prepared by Sveta Matskevich)
Mazar et. al. (2020 v.1)through the Tel from Mazar et. al. (2020 v.5) Photo 3.4
Schematic sections through the tell, showing the present topography. Location map of sections and sections a–a to d–d. Levels in m below sea level (these differ from the levels used in the excavation report; see text)
(prepared by Sveta Matskevich)
Mazar et. al. (2020 v.5)
... THE MOUND: LOCATION, MORPHOLOGY AND SITE-FORMATION PROCESSES
... The morphology of the mound as seen today is probably the result of site-formation processes which occurred during its history due to both tectonic and human activities. A geophysical survey of the mound enabled reconstruction of the natural topography and the depth of the anthropogenic deposits (Chapter 2; Zilberman et al. 2002). The results indicate the existence of an elongated ridge stretching along the western side of the mound from its top until the northwestern corner of the lower mound, with its top level at ca. 140–143 m below sea level (corresponding to ca. 74–77 m in terms of the expedition heights; see explanation below). Thus, the uppermost point of the upper mound in the south should be ca. 24 m above bed-rock, and the topsoil in Area C (in the northwestern part of the lower mound in the north) would be ca. 12 m above the tufa bedrock in that part of the mound (Chapter 2, Figs. 2.10–2.11). A small hill, evidently of tectonic origin, was defined below the top of the upper mound; perhaps this would become the core of the fortified Early Bronze Age settlement defined in Area H (Chapter 5). A series of geological faults were mapped along the survey lines, as follows:
- along the northern edge of the lower mound
- in the south of the upper mound
- three faults in the area of the mound itself, the largest one at the eastern side of the lower mound, including the ravine between the upper and lower mounds south of Area E (Chapter 2, Figs. 2.10,2.12); see Fig. 3.4 for schematic sections of the present topography of the tell.
The lower mound, ca. 315 m along the east–west axis and 135 m along the north–south axis, rises to 8–9 m above the plain on the west and north, while the upper mound (275 m on the east–west axis and 237 m on the north–south axis) rises to ca. 20 m above the plain on the west and ca. 25 m above the ravine that traverses the tell from west to east at the juncture between the upper and lower mounds. The surface of both the upper and lower mounds slopes down to the east; thus, the triangulation point on the western end of the upper mound (-116.26 m, our 100 m datum line) is 15 m higher than the topsoil at the eastern edge of Area A2, 125m to the east, where Iron IIB remains were found just below topsoil. The western end of the lower city at the top of the mound’s slopes in Area C is ca. 16 m higher than the eastern end of that part of the city, near Area E, ca. 300 m away (Fig. 3.4).
The downslope of the topsoil surface to the east and the ravine between the lower and upper mounds may have been created by tectonic activity during historical times. This suggestion is supported by the fact that the mound is located between two segments of the Rehov–Beth-Shean geological fault, and that a minor fault was detected between the upper and lower mounds, as noted above. These subsidiary faults of the Dead Sea Rift are still active and could have affected the shape of the mound during historical times (Chapter 2). Evidence of the slope down from west to east was also detected inside the excavation areas and comprises a prominent site-formation feature. For example, in AreaD, Late Bronze and Iron I layers and floor surfaces were found tilted from west to east, although they are on the western slope of the mound, which would infer an opposite tilt direction. In Area C, elevations of floors in the eastern side of the area are ca. 0.6–1 m lower than floors of the same stratum in the western side of the area, ca. 20 m away; such differences may indicate that by the- 10th and 9th centuries BCE, the slope down from west to east already existed.
Evidence for recent tectonic movements was also found at the bottom of the step-trench in Area D on the western slope of the lower mound, in the form of a 1.3 m-high step in the tufa bedrock in Square K/5, which was interpreted by Zilberman as the outcome of young tectonic activity (see Chapter 2, Figs. 2.8-2.9). This down-faulted block (level 74.70 m) was not reached in the deep backhoe trench that was dug in the field west of the mound (base level of 73.85 m), implying that this is possibly only one step in a graduated fault zone, which resulted in a considerable subsidence of the area west of the mound prior to the accumulation of thick colluvial sediments to its west (see further below). This fault was initially detected in the geo-seismic study of the mound (Zilberman et al. 2002). The dating of the faulting activity is unclear; however, it could, at least in part, be later than the earliest occupation of the lower mound in the 15th century BCE.
The lowest part of the western slope of the mound was buried under layers of colluvium accumulated over the last 3000 years. This became evident in Area D, where Stratum D-11, the lowest Late Bronze Age occupation layer, was exposed 2.15 m lower than the current level of the plain to the west of the mound (Chapter 15; Fig. 15.2). This indicates a substantial rise of the field level in historical times, as well as significant changes in the topography and visible prominence of the mound, at least on the western side. A backhoe trench dug into the field ca. 8 m to the west of the edge of the mound opposite Area D, revealed an accumulation of brown colluvial soils at least 4.3 m deep (as much as the backhoe could reach); this layer contained only Roman/Byzantine sherds, probably eroded from Khirbet Farwana, ca. 0.7 km northwest of the mound, the location of the Roman-Byzantine town Rohob. The accumulation of such thick deposits during the last 3000 years (or less) is probably the result of massive erosion from the Gilboa ridge, located ca. 3 km west of the mound, possibly through ancient channels not clearly visible in the present topography of the valley, but that can be detected through geophysical inquiries (Zilberman et al. 2002; Zilberman, Amit and Bruner 2004; Chapter 2, this volume). Similar phenomena were observed near other mounds in the Southern Levant, e.g., Lachish and Megiddo (Rosen 2006, with previous literature).
Erosion along the slopes of the mound is another site-formation feature. In Area D, all eleven strata revealed in the step-trench were found cut along their western margins, so that the western portions of all the structures were missing. The extent of the erosion is unknown, but it may be assumed that it caused the elimination of ca. 1-2 m of each stratum. No fortifications were found along the slope in Area D, but it seems that an entire fortification system could not just disappear due to erosion and we thus concluded that such fortifications did not exist during the entire LB IB-Iron Age IIA occupation sequence represented in Area D (Chapter 15).
On the north and south, the mound is bounded by east-west brooks. An unnamed spring is located at the bottom of the northern slope of the lower mound; today, a substantial part of this area is covered by dense reeds and vegetation typical of an area adjoining a water source (see Photo 3.3, top). Three additional springs ('En Neshev, 'En Merljav and 'En Rehov) are found 350-450 m to the north and east of the mound; these must have been the main water sources of the ancient city. Five additional springs are located at a distance of up to 2 km to the north and east; two of them are in the area of Kibbutz 'En Hanatziv, 1.5-2 km north of the mound (known today as 'En Zvi and 'En Yehudah, which are probably the springs marked as Ain Nusrah and Ain Nuseirah on the SWP map; see Fig. 3.1 and Chapter 1, Fig. 1.3).
The SWP map marks a "Roman Road" 500 m due west of the mound, just below or parallel to the modern Route 90, the main road through the Jordan Valley to Beth-Shean (Fig. 3.1; Photo 3.1, upper left). It may be assumed that a similar road was in use during the Bronze and Iron Ages, and that an east-west road led to Transjordan, as alluded to in Papyrus Anastasi I.
Gates to the lower city may have been located at the eastern end of the outlet of the ravine between the upper and lower mounds and, perhaps, also near the western join between the lower and upper mounds, where there is a topographic depression with a modern dirt road that ascends the mound from the west. A ramp visible on the northern slope of the lower mound could be evidence for an ancient road that climbed the slope to a possible entrance located between Areas C and E, although this may have been a modern feature (Photo 3.11).


 Table 12.1
Correlation of local Area C and general tell strata
Mazar et. al. (2020 v.2)
 Table 15.1
Stratigraphy and chronology in Area D, with correlation to Area C
Mazar et. al. (2020 v.3)
 Table 17.2
Correlation of the Iron Age stratigraphic sequence in Areas C, D, E, and F
Mazar et. al. (2020 v.3)
 Table 20.1
Correlation of strata – Areas G and C
Mazar et. al. (2020 v.3)
- from Finkelstein (2013:7)
 Table 1
Dates of ceramic phases in the Levant and the transition between them according to recent radiocarbon results (based on a Bayesian model, 63 percent agreement between the model and the data)
Finkelstein (2013:7)
- from Amihai Mazar in Stern et. al. (2008)
- For reference in dealing with older publications
 Stratigraphy of Tel Rehov
Amihai Mazar in Stern et. al. (2008)
Although
Mazar in Mazar et. al. (2020 v. 3: Chapter 15:1) noted that continuous occupation was detected in Area D from Late Bronze I to Iron IIA,
a time span of some 600 years
and that no major destruction events were identified between the strata
, there are a number of descriptions
of potentially seismically induced structural damage in their report on Area D. It may be the case that in some parts of Mazar et. al. (2020)'s
Final Report, destruction is defined solely as destruction due to military conquest.
Rotem, Sumaka'i Fink, and Mazar in Mazar et. al. (2020 v. 3 Ch.15:57) report that Iron IIA strata in Area D (D-2 and younger) were very damaged,
apparently due to erosion.
- Figure 15.5
Plan of Stratum D-10 constructional fills from Mazar et. al. (2020 v. 3: Chapter 15)
Figure 15.5
Plan of Stratum D-10 constructional fills
Mazar et. al. (2020 v.3) - Figure 15.6
Plan of Stratum D-10 from Mazar et. al. (2020 v. 3: Chapter 15)
Figure 15.6
Plan of Stratum D-10
Mazar et. al. (2020 v.3)
Davidovich, Sumaka'i Fink, and Mazar in Mazar et. al. (2020 v. 3: Chapter 15:16-19) report brick debris related to collapse of Building DA in Stratum D-10 while noting that
it remains unclear whether a human or natural agent initiated the collapse of the building.Davidovich, Sumaka'i Fink, and Mazar in Mazar et. al. (2020 v. 3: Chapter 15:20) later noted that
There is no clear evidence for a sudden or violent destruction of this building, although very little of its interior was excavated. It is possible that the building went out of use due to deterioration, damage by earthquakes or other natural causes. It is also possible that the building was abandoned as part of socio-political changes in the city during the transition between the 14th and 13th centuries BCE.Stratum D-10 was dated to LB IIA in the 14th century BCE
- Figure 15.7
Plan of Stratum D-9b from Mazar et. al. (2020 v. 3: Chapter 15)
Figure 15.7
Plan of Stratum D-9b
Mazar et. al. (2020 v.3) - Figure 15.8
Plan of Stratum D-9a from Mazar et. al. (2020 v. 3: Chapter 15)
Figure 15.8
Plan of Stratum D-9a
Mazar et. al. (2020 v.3) - Photo 15.28
Squares M–N/4–5 from Mazar et. al. (2020 v. 3: Chapter 15)
 Photo 15.28
Squares M–N/4–5, looking south at D-9a–b stone foundations (2010)
Mazar et. al. (2020 v.3) - Photo 15.29
Squares M–N/4–5, from Mazar et. al. (2020 v. 3: Chapter 15)
 Photo 15.29
Squares M–N/4–5, looking south; left: D-9a Wall 8932 and Post-holes 1912; right: D-9b stone foundations (2010)
Mazar et. al. (2020 v.3) - Photo 15.30
Squares N/4–5 from Mazar et. al. (2020 v. 3: Chapter 15)
 Photo 15.30
Squares N/4–5, looking west; top: D-9b stone foundations; bottom: D-9a Wall 8932 and Post-holes 1912; right: D-9a Wall 1916 (2010)
Mazar et. al. (2020 v.3) - Photo 15.31
Squares N/5 from Mazar et. al. (2020 v. 3: Chapter 15)
 Photo 15.31
Square N/5, looking south; bottom: D-9a Wall 1916; right and top: D-9b Walls 8943 and 9923; left: D-9a Post-holes 1912 (2010)
Mazar et. al. (2020 v.3)
Davidovich, Sumaka'i Fink, and Mazar in Mazar et. al. (2020 v. 3: Chapter 15:22-26) report that
two units, either rooms or courtyardsin D-9b Building DB
were delineated by three walls (8943, 9923, 1904) (Photos 15.28–15.31)while noting that Wall 9923
sloped considerably to the east, with a difference of up to 0.4 m in elevation of the lower level over its length.They noted the presence of
other tilted features in this areawhich
possibly resulted from young [er?] tectonic activity. They also noted that
the wall ended abruptly on the east, without a clear edge, and with a slight protrusion to the south, the nature of which remained unclear.
Davidovich, Sumaka'i Fink, and Mazar in Mazar et. al. (2020 v. 3: Chapter 15:22-26) noted that the foundations of oven 9924 near to Wall 9923
were slightly tilted to the east, in accordance with Floor 9925 and Wall 9923.
Strata D-9a and D-9b were dated to LB IIA/IIB in the late 14th-13th centuries BCE.
- Table 15.1
Stratigraphy and chronology in Area D, with correlation to Area C from Mazar et. al. (2020 v. 3: Chapter 17)
Table 15.1
Stratigraphy and chronology in Area D, with correlation to Area C
Mazar et. al. (2020 v.3) - Table 15.2
Locus and basket numbers from Mazar et. al. (2020 v. 3: Chapter 17)
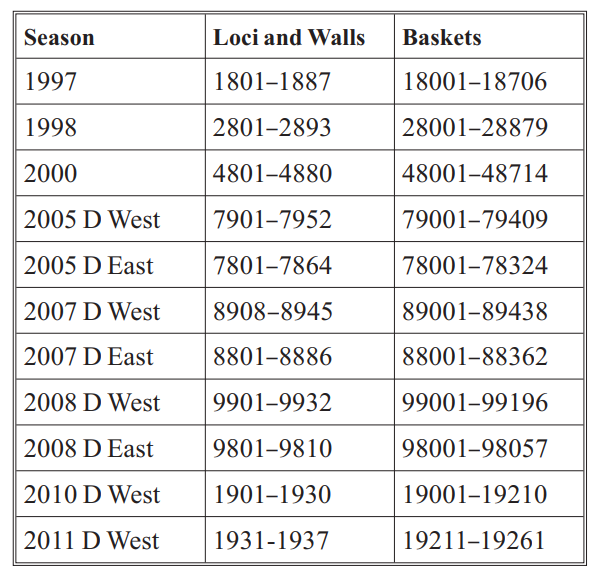 Table 15.2
Locus and basket numbers
Mazar et. al. (2020 v.3) - Figure 15.1
Location of section drawings on superimposed plan of Strata D-11–D-2 from Mazar et. al. (2020 v. 3: Chapter 17)
Figure 15.1
Location of section drawings on superimposed plan of Strata D-11–D-2
Mazar et. al. (2020 v.3) - Figure 15.2
Schematic section of Area D from Mazar et. al. (2020 v. 3: Chapter 17)
Figure 15.2
Schematic section of Area D
Mazar et. al. (2020 v.3) - Figure 15.10
Plan of Stratum D-8' from Mazar et. al. (2020 v. 3: Chapter 15)
Figure 15.10
Plan of Stratum D-8'
Mazar et. al. (2020 v.3)
- Plans: Figs. 15.10
The Stratum D-8 floor to the west of Wall 8932 was covered with a 0.3–0.4 m-thick layer of brick debris, containing compacted whitish brick fragments, which most probably originated from Wall 8932. In Square M/5, this debris layer was superimposed by a 0.01–0.02 m-thick pinkish clay layer (7938; Figs. 15.10, 15.17), which was covered by a thick (0.05–0.1 m) layer of dark gray ash. This layer sloped from west (80.40 m) to east (80.26 m); it extended into the northern section of the square, but faded away in its southern part, as well as in Square N/5 (9908; Fig. 15.10). On 7938 was a 0.15–0.2 m-thick accumulation, rich in sherds and animal bones, which may be explained as some kind of a localized ephemeral activity, post-dating Stratum D-8 and pre-dating Stratum D-7b; this phase was denoted D-8'. No evidence for this activity was found in Squares M–N/4.
Pottery from loci attributed to this layer is presented together with that of Stratum D-8 (Figs. 16.16–16.22), and is dated to LB IIB [13th century BCE].
- Table 15.1
Stratigraphy and chronology in Area D, with correlation to Area C from Mazar et. al. (2020 v. 3: Chapter 17)
Table 15.1
Stratigraphy and chronology in Area D, with correlation to Area C
Mazar et. al. (2020 v.3) - Table 15.2
Locus and basket numbers from Mazar et. al. (2020 v. 3: Chapter 17)
Table 15.2
Locus and basket numbers
Mazar et. al. (2020 v.3) - Figure 15.1
Location of section drawings on superimposed plan of Strata D-11–D-2 from Mazar et. al. (2020 v. 3: Chapter 17)
Figure 15.1
Location of section drawings on superimposed plan of Strata D-11–D-2
Mazar et. al. (2020 v.3) - Figure 15.2
Schematic section of Area D from Mazar et. al. (2020 v. 3: Chapter 17)
Figure 15.2
Schematic section of Area D
Mazar et. al. (2020 v.3) - Figure 15.10
Plan of Stratum D-8' from Mazar et. al. (2020 v. 3: Chapter 15)
Figure 15.10
Plan of Stratum D-8'
Mazar et. al. (2020 v.3)
- Plans: Figs. 15.10
Covering the brick debris and walls related to Stratum D-8, a 0.35–0.6 m-thick layered accumulation was found all over the excavated area (2826 in Square M/4, 7915 and 7937 in M/5, 8927 and 8929 in N/4, 9904 in N/5) (Fig. 15.11). It was characterized by a soft brown layered matrix containing a few brick fragments, very rich in charred material (charcoal and grain), as well as sherds, bones, and fine plaster fragments of unknown origin. The layering of this accumulation was more pronounced in the eastern part, where the layers sloped down into the eastern section of Squares N/4–5. Several thin layers consisted of grayish material, possibly the remains of ash or decayed organics.
No architectural elements were noted in association with this thick accumulation. It clearly sealed the remains of Stratum D-8 and was superimposed by Stratum D-7b elements, most of which were pits dug into the aforementioned accumulation (see below). Therefore, it seems to belong to a post-D-8 and pre-D-7 phase. Nevertheless, it is difficult to suggest any clear explanation for such a thick accumulation, unless a gap in occupation enabled natural forces of sedimentation to operate undisrupted for an unknown time span. Another option is that this layer was a constructional fill related to the building of Stratum D-7b. Although no substantial architecture was found in the latter, the small size of the excavated area does not allow us to reach secure conclusions, and this option remains viable.
Pottery from loci attributed to this layer is presented together with that of Stratum D-8 in Figs. 16.16–16.23.
- Table 15.1
Stratigraphy and chronology in Area D, with correlation to Area C from Mazar et. al. (2020 v. 3: Chapter 17)
Table 15.1
Stratigraphy and chronology in Area D, with correlation to Area C
Mazar et. al. (2020 v.3) - Table 15.2
Locus and basket numbers from Mazar et. al. (2020 v. 3: Chapter 17)
Table 15.2
Locus and basket numbers
Mazar et. al. (2020 v.3) - Figure 15.1
Location of section drawings on superimposed plan of Strata D-11–D-2 from Mazar et. al. (2020 v. 3: Chapter 17)
Figure 15.1
Location of section drawings on superimposed plan of Strata D-11–D-2
Mazar et. al. (2020 v.3) - Figure 15.2
Schematic section of Area D from Mazar et. al. (2020 v. 3: Chapter 17)
Figure 15.2
Schematic section of Area D
Mazar et. al. (2020 v.3) - Figure 15.12
Plan of Stratum D-7b from Mazar et. al. (2020 v. 3: Chapter 15)
Figure 15.12
Plan of Stratum D-7b
Mazar et. al. (2020 v.3) - Figure 15.13
Plan of Stratum D-7a (encircled numbers denote foundation deposits as listed in the text) from Mazar et. al. (2020 v. 3: Chapter 15)
Figure 15.13
Plan of Stratum D-7a (encircled numbers denote foundation deposits as listed in the text)
Mazar et. al. (2020 v.3) - Figure 15.14
Plan of Stratum D-7a' from Mazar et. al. (2020 v. 3: Chapter 15)
Figure 15.14
Plan of Stratum D-7a'
Mazar et. al. (2020 v.3) - Figure 15.17a
Section 1a from Mazar et. al. (2020 v. 3: Chapter 15)
 Figure 15.17a
Section 1a (Squares G–L/5, looking north, showing probe in alluvial field)
Mazar et. al. (2020 v.3) - Figure 15.17b
Section 1b from Mazar et. al. (2020 v. 3: Chapter 15)
 Figure 15.17b
Section 1b (Squares J–M/5 and part of N/5, looking north)
Mazar et. al. (2020 v.3) - Figure 15.19
Section 3 from Mazar et. al. (2020 v. 3: Chapter 15)
 Figure 15.19
Section 3 (Squares L–N/4, looking north)
Mazar et. al. (2020 v.3) - Figure 15.20
Section 4 from Mazar et. al. (2020 v. 3: Chapter 15)
 Figure 15.20
Section 4 (Squares N–L/4, looking south)
Mazar et. al. (2020 v.3) - Figure 15.21
Section 5 from Mazar et. al. (2020 v. 3: Chapter 15)
 Figure 15.21
Section 5 (Squares N/4–5, looking east)
Mazar et. al. (2020 v.3) - Photo 15.40
Squares M–N/4–5 from Mazar et. al. (2020 v. 3: Chapter 15)
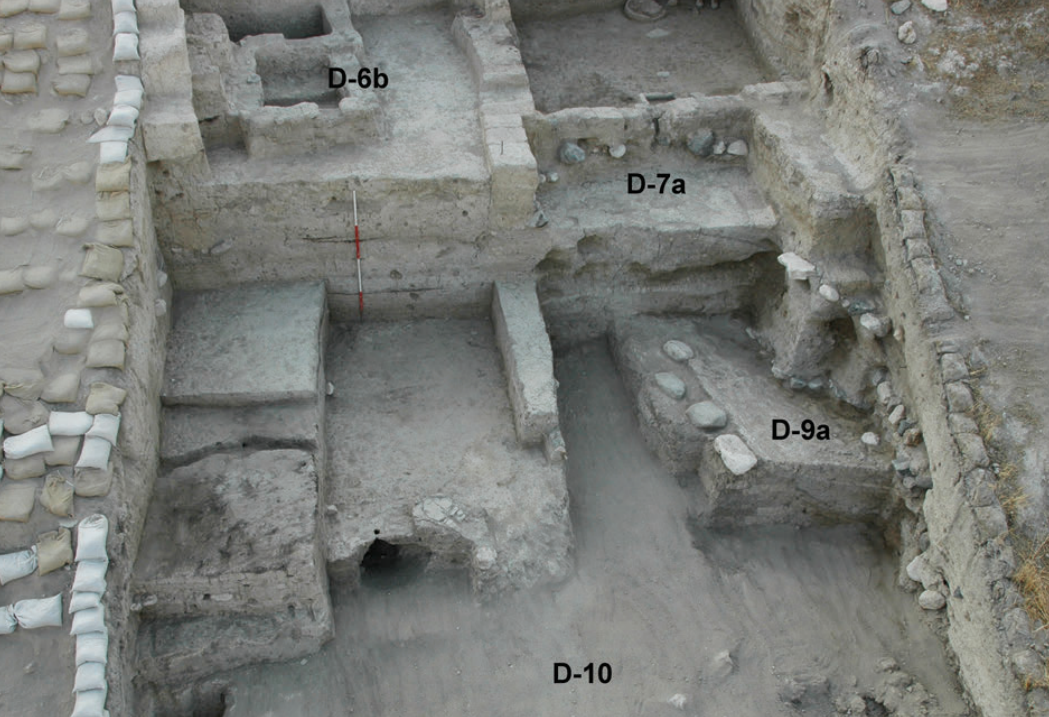 Photo 15.40
Squares M–N/4–5, looking east; left: backhoe trench into D-10 tufa fill near porcupine hole; D-9 to D-6b floors and installations in middle and upper steps (2005)
Mazar et. al. (2020 v.3) - Photo 15.41
Squares N/4–5 from Mazar et. al. (2020 v. 3: Chapter 15)
 Photo 15.41
Squares N/4–5, looking east; D-8–9a Wall 8932 on D-9b Floor 9927, cut on the south by D-7b Pit 8916
Mazar et. al. (2020 v.3) - Photo 15.42
Squares L–N/4 from Mazar et. al. (2020 v. 3: Chapter 15)
 Photo 15.42
Squares L–N/4, looking east; bottom: foundation of D-9b Wall 2816; center: D-9a stone floor 2855; above, right: D-7a Wall 1818 (1998)
Mazar et. al. (2020 v.3) - Photo 15.45
Squares N–M/4–5 from Mazar et. al. (2020 v. 3: Chapter 15)
 Photo 15.45
Squares N–M/4–5, looking southeast; center: D-7a' pillar bases; top: stone foundation of D-4 Wall 1883 (2007)
Mazar et. al. (2020 v.3) - Photo 15.46
Northeast corner of Square M/5 from Mazar et. al. (2020 v. 3: Chapter 15)
 Photo 15.46
Northeast corner of Square M/5, looking north; lamp-and-bowl foundation deposit below D-7a Wall 7906, cut into stone lining of D-7b Oven 7924 (2007)
Mazar et. al. (2020 v.3) - Photo 15.47
Square M/5 from Mazar et. al. (2020 v. 3: Chapter 15)
 Photo 15.47
Square M/5, looking south at section through D-7b Installation 7919 (2005); bowl: Fig. 16.26:2
Mazar et. al. (2020 v.3) - Photo 15.48
Square N/4 from Mazar et. al. (2020 v. 3: Chapter 15)
 Photo 15.48
Square N/4, looking northeast at D-7b Floor 8914, cut by D-7a Installation 8906 (2007)
Mazar et. al. (2020 v.3) - Photo 15.49
Square M/5 from Mazar et. al. (2020 v. 3: Chapter 15)
 Photo 15.49
Square M/5, looking north at stone foundation of D-7a Wall 7906 with floor striations in section; below the wall: ashy layer of D-7b Floor 7903 (2005)
Mazar et. al. (2020 v.3) - Photo 15.50
Square N/5 from Mazar et. al. (2020 v. 3: Chapter 15)
 Photo 15.50
Square N/5, looking north at D-7a stone floor 9906, pillar bases 9907 and Wall 8917 (2008)
Mazar et. al. (2020 v.3) - Photo 15.51
Square N/5 from Mazar et. al. (2020 v. 3: Chapter 15)
 Photo 15.51
Square N/5, looking west at D-7a stone floor 9906 and pillar bases 9907 (2008)
Mazar et. al. (2020 v.3) - Photo 15.52
Square N/4 from Mazar et. al. (2020 v. 3: Chapter 15)
 Photo 15.52
Square N/4, looking north; left: foundation of D-7a–6b Wall 2842; center: D-7a Floor 8907 and Installation 8906 (2007)
Mazar et. al. (2020 v.3) - Photo 15.53
Square N/4 from Mazar et. al. (2020 v. 3: Chapter 15)
 Photo 15.53
Square N/4, looking west; bottom left: D-7a Ovens 7946 and 8902; center: D-7b Pit 8916 (2007)
Mazar et. al. (2020 v.3) - Photo 15.54a
Square M/4 from Mazar et. al. (2020 v. 3: Chapter 15)
 Photo 15.54a
Square M/4; D-7a lamp and bowl deposits - deposit No. 2, looking southeast east (1997)
Mazar et. al. (2020 v.3) - Photo 15.54b
Square M/4 from Mazar et. al. (2020 v. 3: Chapter 15)
 Photo 15.54b
Square M/4; D-7a lamp and bowl deposits - deposit No. 3, looking east (1997)
Mazar et. al. (2020 v.3) - Photo 15.55
Square N/5 from Mazar et. al. (2020 v. 3: Chapter 15)
 Photo 15.55
Square N/5, looking west at D-7a' pillar bases 8944 and Walls 8904 and 4856 (2007)
Mazar et. al. (2020 v.3) - Photo 15.56
Squares N/4–5 from Mazar et. al. (2020 v. 3: Chapter 15)
 Photo 15.56
Squares N/4–5, looking east; left: D-6b Installations 7931 and 7939; right: D-7a Wall 8904, superimposed by D-6b Installation 2874 (2005)
Mazar et. al. (2020 v.3) - Photo 15.57
Squares N/4–5 from Mazar et. al. (2020 v. 3: Chapter 15)
 Photo 15.57
Squares N/4–5, looking south; bottom: D-6b Installations 7931 and 7939; center: D-7a Wall 8904, superimposed by D-6a–b Installation 2874 (2005)
Mazar et. al. (2020 v.3)
Davidovich, Sumaka'i Fink, and Mazar in Mazar et. al. (2020 v. 3: Chapter 15:40-41) reported
three lamp-and-bowl foundation depositsassociated with Wall 7906,
each comprised of one lamp and one bowl, the latter usually placed above the former.A deposit labeled as the
second deposit (No. 6, Photo 15.46; Fig. 16.24:13–14) was found immediately to the south of the stone foundation of Wall 7906 in the eastern portion of Square M/5. It is possible that this foundation deposit had shifted slightly from its original position, as the lamp and bowl were found at an angle and not horizontally laid.
Davidovich, Sumaka'i Fink, and Mazar in Mazar et. al. (2020 v. 3: Chapter 15:40-41) also noted
- the foundation of Wall 8917 (Photo 15.50), parallel to Wall 7906, was tilted to the east
(
80.84–81.05 m along the 2.3 m exposed part of the wall
). - Floor 9906,
made of basalt and limestone fieldstones, cobbles and pebbles, with occasional basalt grinding stone fragments
, sloped to the east(80.92–81.07 m), in accordance with the foundations of Walls 7906 (eastern part) and 8917, possibly due to post-depositional processes, such as young tectonic activities.
- difficult to interpret stratigraphy in the southwestern unit of Stratum D-7a which included brick debris layers and a floor tilted to the west
Strata D-7a and D-7b were dated to Iron IA [12th century BCE until ca. 1130 BCE(?)].
- Table 15.1
Stratigraphy and chronology in Area D, with correlation to Area C from Mazar et. al. (2020 v. 3: Chapter 17)
Table 15.1
Stratigraphy and chronology in Area D, with correlation to Area C
Mazar et. al. (2020 v.3) - Table 15.2
Locus and basket numbers from Mazar et. al. (2020 v. 3: Chapter 17)
Table 15.2
Locus and basket numbers
Mazar et. al. (2020 v.3) - Figure 15.1
Location of section drawings on superimposed plan of Strata D-11–D-2 from Mazar et. al. (2020 v. 3: Chapter 17)
Figure 15.1
Location of section drawings on superimposed plan of Strata D-11–D-2
Mazar et. al. (2020 v.3) - Figure 15.2
Schematic section of Area D from Mazar et. al. (2020 v. 3: Chapter 17)
Figure 15.2
Schematic section of Area D
Mazar et. al. (2020 v.3) - Figure 15.12
Plan of Stratum D-7b from Mazar et. al. (2020 v. 3: Chapter 15)
Figure 15.12
Plan of Stratum D-7b
Mazar et. al. (2020 v.3) - Figure 15.13
Plan of Stratum D-7a (encircled numbers denote foundation deposits as listed in the text) from Mazar et. al. (2020 v. 3: Chapter 15)
Figure 15.13
Plan of Stratum D-7a (encircled numbers denote foundation deposits as listed in the text)
Mazar et. al. (2020 v.3) - Figure 15.14
Plan of Stratum D-7a' from Mazar et. al. (2020 v. 3: Chapter 15)
Figure 15.14
Plan of Stratum D-7a'
Mazar et. al. (2020 v.3) - Figure 15.17a
Section 1a from Mazar et. al. (2020 v. 3: Chapter 15)
Figure 15.17a
Section 1a (Squares G–L/5, looking north, showing probe in alluvial field)
Mazar et. al. (2020 v.3) - Figure 15.17b
Section 1b from Mazar et. al. (2020 v. 3: Chapter 15)
Figure 15.17b
Section 1b (Squares J–M/5 and part of N/5, looking north)
Mazar et. al. (2020 v.3) - Figure 15.19
Section 3 from Mazar et. al. (2020 v. 3: Chapter 15)
Figure 15.19
Section 3 (Squares L–N/4, looking north)
Mazar et. al. (2020 v.3) - Figure 15.20
Section 4 from Mazar et. al. (2020 v. 3: Chapter 15)
Figure 15.20
Section 4 (Squares N–L/4, looking south)
Mazar et. al. (2020 v.3) - Figure 15.21
Section 5 from Mazar et. al. (2020 v. 3: Chapter 15)
Figure 15.21
Section 5 (Squares N/4–5, looking east)
Mazar et. al. (2020 v.3) - Photo 15.40
Squares M–N/4–5 from Mazar et. al. (2020 v. 3: Chapter 15)
Photo 15.40
Squares M–N/4–5, looking east; left: backhoe trench into D-10 tufa fill near porcupine hole; D-9 to D-6b floors and installations in middle and upper steps (2005)
Mazar et. al. (2020 v.3) - Photo 15.41
Squares N/4–5 from Mazar et. al. (2020 v. 3: Chapter 15)
Photo 15.41
Squares N/4–5, looking east; D-8–9a Wall 8932 on D-9b Floor 9927, cut on the south by D-7b Pit 8916
Mazar et. al. (2020 v.3) - Photo 15.42
Squares L–N/4 from Mazar et. al. (2020 v. 3: Chapter 15)
Photo 15.42
Squares L–N/4, looking east; bottom: foundation of D-9b Wall 2816; center: D-9a stone floor 2855; above, right: D-7a Wall 1818 (1998)
Mazar et. al. (2020 v.3) - Photo 15.45
Squares N–M/4–5 from Mazar et. al. (2020 v. 3: Chapter 15)
Photo 15.45
Squares N–M/4–5, looking southeast; center: D-7a' pillar bases; top: stone foundation of D-4 Wall 1883 (2007)
Mazar et. al. (2020 v.3) - Photo 15.46
Northeast corner of Square M/5 from Mazar et. al. (2020 v. 3: Chapter 15)
Photo 15.46
Northeast corner of Square M/5, looking north; lamp-and-bowl foundation deposit below D-7a Wall 7906, cut into stone lining of D-7b Oven 7924 (2007)
Mazar et. al. (2020 v.3) - Photo 15.47
Square M/5 from Mazar et. al. (2020 v. 3: Chapter 15)
Photo 15.47
Square M/5, looking south at section through D-7b Installation 7919 (2005); bowl: Fig. 16.26:2
Mazar et. al. (2020 v.3) - Photo 15.48
Square N/4 from Mazar et. al. (2020 v. 3: Chapter 15)
Photo 15.48
Square N/4, looking northeast at D-7b Floor 8914, cut by D-7a Installation 8906 (2007)
Mazar et. al. (2020 v.3) - Photo 15.49
Square M/5 from Mazar et. al. (2020 v. 3: Chapter 15)
Photo 15.49
Square M/5, looking north at stone foundation of D-7a Wall 7906 with floor striations in section; below the wall: ashy layer of D-7b Floor 7903 (2005)
Mazar et. al. (2020 v.3) - Photo 15.50
Square N/5 from Mazar et. al. (2020 v. 3: Chapter 15)
Photo 15.50
Square N/5, looking north at D-7a stone floor 9906, pillar bases 9907 and Wall 8917 (2008)
Mazar et. al. (2020 v.3) - Photo 15.51
Square N/5 from Mazar et. al. (2020 v. 3: Chapter 15)
Photo 15.51
Square N/5, looking west at D-7a stone floor 9906 and pillar bases 9907 (2008)
Mazar et. al. (2020 v.3) - Photo 15.52
Square N/4 from Mazar et. al. (2020 v. 3: Chapter 15)
Photo 15.52
Square N/4, looking north; left: foundation of D-7a–6b Wall 2842; center: D-7a Floor 8907 and Installation 8906 (2007)
Mazar et. al. (2020 v.3) - Photo 15.53
Square N/4 from Mazar et. al. (2020 v. 3: Chapter 15)
Photo 15.53
Square N/4, looking west; bottom left: D-7a Ovens 7946 and 8902; center: D-7b Pit 8916 (2007)
Mazar et. al. (2020 v.3) - Photo 15.54a
Square M/4 from Mazar et. al. (2020 v. 3: Chapter 15)
Photo 15.54a
Square M/4; D-7a lamp and bowl deposits - deposit No. 2, looking southeast east (1997)
Mazar et. al. (2020 v.3) - Photo 15.54b
Square M/4 from Mazar et. al. (2020 v. 3: Chapter 15)
Photo 15.54b
Square M/4; D-7a lamp and bowl deposits - deposit No. 3, looking east (1997)
Mazar et. al. (2020 v.3) - Photo 15.55
Square N/5 from Mazar et. al. (2020 v. 3: Chapter 15)
Photo 15.55
Square N/5, looking west at D-7a' pillar bases 8944 and Walls 8904 and 4856 (2007)
Mazar et. al. (2020 v.3) - Photo 15.56
Squares N/4–5 from Mazar et. al. (2020 v. 3: Chapter 15)
Photo 15.56
Squares N/4–5, looking east; left: D-6b Installations 7931 and 7939; right: D-7a Wall 8904, superimposed by D-6b Installation 2874 (2005)
Mazar et. al. (2020 v.3) - Photo 15.57
Squares N/4–5 from Mazar et. al. (2020 v. 3: Chapter 15)
Photo 15.57
Squares N/4–5, looking south; bottom: D-6b Installations 7931 and 7939; center: D-7a Wall 8904, superimposed by D-6a–b Installation 2874 (2005)
Mazar et. al. (2020 v.3)
Davidovich, Sumaka'i Fink, and Mazar in Mazar et. al. (2020 v. 3: Chapter 15:45-46) report the following:
Building DC of Stratum D-7a collapsed and the occupation layers were covered by brick debris, although no evidence for a violent destruction and fire was found. The collapse layer, ranging in depth from 0.3 m to 1.2 m, was excavated as different loci in the various parts of the building: 2843 in the southwestern unit, 7945 in the southeastern unit, 7935/8903 in the southern and western parts of Square N/5, and 4847/4817/4812 in the northwestern part. The collapse contained brick fragments of both the typical yellowish bricks of the initial phase of Stratum D-7a and other types of bricks (white, gray, brown, reddish) used in this stratum and its later phase. These collapse layers were found immediately below topsoil in Squares M–N/4 and below floor levels related to Stratum D-6b in Squares M–N/5. In the main part of Square N/5, installations of Stratum D-6b penetrated considerably into the earlier deposits (Figs. 15.20– 15.21), removing much of the brick debris of Stratum D-7.4Strata D-7a and D-7b were dated to Iron IA [12th century BCE until ca. 1130 BCE(?)].
The pottery assemblage of Stratum D-7a–b is similar to that of Strata S-4 and S-3 at Beth-Shean (TBS III: Chapter 5) and should be dated to the 12th century BCE (Iron IA).
- Table 15.1
Stratigraphy and chronology in Area D, with correlation to Area C from Mazar et. al. (2020 v. 3: Chapter 17)
Table 15.1
Stratigraphy and chronology in Area D, with correlation to Area C
Mazar et. al. (2020 v.3) - Table 15.2
Locus and basket numbers from Mazar et. al. (2020 v. 3: Chapter 17)
Table 15.2
Locus and basket numbers
Mazar et. al. (2020 v.3) - Figure 15.1
Location of section drawings on superimposed plan of Strata D-11–D-2 from Mazar et. al. (2020 v. 3: Chapter 17)
Figure 15.1
Location of section drawings on superimposed plan of Strata D-11–D-2
Mazar et. al. (2020 v.3) - Figure 15.2
Schematic section of Area D from Mazar et. al. (2020 v. 3: Chapter 17)
Figure 15.2
Schematic section of Area D
Mazar et. al. (2020 v.3) - Figure 15.19
Section 3 from Mazar et. al. (2020 v. 3: Chapter 15)
Figure 15.19
Section 3 (Squares L–N/4, looking north)
Mazar et. al. (2020 v.3) - Figure 15.20
Section 4 from Mazar et. al. (2020 v. 3: Chapter 15)
Figure 15.20
Section 4 (Squares N–L/4, looking south)
Mazar et. al. (2020 v.3) - Figure 15.21
Section 5 from Mazar et. al. (2020 v. 3: Chapter 15)
Figure 15.21
Section 5 (Squares N/4–5, looking east)
Mazar et. al. (2020 v.3) - Figure 15.22
Plan of Stratum D-5 from Mazar et. al. (2020 v. 3: Chapter 15)
Figure 15.22
Plan of Stratum D-5
Mazar et. al. (2020 v.3) - Figure 15.32
Section 6 from Mazar et. al. (2020 v. 3: Chapter 15)
 Figure 15.32
Section 6 (Squares P–Q/5, looking north)
Mazar et. al. (2020 v.3) - Figure 15.33
Section 7 from Mazar et. al. (2020 v. 3: Chapter 15)
 Figure 15.33
Section 7 (Squares P–Q/4, looking north)
Mazar et. al. (2020 v.3) - Figure 15.34
Section 8 from Mazar et. al. (2020 v. 3: Chapter 15)
 Figure 15.34
Section 8 (Squares Q–N/4, looking south)
Mazar et. al. (2020 v.3) - Figure 15.35
Section 9 from Mazar et. al. (2020 v. 3: Chapter 15)
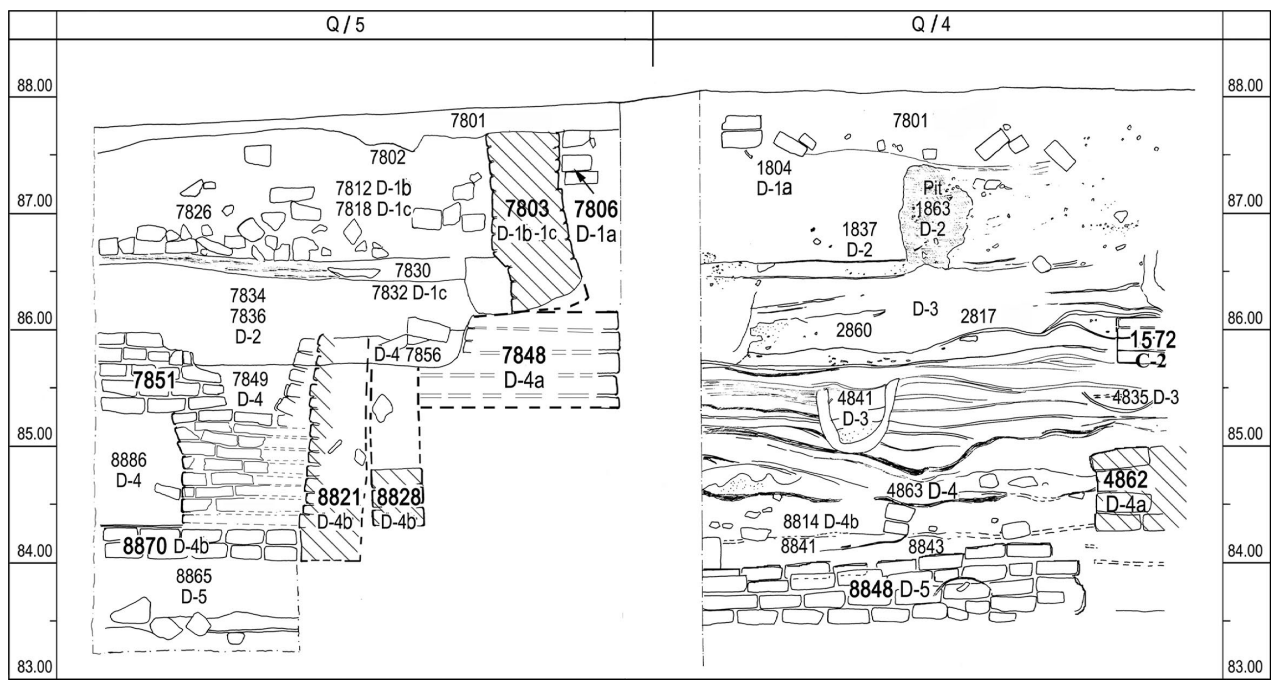 Figure 15.35
Section 9 (Squares Q/4–5, looking east)
Mazar et. al. (2020 v.3) - Photo 15.45
Squares N–M/4–5 from Mazar et. al. (2020 v. 3: Chapter 15)
Photo 15.45
Squares N–M/4–5, looking southeast; center: D-7a' pillar bases; top: stone foundation of D-4 Wall 1883 (2007)
Mazar et. al. (2020 v.3) - Photo 15.56
Squares N/4–5 from Mazar et. al. (2020 v. 3: Chapter 15)
Photo 15.56
Squares N/4–5, looking east; left: D-6b Installations 7931 and 7939; right: D-7a Wall 8904, superimposed by D-6b Installation 2874 (2005)
Mazar et. al. (2020 v.3) - Photo 15.57
Squares N/4–5 from Mazar et. al. (2020 v. 3: Chapter 15)
Photo 15.57
Squares N/4–5, looking south; bottom: D-6b Installations 7931 and 7939; center: D-7a Wall 8904, superimposed by D-6a–b Installation 2874 (2005)
Mazar et. al. (2020 v.3) - Photo 15.61
Square N/4 from Mazar et. al. (2020 v. 3: Chapter 15)
 Photo 15.61
Square N/4; D-6a Oven 2841 below D-4b Floor 1845 (1998)
Mazar et. al. (2020 v.3) - Photo 15.63
Squares N–Q/4–5 from Mazar et. al. (2020 v. 3: Chapter 15)
 Photo 15.63
Squares N–Q/4–5 at end of 2007 season; center: north–south street (Photo: SkyView).
Mazar et. al. (2020 v.3) - Photo 15.64
Square N–P/4 from Mazar et. al. (2020 v. 3: Chapter 15)
 Photo 15.64
Square N–P/4, looking east; right: stone foundation of D-4 Wall 1811; center right: D-6a Oven 2841 (1998)
Mazar et. al. (2020 v.3) - Photo 15.65
Probe in street, Square P/4 from Mazar et. al. (2020 v. 3: Chapter 15)
 Photo 15.65
Probe in street, Square P/4; D-5 stone fill 9810, east of Wall 2882 (2008)
Mazar et. al. (2020 v.3) - Photo 15.66
Squares P/4–5 from Mazar et. al. (2020 v. 3: Chapter 15)
 Photo 15.66
Squares P/4–5, looking south, D-4b Street 8803, bordered by Wall 1883 (right) and Walls 8850, 1860, above 2881 (left); lower left: Installation 8810 (2007)
Mazar et. al. (2020 v.3) - Photo 15.67
Squares P/4–5; fallen bricks (7847) along eastern face of Wall 1883 from Mazar et. al. (2020 v. 3: Chapter 15)
 Photo 15.67
Squares P/4–5, same as Photo 15.66, looking north; fallen bricks (7847) along eastern face of Wall 1883 (2007)
Mazar et. al. (2020 v.3) - Photo 15.68
Square P-5, looking west at Wall 1883; foreground: brick collapse in street from Mazar et. al. (2020 v. 3: Chapter 15)
 Photo 15.68
Square P-5, looking west at Wall 1883; foreground: brick collapse in street (2005)
Mazar et. al. (2020 v.3) - Photo 15.69
Squares P–Q/4–5 from Mazar et. al. (2020 v. 3: Chapter 15)
 Photo 15.69
Squares P–Q/4–5, looking north at D-5 Buildings DD and DE, (2008)
Mazar et. al. (2020 v.3) - Photo 15.70
Squares Q/4–5, looking north at D-5 Room 8867 from Mazar et. al. (2020 v. 3: Chapter 15)
 Photo 15.70
Squares Q/4–5, looking north at D-5 Room 8867; bottom: Pit 8883 (2008)
Mazar et. al. (2020 v.3) - Photo 15.71
Square Q/5, looking west at D-4 Building DG; lower right: brick collapse 8865 in D-5 Building DE from Mazar et. al. (2020 v. 3: Chapter 15)
 Photo 15.71
Square Q/5, looking west at D-4 Building DG; lower right: brick collapse 8865 in D-5 Building DE (2007)
Mazar et. al. (2020 v.3) - Photo 15.72
Square Q/5 from Mazar et. al. (2020 v. 3: Chapter 15)
 Photo 15.72
Square Q/5, looking west; lower right: Room 8865 of D-5 Building DD; left: walls of D-4 Buildings DG and DH (2007)
Mazar et. al. (2020 v.3) - Photo 15.73
Square P/5 from Mazar et. al. (2020 v. 3: Chapter 15)
 Photo 15.73
Square P/5, looking west; center: D-5 Room 8874 with ‘steps’ 8879; D-4b Installation 8810 on top of D-5 Wall 8878 (2007).
Mazar et. al. (2020 v.3) - Photo 15.74
Squares Q/4–5 from Mazar et. al. (2020 v. 3: Chapter 15)
 Photo 15.74
Squares Q/4–5, looking east at D-5 Building DD; Installation 9805 on Floor 8867 (2008)
Mazar et. al. (2020 v.3) - Photo 15.75
Square Q/4 from Mazar et. al. (2020 v. 3: Chapter 15)
 Photo 15.75
Square Q/4, looking north at D-5 Building DD; Floor 8867, cut by Pit 8883 (2008)
Mazar et. al. (2020 v.3) - Photo 15.76
Square P/4 from Mazar et. al. (2020 v. 3: Chapter 15)
 Photo 15.76
Square P/4, looking southwest at D-5 Building DD; left: Floor 8871 and Pit 8876; top right: street between Walls 2881 and 2882 (2008)
Mazar et. al. (2020 v.3) - Photo 15.77
Squares P–Q/4 from Mazar et. al. (2020 v. 3: Chapter 15)
 Photo 15.77
Squares P–Q/4, looking southwest at D-5 Building DD; Floor 8871, cut by Pits 8876 (center) and 8880 (left); D-4 Wall 1884 floating above floor (2007)
Mazar et. al. (2020 v.3) - Photo 15.88
Square Q/5 from Mazar et. al. (2020 v. 3: Chapter 15)
 Photo 15.88
Square Q/5, looking east; D-4a Building DJ, with elements of D-4b Buildings DH and DG below (2007)
Mazar et. al. (2020 v.3)
- Plan: Fig. 15.22
- Sections: Figs. 15.19–15.21; 15.32–15.35
- Photos 15.45, 15.56–15.57, 15.61, 15.63–15.77, 15.88
- Pottery: Buildings: Figs. 16.38–16.40; Street: Figs. 16.41–16.47)
- Stratigraphic Table
from Mazar et. al. (2020 v.1:XVII)
 Stratigraphic Table
Mazar et. al. (2020 v.1) - Fig. 3.7 Map of the
site showing grid and excavation areas from Mazar et. al. (2020 v.1)
Figure 3.7
Topographic map of Tel Rehov showing the grid and excavated areas. Note that levels are given in actual elevation below sea level followed by the relative levels used by our excavation
(triangulation point -116.26 considered as +100m)
(topography and grid by Mabat, Digital Mapping, Jerusalem; areas added by Jay Rosenberg)
Mazar et. al. (2020 v.1) - Deformation Map of Stratum C-2
by Jefferson Williams
 Stratum C-2 Deformation Map
modified by JW from Fig. 12.7 of Mazar et. al. (2020 v.2) - Deformation Map of Stratum G2
by Jefferson Williams
 Stratum G2 Deformation Map
modified by JW from Fig. 20.1 of Mazar et. al. (2020 v.3) - Fig. 2.11 Subsurface structure
of Tel Rehov interpreted from seismic - from Mazar et. al. (2020 v.1)
Figure 2.11
The subsurface structure of Tel Rehov as demonstrated by the N–S oriented seismic line 136.
- Velocity-Depth model of lower tufa sediments
- Velocity-Depth model of upper anthropogenic sediments
(Note the small hill under the higher mound) - Diffraction Stack illustrating the waves diffracted from the fault traces
- the interpreted faults under the mound - the fault between stations 40 and 60 [2nd fault from the right] underlies the step between the higher and lower mounds.
(from Zilberman et al. 2002:13; Fig. 4)
Mazar et. al. (2020 v.1) - Fig. 2.12 Seismic interpretation
of the top of the lower tufa layer along with subsurface faults - from Mazar et. al. (2020 v.1)
Figure 2.12
A subsurface map of the tufa hill, which underlies the anthropogenic sediments of Tel Rehov. The faults are reconstructed from the seismic survey. The survey lines are marked in red.
(from Zilberman et al. 2002:16; Fig. 5)
Seismic Survey lines (not shown here) are in Fig. 2.10 of Mazar et. al. (2020 v.1:28)
Mazar et. al. (2020 v.1) - Fig. 12.7 - Plan of Stratum C-2
from Mazar et. al. (2020 v.2)
Fig. 12.7
Plan of Stratum C-2 (1:250); for the continuation of this stratum in Area D, see Fig. 15.28
Mazar et. al. (2020 v.2) - Fig. 12.54 - Superimposed
plan of Strata C-3–C-1a from Mazar et. al. (2020 v.2)
 Fig. 12.19
Location of section drawings on superimposed plan of Strata C-3–C-1a (1:250)
Panitz-Cohen and Mazar in Mazar et. al. (2020 v.2)
- from Mazar in Mazar and Panitz-Cohen ed.s, (2020 v. 1:119)
- Area C stratigraphy correlated to the rest of the site
- Dating of Iron IIA strata was based on a combination of
the following:
Relative dating based on comparative study of pottery assemblages in well-stratified regional contexts
Absolute dating based on radiometric data
Historical considerations
Table 12.1Correlation of local Area C and general tell strata
Mazar et. al. (2020 v.2)
- Figure 4.1
Map of major archaeological and historical sites in central and northern Israel and Jordan from Mazar et. al. (2020 v.1)
 Figure 4.1
Map of major archaeological and historical sites in central and northern Israel and Jordan
Mazar et. al. (2020 v.1) - Figure 4.2
Map of Tel ReHov showing the excavation areas and architecture of Stratum IV from Mazar et. al. (2020 v.1)
 Figure 4.2
topographic map of Tel ReHov showing the excavation areas and architecture of Stratum IV (see also Fig.3.7)
Mazar et. al. (2020 v.1) - Table 4.1
Stratigraphic Table from Mazar et. al. (2020 v.1:XVII)
Stratigraphic Table
Mazar et. al. (2020 v.1)
- Photo 4.2
Fragments of roofing material from Stratum IV from Mazar et. al. (2020 v.1)
 Photo 4.2
Fragments of roofing material made of lumps of clay with reed and beam impressions, found in Area C, Stratum IV
Mazar et. al. (2020 v.1)
- Figure 4.1 -
Map of major archaeological and historical sites in central and northern Israel and Jordan from Mazar et. al. (2020 v.1)
Figure 4.1
Map of major archaeological and historical sites in central and northern Israel and Jordan
Mazar et. al. (2020 v.1)
Stratum VI is attributed to Early Iron IIA, since it is preceded by Stratum VII of Iron IB and succeeded by Strata V-IV of Late Iron IIA. It yielded a relatively substantial pottery assemblage which, on the one hand, demonstrates many similarities with the preceding and subsequent assemblages but, on the other hand, has its own characteristics. The latter include the first appearance, mostly on serving vessels, of a relatively large amount of red slip, often hand burnished. Painted decoration is mainly limited to horizontal straight and wavy red bands in the style known at Tel Rehov in the Iron IB; most of the Canaanite-like motifs appear on small sherds, so it is difficult to say to what extent these are residual. Hippo jars appear for the first time, but are still rare. Imported Phoenician pottery includes several Bichrome sherds, and a small amount of imported Cypriot pottery includes White Painted and Bichrome sherds, but no Black-on-Red, aside from one small and ambivalent sherd in Stratum C-2.
The northern ceramic assemblages assigned by Herzog and Singer-Avitz (2004; 2006) to their Early Iron IIA horizon are (references updated):
- Beth-Shean Stratum S-lb (TBS I: Pls. 6—8)
- Megiddo Stratum VB (Arie 2013)
- Jezreel pre-enclosure fills (Zimhoni 1997: 29-56)
- Taanach Period IIA (Rast 1978: Figs.18-29)
- Yoqne'am Strata XVI-XV (Ben Tor, Zarzecki-Peleg and Cohen-Anidjar 2005: 108-112, Figs. I.36-I.38)
- Horbat Rosh Zayit Stratum III (Gal and Alexandre 2000: 30-33)
- Tell el-Farah North Stratum VIIa (Chambon 1984: Pls. 45-60)
- Dor Phase Ir1|2A (Phases 7a-b, 6b-c in Area G) (Gilboa and Sharon 2003: 21-22, Figs. 10-11; Gilboa 2018: Pls. 20:49, 20.56-20.64)
- Hazor X-IX (?)
- Tell el-Hammah, lower phase (attributed to Iron Age I, yet the few published pottery items [Cahill 2006: 436, Fig. 4] can fit Tel Rehov VI)
Several caveats to this list must be noted. The first is that all the contexts mentioned above (except Dor and, to some extent, Tell Abu al-Kharaz) yielded very small quantities of pottery, mainly sherds, and most of them are not sufficiently distinctive to be compared to our Stratum VI assemblage. In addition, the great degree of continuity between these assemblages and the following Late Iron IIA renders it difficult to distinguish between these two sub-periods. For example, at Jezreel, the pottery from the pre-enclosure fills cannot be distinguished from that found in the enclosure's destruction layer (Zimhoni 1997). At Megiddo, the pottery from Stratum VB is very similar to that of VA-IVB (Zimhoni 1997; Arie 2013) and the same may be said concerning Taanach IIA and IIB. Regional differences should also be taken into account. For example, the correlation between the pottery from Hazor Strata X-IX (Ben-Tor and Ben-Ami 1998; 2012) and our Stratum VI cannot be established with confidence, perhaps due to such regional differences and the strong Canaanite traditions which are present at Tel Rehov, but missing at Hazor. To conclude, Tel Rehov VI provides the largest pottery assemblage that can be attributed to the Early Iron IIA in northern Israel, along with Dor for the northern coastal plain. Yet, even at Tel Rehov, the continuity of many forms from Iron IB to Early Iron IIA, and from the latter to Late Iron IIA, make precise divisions difficult in many cases.
- Figure 4.1 -
Map of major archaeological and historical sites in central and northern Israel and Jordan from Mazar et. al. (2020 v.1)
Figure 4.1
Map of major archaeological and historical sites in central and northern Israel and Jordan
Mazar et. al. (2020 v.1)
The large amount of pottery from Strata V-IV (with very little distinction between the two), discussed in Chapter 24, can be attributed to Late Iron IIA, as defined by Herzog and Avitz-Singer (2006; see also surveys in TBS I: 320-323; APIN-IH: 135-188). The following contexts can be assigned to this phase:
- Tel Beth-Shean Strata S-la and P-10-P-9 (TBS I: 313-384; Plates 6-16)
- Tell el-Hammah two upper phases (Cahill 2006: Figs. 6-11)
- Tel 'Amal Strata III-IV (Levi and Edelstein 1972)
- the Jezreel 7enclosure (Zimhoni 1997: 13-28, 39-53, Figs. 1.2-1.10; 2.5-2.12)
- Megiddo VA-IVB (Finkelstein, Zimhoni and Kafri 2000; Arie 2013)
- Yoqne'am XIV (Ben Tor, Zarzecki-Peleg and Cohen-Anidjar 2005: Figs. I.50-I.52)
- Taanach Period IIB (Rast 1978: Figs. 30-69)
- Tell el-Far'ah North Stratum VIIb (Chambon 1984: 53-72, Pls. 45-62)
- Hazor X—IX(?), VIII (although see comments above and below)
- Horbat Rosh Zayit Strata IIa-Ilb (Gal and Alexandre 2000: 34-122)
- Dor Phase Ir2a (Phase 6a in Area G; Gilboa and Sharon 2003: 23-24, Figs. 12-13; Gilboa 2018: Pls. 20.6-20.67)
- Tell Abu Hawam Stratum III (Hamilton 1935)
- Tell Keisan Strata 8?-6 (Briend and Humbert 1980: Pls. 48-56)
- Tell Abu al-Kharaz Phases XI-XII (Fischer 2013)20
The absolute chronology of the Iron IIA strata is a subject of ongoing debate, based on radiometric dates and historical considerations, although it seems that by now, agreement has been reached on some major issues. The original Low Chronology date of the beginning of Iron IIA strata to ca. 900 BCE proved to be wrong, based on radiocarbon dating. On the other hand, the extension of Iron IIA into the 9th century is certainly correct, as it is anchored in the evidence from Jezreel, where the royal enclosure cannot predate Ahab [r. c. 871 - c. 852 BCE]. According to the modified chronology which I have suggested since 2003, Iron IIA started during the first half of the 10th century BCE and continued until sometime in the second half of the 9th century (Table 4.3). This approach was basically backed up by numerous radiocarbon dates, although there are different views concerning the precise time span and absolute dates of each of the two Iron IIA phases (for summaries and earlier literature, see Finkelstein and Piasetzky 2011; Mazar 2011b).
 Table 4.3
Three chronological systems for Iron IB-IIB
Mazar et. al. (2020 v.1)
The radiocarbon data from the Iron IIA strata at Tel Rehov is based on 27 short-lived samples, most of them measured several times, so that a total of 110 dates are available (Chapter 48, Table 48.4; partly published earlier in Mazar et al. 2005). This is the largest number of dates from a single site in this period. Several difficulties should be noted (see discussion in Chapter 48):
- The stratigraphic affiliation of several samples to specific phase of the Iron IIA is questionable: in particular, Samples R21—R23 from Area D and Samples R31—R34 from Area C, which could be either Stratum V or IV
- There are a few outliers (all Sample 27 and one determination in R36)
- Occasionally, samples from the same context or stratum yielded considerably different dates, which would provide too wide a range for our required resolution of less than half a century.
 Table 4.4
Results of a Bayesian model for secure dates from Areas C+D and B in lσ and 2σ CalBC showing dates for Strata VI-IV (not including unmodeled dates from Area E) - for details see Chapter 48
Mazar et. al. (2020 v.1)
The model for Areas C and D (in which most of the samples are included) resulted in the condensation of Strata VI, V and IV into a time frame of maximum 73 years between 936 (uppermost possible date) and 863 (lowest possible date) and minimum seven years (911-904 CalBC) in 1σ, while the 2σ, dates provide a longer maximal range of 145 years for this time span (and minimal -4 years!). The results in the 1σ range are much too short a time slot for three strata with several sub-phases and clear changes in the pottery assemblage between Stratum VI and Strata V-IV. The Bayesian model from Area B (from the end of Stratum VI to the end of Stratum IV) provided a wider range. It should also be recalled that the models provide considerable time spans for each of the transitions between strata, much wider than we would expect for the close dating of less than half a century that we seek for this period. Furthermore, one sample measured several times from Area E provided unmodeled calibrated dates in the late 9th century BCE which are much lower compared to both the unmodeled and modeled dates from the other areas. It appears that the more samples are measured, the problems involved in their interpretation become more complex.
Since the subject is discussed in detail in Chapter 48, I emphasize here only a few notable points. At the outset it should be noted that in the discussion of Iron Age chronology, where we expect restricted resolutions of less than half a century, it became common to cite only or mainly the 1σ CalBC dates (68% probability), and so I did as well in most cases. Yet, it should be recalled that the 2σ dates (95% probability) provide wider ranges and should be taken into consideration as well. Indeed, quite a few discussions of radiocarbon dates in archaeology refer only to the 2σ dates. In such narrow time slots as those involved in the Iron Age chronological debate, the possibilities provided by the 2σ range are sometimes crucial.
Another problem is the relationship between unmodeled and modeled dates. Unmodeled dates from Stratum VI cover most of the 10th century BCE, while the Bayesian model for Areas C+D provide, in my opinion, too short a time span for this stratum, which has in several locations two stratigraphic phases and yielded a pottery assemblage that differs somewhat from the previous and later strata. This result may have been caused by the constraint resulting from the over 100-years span provided by the Bayesian model for Stratum D-3 (see above in the discussion of Iron IB dates). I therefore suggest a much shorter time span for Stratum D-3 and a longer one for Stratum VI, supported by the unmodeled calibrated dates, and conclude that the beginning of Stratum VI could occur during the first half of the 10th century. Taking into consideration the dates of the following Stratum V, the end of Stratum VI should be dated to somewhere in the last quarter of the 10th century.
The date of Stratum V is based on five samples from secure contexts in Area C and one from Area B (a total of 24 repetitions).21 It appears that the last two decades of the 10th century and the beginning of the 9th century BCE are the most reasonable dates for this stratum.
The destruction of Stratum IV is dated by three samples from Area C and two from Area B (a total of 17 repetitions) (Samples R35-R41). The dates are partly in the 10th century and mostly in the 9th century; some reach the second half of the 9th century BCE. The Bayesian model for Areas C+D would end this stratum no later than 863 (1σ) and 817 (2σ) CalBC, while the model for Area B provides lower dates: 833 (161σ) and 822 (1σ) CalBC. In Area E, one of two samples from loci attributed to the early phase of the courtyard (E-lb, probably corresponding with Stratum V), measured several times, provided the exceptionally low date of 832-810 (unmodeled).
My suggested date of 840/830 BCE for the destruction of Stratum IV is based on attribution of this destruction to Hazael (see below). As can be seen in Table 4.4, this date is lower by 23-33 years than the lowest date in the 1σ model for the end of Stratum IV in Area C (863 CalBC), but can fit the lowest as date from Area C (812 BCE), the lowest 2σ and as dates from Area B (838, 822 BCE) and many of the unmodeled lowest dates from Areas B, C and E in the 1σ and 2σ ranges.
Radiocarbon dates from Iron IIA strata at other sites in northern Israel were widely discussed in recent years (e.g., Sharon et al. 2007; Mazar and Bronk Ramsey 2008; Finkelstein and Piasetzky 2009; 2010; 2011; Lee, Mazar and Bronk Ramsey 2013). However, in many cases, the number of measurements from a single site is insufficient, and often they provide a wide range of dates in the 10th to 9th centuries. An example is Megiddo, where only eight samples with eleven repetitions were measured from Iron IIA strata: one from Stratum H-7 (a middle phase of Stratum VB) with a CalBC 1σ date of 1000-920, three from Stratum H-5 which corresponds to general Stratum VA-IVB, two of them (RTT3948 and RTK 6429) provided dates that cover the entire 9th century BCE and the third (RTT 3949) provided a date in the 10th century (1005-930 CaIBC) (Toffolo et al. 2014: 235).22 Four additional dates were published from Stratum Q-5, a Late Iron IIA context which is phased by the excavators between Stratum VB and VA-IVB; the calibrated dates are 1050-940, 980-895, 1000-920 and 895-830 BCE (1σ) and a (yet unpublished) Bayesian model is cited as providing a date of ca. 900 BCE (Kleiman et al. 2019: 547 and Table 7). This is just one example of the potential inconsistencies in the results of 14C dating, in particular when only a few dates are available. Bayesian models are used in order to limit these wide ranges; yet, the unmodeled dates should be taken into account when weighing the results of Bayesian models, specially in cases when the models include data from many sites. The radiometric evidence is certainly important, but has its limitations when it comes down to subtle dating at a resolution of less than 50 years.
I end this section with the words of Walter Kutchera, the former director of the radiometric laboratory in the University of Vienna:
I am convinced that 14C is the most wonderful tool for archaeology, when its inherent uncertainty is properly respected. Unfortunately, pushing its use beyond these limitations puts "oil into the fire" of those who mistrust the 14C method altogether .....23These words are very true when we deal with Iron Age chronology, particularly in the 10th-9th centuries BCE.
- Figure 12.1 -
Site Plan with grid and excavation areas from Mazar et. al. (2020 v.2)
Figure 12.1
Topographic map of Tel Rehov with location of Area C
Panitz-Cohen and Mazar in Mazar et. al. (2020 v.2) - Photo 12.1 -
Aerial Photo showing Area C from Mazar et. al. (2020 v.2)
 Photo 12.1
Aerial view, looking south, foreground: Area C; right: Area D (SkyView)
Panitz-Cohen and Mazar in Mazar et. al. (2020 v.2) - Stratigraphic Table
from Mazar et. al. (2020 v.1:XVII)
Stratigraphic Table
Mazar et. al. (2020 v.1)
Area C was located at the northwestern end of the lower city of Tel Rehov, which is the highest point of this part of the mound (Fig. 12.1; Photo 12.1). It was excavated with the purpose of clarifying the stratigraphic sequence and defining the nature of settlement in this part of the tell. ...
Stratigraphy
Four main strata were detected in Area C, termed from earliest to latest (Table 12.1):
- C-3
- C-2
- C-1b
- C-1a
Table 12.1Correlation of local Area C and general tell strata
Mazar et. al. (2020 v.2)
The amount of continuity between the major strata (C-3–C-1) differed. Some walls of Stratum C-2 were built directly on those of C-3, while others were constructed according to a different plan altogether. Some buildings of Stratum C-2 were rebuilt in C-1b, while others went out of use. The greatest continuity took place between Strata C-1b and C-1a, which should be viewed, in fact, as two phases of the same occupation, although there were also several marked changes, mostly in the southeastern part of the area. Strata C-3 and C-2 each had a distinct brick type, while the bricks of Strata C-1b and C-1a were similar, although of varied materials (Tables 12.27–12.30).
The correlation between the destruction/construction events in a city that was constructed entirely of bricks turned out to be complicated task. Our stratigraphic division was based on the attempt to integrate local sequences in the various parts of the area into one comprehensive scheme. Although in each context we were able to establish clear stratigraphy, there remained open questions concerning the correlation between them, in particular due to a violent event at the end of Stratum C-1b, mostly in the southeastern part of the field (Squares Y–Z, A– B/20, 1–3). However, other parts of Area C with remains attributed to Stratum C-1b did not suffer such massive destruction. Following the violent destruction at the end of Stratum C-1a, Area C, like the entire lower city, was entirely abandoned, and the architecture of this stratum was revealed just under modern topsoil.
- Fig. 12.7 -
Plan of Stratum C-2 from Mazar et. al. (2020 v.2)
Fig. 12.7
Plan of Stratum C-2 (1:250); for the continuation of this stratum in Area D, see Fig. 15.28
Mazar et. al. (2020 v.2)
Stratum C-2 was dated to Early Iron Age IIA, the 10th century BCE (for more specific dating, see below and Chapters 4, 48). It marked the initial appearance of red-slipped and hand-burnished wares; Cypriot Black-on-Red ware that appeared in subsequent strata was lacking (Chapter 27). The Hippo storage jar made its first appearance in this stratum, although in small amounts and partially ambiguous from a typological point of view, made of the same type of clay common in subsequent strata (Chapter 24). Most of the pottery was fragmentary, aside from several complete vessels, including an assemblage from Locus 1555b in Square R/4 (Figs. 13.10–13.11; Photo 13.1) whose typological attributes and decoration recall Iron IB pottery, as discussed below.
One of the most distinct characteristics of this occupation phase was that almost all the walls were constructed with hard-packed yellow bricks, very different from the crumbly gray bricks of Stratum C-3 (Table 12.28). Most of the rooms were found full of complete fallen bricks of this type. This, and traces of damage in the walls, such as cracks and slippage, allude to seismic activity at some point, possibly the reason for the end of this stratum. Despite this damage, the walls of Stratum C-2 were, in most cases, well preserved, for example in Building CB, where they stood up to 18 courses, with two intact entrances.
- Figure 12.9 -
Plan of Stratum C-2 from Mazar et. al. (2020 v.2)
 Figure 12.9
Plan of Stratum C-2, west; area in Squares Y/1–2 cut by apiary (1:125)
Panitz-Cohen and Mazar in Mazar et. al. (2020 v.2) - Figure 12.97 -
Section 43 (Square R/4, looking north) from Mazar et. al. (2020 v.2)
 Figure 12.97
Section 43 (Square R/4, looking north)
Panitz-Cohen and Mazar in Mazar et. al. (2020 v.2) - Photo 12.23 -
Room 1555 at the beginning of excavation from Mazar et. al. (2020 v.2)
 Photo 12.23
Squares R–S/4, looking south; Room 1555 at the beginning of its excavation (2010)
Panitz-Cohen and Mazar in Mazar et. al. (2020 v.2) - Photo 12.24 -
Damaged eastern face of Wall 1563 from Mazar et. al. (2020 v.2)
 Photo 12.24
Square R/4, looking southeast at Wall 1563 (left) and its corner with Wall 1572 (right) (2010)
Panitz-Cohen and Mazar in Mazar et. al. (2020 v.2) - Photo 12.25 -
Smashed vessels in Room 1555 from Mazar et. al. (2020 v.2)
 Photo 12.25
Square R/4, looking south at smashed vessels in Locus 1555b (2010)
Panitz-Cohen and Mazar in Mazar et. al. (2020 v.2)
- Plan: Fig. 12.9
- Section: Fig. 12.97
- Photos 12.23–12.25
- Pottery: Figs. 13.10–13.11
The 18 restored vessels from Locus 1555b (Figs. 13.10–13.11; photo on p. 270) were attributed to Room 1555 of Stratum C-2, based on the relation of the debris layer (1555a) and the top of the pottery layer (1555b) to the surrounding walls. As such, this would be the only case where an assemblage of restorable vessels could be attributed to Stratum C-2 and the only evidence for a sudden destruction at the end of this occupation level, although no traces of fire were found; the cause might have been an earthquake. Yet, there is a certain dilemma concerning this pottery group. Unlike much of the other pottery from Stratum C-2, the vessels lacked red slip and burnish, and several were painted in a style typical of the Iron IB pottery at Tel Rehov. Typologically as well, the vessels suit an Iron IB date, although most forms also continued into Early Iron IIA. These factors, as well as the fact that the main bulk of the pottery was found at level 85.60 m, which is somewhat lower than the uppermost pits of Stratum D-3 (general Stratum VII) in the adjacent Square Q/4, raised initial doubts as to the attribution of this locus. If this pottery was on a layer relating to the debris of Locus 1555a and abutting the bottom of the room’s walls, it must belong to Stratum C-2. However, the possibility remains that this pottery concentration should be attributed to Stratum C-3a, the last Iron IB phase, in which case the thin debris layer 11428 might have been the surface on which the assemblage rested. In that case, Floor 11436 and Pits 11438 and 11439 would be attributed to an earlier phase, denoted Stratum C-3b, corresponding to the lower pits of Stratum D-3; if so, then the pottery concentration preceded the walls of the room as defined above. This is not entirely impossible when considering the location of this pottery concentration in relation to the bottom of these walls (see section, Fig. 12.97). However, in that case, Room 1555 would remain without a floor, despite the good preservation of its walls. Another problem with this explanation is that floors attributed to Stratum C-2 east of Room 1555 (in Square S/4) are almost at the same level or even lower than the pottery in Locus 1555b. Ultimately, this unique assemblage was assigned to Stratum C-2, while acknowledging that the pottery types could be either Iron IB or Early Iron IIA, demonstrating the continuity between these two periods, as discussed in Chapter 24.
West of Square R/4, where the steep western slope of the mound started, was the border between Areas C and D. In Squares R–Q/4–5 of Area D, architectural elements attributed to Stratum D-2 continued until the erosion line down the slope, with no evidence for a defense line of any sort. These remains were contemporary with Stratum C-2 and thus, we concluded that the city had not been fortified at that time.
- Figure 12.9 -
Plan of Stratum C-2 (west) from Mazar et. al. (2020 v.2)
Figure 12.9
Plan of Stratum C-2, west; area in Squares Y/1–2 cut by apiary (1:125)
Panitz-Cohen and Mazar in Mazar et. al. (2020 v.2) - Figure 12.10 -
Plan of Buildings CA and CB in Stratum C-2 from Mazar et. al. (2020 v.2)
 Figure 12.10
Plan of Buildings CA and CB, Stratum C-2 (1:75)
Panitz-Cohen and Mazar in Mazar et. al. (2020 v.2) - Figure 12.65 -
Section 11 from Mazar et. al. (2020 v.2)
 Figure 12.65
Section 11 (Squares T/1–4, looking west); the section in Square T/3 north of Walls 1448/4439 was drawn on a line east of Wall 1506
Panitz-Cohen and Mazar in Mazar et. al. (2020 v.2) - Figure 12.66 -
Section 12 from Mazar et. al. (2020 v.2)
 Figure 12.66
Section 12 (Square S/4, looking east at walls)
Panitz-Cohen and Mazar in Mazar et. al. (2020 v.2) - Figure 12.67 -
Section 13 from Mazar et. al. (2020 v.2)
 Figure 12.67
Section 13 (Square S/3, section below Wall 1448, looking south)
Panitz-Cohen and Mazar in Mazar et. al. (2020 v.2) - Figure 12.68 -
Section 14 from Mazar et. al. (2020 v.2)
 Figure 12.68
Section 14 (Square T/3, looking north)
Panitz-Cohen and Mazar in Mazar et. al. (2020 v.2) - Photo 12.27 -
Looking south at Buildings CA and CB in Stratum C-2 from Mazar et. al. (2020 v.2)
 Photo 12.27
View of C-2 Building CA, looking south; C-2 Building CB on the south (2000)
Panitz-Cohen and Mazar in Mazar et. al. (2020 v.2) - Photo 12.28 -
Looking south at Building CA in Stratum C-2 with a bulge in Wall 4439 from Mazar et. al. (2020 v.2)
 Photo 12.28
Southeastern part of C-2 Building CA, looking south; C-1b Wall 1448 above repair line covering Wall 4439 (2000)
JW: Walls 4439 is bulging
Panitz-Cohen and Mazar in Mazar et. al. (2020 v.2) - Photo 12.29 -
Room 4426 in Building CA in Stratum C-2 with burnt grain on the floor from Mazar et. al. (2020 v.2)
 Photo 12.29
Room 4426 in C-2 Building CA, looking southwest; burnt grain on floor (2000)
Panitz-Cohen and Mazar in Mazar et. al. (2020 v.2) - Photo 12.30 -
Buildings CA and CB in Stratum C-2 looking south from Mazar et. al. (2020 v.2)
 Photo 12.30
C-2 Building CB adjoining Building CA on the south, looking south (2000)
Panitz-Cohen and Mazar in Mazar et. al. (2020 v.2)
- Plans: Figs. 12.9–12.10
- Sections: Figs. 12.65–12.68
- Photos 12.4–12.5, 12.27–12.30
- Pottery: Figs. 13.13–13.14
- Figure 12.9 -
Plan of Stratum C-2 (west) from Mazar et. al. (2020 v.2)
Figure 12.9
Plan of Stratum C-2, west; area in Squares Y/1–2 cut by apiary (1:125)
Panitz-Cohen and Mazar in Mazar et. al. (2020 v.2) - Figure 12.10 -
Plan of Buildings CA and CB in Stratum C-2 from Mazar et. al. (2020 v.2)
Figure 12.10
Plan of Buildings CA and CB, Stratum C-2 (1:75)
Panitz-Cohen and Mazar in Mazar et. al. (2020 v.2) - Figure 12.65 -
Section 11 from Mazar et. al. (2020 v.2)
Figure 12.65
Section 11 (Squares T/1–4, looking west); the section in Square T/3 north of Walls 1448/4439 was drawn on a line east of Wall 1506
Panitz-Cohen and Mazar in Mazar et. al. (2020 v.2) - Figure 12.69 -
Section 15 from Mazar et. al. (2020 v.2)
 Figure 12.69
Section 15 (Squares S–Y/2, looking north) (1:55)
Panitz-Cohen and Mazar in Mazar et. al. (2020 v.2) - Figure 12.77 -
Section 23 from Mazar et. al. (2020 v.2)
 Figure 12.77
Section 23 (Square Y/3, section below Wall 2411, looking east)
Panitz-Cohen and Mazar in Mazar et. al. (2020 v.2) - Figure 12.79 -
Section 25 from Mazar et. al. (2020 v.2)
 Figure 12.79
Section 25 (Squares T–Y/3, looking south)
Panitz-Cohen and Mazar in Mazar et. al. (2020 v.2) - Photo 12.30 -
Buildings CA and CB in Stratum C-2 looking south from Mazar et. al. (2020 v.2)
Photo 12.30
C-2 Building CB adjoining Building CA on the south, looking south (2000)
Panitz-Cohen and Mazar in Mazar et. al. (2020 v.2) - Photo 12.31 -
Wall 2505 from Mazar et. al. (2020 v.2)
 Photo 12.31
C-2 Building CB, looking east; Wall 2505 with entrance (1998)
Panitz-Cohen and Mazar in Mazar et. al. (2020 v.2) - Photo 12.32 -
Wall 2505 from Mazar et. al. (2020 v.2)
 Photo 12.32
C-2 Building CB, entrance in Wall 2505, superimposed by C-1 Wall 1416 of Building CG, looking west (2000)
Panitz-Cohen and Mazar in Mazar et. al. (2020 v.2) - Photo 12.33 -
Wall 2505 from Mazar et. al. (2020 v.2)
 Photo 12.33
C-2 Building CB, close-up of entrance in Wall 2505, looking west (2000)
Panitz-Cohen and Mazar in Mazar et. al. (2020 v.2) - Photo 12.34 -
Central Hall from Mazar et. al. (2020 v.2)
 Photo 12.34
C-2 Building CB, central hall, looking south (1998)
Panitz-Cohen and Mazar in Mazar et. al. (2020 v.2) - Photo 12.35 -
Split between northern walls 1442 and 1483 of Building CB - possibly due to an earthquake - from Mazar et. al. (2020 v.2)
 Photo 12.35
C-2 Building CB, northern wall; note possible earthquake damage (1998)
JW: The earthquake damage alluded to is the split between walls 1442 and 1483
Panitz-Cohen and Mazar in Mazar et. al. (2020 v.2) - Photo 12.36 -
Lamp in niche of Wall 1483 - from Mazar et. al. (2020 v.2)
 Photo 12.36
C-2 Building CB; intact lamp in niche in the western doorjamb of entrance in Wall 1483, looking north (1998)
Panitz-Cohen and Mazar in Mazar et. al. (2020 v.2) - Photo 12.37 -
Large Tumbled Stone in Building CB from Mazar et. al. (2020 v.2)
 Photo 12.37
C-2 Building CB; large stone south of entrance in Wall 1483, looking north (1998)
Panitz-Cohen and Mazar in Mazar et. al. (2020 v.2) - Photo 12.38 -
Wall 2481 from Mazar et. al. (2020 v.2)
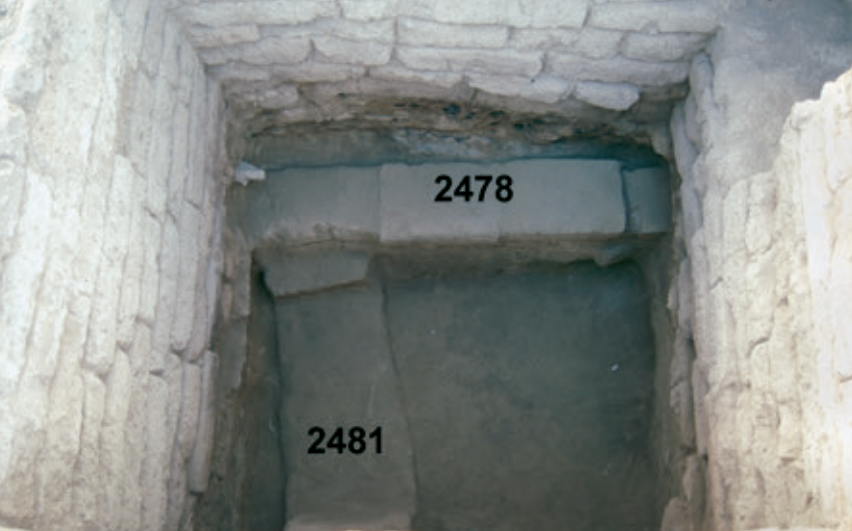 Photo 12.38
C-2 Building CB Wall 2481 below Room 2444 of C-1 Building CG, looking east; note intentionally removed bricks in Wall 2481 (1998)
Panitz-Cohen and Mazar in Mazar et. al. (2020 v.2) - Photo 12.39 -
Tilted Stratum C-1 Wall 2411 overlying Stratum C-2 Wall 5476 from Mazar et. al. (2020 v.2)
 Photo 12.39
Square Y/3, looking west at C-1 Building CG; C-2 walls below wood in foundation (2008)
Panitz-Cohen and Mazar in Mazar et. al. (2020 v.2)
- Plans: Figs. 12.9–12.10
- Sections: Figs.12.65, 12.69, 12.77, 12.79
- Photos 12.3–12.5, 12.8, 12.15–12.16, 12.30–12.39
- Pottery: Figs. 13.15–13.18
- Figure 12.12 -
Plan of Stratum C-2 from Mazar et. al. (2020 v.2)
 Figure 12.12
Plan of Stratum C-2, northeast (1:125)
Panitz-Cohen and Mazar in Mazar et. al. (2020 v.2) - Figure 12.62 -
Section 8 from Mazar et. al. (2020 v.2)
 Figure 12.62
Section 8 (Square Y/5, looking north)
Panitz-Cohen and Mazar in Mazar et. al. (2020 v.2) - Figure 12.63 -
Section 9 from Mazar et. al. (2020 v.2)
 Figure 12.63
Section 9 (Square Y/5, looking west)
Panitz-Cohen and Mazar in Mazar et. al. (2020 v.2) - Figure 12.64 -
Section 10 from Mazar et. al. (2020 v.2)
 Figure 12.64
Section 10 (Square T/4, looking east)
Panitz-Cohen and Mazar in Mazar et. al. (2020 v.2) - Photo 12.40 -
Tilted C1-b Wall 2454 on top of C-2 Wall 6441 from Mazar et. al. (2020 v.2)
 Photo 12.40
Building CE, looking at eastern wall (2003)
Panitz-Cohen and Mazar in Mazar et. al. (2020 v.2) - Photo 12.41 -
Building CE from Mazar et. al. (2020 v.2)
 Photo 12.41
Building CE, looking southeast; Stratum C-2 walls below Stratum C-1 walls (2003)
Panitz-Cohen and Mazar in Mazar et. al. (2020 v.2) - Photo 12.42 -
fallen bricks and debris in Room 6464 from Mazar et. al. (2020 v.2)
 Photo 12.42
C-2 Building CE, looking east; fallen bricks and debris in Room 6464 (2003)
Panitz-Cohen and Mazar in Mazar et. al. (2020 v.2) - Photo 12.43 -
from Mazar et. al. (2020 v.2)
 Photo 12.43
Squares Y-Z/4-6, looking south; right: northern spaces of Building CE; center: Stratum C-2 Building CU below C-1 Building CF (2005)
Panitz-Cohen and Mazar in Mazar et. al. (2020 v.2)
- Plan: Fig. 12.12
- Section: Figs. 12.62–12.64
- Photos 12.40–12.43
- Pottery: Fig. 13.22
- Figure 12.12 -
Plan of Stratum C-2 from Mazar et. al. (2020 v.2)
Figure 12.12
Plan of Stratum C-2, northeast (1:125)
Panitz-Cohen and Mazar in Mazar et. al. (2020 v.2) - Figure 12.14 -
Plan of Building CY, Stratum C-2 from Mazar et. al. (2020 v.2)
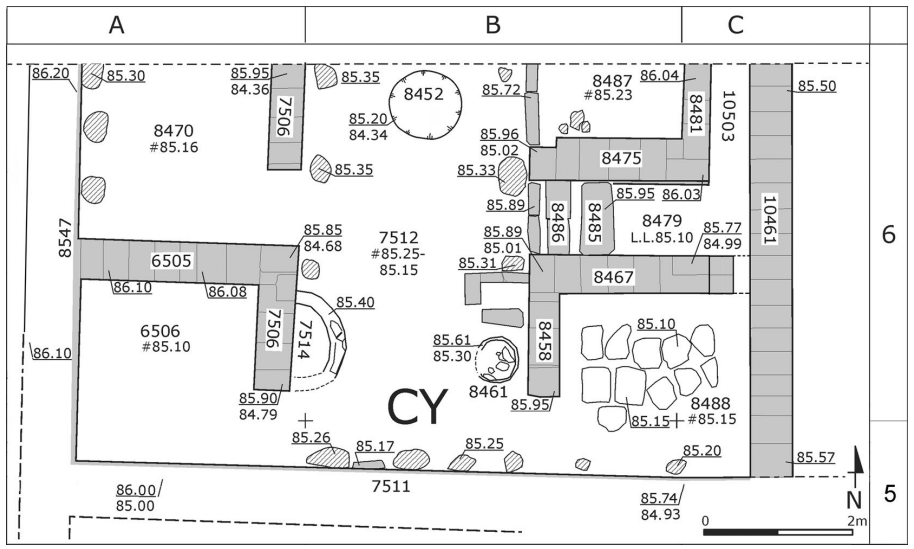 Figure 12.14
Plan of Building CY, Stratum C-2 (1:75)
Panitz-Cohen and Mazar in Mazar et. al. (2020 v.2) - Figure 12.55 -
Section 1 from Mazar et. al. (2020 v.2)
 Figure 12.55
Section 1 (Squares A/6–C/6, looking north)
Panitz-Cohen and Mazar in Mazar et. al. (2020 v.2) - Figure 12.56 -
Section 2 from Mazar et. al. (2020 v.2)
 Figure 12.56
Section 2 (Squares B/5–6, section below C-1 Walls 6420 and 6476, and below C-2 Wall 7506, looking west)
Panitz-Cohen and Mazar in Mazar et. al. (2020 v.2) - Photo 12.58 -
Building CY in Stratum C-2 from Mazar et. al. (2020 v.2)
 Photo 12.58
C-2 Building CY, looking west; meter stick on Floor 7512 (2007)
Panitz-Cohen and Mazar in Mazar et. al. (2020 v.2) - Photo 12.59 -
Wall 7511 in Stratum C-2 from Mazar et. al. (2020 v.2)
 Photo 12.59
C-2 Building CY, looking south at Wall 7511, covered by wood in foundation of C-1 Wall 6444 (2007)
Panitz-Cohen and Mazar in Mazar et. al. (2020 v.2) - Photo 12.60 -
Closeup on Wall 7511 in Stratum C-2 from Mazar et. al. (2020 v.2)
 Photo 12.60
Detail of Wall 7511 (see Photo 12.59), looking southwest (2007)
Panitz-Cohen and Mazar in Mazar et. al. (2020 v.2) - Photo 12.61 -
brick collapse 10412 from Mazar et. al. (2020 v.2)
 Photo 12.61
C-2 Building CY, stones along northern face of Wall 7511, looking south; brick collapse 10412 in center (2010)
Panitz-Cohen and Mazar in Mazar et. al. (2020 v.2) - Photo 12.62 -
Building CY from Mazar et. al. (2020 v.2)
 Photo 12.62
C-2 Building CY, looking east; note blocked entrance to Room 8479; meter stick on Floor 7512 (2007)
Panitz-Cohen and Mazar in Mazar et. al. (2020 v.2) - Photo 12.63 -
Building CY from Mazar et. al. (2020 v.2)
 Photo 12.63
. Eastern part of C-2 Building CY, looking south; note blockage of Room 8479 in center; meter stick on Floor 8488 (2007)
Panitz-Cohen and Mazar in Mazar et. al. (2020 v.2)
- Plan: Figs. 12.12, 12.14
- Section: Figs. 12.55–12.56
- Photos 12.58–12.63
- Pottery: Figs. 13.34–13.37
- Figure 12.9 -
Plan of Stratum C-2 from Mazar et. al. (2020 v.2)
Figure 12.9
Plan of Stratum C-2, west; area in Squares Y/1–2 cut by apiary (1:125)
Panitz-Cohen and Mazar in Mazar et. al. (2020 v.2)
The plan of Stratum C-2 included densely built units of varying architectural plans, most of which were adjoined and all built of the same type of hard yellow bricks. Notable were the absence of stone foundations for the brick walls and the architectural plans which, although fragmentary in most cases, appear to differ from most known Iron Age II buildings in northern Israel. Moreover, they differ from each other, so that each structure was unique.
The finds included red-slipped and hand-burnished, as well as red-painted pottery, mostly sherds, aside from sporadic complete vessels. The single locus that yielded restorable pottery (Locus 1555b with 18 vessels) is stratigraphically attributed to Stratum C-2, while the pottery types recall late Iron IB forms that continued into Iron IIA (see Chapter 24). Additional finds included several clay figurines, seals, three inscriptions (one on an almost-complete storage jar), and iron and bronze objects.
Stratum C-2 appears to have lasted a long time, as evidenced by the thick accumulation of striations in the open areas and inside several of the buildings. Only in three places was there clear evidence of two phases (Buildings CT, CE, and perhaps, the partial unit in Squares Y/3–4) and it is possible that most of the well-built units simply continued to be used, with very minor renovations, during the entire occupation phase.
The lack of Stratum C-2 remains in the area of the apiary of Stratum C-1b (Squares Y–Z/1–2) must be explained as resulting from their intentional removal by the builders of the apiary when they established it on a lower level than the surrounding buildings. This was evidenced by the existence of Stratum C-2 building remains west, north and northeast of the apiary area. It should be noted that the Stratum C-2 floor west of the apiary in Square T/1 was ca. 1.0 m higher than the apiary floor, while in Square B/3 (northeast of the apiary), it was almost at the same level as that of the apiary floor. This comprises additional evidence for the tilt towards the east or southeast, observed in other cases at Tel Rehov as well.
The termination of Stratum C-2 appears to have been brought about by an earthquake, based on the fact that many of the walls showed signs of damage, such as cracks, tilts and sinkage, as well as the large amount of fallen bricks consistently found on the floors in each unit. A possibility is that some of this damage was gradual and not cataclysmic, generating local renovations and internal changes during the course of this stratum. Aside from the layer in Room 1555 (Square R/4) with its 18 complete smashed vessels, the relative lack of whole vessels and other finds in situ on the floors suggests that the final termination of this occupation did not take the inhabitants by surprise and that they had enough time to evacuate. We may think of a series of earthquakes that caused the abandonment and demolition of the houses, some taking place after the abandonment of the town.
- Fig. 12.18 -
Plan of Stratum C-1b from Mazar et. al. (2020 v.2)
Fig. 12.18
Plan of Stratum C-1b (1:200)
Mazar et. al. (2020 v.2) - Fig. 12.19 -
Plan of Stratum C-1a from Mazar et. al. (2020 v.2)
Fig. 12.19
Plan of Stratum C-1a (1:200)
Mazar et. al. (2020 v.2) - Fig. 12.23 -
Isometric view of Area C, Stratum C-1a, looking northwest from Mazar et. al. (2020 v.2)
Fig. 12.23
Isometric view of Area C, Stratum C-1a, looking northwest
Mazar et. al. (2020 v.2)
- Plans: Figs. 12.16–12.53
In the western and northern parts of Area C, the continuity between Strata C-1b and C-1a was marked and, in fact, both should be considered phases of one city, with most of the changes being floor raisings and minor adjustments of walls (Fig. 12.17). However, in the southeastern quarter of the area, the apiary, Building CM and buildings to their east went of use and were replaced by entirely new buildings in Stratum C-1a. Due to this situation, the following description is organized by units, detailing the phases within them that are attributed to C-1b and C-1a. The units of Strata C-1b and C-1a in the southeast of the area are described at the end in separate sections.
Altogether, 23 architectural units were defined; they are presented below according to four main parts.
- Figure 12.24 -
Plan of Stratum C-1b from Mazar et. al. (2020 v.2)

 Figure 12.9
Plan of Stratum C-1b, west (1:125)
Panitz-Cohen and Mazar in Mazar et. al. (2020 v.2) - Figure 12.25 -
Plan of Stratum C-1a from Mazar et. al. (2020 v.2)
Figure 12.9
Plan of Stratum C-1a, west (1:125)
Panitz-Cohen and Mazar in Mazar et. al. (2020 v.2) - Figure 12.97 -
Section 43 (Square R/4, looking north) from Mazar et. al. (2020 v.2)
Figure 12.97
Section 43 (Square R/4, looking north)
Panitz-Cohen and Mazar in Mazar et. al. (2020 v.2) - Photo 12.64 -
Square R/4 from Mazar et. al. (2020 v.2)
 Photo 12.64
Square R/4, looking south, before removal of balk between Squares R–Q/4 (on right); meter stick on C-1b Locus 2446 (compare Photo 12.23 for lower levels in this square) (2000)
Panitz-Cohen and Mazar in Mazar et. al. (2020 v.2) - Photo 12.65 -
Square R/4 from Mazar et. al. (2020 v.2)
 Photo 12.65
Square R/4; C-1a Room 2442, with plaster patch, looking north (1998)
Panitz-Cohen and Mazar in Mazar et. al. (2020 v.2)
- Plan: Figs. 12.24–12.25
- Section: Fig. 12.97
- Photos 12.8, 12.64–12.65
- Pottery: C-1b — Fig. 13.40:8–12; C-1a — Figs. 13.68–13.70
- Figure 12.24 -
Plan of Stratum C-1b from Mazar et. al. (2020 v.2)
Figure 12.24
Plan of Stratum C-1b, west (1:125)
Panitz-Cohen and Mazar in Mazar et. al. (2020 v.2) - Figure 12.65 -
Section 11 from Mazar et. al. (2020 v.2)
Figure 12.65
Section 11 (Squares T/1–4, looking west); the section in Square T/3 north of Walls 1448/4439 was drawn on a line east of Wall 1506
Panitz-Cohen and Mazar in Mazar et. al. (2020 v.2) - Figure 12.66 -
Section 12 from Mazar et. al. (2020 v.2)
Figure 12.66
Section 12 (Square S/4, looking east at walls)
Panitz-Cohen and Mazar in Mazar et. al. (2020 v.2) - Figure 12.67 -
Section 13 from Mazar et. al. (2020 v.2)
Figure 12.67
Section 13 (Square S/3, section below Wall 1448, looking south)
Panitz-Cohen and Mazar in Mazar et. al. (2020 v.2) - Figure 12.68 -
Section 14 from Mazar et. al. (2020 v.2)
Figure 12.67
Section 14 (Square T/3, looking north)
Panitz-Cohen and Mazar in Mazar et. al. (2020 v.2) - Photo 12.66 -
Tilted Wall 2495 in C-1b Building CD excavation from Mazar et. al. (2020 v.2)
 Photo 12.66
C-1b Building CD, looking east; Wall 2495 above C-2 Wall 4434 (2000)
Panitz-Cohen and Mazar in Mazar et. al. (2020 v.2)
- Plan: Fig. 12.24
- Section: Figs. 12.65–12.68
- Photos 12.66
- Pottery: Fig. 13.41
- Figure 12.25 -
Plan of Stratum C-1a from Mazar et. al. (2020 v.2)
Figure 12.25
Plan of Stratum C-1a, west (1:125)
Panitz-Cohen and Mazar in Mazar et. al. (2020 v.2) - Figure 12.65 -
Section 11 from Mazar et. al. (2020 v.2)
Figure 12.65
Section 11 (Squares T/1–4, looking west); the section in Square T/3 north of Walls 1448/4439 was drawn on a line east of Wall 1506
Panitz-Cohen and Mazar in Mazar et. al. (2020 v.2) - Figure 12.69 -
Section 15 from Mazar et. al. (2020 v.2)
Figure 12.69
Section 15 (Squares S–Y/2, looking north) (1:55)
Panitz-Cohen and Mazar in Mazar et. al. (2020 v.2) - Photo 12.70 -
C-1a Piazza CK from Mazar et. al. (2020 v.2)
 Photo 12.70
C-1a Piazza CK, looking east; lower center: Stones 1427 and 1496 (1997)
Panitz-Cohen and Mazar in Mazar et. al. (2020 v.2) - Photo 12.71 -
C-1a Piazza CK from Mazar et. al. (2020 v.2)
 Photo 12.71
C-1a Piazza CK, looking south; Stones 1496, with cooking pots in the center (1997)
Panitz-Cohen and Mazar in Mazar et. al. (2020 v.2)
- Plan: Fig. 12.25
- Section: Figs. 12.65, 12.69
- Photos 12.70–12.71
- Pottery: Figs. 13.71–13.72
- Figure 12.27 -
Plan of Stratum C-1b from Mazar et. al. (2020 v.2)
 Figure 12.27
Plan of Stratum C-1b, north-center (1:125)
Panitz-Cohen and Mazar in Mazar et. al. (2020 v.2) - Figure 12.28 -
Plan of Stratum C-1a from Mazar et. al. (2020 v.2)
 Figure 12.28
Plan of Stratum C-1a, north-center (1:125)
Panitz-Cohen and Mazar in Mazar et. al. (2020 v.2) - Figure 12.62 -
Section 8 from Mazar et. al. (2020 v.2)
Figure 12.62
Section 8 (Square Y/5, looking north)
Panitz-Cohen and Mazar in Mazar et. al. (2020 v.2) - Figure 12.63 -
Section 9 from Mazar et. al. (2020 v.2)
Figure 12.63
Section 9 (Square Y/5, looking west)
Panitz-Cohen and Mazar in Mazar et. al. (2020 v.2) - Figure 12.64 -
Section 10 from Mazar et. al. (2020 v.2)
Figure 12.64
Section 10 (Square T/4, looking east)
Panitz-Cohen and Mazar in Mazar et. al. (2020 v.2) - Photo 12.75 -
Buildings CE, CF and CG from Mazar et. al. (2020 v.2)
 Photo 12.75
Squares T–Z, A/3–5, general view to southeast; Buildings CE, CF and CG (2003)
Panitz-Cohen and Mazar in Mazar et. al. (2020 v.2) - Photo 12.76 -
Building CE, C-1b Room 2489 from Mazar et. al. (2020 v.2)
 Photo 12.76
Building CE, C-1b Room 2489, looking north (1998)
Panitz-Cohen and Mazar in Mazar et. al. (2020 v.2) - Photo 12.77 -
Building CE, looking east at Wall 2454 from Mazar et. al. (2020 v.2)
 Photo 12.77
Building CE, looking east at Wall 2454; note marginal bosses on bricks and wood in foundation (2003)
Panitz-Cohen and Mazar in Mazar et. al. (2020 v.2) - Photo 12.78 -
Building CE; corner of Walls 2454 and 1491 from Mazar et. al. (2020 v.2)
 Photo 12.78
Building CE; corner of Walls 2454 and 1491, looking northeast (2003)
Panitz-Cohen and Mazar in Mazar et. al. (2020 v.2) - Photo 12.79 -
Building CE, C-1a Room 1471 from Mazar et. al. (2020 v.2)
 Photo 12.79
Building CE, C-1a Room 1471, looking west (1997)
Panitz-Cohen and Mazar in Mazar et. al. (2020 v.2) - Photo 12.80 -
Northern rooms of Building CE from Mazar et. al. (2020 v.2)
 Photo 12.80
Squares Y/5-6, northern rooms of Building CE, looking east (2003)
Panitz-Cohen and Mazar in Mazar et. al. (2020 v.2) - Photo 12.81 -
Building CE, Stratum C-1b, Room 6449 from Mazar et. al. (2020 v.2)
 Photo 12.81
Building CE, Stratum C-1b, Room 6449, near corner of Walls 2454 and 1491, looking east (2003)
Panitz-Cohen and Mazar in Mazar et. al. (2020 v.2) - Photo 12.82 -
Destruction debris inBuilding CE, C-1b Room 6449 from Mazar et. al. (2020 v.2)
 Photo 12.82
Building CE, C-1b Room 6449, looking south at bricks against Wall 1491 and chalices in destruction debris (2003)
Panitz-Cohen and Mazar in Mazar et. al. (2020 v.2) - Photo 12.83 -
Detail of marginal bosses on bricks in C-1b Wall 6452 from Mazar et. al. (2020 v.2)
 Photo 12.83
Building CE, detail of marginal bosses on bricks in C-1b Wall 6452 (2003)
Panitz-Cohen and Mazar in Mazar et. al. (2020 v.2) - Photo 12.84 -
Building CE, C-1a Room 6433 from Mazar et. al. (2020 v.2)
 Photo 12.84
Building CE, C-1a Room 6433, looking south at corner of Walls 1491 and 2454 (2003)
Panitz-Cohen and Mazar in Mazar et. al. (2020 v.2) - Photo 12.87 -
C-1 Building CR from Mazar et. al. (2020 v.2)
 Photo 12.87
Squares Y–Z/6, looking south at southwestern corner of C-1 Building CR, cut by Pit 6498 (2005)
Panitz-Cohen and Mazar in Mazar et. al. (2020 v.2)
- Plan: Figs. 12.27–12.28
- Section: Figs. 12.62–12.64
- Photos 12.75–12.84, 12.87
- Pottery: C-1b — Figs. 13.44–13.45; C-1a — Figs. 13.75–13.76
- Figure 12.27 -
Plan of Stratum C-1b from Mazar et. al. (2020 v.2)
Figure 12.27
Plan of Stratum C-1b, north-center (1:125)
Panitz-Cohen and Mazar in Mazar et. al. (2020 v.2) - Figure 12.28 -
Plan of Stratum C-1a from Mazar et. al. (2020 v.2)
Figure 12.28
Plan of Stratum C-1a, north-center (1:125)
Panitz-Cohen and Mazar in Mazar et. al. (2020 v.2) - Figure 12.33 -
Plan of Building CR, early phase of Stratum C-1b from Mazar et. al. (2020 v.2)
 Figure 12.33
Plan of Building CR, early phase of Stratum C-1b; the pits in Squares A, Z/6 are possibly an interim phase between Strata C-2 and C-1b (1:100)
Panitz-Cohen and Mazar in Mazar et. al. (2020 v.2) - Figure 12.34 -
Plan of Stratum C-1b from Mazar et. al. (2020 v.2)
 Figure 12.34
Plan of Stratum C-1b, northeast (1:125)
Panitz-Cohen and Mazar in Mazar et. al. (2020 v.2) - Figure 12.35 -
Plan of Stratum C-1a from Mazar et. al. (2020 v.2)
 Figure 12.35
Plan of Stratum C-1a, northeast (1:125)
Panitz-Cohen and Mazar in Mazar et. al. (2020 v.2) - Figure 12.36 -
Plan of Building CF, Stratum C-1a from Mazar et. al. (2020 v.2)
 Figure 12.36
Plan of Building CF, Stratum C-1a (1:75)
Panitz-Cohen and Mazar in Mazar et. al. (2020 v.2) - Photo 12.85 -
Square Z/6, looking north at C-1a, C-1b and C-2 walls from Mazar et. al. (2020 v.2)
 Photo 12.85
Square Z/6, looking north at C-1a, C-1b and C-2 walls (2003)
Panitz-Cohen and Mazar in Mazar et. al. (2020 v.2) - Photo 12.86 -
Square Z/6 from Mazar et. al. (2020 v.2)
 Photo 12.86
Square Z/6, looking south; meter stick in entrance corridor of C-2 Building CU (2005)
Panitz-Cohen and Mazar in Mazar et. al. (2020 v.2) - Photo 12.87 -
Squares Y–Z/6 from Mazar et. al. (2020 v.2)
 Photo 12.87
Squares Y–Z/6, looking south at southwestern corner of C-1 Building CR, cut by Pit 6498 (2005)
Panitz-Cohen and Mazar in Mazar et. al. (2020 v.2) - Photo 12.88 -
Fractured and displaced blocks of Building CR, late phase of C-1b from Mazar et. al. (2020 v.2)
 Photo 12.88
Building CR, late phase of C-1b; bricks of 6512, looking east (2005)
JW: Note fractured and displaced blocks
Panitz-Cohen and Mazar in Mazar et. al. (2020 v.2) - Photo 12.89 -
Broken Jugs and charred beams in Building CR, C-1a Room 6468 from Mazar et. al. (2020 v.2)
 Photo 12.89
Building CR, C-1a Room 6468, looking south; concentration of jugs along Wall 6461 and charred beams to left (east) (2003)
Panitz-Cohen and Mazar in Mazar et. al. (2020 v.2) - Photo 12.90 -
Building CR, C-1a Room 6468 from Mazar et. al. (2020 v.2)
 Photo 12.90
Building CR, C-1a Room 6468, looking south, after removal of jugs seen in Photo 12.89 (2000)
Panitz-Cohen and Mazar in Mazar et. al. (2020 v.2) - Photo 12.91 -
Buildings CR, CF, and CG from Mazar et. al. (2020 v.2)
 Photo 12.91
General view to south; foreground left: Building CF (2000)
Panitz-Cohen and Mazar in Mazar et. al. (2020 v.2)
- Plan: Fig. 12.27–12.29, 12.33–12.36
- Photos 12.85–12.91
- Pottery: C-1b — Fig.13.48:1–14; C-1a — Figs. 13.77–13.79
- Figure 12.33 -
Plan of Building CR, early phase of Stratum C-1b from Mazar et. al. (2020 v.2)
Figure 12.33
Plan of Building CR, early phase of Stratum C-1b; the pits in Squares A, Z/6 are possibly an interim phase between Strata C-2 and C-1b (1:100)
Panitz-Cohen and Mazar in Mazar et. al. (2020 v.2)
- Plan: Fig. 12.33
- Figure 12.27 -
Plan of Stratum C-1b from Mazar et. al. (2020 v.2)
Figure 12.27
Plan of Stratum C-1b, north-center (1:125)
Panitz-Cohen and Mazar in Mazar et. al. (2020 v.2) - Figure 12.34 -
Plan of Stratum C-1b from Mazar et. al. (2020 v.2)
Figure 12.34
Plan of Stratum C-1b, northeast (1:125)
Panitz-Cohen and Mazar in Mazar et. al. (2020 v.2)
- Plans: Figs. 12.27, 12.34
A layer of soft debris (6479) above the floor included several high quality red-slipped and burnished bowl fragments (Fig. 13.48:1–4); its upper layer might have been a fill laid in preparation for the construction of the subsequent phase.
The western room (5459) did not undergo any change in this phase of Stratum C-1b. It contained a layer of brick debris and charcoal patches, with some bones and sherds. No clear floor level was discerned.
- Figure 12.28 -
Plan of Stratum C-1a from Mazar et. al. (2020 v.2)
Figure 12.28
Plan of Stratum C-1a, north-center (1:125)
Panitz-Cohen and Mazar in Mazar et. al. (2020 v.2) - Figure 12.35 -
Plan of Stratum C-1a from Mazar et. al. (2020 v.2)
Figure 12.35
Plan of Stratum C-1a, northeast (1:125)
Panitz-Cohen and Mazar in Mazar et. al. (2020 v.2) - Figure 12.36 -
Plan of Building CF, Stratum C-1a from Mazar et. al. (2020 v.2)
Figure 12.36
Plan of Building CF, Stratum C-1a (1:75)
Panitz-Cohen and Mazar in Mazar et. al. (2020 v.2)
- Plans: Figs. 12.28, 12.35–12.36
Floors of this stratum were found 0.7–0.8 m above those of the previous phase. The floor of the eastern room (6468) covered the top of Wall 6489, so that this room, like the western one, continued to the north beyond the limit of the excavation. In Room 6468, the floor was covered by a layer of burnt destruction debris, covered in turn by fallen bricks just below topsoil. This room contained 13 loomweights, including several that were arranged in a circle against the eastern face of Wall 6461, and others that surrounded two burnt wooden beams on a north–south axis that appeared to have belonged to a loom (Photos 12.89–12.90). Among the pottery vessels (Figs. 13.77–13.79) were seven jugs, two of which were finely red slipped and burnished (Fig. 13.79:6–7).
- Figure 12.27 -
Plan of Stratum C-1b from Mazar et. al. (2020 v.2)
Figure 12.27
Plan of Stratum C-1b, north-center (1:125)
Panitz-Cohen and Mazar in Mazar et. al. (2020 v.2) - Figure 12.28 -
Plan of Stratum C-1a from Mazar et. al. (2020 v.2)
Figure 12.28
Plan of Stratum C-1a, north-center (1:125)
Panitz-Cohen and Mazar in Mazar et. al. (2020 v.2) - Figure 12.29 -
Building CE, Stratum C-1b; corner of Walls 2454 and 1491 from Mazar et. al. (2020 v.2)
 Figure 12.29
Building CE, Stratum C-1b; elevation: corner of Walls 2454 and 1491 (1:50)
Panitz-Cohen and Mazar in Mazar et. al. (2020 v.2) - Figure 12.33 -
Plan of Building CR, early phase of Stratum C-1b from Mazar et. al. (2020 v.2)
Figure 12.33
Plan of Building CR, early phase of Stratum C-1b; the pits in Squares A, Z/6 are possibly an interim phase between Strata C-2 and C-1b (1:100)
Panitz-Cohen and Mazar in Mazar et. al. (2020 v.2) - Figure 12.34 -
Plan of Stratum C-1b from Mazar et. al. (2020 v.2)
Figure 12.34
Plan of Stratum C-1b, northeast (1:125)
Panitz-Cohen and Mazar in Mazar et. al. (2020 v.2) - Figure 12.35 -
Plan of Stratum C-1a from Mazar et. al. (2020 v.2)
Figure 12.35
Plan of Stratum C-1a, northeast (1:125)
Panitz-Cohen and Mazar in Mazar et. al. (2020 v.2) - Figure 12.36 -
Plan of Building CF, Stratum C-1a from Mazar et. al. (2020 v.2)
Figure 12.36
Plan of Building CF, Stratum C-1a (1:75)
Panitz-Cohen and Mazar in Mazar et. al. (2020 v.2) - Figure 12.58 -
Section 4 from Mazar et. al. (2020 v.2)
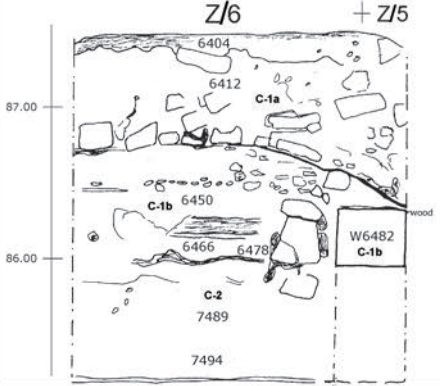 Figure 12.58
Section 4 (Squares Z/5–6, looking east)
Panitz-Cohen and Mazar in Mazar et. al. (2020 v.2) - Figure 12.59 -
Section 5 from Mazar et. al. (2020 v.2)
 Figure 12.59
Section 5 (Square Y/5, section below Bench 5472, looking west)
Panitz-Cohen and Mazar in Mazar et. al. (2020 v.2) - Figure 12.60 -
Section 6 from Mazar et. al. (2020 v.2)
 Figure 12.60
Section 6 (Square Y/5, section below Wall 5431, looking south)
Panitz-Cohen and Mazar in Mazar et. al. (2020 v.2) - Figure 12.61 -
Section 7 from Mazar et. al. (2020 v.2)
 Figure 12.61
Section 7 (Squares Y–Z/4, section below Bench 5468, looking south)
Panitz-Cohen and Mazar in Mazar et. al. (2020 v.2) - Photo 12.91 -
Buildings CR, CF, and CG from Mazar et. al. (2020 v.2)
Photo 12.91
General view to south; foreground left: Building CF (2000)
Panitz-Cohen and Mazar in Mazar et. al. (2020 v.2) - Photo 12.92 -
Building CF from Mazar et. al. (2020 v.2)
 Photo 12.92
General view to south; center: Building CF (2003)
Panitz-Cohen and Mazar in Mazar et. al. (2020 v.2) - Photo 12.93 -
Eastern balk of Square Z/6 from Mazar et. al. (2020 v.2)
 Photo 12.93
Eastern balk of Square Z/6, looking east at section through entrance corridor of Building CF; meter stick on C-2 level (2003)
Panitz-Cohen and Mazar in Mazar et. al. (2020 v.2) - Photo 12.94 -
Eastern part of Building CF from Mazar et. al. (2020 v.2)
 Photo 12.94
Eastern part of Building CF, looking north at northern space and entranceway (with balk) (2003)
Panitz-Cohen and Mazar in Mazar et. al. (2020 v.2) - Photo 12.95 -
Section in the middle of Square Z/5 from Mazar et. al. (2020 v.2)
 Photo 12.95
Section in the middle of Square Z/5, under Floor 5498 in C-1a Building CF, looking south (2003)
Panitz-Cohen and Mazar in Mazar et. al. (2020 v.2) - Photo 12.96 -
C-1a Building CF, broken pottery in southern part of Room 5498 from Mazar et. al. (2020 v.2)
 Photo 12.96
C-1a Building CF, southern part of Room 5498, looking north; center: top of pottery model shrine, wooden beam (loom?) to its north (2001)
Panitz-Cohen and Mazar in Mazar et. al. (2020 v.2) - Photo 12.97 -
C-1a Building CF, Room 5498 from Mazar et. al. (2020 v.2)
 Photo 12.97
C-1a Building CF, Room 5498, looking east at eastern section of Square Z/5 and detail of wooden beam; grinding installation 5456 on right (2003)
Panitz-Cohen and Mazar in Mazar et. al. (2020 v.2) - Photo 12.98 -
C-1a Building CF, Room 5498 from Mazar et. al. (2020 v.2)
 Photo 12.98
C-1a Building CF, grinding installation 5456 in south of Room 5498, looking south; woman crouching west of installation, holding an upper grinding stone found nearby (2003)
Panitz-Cohen and Mazar in Mazar et. al. (2020 v.2) - Photo 12.99 -
C-1a Building CF, Room 5499 from Mazar et. al. (2020 v.2)
 Photo 12.99
C-1a Building CF, Room 5499, looking east; note plastered walls and wooden beams incorporated in floor makeup (2003)
Panitz-Cohen and Mazar in Mazar et. al. (2020 v.2) - Photo 12.100 -
C-1a Building CF, below Room 5499 from Mazar et. al. (2020 v.2)
 Photo 12.100
C-1a Building CF, below Room 5499, looking south; note wooden beams in foundation of Wall 5455 (2003)
Panitz-Cohen and Mazar in Mazar et. al. (2020 v.2) - Photo 12.101 -
Building CF from Mazar et. al. (2020 v.2)
 Photo 12.101
Building CF, the western wing with bench rooms, looking south (2003)
Panitz-Cohen and Mazar in Mazar et. al. (2020 v.2) - Photo 12.102 -
Building CF from Mazar et. al. (2020 v.2)
 Photo 12.102
Building CF, probe under C-1a Room 5444, looking east; C-2 Wall 6454 below (2003)
Panitz-Cohen and Mazar in Mazar et. al. (2020 v.2) - Photo 12.103 -
Building CF from Mazar et. al. (2020 v.2)
 Photo 12.103
Building CF, probe under C-1a Room 5444, looking southwest, after removal of Bench 5468 and part of Bench 5469 (2003)
Panitz-Cohen and Mazar in Mazar et. al. (2020 v.2) - Photo 12.104 -
Building CF, C-1a Room 5444 from Mazar et. al. (2020 v.2)
 Photo 12.104
Building CF, C-1a Room 5444, looking west at Wall 4422, after partial removal of Bench 5469 and layer of fallen ceiling material and rubble below (2003)
Panitz-Cohen and Mazar in Mazar et. al. (2020 v.2) - Photo 12.105 -
Building CF from Mazar et. al. (2020 v.2)
 Photo 12.105
Building CF, detail of Photo 12.104 (2003)
Panitz-Cohen and Mazar in Mazar et. al. (2020 v.2) - Photo 12.106 -
Building CF, top of destruction debris 6401 in C-1a from Mazar et. al. (2020 v.2)
 Photo 12.106
Building CF, looking south; top of destruction debris 6401 in C-1a; right: Room 6435 with grinding stone Installation 6406 (2003)
Panitz-Cohen and Mazar in Mazar et. al. (2020 v.2) - Photo 12.107 -
Building CF, grinding installation 6406 and destruction debris 6401 in Room 6435 from Mazar et. al. (2020 v.2)
 Photo 12.107
Building CF, grinding installation 6406 and destruction debris 6401 in Room 6435, looking south (2003)
Panitz-Cohen and Mazar in Mazar et. al. (2020 v.2) - Photo 12.108 -
Building CF, fragments of altar from Mazar et. al. (2020 v.2)
 Photo 12.108
Building CF, fragments of altar in topsoil of Room 6435 (2003)
Panitz-Cohen and Mazar in Mazar et. al. (2020 v.2) - Photo 12.109 -
Building CF, grinding installation 6406 in Room 6435 from Mazar et. al. (2020 v.2)
 Photo 12.109
Building CF, grinding installation 6406 in Room 6435, looking southwest at western wing of building (2003)
Panitz-Cohen and Mazar in Mazar et. al. (2020 v.2) - Photo 12.110 -
Building CF, Stratum C-1a, grinding Installation 6406 in Room 6435 from Mazar et. al. (2020 v.2)
 Photo 12.110
Building CF, Stratum C-1a, grinding Installation 6406 in Room 6435, looking west (2003)
Panitz-Cohen and Mazar in Mazar et. al. (2020 v.2) - Photo 12.111 -
Smashed vessels on floor of Room 5460 in Building CF from Mazar et. al. (2020 v.2)
 Photo 12.111
Building CF, looking south at western wing; front; smashed vessels on floor of Room 5460; note bricks 5458 in Room 5445 to south (2001)
Panitz-Cohen and Mazar in Mazar et. al. (2020 v.2) - Photo 12.112 -
C-1a Building CF, Room 5444 from Mazar et. al. (2020 v.2)
 Photo 12.112
C-1a Building CF, Room 5444 looking north; large pottery crate in northwestern corner (2001)
Panitz-Cohen and Mazar in Mazar et. al. (2020 v.2) - Photo 12.113 -
Room 5444 from Mazar et. al. (2020 v.2)
 Photo 12.113
Room 5444, looking west; floor and benches exposed (2003)
Panitz-Cohen and Mazar in Mazar et. al. (2020 v.2)
- Plan: Figs. 12.27–12.28, 12.33–12.36
- Section: Figs. 12.58–12.61
- Photos 12.5–12.6, 12.91–12.113
- Pottery: C-1b — Figs. 13.46–13.47, C-1a — Figs. 13.80–13.96
- Figure 12.33 -
Plan of Building CR, early phase of Stratum C-1b from Mazar et. al. (2020 v.2)
Figure 12.33
Plan of Building CR, early phase of Stratum C-1b; the pits in Squares A, Z/6 are possibly an interim phase between Strata C-2 and C-1b (1:100)
Panitz-Cohen and Mazar in Mazar et. al. (2020 v.2)
- Plan: Fig. 12.33
- Figure 12.27 -
Plan of Stratum C-1b from Mazar et. al. (2020 v.2)
Figure 12.27
Plan of Stratum C-1b, north-center (1:125)
Panitz-Cohen and Mazar in Mazar et. al. (2020 v.2) - Figure 12.34 -
Plan of Stratum C-1b from Mazar et. al. (2020 v.2)
Figure 12.34
Plan of Stratum C-1b, northeast (1:125)
Panitz-Cohen and Mazar in Mazar et. al. (2020 v.2)
- Plan: Figs. 12.27, 12.34
- Figure 12.29 -
Building CE, Stratum C-1b; corner of Walls 2454 and 1491 from Mazar et. al. (2020 v.2)
Figure 12.29
Building CE, Stratum C-1b; elevation: corner of Walls 2454 and 1491 (1:50)
Panitz-Cohen and Mazar in Mazar et. al. (2020 v.2) - Figure 12.35 -
Plan of Stratum C-1a from Mazar et. al. (2020 v.2)
Figure 12.35
Plan of Stratum C-1a, northeast (1:125)
Panitz-Cohen and Mazar in Mazar et. al. (2020 v.2) - Figure 12.36 -
Plan of Building CF, Stratum C-1a from Mazar et. al. (2020 v.2)
Figure 12.36
Plan of Building CF, Stratum C-1a (1:75)
Panitz-Cohen and Mazar in Mazar et. al. (2020 v.2)
- Figs. 12.29, 12.35–12.36
- Figure 12.27 -
Plan of Stratum C-1b from Mazar et. al. (2020 v.2)
Figure 12.27
Plan of Stratum C-1b, north-center (1:125)
Panitz-Cohen and Mazar in Mazar et. al. (2020 v.2) - Figure 12.34 -
Plan of Stratum C-1b from Mazar et. al. (2020 v.2)
Figure 12.34
Plan of Stratum C-1b, northeast (1:125)
Panitz-Cohen and Mazar in Mazar et. al. (2020 v.2)
- Plan: Figs. 12.27, 12.34
The northern border of this space was Wall 6493, shared with Building CR (Photos 12.85, 12.91–12.92). On the east, it was bounded by Wall 6408, and on the south, by Wall 6482 (Photos 12.94, 12.116). No entrance in Wall 6482 that would have connected the northern space with the rooms to the south was found, but possibly one had existed above the two preserved courses of this wall.
The space enclosed by these walls contained a patchy floor of red, gray and white striations (6466) at level 86.10 m, with only a few sherds and bones (Photo 12.93). The floor was covered by a layer of soft brown earth (6450) which might have been a leveling fill in preparation for the construction of the Stratum C-1a floor above. Two smooth pink mizi limestone slabs were found on the floor level, one in Square Z/6 and another near the southeastern corner of the space. They were similar to the large stone found in Room 6465 to the south.
A curious feature revealed at the bottom level of the striations in this space was the presence of several very large, amorphic blocks of brick, with a particularly large one in the center (Fig. 12.58). It is possible that these were placed as a kind of leveler above the remains of C-2 Building CU, or were simply discarded during the construction of Building CF and covered by the earliest floor of that building.
- Figure 12.27 -
Plan of Stratum C-1b from Mazar et. al. (2020 v.2)
Figure 12.27
Plan of Stratum C-1b, north-center (1:125)
Panitz-Cohen and Mazar in Mazar et. al. (2020 v.2) - Figure 12.34 -
Plan of Stratum C-1b from Mazar et. al. (2020 v.2)
Figure 12.34
Plan of Stratum C-1b, northeast (1:125)
Panitz-Cohen and Mazar in Mazar et. al. (2020 v.2)
- Plan: Figs. 12.27, 12.34
- Figure 12.29 -
Building CE, Stratum C-1b; corner of Walls 2454 and 1491 (1:50) from Mazar et. al. (2020 v.2)
Figure 12.29
Building CE, Stratum C-1b; elevation: corner of Walls 2454 and 1491 (1:50)
Panitz-Cohen and Mazar in Mazar et. al. (2020 v.2) - Figure 12.35 -
Plan of Stratum C-1a from Mazar et. al. (2020 v.2)
Figure 12.35
Plan of Stratum C-1a, northeast (1:125)
Panitz-Cohen and Mazar in Mazar et. al. (2020 v.2) - Figure 12.36 -
Plan of Building CF, Stratum C-1a from Mazar et. al. (2020 v.2)
Figure 12.36
Plan of Building CF, Stratum C-1a (1:75)
Panitz-Cohen and Mazar in Mazar et. al. (2020 v.2)
- Plans: Figs. 12.29, 12.35–12.36
The slightly higher stump of the erstwhile northern wall (6482) created a situation wherein the floor (6427, 86.50 m) in the area of the former northern space was now 0.35 m higher than the floor (5498, 86.15 m) to the south of this wall; this discrepancy was probably bridged by wooden or brick steps. Floor 6427 in the north was composed of white lime, covered with burnt debris (6417). An oven (6421) was built in the center of the northern space, against the southern face of Wall 6410, about 1.0 m to the west of the location of Oven 7428 of Stratum C-2, yet 2.0 m higher (Photo 12.109). A storage jar (Fig. 13.90:10) and a krater (Fig. 13.84:2) were found right near it, resting on the floor. On the far eastern end of this space, opposite the entrance corridor, was a large, roughly squared, 0.3 m-tall, flat-topped stone. Numerous bones found on and nearby this stone suggest that it was possibly used as a butcher block (Photo 12.94).
Floor 5498 in the south (covering the area of C-1b Room 6465) was composed of thin mud plaster below a layer of soft reddish earth, which covered the top of the cut walls of Stratum C-1b. On the floor was a 0.7 m-thick layer of very burnt destruction debris (5416, 5429, 5439), containing fallen bricks, burnt brick debris, ash and charcoal, ceiling collapse, and 49 complete (restorable and intact) vessels (Figs. 13.80–13.95; Photo 12.96). Other finds included grinding stones and stone vessels, as well as 59 stone loomweights, mostly concentrated around a wooden beam that apparently represented a loom in the middle of this space (Photos 12.96–12.97; Fig. 12.35). To the north of this beam was a poorly preserved installation (5481) composed of a low, curving parapet of clay; to its north were short pieces of wood and numerous fragments of an oven or a low-fired clay vat; none of these elements could be reconstructed due to the fierce destruction. Built against the southern wall of this space (5437) was a grinding stone installation (5456), like that found in Room 6435 (6406) (Photos 12.96, 12.98), although this one was a semi-circle attached to the wall, while the latter was a complete oval (described below). This installation was composed of a low round-topped clay parapet, 0.9 m at its widest diameter, in which a large lower grinding stone was set on an east– west axis; it was not found tilted, as it was in Installation 6406. Two complete upper grinding stones were found nearby. A unique find in this room, located 1.5 m north of the entranceway in Wall 5437, was a pottery model shrine (Chapter 35, No. 36), resting directly on the floor, its opening facing north. Its upper part was broken off, found overturned just to the southeast of the lower part, with a Hippo jar (Fig. 13.92:3) lying smashed on top of it; another storage jar (Fig. 13.89:9) was found to its east (Photo 12.96). The top of the model shrine was adorned with a unique scene of figures in relief, showing what appears to be a lion(?) grasping two human heads in its claws. Inside the box was light gray ashy material that contained an animal jaw bone and a tooth. A jug containing grain (Fig. 13.93:5) was found in this room as well. Some grain was also found spilled on the floor near the abovementioned storage jars. Grain from the jug was submitted to 14C dating (Chapter 48, Sample R35); the average calibrated dates were 922–850 BCE (1σ) and 970–838 BCE (2σ).
- Figure 12.27 -
Plan of Stratum C-1b from Mazar et. al. (2020 v.2)
Figure 12.27
Plan of Stratum C-1b, north-center (1:125)
Panitz-Cohen and Mazar in Mazar et. al. (2020 v.2) - Figure 12.29 -
Building CE, Stratum C-1b; corner of Walls 2454 and 1491 (1:50) from Mazar et. al. (2020 v.2)
Figure 12.29
Building CE, Stratum C-1b; elevation: corner of Walls 2454 and 1491 (1:50)
Panitz-Cohen and Mazar in Mazar et. al. (2020 v.2) - Figure 12.35 -
Plan of Stratum C-1a from Mazar et. al. (2020 v.2)
Figure 12.35
Plan of Stratum C-1a, northeast (1:125)
Panitz-Cohen and Mazar in Mazar et. al. (2020 v.2) - Figure 12.36 -
Plan of Building CF, Stratum C-1a from Mazar et. al. (2020 v.2)
Figure 12.36
Plan of Building CF, Stratum C-1a (1:75)
Panitz-Cohen and Mazar in Mazar et. al. (2020 v.2)
- Plans: Figs. 12.27, 12.29, 12.35–12.36
The room was filled with almost 1.0 m of very burnt destruction debris; the top layer (5426) was virtually sterile and contained extremely hard brick material and fallen bricks, as well as ceiling material, while the remainder of the debris (5461) was extremely burnt and rich in finds, including 46 intact and smashed vessels (Figs. 13.80–13.95), 19 of them storage jars, which were mostly stacked against the eastern wall. One of these jars was found full of a powdery white substance, most likely an organic material that had burnt, while another contained grain. Additional finds included grinding stones and other worked stones, a large clay ‘footbath’ (Fig. 13.96a:11), and 15 loomweights, concentrated in the entranceway (5500) (Table 12.15). In the southeastern corner of the room was a concentration of extremely burnt pinkish brick that had pulverized. This appears to have been some installation that was too damaged by the fire to define.
- Figure 12.27 -
Plan of Stratum C-1b from Mazar et. al. (2020 v.2)
Figure 12.27
Plan of Stratum C-1b, north-center (1:125)
Panitz-Cohen and Mazar in Mazar et. al. (2020 v.2)
- Plan: Fig. 12.27
- Walls 4413 and 4422 (Squares Y–Z/4) had wooden beams incorporated in their foundations; this was a consistent characteristic typical of all Stratum C-1b construction in Area C, but was almost never found in walls that were first built in Stratum C-1a.
- The bricks in the lower courses of the northern face of Wall 4413 and eastern face of Wall 4422 (southern end) had two vertical protrusions, or marginal bosses, on each end, which was a characteristic found in other walls clearly dated to Stratum C-1b in the adjacent Building CE and in the unit north of Building CD (see above).
- The wooden beams incorporated in the foundation of Wall 4479, seen in its southern face in Square Z/4 and clearly related to Stratum C-1b, were probably, based on their levels, the continuation of the beams in the foundation of Wall 4413, which ran adjacent to it on the north and served as the inner southern wall of the western wing.
- The floors abutted the lowest course of these walls.
The length of the hall was 8.6–8.8 m (due to the angle of the southern wall, 4413) and its width, 2.7 m. Its interior was revealed only in probes under the floors and benches of Stratum C-1a (Figs. 12.59– 12.61; Photos 12.102–12.105). The lowest layer was 0.4 m-thick, composed of soft, smooth, burnt black material (5488, 5487, 5475, from north to south), which abutted the lowest course of the walls, on the level of the wooden beams in their foundations, as revealed in those spots where we removed the benches of the later phase. This black layer apparently represents the floor; directly below it were the remains of Stratum C-2 Building CU. Finds from this black layer included red-slipped and hand-burnished pottery, mostly sherds, but several complete or almost-complete vessels as well (Figs. 13.46–13.47), along with loomweights, beads, stoppers, grinding stones, bone objects and some grain (Table 12.14). This layer was covered by a 0.4 m-thick layer of burnt rubble (5478, 5479, 5463, from north to south), composed of hard burnt chunks of reddish brick, gray ash, bits of charcoal and large segments of collapsed ceiling material, some of which lay flat (Photos 12.102–12.105). This rubble abutted the surrounding walls in each room and was covered by a thin layer of whitish material (phytolith?), on which the Stratum C-1a floors, walls and benches were laid.
- Figure 12.29 -
Building CE, Stratum C-1b; corner of Walls 2454 and 1491 (1:50) from Mazar et. al. (2020 v.2)
Figure 12.29
Building CE, Stratum C-1b; elevation: corner of Walls 2454 and 1491 (1:50)
Panitz-Cohen and Mazar in Mazar et. al. (2020 v.2) - Figure 12.35 -
Plan of Stratum C-1a from Mazar et. al. (2020 v.2)
Figure 12.35
Plan of Stratum C-1a, northeast (1:125)
Panitz-Cohen and Mazar in Mazar et. al. (2020 v.2) - Figure 12.36 -
Plan of Building CF, Stratum C-1a from Mazar et. al. (2020 v.2)
Figure 12.36
Plan of Building CF, Stratum C-1a (1:75)
Panitz-Cohen and Mazar in Mazar et. al. (2020 v.2)
- Plans: Figs. 12.29, 12.35–12.36
Along the north–south walls were lines of bricks, most of them 0.35 m wide, while others were narrower (0.3 m) or wider (0.45 m). All were preserved 0.25–0.35 m high (two courses); their height above the abutting floors ranged from 0.1– 0.25 m, while in the northern room they were flush with the floor. These were understood as benches, and they joined with those found under the three east–west cross walls. The bottom level of the benches was ca. 0.65 m above that of the outer walls of the building to which they were attached, and they were clearly built on top of the rubble and collapse layer ascribed to Stratum C-1b, described above (Figs. 12.59–12.61). This rubble also abutted the very bottom of the benches, suggesting that they were slightly sunk into that debris when constructed. The north–south benches lining the eastern and western walls of this wing run on one continuous line. This was particularly noticeable on the east, where the bench ran contiguously along the western face of Wall 5414. The benches were all composed of identical bricks that had been burnt to an almost stone-like consistency and to a pinkish color.
The Stratum C-1a floors in each room were composed of white lime and abutted the upper course of the benches. On these floors was a thick layer of burnt destruction debris with many finds. Following is a description of the rooms from north to south (6435, 5460, 5445, 5444)
- Figure 12.34 -
Plan of Stratum C-1b from Mazar et. al. (2020 v.2)
Figure 12.34
Plan of Stratum C-1b, northeast (1:125)
Panitz-Cohen and Mazar in Mazar et. al. (2020 v.2) - Figure 12.35 -
Plan of Stratum C-1a from Mazar et. al. (2020 v.2)
Figure 12.35
Plan of Stratum C-1a, northeast (1:125)
Panitz-Cohen and Mazar in Mazar et. al. (2020 v.2) - Figure 12.38 -
Plan of Buildings CW, CQ1 and CQ3, Stratum C-1a from Mazar et. al. (2020 v.2)
 Figure 12.38
Plan of Buildings CW, CQ1 and CQ3, Stratum C-1a (1:75)
Panitz-Cohen and Mazar in Mazar et. al. (2020 v.2) - Figure 12.55 -
Section 1 from Mazar et. al. (2020 v.2)
 Figure 12.55
Section 1 (Squares A/6–C/6, looking north)
Panitz-Cohen and Mazar in Mazar et. al. (2020 v.2) - Figure 12.56 -
Section 2 from Mazar et. al. (2020 v.2)
 Figure 12.56
Section 2 (Squares B/5–6, section below C-1 Walls 6420 and 6476, and below C-2 Wall 7506, looking west)
Panitz-Cohen and Mazar in Mazar et. al. (2020 v.2) - Photo 12.114 -
C-1a Buildings CW, CQ1, CQ2 (west half excavated) from Mazar et. al. (2020 v.2)
 Photo 12.114
C-1a Buildings CW, CQ1, CQ2 (west half excavated), general view to southeast (2005)
Panitz-Cohen and Mazar in Mazar et. al. (2020 v.2) - Photo 12.115 -
Debris on Floor 8430 in C-1a Building CW Mazar et. al. (2020 v.2)
 Photo 12.115
C-1a Building CW, eastern part, looking west (2007)
JW:Debris on floor 8430
Panitz-Cohen and Mazar in Mazar et. al. (2020 v.2) - Photo 12.116 -
C-1a Building CW, looking west, Rooms 6411 and 6438 from Mazar et. al. (2020 v.2)
 Photo 12.116
C-1a Building CW, looking west, Rooms 6411 and 6438 (2003)
Panitz-Cohen and Mazar in Mazar et. al. (2020 v.2) - Photo 12.117 -
C-1a Building CW, looking south; destruction debris and vessels in Room 6411 from Mazar et. al. (2020 v.2)
 Photo 12.117
C-1a Building CW, looking south; destruction debris and vessels in Room 6411 (2003)
Panitz-Cohen and Mazar in Mazar et. al. (2020 v.2) - Photo 12.118 -
C-1a Building CW, Room 6411 from Mazar et. al. (2020 v.2)
 Photo 12.118
C-1a Building CW, Room 6411, looking west; concentration of loomweights on western end of Bench 6496 (2003)
Panitz-Cohen and Mazar in Mazar et. al. (2020 v.2) - Photo 12.119 -
C-1a Skeleton in Square C/6 from Mazar et. al. (2020 v.2)
 Photo 12.119
Square C/6, skeleton (8472) east of Wall 8424 of C-1a Building CW, looking west (2007)
Panitz-Cohen and Mazar in Mazar et. al. (2020 v.2)
- Plans: Figs. 12.34–12.35, 12.38
- Sections: Figs. 12.55–12.56
- Photos 12.114–12.119
- Pottery: C-1b — Figs. 13.48:15–20; C-1a — Figs. 13.97–13.102
- Figure 12.34 -
Plan of Stratum C-1b from Mazar et. al. (2020 v.2)
Figure 12.34
Plan of Stratum C-1b, northeast (1:125)
Panitz-Cohen and Mazar in Mazar et. al. (2020 v.2) - Figure 12.35 -
Plan of Stratum C-1a from Mazar et. al. (2020 v.2)
Figure 12.35
Plan of Stratum C-1a, northeast (1:125)
Panitz-Cohen and Mazar in Mazar et. al. (2020 v.2) - Figure 12.57 -
Section 3 from Mazar et. al. (2020 v.2)
 Figure 12.57
Section 3 (Squares A/4–5, looking east)
Panitz-Cohen and Mazar in Mazar et. al. (2020 v.2) - Photo 12.120 -
Wall 7413 of C-1a Building CQ2 tilted southward towards the street from Mazar et. al. (2020 v.2)
 Photo 12.120
C-1a Buildings CQ1 and CQ2 and street (Squares Z, A–C/4) to their south, looking southwest (2007)
Panitz-Cohen and Mazar in Mazar et. al. (2020 v.2) - Photo 12.121 -
C-1a Building CQ1; destruction debris in western rooms from Mazar et. al. (2020 v.2)
 Photo 12.121
C-1a Building CQ1, looking west; destruction debris in western rooms (2007)
Panitz-Cohen and Mazar in Mazar et. al. (2020 v.2) - Photo 12.122 -
C-1a Building CQ1 from Mazar et. al. (2020 v.2)
 Photo 12.122
C-1a Building CQ1, looking west; floors of western rooms (see Photo 12.121) (2007)
Panitz-Cohen and Mazar in Mazar et. al. (2020 v.2) - Photo 12.123 -
Wall 7413 of C-1a Building CQ2 tilted southward from Mazar et. al. (2020 v.2)
 Photo 12.123
C-1a Building CQ2, looking west; meter stick on Floor 7500 (2007)
Panitz-Cohen and Mazar in Mazar et. al. (2020 v.2) - Photo 12.124 -
C-1a Building CQ1; destruction debris in Room 7490 from Mazar et. al. (2020 v.2)
 Photo 12.124
C-1a Building CQ2, looking west; destruction debris in Room 7490 (2005)
Panitz-Cohen and Mazar in Mazar et. al. (2020 v.2) - Photo 12.125 -
Tilted Wall in C-1a Building CQ2 from Mazar et. al. (2020 v.2)
 Photo 12.125
C-1a Building CQ2, wood in foundation of Walls 7413 and 7459 (2007)
Panitz-Cohen and Mazar in Mazar et. al. (2020 v.2) - Photo 12.126 -
Destruction debris in Room 7500 of C-1a Building CQ1 from Mazar et. al. (2020 v.2)
 Photo 12.126
C-1a Building CQ2, looking west; destruction debris (7442) in western half of Room 7500 (2005)
Panitz-Cohen and Mazar in Mazar et. al. (2020 v.2)
- Plans: Figs. 12.34–12.35, 12.38
- Section: Fig. 12.57
- Photos 12.120–12.126
- Pottery: Figs. 13.103–13.119
- Figure 12.34 -
Plan of Stratum C-1b from Mazar et. al. (2020 v.2)
Figure 12.34
Plan of Stratum C-1b, northeast (1:125)
Panitz-Cohen and Mazar in Mazar et. al. (2020 v.2) - Figure 12.35 -
Plan of Stratum C-1a from Mazar et. al. (2020 v.2)
Figure 12.35
Plan of Stratum C-1a, northeast (1:125)
Panitz-Cohen and Mazar in Mazar et. al. (2020 v.2) - Figure 12.38 -
Plan of Buildings CW, CQ1 and CQ3, Stratum C-1a from Mazar et. al. (2020 v.2)
Figure 12.38
Plan of Buildings CW, CQ1 and CQ3, Stratum C-1a (1:75)
Panitz-Cohen and Mazar in Mazar et. al. (2020 v.2)
- Plans: Figs. 12.34–12.35, 12.38
- Figure 12.18 -
Plan of Stratum C-1b from Mazar et. al. (2020 v.2)
Figure 12.18
Plan of Stratum C-1b (1:200)
Panitz-Cohen and Mazar in Mazar et. al. (2020 v.2) - Figure 12.19 -
Plan of Stratum C-1a from Mazar et. al. (2020 v.2)
Figure 12.19
Plan of Stratum C-1a (1:200)
Panitz-Cohen and Mazar in Mazar et. al. (2020 v.2) - Figure 12.39 -
Plan of Stratum C-1b from Mazar et. al. (2020 v.2)
 Figure 12.39
Plan of Stratum C-1b, south-center and southeast, with apiary (1:125)
Panitz-Cohen and Mazar in Mazar et. al. (2020 v.2) - Figure 12.40 -
Plan of Buildings CG, CH, CM and apiary, Stratum C-1b from Mazar et. al. (2020 v.2)
 Figure 12.40
Plan of Buildings CG, CH, CM and apiary, Stratum C-1b (1:75)
Panitz-Cohen and Mazar in Mazar et. al. (2020 v.2) - Figure 12.68 -
Section 14 from Mazar et. al. (2020 v.2)
Figure 12.67
Section 14 (Square T/3, looking north)
Panitz-Cohen and Mazar in Mazar et. al. (2020 v.2) - Figure 12.69 -
Section 15 from Mazar et. al. (2020 v.2)
Figure 12.69
Section 15 (Squares S–Y/2, looking north) (1:55)
Panitz-Cohen and Mazar in Mazar et. al. (2020 v.2) - Figure 12.73 -
Section 19 from Mazar et. al. (2020 v.2)
 Figure 12.73
Section 19 (Squares T–Y/1, looking south
Panitz-Cohen and Mazar in Mazar et. al. (2020 v.2) - Figure 12.76 -
Section 22 from Mazar et. al. (2020 v.2)
 Figure 12.76
Section 22 (Squares T–Y/3, looking north in Room 2460
Panitz-Cohen and Mazar in Mazar et. al. (2020 v.2) - Figure 12.77 -
Section 23 from Mazar et. al. (2020 v.2)
 Figure 12.77
Section 23 (Square Y/3, section below Wall 2411, looking east)
Panitz-Cohen and Mazar in Mazar et. al. (2020 v.2) - Photo 12.92 -
Buildings CF, CW, and CG from Mazar et. al. (2020 v.2)
Photo 12.92
General view to south; center: Building CF (2003)
Panitz-Cohen and Mazar in Mazar et. al. (2020 v.2) - Photo 12.127 -
C-1 Building CG and C-2 Buildings CA and CB from Mazar et. al. (2020 v.2)
 Photo 12.127
C-1 Building CG in center, looking west; C-2 Buildings CA and CB in background. Amihai Mazar sitting on floor of C-1b Building CM (2000)
Panitz-Cohen and Mazar in Mazar et. al. (2020 v.2) - Photo 12.128 -
Tilted and Deformed Walls in Building CG from Mazar et. al. (2020 v.2)
 Photo 12.128
Building CG, detail of corner of Walls 2439 (left) and 1416 (right), with wooden beams in foundations, looking south (2000)
Panitz-Cohen and Mazar in Mazar et. al. (2020 v.2) - Photo 12.129 -
Tilted and Collapsed Walls in Building CG from Mazar et. al. (2020 v.2)
 Photo 12.129
Detail of additional layers of wood under Wall 2439 (see Photo 12.128), looking south; note C-1b brick collapse on left (south); entrance in C-2 Wall 2505 on right (2000)
Panitz-Cohen and Mazar in Mazar et. al. (2020 v.2) - Photo 12.130 -
Wood Beam Foundations in Building CG from Mazar et. al. (2020 v.2)
 Photo 12.130
Building CG, looking south; wooden beams in wall foundations and below floor in Room 2444 (1998)
Panitz-Cohen and Mazar in Mazar et. al. (2020 v.2) - Photo 12.131 -
Destruction and slippage of lower brick courses in Room 2441 from Mazar et. al. (2020 v.2)
 Photo 12.131
C-1b Building CG, Room 2441, looking north at destruction and slippage of lower brick courses in Wall 2411 (2000)
Panitz-Cohen and Mazar in Mazar et. al. (2020 v.2) - Photo 12.132 -
Destruction and slippage of lower brick courses in Room 2441 from Mazar et. al. (2020 v.2)
 Photo 12.132
Same view as Photo 12.131, looking north, after excavation of destruction debris in southern part; wooden beams appearing just under floor level (2000)
Panitz-Cohen and Mazar in Mazar et. al. (2020 v.2) - Photo 12.133 -
Collapse of Wall 2439 from Mazar et. al. (2020 v.2)
 Photo 12.133
Building CG, Room 2411, looking south at collapse of Wall 2439 above wooden beams, below floor of Room 2441 (2000)
Panitz-Cohen and Mazar in Mazar et. al. (2020 v.2) - Photo 12.134 -
Foundation trench of C-1 Wall 1416 from Mazar et. al. (2020 v.2)
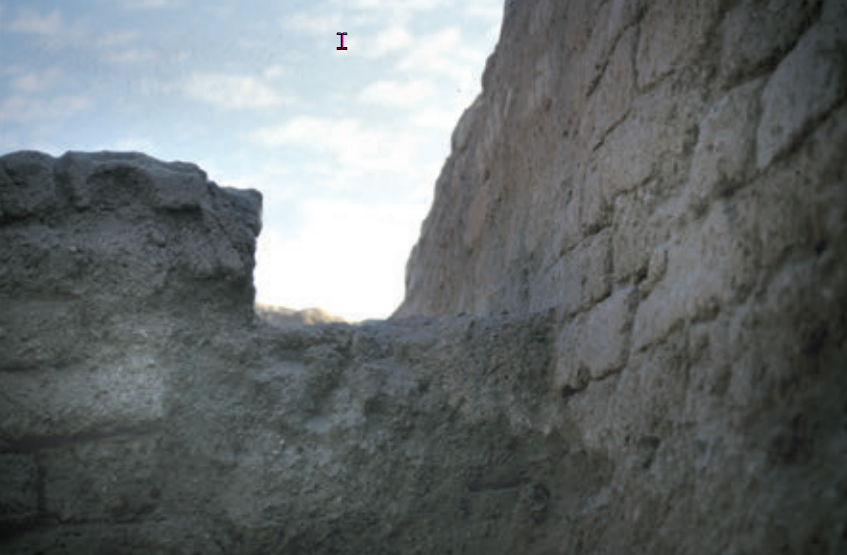 Photo 12.134
Foundation trench of C-1 Wall 1416, cutting eastern end of C-2 Wall 1483 (1998)
Panitz-Cohen and Mazar in Mazar et. al. (2020 v.2) - Photo 12.135 -
Brick collapse from C-1b Building CG from Mazar et. al. (2020 v.2)
 Photo 12.135
Square Y/2, looking northeast; right: Wall 4443 of C-1a Building CL; left: Fill 5430 above brick collapse from C-1b Building CG (2001)
Panitz-Cohen and Mazar in Mazar et. al. (2020 v.2)
- Plans: Figs. 12.18–12.19, 12.39–12.40
- Sections: Figs. 12.68–12.69, 12.73, 12.76–12.77
- Photos: 12.92, 12.127–12.135;
- Pottery: Figs. 13.52–13.55
- Figure 12.18 -
Plan of Stratum C-1b from Mazar et. al. (2020 v.2)
Figure 12.18
Plan of Stratum C-1b (1:200)
Panitz-Cohen and Mazar in Mazar et. al. (2020 v.2) - Figure 12.39 -
Plan of Stratum C-1b from Mazar et. al. (2020 v.2)
Figure 12.39
Plan of Stratum C-1b, south-center and southeast, with apiary (1:125)
Panitz-Cohen and Mazar in Mazar et. al. (2020 v.2) - Figure 12.40 -
Plan of Buildings CG, CH, CM and apiary, Stratum C-1b from Mazar et. al. (2020 v.2)
Figure 12.40
Plan of Buildings CG, CH, CM and apiary, Stratum C-1b (1:75)
Panitz-Cohen and Mazar in Mazar et. al. (2020 v.2) - Figure 12.75 -
Section 21 from Mazar et. al. (2020 v.2)
 Figure 12.75
Section 21 (Square Y/3, looking north at Wall 4465)
Panitz-Cohen and Mazar in Mazar et. al. (2020 v.2) - Figure 12.78 -
Section 24 from Mazar et. al. (2020 v.2)
 Figure 12.78
Section 24 (Square Z/3, looking east)
Panitz-Cohen and Mazar in Mazar et. al. (2020 v.2) - Figure 12.79 -
Section 25 from Mazar et. al. (2020 v.2)
 Figure 12.79
Section 25 (Squares T–Y/3, looking south)
Panitz-Cohen and Mazar in Mazar et. al. (2020 v.2) - Photo 12.136 -
Stratigraphic section through walls in C-2 and C-1b from Mazar et. al. (2020 v.2)
 Photo 12.136
Squares Y/3–4; C-2 Walls 4515, 4516 and 4465 under C-1b Walls 4432 and 4479 (right), looking west; left: higher stump of Wall 4432; top: Wall 2411 of Building CG (2000)
Panitz-Cohen and Mazar in Mazar et. al. (2020 v.2) - Photo 12.137 -
Row of chalices along eastern face of Wall 2411 from Mazar et. al. (2020 v.2)
 Photo 12.137
Building CM, row of chalices along eastern face of Wall 2411, looking west; meter stick on top of Wall 4432, not yet exposed (2000)
Panitz-Cohen and Mazar in Mazar et. al. (2020 v.2) - Photo 12.138 -
Row of chalices along eastern face of Wall 2411 from Mazar et. al. (2020 v.2)
 Photo 12.138
Building CM, row of chalices along eastern face of Wall 2411, looking west; meter stick on top of Wall 4432, not yet exposed (2000)
Panitz-Cohen and Mazar in Mazar et. al. (2020 v.2) - Photo 12.139 -
C-1b Building CM from Mazar et. al. (2020 v.2)
 Photo 12.139
C-1b Building CM, looking west; Installation 4448 in center (after removal of cooking jug; see Photo 12.140) (2000)
Panitz-Cohen and Mazar in Mazar et. al. (2020 v.2) - Photo 12.140 -
Cracked Cooking Jar on the floor in C-1b Building CM from Mazar et. al. (2020 v.2)
 Photo 12.140
C-1b Building CM, cooking jug in Installation 4448 (2000)
Panitz-Cohen and Mazar in Mazar et. al. (2020 v.2) - Photo 12.141 -
C-1b Building CM from Mazar et. al. (2020 v.2)
 Photo 12.141
C-1b Building CM, looking west; left: concentration of wood near balk between Squares Y–Z/2–3 (2000)
Panitz-Cohen and Mazar in Mazar et. al. (2020 v.2)
- Plans: Figs. 12.18, 12.39–12.40;
- Sections: Figs. 12.75, 12.78–12.79
- Photos 12.136–12.142
- Pottery: Figs. 13.49–13.51
- Figure 12.18 -
Plan of Stratum C-1b from Mazar et. al. (2020 v.2)
Figure 12.18
Plan of Stratum C-1b (1:200)
Panitz-Cohen and Mazar in Mazar et. al. (2020 v.2) - Figure 12.39 -
Plan of Stratum C-1b from Mazar et. al. (2020 v.2)
Figure 12.39
Plan of Stratum C-1b, south-center and southeast, with apiary (1:125)
Panitz-Cohen and Mazar in Mazar et. al. (2020 v.2) - Figure 12.40 -
Plan of Buildings CG, CH, CM and apiary, Stratum C-1b from Mazar et. al. (2020 v.2)
Figure 12.40
Plan of Buildings CG, CH, CM and apiary, Stratum C-1b (1:75)
Panitz-Cohen and Mazar in Mazar et. al. (2020 v.2) - Figure 12.70 -
Section 16 from Mazar et. al. (2020 v.2)
 Figure 12.70
Section 16 (Squares S–Y/1, looking north) (1:55)
Panitz-Cohen and Mazar in Mazar et. al. (2020 v.2) - Figure 12.72 -
Section 18 from Mazar et. al. (2020 v.2)
 Figure 12.72
Section 18 (Squares T–Y/2, looking north at Wall 1437 and subsidiary balk to its east)
Panitz-Cohen and Mazar in Mazar et. al. (2020 v.2) - Figure 12.73 -
Section 19 from Mazar et. al. (2020 v.2)
Figure 12.73
Section 19 (Squares T–Y/1, looking south
Panitz-Cohen and Mazar in Mazar et. al. (2020 v.2) - Figure 12.74 -
Section 20 from Mazar et. al. (2020 v.2)
 Figure 12.74
Section 20 (Squares T–Y/1, looking south at Wall 2426)
Panitz-Cohen and Mazar in Mazar et. al. (2020 v.2) - Photo 12.143 -
C-1b Building CH from Mazar et. al. (2020 v.2)
 Photo 12.143
C-1b Building CH, looking west; right: southwestern corner of Building CG (1998)
Panitz-Cohen and Mazar in Mazar et. al. (2020 v.2) - Photo 12.144 -
Collapsed and Tilted Walls along a lineament from Mazar et. al. (2020 v.2)
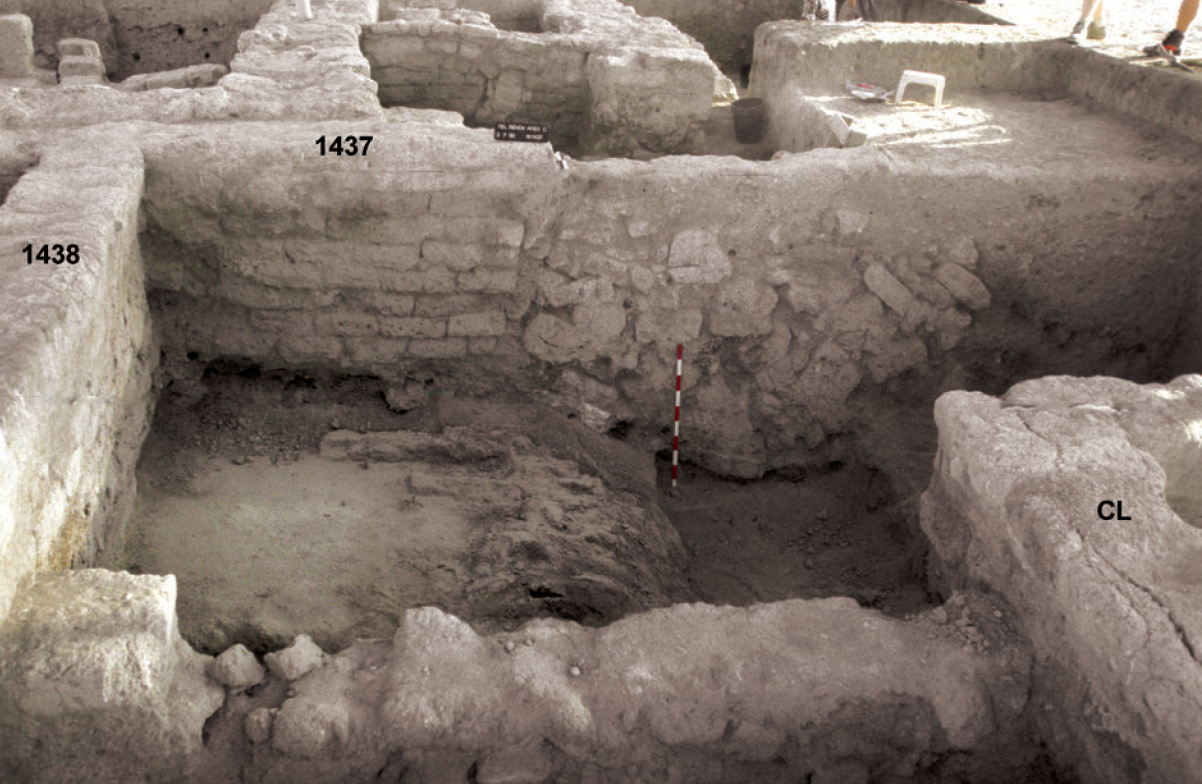 Photo 12.144
Squares T–Y/1–2, northern part of C-1b Building CH, looking north; lower right: northwestern corner of C-1a Building CL, Stratum C-1a (2000)
JW: Note the axis of deformation and slumping from foreground to background
Panitz-Cohen and Mazar in Mazar et. al. (2020 v.2) - Photo 12.145 -
Wood foundations from Mazar et. al. (2020 v.2)
 Photo 12.145
C-1b Building CH, detail of wood in the foundation of Wall 1437 at its corner with Wall 1438, looking north (1998)
JW: Note the axis of deformation and slumping from foreground to background
Panitz-Cohen and Mazar in Mazar et. al. (2020 v.2) - Photo 12.146 -
Collapsed Wall from Mazar et. al. (2020 v.2)
 Photo 12.146
Square Y/1, C-1b Building CH, looking east ; wooden construction and collapsed Wall 2426 (right) cut by Wall 2413 of Building CL, Stratum C-1a (1998)
Panitz-Cohen and Mazar in Mazar et. al. (2020 v.2) - Photo 12.147 -
Collapsed Wall from Mazar et. al. (2020 v.2)
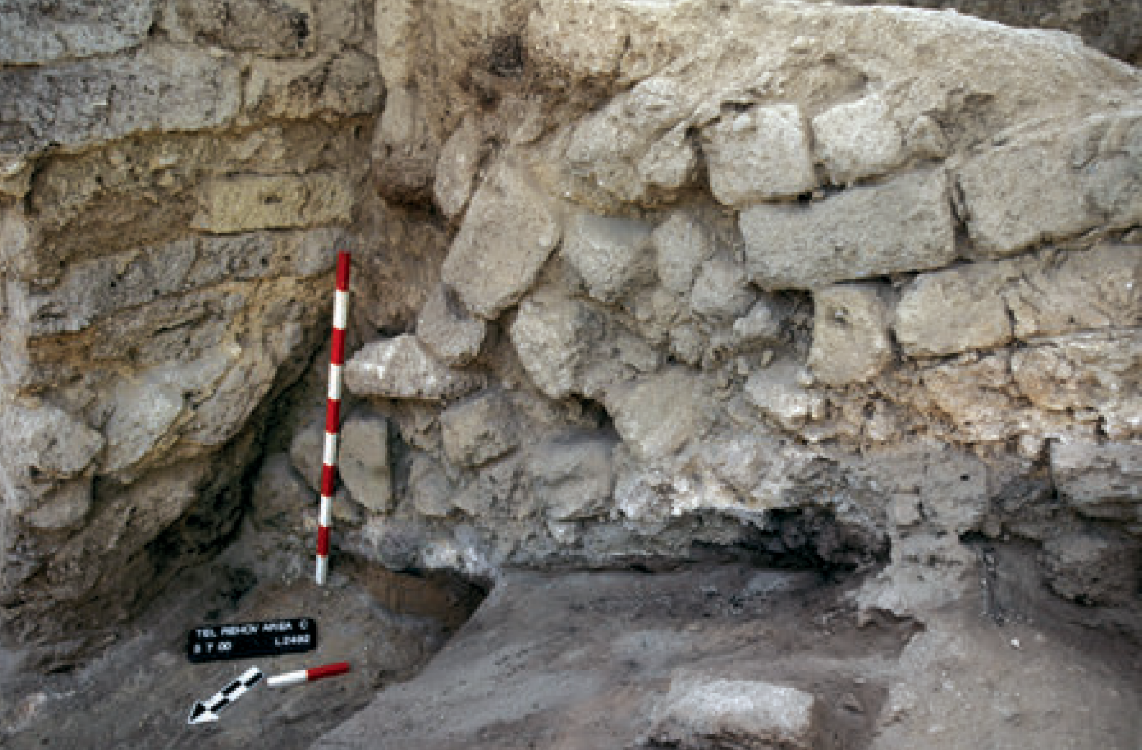 Photo 12.147
Square Y/1, C-1b Building CH, looking south; detail of eastern end of collapsed Wall 2426, cut by foundation trench of Wall 2413 of C-1a Building CL (2000)
Panitz-Cohen and Mazar in Mazar et. al. (2020 v.2) - Photo 12.148 -
Wooden Construction from Mazar et. al. (2020 v.2)
 Photo 12.148
Wooden construction through C-1b Building CH, looking west; eastern end of C-2 Wall 2465 cut by wood (1998)
Panitz-Cohen and Mazar in Mazar et. al. (2020 v.2) - Photo 12.149 -
Wooden Construction from Mazar et. al. (2020 v.2)
 Photo 12.149
As Photo 12.148, looking east (1998)
Panitz-Cohen and Mazar in Mazar et. al. (2020 v.2)
- (Plans: Figs. 12.18, 12.39–12.40, 12.44
- Sections: Figs. 12.70, 12.72–12.74
- Photos 12.3, 12.143–12.149;
- Pottery: Figs. 13.56–13.59
- Figure 12.39 -
Plan of Stratum C-1b from Mazar et. al. (2020 v.2)
Figure 12.39
Plan of Stratum C-1b, south-center and southeast, with apiary (1:125)
Panitz-Cohen and Mazar in Mazar et. al. (2020 v.2) - Figure 12.40 -
Plan of Buildings CG, CH, CM and apiary, Stratum C-1b from Mazar et. al. (2020 v.2)
Figure 12.40
Plan of Buildings CG, CH, CM and apiary, Stratum C-1b (1:75)
Panitz-Cohen and Mazar in Mazar et. al. (2020 v.2) - Figure 12.44 -
Plan of Building CH and apiary from Mazar et. al. (2020 v.2)
 Figure 12.44
Plan of Building CH and apiary (scale 1:100)
Panitz-Cohen and Mazar in Mazar et. al. (2020 v.2) - Figure 12.73 -
Section 19 from Mazar et. al. (2020 v.2)
Figure 12.73
Section 19 (Squares T–Y/1, looking south
Panitz-Cohen and Mazar in Mazar et. al. (2020 v.2) - Figure 12.80 -
Section 26 from Mazar et. al. (2020 v.2)
 Figure 12.80
Section 26 (Square Z/1, western end, looking south)
Panitz-Cohen and Mazar in Mazar et. al. (2020 v.2) - Figure 12.81 -
Section 27 from Mazar et. al. (2020 v.2)
 Figure 12.81
Section 27 (Squares Y–Z/2, looking north)
Panitz-Cohen and Mazar in Mazar et. al. (2020 v.2) - Figure 12.82 -
Section 28 from Mazar et. al. (2020 v.2)
 Figure 12.82
Section 28 (Squares Y–Z, A/1, looking north)
Panitz-Cohen and Mazar in Mazar et. al. (2020 v.2) - Figure 12.83 -
Section 29 from Mazar et. al. (2020 v.2)
 Figure 12.83
Section 29 (Squares Z/1–2, looking east)
Panitz-Cohen and Mazar in Mazar et. al. (2020 v.2) - Figure 12.84 -
Section 30 from Mazar et. al. (2020 v.2)
 Figure 12.84
Section 30 (Square Z/20, looking east)
Panitz-Cohen and Mazar in Mazar et. al. (2020 v.2) - Figure 12.85 -
Section 31 from Mazar et. al. (2020 v.2)
 Figure 12.85
Section 31 (Square Z/20, looking west)
Panitz-Cohen and Mazar in Mazar et. al. (2020 v.2) - Figure 12.86 -
Section 32 from Mazar et. al. (2020 v.2)
 Figure 12.86
Section 32 (Square Y/1, looking east along Wall 4443)
Panitz-Cohen and Mazar in Mazar et. al. (2020 v.2) - Figure 12.87 -
Section 33 from Mazar et. al. (2020 v.2)
 Figure 12.87
Section 33 (Square Y/1, section below Wall 2504, looking south)
Panitz-Cohen and Mazar in Mazar et. al. (2020 v.2) - Photo 12.150 -
General view of C-1b apiary from Mazar et. al. (2020 v.2)
 Photo 12.150
Squares Y–Z/1–2, general view of C-1b apiary, looking northeast; section on east with remains of C-1a Building CL covering apiary destruction debris (2007)
Panitz-Cohen and Mazar in Mazar et. al. (2020 v.2) - Photo 12.151 -
Another view of C-1b apiary from Mazar et. al. (2020 v.2)
 Photo 12.151
As Photo 12.150, looking southeast, before exposure of the eastern wall and southern hives in middle row (2007)
Panitz-Cohen and Mazar in Mazar et. al. (2020 v.2) - Photo 12.152 -
Another view of C-1b apiary from Mazar et. al. (2020 v.2)
 Photo 12.152
View of apiary, looking southeast, with eastern closing wall 9453 superimposed by C-1a Wall 9406 (2008)
Panitz-Cohen and Mazar in Mazar et. al. (2020 v.2) - Photo 12.153 -
Tilted Wall 5453 from Mazar et. al. (2020 v.2)
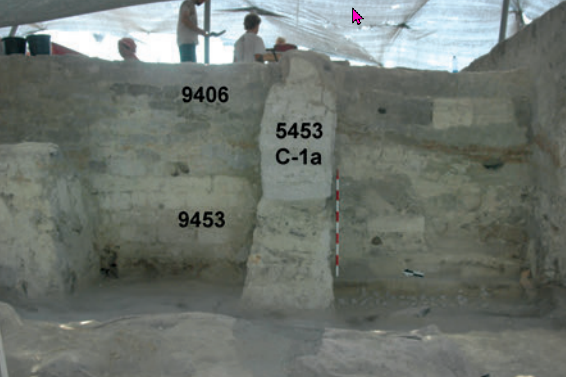 Photo 12.153
Square A/1, looking east at eastern wall of apiary (9453), below C-1a Wall 9406 (2008)
Panitz-Cohen and Mazar in Mazar et. al. (2020 v.2) - Photo 12.154 -
Collapsed western part of Wall 8469 from Mazar et. al. (2020 v.2)
 Photo 12.154
Squares Y/2– 3; collapsed western part of Wall 8469 abutting Wall 2411 of Building CG, looking west; note wood in foundation of both walls (2007)
Panitz-Cohen and Mazar in Mazar et. al. (2020 v.2) - Photo 12.155 -
Collapsed bricks in western end of Wall 8469 from Mazar et. al. (2020 v.2)
 Photo 12.155
Square Y/2, looking north at collapsed bricks in western end of Wall 8469, near corner with Wall 2411 (2007)
Panitz-Cohen and Mazar in Mazar et. al. (2020 v.2) - Photo 12.156 -
North-central and northwestern part of apiary from Mazar et. al. (2020 v.2)
 Photo 12.156
North-central and northwestern part of apiary, looking west (2007)
Panitz-Cohen and Mazar in Mazar et. al. (2020 v.2) - Photo 12.157 -
Tilted Wall 8469 from Mazar et. al. (2020 v.2)
 Photo 12.157
Western row of hives abutting Wall 8469, looking west (2007)
Panitz-Cohen and Mazar in Mazar et. al. (2020 v.2) - Photo 12.158 -
View of the apiary from Mazar et. al. (2020 v.2)
 Photo 12.158
Apiary, looking north; meter stick on white floor (8460) between eastern and central rows of hives (2008)
Panitz-Cohen and Mazar in Mazar et. al. (2020 v.2) - Photo 12.159 -
Central and western part of the apiary from Mazar et. al. (2020 v.2)
 Photo 12.159
Central and western part of the apiary, looking north; upper left: collapse of Room 2441, C-1b Building CG (2007)
Panitz-Cohen and Mazar in Mazar et. al. (2020 v.2) - Photo 12.160 -
Northern end of the apiary from Mazar et. al. (2020 v.2)
 Photo 12.160
Square Z/2–3, northern end of apiary, looking northwest; lower right: eastern row of hives (2012)
Panitz-Cohen and Mazar in Mazar et. al. (2020 v.2)
- Plans: Figs. 12.39–12.40, 12.44
- Sections: Figs. 12.73, 12.80–12.87
- Photos 12.8, 12.150–12.160; additional illustrations in Chapter 14A
- Pottery: Figs. 13.60–13.67
- Figure 12.18 -
Plan of Stratum C-1b from Mazar et. al. (2020 v.2)
Figure 12.18
Plan of Stratum C-1b (1:200)
Panitz-Cohen and Mazar in Mazar et. al. (2020 v.2) - Figure 12.39 -
Plan of Stratum C-1b from Mazar et. al. (2020 v.2)
Figure 12.39
Plan of Stratum C-1b, south-center and southeast, with apiary (1:125)
Panitz-Cohen and Mazar in Mazar et. al. (2020 v.2) - Figure 12.48 -
Plan of Building CZ, Stratum C-1b from Mazar et. al. (2020 v.2)
 Figure 12.48
Plan of Building CZ, Stratum C-1b (1:75)
Panitz-Cohen and Mazar in Mazar et. al. (2020 v.2) - Figure 12.89 -
Section 35 from Mazar et. al. (2020 v.2)
 Figure 12.89
Section 35 (Square B/3, section below Wall 10518 (looking south)
Panitz-Cohen and Mazar in Mazar et. al. (2020 v.2) - Figure 12.90 -
Section 36 from Mazar et. al. (2020 v.2)
 Figure 12.90
Section 36 (Squares B/2–3, section below Wall 10464, looking west)
Panitz-Cohen and Mazar in Mazar et. al. (2020 v.2) - Figure 12.91 -
Section 37 from Mazar et. al. (2020 v.2)
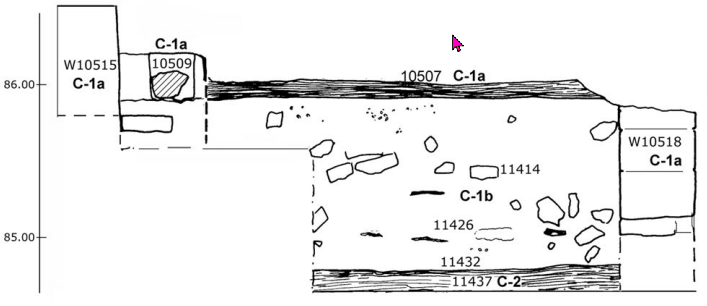 Figure 12.91
Section 37 (Square C/3, looking east)
Panitz-Cohen and Mazar in Mazar et. al. (2020 v.2) - Figure 12.92 -
Section 38 from Mazar et. al. (2020 v.2)
 Figure 12.92
Section 38 (Squares B–C/3, looking north at Wall 10515 and entrance)
Panitz-Cohen and Mazar in Mazar et. al. (2020 v.2) - Figure 12.94 -
Section 40 from Mazar et. al. (2020 v.2)
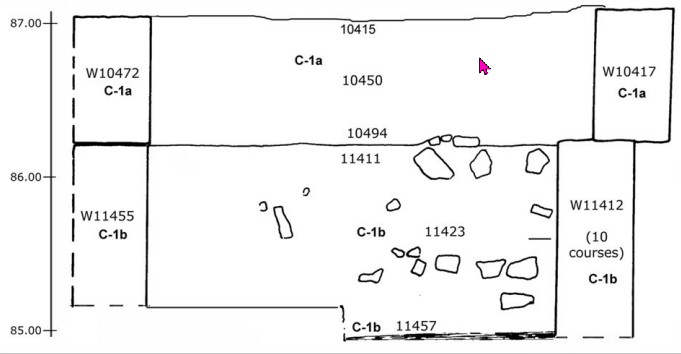 Figure 12.94
Section 40 (Square A/3, looking east)
Panitz-Cohen and Mazar in Mazar et. al. (2020 v.2) - Figure 12.95 -
Section 41 from Mazar et. al. (2020 v.2)
 Figure 12.95
Section 41 (Squares A/2–3, looking west at entrance in Wall 9406 and C-1b walls below)
Panitz-Cohen and Mazar in Mazar et. al. (2020 v.2) - Photo 12.161 -
Southeastern part of Area C from Mazar et. al. (2020 v.2)
 Photo 12.161
Southeastern part of Area C (2012)
(photo: David Silverman)
Panitz-Cohen and Mazar in Mazar et. al. (2020 v.2) - Photo 12.162 -
C-1b Building CZ from Mazar et. al. (2020 v.2)
 Photo 12.162
C-1b Building CZ, looking north (2012)
Panitz-Cohen and Mazar in Mazar et. al. (2020 v.2) - Photo 12.163 -
C-1b Building CZ, southwestern room (11449) from Mazar et. al. (2020 v.2)
 Photo 12.163
C-1b Building CZ, southwestern room (11449), looking west (2012)
Panitz-Cohen and Mazar in Mazar et. al. (2020 v.2) - Photo 12.164 -
C-1b Building CZ, looking south at Wall 11427 below C-1a Wall 10482 from Mazar et. al. (2020 v.2)
 Photo 12.164
Square A/2, C-1b Building CZ, looking south at Wall 11427 below C-1a Wall 10482 (2012)
Panitz-Cohen and Mazar in Mazar et. al. (2020 v.2) - Photo 12.165 -
C-1b Building CZ, southeastern part from Mazar et. al. (2020 v.2)
 Photo 12.165
Squares B–C/2–3, C-1b Building CZ, southeastern part, looking south (2010)
Panitz-Cohen and Mazar in Mazar et. al. (2020 v.2) - Photo 12.166 -
C-1a Wall 10464 sealing the fallen bricks and debris on Floor 1142 of C-1b Building CZ from Mazar et. al. (2020 v.2)
 Photo 12.166
C-1b Building CZ, looking west at C-1a Wall 10464 sealing the fallen bricks and debris on Floor 11426 (2012)
Panitz-Cohen and Mazar in Mazar et. al. (2020 v.2) - Photo 12.167 -
Pillar bases of C-1a Building CX set directly on top of fallen bricks from Mazar et. al. (2020 v.2)
 Photo 12.167
C-1b Building CZ, central courtyard, looking south; pillar bases of C-1a Building CX set directly on top of fallen bricks (2012)
Panitz-Cohen and Mazar in Mazar et. al. (2020 v.2) - Photo 12.168 -
Layered Walls in C-1b Building CZ from Mazar et. al. (2020 v.2)
 Photo 12.168
Square C/2, C-1b Building CZ, southeastern room, looking south at Walls 11458 and 11421; note entrance in eastern end of walls, blocked on top by C-1a Wall 10409, Building CP (2012)
Panitz-Cohen and Mazar in Mazar et. al. (2020 v.2)
- Plans: Figs. 12.18, 12.39, 12.48
- Sections: Figs. 12.89–12.92, 12.94–12.95
- Photos 12.9, 12.161–12.168
- Pottery: Fig. 13.51:17
- Figure 12.19 -
Plan of Stratum C-1a from Mazar et. al. (2020 v.2)
Figure 12.19
Plan of Stratum C-1a (1:200)
Panitz-Cohen and Mazar in Mazar et. al. (2020 v.2) - Figure 12.50 -
Plan of Stratum C-1a, south-center and southeast from Mazar et. al. (2020 v.2)
 Figure 12.50
Plan of Stratum C-1a, south-center and southeast (1:125)
Panitz-Cohen and Mazar in Mazar et. al. (2020 v.2) - Figure 12.51 -
Plan of Buildings CQ3 and CX, Stratum C-1a from Mazar et. al. (2020 v.2)
 Figure 12.51
Plan of Buildings CQ3 and CX, Stratum C-1a (1:75)
Panitz-Cohen and Mazar in Mazar et. al. (2020 v.2) - Figure 12.88 -
Section 34 from Mazar et. al. (2020 v.2)
 Figure 12.88
Section 34 (A–C/2, looking north) 2504, looking south)
Panitz-Cohen and Mazar in Mazar et. al. (2020 v.2) - Figure 12.94 -
Section 40 from Mazar et. al. (2020 v.2)
Figure 12.94
Section 40 (Square A/3, looking east)
Panitz-Cohen and Mazar in Mazar et. al. (2020 v.2) - Figure 12.95 -
Section 41 from Mazar et. al. (2020 v.2)
Figure 12.95
Section 41 (Squares A/2–3, looking west at entrance in Wall 9406 and C-1b walls below)
Panitz-Cohen and Mazar in Mazar et. al. (2020 v.2) - Photo 12.169 -
General view of Area C from Mazar et. al. (2020 v.2)
 Photo 12.169
General view of Area C, looking west (2010)
Panitz-Cohen and Mazar in Mazar et. al. (2020 v.2) - Photo 12.170 -
General view of southeastern part of Area C from Mazar et. al. (2020 v.2)
 Photo 12.170
General view of southeastern part of Area C, looking west (2010)
Panitz-Cohen and Mazar in Mazar et. al. (2020 v.2) - Photo 12.171 -
C-1a Building CQ3 from Mazar et. al. (2020 v.2)
 Photo 12.171
C-1a Building CQ3, looking north at entrance in Wall 10472; top of C-1b Wall 11407 in foreground (2012)
Panitz-Cohen and Mazar in Mazar et. al. (2020 v.2) - Photo 12.172 -
C-1a Building CQ3; wooden beams below bricks in threshold of Wall 9406 from Mazar et. al. (2020 v.2)
 Photo 12.172
C-1a Building CQ3; wooden beams below bricks in threshold of Wall 9406, looking west.
Panitz-Cohen and Mazar in Mazar et. al. (2020 v.2) - Photo 12.173 -
C-1a Building CQ3, southern part of Room 10460 from Mazar et. al. (2020 v.2)
 Photo 12.173
C-1a Building CQ3, southern part of Room 10460, looking west from southern part of Building CX (2010)
Panitz-Cohen and Mazar in Mazar et. al. (2020 v.2) - Photo 12.174 -
Smashed object on the floor of Room 10495 from Mazar et. al. (2020 v.2)
 Photo 12.174
C-1a Building CQ3, Room 10495, Installation 10505, looking south (2010)
Panitz-Cohen and Mazar in Mazar et. al. (2020 v.2) - Photo 12.175 -
Room 10495 from Mazar et. al. (2020 v.2)
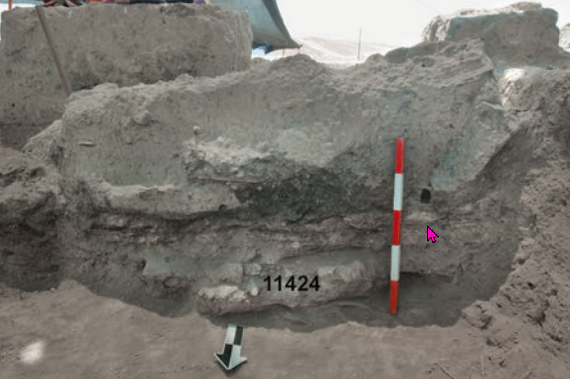 Photo 12.175
C-1a Building CQ3, Room 10495, brick parapet in south of Installation 10505, looking south; note stones of 11424 below (2012)
Panitz-Cohen and Mazar in Mazar et. al. (2020 v.2) - Photo 12.176 -
Looking south from Room 10495 to Room 10452 from Mazar et. al. (2020 v.2)
 Photo 12.176
C-1a Building CQ3, looking south from Room 10495 to Room 10452 (excavation below floor); Stones 11424 under wall of Installation 10505 (see Photo 12.175 (2012)
Panitz-Cohen and Mazar in Mazar et. al. (2020 v.2) - Photo 12.177 -
Room 10452 from Mazar et. al. (2020 v.2)
 Photo 12.177
C-1a Building CQ3, Room 10452, looking north at entrance (2010)
Panitz-Cohen and Mazar in Mazar et. al. (2020 v.2) - Photo 12.178 -
Smashed pottery and destruction debris against southern wall of Room 10452 from Mazar et. al. (2020 v.2)
 Photo 12.178
C-1a Building CQ3, Room 10452, looking south; smashed pottery and destruction debris against southern wall, on plastered installation (see Photo 12.179) (2010)
Panitz-Cohen and Mazar in Mazar et. al. (2020 v.2) - Photo 12.179 -
Room 10452 from Mazar et. al. (2020 v.2)
 Photo 12.179
C-1a Building CQ3, Room 10452, looking south at plastered installation against southern wall (2010)
Panitz-Cohen and Mazar in Mazar et. al. (2020 v.2)
- Plans: Figs. 12.19, 12.50–12.51
- Sections: Figs. 12.88, 12.94–12.95
- Photos 12.169–12.179
- Pottery: Figs. 13.130–13.135
- Figure 12.19 -
Plan of Stratum C-1a from Mazar et. al. (2020 v.2)
Figure 12.19
Plan of Stratum C-1a (1:200)
Panitz-Cohen and Mazar in Mazar et. al. (2020 v.2) - Figure 12.50 -
Plan of Stratum C-1a, south-center and southeast from Mazar et. al. (2020 v.2)
Figure 12.50
Plan of Stratum C-1a, south-center and southeast (1:125)
Panitz-Cohen and Mazar in Mazar et. al. (2020 v.2) - Figure 12.51 -
Plan of Buildings CQ3 and CX, Stratum C-1a from Mazar et. al. (2020 v.2)
Figure 12.51
Plan of Buildings CQ3 and CX, Stratum C-1a (1:75)
Panitz-Cohen and Mazar in Mazar et. al. (2020 v.2) - Figure 12.88 -
Section 34 from Mazar et. al. (2020 v.2)
Figure 12.88
Section 34 (A–C/2, looking north) 2504, looking south)
Panitz-Cohen and Mazar in Mazar et. al. (2020 v.2) - Figure 12.89 -
Section 35 from Mazar et. al. (2020 v.2)
Figure 12.89
Section 35 (Square B/3, section below Wall 10518 (looking south)
Panitz-Cohen and Mazar in Mazar et. al. (2020 v.2) - Figure 12.90 -
Section 36 from Mazar et. al. (2020 v.2)
Figure 12.90
Section 36 (Squares B/2–3, section below Wall 10464, looking west)
Panitz-Cohen and Mazar in Mazar et. al. (2020 v.2) - Figure 12.91 -
Section 37 from Mazar et. al. (2020 v.2)
Figure 12.91
Section 37 (Square C/3, looking east)
Panitz-Cohen and Mazar in Mazar et. al. (2020 v.2) - Figure 12.92 -
Section 38 from Mazar et. al. (2020 v.2)
Figure 12.92
Section 38 (Squares B–C/3, looking north at Wall 10515 and entrance)
Panitz-Cohen and Mazar in Mazar et. al. (2020 v.2) - Photo 12.180 -
C-1a Building CX, Room 10507 from Mazar et. al. (2020 v.2)
 Photo 12.180
C-1a Building CX, Room 10507, looking southwest; Egon Lass standing on Bench 10502 (cut in center) (2010)
Panitz-Cohen and Mazar in Mazar et. al. (2020 v.2) - Photo 12.181 -
C-1a Building CX, Room 10507 from Mazar et. al. (2020 v.2)
 Photo 12.181
C-1a Building CX, Room 10507, looking north (2010)
Panitz-Cohen and Mazar in Mazar et. al. (2020 v.2) - Photo 12.182 -
Entrance into Building CX from Mazar et. al. (2020 v.2)
 Photo 12.182
Entrance into Building CX, looking north, with wooden threshold and plaster pilaster on the east (2012)
Panitz-Cohen and Mazar in Mazar et. al. (2020 v.2) - Photo 12.183 -
C-1a Building CX from Mazar et. al. (2020 v.2)
 Photo 12.183
C-1a Building CX, Locus 11413 in front of entrance, with loomweights, looking west (2012)
Panitz-Cohen and Mazar in Mazar et. al. (2020 v.2) - Photo 12.184 -
C-1a Building CX, Room 10507 from Mazar et. al. (2020 v.2)
 Photo 12.184
C-1a Building CX, brick pilaster 10517 in Room 10507; meter stick against balk between Squares C/2–3, looking north (2010)
Panitz-Cohen and Mazar in Mazar et. al. (2020 v.2) - Photo 12.185 -
C-1a Building CX, vessels in destruction debris in center of Room 10507 from Mazar et. al. (2020 v.2)
 Photo 12.185
C-1a Building CX, vessels in destruction debris in center of Room 10507, against Bench 10502, looking north (2010)
Panitz-Cohen and Mazar in Mazar et. al. (2020 v.2) - Photo 12.186 -
C-1a Building CX, Locus 10431, vessels in burnt destruction debris from Mazar et. al. (2020 v.2)
 Photo 12.186
C-1a Building CX, Locus 10431, vessels in burnt destruction debris, looking west (2010)
Panitz-Cohen and Mazar in Mazar et. al. (2020 v.2) - Photo 12.187 -
C-1a Building CX from Mazar et. al. (2020 v.2)
 Photo 12.187
C-1a Building CX, Locus 10499, looking east at cache of loomweights and wooden beam (2010)
Panitz-Cohen and Mazar in Mazar et. al. (2020 v.2) - Photo 12.188 -
C-1a Building CX from Mazar et. al. (2020 v.2)
 Photo 12.188
C-1a Building CX, looking north at Installation 10509 against Wall 10515. Amihai Mazar in front of entrance to building (2010)
Panitz-Cohen and Mazar in Mazar et. al. (2020 v.2)
- Plans: Figs. 12.19, 12.50–12.51
- Sections: Figs. 12.88–12.92
- Photos 12.170, 12.180–12.188
- Pottery: Figs. 13.136–13.142
Two means of roof support were identified in the large inner space of this building. One was a north–south row of five pillar bases, each made of an unworked flat stone, located in the northern half, 2.0 m east of the western wall and 3.4 m west of the eastern wall (Photos 12.180–12.181). The two northernmost bases bore traces of the burnt wood pillars on them. The other means of roof support was a unique square pilaster of gray bricks (10517), located to the southeast of the row of pillar bases and standing 1.3 m high (Photo 12.184). A large smooth stone was found southeast of this pilaster.
A T-shaped brick bench or screen wall (10502) was located along the northern two-thirds of the western wall (10464); it protruded 1.3 m into the center of the structure (Photo 12.181). Two vessels were placed in the southern niche formed by this ‘T’, a large barrel krater (Fig. 13.137:2) and a storage jar (Fig. 13.140:14) (Photo 12.185). Another bench (10491) ran along the eastern end of the southern wall (10409), built above the eastern end of C-1b Wall 11421 of Building CZ, separated by a 0.4 m-thick fill.
The floor of Building CX (10481, 10497 and 10507) was composed of reddish-brown clay interspersed with black burnt material and gray ash. In the area between the pillar bases and Bench 10502 was a strip of small travertine chunks that were incorporated into the floor (10477; Photos 12.180– 12.181). They were not suitable to serve as a pavement, since they were very loosely laid, and perhaps they played a role in some activity that took place here. They recall a similar strip of stones (7479) set in the floor of Courtyard 7471 in Building CW. Immediately below the floor level in the southeastern part of the building were the tops of C-1b Walls 10500 and 10518 of Building CZ (Figs. 12.89, 12.91; Photo 12.181).
Like the other units, Building CX was found full of very burnt destruction debris, with fallen bricks, charcoal pieces, ash, and large a amount of pottery, with 122 complete or almost-complete vessels, many of them in situ (Figs. 12.88, 13.136– 13.142; Photos 12.185–12.186). Just inside and west of the entrance, a cooking jug (Fig. 13.138:8) and part of a storage jar were found (Fig. 13.140:17; Photo 12.183). Concentrations of loomweights here, to the south of Installation 10509, and just west of the northern end of the row of pillar bases, found along with fragments of burnt wood beams (Photos 12.181, 12.187–12.188), indicate these had belonged to one, or possibly two looms. Altogether, 164 loomweights were found in this building, mostly in the northern part (Chapter 39).
Two grinding installations were located close to the entrance. One (10509), just to its west, was attached to the northern wall, comprising a large lower grinding stone slab fronted on the east by a small shallow plastered basin which was slightly lower and served as a receptacle for the grain as it was ground; it was surrounded by a flat-topped brick ‘rim’ (Photo 12.188). An additional lower grinding stone slab fragment was found below the upper one, apparently as a support, and a nicely worked rectangular smoothed pink mizi limestone, apparently in secondary use, was set under the eastern end of the large lower grinding, between it and the receptacle on the south. On the northern ‘rim’ of the plastered basin was a fine flint blade and a small upper grinding stone; two large upper grinding stones were found just to the west. To the east of Installation 10509, in front of the entranceway, was still another large lower grinding stone slab fragment, found overturned (Photo 12.188). The second installation (10519), less well preserved, was found just south of the entrance, close to the eastern wall. It comprised a similar round plastered receptacle with a brick bordering it on its west; a rounded lower grinding stone was set inside it and another such stone was found to the west of the brick.
A large concentration of grain was found inside a storage jar in the southern part of the building (10431). The grain was submitted to 14C dating (Chapter 48, Sample R36). One of the two measurements provided the calibrated dates 978–848 BCE (1σ) and 996–838 BCE (2σ); the other was way too high and was defined as an outlier.
Notably, no ovens or other cooking installations were found in any of the buildings, CQ1, CQ2, CQ3 and CX, although such installations were found in the larger buildings, CF and CP.
- Figure 12.19 -
Plan of Stratum C-1a from Mazar et. al. (2020 v.2)
Figure 12.19
Plan of Stratum C-1a (1:200)
Panitz-Cohen and Mazar in Mazar et. al. (2020 v.2) - Figure 12.50 -
Plan of Stratum C-1a, south-center and southeast from Mazar et. al. (2020 v.2)
Figure 12.50
Plan of Stratum C-1a, south-center and southeast (1:125)
Panitz-Cohen and Mazar in Mazar et. al. (2020 v.2) - Figure 12.52a -
Plan of Building CP, Stratum C-1a from Mazar et. al. (2020 v.2)
 Figure 12.52a
Plan of Building CP, Stratum C-1a (1:75)
Panitz-Cohen and Mazar in Mazar et. al. (2020 v.2) - Figure 12.52b -
Isometric reconstruction, Building CP, Stratum C-1a from Mazar et. al. (2020 v.2)
 Figure 12.52b
Isometric reconstruction, Building CP, Stratum C-1a, looking northwest
Panitz-Cohen and Mazar in Mazar et. al. (2020 v.2) - Figure 12.52c -
Plan of sub-floor brick construction in Building CP, Stratum C-1a from Mazar et. al. (2020 v.2)
 Figure 12.52c
Plan of sub-floor brick construction in Building CP, Stratum C-1a (1:100)
Panitz-Cohen and Mazar in Mazar et. al. (2020 v.2) - Figure 12.92 -
Section 38 from Mazar et. al. (2020 v.2)
Figure 12.92
Section 38 (Squares B–C/3, looking north at Wall 10515 and entrance)
Panitz-Cohen and Mazar in Mazar et. al. (2020 v.2) - Photo 12.169 -
General view of Area C from Mazar et. al. (2020 v.2)
Photo 12.169
General view of Area C, looking west (2010)
Panitz-Cohen and Mazar in Mazar et. al. (2020 v.2) - Photo 12.170 -
General view of southeastern part of Area C from Mazar et. al. (2020 v.2)
Photo 12.170
General view of southeastern part of Area C, looking west (2010)
Panitz-Cohen and Mazar in Mazar et. al. (2020 v.2) - Photo 12.189 -
C-1a Building CP, with sub-floor construction in Room 10476 from Mazar et. al. (2020 v.2)
 Photo 12.189
C-1a Building CP, with sub-floor construction in Room 10476 (top center) (2012)
(photo: David Silverman)
Panitz-Cohen and Mazar in Mazar et. al. (2020 v.2) - Photo 12.190 -
C-1a Building CP on the floor level from Mazar et. al. (2020 v.2)
 Photo 12.190
C-1a Building CP on the floor level, looking west; meter stick in Room 10476 (2012)
Panitz-Cohen and Mazar in Mazar et. al. (2020 v.2) - Photo 12.191 -
C-1a Building CP from Mazar et. al. (2020 v.2)
 Photo 12.191
C-1a Building CP, looking north; wall of C-1b phase (11472) in foreground; C-1b Building CZ in background (2012)
Panitz-Cohen and Mazar in Mazar et. al. (2020 v.2) - Photo 12.192 -
Wall 9406, dividing Building CL (mostly removed) and Building CP from Mazar et. al. (2020 v.2)
 Photo 12.192
Wall 9406, dividing Building CL (mostly removed, left) and Building CP (right), looking north; lower left: eastern row of beehives, C-1b apiary (2008)
Panitz-Cohen and Mazar in Mazar et. al. (2020 v.2) - Photo 12.193 -
Building CP Walls from Mazar et. al. (2020 v.2)
 Photo 12.193
Northern wall (11458) of the early phase of Building CP, Stratum C-1b, looking north, below Wall 10409 of C-1a (2012)
Panitz-Cohen and Mazar in Mazar et. al. (2020 v.2) - Photo 12.194 -
Building CP Walls from Mazar et. al. (2020 v.2)
 Photo 12.194
Building CP, looking south at C-1b Wall 11477 and C-1a Wall 10457; center: C-1a sub-floor construction 11468 (2012)
Panitz-Cohen and Mazar in Mazar et. al. (2020 v.2) - Photo 12.195 -
Building CP Walls from Mazar et. al. (2020 v.2)
 Photo 12.195
Building CP, looking east at C-1a Wall 10462 above C-1b Wall 11473; note gap between them (2012)
Panitz-Cohen and Mazar in Mazar et. al. (2020 v.2) - Photo 12.196 -
C-1a Building CP from Mazar et. al. (2020 v.2)
 Photo 12.196
C-1a Building CP, looking east; top of C-1b Wall 11470, serving as a threshold leading from Room 10458 to Room 9449 (2010)
Panitz-Cohen and Mazar in Mazar et. al. (2020 v.2) - Photo 12.197 -
C-1a Building CP from Mazar et. al. (2020 v.2)
 Photo 12.197
C-1a Building CP, eastern and central rooms, looking west; meter stick in Room 11441 (2012)
Panitz-Cohen and Mazar in Mazar et. al. (2020 v.2) - Photo 12.198 -
C-1a Building CP Room 10510 from Mazar et. al. (2020 v.2)
 Photo 12.198
C-1a Building CP, Room 10510 (northeastern room), looking north (2010)
Panitz-Cohen and Mazar in Mazar et. al. (2020 v.2) - Photo 12.199 -
Smashed objects in C-1a Building CP, Room 10510 from Mazar et. al. (2020 v.2)
 Photo 12.199
C-1a Building CP, Room 10510; incense burner (Fig. 13.158:5) and other finds (2010)
Panitz-Cohen and Mazar in Mazar et. al. (2020 v.2) - Photo 12.200 -
Rooms 11441 and 10510 in C-1a Building CP from Mazar et. al. (2020 v.2)
 Photo 12.200
C-1a Building CP, Rooms 11441 and 10510, looking west; meter stick in Room 11441 (2012)
Panitz-Cohen and Mazar in Mazar et. al. (2020 v.2) - Photo 12.201 -
Destruction debris in Room 11441 in C-1a Building CP from Mazar et. al. (2020 v.2)
 Photo 12.201
C-1a Building CP, destruction debris (11418) in Room 11441, looking west (2012)
Panitz-Cohen and Mazar in Mazar et. al. (2020 v.2) - Photo 12.202 -
Rooms 11441 and 11451 in C-1a Building CP from Mazar et. al. (2020 v.2)
 Photo 12.202
C-1a Building CP, looking east at Room 11451 (right) and Room 11441 (left) (2012)
Panitz-Cohen and Mazar in Mazar et. al. (2020 v.2) - Photo 12.203 -
Rooms 10476 and 11451 in C-1a Building CP from Mazar et. al. (2020 v.2)
 Photo 12.203
C-1a Building CP, looking west from Room 11451 to Room 10476 (2012)
Panitz-Cohen and Mazar in Mazar et. al. (2020 v.2) - Photo 12.204 -
C-1a Building CP from Mazar et. al. (2020 v.2)
 Photo 12.204
C-1a Building CP, curved molded plaster in northern end of Wall 11440 at entrance into Room 11451, looking east (2012)
Panitz-Cohen and Mazar in Mazar et. al. (2020 v.2) - Photo 12.205 -
destruction debris with fallen grinding stone and loom weights in Room 11451 in C-1a Building CP from Mazar et. al. (2020 v.2)
 Photo 12.205
C-1a Building CP, Room 11451, looking east; right: destruction debris with fallen grinding stone and loom weights; left foreground: plastered Bench 11452 attached to Wall 11417 (2012)
Panitz-Cohen and Mazar in Mazar et. al. (2020 v.2) - Photo 12.206 -
Room 11451 in C-1a Building CP from Mazar et. al. (2020 v.2)
 Photo 12.206
C-1a Building CP, Room 11451, looking north at Wall 11417 with Bench 11452 (2012)
Panitz-Cohen and Mazar in Mazar et. al. (2020 v.2) - Photo 12.207 -
C-1a Building CP, looking north (before excavation of eastern wing) from Mazar et. al. (2020 v.2)
 Photo 12.207
C-1a Building CP, looking north (before excavation of eastern wing) (2010)
Panitz-Cohen and Mazar in Mazar et. al. (2020 v.2) - Photo 12.208 -
Room 10458 in C-1a Building CP from Mazar et. al. (2020 v.2)
 Photo 12.208
C-1a Building CP, Room 10458, looking west; meter stick on earth floor 10458 above plaster bedding; background: entrance to Room 9449 (2010)
Panitz-Cohen and Mazar in Mazar et. al. (2020 v.2) - Photo 12.209 -
Room 10458 in C-1a Building CP from Mazar et. al. (2020 v.2)
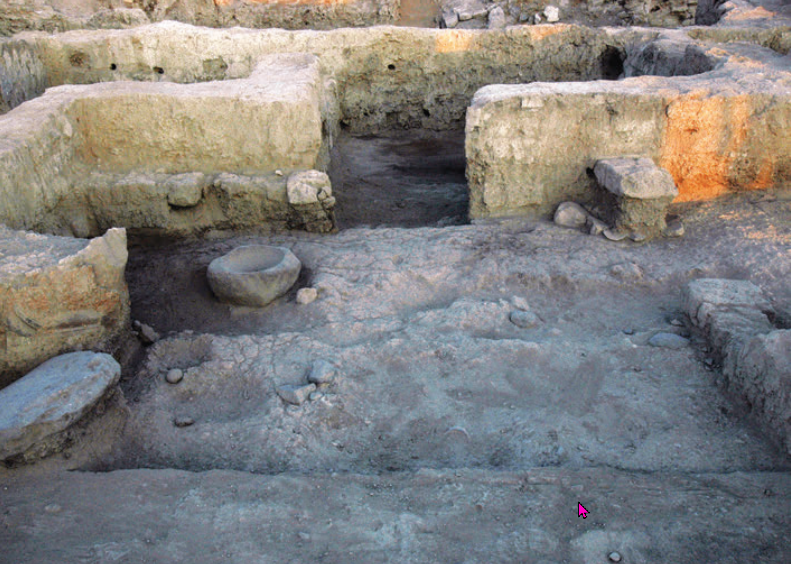 Photo 12.209
C-1a Building CP, western part of Room 10458, looking west to Room 9449; note plaster foundation of floor (10498) in western part of room and northern end of Bench 10463 ending at entranceway to Room 9449; left: Oven 10430 (2010)
Panitz-Cohen and Mazar in Mazar et. al. (2020 v.2) - Photo 12.210 -
Pottery altar in C-1a Building CP from Mazar et. al. (2020 v.2)
 Photo 12.210
C-1a Building CP, pottery altar (Chapter 35, No. 3) against Wall 9448, before exposure of Bench 10454 (2008)
Panitz-Cohen and Mazar in Mazar et. al. (2020 v.2) - Photo 12.211 -
Broken vessels in Room 10458 of C-1a Building CP from Mazar et. al. (2020 v.2)
 Photo 12.211
C-1a Building CP, southwestern corner of Room 10458, looking south at krater-pithos and Oven 10430, with concentration of vessels to their north (2010)
Panitz-Cohen and Mazar in Mazar et. al. (2020 v.2) - Photo 12.212 -
Broken vessels in Room 10458 of C-1a Building CP from Mazar et. al. (2020 v.2)
 Photo 12.212
As Photo 12.211, detail of vessels, grinding stone and stand with petals, before exposure of the mortar seen in Photo 12.213 (2010)
Panitz-Cohen and Mazar in Mazar et. al. (2020 v.2) - Photo 12.213 -
Pottery in Room 10458 of C-1a Building CP from Mazar et. al. (2020 v.2)
 Photo 12.213
C-1a Building CP, southwestern corner of Room 10458, looking south at krater-pithos with cooking pot inside, mortar embedded in floor, Oven 10430 and large stone to its east; woman sitting on Bench 10454 (2010)
Panitz-Cohen and Mazar in Mazar et. al. (2020 v.2) - Photo 12.214 -
Room 10458 of C-1a Building CP from Mazar et. al. (2020 v.2)
 Photo 12.214
C-1a Building CP, looking west; cache of loomweights in northwestern corner of Room 10458 (2010)
Panitz-Cohen and Mazar in Mazar et. al. (2020 v.2) - Photo 12.215 -
Rooms 10476 and 10506 of C-1a Building CP from Mazar et. al. (2020 v.2)
 Photo 12.215
C-1a Building CP, Rooms 10476 and 10506, looking west (2010)
Panitz-Cohen and Mazar in Mazar et. al. (2020 v.2) - Photo 12.216 -
C-1a Building CP from Mazar et. al. (2020 v.2)
 Photo 12.216
C-1a Building CP, entrance between Rooms 10476 and 11451, looking south at plaster on doorjamb of Wall 10485 (2010)
Panitz-Cohen and Mazar in Mazar et. al. (2020 v.2) - Photo 12.217 -
Broken Vessels on 1 side of wall and on a Bench on other side - in C-1a Building CP from Mazar et. al. (2020 v.2)
 Photo 12.217
C-1a Building CP, looking north at Room 10458 (top) and Room 10476 (bottom); note vessels on Bench 10466 (2010)
Panitz-Cohen and Mazar in Mazar et. al. (2020 v.2) - Photo 12.218 -
Room 10476 in C-1a Building CP from Mazar et. al. (2020 v.2)
 Photo 12.218
Building CP, Stratum C-1a, Room 10476, looking west at Bench 10467 and entrance into Room 9450 (2010)
Panitz-Cohen and Mazar in Mazar et. al. (2020 v.2) - Photo 12.219 -
Fractured stones in sub floor construction of Room 10476 in C-1a Building CP from Mazar et. al. (2020 v.2)
 Photo 12.219
C-1a Building CP, Room 10476, sub-floor construction 11468, looking north (2012)
Panitz-Cohen and Mazar in Mazar et. al. (2020 v.2) - Photo 12.220 -
Large mortar from Building CP, Room 10476 from Mazar et. al. (2020 v.2)
 Photo 12.220
Large mortar from Building CP, Room 10476 (2010)
Panitz-Cohen and Mazar in Mazar et. al. (2020 v.2) - Photo 12.221 -
Destruction debris in Room 10476 of C-1a Building CP from Mazar et. al. (2020 v.2)
 Photo 12.221
C-1a Building CP, looking south at destruction debris in Room 10476, with loom weights, stones and smashed top of kraterpithos (Fig. 13.146:4), east of Bin 10488 (2010)
Panitz-Cohen and Mazar in Mazar et. al. (2020 v.2) - Photo 12.222 -
Bin 10488 and krater-pithos from Mazar et. al. (2020 v.2)
 Photo 12.222
As Photo 12.228, detail of Bin 10488 and krater-pithos (Fig. 12.146:4) to its east (2010)
Panitz-Cohen and Mazar in Mazar et. al. (2020 v.2) - Photo 12.223 -
C-1a Building CP from Mazar et. al. (2020 v.2)
 Photo 12.223
C-1a Building CP, looking west from southwestern part of Room 10476 to Room 10506; Bin 10488 in front and Bin 10501 in back; note pottery ‘bucket’ between the bins (2010)
Panitz-Cohen and Mazar in Mazar et. al. (2020 v.2) - Photo 12.224 -
C-1a Building CP from Mazar et. al. (2020 v.2)
 Photo 12.224
C-1a Building CP, detail of grain in bottom of Bin 10488 (2010)
Panitz-Cohen and Mazar in Mazar et. al. (2020 v.2) - Photo 12.225 -
Room 9449 of C-1a Building CP from Mazar et. al. (2020 v.2)
 Photo 12.225
C-1a Building CP, Room 9449, during excavation, looking north; Bench 9443 in north of room; left: excavation down to floor of apiary (2008)
Panitz-Cohen and Mazar in Mazar et. al. (2020 v.2) - Photo 12.226 -
Bin 9434 in Room 9450 of C-1a Building CP from Mazar et. al. (2020 v.2)
 Photo 12.226
C-1a Building CP, Bin 9434 in Room 9450, looking south (2008)
Panitz-Cohen and Mazar in Mazar et. al. (2020 v.2) - Photo 12.227 -
Room 9450 of C-1a Building CP from Mazar et. al. (2020 v.2)
 Photo 12.227
C-1a Building CP, Room 9450, looking southeast (2008)
Panitz-Cohen and Mazar in Mazar et. al. (2020 v.2) - Photo 12.228 -
Copious destruction debris in Room 9450 of C-1a Building CP from Mazar et. al. (2020 v.2)
 Photo 12.228
C-1a Building CP, Room 9450, pottery altar (Chapter 35, No. 2) in destruction debris (9420), looking east (2008)
Panitz-Cohen and Mazar in Mazar et. al. (2020 v.2) - Photo 12.229 -
Room 10506 of C-1a Building CP from Mazar et. al. (2020 v.2)
 Photo 12.229
C-1a Building CP, Room 10506, looking east into Room 10476; two pottery bins and ‘bucket’ along Wall 10457 (2010)
Panitz-Cohen and Mazar in Mazar et. al. (2020 v.2) - Photo 12.230 -
Room 10506 of C-1a Building CP from Mazar et. al. (2020 v.2)
 Photo 12.230
C-1a Building CP, Room 10506, looking west, with Bin 10501 in southwestern corner; meter stick along Bench 10504 (2010)
Panitz-Cohen and Mazar in Mazar et. al. (2020 v.2) - Photo 12.231 -
Room 10506 of C-1a Building CP from Mazar et. al. (2020 v.2)
 Photo 12.231
C-1a Building CP, Room 10506, looking southwest, pottery bucket and Bin 10501 against Wall 10457 (2010)
Panitz-Cohen and Mazar in Mazar et. al. (2020 v.2) - Photo 12.232 -
Bin 10501 restored Mazar et. al. (2020 v.2)
 Photo 12.232
Bin 10501 restored
Panitz-Cohen and Mazar in Mazar et. al. (2020 v.2) - Photo 12.233 -
Room 10506 of C-1a Building CP from Mazar et. al. (2020 v.2)
 Photo 12.233
C-1a Building CP, Room 10506, looking southeast; juglet (Fig. 13.156:18) laid against threshold in Wall 10480 (2012)
Panitz-Cohen and Mazar in Mazar et. al. (2020 v.2) - Photo 12.234 -
Walls of Building CL from Mazar et. al. (2020 v.2)
 Photo 12.234
Walls 9406, 5418 and 5453 of C-1a Building CL above C-1b Wall 9453 and apiary destruction debris (2010)
Panitz-Cohen and Mazar in Mazar et. al. (2020 v.2)
- Plans: Figs. 12.19, 12.50, 12.52a–c
- Section: Fig. 12.93
- Photos 12.169–12.170, 12.189–12.234
- Pottery: Figs. 13.143–13.160
- Figure 12.19 -
Plan of Stratum C-1a from Mazar et. al. (2020 v.2)
Figure 12.19
Plan of Stratum C-1a (1:200)
Panitz-Cohen and Mazar in Mazar et. al. (2020 v.2) - Figure 12.50 -
Plan of Stratum C-1a, south-center and southeast from Mazar et. al. (2020 v.2)
Figure 12.50
Plan of Stratum C-1a, south-center and southeast (1:125)
Panitz-Cohen and Mazar in Mazar et. al. (2020 v.2) - Figure 12.53 -
Plan of Building CL, Stratum C-1a from Mazar et. al. (2020 v.2)
 Figure 12.53
Plan of Building CL, Stratum C-1a (1:75)
Panitz-Cohen and Mazar in Mazar et. al. (2020 v.2) - Figure 12.73 -
Section 19 from Mazar et. al. (2020 v.2)
Figure 12.73
Section 19 (Squares T–Y/1, looking south
Panitz-Cohen and Mazar in Mazar et. al. (2020 v.2) - Figure 12.74 -
Section 20 from Mazar et. al. (2020 v.2)
Figure 12.74
Section 20 (Squares T–Y/1, looking south at Wall 2426)
Panitz-Cohen and Mazar in Mazar et. al. (2020 v.2) - Figure 12.80 -
Section 26 from Mazar et. al. (2020 v.2)
Figure 12.80
Section 26 (Square Z/1, western end, looking south)
Panitz-Cohen and Mazar in Mazar et. al. (2020 v.2) - Figure 12.83 -
Section 29 from Mazar et. al. (2020 v.2)
Figure 12.83
Section 29 (Squares Z/1–2, looking east)
Panitz-Cohen and Mazar in Mazar et. al. (2020 v.2) - Figure 12.84 -
Section 30 from Mazar et. al. (2020 v.2)
Figure 12.84
Section 30 (Square Z/20, looking east)
Panitz-Cohen and Mazar in Mazar et. al. (2020 v.2) - Figure 12.85 -
Section 31 from Mazar et. al. (2020 v.2)
Figure 12.85
Section 31 (Square Z/20, looking west)
Panitz-Cohen and Mazar in Mazar et. al. (2020 v.2) - Figure 12.86 -
Section 32 from Mazar et. al. (2020 v.2)
Figure 12.86
Section 32 (Square Y/1, looking east along Wall 4443)
Panitz-Cohen and Mazar in Mazar et. al. (2020 v.2) - Figure 12.87 -
Section 33 from Mazar et. al. (2020 v.2)
Figure 12.87
Section 33 (Square Y/1, section below Wall 2504, looking south)
Panitz-Cohen and Mazar in Mazar et. al. (2020 v.2) - Photo 12.234 -
Walls of Building CL from Mazar et. al. (2020 v.2)
Photo 12.234
Walls 9406, 5418 and 5453 of C-1a Building CL above C-1b Wall 9453 and apiary destruction debris (2010)
Panitz-Cohen and Mazar in Mazar et. al. (2020 v.2) - Photo 12.235 -
Walls in section of C-1a Building CL above C-1b apiary destruction debris (collapsed walls) from Mazar et. al. (2020 v.2)
 Photo 12.235
Square Y/1, C-1a Building CL, western wing, looking north; walls in section above apiary destruction debris (2000)
Panitz-Cohen and Mazar in Mazar et. al. (2020 v.2) - Photo 12.236 -
Wall 4443 in C-1a Building CL from Mazar et. al. (2020 v.2)
 Photo 12.236
Squares Y– Z/1, C-1a Building CL, Wall 4443 with layer of black oily material; Wall 2504 on the left (north); looking east (2001)
Panitz-Cohen and Mazar in Mazar et. al. (2020 v.2) - Photo 12.237 -
Burnt material (9432) on Floor 9435 in C-1a Building CL from Mazar et. al. (2020 v.2)
 Photo 12.237
Square Z/20, C-1a Building CL, looking south; burnt material (9432) on Floor 9435 (2008)
Panitz-Cohen and Mazar in Mazar et. al. (2020 v.2) - Photo 12.238 -
Burnt oily material (5435) on Floor 5482 in C-1a Building CL from Mazar et. al. (2020 v.2)
 Photo 12.238
C-1a Building CL, burnt oily material (5435) on Floor 5482, looking west (2001)
Panitz-Cohen and Mazar in Mazar et. al. (2020 v.2) - Photo 12.239 -
Eastern wing and Floor 5446 in C-1a Building CL from Mazar et. al. (2020 v.2)
 Photo 12.239
C-1a Building CL, eastern wing, looking south; Floor 5446 (2007)
Panitz-Cohen and Mazar in Mazar et. al. (2020 v.2)
- Plans: Figs. 12.19, 12.50, 12.53
- Sections: Figs. 12.73–12.74, 12.80, 12.83–12.87
- Photos 12.234–12.239
- Pottery: Figs. 13.125–13.129
Fig. 12.54Location of section drawings on superimposed plan of Strata C-3–C-1a (1:250)
Panitz-Cohen and Mazar in Mazar et. al. (2020 v.2)
- Figure 12.18 -
Plan of Stratum C-1b from Mazar et. al. (2020 v.2)
Figure 12.18
Plan of Stratum C-1b (1:200)
Panitz-Cohen and Mazar in Mazar et. al. (2020 v.2) - Figure 12.19 -
Plan of Stratum C-1a from Mazar et. al. (2020 v.2)
Figure 12.19
Plan of Stratum C-1a (1:200)
Panitz-Cohen and Mazar in Mazar et. al. (2020 v.2) - Figure 12.24 -
Plan of Stratum C-1b from Mazar et. al. (2020 v.2)
Figure 12.24
Plan of Stratum C-1b, west (1:125)
Panitz-Cohen and Mazar in Mazar et. al. (2020 v.2) - Figure 12.25 -
Plan of Stratum C-1a from Mazar et. al. (2020 v.2)
Figure 12.25
Plan of Stratum C-1a, west (1:125)
Panitz-Cohen and Mazar in Mazar et. al. (2020 v.2) - Figure 12.27 -
Plan of Stratum C-1b from Mazar et. al. (2020 v.2)
Figure 12.27
Plan of Stratum C-1b, north-center (1:125)
Panitz-Cohen and Mazar in Mazar et. al. (2020 v.2) - Figure 12.28 -
Plan of Stratum C-1a from Mazar et. al. (2020 v.2)
Figure 12.28
Plan of Stratum C-1a, north-center (1:125)
Panitz-Cohen and Mazar in Mazar et. al. (2020 v.2) - Figure 12.29 -
Building CE, Stratum C-1b; corner of Walls 2454 and 1491 from Mazar et. al. (2020 v.2)
Figure 12.29
Building CE, Stratum C-1b; elevation: corner of Walls 2454 and 1491 (1:50)
Panitz-Cohen and Mazar in Mazar et. al. (2020 v.2) - Figure 12.33 -
Plan of Building CR, early phase of Stratum C-1b from Mazar et. al. (2020 v.2)
Figure 12.33
Plan of Building CR, early phase of Stratum C-1b; the pits in Squares A, Z/6 are possibly an interim phase between Strata C-2 and C-1b (1:100)
Panitz-Cohen and Mazar in Mazar et. al. (2020 v.2) - Figure 12.34 -
Plan of Stratum C-1b from Mazar et. al. (2020 v.2)
Figure 12.34
Plan of Stratum C-1b, northeast (1:125)
Panitz-Cohen and Mazar in Mazar et. al. (2020 v.2) - Figure 12.35 -
Plan of Stratum C-1a from Mazar et. al. (2020 v.2)
Figure 12.35
Plan of Stratum C-1a, northeast (1:125)
Panitz-Cohen and Mazar in Mazar et. al. (2020 v.2) - Figure 12.36 -
Plan of Building CF, Stratum C-1a from Mazar et. al. (2020 v.2)
Figure 12.36
Plan of Building CF, Stratum C-1a (1:75)
Panitz-Cohen and Mazar in Mazar et. al. (2020 v.2) - Figure 12.39 -
Plan of Stratum C-1b from Mazar et. al. (2020 v.2)
Figure 12.39
Plan of Stratum C-1b, south-center and southeast, with apiary (1:125)
Panitz-Cohen and Mazar in Mazar et. al. (2020 v.2) - Figure 12.40 -
Plan of Buildings CG, CH, CM and apiary, Stratum C-1b from Mazar et. al. (2020 v.2)
Figure 12.40
Plan of Buildings CG, CH, CM and apiary, Stratum C-1b (1:75)
Panitz-Cohen and Mazar in Mazar et. al. (2020 v.2) - Figure 12.44 -
Plan of Building CH and apiary from Mazar et. al. (2020 v.2)
Figure 12.44
Plan of Building CH and apiary (scale 1:100)
Panitz-Cohen and Mazar in Mazar et. al. (2020 v.2) - Figure 12.48 -
Plan of Building CZ, Stratum C-1b from Mazar et. al. (2020 v.2)
Figure 12.48
Plan of Building CZ, Stratum C-1b (1:75)
Panitz-Cohen and Mazar in Mazar et. al. (2020 v.2) - Figure 12.50 -
Plan of Stratum C-1a, south-center and southeast from Mazar et. al. (2020 v.2)
Figure 12.50
Plan of Stratum C-1a, south-center and southeast (1:125)
Panitz-Cohen and Mazar in Mazar et. al. (2020 v.2) - Figure 12.51 -
Plan of Buildings CQ3 and CX, Stratum C-1a from Mazar et. al. (2020 v.2)
Figure 12.51
Plan of Buildings CQ3 and CX, Stratum C-1a (1:75)
Panitz-Cohen and Mazar in Mazar et. al. (2020 v.2) - Figure 12.52a -
Plan of Building CP, Stratum C-1a from Mazar et. al. (2020 v.2)
Figure 12.52a
Plan of Building CP, Stratum C-1a (1:75)
Panitz-Cohen and Mazar in Mazar et. al. (2020 v.2) - Figure 12.52b -
Isometric reconstruction, Building CP, Stratum C-1a from Mazar et. al. (2020 v.2)
Figure 12.52b
Isometric reconstruction, Building CP, Stratum C-1a, looking northwest
Panitz-Cohen and Mazar in Mazar et. al. (2020 v.2) - Figure 12.52c -
Plan of sub-floor brick construction in Building CP, Stratum C-1a from Mazar et. al. (2020 v.2)
Figure 12.52c
Plan of sub-floor brick construction in Building CP, Stratum C-1a (1:100)
Panitz-Cohen and Mazar in Mazar et. al. (2020 v.2)
- Figure 12.55 -
Section 1 from Mazar et. al. (2020 v.2)
Figure 12.55
Section 1 (Squares A/6–C/6, looking north)
Panitz-Cohen and Mazar in Mazar et. al. (2020 v.2) - Figure 12.56 -
Section 2 from Mazar et. al. (2020 v.2)
Figure 12.56
Section 2 (Squares B/5–6, section below C-1 Walls 6420 and 6476, and below C-2 Wall 7506, looking west)
Panitz-Cohen and Mazar in Mazar et. al. (2020 v.2) - Figure 12.57 -
Section 3 from Mazar et. al. (2020 v.2)
Figure 12.57
Section 3 (Squares A/4–5, looking east)
Panitz-Cohen and Mazar in Mazar et. al. (2020 v.2) - Figure 12.58 -
Section 4 from Mazar et. al. (2020 v.2)
Figure 12.58
Section 4 (Squares Z/5–6, looking east)
Panitz-Cohen and Mazar in Mazar et. al. (2020 v.2) - Figure 12.59 -
Section 5 from Mazar et. al. (2020 v.2)
Figure 12.59
Section 5 (Square Y/5, section below Bench 5472, looking west)
Panitz-Cohen and Mazar in Mazar et. al. (2020 v.2) - Figure 12.60 -
Section 6 from Mazar et. al. (2020 v.2)
Figure 12.60
Section 6 (Square Y/5, section below Wall 5431, looking south)
Panitz-Cohen and Mazar in Mazar et. al. (2020 v.2) - Figure 12.61 -
Section 7 from Mazar et. al. (2020 v.2)
Figure 12.61
Section 7 (Squares Y–Z/4, section below Bench 5468, looking south)
Panitz-Cohen and Mazar in Mazar et. al. (2020 v.2) - Figure 12.62 -
Section 8 from Mazar et. al. (2020 v.2)
Figure 12.62
Section 8 (Square Y/5, looking north)
Panitz-Cohen and Mazar in Mazar et. al. (2020 v.2) - Figure 12.63 -
Section 9 from Mazar et. al. (2020 v.2)
Figure 12.63
Section 9 (Square Y/5, looking west)
Panitz-Cohen and Mazar in Mazar et. al. (2020 v.2) - Figure 12.64 -
Section 10 from Mazar et. al. (2020 v.2)
Figure 12.64
Section 10 (Square T/4, looking east)
Panitz-Cohen and Mazar in Mazar et. al. (2020 v.2) - Figure 12.65 -
Section 11 from Mazar et. al. (2020 v.2)
Figure 12.65
Section 11 (Squares T/1–4, looking west); the section in Square T/3 north of Walls 1448/4439 was drawn on a line east of Wall 1506
Panitz-Cohen and Mazar in Mazar et. al. (2020 v.2) - Figure 12.66 -
Section 12 from Mazar et. al. (2020 v.2)
Figure 12.66
Section 12 (Square S/4, looking east at walls)
Panitz-Cohen and Mazar in Mazar et. al. (2020 v.2) - Figure 12.67 -
Section 13 from Mazar et. al. (2020 v.2)
Figure 12.67
Section 13 (Square S/3, section below Wall 1448, looking south)
Panitz-Cohen and Mazar in Mazar et. al. (2020 v.2) - Figure 12.68 -
Section 14 from Mazar et. al. (2020 v.2)
Figure 12.67
Section 14 (Square T/3, looking north)
Panitz-Cohen and Mazar in Mazar et. al. (2020 v.2) - Figure 12.69 -
Section 15 from Mazar et. al. (2020 v.2)
Figure 12.69
Section 15 (Squares S–Y/2, looking north) (1:55)
Panitz-Cohen and Mazar in Mazar et. al. (2020 v.2) - Figure 12.70 -
Section 16 from Mazar et. al. (2020 v.2)
Figure 12.70
Section 16 (Squares S–Y/1, looking north) (1:55)
Panitz-Cohen and Mazar in Mazar et. al. (2020 v.2) - Figure 12.72 -
Section 18 from Mazar et. al. (2020 v.2)
Figure 12.72
Section 18 (Squares T–Y/2, looking north at Wall 1437 and subsidiary balk to its east)
Panitz-Cohen and Mazar in Mazar et. al. (2020 v.2) - Figure 12.73 -
Section 19 from Mazar et. al. (2020 v.2)
Figure 12.73
Section 19 (Squares T–Y/1, looking south
Panitz-Cohen and Mazar in Mazar et. al. (2020 v.2) - Figure 12.74 -
Section 20 from Mazar et. al. (2020 v.2)
Figure 12.74
Section 20 (Squares T–Y/1, looking south at Wall 2426)
Panitz-Cohen and Mazar in Mazar et. al. (2020 v.2) - Figure 12.75 -
Section 21 from Mazar et. al. (2020 v.2)
Figure 12.75
Section 21 (Square Y/3, looking north at Wall 4465)
Panitz-Cohen and Mazar in Mazar et. al. (2020 v.2) - Figure 12.76 -
Section 22 from Mazar et. al. (2020 v.2)
Figure 12.76
Section 22 (Squares T–Y/3, looking north in Room 2460
Panitz-Cohen and Mazar in Mazar et. al. (2020 v.2) - Figure 12.77 -
Section 23 from Mazar et. al. (2020 v.2)
Figure 12.77
Section 23 (Square Y/3, section below Wall 2411, looking east)
Panitz-Cohen and Mazar in Mazar et. al. (2020 v.2) - Figure 12.78 -
Section 24 from Mazar et. al. (2020 v.2)
Figure 12.78
Section 24 (Square Z/3, looking east)
Panitz-Cohen and Mazar in Mazar et. al. (2020 v.2) - Figure 12.79 -
Section 25 from Mazar et. al. (2020 v.2)
Figure 12.79
Section 25 (Squares T–Y/3, looking south)
Panitz-Cohen and Mazar in Mazar et. al. (2020 v.2) - Figure 12.80 -
Section 26 from Mazar et. al. (2020 v.2)
Figure 12.80
Section 26 (Square Z/1, western end, looking south)
Panitz-Cohen and Mazar in Mazar et. al. (2020 v.2) - Figure 12.81 -
Section 27 from Mazar et. al. (2020 v.2)
Figure 12.81
Section 27 (Squares Y–Z/2, looking north)
Panitz-Cohen and Mazar in Mazar et. al. (2020 v.2) - Figure 12.82 -
Section 28 from Mazar et. al. (2020 v.2)
Figure 12.82
Section 28 (Squares Y–Z, A/1, looking north)
Panitz-Cohen and Mazar in Mazar et. al. (2020 v.2) - Figure 12.83 -
Section 29 from Mazar et. al. (2020 v.2)
Figure 12.83
Section 29 (Squares Z/1–2, looking east)
Panitz-Cohen and Mazar in Mazar et. al. (2020 v.2) - Figure 12.84 -
Section 30 from Mazar et. al. (2020 v.2)
Figure 12.84
Section 30 (Square Z/20, looking east)
Panitz-Cohen and Mazar in Mazar et. al. (2020 v.2) - Figure 12.85 -
Section 31 from Mazar et. al. (2020 v.2)
Figure 12.85
Section 31 (Square Z/20, looking west)
Panitz-Cohen and Mazar in Mazar et. al. (2020 v.2) - Figure 12.86 -
Section 32 from Mazar et. al. (2020 v.2)
Figure 12.86
Section 32 (Square Y/1, looking east along Wall 4443)
Panitz-Cohen and Mazar in Mazar et. al. (2020 v.2) - Figure 12.87 -
Section 33 from Mazar et. al. (2020 v.2)
Figure 12.87
Section 33 (Square Y/1, section below Wall 2504, looking south)
Panitz-Cohen and Mazar in Mazar et. al. (2020 v.2) - Figure 12.88 -
Section 34 from Mazar et. al. (2020 v.2)
Figure 12.88
Section 34 (A–C/2, looking north) 2504, looking south)
Panitz-Cohen and Mazar in Mazar et. al. (2020 v.2) - Figure 12.89 -
Section 35 from Mazar et. al. (2020 v.2)
Figure 12.89
Section 35 (Square B/3, section below Wall 10518 (looking south)
Panitz-Cohen and Mazar in Mazar et. al. (2020 v.2) - Figure 12.90 -
Section 36 from Mazar et. al. (2020 v.2)
Figure 12.90
Section 36 (Squares B/2–3, section below Wall 10464, looking west)
Panitz-Cohen and Mazar in Mazar et. al. (2020 v.2) - Figure 12.91 -
Section 37 from Mazar et. al. (2020 v.2)
Figure 12.91
Section 37 (Square C/3, looking east)
Panitz-Cohen and Mazar in Mazar et. al. (2020 v.2) - Figure 12.92 -
Section 38 from Mazar et. al. (2020 v.2)
Figure 12.92
Section 38 (Squares B–C/3, looking north at Wall 10515 and entrance)
Panitz-Cohen and Mazar in Mazar et. al. (2020 v.2) - Figure 12.94 -
Section 40 from Mazar et. al. (2020 v.2)
Figure 12.94
Section 40 (Square A/3, looking east)
Panitz-Cohen and Mazar in Mazar et. al. (2020 v.2) - Figure 12.95 -
Section 41 from Mazar et. al. (2020 v.2)
Figure 12.95
Section 41 (Squares A/2–3, looking west at entrance in Wall 9406 and C-1b walls below)
Panitz-Cohen and Mazar in Mazar et. al. (2020 v.2) - Figure 12.97 -
Section 43 (Square R/4, looking north) from Mazar et. al. (2020 v.2)
Figure 12.97
Section 43 (Square R/4, looking north)
Panitz-Cohen and Mazar in Mazar et. al. (2020 v.2)
- Table 15.1
Stratigraphy and chronology in Area D, with correlation to Area C from Mazar et. al. (2020 v. 3: Chapter 17)
Table 15.1
Stratigraphy and chronology in Area D, with correlation to Area C
Mazar et. al. (2020 v.3) - Table 15.2
Locus and basket numbers from Mazar et. al. (2020 v. 3: Chapter 17)
Table 15.2
Locus and basket numbers
Mazar et. al. (2020 v.3) - Figure 15.1
Location of section drawings on superimposed plan of Strata D-11–D-2 from Mazar et. al. (2020 v. 3: Chapter 17)
Figure 15.1
Location of section drawings on superimposed plan of Strata D-11–D-2
Mazar et. al. (2020 v.3) - Figure 15.2
Schematic section of Area D from Mazar et. al. (2020 v. 3: Chapter 17)
Figure 15.2
Schematic section of Area D
Mazar et. al. (2020 v.3)
- Table 15.1 -
Stratigraphy and chronology in Area D, with correlation to Area C from Mazar et. al. (2020 v. 3: Chapter 17)
Table 15.1
Stratigraphy and chronology in Area D, with correlation to Area C
Mazar et. al. (2020 v.3) - Table 15.2 -
Locus and basket numbers from Mazar et. al. (2020 v. 3: Chapter 17)
Table 15.2
Locus and basket numbers
Mazar et. al. (2020 v.3) - Figure 15.1 -
Location of section drawings on superimposed plan of Strata D-11–D-2 from Mazar et. al. (2020 v. 3: Chapter 17)
Figure 15.1
Location of section drawings on superimposed plan of Strata D-11–D-2
Mazar et. al. (2020 v.3) - Figure 15.2 -
Schematic section of Area D from Mazar et. al. (2020 v. 3: Chapter 17)
Figure 15.2
Schematic section of Area D
Mazar et. al. (2020 v.3) - Photo 15.1 -
Area D at the end of 1997 season from Mazar et. al. (2020 v. 3: Chapter 15)
 Photo 15.1
General view, end of 1997 season, looking east; from top to bottom: Squares Q/4 to L/4
Mazar et. al. (2020 v.3) - Photo 15.2 -
Area D at the end of 1998 season from Mazar et. al. (2020 v. 3: Chapter 15)
 Photo 15.2
General view, end of 1998 season, looking east; from top to bottom: Squares Q/4 to L/4
Mazar et. al. (2020 v.3) - Photo 15.3 -
Area D at the end of 2000 season from Mazar et. al. (2020 v. 3: Chapter 15)
 Photo 15.3
General view, end of 2000 season, looking east; from top to bottom: Squares Q/4–5 to L/4
Mazar et. al. (2020 v.3) - Photo 15.4 -
Area D at the end of 2005 season from Mazar et. al. (2020 v. 3: Chapter 15)
 Photo 15.4
General view, end of 2005 season, looking east; from top to bottom: Squares Q/4–5 to L/4–5
Mazar et. al. (2020 v.3) - Photo 15.5 -
Aerial view, end of 2008 season from Mazar et. al. (2020 v. 3: Chapter 15)
 Photo 15.5
Aerial view, end of 2008 season
Mazar et. al. (2020 v.3) - Photo 15.6 -
General view, end of 2010 season from Mazar et. al. (2020 v. 3: Chapter 15)
 Photo 15.6
General view, end of 2010 season, looking southwest; Squares L–N/4–5
Mazar et. al. (2020 v.3)
Area D was a step trench dug in the northern part of the western slope of the lower mound, from the bottom of the tell to the uppermost level (Fig. 15.2). The area was excavated during seven seasons (1997–1998, 2000, 2005, 2007–2008, 2010). In 1997 and 1998, the area was excavated as a 4.0 m wide trench extending westwards from the northwestern square of Area C (R/4) and running five squares (25 m) down the slope (Squares Q/4–L/4) (Photos 15.1–15.2). In 2000 and 2005, the trench was extended by one square to the north (L–Q/5), while only minor probes were conducted in the original trench (Photos 15.3–15.4). Starting from 2005, Area D was divided into two sub-areas: the upper (eastern) portion of the slope (Squares P– Q/4–5) was excavated as Area D1 and the lower (western) portion (Squares L–N/4–5) as Area D2. These terms are not retained in this chapter and are replaced by Area D East (the upper part of the trench) and Area D West (the lower part of the trench) respectively. Both areas were excavated in 2005, 2007 and 2008 (Photo 15.5), while in the 2010 season, and for a few days in April 2011 (Squares N/4–5), work was carried out only in Area D West (Photo 15.6). The actual width of the excavated step trench was 9.0 m (Fig. 15.1). In addition to the manual excavation, two backhoe trenches were excavated from the base of the mound westwards, towards the present agricultural field, intended to reveal geological features and geomorphological processes at the base of the mound. In the first three seasons (1997, 1998, 2000) Area D was supervised by Amir Sumaka'i Fink, together with Yoav Schur in 1997–1998. In 2005, 2007, 2008, 2010 and 2011), Area D East was supervised by Yael Rotem and Area D West by Uri Davidovich.
The present chapter is divided between the two parts of the area: the western (lower) part and eastern (higher) part.
The goal of the excavation of Area D was to study the occupation history, stratigraphic sequence, formation processes and potential fortification lines in the lower mound. Based on results of previous surveys (see Chapter 3) and the shape of the steep, homogeneous western and northern slopes of the lower mound, it was assumed that this formation was created by an earthen rampart, possibly constructed during the Middle Bronze Age. However, excavation has unequivocally shown that the lower mound was first settled in Late Bronze I, a phenomenon which is almost unparalleled at other sites in the Southern Levant.
Continuous occupation was detected in Area D from Late Bronze I to Iron IIA, a time span of some 600 years. The excavation concentrated on defining the various strata and occupation phases and their architectural remains, as well as the nature of the transition between them. Eleven main strata and several sub-phases were defined along the slope, with an accumulation reaching 11.45 m (between levels 76.45 m and 87.90 m) (Fig. 15.2). No fortifications were found along the entire step trench and no major destruction events were identified between the strata. The correlation between Strata D-2 and D-1 to the stratigraphy in nearby Area C was a key to anchoring the local stratigraphy of Area D in relation to the rest of the tell, although the issue of the precise correlation between the Iron IB strata in Area D and those in Area C remains unresolved and is further discussed below in this chapter. Table 15.1 presents the stratigraphic sequence and suggested correlation to strata in Area C, as well as periodization and approximate dates of the various strata.1
- Table 15.1 -
Stratigraphy and chronology in Area D, with correlation to Area C from Mazar et. al. (2020 v. 3: Chapter 17)
Table 15.1
Stratigraphy and chronology in Area D, with correlation to Area C
Mazar et. al. (2020 v.3) - Table 15.2 -
Locus and basket numbers from Mazar et. al. (2020 v. 3: Chapter 17)
Table 15.2
Locus and basket numbers
Mazar et. al. (2020 v.3) - Figure 15.1 -
Location of section drawings on superimposed plan of Strata D-11–D-2 from Mazar et. al. (2020 v. 3: Chapter 17)
Figure 15.1
Location of section drawings on superimposed plan of Strata D-11–D-2
Mazar et. al. (2020 v.3) - Figure 15.2 -
Schematic section of Area D from Mazar et. al. (2020 v. 3: Chapter 17)
Figure 15.2
Schematic section of Area D
Mazar et. al. (2020 v.3) - Figure 15.17b -
Section 1b from Mazar et. al. (2020 v. 3: Chapter 15)
Figure 15.17b
Section 1b (Squares J–M/5 and part of N/5, looking north)
Mazar et. al. (2020 v.3)
The initial understanding of the formation processes of the site assumed that Tel Rehov in general, and the lower mound in particular, developed on a natural spur which protruded slightly above the level of the surrounding fields. This assumption was presumably corroborated later by the results of the geoseismic survey, which showed that both parts of the mound were built on an elevated, eastward-tilted tufa block (Zilberman et al. 2002; Chapter 2, this volume). It was also assumed that the level of the field to the west of the mound remained fairly unchanged during the time span that elapsed from the first settlement in the lower mound to the present day. The low natural hill inferred from the geoseismic survey (Zilberman et al. 2002) was not found during the excavation. In fact, the excavation in Area D has shown that the lower mound was built of successive, almost horizontal strata which show almost no terracing, beginning at a level even lower than that of the current field.
Evidence gathered both by excavation at the base of Area D (see below) and during the geoseismic survey indicates that a geological fault, probably of a stepped structure, borders the mound on the west (Chapter 2 and Zilberman et al. 2004). Young tectonic activity along this fault, which postdates at least the earlier strata of the lower mound, is indicated by the missing western portion of the monumental building of Stratum D-10 (see below), as gravitational erosion cannot account for this observation. This tectonic activity has created, together with the continuous occupation of the site east of the fault line, a clear demarcation between the mound and the down-faulted block to its west, a process which possibly enhanced post-depositional erosion on the western slope of the mound. It is hypothesized, based on the plans of most strata (e.g., the buildings of Strata D-5 and D-4), that the scale of erosion (i.e., the missing portions of most strata) is no greater than a few meters. Thus, it seems untenable to assume that fortification systems could have been entirely eroded. Combined with the evidence gathered in Areas C and E, it is concluded that the lower mound was probably never fortified.
The young tectonic activities, both in the aforementioned fault and in other faults surrounding the mound (Zilberman et al. 2004; Chapter 2, this volume), could also have caused the tilting of layers and structures towards the southeast (towards the center of the mound) that was noted in both Areas D and C. This post-depositional tilting could have occurred during the occupational sequence, either close in time to the creation of the tilted features, or much later (see Chapter 3 and below, discussion of Strata D-11 and D-10).
Based on a backhoe trench excavated in the present-day field west of the mound, it is clear that the down-faulted block is covered with at least 4.3 m of dark brown colluvium which accumulated in the last 1000–1500 years, as indicated by the appearance of worn Roman-Byzantine or later sherds which must have originated in the Late Antiquity settlement of Rehob, located ca. 700 m to the northwest of Area D (Vitto 1993). The top level of the present field is ca. 2.0 m higher than the bedrock of the uplifted tufa block, as was exposed at the base of the excavation in Area D (Fig. 15.17b, and further below).
- Table 15.1 -
Stratigraphy and chronology in Area D, with correlation to Area C from Mazar et. al. (2020 v. 3: Chapter 17)
Table 15.1
Stratigraphy and chronology in Area D, with correlation to Area C
Mazar et. al. (2020 v.3) - Table 15.2 -
Locus and basket numbers from Mazar et. al. (2020 v. 3: Chapter 17)
Table 15.2
Locus and basket numbers
Mazar et. al. (2020 v.3) - Figure 15.1 -
Location of section drawings on superimposed plan of Strata D-11–D-2 from Mazar et. al. (2020 v. 3: Chapter 17)
Figure 15.1
Location of section drawings on superimposed plan of Strata D-11–D-2
Mazar et. al. (2020 v.3) - Figure 15.2 -
Schematic section of Area D from Mazar et. al. (2020 v. 3: Chapter 17)
Figure 15.2
Schematic section of Area D
Mazar et. al. (2020 v.3) - Figure 15.17a -
Section 1a from Mazar et. al. (2020 v. 3: Chapter 15)
Figure 15.17a
Section 1a (Squares G–L/5, looking north, showing probe in alluvial field)
Mazar et. al. (2020 v.3) - Figure 15.17b -
Section 1b from Mazar et. al. (2020 v. 3: Chapter 15)
Figure 15.17b
Section 1b (Squares J–M/5 and part of N/5, looking north)
Mazar et. al. (2020 v.3) - Figure 15.18a -
Section 2a from Mazar et. al. (2020 v. 3: Chapter 15)
 Figure 15.18a
Section 2a (Squares M/4–5, looking west in Probe III)
Mazar et. al. (2020 v.3) - Figure 15.18b -
Section 2b from Mazar et. al. (2020 v. 3: Chapter 15)
 Figure 15.18b
Section 2a (Squares M/4–5, looking west in Probe III)
Mazar et. al. (2020 v.3)
- Sections: Fig. 15.17a–b
Apart from studying the earliest part of the stratigraphic sequence of the lower mound, the excavations at the base of Area D had two additional goals: to clarify the outline of the natural topography, whether bedrock or virgin soil, which predated the first human activity in this area, and to explore the relationship between the formation processes of the lower mound in its initial phases and of the nearby plain located to the west of the mound. These investigations were carried out in three deep manually excavated probes and in two narrow backhoe trenches, all located at the lowermost part of the step trench.
Three probes were dug in order to explore the constructional fill of Stratum D-10 and occupation layers of Stratum D-11 (Fig. 15.3):
- Probe I, located at the northwestern corner of Square L/4 (excavated in 1998, 1.0×2.0 m)
- Probe II, located at the southwestern corner of Square M/4 (excavated in 2008 and 2010, ca. 1.0×2.5 m)
- Probe III, located at the southern part of Square M/5 and northern part of Square M/4 (excavated in 2010, ca. 9.0 sq m).
A 17 m-long backhoe trench, 0.7 m wide and up to 4.0 m deep, was first dug in 1998 in Squares K–L/5 (4.0 m long) and was extended and deepened during the 2005 and 2008 seasons, along the line of Squares J–M/5 (Fig. 15.3, lower part of Fig. 15.17a). The purpose of this trench was to examine the depth and extent of the 2.0 m-deep artificial fill of Stratum D-10 (which, at the time, was thought to be a natural phenomenon), as well as to uncover geological features related to the edge of the mound and its relation to the colluvial field to the west. During the 2008 season, another short trench (1.0 m wide, 2.5 m long, 4.3 m deep) was dug in this field (Squares H–G/5) (Fig. 15.17a). Although done with a backhoe, the work was closely supervised, with pottery collected and assigned to the various layers. Yet, most of this trench contained either topsoil wash (Squares J–K/5) or a deep fill devoid of finds (Squares L–M/5).
Bedrock, reached at the bottom of Probes I and III, as well as in the backhoe trench (Squares L– M/4–5) (Figs. 15.3, 15.17a, 15.18a), is composed of chunky yellowish tufa, belonging most probably to the Beth-Shean formation of the Late Pleistocene, at the margins of the tilted, uplifted block detected in the geoseismic survey (Chapter 2 and Zilberman et al. 2002). The tufa bedrock forms a roughly horizontal surface, detected at level 76.15 m in Squares K–M/5 in the backhoe trench, at 76.30 m at the bottom of Probe I, and at 75.95 m at the bottom of Probe III. In the western portion of the backhoe trench, at the eastern side of Square J/5, a natural fault was observed in the tufa bedrock. The fault, 1.3 m high, separates an eastern uplifted block from a down-faulted area to its west, where bedrock forms a horizontal surface at level 74.85 m (Figs. 15.17a–b). This fault may constitute only one branch of a wider, stepped fault, since the continuation of the long backhoe trench, dug in the field ca. 8.0 m to the west of the aforementioned fault, was excavated to level 73.85 m without reaching bedrock (Fig. 15.17a). This level is lower by ca. 1.0 m compared to the bedrock level of the down-faulted block detected in the long trench, thus implying a step-like fault zone west of the mound, which is probably part of the fault bordering Tel Rehov on the west, detected during the geoseismic survey (Chapter 2). Regarding the possibility of young tectonic activity along this fault line and its implications for the formation of the lower mound, see discussion above and further below.
The field which lies to the west of the lower mound, intensively cultivated in the last decades, gradually slopes from the west (near today’s Road 90) to the east, towards its lowest part just at the foot of the mound, where a north–south dirt road currently runs. The present level of the field at the base of Area D is 78.50 m, ca. 2.3 m above the uplifted tufa bedrock surface described above. As already mentioned, the short backhoe trench that was dug in the field ca. 8.0 m west of the aforementioned fault (Fig. 15.17a; Photo 15.7), descended from the surface of the field to level 73.85 m (4.3 m deep) without reaching bedrock.
The first anthropogenic activity in Squares K– L/4–5 seems to have taken place immediately above bedrock. Considering that the uplifted tufa bedrock had been exposed above ground when the first occupants arrived, the field would have been at least 2.0 m below its present level. However, due to the possibility of young tectonic activities, discussed above, the actual level of the field could have been much lower with regard to the initial occupation.
- Table 15.1 -
Stratigraphy and chronology in Area D, with correlation to Area C from Mazar et. al. (2020 v. 3: Chapter 17)
Table 15.1
Stratigraphy and chronology in Area D, with correlation to Area C
Mazar et. al. (2020 v.3) - Table 15.2 -
Locus and basket numbers from Mazar et. al. (2020 v. 3: Chapter 17)
Table 15.2
Locus and basket numbers
Mazar et. al. (2020 v.3) - Figure 15.1 -
Location of section drawings on superimposed plan of Strata D-11–D-2 from Mazar et. al. (2020 v. 3: Chapter 17)
Figure 15.1
Location of section drawings on superimposed plan of Strata D-11–D-2
Mazar et. al. (2020 v.3) - Figure 15.2 -
Schematic section of Area D from Mazar et. al. (2020 v. 3: Chapter 17)
Figure 15.2
Schematic section of Area D
Mazar et. al. (2020 v.3) - Figure 15.3 -
Plan of Stratum D-11b from Mazar et. al. (2020 v. 3: Chapter 15)
Figure 15.3
Plan of Stratum D-11b
Mazar et. al. (2020 v.3) - Figure 15.4 -
Plan of Stratum D-11a from Mazar et. al. (2020 v. 3: Chapter 15)
Figure 15.4
Plan of Stratum D-11a
Mazar et. al. (2020 v.3) - Figure 15.17a -
Section 1a from Mazar et. al. (2020 v. 3: Chapter 15)
Figure 15.17a
Section 1a (Squares G–L/5, looking north, showing probe in alluvial field)
Mazar et. al. (2020 v.3) - Figure 15.17b -
Section 1b from Mazar et. al. (2020 v. 3: Chapter 15)
Figure 15.17b
Section 1b (Squares J–M/5 and part of N/5, looking north)
Mazar et. al. (2020 v.3) - Figure 15.18a -
Section 2a from Mazar et. al. (2020 v. 3: Chapter 15)
Figure 15.18a
Section 2a (Squares M/4–5, looking west in Probe III)
Mazar et. al. (2020 v.3) - Figure 15.18b -
Section 2b from Mazar et. al. (2020 v. 3: Chapter 15)
Figure 15.18b
Section 2a (Squares M/4–5, looking west in Probe III)
Mazar et. al. (2020 v.3) - Figure 15.19 -
Section 3 from Mazar et. al. (2020 v. 3: Chapter 15)
Figure 15.19
Section 3 (Squares L–N/4, looking north)
Mazar et. al. (2020 v.3) - Figure 15.20 -
Section 4 from Mazar et. al. (2020 v. 3: Chapter 15)
Figure 15.20
Section 4 (Squares N–L/4, looking south)
Mazar et. al. (2020 v.3) - Photo 15.6 -
General view, end of 2010 season from Mazar et. al. (2020 v. 3: Chapter 15)
Photo 15.6
General view, end of 2010 season, looking southwest; Squares L–N/4–5
Mazar et. al. (2020 v.3) - Photo 15.8 -
Probe III in Squares M/4–5 from Mazar et. al. (2020 v. 3: Chapter 15)
 Photo 15.8
Probe III in Squares M/4–5; looking south at Stratum D-10 Buttress 2889 and Wall 2886; right: section in 2.0 m-high tufa fill, Stratum D-10; bottom left: D-11b Hearth 1926
Mazar et. al. (2020 v.3) - Photo 15.9 -
Probe III in Squares M/4–5 from Mazar et. al. (2020 v. 3: Chapter 15)
 Photo 15.9
Probe III in Squares M/4–5; looking south at Buttress 2889 and Wall 2886, Stratum D-10; bottom: D-11b Hearths 1926 (left) and 1925 (right), Wall 1927 to their north
Mazar et. al. (2020 v.3) - Photo 15.10 -
Probe III in Squares M/4–5 from Mazar et. al. (2020 v. 3: Chapter 15)
 Photo 15.10
Probe III in Squares M/4–5; looking north at Stratum D-10 Buttress 8938 and Wall 8942; bottom: D-11a Wall 1915 and ash pile (1919) to its north; northern and western sections: D-10 tufa fill
Mazar et. al. (2020 v.3) - Photo 15.11 -
Probe III in Squares M/4–5 from Mazar et. al. (2020 v. 3: Chapter 15)
 Photo 15.11
Probe III in Squares M/4–5, looking north at D-11a Wall 1923 covered by layer (1907) and tufa fill (2814) of D-10
Mazar et. al. (2020 v.3) - Photo 15.12 -
Probe II in Square M/4 from Mazar et. al. (2020 v. 3: Chapter 15)
 Photo 15.12
Probe II in Square M/4, looking east; D-11a stone floor (9917) covering D-11b layers; on top: successive D-10 fill layers (9914, 9905) and Floor 8939
Mazar et. al. (2020 v.3) - Photo 15.13 -
Backhoe trench in Square M/5 from Mazar et. al. (2020 v. 3: Chapter 15)
 Photo 15.13
Backhoe trench in Square M/5, looking east; D-10 Wall 8942 with large stone below it at end of trench; thick tufa fill 2814 in trench sections
Mazar et. al. (2020 v.3)
- Plans: Figs. 15.3–15.4
- Sections: Figs. 15.17–15.20
- Photos 15.6, 15.8–15.13
- Pottery: Figs. 16.1–16.3
- Table 15.1 -
Stratigraphy and chronology in Area D, with correlation to Area C from Mazar et. al. (2020 v. 3: Chapter 17)
Table 15.1
Stratigraphy and chronology in Area D, with correlation to Area C
Mazar et. al. (2020 v.3) - Table 15.2 -
Locus and basket numbers from Mazar et. al. (2020 v. 3: Chapter 17)
Table 15.2
Locus and basket numbers
Mazar et. al. (2020 v.3) - Figure 15.1 -
Location of section drawings on superimposed plan of Strata D-11–D-2 from Mazar et. al. (2020 v. 3: Chapter 17)
Figure 15.1
Location of section drawings on superimposed plan of Strata D-11–D-2
Mazar et. al. (2020 v.3) - Figure 15.2 -
Schematic section of Area D from Mazar et. al. (2020 v. 3: Chapter 17)
Figure 15.2
Schematic section of Area D
Mazar et. al. (2020 v.3) - Figure 15.5 -
Plan of Stratum D-10 constructional fills from Mazar et. al. (2020 v. 3: Chapter 15)
Figure 15.5
Plan of Stratum D-10 constructional fills
Mazar et. al. (2020 v.3) - Figure 15.6 -
Plan of Stratum D-10 from Mazar et. al. (2020 v. 3: Chapter 15)
Figure 15.6
Plan of Stratum D-10
Mazar et. al. (2020 v.3) - Figure 15.17a -
Section 1a from Mazar et. al. (2020 v. 3: Chapter 15)
Figure 15.17a
Section 1a (Squares G–L/5, looking north, showing probe in alluvial field)
Mazar et. al. (2020 v.3) - Figure 15.17b -
Section 1b from Mazar et. al. (2020 v. 3: Chapter 15)
Figure 15.17b
Section 1b (Squares J–M/5 and part of N/5, looking north)
Mazar et. al. (2020 v.3) - Figure 15.18a -
Section 2a from Mazar et. al. (2020 v. 3: Chapter 15)
Figure 15.18a
Section 2a (Squares M/4–5, looking west in Probe III)
Mazar et. al. (2020 v.3) - Figure 15.18b -
Section 2b from Mazar et. al. (2020 v. 3: Chapter 15)
Figure 15.18b
Section 2a (Squares M/4–5, looking west in Probe III)
Mazar et. al. (2020 v.3) - Figure 15.19 -
Section 3 from Mazar et. al. (2020 v. 3: Chapter 15)
Figure 15.19
Section 3 (Squares L–N/4, looking north)
Mazar et. al. (2020 v.3) - Figure 15.20 -
Section 4 from Mazar et. al. (2020 v. 3: Chapter 15)
Figure 15.20
Section 4 (Squares N–L/4, looking south)
Mazar et. al. (2020 v.3) - Photo 15.4 -
Area D at the end of 2005 season from Mazar et. al. (2020 v. 3: Chapter 15)
Photo 15.4
General view, end of 2005 season, looking east; from top to bottom: Squares Q/4–5 to L/4–5
Mazar et. al. (2020 v.3) - Photo 15.5 -
Aerial view, end of 2008 season from Mazar et. al. (2020 v. 3: Chapter 15)
Photo 15.5
Aerial view, end of 2008 season
Mazar et. al. (2020 v.3) - Photo 15.6 -
General view, end of 2010 season from Mazar et. al. (2020 v. 3: Chapter 15)
Photo 15.6
General view, end of 2010 season, looking southwest; Squares L–N/4–5
Mazar et. al. (2020 v.3) - Photo 15.8 -
Probe III in Squares M/4–5 from Mazar et. al. (2020 v. 3: Chapter 15)
Photo 15.8
Probe III in Squares M/4–5; looking south at Stratum D-10 Buttress 2889 and Wall 2886; right: section in 2.0 m-high tufa fill, Stratum D-10; bottom left: D-11b Hearth 1926
Mazar et. al. (2020 v.3) - Photo 15.9 -
Probe III in Squares M/4–5 from Mazar et. al. (2020 v. 3: Chapter 15)
Photo 15.9
Probe III in Squares M/4–5; looking south at Buttress 2889 and Wall 2886, Stratum D-10; bottom: D-11b Hearths 1926 (left) and 1925 (right), Wall 1927 to their north
Mazar et. al. (2020 v.3) - Photo 15.10 -
Probe III in Squares M/4–5 from Mazar et. al. (2020 v. 3: Chapter 15)
Photo 15.10
Probe III in Squares M/4–5; looking north at Stratum D-10 Buttress 8938 and Wall 8942; bottom: D-11a Wall 1915 and ash pile (1919) to its north; northern and western sections: D-10 tufa fill
Mazar et. al. (2020 v.3) - Photo 15.11 -
Probe III in Squares M/4–5 from Mazar et. al. (2020 v. 3: Chapter 15)
Photo 15.11
Probe III in Squares M/4–5, looking north at D-11a Wall 1923 covered by layer (1907) and tufa fill (2814) of D-10
Mazar et. al. (2020 v.3) - Photo 15.12 -
Probe II in Square M/4 from Mazar et. al. (2020 v. 3: Chapter 15)
Photo 15.12
Probe II in Square M/4, looking east; D-11a stone floor (9917) covering D-11b layers; on top: successive D-10 fill layers (9914, 9905) and Floor 8939
Mazar et. al. (2020 v.3) - Photo 15.13 -
Backhoe trench in Square M/5 from Mazar et. al. (2020 v. 3: Chapter 15)
Photo 15.13
Backhoe trench in Square M/5, looking east; D-10 Wall 8942 with large stone below it at end of trench; thick tufa fill 2814 in trench sections
Mazar et. al. (2020 v.3) - Photo 15.14 -
Probe III in Squares M/4–5 from Mazar et. al. (2020 v. 3: Chapter 15)
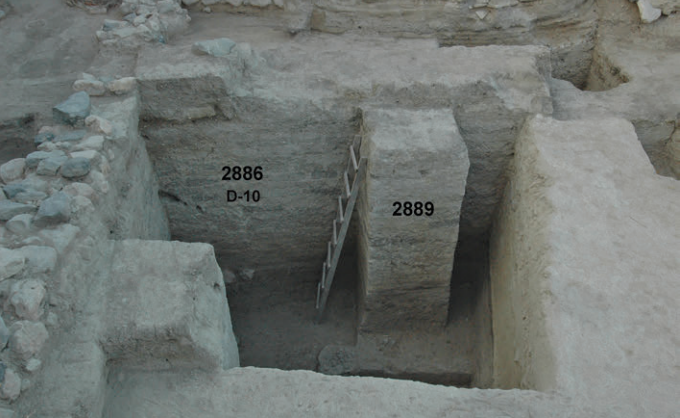 Photo 15.14
Probe III in Squares M/4–5, looking south; left: stone foundation of D-9b Wall 8943 on top of D-10 Wall 8942 and Buttress 8938; background: D-10 Wall 2886 and Buttress 2889 (2010)
Mazar et. al. (2020 v.3) - Photo 15.15 -
Detail of Probe III from Mazar et. al. (2020 v. 3: Chapter 15)
 Photo 15.15
Detail of Probe III, looking south at Wall 2886 and Buttress 2889 (2010)
Mazar et. al. (2020 v.3) - Photo 15.16 -
Detail of Probe III from Mazar et. al. (2020 v. 3: Chapter 15)
 Photo 15.16
Detail of Probe III, looking east at Wall 8942 and Buttress 8938 (left) (2010)
Mazar et. al. (2020 v.3) - Photo 15.18 -
Squares L–M/4 at end of 2010 season from Mazar et. al. (2020 v. 3: Chapter 15)
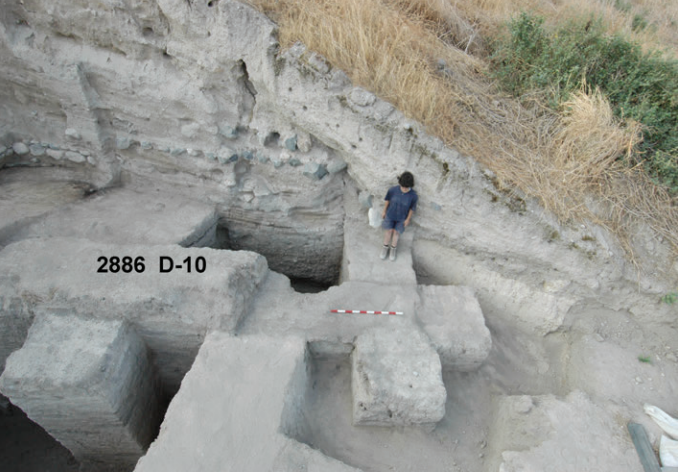 Photo 15.18
Squares L–M/4 at end of 2010 season, looking south at D-10 Walls 2886 and 2890 and Buttresses 2889, 1902, 1903; Probe II (9905) in Square M/4 east of Wall 2890
Mazar et. al. (2020 v.3) - Photo 15.19 -
Probe II in Square M/4 from Mazar et. al. (2020 v. 3: Chapter 15)
 Photo 15.19
Probe II in Square M/4, looking east; D-10 constructional fill (9914, 9905) and Floor 8939 in section (1998)
Mazar et. al. (2020 v.3) - Photo 15.20 -
Probe II in Square M/4 from Mazar et. al. (2020 v. 3: Chapter 15)
 Photo 15.20
Probe II in Square M/4, looking south; D-10 constructional fill (9914, 9905) and Floor 8939 in section (2008)
Mazar et. al. (2020 v.3) - Photo 15.21 -
Squares L–M/4 from Mazar et. al. (2020 v. 3: Chapter 15)
 Photo 15.21
Squares L–M/4, looking east at corner of Wall 2890 and Buttresses 1902 and 1903; left: Courtyard 8934 (2010)
Mazar et. al. (2020 v.3) - Photo 15.22 -
Square M/5, Buttress 8938 and Wall 8942 abutted by D-10 Courtyard 8934 from Mazar et. al. (2020 v. 3: Chapter 15)
 Photo 15.22
Square M/5, Buttress 8938 and Wall 8942 abutted by D-10 Courtyard 8934, looking northeast (2008)
Mazar et. al. (2020 v.3) - Photo 15.23 -
Squares L–N/4–5 from Mazar et. al. (2020 v. 3: Chapter 15)
 Photo 15.23
Squares L–N/4–5, looking east; front: D-10 Courtyard 8934 and top of Buttresses 2889 (right) and 8938 (left); background: Strata D-9 to D-5 (2007)
Mazar et. al. (2020 v.3) - Photo 15.24 -
Squares L–N/4–5 from Mazar et. al. (2020 v. 3: Chapter 15)
 Photo 15.24
Squares L–N/4–5, looking south; center: D-10 Courtyard 8934; left: Wall 8942 and Buttress 8938; top: Wall 2886 and Buttress 2889, partly superimposed by D-9b 2816 and 2892; in southern section: D-9 and D-8 layers (2007)
Mazar et. al. (2020 v.3) - Photo 15.25 -
Squares L–N/4–5 from Mazar et. al. (2020 v. 3: Chapter 15)
 Photo 15.25
Squares L–N/4–5, looking north; center: D-10 Courtyard 8934; right: Buttress 8938; bottom: Wall 2886 and Buttress 2889 partly superimposed by D-9b Walls 2816 and 2892 (2007)
Mazar et. al. (2020 v.3) - Photo 15.26 -
Squares L–M/4 from Mazar et. al. (2020 v. 3: Chapter 15)
 Photo 15.26
Squares L–M/4, looking south at section; bottom: D-9b Wall 2816; D-9a stone floor (2855) at top of meter stick, sealing D-10 and D-9b floors (bird-nest holes in section) (2007)
Mazar et. al. (2020 v.3) - Photo 15.27 -
Squares M–N/4 from Mazar et. al. (2020 v. 3: Chapter 15)
 Photo 15.27
Squares M–N/4, looking southeast; D-10 Courtyard 8934 in corner of Walls 8942 and 2886; top left: stone foundation of D-9b Wall 8943 (2008).
Mazar et. al. (2020 v.3) - Photo 15.37 -
Squares L–M/4 from Mazar et. al. (2020 v. 3: Chapter 15)
 Photo 15.37
Squares L–M/4, looking north at foundations of D-9b Wall 2816 above D-10 Wall 2886 and Buttress 1903, with D-10 Wall 2890 at the bottom
Mazar et. al. (2020 v.3) - Photo 15.38 -
Square N/4 from Mazar et. al. (2020 v. 3: Chapter 15)
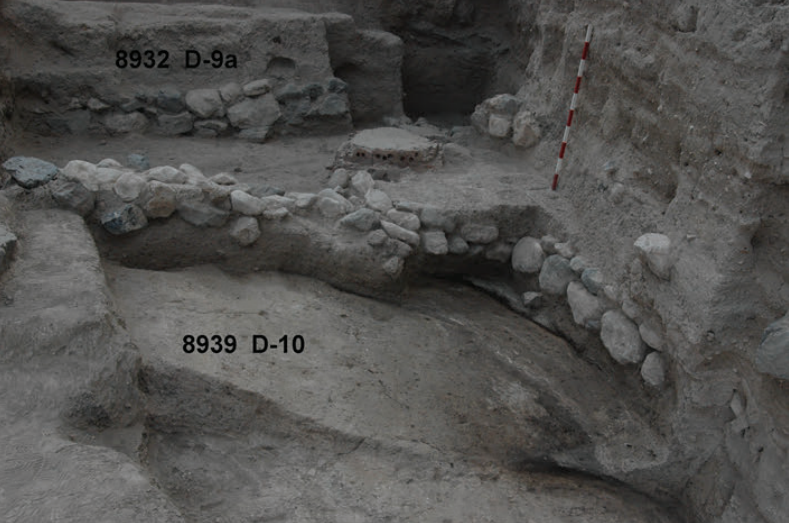 Photo 15.38
Square N/4, sloping striations in D-10 Locus 8939 below D-9 stone foundations of Walls 8943 and 1906, looking east; background: D-8–9a Wall 8932 (2010)
Mazar et. al. (2020 v.3)
- Plans: Figs. 15.5–15.6
- Sections: Figs. 15.17–15.20
- Photos 15.4–15.6, 15.8–15.16, 15.18–15.27, 15.37–15.38
- Pottery: Figs. 16.4–16.8
- Table 15.1 -
Stratigraphy and chronology in Area D, with correlation to Area C from Mazar et. al. (2020 v. 3: Chapter 17)
Table 15.1
Stratigraphy and chronology in Area D, with correlation to Area C
Mazar et. al. (2020 v.3) - Table 15.2 -
Locus and basket numbers from Mazar et. al. (2020 v. 3: Chapter 17)
Table 15.2
Locus and basket numbers
Mazar et. al. (2020 v.3) - Figure 15.1 -
Location of section drawings on superimposed plan of Strata D-11–D-2 from Mazar et. al. (2020 v. 3: Chapter 17)
Figure 15.1
Location of section drawings on superimposed plan of Strata D-11–D-2
Mazar et. al. (2020 v.3) - Figure 15.2 -
Schematic section of Area D from Mazar et. al. (2020 v. 3: Chapter 17)
Figure 15.2
Schematic section of Area D
Mazar et. al. (2020 v.3) - Figure 15.7 -
Plan of Stratum D-9b from Mazar et. al. (2020 v. 3: Chapter 15)
Figure 15.7
Plan of Stratum D-9b
Mazar et. al. (2020 v.3) - Figure 15.8 -
Plan of Stratum D-9a from Mazar et. al. (2020 v. 3: Chapter 15)
Figure 15.8
Plan of Stratum D-9a
Mazar et. al. (2020 v.3) - Figure 15.17a -
Section 1a from Mazar et. al. (2020 v. 3: Chapter 15)
Figure 15.17a
Section 1a (Squares G–L/5, looking north, showing probe in alluvial field)
Mazar et. al. (2020 v.3) - Figure 15.17b -
Section 1b from Mazar et. al. (2020 v. 3: Chapter 15)
Figure 15.17b
Section 1b (Squares J–M/5 and part of N/5, looking north)
Mazar et. al. (2020 v.3) - Figure 15.18a -
Section 2a from Mazar et. al. (2020 v. 3: Chapter 15)
Figure 15.18a
Section 2a (Squares M/4–5, looking west in Probe III)
Mazar et. al. (2020 v.3) - Figure 15.18b -
Section 2b from Mazar et. al. (2020 v. 3: Chapter 15)
Figure 15.18b
Section 2a (Squares M/4–5, looking west in Probe III)
Mazar et. al. (2020 v.3) - Figure 15.19 -
Section 3 from Mazar et. al. (2020 v. 3: Chapter 15)
Figure 15.19
Section 3 (Squares L–N/4, looking north)
Mazar et. al. (2020 v.3) - Figure 15.20 -
Section 4 from Mazar et. al. (2020 v. 3: Chapter 15)
Figure 15.20
Section 4 (Squares N–L/4, looking south)
Mazar et. al. (2020 v.3) - Figure 15.21 -
Section 5 from Mazar et. al. (2020 v. 3: Chapter 15)
Figure 15.21
Section 5 (Squares N/4–5, looking east)
Mazar et. al. (2020 v.3) - Photo 15.23 -
Squares L–N/4–5 from Mazar et. al. (2020 v. 3: Chapter 15)
Photo 15.23
Squares L–N/4–5, looking east; front: D-10 Courtyard 8934 and top of Buttresses 2889 (right) and 8938 (left); background: Strata D-9 to D-5 (2007)
Mazar et. al. (2020 v.3) - Photo 15.24 -
Squares L–N/4–5 from Mazar et. al. (2020 v. 3: Chapter 15)
Photo 15.24
Squares L–N/4–5, looking south; center: D-10 Courtyard 8934; left: Wall 8942 and Buttress 8938; top: Wall 2886 and Buttress 2889, partly superimposed by D-9b 2816 and 2892; in southern section: D-9 and D-8 layers (2007)
Mazar et. al. (2020 v.3) - Photo 15.25 -
Squares L–N/4–5 from Mazar et. al. (2020 v. 3: Chapter 15)
Photo 15.25
Squares L–N/4–5, looking north; center: D-10 Courtyard 8934; right: Buttress 8938; bottom: Wall 2886 and Buttress 2889 partly superimposed by D-9b Walls 2816 and 2892 (2007)
Mazar et. al. (2020 v.3) - Photo 15.26 -
Squares L–M/4 from Mazar et. al. (2020 v. 3: Chapter 15)
Photo 15.26
Squares L–M/4, looking south at section; bottom: D-9b Wall 2816; D-9a stone floor (2855) at top of meter stick, sealing D-10 and D-9b floors (bird-nest holes in section) (2007)
Mazar et. al. (2020 v.3) - Photo 15.27 -
Squares M–N/4 from Mazar et. al. (2020 v. 3: Chapter 15)
Photo 15.27
Squares M–N/4, looking southeast; D-10 Courtyard 8934 in corner of Walls 8942 and 2886; top left: stone foundation of D-9b Wall 8943 (2008).
Mazar et. al. (2020 v.3) - Photo 15.28 -
Squares M–N/4–5 from Mazar et. al. (2020 v. 3: Chapter 15)
Photo 15.28
Squares M–N/4–5, looking south at D-9a–b stone foundations (2010)
Mazar et. al. (2020 v.3) - Photo 15.29 -
Squares M–N/4–5, from Mazar et. al. (2020 v. 3: Chapter 15)
Photo 15.29
Squares M–N/4–5, looking south; left: D-9a Wall 8932 and Post-holes 1912; right: D-9b stone foundations (2010)
Mazar et. al. (2020 v.3) - Photo 15.30 -
Squares N/4–5 from Mazar et. al. (2020 v. 3: Chapter 15)
Photo 15.30
Squares N/4–5, looking west; top: D-9b stone foundations; bottom: D-9a Wall 8932 and Post-holes 1912; right: D-9a Wall 1916 (2010)
Mazar et. al. (2020 v.3) - Photo 15.31 -
Squares N/5 from Mazar et. al. (2020 v. 3: Chapter 15)
Photo 15.31
Square N/5, looking south; bottom: D-9a Wall 1916; right and top: D-9b Walls 8943 and 9923; left: D-9a Post-holes 1912 (2010)
Mazar et. al. (2020 v.3) - Photo 15.32 -
Squares N/4 from Mazar et. al. (2020 v. 3: Chapter 15)
 Photo 15.32
Square N/4, looking south at D-9b Floor 9927, Oven 9918 and Installation 1905; right: Wall 8943; background: Wall 1904 (2010)
Mazar et. al. (2020 v.3) - Photo 15.33 -
Square M/5 from Mazar et. al. (2020 v. 3: Chapter 15)
 Photo 15.33
Square M/5, looking south at D-9b bronze-melting canal (8921) and Installation 8925 (2007)
Mazar et. al. (2020 v.3) - Photo 15.34 -
Detail of bronze-melting canal (8921) with fragments of bellow, charcoal, and metal object in situ from Mazar et. al. (2020 v. 3: Chapter 15)
 Photo 15.34
Detail of bronze-melting canal (8921) with fragments of bellow, charcoal, and metal object in situ, looking west (2007)
Mazar et. al. (2020 v.3) - Photo 15.35 -
Square M/5 from Mazar et. al. (2020 v. 3: Chapter 15)
 Photo 15.35
Square M/5, detail of Installation 8925 near bronze-melting canal (8921), looking south (2007)
Mazar et. al. (2020 v.3) - Photo 15.36 -
Square M/5 from Mazar et. al. (2020 v. 3: Chapter 15)
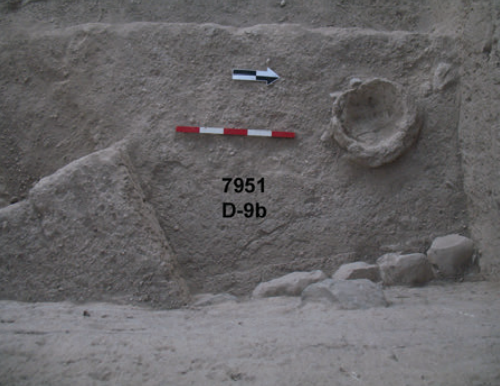 Photo 15.36
Square M/5, D-9b Installation 8936 and stone foundation of Wall 8943, looking west; left: D-10 Buttress 8938 (2007)
Mazar et. al. (2020 v.3) - Photo 15.37 -
Squares L–M/4 from Mazar et. al. (2020 v. 3: Chapter 15)
Photo 15.37
Squares L–M/4, looking north at foundations of D-9b Wall 2816 above D-10 Wall 2886 and Buttress 1903, with D-10 Wall 2890 at the bottom
Mazar et. al. (2020 v.3) - Photo 15.38 -
Square N/4 from Mazar et. al. (2020 v. 3: Chapter 15)
Photo 15.38
Square N/4, sloping striations in D-10 Locus 8939 below D-9 stone foundations of Walls 8943 and 1906, looking east; background: D-8–9a Wall 8932 (2010)
Mazar et. al. (2020 v.3) - Photo 15.39 -
Square N/4 from Mazar et. al. (2020 v. 3: Chapter 15)
 Photo 15.39
Square N/4, Locus 8919, foundation deposit (basalt bowl and lamp) in corner of Walls 8943 and 1906, looking southeast (2010)
Mazar et. al. (2020 v.3) - Photo 15.40 -
Squares M–N/4–5 from Mazar et. al. (2020 v. 3: Chapter 15)
Photo 15.40
Squares M–N/4–5, looking east; left: backhoe trench into D-10 tufa fill near porcupine hole; D-9 to D-6b floors and installations in middle and upper steps (2005)
Mazar et. al. (2020 v.3) - Photo 15.41 -
Squares N/4–5 from Mazar et. al. (2020 v. 3: Chapter 15)
Photo 15.41
Squares N/4–5, looking east; D-8–9a Wall 8932 on D-9b Floor 9927, cut on the south by D-7b Pit 8916
Mazar et. al. (2020 v.3) - Photo 15.42 -
Squares L–N/4 from Mazar et. al. (2020 v. 3: Chapter 15)
Photo 15.42
Squares L–N/4, looking east; bottom: foundation of D-9b Wall 2816; center: D-9a stone floor 2855; above, right: D-7a Wall 1818 (1998)
Mazar et. al. (2020 v.3) - Photo 15.43 -
Square M/4 from Mazar et. al. (2020 v. 3: Chapter 15)
 Photo 15.43
Square M/4, looking east at D-9a stone floor 2855 (1998)
Mazar et. al. (2020 v.3) - Photo 15.44 -
Square M/4 from Mazar et. al. (2020 v. 3: Chapter 15)
 Photo 15.44
Square M/4, looking east at sloping layers 8939 (D-10) and 8919 (D-9b), sealed below D-9a stone Floor 2855 (2008)
Mazar et. al. (2020 v.3)
- Plans: Figs. 15.7–15.8
- Sections: Figs. 15.17, 15.18b, 15.19–15.21
- Photos 15.23–15.44
- Pottery: Figs. 16.9–16.15
- Table 15.1 -
Stratigraphy and chronology in Area D, with correlation to Area C from Mazar et. al. (2020 v. 3: Chapter 17)
Table 15.1
Stratigraphy and chronology in Area D, with correlation to Area C
Mazar et. al. (2020 v.3) - Table 15.2 -
Locus and basket numbers from Mazar et. al. (2020 v. 3: Chapter 17)
Table 15.2
Locus and basket numbers
Mazar et. al. (2020 v.3) - Figure 15.1 -
Location of section drawings on superimposed plan of Strata D-11–D-2 from Mazar et. al. (2020 v. 3: Chapter 17)
Figure 15.1
Location of section drawings on superimposed plan of Strata D-11–D-2
Mazar et. al. (2020 v.3) - Figure 15.2 -
Schematic section of Area D from Mazar et. al. (2020 v. 3: Chapter 17)
Figure 15.2
Schematic section of Area D
Mazar et. al. (2020 v.3) - Figure 15.9 -
Plan of Stratum D-8 from Mazar et. al. (2020 v. 3: Chapter 15)
Figure 15.9
Plan of Stratum D-8
Mazar et. al. (2020 v.3) - Figure 15.10 -
Plan of Stratum D-8' from Mazar et. al. (2020 v. 3: Chapter 15)
Figure 15.10
Plan of Stratum D-8'
Mazar et. al. (2020 v.3) - Figure 15.11 -
Plan of post Stratum D-8 fills from Mazar et. al. (2020 v. 3: Chapter 15)
Figure 15.11
Plan of post Stratum D-8 fills
Mazar et. al. (2020 v.3) - Figure 15.17a -
Section 1a from Mazar et. al. (2020 v. 3: Chapter 15)
Figure 15.17a
Section 1a (Squares G–L/5, looking north, showing probe in alluvial field)
Mazar et. al. (2020 v.3) - Figure 15.17b -
Section 1b from Mazar et. al. (2020 v. 3: Chapter 15)
Figure 15.17b
Section 1b (Squares J–M/5 and part of N/5, looking north)
Mazar et. al. (2020 v.3) - Figure 15.19 -
Section 3 from Mazar et. al. (2020 v. 3: Chapter 15)
Figure 15.19
Section 3 (Squares L–N/4, looking north)
Mazar et. al. (2020 v.3) - Figure 15.20 -
Section 4 from Mazar et. al. (2020 v. 3: Chapter 15)
Figure 15.20
Section 4 (Squares N–L/4, looking south)
Mazar et. al. (2020 v.3) - Figure 15.21 -
Section 5 from Mazar et. al. (2020 v. 3: Chapter 15)
Figure 15.21
Section 5 (Squares N/4–5, looking east)
Mazar et. al. (2020 v.3)
- Plans: Figs. 15.9–15.11
- Sections: Figs. 15.17b, 15.19–15.21
- Pottery: Figs. 16.16–16.23
In Stratum D-8, a large open area covered with a thick white beaten-earth floor replaced the halfopen spaces of Stratum D-9a, while the main wall line of the latter (8932 and row of pillar bases 1912) continued to be in use. The function of this spacious courtyard was hard to define, as only its eastern border was found within the excavated area and it was totally devoid of installations.
The white floor (2824 in Square M/4, 7944 in M/5, 8933 in N/4 and 9909 in N/5) extended over an area of ca. 70 sq. m and was cut by the erosion line in the west. The floor sloped in various directions at levels between 80.06 m–80.27 m, the former only 0.2–0.4 m above the floors that were attributed to Stratum D-9a, described above. It also covered the two rows of pillar bases of the previous stratum, as well as Wall 9922 in the southern part of Square N/4. The floor abutted Wall 8932 and perhaps also the wooden pillars that had stood on the stone bases 1912 (although the bases were now ca. 0.7 m lower than the new floor). The southeastern corner of the floor was cut by Stratum D-7b Pit 8916. A large complete krater (Fig. 16.18:4) was found leaning against Wall 8932 and a complete Mycenaean IIB stirrup jar (Fig. 16.22:5) was found on Floor 7944 (Square M/5). It should be noted that while the floor was clearly observed in most parts, the northern and northeastern portion of it, near the pillar bases (1912) and the northern section of Squares M–N/5, was harder to discern, possibly as the floor there was thinner or less well preserved.
In the narrow strip excavated east of Wall 8932 and pillar bases 1912, was a ca. 0.5 m-thick layer (1908, 1909) comprised mostly of brown layered sediments that might have been floors, with bones and sherds (Figs. 16.16–16.17, 16.19–16.22). An almost-complete small jug (Fig. 16.21:1) was found on top of a rather continuous thin whitish layer which might represent a floor level (79.73– 79.84 m).
The ceramic assemblage of Stratum D-8 that included several Mycenaean and Cypriot imports is typical of LB IIB and should be dated to the 13th century BCE.
- Table 15.1 -
Stratigraphy and chronology in Area D, with correlation to Area C from Mazar et. al. (2020 v. 3: Chapter 17)
Table 15.1
Stratigraphy and chronology in Area D, with correlation to Area C
Mazar et. al. (2020 v.3) - Table 15.2 -
Locus and basket numbers from Mazar et. al. (2020 v. 3: Chapter 17)
Table 15.2
Locus and basket numbers
Mazar et. al. (2020 v.3) - Figure 15.1 -
Location of section drawings on superimposed plan of Strata D-11–D-2 from Mazar et. al. (2020 v. 3: Chapter 17)
Figure 15.1
Location of section drawings on superimposed plan of Strata D-11–D-2
Mazar et. al. (2020 v.3) - Figure 15.2 -
Schematic section of Area D from Mazar et. al. (2020 v. 3: Chapter 17)
Figure 15.2
Schematic section of Area D
Mazar et. al. (2020 v.3) - Figure 15.10 -
Plan of Stratum D-8' from Mazar et. al. (2020 v. 3: Chapter 15)
Figure 15.10
Plan of Stratum D-8'
Mazar et. al. (2020 v.3)
- Plans: Figs. 15.10
The Stratum D-8 floor to the west of Wall 8932 was covered with a 0.3–0.4 m-thick layer of brick debris, containing compacted whitish brick fragments, which most probably originated from Wall 8932. In Square M/5, this debris layer was superimposed by a 0.01–0.02 m-thick pinkish clay layer (7938; Figs. 15.10, 15.17), which was covered by a thick (0.05–0.1 m) layer of dark gray ash. This layer sloped from west (80.40 m) to east (80.26 m); it extended into the northern section of the square, but faded away in its southern part, as well as in Square N/5 (9908; Fig. 15.10). On 7938 was a 0.15–0.2 m-thick accumulation, rich in sherds and animal bones, which may be explained as some kind of a localized ephemeral activity, post-dating Stratum D-8 and pre-dating Stratum D-7b; this phase was denoted D-8'. No evidence for this activity was found in Squares M–N/4.
Pottery from loci attributed to this layer is presented together with that of Stratum D-8 (Figs. 16.16–16.22), and is dated to LB IIB.
- Table 15.1 -
Stratigraphy and chronology in Area D, with correlation to Area C from Mazar et. al. (2020 v. 3: Chapter 17)
Table 15.1
Stratigraphy and chronology in Area D, with correlation to Area C
Mazar et. al. (2020 v.3) - Table 15.2 -
Locus and basket numbers from Mazar et. al. (2020 v. 3: Chapter 17)
Table 15.2
Locus and basket numbers
Mazar et. al. (2020 v.3) - Figure 15.1 -
Location of section drawings on superimposed plan of Strata D-11–D-2 from Mazar et. al. (2020 v. 3: Chapter 17)
Figure 15.1
Location of section drawings on superimposed plan of Strata D-11–D-2
Mazar et. al. (2020 v.3) - Figure 15.2 -
Schematic section of Area D from Mazar et. al. (2020 v. 3: Chapter 17)
Figure 15.2
Schematic section of Area D
Mazar et. al. (2020 v.3) - Figure 15.10 -
Plan of Stratum D-8' from Mazar et. al. (2020 v. 3: Chapter 15)
Figure 15.10
Plan of Stratum D-8'
Mazar et. al. (2020 v.3)
- Plans: Figs. 15.10
Covering the brick debris and walls related to Stratum D-8, a 0.35–0.6 m-thick layered accumulation was found all over the excavated area (2826 in Square M/4, 7915 and 7937 in M/5, 8927 and 8929 in N/4, 9904 in N/5) (Fig. 15.11). It was characterized by a soft brown layered matrix containing a few brick fragments, very rich in charred material (charcoal and grain), as well as sherds, bones, and fine plaster fragments of unknown origin. The layering of this accumulation was more pronounced in the eastern part, where the layers sloped down into the eastern section of Squares N/4–5. Several thin layers consisted of grayish material, possibly the remains of ash or decayed organics.
No architectural elements were noted in association with this thick accumulation. It clearly sealed the remains of Stratum D-8 and was superimposed by Stratum D-7b elements, most of which were pits dug into the aforementioned accumulation (see below). Therefore, it seems to belong to a post-D-8 and pre-D-7 phase. Nevertheless, it is difficult to suggest any clear explanation for such a thick accumulation, unless a gap in occupation enabled natural forces of sedimentation to operate undisrupted for an unknown time span. Another option is that this layer was a constructional fill related to the building of Stratum D-7b. Although no substantial architecture was found in the latter, the small size of the excavated area does not allow us to reach secure conclusions, and this option remains viable.
Pottery from loci attributed to this layer is presented together with that of Stratum D-8 in Figs. 16.16–16.23.
- Table 15.1 -
Stratigraphy and chronology in Area D, with correlation to Area C from Mazar et. al. (2020 v. 3: Chapter 17)
Table 15.1
Stratigraphy and chronology in Area D, with correlation to Area C
Mazar et. al. (2020 v.3) - Table 15.2 -
Locus and basket numbers from Mazar et. al. (2020 v. 3: Chapter 17)
Table 15.2
Locus and basket numbers
Mazar et. al. (2020 v.3) - Figure 15.1 -
Location of section drawings on superimposed plan of Strata D-11–D-2 from Mazar et. al. (2020 v. 3: Chapter 17)
Figure 15.1
Location of section drawings on superimposed plan of Strata D-11–D-2
Mazar et. al. (2020 v.3) - Figure 15.2 -
Schematic section of Area D from Mazar et. al. (2020 v. 3: Chapter 17)
Figure 15.2
Schematic section of Area D
Mazar et. al. (2020 v.3) - Figure 15.12 -
Plan of Stratum D-7b from Mazar et. al. (2020 v. 3: Chapter 15)
Figure 15.12
Plan of Stratum D-7b
Mazar et. al. (2020 v.3) - Figure 15.13 -
Plan of Stratum D-7a (encircled numbers denote foundation deposits as listed in the text) from Mazar et. al. (2020 v. 3: Chapter 15)
Figure 15.13
Plan of Stratum D-7a (encircled numbers denote foundation deposits as listed in the text)
Mazar et. al. (2020 v.3) - Figure 15.14 -
Plan of Stratum D-7a' from Mazar et. al. (2020 v. 3: Chapter 15)
Figure 15.14
Plan of Stratum D-7a'
Mazar et. al. (2020 v.3) - Figure 15.17a -
Section 1a from Mazar et. al. (2020 v. 3: Chapter 15)
Figure 15.17a
Section 1a (Squares G–L/5, looking north, showing probe in alluvial field)
Mazar et. al. (2020 v.3) - Figure 15.17b -
Section 1b from Mazar et. al. (2020 v. 3: Chapter 15)
Figure 15.17b
Section 1b (Squares J–M/5 and part of N/5, looking north)
Mazar et. al. (2020 v.3) - Figure 15.19 -
Section 3 from Mazar et. al. (2020 v. 3: Chapter 15)
Figure 15.19
Section 3 (Squares L–N/4, looking north)
Mazar et. al. (2020 v.3) - Figure 15.20 -
Section 4 from Mazar et. al. (2020 v. 3: Chapter 15)
Figure 15.20
Section 4 (Squares N–L/4, looking south)
Mazar et. al. (2020 v.3) - Figure 15.21 -
Section 5 from Mazar et. al. (2020 v. 3: Chapter 15)
Figure 15.21
Section 5 (Squares N/4–5, looking east)
Mazar et. al. (2020 v.3) - Photo 15.40 -
Squares M–N/4–5 from Mazar et. al. (2020 v. 3: Chapter 15)
Photo 15.40
Squares M–N/4–5, looking east; left: backhoe trench into D-10 tufa fill near porcupine hole; D-9 to D-6b floors and installations in middle and upper steps (2005)
Mazar et. al. (2020 v.3) - Photo 15.41 -
Squares N/4–5 from Mazar et. al. (2020 v. 3: Chapter 15)
Photo 15.41
Squares N/4–5, looking east; D-8–9a Wall 8932 on D-9b Floor 9927, cut on the south by D-7b Pit 8916
Mazar et. al. (2020 v.3) - Photo 15.42 -
Squares L–N/4 from Mazar et. al. (2020 v. 3: Chapter 15)
Photo 15.42
Squares L–N/4, looking east; bottom: foundation of D-9b Wall 2816; center: D-9a stone floor 2855; above, right: D-7a Wall 1818 (1998)
Mazar et. al. (2020 v.3) - Photo 15.45 -
Squares N–M/4–5 from Mazar et. al. (2020 v. 3: Chapter 15)
Photo 15.45
Squares N–M/4–5, looking southeast; center: D-7a' pillar bases; top: stone foundation of D-4 Wall 1883 (2007)
Mazar et. al. (2020 v.3) - Photo 15.46-
Northeast corner of Square M/5 from Mazar et. al. (2020 v. 3: Chapter 15)
Photo 15.46
Northeast corner of Square M/5, looking north; lamp-and-bowl foundation deposit below D-7a Wall 7906, cut into stone lining of D-7b Oven 7924 (2007)
Mazar et. al. (2020 v.3) - Photo 15.47-
Square M/5 from Mazar et. al. (2020 v. 3: Chapter 15)
Photo 15.47
Square M/5, looking south at section through D-7b Installation 7919 (2005); bowl: Fig. 16.26:2
Mazar et. al. (2020 v.3) - Photo 15.48-
Square N/4 from Mazar et. al. (2020 v. 3: Chapter 15)
Photo 15.48
Square N/4, looking northeast at D-7b Floor 8914, cut by D-7a Installation 8906 (2007)
Mazar et. al. (2020 v.3) - Photo 15.49-
Square M/5 from Mazar et. al. (2020 v. 3: Chapter 15)
Photo 15.49
Square M/5, looking north at stone foundation of D-7a Wall 7906 with floor striations in section; below the wall: ashy layer of D-7b Floor 7903 (2005)
Mazar et. al. (2020 v.3) - Photo 15.50-
Square N/5 from Mazar et. al. (2020 v. 3: Chapter 15)
Photo 15.50
Square N/5, looking north at D-7a stone floor 9906, pillar bases 9907 and Wall 8917 (2008)
Mazar et. al. (2020 v.3) - Photo 15.51-
Square N/5 from Mazar et. al. (2020 v. 3: Chapter 15)
Photo 15.51
Square N/5, looking west at D-7a stone floor 9906 and pillar bases 9907 (2008)
Mazar et. al. (2020 v.3) - Photo 15.52-
Square N/4 from Mazar et. al. (2020 v. 3: Chapter 15)
Photo 15.52
Square N/4, looking north; left: foundation of D-7a–6b Wall 2842; center: D-7a Floor 8907 and Installation 8906 (2007)
Mazar et. al. (2020 v.3) - Photo 15.53-
Square N/4 from Mazar et. al. (2020 v. 3: Chapter 15)
Photo 15.53
Square N/4, looking west; bottom left: D-7a Ovens 7946 and 8902; center: D-7b Pit 8916 (2007)
Mazar et. al. (2020 v.3) - Photo 15.54a-
Square M/4 from Mazar et. al. (2020 v. 3: Chapter 15)
Photo 15.54a
Square M/4; D-7a lamp and bowl deposits - deposit No. 2, looking southeast east (1997)
Mazar et. al. (2020 v.3) - Photo 15.54b-
Square M/4 from Mazar et. al. (2020 v. 3: Chapter 15)
Photo 15.54b
Square M/4; D-7a lamp and bowl deposits - deposit No. 3, looking east (1997)
Mazar et. al. (2020 v.3) - Photo 15.55-
Square N/5 from Mazar et. al. (2020 v. 3: Chapter 15)
Photo 15.55
Square N/5, looking west at D-7a' pillar bases 8944 and Walls 8904 and 4856 (2007)
Mazar et. al. (2020 v.3) - Photo 15.56-
Squares N/4–5 from Mazar et. al. (2020 v. 3: Chapter 15)
Photo 15.56
Squares N/4–5, looking east; left: D-6b Installations 7931 and 7939; right: D-7a Wall 8904, superimposed by D-6b Installation 2874 (2005)
Mazar et. al. (2020 v.3) - Photo 15.57-
Squares N/4–5 from Mazar et. al. (2020 v. 3: Chapter 15)
Photo 15.57
Squares N/4–5, looking south; bottom: D-6b Installations 7931 and 7939; center: D-7a Wall 8904, superimposed by D-6a–b Installation 2874 (2005)
Mazar et. al. (2020 v.3)
- Plans: Figs. 15.12–15.14
- Sections: Figs. 15.17b, 15.19–15.21
- Photos 15.40–15.42,15.45–15.57
- Pottery: Figs. 16.24–16.33
Stratum D-7 comprised two main and one local stratigraphic phases, denoted D-7b, D-7a and D-7a'.
- Table 15.1 -
Stratigraphy and chronology in Area D, with correlation to Area C from Mazar et. al. (2020 v. 3: Chapter 17)
Table 15.1
Stratigraphy and chronology in Area D, with correlation to Area C
Mazar et. al. (2020 v.3) - Table 15.2 -
Locus and basket numbers from Mazar et. al. (2020 v. 3: Chapter 17)
Table 15.2
Locus and basket numbers
Mazar et. al. (2020 v.3) - Figure 15.1 -
Location of section drawings on superimposed plan of Strata D-11–D-2 from Mazar et. al. (2020 v. 3: Chapter 17)
Figure 15.1
Location of section drawings on superimposed plan of Strata D-11–D-2
Mazar et. al. (2020 v.3) - Figure 15.2 -
Schematic section of Area D from Mazar et. al. (2020 v. 3: Chapter 17)
Figure 15.2
Schematic section of Area D
Mazar et. al. (2020 v.3) - Figure 15.15 -
Plan of Stratum D-6b from Mazar et. al. (2020 v. 3: Chapter 15)
Figure 15.15
Plan of Stratum D-6b
Mazar et. al. (2020 v.3) - Figure 15.16 -
Plan of Stratum D-6a from Mazar et. al. (2020 v. 3: Chapter 15)
Figure 15.16
Plan of Stratum D-6a
Mazar et. al. (2020 v.3) - Figure 15.19 -
Section 3 from Mazar et. al. (2020 v. 3: Chapter 15)
Figure 15.19
Section 3 (Squares L–N/4, looking north)
Mazar et. al. (2020 v.3) - Figure 15.20 -
Section 4 from Mazar et. al. (2020 v. 3: Chapter 15)
Figure 15.20
Section 4 (Squares N–L/4, looking south)
Mazar et. al. (2020 v.3) - Figure 15.21 -
Section 5 from Mazar et. al. (2020 v. 3: Chapter 15)
Figure 15.21
Section 5 (Squares N/4–5, looking east)
Mazar et. al. (2020 v.3) - Photo 15.56-
Squares N/4–5 from Mazar et. al. (2020 v. 3: Chapter 15)
Photo 15.56
Squares N/4–5, looking east; left: D-6b Installations 7931 and 7939; right: D-7a Wall 8904, superimposed by D-6b Installation 2874 (2005)
Mazar et. al. (2020 v.3) - Photo 15.57-
Squares N/4–5 from Mazar et. al. (2020 v. 3: Chapter 15)
Photo 15.57
Squares N/4–5, looking south; bottom: D-6b Installations 7931 and 7939; center: D-7a Wall 8904, superimposed by D-6a–b Installation 2874 (2005)
Mazar et. al. (2020 v.3) - Photo 15.58-
Square N/5 from Mazar et. al. (2020 v. 3: Chapter 15)
 Photo 15.58
Square N/5, looking west; detail of D-6b Installations 7939 (bottom) and 7931 (top); top right: red clay patch 7925 above D-6a Wall 7926 (2005)
Mazar et. al. (2020 v.3) - Photo 15.59-
Square N/4 from Mazar et. al. (2020 v. 3: Chapter 15)
 Photo 15.59
Square N/4, looking east; detail of D-6b Installation 2874 (2005)
Mazar et. al. (2020 v.3) - Photo 15.60-
Square N/4 from Mazar et. al. (2020 v. 3: Chapter 15)
 Photo 15.60
Square N/4, southern section showing D-6 striations and ash layers (bird-nest holes in section).
Mazar et. al. (2020 v.3) - Photo 15.61-
Square N/4 from Mazar et. al. (2020 v. 3: Chapter 15)
Photo 15.61
Square N/4; D-6a Oven 2841 below D-4b Floor 1845 (1998)
Mazar et. al. (2020 v.3) - Photo 15.62-
Square P/4 from Mazar et. al. (2020 v. 3: Chapter 15)
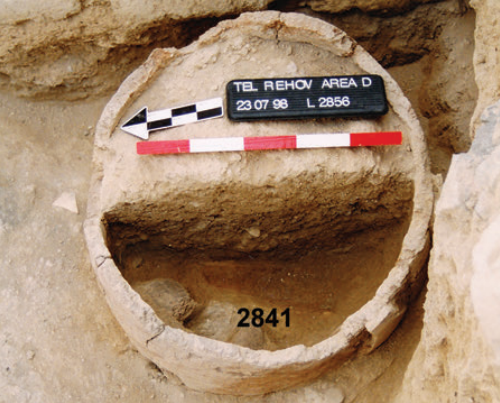 Photo 15.62
Square P/4, section in D-6a Oven 2841
Mazar et. al. (2020 v.3)
- Plans: 15.15–15.16
- Sections: : Figs. 15.19–15.21
- Photos 15.56–15.62
- Pottery: Figs. 16.34–16.37
- Table 15.1 -
Stratigraphy and chronology in Area D, with correlation to Area C from Mazar et. al. (2020 v. 3: Chapter 17)
Table 15.1
Stratigraphy and chronology in Area D, with correlation to Area C
Mazar et. al. (2020 v.3) - Table 15.2 -
Locus and basket numbers from Mazar et. al. (2020 v. 3: Chapter 17)
Table 15.2
Locus and basket numbers
Mazar et. al. (2020 v.3) - Figure 15.1 -
Location of section drawings on superimposed plan of Strata D-11–D-2 from Mazar et. al. (2020 v. 3: Chapter 17)
Figure 15.1
Location of section drawings on superimposed plan of Strata D-11–D-2
Mazar et. al. (2020 v.3) - Figure 15.2 -
Schematic section of Area D from Mazar et. al. (2020 v. 3: Chapter 17)
Figure 15.2
Schematic section of Area D
Mazar et. al. (2020 v.3) - Figure 15.19 -
Section 3 from Mazar et. al. (2020 v. 3: Chapter 15)
Figure 15.19
Section 3 (Squares L–N/4, looking north)
Mazar et. al. (2020 v.3) - Figure 15.20 -
Section 4 from Mazar et. al. (2020 v. 3: Chapter 15)
Figure 15.20
Section 4 (Squares N–L/4, looking south)
Mazar et. al. (2020 v.3) - Figure 15.21 -
Section 5 from Mazar et. al. (2020 v. 3: Chapter 15)
Figure 15.21
Section 5 (Squares N/4–5, looking east)
Mazar et. al. (2020 v.3) - Figure 15.22 -
Plan of Stratum D-5 from Mazar et. al. (2020 v. 3: Chapter 15)
Figure 15.22
Plan of Stratum D-5
Mazar et. al. (2020 v.3) - Figure 15.32 -
Section 6 from Mazar et. al. (2020 v. 3: Chapter 15)
Figure 15.32
Section 6 (Squares P–Q/5, looking north)
Mazar et. al. (2020 v.3) - Figure 15.33 -
Section 7 from Mazar et. al. (2020 v. 3: Chapter 15)
Figure 15.33
Section 7 (Squares P–Q/4, looking north)
Mazar et. al. (2020 v.3) - Figure 15.34 -
Section 8 from Mazar et. al. (2020 v. 3: Chapter 15)
Figure 15.34
Section 8 (Squares Q–N/4, looking south)
Mazar et. al. (2020 v.3) - Figure 15.35 -
Section 9 from Mazar et. al. (2020 v. 3: Chapter 15)
Figure 15.35
Section 9 (Squares Q/4–5, looking east)
Mazar et. al. (2020 v.3) - Photo 15.45 -
Squares N–M/4–5 from Mazar et. al. (2020 v. 3: Chapter 15)
Photo 15.45
Squares N–M/4–5, looking southeast; center: D-7a' pillar bases; top: stone foundation of D-4 Wall 1883 (2007)
Mazar et. al. (2020 v.3) - Photo 15.56-
Squares N/4–5 from Mazar et. al. (2020 v. 3: Chapter 15)
Photo 15.56
Squares N/4–5, looking east; left: D-6b Installations 7931 and 7939; right: D-7a Wall 8904, superimposed by D-6b Installation 2874 (2005)
Mazar et. al. (2020 v.3) - Photo 15.57-
Squares N/4–5 from Mazar et. al. (2020 v. 3: Chapter 15)
Photo 15.57
Squares N/4–5, looking south; bottom: D-6b Installations 7931 and 7939; center: D-7a Wall 8904, superimposed by D-6a–b Installation 2874 (2005)
Mazar et. al. (2020 v.3) - Photo 15.61-
Square N/4 from Mazar et. al. (2020 v. 3: Chapter 15)
Photo 15.61
Square N/4; D-6a Oven 2841 below D-4b Floor 1845 (1998)
Mazar et. al. (2020 v.3) - Photo 15.63-
Squares N–Q/4–5 from Mazar et. al. (2020 v. 3: Chapter 15)
Photo 15.63
Squares N–Q/4–5 at end of 2007 season; center: north–south street (Photo: SkyView).
Mazar et. al. (2020 v.3) - Photo 15.64-
Square N–P/4 from Mazar et. al. (2020 v. 3: Chapter 15)
Photo 15.64
Square N–P/4, looking east; right: stone foundation of D-4 Wall 1811; center right: D-6a Oven 2841 (1998)
Mazar et. al. (2020 v.3) - Photo 15.65-
Probe in street, Square P/4 from Mazar et. al. (2020 v. 3: Chapter 15)
Photo 15.65
Probe in street, Square P/4; D-5 stone fill 9810, east of Wall 2882 (2008)
Mazar et. al. (2020 v.3) - Photo 15.66-
Squares P/4–5 from Mazar et. al. (2020 v. 3: Chapter 15)
Photo 15.66
Squares P/4–5, looking south, D-4b Street 8803, bordered by Wall 1883 (right) and Walls 8850, 1860, above 2881 (left); lower left: Installation 8810 (2007)
Mazar et. al. (2020 v.3) - Photo 15.67-
Squares P/4–5; fallen bricks (7847) along eastern face of Wall 1883 from Mazar et. al. (2020 v. 3: Chapter 15)
Photo 15.67
Squares P/4–5, same as Photo 15.66, looking north; fallen bricks (7847) along eastern face of Wall 1883 (2007)
Mazar et. al. (2020 v.3) - Photo 15.68-
Square P-5, looking west at Wall 1883; foreground: brick collapse in street from Mazar et. al. (2020 v. 3: Chapter 15)
Photo 15.68
Square P-5, looking west at Wall 1883; foreground: brick collapse in street (2005)
Mazar et. al. (2020 v.3) - Photo 15.69-
Squares P–Q/4–5 from Mazar et. al. (2020 v. 3: Chapter 15)
Photo 15.69
Squares P–Q/4–5, looking north at D-5 Buildings DD and DE, (2008)
Mazar et. al. (2020 v.3) - Photo 15.70-
Squares Q/4–5, looking north at D-5 Room 8867 from Mazar et. al. (2020 v. 3: Chapter 15)
Photo 15.70
Squares Q/4–5, looking north at D-5 Room 8867; bottom: Pit 8883 (2008)
Mazar et. al. (2020 v.3) - Photo 15.71-
Square Q/5, looking west at D-4 Building DG; lower right: brick collapse 8865 in D-5 Building DE from Mazar et. al. (2020 v. 3: Chapter 15)
Photo 15.71
Square Q/5, looking west at D-4 Building DG; lower right: brick collapse 8865 in D-5 Building DE (2007)
Mazar et. al. (2020 v.3) - Photo 15.72-
Square Q/5 from Mazar et. al. (2020 v. 3: Chapter 15)
Photo 15.72
Square Q/5, looking west; lower right: Room 8865 of D-5 Building DD; left: walls of D-4 Buildings DG and DH (2007)
Mazar et. al. (2020 v.3) - Photo 15.73-
Square P/5 from Mazar et. al. (2020 v. 3: Chapter 15)
Photo 15.73
Square P/5, looking west; center: D-5 Room 8874 with ‘steps’ 8879; D-4b Installation 8810 on top of D-5 Wall 8878 (2007).
Mazar et. al. (2020 v.3) - Photo 15.74-
Squares Q/4–5 from Mazar et. al. (2020 v. 3: Chapter 15)
Photo 15.74
Squares Q/4–5, looking east at D-5 Building DD; Installation 9805 on Floor 8867 (2008)
Mazar et. al. (2020 v.3) - Photo 15.75-
Square Q/4 from Mazar et. al. (2020 v. 3: Chapter 15)
Photo 15.75
Square Q/4, looking north at D-5 Building DD; Floor 8867, cut by Pit 8883 (2008)
Mazar et. al. (2020 v.3) - Photo 15.76-
Square P/4 from Mazar et. al. (2020 v. 3: Chapter 15)
Photo 15.76
Square P/4, looking southwest at D-5 Building DD; left: Floor 8871 and Pit 8876; top right: street between Walls 2881 and 2882 (2008)
Mazar et. al. (2020 v.3) - Photo 15.77-
Squares P–Q/4 from Mazar et. al. (2020 v. 3: Chapter 15)
Photo 15.77
Squares P–Q/4, looking southwest at D-5 Building DD; Floor 8871, cut by Pits 8876 (center) and 8880 (left); D-4 Wall 1884 floating above floor (2007)
Mazar et. al. (2020 v.3) - Photo 15.88-
Square Q/5 from Mazar et. al. (2020 v. 3: Chapter 15)
Photo 15.88
Square Q/5, looking east; D-4a Building DJ, with elements of D-4b Buildings DH and DG below (2007)
Mazar et. al. (2020 v.3)
- Plan: Fig. 15.22
- Sections: Figs. 15.19–15.21; 15.32–15.35
- Photos 15.45, 15.56–15.57, 15.61, 15.63–15.77, 15.88
- Pottery: Buildings: Figs. 16.38–16.40; Street: Figs. 16.41–16.47)
- Table 15.1 -
Stratigraphy and chronology in Area D, with correlation to Area C from Mazar et. al. (2020 v. 3: Chapter 17)
Table 15.1
Stratigraphy and chronology in Area D, with correlation to Area C
Mazar et. al. (2020 v.3) - Table 15.2 -
Locus and basket numbers from Mazar et. al. (2020 v. 3: Chapter 17)
Table 15.2
Locus and basket numbers
Mazar et. al. (2020 v.3) - Figure 15.1 -
Location of section drawings on superimposed plan of Strata D-11–D-2 from Mazar et. al. (2020 v. 3: Chapter 17)
Figure 15.1
Location of section drawings on superimposed plan of Strata D-11–D-2
Mazar et. al. (2020 v.3) - Figure 15.2 -
Schematic section of Area D from Mazar et. al. (2020 v. 3: Chapter 17)
Figure 15.2
Schematic section of Area D
Mazar et. al. (2020 v.3) - Figure 15.19 -
Section 3 from Mazar et. al. (2020 v. 3: Chapter 15)
Figure 15.19
Section 3 (Squares L–N/4, looking north)
Mazar et. al. (2020 v.3) - Figure 15.20 -
Section 4 from Mazar et. al. (2020 v. 3: Chapter 15)
Figure 15.20
Section 4 (Squares N–L/4, looking south)
Mazar et. al. (2020 v.3) - Figure 15.21 -
Section 5 from Mazar et. al. (2020 v. 3: Chapter 15)
Figure 15.21
Section 5 (Squares N/4–5, looking east)
Mazar et. al. (2020 v.3) - Figure 15.23 -
Plan of Stratum D-4b from Mazar et. al. (2020 v. 3: Chapter 15)
Figure 15.23
Plan of Stratum D-4b
Mazar et. al. (2020 v.3) - Figure 15.24 -
Plan of Stratum D-4a from Mazar et. al. (2020 v. 3: Chapter 15)
Figure 15.24
Plan of Stratum D-4a
Mazar et. al. (2020 v.3) - Figure 15.25a -
Iron IB remains in Areas D and C from Mazar et. al. (2020 v. 3: Chapter 15)
Figure 15.25a
Schematic plan of Iron IB remains in Areas D and C, showing possible correlation: Strata D-5 and C-3b
Mazar et. al. (2020 v.3) - Figure 15.25b -
Iron IB remains in Areas D and C from Mazar et. al. (2020 v. 3: Chapter 15)
Figure 15.25b
Schematic plan of Iron IB remains in Areas D and C, showing possible correlation: Strata D-4b and C-3a
Mazar et. al. (2020 v.3) - Figure 15.32 -
Section 6 from Mazar et. al. (2020 v. 3: Chapter 15)
Figure 15.32
Section 6 (Squares P–Q/5, looking north)
Mazar et. al. (2020 v.3) - Figure 15.33 -
Section 7 from Mazar et. al. (2020 v. 3: Chapter 15)
Figure 15.33
Section 7 (Squares P–Q/4, looking north)
Mazar et. al. (2020 v.3) - Figure 15.34 -
Section 8 from Mazar et. al. (2020 v. 3: Chapter 15)
Figure 15.34
Section 8 (Squares Q–N/4, looking south)
Mazar et. al. (2020 v.3) - Figure 15.35 -
Section 9 from Mazar et. al. (2020 v. 3: Chapter 15)
Figure 15.35
Section 9 (Squares Q/4–5, looking east)
Mazar et. al. (2020 v.3) - Photo 15.61-
Square N/4 from Mazar et. al. (2020 v. 3: Chapter 15)
Photo 15.61
Square N/4; D-6a Oven 2841 below D-4b Floor 1845 (1998)
Mazar et. al. (2020 v.3) - Photo 15.63-
Squares N–Q/4–5 from Mazar et. al. (2020 v. 3: Chapter 15)
Photo 15.63
Squares N–Q/4–5 at end of 2007 season; center: north–south street (Photo: SkyView).
Mazar et. al. (2020 v.3) - Photo 15.64-
Square N–P/4 from Mazar et. al. (2020 v. 3: Chapter 15)
Photo 15.64
Square N–P/4, looking east; right: stone foundation of D-4 Wall 1811; center right: D-6a Oven 2841 (1998)
Mazar et. al. (2020 v.3) - Photo 15.65-
Probe in street, Square P/4 from Mazar et. al. (2020 v. 3: Chapter 15)
Photo 15.65
Probe in street, Square P/4; D-5 stone fill 9810, east of Wall 2882 (2008)
Mazar et. al. (2020 v.3) - Photo 15.66-
Squares P/4–5 from Mazar et. al. (2020 v. 3: Chapter 15)
Photo 15.66
Squares P/4–5, looking south, D-4b Street 8803, bordered by Wall 1883 (right) and Walls 8850, 1860, above 2881 (left); lower left: Installation 8810 (2007)
Mazar et. al. (2020 v.3) - Photo 15.71-
Square Q/5, looking west at D-4 Building DG; lower right: brick collapse 8865 in D-5 Building DE from Mazar et. al. (2020 v. 3: Chapter 15)
Photo 15.71
Square Q/5, looking west at D-4 Building DG; lower right: brick collapse 8865 in D-5 Building DE (2007)
Mazar et. al. (2020 v.3) - Photo 15.72-
Square Q/5 from Mazar et. al. (2020 v. 3: Chapter 15)
Photo 15.72
Square Q/5, looking west; lower right: Room 8865 of D-5 Building DD; left: walls of D-4 Buildings DG and DH (2007)
Mazar et. al. (2020 v.3) - Photo 15.77-
Squares P–Q/4 from Mazar et. al. (2020 v. 3: Chapter 15)
Photo 15.77
Squares P–Q/4, looking southwest at D-5 Building DD; Floor 8871, cut by Pits 8876 (center) and 8880 (left); D-4 Wall 1884 floating above floor (2007)
Mazar et. al. (2020 v.3) - Photo 15.78-
General view of Area D from Mazar et. al. (2020 v. 3: Chapter 15)
 Photo 15.78
General view, looking west, end of 2000 season
Mazar et. al. (2020 v.3) - Photo 15.79-
Squares N–P/4,from Mazar et. al. (2020 v. 3: Chapter 15)
 Photo 15.79
Squares N–P/4, looking north at D-4 Building DF (2000)
Mazar et. al. (2020 v.3) - Photo 15.80-
Squares N–P/4 from Mazar et. al. (2020 v. 3: Chapter 15)
 Photo 15.80
Squares N–P/4, looking east; Building DF; D-4b stone floor 1845 covered by pebbles (1842); D-4a brick collapse and stratified layers above (1997)
Mazar et. al. (2020 v.3) - Photo 15.81-
Square N/4 from Mazar et. al. (2020 v. 3: Chapter 15)
 Photo 15.81
Square N/4, looking east; D-4b Building DF; background: Wall 1811; foreground: accumulation 1805 on Floor 1822; note two rows of bricks separated by a line in Wall 1811 (1997)
Mazar et. al. (2020 v.3) - Photo 15.82-
Squares N–P/4 from Mazar et. al. (2020 v. 3: Chapter 15)
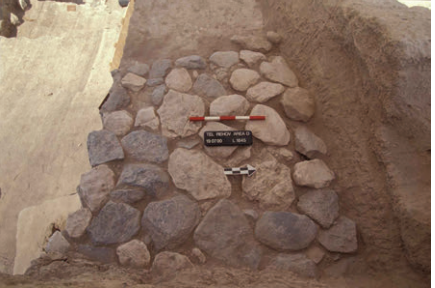 Photo 15.82
Squares N–P/4, looking west; D-5 Building DF, stone floor 1845 (2000)
Mazar et. al. (2020 v.3) - Photo 15.83-
Square P/4 from Mazar et. al. (2020 v. 3: Chapter 15)
 Photo 15.83
Square P/4, looking north; right: D-4a street surface 1873; meter stick on Wall 1883 (1997).
Mazar et. al. (2020 v.3) - Photo 15.84-
Square P/5 from Mazar et. al. (2020 v. 3: Chapter 15)
 Photo 15.84
Square P/5, looking south at D-4a stone pavement (7805/7828) in street (2005)
Mazar et. al. (2020 v.3) - Photo 15.85-
Squares P–N/4–5 from Mazar et. al. (2020 v. 3: Chapter 15)
 Photo 15.85
Squares P–N/4–5, looking west; D-4b Buildings DG and DH; center: D-4a Floor 8820, Building DJ (2007)
Mazar et. al. (2020 v.3) - Photo 15.86-
Square P/4 from Mazar et. al. (2020 v. 3: Chapter 15)
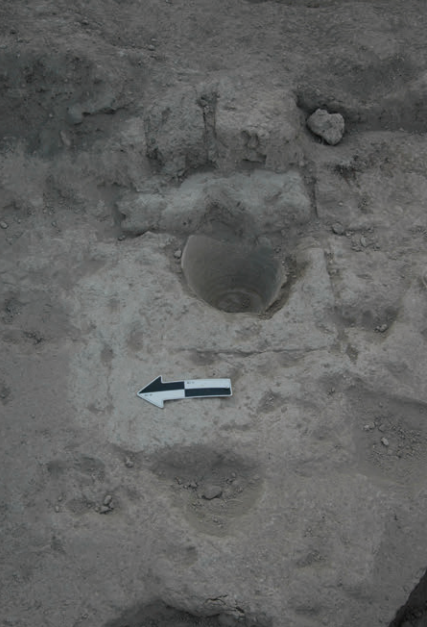 Photo 15.86
Square P/4, looking east; D-4b Building DG, Installation 8824 (2007)
Mazar et. al. (2020 v.3) - Photo 15.87-
Square Q/5 from Mazar et. al. (2020 v. 3: Chapter 15)
 Photo 15.87
Square Q/5, looking north; D-4b Building DG, Room 8830; Installation 8837 in northeastern corner of room (2007)
Mazar et. al. (2020 v.3) - Photo 15.88-
Square Q/5 from Mazar et. al. (2020 v. 3: Chapter 15)
Photo 15.88
Square Q/5, looking east; D-4a Building DJ, with elements of D-4b Buildings DH and DG below (2007)
Mazar et. al. (2020 v.3) - Photo 15.89-
Square Q/5 from Mazar et. al. (2020 v. 3: Chapter 15)
 Photo 15.89
Square Q/5, eastern section; D-4a Building DJ above elements of D-4b Buildings DH and DG (2007)
Mazar et. al. (2020 v.3) - Photo 15.90-
Square Q/5 from Mazar et. al. (2020 v. 3: Chapter 15)
 Photo 15.90
Square Q/5, looking north; D-4b Building DH (2007)
Mazar et. al. (2020 v.3) - Photo 15.95 -
Square P/5 from Mazar et. al. (2020 v. 3: Chapter 15)
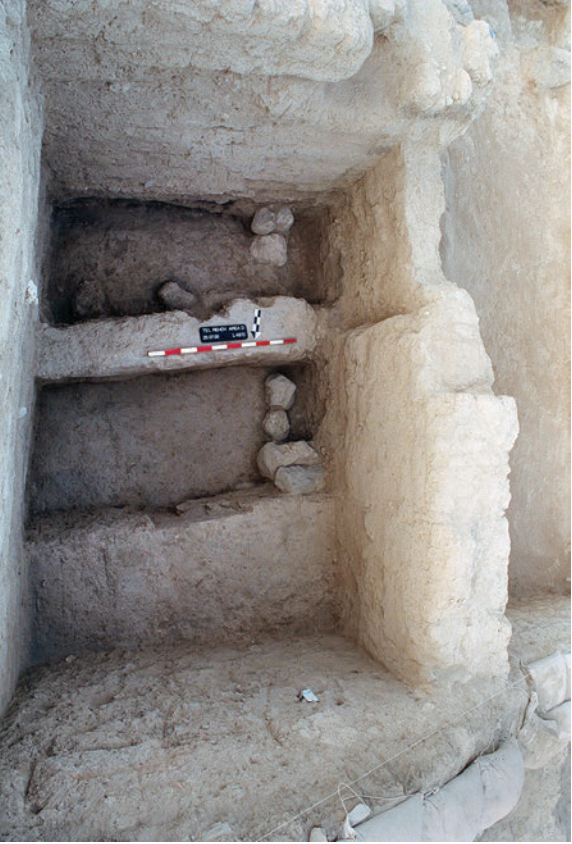 Photo 15.95
Square P/5, D-4a Building DJ, Rooms 4858 (bottom) and 4872 (top) (2000)
Mazar et. al. (2020 v.3) - Photo 15.96 -
Square P/5, looking west; D-4a Building DJ, debris and vessels in Room 4872 from Mazar et. al. (2020 v. 3: Chapter 15)
 Photo 15.96
Square P/5, looking west; D-4a Building DJ, debris and vessels in Room 4872 (2000)
Mazar et. al. (2020 v.3) - Photo 15.97 -
Smashed Pottery in Square P/5 D-4a Building DJ, Room 4872 from Mazar et. al. (2020 v. 3: Chapter 15)
 Photo 15.97
Square P/5, looking west; detail of D-4a Building DJ, Room 4872 (see Photo 15.96) (2000)
Mazar et. al. (2020 v.3) - Photo 15.98 -
Squares P–Q/4 from Mazar et. al. (2020 v. 3: Chapter 15)
 Photo 15.98
Squares P–Q/4, looking south; D-4a Building DJ, Rooms 4863 (left) and 2869 (right) (2000)
Mazar et. al. (2020 v.3) - Photo 15.99 -
Square P/4 from Mazar et. al. (2020 v. 3: Chapter 15)
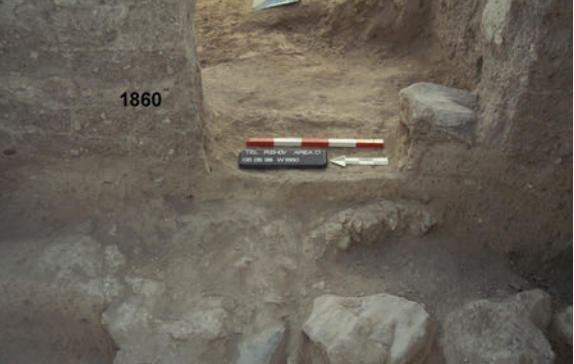 Photo 15.99
Square P/4, looking east at entrance from street to Room 2869, D-4a Building DJ; foreground: stones (2886) in D-4b street surface (1998)
Mazar et. al. (2020 v.3) - Photo 15.101 -
Square Q/4 from Mazar et. al. (2020 v. 3: Chapter 15)
 Photo 15.101
Square Q/4, looking south at D-3 pits cutting into D-4 debris. Right: D-4 Wall 1860 (1998)
Mazar et. al. (2020 v.3) - Photo 15.102 -
Squares P–Q/4 from Mazar et. al. (2020 v. 3: Chapter 15)
 Photo 15.102
Squares P–Q/4, looking north at lower D-3 pits, dug into D-4 architecture (2000)
Mazar et. al. (2020 v.3) - Photo 15.111 -
Square P/5, looking south at reed impressions (ceiling collapse?) on plaster layer from Mazar et. al. (2020 v. 3: Chapter 15)
 Photo 15.111
Square P/5, looking south at reed impressions (ceiling collapse?) on plaster layer, below foundations of D-2 Wall 4808; foreground: D-4b basalt basin (8807) in Installation 8810 (2007)
Mazar et. al. (2020 v.3) - Photo 15.112 -
Closeup of layer in Photo 15.111 from Mazar et. al. (2020 v. 3: Chapter 15)
 Photo 15.112
Closeup of layer in Photo 15.111
Mazar et. al. (2020 v.3) - Photo 15.113 -
Square Q/5 from Mazar et. al. (2020 v. 3: Chapter 15)
 Photo 15.113
Square Q/5, looking north at D-2 Wall 4808, built into D-4a Building DJ (2007)
Mazar et. al. (2020 v.3) - Photo 15.114 -
Square Q/5 from Mazar et. al. (2020 v. 3: Chapter 15)
 Photo 15.114
Square Q/5, looking north; eastern part of D-2 Wall 4808, built against Wall 7851 (2007)
Mazar et. al. (2020 v.3) - Photo 15.116 -
Square Q/5 from Mazar et. al. (2020 v. 3: Chapter 15)
 Photo 15.116
Square Q/5, looking east; top and center: D-1 walls and layers; bottom: D-4 Rooms 4872 and 4858 (2005)
Mazar et. al. (2020 v.3)
- Plans: Figs. 15.23–15.25
- Sections: Figs. 15.19a–15.21, 15.32–15.35
- Photos 15.61, 15.63–15.66, 15.71–15.72, 15.77–15.90, 15.95–15.99, 15.101–15.102, 15.111–15.114, 15.116;
- Pottery: Buildings: Figs. 16.48–16.54; Street: Figs. 16.41–16.47
- Table 15.1 -
Stratigraphy and chronology in Area D, with correlation to Area C from Mazar et. al. (2020 v. 3: Chapter 17)
Table 15.1
Stratigraphy and chronology in Area D, with correlation to Area C
Mazar et. al. (2020 v.3) - Table 15.2 -
Locus and basket numbers from Mazar et. al. (2020 v. 3: Chapter 17)
Table 15.2
Locus and basket numbers
Mazar et. al. (2020 v.3) - Figure 15.1 -
Location of section drawings on superimposed plan of Strata D-11–D-2 from Mazar et. al. (2020 v. 3: Chapter 17)
Figure 15.1
Location of section drawings on superimposed plan of Strata D-11–D-2
Mazar et. al. (2020 v.3) - Figure 15.2 -
Schematic section of Area D from Mazar et. al. (2020 v. 3: Chapter 17)
Figure 15.2
Schematic section of Area D
Mazar et. al. (2020 v.3) - Figure 15.21 -
Section 5 from Mazar et. al. (2020 v. 3: Chapter 15)
Figure 15.21
Section 5 (Squares N/4–5, looking east)
Mazar et. al. (2020 v.3) - Figure 15.26 -
Plan of Stratum D-3, lower pits from Mazar et. al. (2020 v. 3: Chapter 15)
Figure 15.26
Plan of Stratum D-3, lower pits
Mazar et. al. (2020 v.3) - Figure 15.27 -
Plan of Stratum D-3, upper pits from Mazar et. al. (2020 v. 3: Chapter 15)
Figure 15.27
Plan of Stratum D-3, upper pits
Mazar et. al. (2020 v.3) - Figure 15.33 -
Section 7 from Mazar et. al. (2020 v. 3: Chapter 15)
Figure 15.33
Section 7 (Squares P–Q/4, looking north)
Mazar et. al. (2020 v.3) - Figure 15.34 -
Section 8 from Mazar et. al. (2020 v. 3: Chapter 15)
Figure 15.34
Section 8 (Squares Q–N/4, looking south)
Mazar et. al. (2020 v.3) - Figure 15.35 -
Section 9 from Mazar et. al. (2020 v. 3: Chapter 15)
Figure 15.35
Section 9 (Squares Q/4–5, looking east)
Mazar et. al. (2020 v.3) - Photo 15.100 -
Squares Q–P/4 from Mazar et. al. (2020 v. 3: Chapter 15)
 Photo 15.100
Squares Q–P/4, looking west; upper D-3 pits (1998)
Mazar et. al. (2020 v.3) - Photo 15.101 -
Square Q/4 from Mazar et. al. (2020 v. 3: Chapter 15)
Photo 15.101
Square Q/4, looking south at D-3 pits cutting into D-4 debris. Right: D-4 Wall 1860 (1998)
Mazar et. al. (2020 v.3) - Photo 15.102 -
Squares P–Q/4 from Mazar et. al. (2020 v. 3: Chapter 15)
Photo 15.102
Squares P–Q/4, looking north at lower D-3 pits, dug into D-4 architecture (2000)
Mazar et. al. (2020 v.3) - Photo 15.103 -
Square Q/4 from Mazar et. al. (2020 v. 3: Chapter 15)
 Photo 15.103
Square Q/4, looking south at D-3 Pits 4805 (bottom) and 4806 (top) (2000)
Mazar et. al. (2020 v.3) - Photo 15.104 -
Square Q/4, D-3 Pit 2808 from Mazar et. al. (2020 v. 3: Chapter 15)
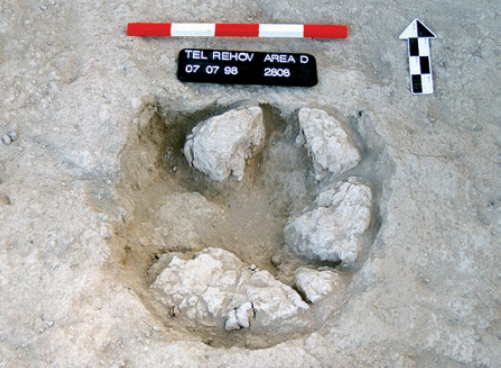 Photo 15.104
Square Q/4, D-3 Pit 2808 (1998)
Mazar et. al. (2020 v.3) - Photo 15.105 -
Squares P–Q/4, looking west at upper D-3 pits from Mazar et. al. (2020 v. 3: Chapter 15)
 Photo 15.105
Squares P–Q/4, looking west at upper D-3 pits (1998)
Mazar et. al. (2020 v.3) - Photo 15.106 -
Square Q/4, looking south at D-3 Pit 2872 from Mazar et. al. (2020 v. 3: Chapter 15)
 Photo 15.106
Square Q/4, looking south at D-3 Pit 2872 (1998)
Mazar et. al. (2020 v.3) - Photo 15.107 -
Square Q/4, looking west at D-3 Pit 2850 from Mazar et. al. (2020 v. 3: Chapter 15)
 Photo 15.107
Square Q/4, looking west at D-3 Pit 2850 (1998)
Mazar et. al. (2020 v.3)
- Plans: Figs. 15.26–15.27
- Sections: Figs. 15.21, 15.33–15.35
- Photos 15.100–15.107
- Pottery: Figs. 16.55–16.58
- Table 15.1 -
Stratigraphy and chronology in Area D, with correlation to Area C from Mazar et. al. (2020 v. 3: Chapter 17)
Table 15.1
Stratigraphy and chronology in Area D, with correlation to Area C
Mazar et. al. (2020 v.3) - Table 15.2 -
Locus and basket numbers from Mazar et. al. (2020 v. 3: Chapter 17)
Table 15.2
Locus and basket numbers
Mazar et. al. (2020 v.3) - Figure 15.1 -
Location of section drawings on superimposed plan of Strata D-11–D-2 from Mazar et. al. (2020 v. 3: Chapter 17)
Figure 15.1
Location of section drawings on superimposed plan of Strata D-11–D-2
Mazar et. al. (2020 v.3) - Figure 15.2 -
Schematic section of Area D from Mazar et. al. (2020 v. 3: Chapter 17)
Figure 15.2
Schematic section of Area D
Mazar et. al. (2020 v.3) - Figure 15.28 -
Plan of Stratum D-2 from Mazar et. al. (2020 v. 3: Chapter 15)
Figure 15.28
Plan of Stratum D-2
Mazar et. al. (2020 v.3) - Figure 15.32 -
Section 6 from Mazar et. al. (2020 v. 3: Chapter 15)
Figure 15.32
Section 6 (Squares P–Q/5, looking north)
Mazar et. al. (2020 v.3) - Figure 15.33 -
Section 7 from Mazar et. al. (2020 v. 3: Chapter 15)
Figure 15.33
Section 7 (Squares P–Q/4, looking north)
Mazar et. al. (2020 v.3) - Figure 15.34 -
Section 8 from Mazar et. al. (2020 v. 3: Chapter 15)
Figure 15.34
Section 8 (Squares Q–N/4, looking south)
Mazar et. al. (2020 v.3) - Figure 15.35 -
Section 9 from Mazar et. al. (2020 v. 3: Chapter 15)
Figure 15.35
Section 9 (Squares Q/4–5, looking east)
Mazar et. al. (2020 v.3) - Photo 15.108 -
Square P/4 from Mazar et. al. (2020 v. 3: Chapter 15)
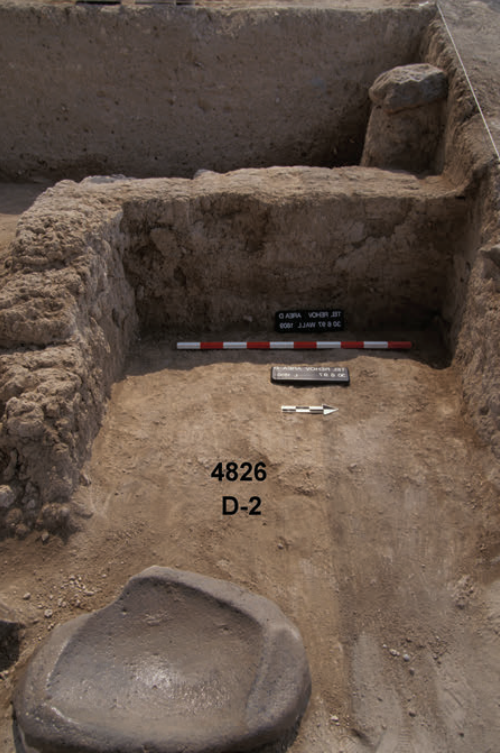 Photo 15.108
Square P/4, looking east at D-2 Room 4826 (2000)
Mazar et. al. (2020 v.3) - Photo 15.109 -
Square P/5 from Mazar et. al. (2020 v. 3: Chapter 15)
 Photo 15.109
Square P/5, looking west at D-2 Room 4828 (2000)
Mazar et. al. (2020 v.3) - Photo 15.110 -
Square P/5 from Mazar et. al. (2020 v. 3: Chapter 15)
 Photo 15.110
Square P/5, looking east at D-2 Room 4828; right: trench cutting northern end of Floor 4825 (2000)
Mazar et. al. (2020 v.3) - Photo 15.111 -
Square P/5, looking south at reed impressions (ceiling collapse?) on plaster layer from Mazar et. al. (2020 v. 3: Chapter 15)
Photo 15.111
Square P/5, looking south at reed impressions (ceiling collapse?) on plaster layer, below foundations of D-2 Wall 4808; foreground: D-4b basalt basin (8807) in Installation 8810 (2007)
Mazar et. al. (2020 v.3) - Photo 15.112 -
Closeup of layer in Photo 15.111 from Mazar et. al. (2020 v. 3: Chapter 15)
Photo 15.112
Closeup of layer in Photo 15.111
Mazar et. al. (2020 v.3) - Photo 15.113 -
Square Q/5 from Mazar et. al. (2020 v. 3: Chapter 15)
Photo 15.113
Square Q/5, looking north at D-2 Wall 4808, built into D-4a Building DJ (2007)
Mazar et. al. (2020 v.3) - Photo 15.114 -
Square Q/5 from Mazar et. al. (2020 v. 3: Chapter 15)
Photo 15.114
Square Q/5, looking north; eastern part of D-2 Wall 4808, built against Wall 7851 (2007)
Mazar et. al. (2020 v.3) - Photo 15.115 -
Square Q/5 from Mazar et. al. (2020 v. 3: Chapter 15)
 Photo 15.115
Square Q/5, looking west; D-1b–c walls above D-2 Wall 4808 (2005)
Mazar et. al. (2020 v.3)
- Plan: Fig. 15.28
- Sections: Figs. 15.32–15.35
- Photos 15.108–15.115
- Pottery: Fig. 16.59
- Table 15.1 -
Stratigraphy and chronology in Area D, with correlation to Area C from Mazar et. al. (2020 v. 3: Chapter 17)
Table 15.1
Stratigraphy and chronology in Area D, with correlation to Area C
Mazar et. al. (2020 v.3) - Table 15.2 -
Locus and basket numbers from Mazar et. al. (2020 v. 3: Chapter 17)
Table 15.2
Locus and basket numbers
Mazar et. al. (2020 v.3) - Figure 15.1 -
Location of section drawings on superimposed plan of Strata D-11–D-2 from Mazar et. al. (2020 v. 3: Chapter 17)
Figure 15.1
Location of section drawings on superimposed plan of Strata D-11–D-2
Mazar et. al. (2020 v.3) - Figure 15.2 -
Schematic section of Area D from Mazar et. al. (2020 v. 3: Chapter 17)
Figure 15.2
Schematic section of Area D
Mazar et. al. (2020 v.3) - Figure 15.29 -
Plan of Stratum D-1c from Mazar et. al. (2020 v. 3: Chapter 15)
Figure 15.29
Plan of Stratum D-1c
Mazar et. al. (2020 v.3) - Figure 15.30 -
Plan of Stratum D-1b from Mazar et. al. (2020 v. 3: Chapter 15)
Figure 15.30
Plan of Stratum D-1b
Mazar et. al. (2020 v.3) - Figure 15.31 -
Plan of Stratum D-1a from Mazar et. al. (2020 v. 3: Chapter 15)
Figure 15.31
Plan of Stratum D-1a
Mazar et. al. (2020 v.3) - Figure 15.32 -
Section 6 from Mazar et. al. (2020 v. 3: Chapter 15)
Figure 15.32
Section 6 (Squares P–Q/5, looking north)
Mazar et. al. (2020 v.3) - Figure 15.33 -
Section 7 from Mazar et. al. (2020 v. 3: Chapter 15)
Figure 15.33
Section 7 (Squares P–Q/4, looking north)
Mazar et. al. (2020 v.3) - Figure 15.34 -
Section 8 from Mazar et. al. (2020 v. 3: Chapter 15)
Figure 15.34
Section 8 (Squares Q–N/4, looking south)
Mazar et. al. (2020 v.3) - Figure 15.35 -
Section 9 from Mazar et. al. (2020 v. 3: Chapter 15)
Figure 15.35
Section 9 (Squares Q/4–5, looking east)
Mazar et. al. (2020 v.3) - Photo 15.115 -
Square Q/5 from Mazar et. al. (2020 v. 3: Chapter 15)
Photo 15.115
Square Q/5, looking west; D-1b–c walls above D-2 Wall 4808 (2005)
Mazar et. al. (2020 v.3) - Photo 15.116 -
Square Q/5 from Mazar et. al. (2020 v. 3: Chapter 15)
Photo 15.116
Square Q/5, looking east; top and center: D-1 walls and layers; bottom: D-4 Rooms 4872 and 4858 (2005)
Mazar et. al. (2020 v.3) - Photo 15.117 -
Square Q/5 from Mazar et. al. (2020 v. 3: Chapter 15)
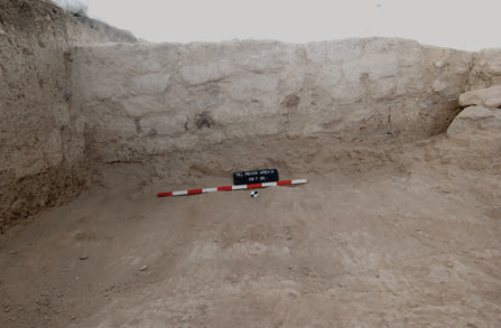 Photo 15.117
Square Q/5, looking south at D-1b–c Wall 7803; Debris 7810 (in left section) on Floor 7837 (2005)
Mazar et. al. (2020 v.3) - Photo 15.118 -
Square Q/5 from Mazar et. al. (2020 v. 3: Chapter 15)
 Photo 15.118
Square Q/5, looking west at Stratum D-1b–c elements (2005)
Mazar et. al. (2020 v.3) - Photo 15.119 -
Square Q/5 from Mazar et. al. (2020 v. 3: Chapter 15)
 Photo 15.119
Square Q/5 looking north; D-2 Floor 7837 below D-1b–c walls (2005)
Mazar et. al. (2020 v.3) - Photo 15.120 -
Square Q/5 from Mazar et. al. (2020 v. 3: Chapter 15)
 Photo 15.120
Square Q/5, eastern section with D-1c Debris 7826 above Floor 7830/7837 (1998)
Mazar et. al. (2020 v.3) - Photo 15.121 -
Square Q/4 from Mazar et. al. (2020 v. 3: Chapter 15)
 Photo 15.121
Square Q/4, looking north at D-1a Wall 1816 (1997)
Mazar et. al. (2020 v.3) - Photo 15.122 -
Square Q/4 from Mazar et. al. (2020 v. 3: Chapter 15)
 Photo 15.122
Square Q/4, looking north at D-1b Oven 1817 (center) and D-1a Wall 1808 (right) (1997)
Mazar et. al. (2020 v.3)
- Plans: Figs. 15.29–15.31
- Sections: Figs. 15.32–15.35
- Photos 15.115–15.122
- Pottery: Fig. 16.60
- Table 15.1 -
Stratigraphy and chronology in Area D, with correlation to Area C from Mazar et. al. (2020 v. 3: Chapter 17)
Table 15.1
Stratigraphy and chronology in Area D, with correlation to Area C
Mazar et. al. (2020 v.3) - Table 15.2 -
Locus and basket numbers from Mazar et. al. (2020 v. 3: Chapter 17)
Table 15.2
Locus and basket numbers
Mazar et. al. (2020 v.3) - Figure 15.1 -
Location of section drawings on superimposed plan of Strata D-11–D-2 from Mazar et. al. (2020 v. 3: Chapter 17)
Figure 15.1
Location of section drawings on superimposed plan of Strata D-11–D-2
Mazar et. al. (2020 v.3) - Figure 15.2 -
Schematic section of Area D from Mazar et. al. (2020 v. 3: Chapter 17)
Figure 15.2
Schematic section of Area D
Mazar et. al. (2020 v.3)
- Figure 15.1
Location of section drawings on superimposed plan of Strata D-11–D-2 from Mazar et. al. (2020 v. 3: Chapter 15)
Figure 15.1
Location of section drawings on superimposed plan of Strata D-11–D-2
Mazar et. al. (2020 v.3) - Figure 15.2
Schematic section of Area D from Mazar et. al. (2020 v. 3: Chapter 15)
Figure 15.2
Schematic section of Area D
Mazar et. al. (2020 v.3) - Figure 15.3
Plan of Stratum D-11b from Mazar et. al. (2020 v. 3: Chapter 15)
Figure 15.3
Plan of Stratum D-11b
Mazar et. al. (2020 v.3) - Figure 15.4
Plan of Stratum D-11a from Mazar et. al. (2020 v. 3: Chapter 15)
Figure 15.4
Plan of Stratum D-11a
Mazar et. al. (2020 v.3) - Figure 15.5
Plan of Stratum D-10 constructional fills from Mazar et. al. (2020 v. 3: Chapter 15)
Figure 15.5
Plan of Stratum D-10 constructional fills
Mazar et. al. (2020 v.3) - Figure 15.6
Plan of Stratum D-10 from Mazar et. al. (2020 v. 3: Chapter 15)
Figure 15.6
Plan of Stratum D-10
Mazar et. al. (2020 v.3) - Figure 15.7
Plan of Stratum D-9b from Mazar et. al. (2020 v. 3: Chapter 15)
Figure 15.7
Plan of Stratum D-9b
Mazar et. al. (2020 v.3) - Figure 15.8
Plan of Stratum D-9a from Mazar et. al. (2020 v. 3: Chapter 15)
Figure 15.8
Plan of Stratum D-9a
Mazar et. al. (2020 v.3) - Figure 15.9
Plan of Stratum D-8 from Mazar et. al. (2020 v. 3: Chapter 15)
Figure 15.9
Plan of Stratum D-8
Mazar et. al. (2020 v.3) - Figure 15.10
Plan of Stratum D-8' from Mazar et. al. (2020 v. 3: Chapter 15)
Figure 15.10
Plan of Stratum D-8'
Mazar et. al. (2020 v.3) - Figure 15.11
Plan of post Stratum D-8 fills from Mazar et. al. (2020 v. 3: Chapter 15)
Figure 15.11
Plan of post Stratum D-8 fills
Mazar et. al. (2020 v.3) - Figure 15.12
Plan of Stratum D-7b from Mazar et. al. (2020 v. 3: Chapter 15)
Figure 15.12
Plan of Stratum D-7b
Mazar et. al. (2020 v.3) - Figure 15.13
Plan of Stratum D-7a (encircled numbers denote foundation deposits as listed in the text) from Mazar et. al. (2020 v. 3: Chapter 15)
Figure 15.13
Plan of Stratum D-7a (encircled numbers denote foundation deposits as listed in the text)
Mazar et. al. (2020 v.3) - Figure 15.14
Plan of Stratum D-7a' from Mazar et. al. (2020 v. 3: Chapter 15)
Figure 15.14
Plan of Stratum D-7a'
Mazar et. al. (2020 v.3) - Figure 15.15
Plan of Stratum D-6b from Mazar et. al. (2020 v. 3: Chapter 15)
Figure 15.15
Plan of Stratum D-6b
Mazar et. al. (2020 v.3) - Figure 15.16
Plan of Stratum D-6a from Mazar et. al. (2020 v. 3: Chapter 15)
Figure 15.16
Plan of Stratum D-6a
Mazar et. al. (2020 v.3) - Figure 15.17a
Section 1a from Mazar et. al. (2020 v. 3: Chapter 15)
Figure 15.17a
Section 1a (Squares G–L/5, looking north, showing probe in alluvial field)
Mazar et. al. (2020 v.3) - Figure 15.17b
Section 1b from Mazar et. al. (2020 v. 3: Chapter 15)
Figure 15.17b
Section 1b (Squares J–M/5 and part of N/5, looking north)
Mazar et. al. (2020 v.3) - Figure 15.18a
Section 2a from Mazar et. al. (2020 v. 3: Chapter 15)
Figure 15.18a
Section 2a (Squares M/4–5, looking west in Probe III)
Mazar et. al. (2020 v.3) - Figure 15.18b
Section 2b from Mazar et. al. (2020 v. 3: Chapter 15)
Figure 15.18b
Section 2a (Squares M/4–5, looking west in Probe III)
Mazar et. al. (2020 v.3) - Figure 15.19
Section 3 from Mazar et. al. (2020 v. 3: Chapter 15)
Figure 15.19
Section 3 (Squares L–N/4, looking north)
Mazar et. al. (2020 v.3) - Figure 15.20
Section 4 from Mazar et. al. (2020 v. 3: Chapter 15)
Figure 15.20
Section 4 (Squares N–L/4, looking south)
Mazar et. al. (2020 v.3) - Figure 15.21
Section 5 from Mazar et. al. (2020 v. 3: Chapter 15)
Figure 15.21
Section 5 (Squares N/4–5, looking east)
Mazar et. al. (2020 v.3) - Figure 15.22
Plan of Stratum D-5 from Mazar et. al. (2020 v. 3: Chapter 15)
Figure 15.22
Plan of Stratum D-5
Mazar et. al. (2020 v.3) - Figure 15.23
Plan of Stratum D-4b from Mazar et. al. (2020 v. 3: Chapter 15)
Figure 15.23
Plan of Stratum D-4b
Mazar et. al. (2020 v.3) - Figure 15.24
Plan of Stratum D-4a from Mazar et. al. (2020 v. 3: Chapter 15)
Figure 15.24
Plan of Stratum D-4a
Mazar et. al. (2020 v.3) - Figure 15.25a
Iron IB remains in Areas D and C from Mazar et. al. (2020 v. 3: Chapter 15)
Figure 15.25a
Schematic plan of Iron IB remains in Areas D and C, showing possible correlation: Strata D-5 and C-3b
Mazar et. al. (2020 v.3) - Figure 15.25b
Iron IB remains in Areas D and C from Mazar et. al. (2020 v. 3: Chapter 15)
Figure 15.25b
Schematic plan of Iron IB remains in Areas D and C, showing possible correlation: Strata D-4b and C-3a
Mazar et. al. (2020 v.3) - Figure 15.26
Plan of Stratum D-3, lower pits from Mazar et. al. (2020 v. 3: Chapter 15)
Figure 15.26
Plan of Stratum D-3, lower pits
Mazar et. al. (2020 v.3) - Figure 15.27
Plan of Stratum D-3, upper pits from Mazar et. al. (2020 v. 3: Chapter 15)
Figure 15.27
Plan of Stratum D-3, upper pits
Mazar et. al. (2020 v.3) - Figure 15.28
Plan of Stratum D-2 from Mazar et. al. (2020 v. 3: Chapter 15)
Figure 15.28
Plan of Stratum D-2
Mazar et. al. (2020 v.3) - Figure 15.29
Plan of Stratum D-1c from Mazar et. al. (2020 v. 3: Chapter 15)
Figure 15.29
Plan of Stratum D-1c
Mazar et. al. (2020 v.3) - Figure 15.30
Plan of Stratum D-1b from Mazar et. al. (2020 v. 3: Chapter 15)
Figure 15.30
Plan of Stratum D-1b
Mazar et. al. (2020 v.3) - Figure 15.31
Plan of Stratum D-1a from Mazar et. al. (2020 v. 3: Chapter 15)
Figure 15.31
Plan of Stratum D-1a
Mazar et. al. (2020 v.3) - Figure 15.32
Section 6 from Mazar et. al. (2020 v. 3: Chapter 15)
Figure 15.32
Section 6 (Squares P–Q/5, looking north)
Mazar et. al. (2020 v.3) - Figure 15.33
Section 7 from Mazar et. al. (2020 v. 3: Chapter 15)
Figure 15.33
Section 7 (Squares P–Q/4, looking north)
Mazar et. al. (2020 v.3) - Figure 15.34
Section 8 from Mazar et. al. (2020 v. 3: Chapter 15)
Figure 15.34
Section 8 (Squares Q–N/4, looking south)
Mazar et. al. (2020 v.3) - Figure 15.35
Section 9 from Mazar et. al. (2020 v. 3: Chapter 15)
Figure 15.35
Section 9 (Squares Q/4–5, looking east)
Mazar et. al. (2020 v.3)
- Photo 15.1
Area D at the end of 1997 season from Mazar et. al. (2020 v. 3: Chapter 15)
Photo 15.1
General view, end of 1997 season, looking east; from top to bottom: Squares Q/4 to L/4
Mazar et. al. (2020 v.3) - Photo 15.2
Area D at the end of 1998 season from Mazar et. al. (2020 v. 3: Chapter 15)
Photo 15.2
General view, end of 1998 season, looking east; from top to bottom: Squares Q/4 to L/4
Mazar et. al. (2020 v.3) - Photo 15.3
Area D at the end of 2000 season from Mazar et. al. (2020 v. 3: Chapter 15)
Photo 15.3
General view, end of 2000 season, looking east; from top to bottom: Squares Q/4–5 to L/4
Mazar et. al. (2020 v.3) - Photo 15.4
Area D at the end of 2005 season from Mazar et. al. (2020 v. 3: Chapter 15)
Photo 15.4
General view, end of 2005 season, looking east; from top to bottom: Squares Q/4–5 to L/4–5
Mazar et. al. (2020 v.3) - Photo 15.5
Aerial view, end of 2008 season from Mazar et. al. (2020 v. 3: Chapter 15)
Photo 15.5
Aerial view, end of 2008 season
Mazar et. al. (2020 v.3) - Photo 15.6
General view, end of 2010 season from Mazar et. al. (2020 v. 3: Chapter 15)
Photo 15.6
General view, end of 2010 season, looking southwest; Squares L–N/4–5
Mazar et. al. (2020 v.3) - Photo 15.7
General view, with backhoe digging a trench in the alluvial plain west of the mound, end of 2008 season from Mazar et. al. (2020 v. 3: Chapter 15)
 Photo 15.7
General view, with backhoe digging a trench in the alluvial plain west of the mound, end of 2008 season
Mazar et. al. (2020 v.3) - Photo 15.8
Probe III in Squares M/4–5 from Mazar et. al. (2020 v. 3: Chapter 15)
Photo 15.8
Probe III in Squares M/4–5; looking south at Stratum D-10 Buttress 2889 and Wall 2886; right: section in 2.0 m-high tufa fill, Stratum D-10; bottom left: D-11b Hearth 1926
Mazar et. al. (2020 v.3) - Photo 15.9
Probe III in Squares M/4–5 from Mazar et. al. (2020 v. 3: Chapter 15)
Photo 15.9
Probe III in Squares M/4–5; looking south at Buttress 2889 and Wall 2886, Stratum D-10; bottom: D-11b Hearths 1926 (left) and 1925 (right), Wall 1927 to their north
Mazar et. al. (2020 v.3) - Photo 15.10
Probe III in Squares M/4–5 from Mazar et. al. (2020 v. 3: Chapter 15)
Photo 15.10
Probe III in Squares M/4–5; looking north at Stratum D-10 Buttress 8938 and Wall 8942; bottom: D-11a Wall 1915 and ash pile (1919) to its north; northern and western sections: D-10 tufa fill
Mazar et. al. (2020 v.3) - Photo 15.11
Probe III in Squares M/4–5 from Mazar et. al. (2020 v. 3: Chapter 15)
Photo 15.11
Probe III in Squares M/4–5, looking north at D-11a Wall 1923 covered by layer (1907) and tufa fill (2814) of D-10
Mazar et. al. (2020 v.3) - Photo 15.12
Probe II in Square M/4 from Mazar et. al. (2020 v. 3: Chapter 15)
Photo 15.12
Probe II in Square M/4, looking east; D-11a stone floor (9917) covering D-11b layers; on top: successive D-10 fill layers (9914, 9905) and Floor 8939
Mazar et. al. (2020 v.3) - Photo 15.13
Backhoe trench in Square M/5 from Mazar et. al. (2020 v. 3: Chapter 15)
Photo 15.13
Backhoe trench in Square M/5, looking east; D-10 Wall 8942 with large stone below it at end of trench; thick tufa fill 2814 in trench sections
Mazar et. al. (2020 v.3) - Photo 15.14
Probe III in Squares M/4–5 from Mazar et. al. (2020 v. 3: Chapter 15)
Photo 15.14
Probe III in Squares M/4–5, looking south; left: stone foundation of D-9b Wall 8943 on top of D-10 Wall 8942 and Buttress 8938; background: D-10 Wall 2886 and Buttress 2889 (2010)
Mazar et. al. (2020 v.3) - Photo 15.15
Detail of Probe III from Mazar et. al. (2020 v. 3: Chapter 15)
Photo 15.15
Detail of Probe III, looking south at Wall 2886 and Buttress 2889 (2010)
Mazar et. al. (2020 v.3) - Photo 15.16
Detail of Probe III from Mazar et. al. (2020 v. 3: Chapter 15)
Photo 15.16
Detail of Probe III, looking east at Wall 8942 and Buttress 8938 (left) (2010)
Mazar et. al. (2020 v.3) - Photo 15.17
Backhoe trench in Square M/10 from Mazar et. al. (2020 v. 3: Chapter 15)
 Photo 15.17
Backhoe trench in Square M/10, north of Area D, showing D-10 tufa fill, looking east (1998)
Mazar et. al. (2020 v.3) - Photo 15.18
Squares L–M/4 at end of 2010 season from Mazar et. al. (2020 v. 3: Chapter 15)
Photo 15.18
Squares L–M/4 at end of 2010 season, looking south at D-10 Walls 2886 and 2890 and Buttresses 2889, 1902, 1903; Probe II (9905) in Square M/4 east of Wall 2890
Mazar et. al. (2020 v.3) - Photo 15.19
Probe II in Square M/4 from Mazar et. al. (2020 v. 3: Chapter 15)
Photo 15.19
Probe II in Square M/4, looking east; D-10 constructional fill (9914, 9905) and Floor 8939 in section (1998)
Mazar et. al. (2020 v.3) - Photo 15.20
Probe II in Square M/4 from Mazar et. al. (2020 v. 3: Chapter 15)
Photo 15.20
Probe II in Square M/4, looking south; D-10 constructional fill (9914, 9905) and Floor 8939 in section (2008)
Mazar et. al. (2020 v.3) - Photo 15.21
Squares L–M/4 from Mazar et. al. (2020 v. 3: Chapter 15)
Photo 15.21
Squares L–M/4, looking east at corner of Wall 2890 and Buttresses 1902 and 1903; left: Courtyard 8934 (2010)
Mazar et. al. (2020 v.3) - Photo 15.22
Square M/5, Buttress 8938 and Wall 8942 abutted by D-10 Courtyard 8934 from Mazar et. al. (2020 v. 3: Chapter 15)
Photo 15.22
Square M/5, Buttress 8938 and Wall 8942 abutted by D-10 Courtyard 8934, looking northeast (2008)
Mazar et. al. (2020 v.3) - Photo 15.23
Squares L–N/4–5 from Mazar et. al. (2020 v. 3: Chapter 15)
Photo 15.23
Squares L–N/4–5, looking east; front: D-10 Courtyard 8934 and top of Buttresses 2889 (right) and 8938 (left); background: Strata D-9 to D-5 (2007)
Mazar et. al. (2020 v.3) - Photo 15.24
Squares L–N/4–5 from Mazar et. al. (2020 v. 3: Chapter 15)
Photo 15.24
Squares L–N/4–5, looking south; center: D-10 Courtyard 8934; left: Wall 8942 and Buttress 8938; top: Wall 2886 and Buttress 2889, partly superimposed by D-9b 2816 and 2892; in southern section: D-9 and D-8 layers (2007)
Mazar et. al. (2020 v.3) - Photo 15.25
Squares L–N/4–5 from Mazar et. al. (2020 v. 3: Chapter 15)
Photo 15.25
Squares L–N/4–5, looking north; center: D-10 Courtyard 8934; right: Buttress 8938; bottom: Wall 2886 and Buttress 2889 partly superimposed by D-9b Walls 2816 and 2892 (2007)
Mazar et. al. (2020 v.3) - Photo 15.26
Squares L–M/4 from Mazar et. al. (2020 v. 3: Chapter 15)
Photo 15.26
Squares L–M/4, looking south at section; bottom: D-9b Wall 2816; D-9a stone floor (2855) at top of meter stick, sealing D-10 and D-9b floors (bird-nest holes in section) (2007)
Mazar et. al. (2020 v.3) - Photo 15.27
Squares M–N/4 from Mazar et. al. (2020 v. 3: Chapter 15)
Photo 15.27
Squares M–N/4, looking southeast; D-10 Courtyard 8934 in corner of Walls 8942 and 2886; top left: stone foundation of D-9b Wall 8943 (2008).
Mazar et. al. (2020 v.3) - Photo 15.28
Squares M–N/4–5 from Mazar et. al. (2020 v. 3: Chapter 15)
Photo 15.28
Squares M–N/4–5, looking south at D-9a–b stone foundations (2010)
Mazar et. al. (2020 v.3) - Photo 15.29
Squares M–N/4–5, from Mazar et. al. (2020 v. 3: Chapter 15)
Photo 15.29
Squares M–N/4–5, looking south; left: D-9a Wall 8932 and Post-holes 1912; right: D-9b stone foundations (2010)
Mazar et. al. (2020 v.3) - Photo 15.30
Squares N/4–5 from Mazar et. al. (2020 v. 3: Chapter 15)
Photo 15.30
Squares N/4–5, looking west; top: D-9b stone foundations; bottom: D-9a Wall 8932 and Post-holes 1912; right: D-9a Wall 1916 (2010)
Mazar et. al. (2020 v.3) - Photo 15.31
Squares N/5 from Mazar et. al. (2020 v. 3: Chapter 15)
Photo 15.31
Square N/5, looking south; bottom: D-9a Wall 1916; right and top: D-9b Walls 8943 and 9923; left: D-9a Post-holes 1912 (2010)
Mazar et. al. (2020 v.3) - Photo 15.32
Squares N/4 from Mazar et. al. (2020 v. 3: Chapter 15)
Photo 15.32
Square N/4, looking south at D-9b Floor 9927, Oven 9918 and Installation 1905; right: Wall 8943; background: Wall 1904 (2010)
Mazar et. al. (2020 v.3) - Photo 15.33
Square M/5 from Mazar et. al. (2020 v. 3: Chapter 15)
Photo 15.33
Square M/5, looking south at D-9b bronze-melting canal (8921) and Installation 8925 (2007)
Mazar et. al. (2020 v.3) - Photo 15.34
Detail of bronze-melting canal (8921) with fragments of bellow, charcoal, and metal object in situ from Mazar et. al. (2020 v. 3: Chapter 15)
Photo 15.34
Detail of bronze-melting canal (8921) with fragments of bellow, charcoal, and metal object in situ, looking west (2007)
Mazar et. al. (2020 v.3) - Photo 15.35
Square M/5 from Mazar et. al. (2020 v. 3: Chapter 15)
Photo 15.35
Square M/5, detail of Installation 8925 near bronze-melting canal (8921), looking south (2007)
Mazar et. al. (2020 v.3) - Photo 15.36
Square M/5 from Mazar et. al. (2020 v. 3: Chapter 15)
Photo 15.36
Square M/5, D-9b Installation 8936 and stone foundation of Wall 8943, looking west; left: D-10 Buttress 8938 (2007)
Mazar et. al. (2020 v.3) - Photo 15.37
Squares L–M/4 from Mazar et. al. (2020 v. 3: Chapter 15)
Photo 15.37
Squares L–M/4, looking north at foundations of D-9b Wall 2816 above D-10 Wall 2886 and Buttress 1903, with D-10 Wall 2890 at the bottom
Mazar et. al. (2020 v.3) - Photo 15.38
Square N/4 from Mazar et. al. (2020 v. 3: Chapter 15)
Photo 15.38
Square N/4, sloping striations in D-10 Locus 8939 below D-9 stone foundations of Walls 8943 and 1906, looking east; background: D-8–9a Wall 8932 (2010)
Mazar et. al. (2020 v.3) - Photo 15.39
Square N/4 from Mazar et. al. (2020 v. 3: Chapter 15)
Photo 15.39
Square N/4, Locus 8919, foundation deposit (basalt bowl and lamp) in corner of Walls 8943 and 1906, looking southeast (2010)
Mazar et. al. (2020 v.3) - Photo 15.40
Squares M–N/4–5 from Mazar et. al. (2020 v. 3: Chapter 15)
Photo 15.40
Squares M–N/4–5, looking east; left: backhoe trench into D-10 tufa fill near porcupine hole; D-9 to D-6b floors and installations in middle and upper steps (2005)
Mazar et. al. (2020 v.3) - Photo 15.41
Squares N/4–5 from Mazar et. al. (2020 v. 3: Chapter 15)
Photo 15.41
Squares N/4–5, looking east; D-8–9a Wall 8932 on D-9b Floor 9927, cut on the south by D-7b Pit 8916
Mazar et. al. (2020 v.3) - Photo 15.42
Squares L–N/4 from Mazar et. al. (2020 v. 3: Chapter 15)
Photo 15.42
Squares L–N/4, looking east; bottom: foundation of D-9b Wall 2816; center: D-9a stone floor 2855; above, right: D-7a Wall 1818 (1998)
Mazar et. al. (2020 v.3) - Photo 15.43
Square M/4 from Mazar et. al. (2020 v. 3: Chapter 15)
Photo 15.43
Square M/4, looking east at D-9a stone floor 2855 (1998)
Mazar et. al. (2020 v.3) - Photo 15.44
Square M/4 from Mazar et. al. (2020 v. 3: Chapter 15)
Photo 15.44
Square M/4, looking east at sloping layers 8939 (D-10) and 8919 (D-9b), sealed below D-9a stone Floor 2855 (2008)
Mazar et. al. (2020 v.3) - Photo 15.45
Squares N–M/4–5 from Mazar et. al. (2020 v. 3: Chapter 15)
Photo 15.45
Squares N–M/4–5, looking southeast; center: D-7a' pillar bases; top: stone foundation of D-4 Wall 1883 (2007)
Mazar et. al. (2020 v.3) - Photo 15.46
Northeast corner of Square M/5 from Mazar et. al. (2020 v. 3: Chapter 15)
Photo 15.46
Northeast corner of Square M/5, looking north; lamp-and-bowl foundation deposit below D-7a Wall 7906, cut into stone lining of D-7b Oven 7924 (2007)
Mazar et. al. (2020 v.3) - Photo 15.47
Square M/5 from Mazar et. al. (2020 v. 3: Chapter 15)
Photo 15.47
Square M/5, looking south at section through D-7b Installation 7919 (2005); bowl: Fig. 16.26:2
Mazar et. al. (2020 v.3) - Photo 15.48
Square N/4 from Mazar et. al. (2020 v. 3: Chapter 15)
Photo 15.48
Square N/4, looking northeast at D-7b Floor 8914, cut by D-7a Installation 8906 (2007)
Mazar et. al. (2020 v.3) - Photo 15.49
Square M/5 from Mazar et. al. (2020 v. 3: Chapter 15)
Photo 15.49
Square M/5, looking north at stone foundation of D-7a Wall 7906 with floor striations in section; below the wall: ashy layer of D-7b Floor 7903 (2005)
Mazar et. al. (2020 v.3) - Photo 15.50
Square N/5 from Mazar et. al. (2020 v. 3: Chapter 15)
Photo 15.50
Square N/5, looking north at D-7a stone floor 9906, pillar bases 9907 and Wall 8917 (2008)
Mazar et. al. (2020 v.3) - Photo 15.51
Square N/5 from Mazar et. al. (2020 v. 3: Chapter 15)
Photo 15.51
Square N/5, looking west at D-7a stone floor 9906 and pillar bases 9907 (2008)
Mazar et. al. (2020 v.3) - Photo 15.52
Square N/4 from Mazar et. al. (2020 v. 3: Chapter 15)
Photo 15.52
Square N/4, looking north; left: foundation of D-7a–6b Wall 2842; center: D-7a Floor 8907 and Installation 8906 (2007)
Mazar et. al. (2020 v.3) - Photo 15.53
Square N/4 from Mazar et. al. (2020 v. 3: Chapter 15)
Photo 15.53
Square N/4, looking west; bottom left: D-7a Ovens 7946 and 8902; center: D-7b Pit 8916 (2007)
Mazar et. al. (2020 v.3) - Photo 15.54a
Square M/4 from Mazar et. al. (2020 v. 3: Chapter 15)
Photo 15.54a
Square M/4; D-7a lamp and bowl deposits - deposit No. 2, looking southeast east (1997)
Mazar et. al. (2020 v.3) - Photo 15.54b
Square M/4 from Mazar et. al. (2020 v. 3: Chapter 15)
Photo 15.54b
Square M/4; D-7a lamp and bowl deposits - deposit No. 3, looking east (1997)
Mazar et. al. (2020 v.3) - Photo 15.55
Square N/5 from Mazar et. al. (2020 v. 3: Chapter 15)
Photo 15.55
Square N/5, looking west at D-7a' pillar bases 8944 and Walls 8904 and 4856 (2007)
Mazar et. al. (2020 v.3) - Photo 15.56
Squares N/4–5 from Mazar et. al. (2020 v. 3: Chapter 15)
Photo 15.56
Squares N/4–5, looking east; left: D-6b Installations 7931 and 7939; right: D-7a Wall 8904, superimposed by D-6b Installation 2874 (2005)
Mazar et. al. (2020 v.3) - Photo 15.57
Squares N/4–5 from Mazar et. al. (2020 v. 3: Chapter 15)
Photo 15.57
Squares N/4–5, looking south; bottom: D-6b Installations 7931 and 7939; center: D-7a Wall 8904, superimposed by D-6a–b Installation 2874 (2005)
Mazar et. al. (2020 v.3) - Photo 15.58
Square N/5 from Mazar et. al. (2020 v. 3: Chapter 15)
Photo 15.58
Square N/5, looking west; detail of D-6b Installations 7939 (bottom) and 7931 (top); top right: red clay patch 7925 above D-6a Wall 7926 (2005)
Mazar et. al. (2020 v.3) - Photo 15.59
Square N/4 from Mazar et. al. (2020 v. 3: Chapter 15)
Photo 15.59
Square N/4, looking east; detail of D-6b Installation 2874 (2005)
Mazar et. al. (2020 v.3) - Photo 15.60
Square N/4 from Mazar et. al. (2020 v. 3: Chapter 15)
Photo 15.60
Square N/4, southern section showing D-6 striations and ash layers (bird-nest holes in section).
Mazar et. al. (2020 v.3) - Photo 15.61
Square N/4 from Mazar et. al. (2020 v. 3: Chapter 15)
Photo 15.61
Square N/4; D-6a Oven 2841 below D-4b Floor 1845 (1998)
Mazar et. al. (2020 v.3) - Photo 15.62
Square P/4 from Mazar et. al. (2020 v. 3: Chapter 15)
Photo 15.62
Square P/4, section in D-6a Oven 2841
Mazar et. al. (2020 v.3) - Photo 15.63
Squares N–Q/4–5 from Mazar et. al. (2020 v. 3: Chapter 15)
Photo 15.63
Squares N–Q/4–5 at end of 2007 season; center: north–south street (Photo: SkyView).
Mazar et. al. (2020 v.3) - Photo 15.64
Square N–P/4 from Mazar et. al. (2020 v. 3: Chapter 15)
Photo 15.64
Square N–P/4, looking east; right: stone foundation of D-4 Wall 1811; center right: D-6a Oven 2841 (1998)
Mazar et. al. (2020 v.3) - Photo 15.65
Probe in street, Square P/4 from Mazar et. al. (2020 v. 3: Chapter 15)
Photo 15.65
Probe in street, Square P/4; D-5 stone fill 9810, east of Wall 2882 (2008)
Mazar et. al. (2020 v.3) - Photo 15.66
Squares P/4–5 from Mazar et. al. (2020 v. 3: Chapter 15)
Photo 15.66
Squares P/4–5, looking south, D-4b Street 8803, bordered by Wall 1883 (right) and Walls 8850, 1860, above 2881 (left); lower left: Installation 8810 (2007)
Mazar et. al. (2020 v.3) - Photo 15.67
Squares P/4–5; fallen bricks (7847) along eastern face of Wall 1883 from Mazar et. al. (2020 v. 3: Chapter 15)
Photo 15.67
Squares P/4–5, same as Photo 15.66, looking north; fallen bricks (7847) along eastern face of Wall 1883 (2007)
Mazar et. al. (2020 v.3) - Photo 15.68
Square P-5, looking west at Wall 1883; foreground: brick collapse in street from Mazar et. al. (2020 v. 3: Chapter 15)
Photo 15.68
Square P-5, looking west at Wall 1883; foreground: brick collapse in street (2005)
Mazar et. al. (2020 v.3) - Photo 15.69
Squares P–Q/4–5 from Mazar et. al. (2020 v. 3: Chapter 15)
Photo 15.69
Squares P–Q/4–5, looking north at D-5 Buildings DD and DE, (2008)
Mazar et. al. (2020 v.3) - Photo 15.70
Squares Q/4–5, looking north at D-5 Room 8867 from Mazar et. al. (2020 v. 3: Chapter 15)
Photo 15.70
Squares Q/4–5, looking north at D-5 Room 8867; bottom: Pit 8883 (2008)
Mazar et. al. (2020 v.3) - Photo 15.71
Square Q/5, looking west at D-4 Building DG; lower right: brick collapse 8865 in D-5 Building DE from Mazar et. al. (2020 v. 3: Chapter 15)
Photo 15.71
Square Q/5, looking west at D-4 Building DG; lower right: brick collapse 8865 in D-5 Building DE (2007)
Mazar et. al. (2020 v.3) - Photo 15.72
Square Q/5 from Mazar et. al. (2020 v. 3: Chapter 15)
Photo 15.72
Square Q/5, looking west; lower right: Room 8865 of D-5 Building DD; left: walls of D-4 Buildings DG and DH (2007)
Mazar et. al. (2020 v.3) - Photo 15.73
Square P/5 from Mazar et. al. (2020 v. 3: Chapter 15)
Photo 15.73
Square P/5, looking west; center: D-5 Room 8874 with ‘steps’ 8879; D-4b Installation 8810 on top of D-5 Wall 8878 (2007).
Mazar et. al. (2020 v.3) - Photo 15.74
Squares Q/4–5 from Mazar et. al. (2020 v. 3: Chapter 15)
Photo 15.74
Squares Q/4–5, looking east at D-5 Building DD; Installation 9805 on Floor 8867 (2008)
Mazar et. al. (2020 v.3) - Photo 15.75
Square Q/4 from Mazar et. al. (2020 v. 3: Chapter 15)
Photo 15.75
Square Q/4, looking north at D-5 Building DD; Floor 8867, cut by Pit 8883 (2008)
Mazar et. al. (2020 v.3) - Photo 15.76
Square P/4 from Mazar et. al. (2020 v. 3: Chapter 15)
Photo 15.76
Square P/4, looking southwest at D-5 Building DD; left: Floor 8871 and Pit 8876; top right: street between Walls 2881 and 2882 (2008)
Mazar et. al. (2020 v.3) - Photo 15.77
Squares P–Q/4 from Mazar et. al. (2020 v. 3: Chapter 15)
Photo 15.77
Squares P–Q/4, looking southwest at D-5 Building DD; Floor 8871, cut by Pits 8876 (center) and 8880 (left); D-4 Wall 1884 floating above floor (2007)
Mazar et. al. (2020 v.3) - Photo 15.78
General view of Area D from Mazar et. al. (2020 v. 3: Chapter 15)
Photo 15.78
General view, looking west, end of 2000 season
Mazar et. al. (2020 v.3) - Photo 15.79
Squares N–P/4,from Mazar et. al. (2020 v. 3: Chapter 15)
Photo 15.79
Squares N–P/4, looking north at D-4 Building DF (2000)
Mazar et. al. (2020 v.3) - Photo 15.80
Squares N–P/4 from Mazar et. al. (2020 v. 3: Chapter 15)
Photo 15.80
Squares N–P/4, looking east; Building DF; D-4b stone floor 1845 covered by pebbles (1842); D-4a brick collapse and stratified layers above (1997)
Mazar et. al. (2020 v.3) - Photo 15.81
Square N/4 from Mazar et. al. (2020 v. 3: Chapter 15)
Photo 15.81
Square N/4, looking east; D-4b Building DF; background: Wall 1811; foreground: accumulation 1805 on Floor 1822; note two rows of bricks separated by a line in Wall 1811 (1997)
Mazar et. al. (2020 v.3) - Photo 15.82
Squares N–P/4 from Mazar et. al. (2020 v. 3: Chapter 15)
Photo 15.82
Squares N–P/4, looking west; D-5 Building DF, stone floor 1845 (2000)
Mazar et. al. (2020 v.3) - Photo 15.83
Square P/4 from Mazar et. al. (2020 v. 3: Chapter 15)
Photo 15.83
Square P/4, looking north; right: D-4a street surface 1873; meter stick on Wall 1883 (1997).
Mazar et. al. (2020 v.3) - Photo 15.84
Square P/5 from Mazar et. al. (2020 v. 3: Chapter 15)
Photo 15.84
Square P/5, looking south at D-4a stone pavement (7805/7828) in street (2005)
Mazar et. al. (2020 v.3) - Photo 15.85
Squares P–N/4–5 from Mazar et. al. (2020 v. 3: Chapter 15)
Photo 15.85
Squares P–N/4–5, looking west; D-4b Buildings DG and DH; center: D-4a Floor 8820, Building DJ (2007)
Mazar et. al. (2020 v.3) - Photo 15.86
Square P/4 from Mazar et. al. (2020 v. 3: Chapter 15)
Photo 15.86
Square P/4, looking east; D-4b Building DG, Installation 8824 (2007)
Mazar et. al. (2020 v.3) - Photo 15.87
Square Q/5 from Mazar et. al. (2020 v. 3: Chapter 15)
Photo 15.87
Square Q/5, looking north; D-4b Building DG, Room 8830; Installation 8837 in northeastern corner of room (2007)
Mazar et. al. (2020 v.3) - Photo 15.88
Square Q/5 from Mazar et. al. (2020 v. 3: Chapter 15)
Photo 15.88
Square Q/5, looking east; D-4a Building DJ, with elements of D-4b Buildings DH and DG below (2007)
Mazar et. al. (2020 v.3) - Photo 15.89
Square Q/5 from Mazar et. al. (2020 v. 3: Chapter 15)
Photo 15.89
Square Q/5, eastern section; D-4a Building DJ above elements of D-4b Buildings DH and DG (2007)
Mazar et. al. (2020 v.3) - Photo 15.90
Square Q/5 from Mazar et. al. (2020 v. 3: Chapter 15)
Photo 15.90
Square Q/5, looking north; D-4b Building DH (2007)
Mazar et. al. (2020 v.3) - Photo 15.91
Square Q/5 from Mazar et. al. (2020 v. 3: Chapter 15)
 Photo 15.91
Square Q/5, looking south; D-4b Building DH, Room 8844; note pottery just below the floor (2007)
Mazar et. al. (2020 v.3) - Photo 15.92
Square P/5 from Mazar et. al. (2020 v. 3: Chapter 15)
 Photo 15.92
Square P/5, looking south; D-4b Building DH, Room 8842; right: Installation 8810 covered by large stones 8856 to east of installation (2007)
Mazar et. al. (2020 v.3) - Photo 15.93
Squares Q–P/4–5 from Mazar et. al. (2020 v. 3: Chapter 15)
 Photo 15.93
Squares Q–P/4–5, end of 2005 season, looking west; right: D-4a Building DJ, Rooms 7853, 4858 and 4872
Mazar et. al. (2020 v.3) - Photo 15.94
Square Q/5, looking east; D-4a Building DJ, brick collapse in Room 7853 from Mazar et. al. (2020 v. 3: Chapter 15)
 Photo 15.94
Square Q/5, looking east; D-4a Building DJ, brick collapse in Room 7853 (2005)
Mazar et. al. (2020 v.3) - Photo 15.95
Square P/5 from Mazar et. al. (2020 v. 3: Chapter 15)
Photo 15.95
Square P/5, D-4a Building DJ, Rooms 4858 (bottom) and 4872 (top) (2000)
Mazar et. al. (2020 v.3) - Photo 15.96
Square P/5, looking west; D-4a Building DJ, debris and vessels in Room 4872 from Mazar et. al. (2020 v. 3: Chapter 15)
Photo 15.96
Square P/5, looking west; D-4a Building DJ, debris and vessels in Room 4872 (2000)
Mazar et. al. (2020 v.3) - Photo 15.97
Smashed Pottery in Square P/5 D-4a Building DJ, Room 4872 from Mazar et. al. (2020 v. 3: Chapter 15)
Photo 15.97
Square P/5, looking west; detail of D-4a Building DJ, Room 4872 (see Photo 15.96) (2000)
Mazar et. al. (2020 v.3) - Photo 15.98
Squares P–Q/4 from Mazar et. al. (2020 v. 3: Chapter 15)
Photo 15.98
Squares P–Q/4, looking south; D-4a Building DJ, Rooms 4863 (left) and 2869 (right) (2000)
Mazar et. al. (2020 v.3) - Photo 15.99
Square P/4 from Mazar et. al. (2020 v. 3: Chapter 15)
Photo 15.99
Square P/4, looking east at entrance from street to Room 2869, D-4a Building DJ; foreground: stones (2886) in D-4b street surface (1998)
Mazar et. al. (2020 v.3) - Photo 15.100
Squares Q–P/4 from Mazar et. al. (2020 v. 3: Chapter 15)
Photo 15.100
Squares Q–P/4, looking west; upper D-3 pits (1998)
Mazar et. al. (2020 v.3) - Photo 15.101
Square Q/4 from Mazar et. al. (2020 v. 3: Chapter 15)
Photo 15.101
Square Q/4, looking south at D-3 pits cutting into D-4 debris. Right: D-4 Wall 1860 (1998)
Mazar et. al. (2020 v.3) - Photo 15.102
Squares P–Q/4 from Mazar et. al. (2020 v. 3: Chapter 15)
Photo 15.102
Squares P–Q/4, looking north at lower D-3 pits, dug into D-4 architecture (2000)
Mazar et. al. (2020 v.3) - Photo 15.103
Square Q/4 from Mazar et. al. (2020 v. 3: Chapter 15)
Photo 15.103
Square Q/4, looking south at D-3 Pits 4805 (bottom) and 4806 (top) (2000)
Mazar et. al. (2020 v.3) - Photo 15.104
Square Q/4, D-3 Pit 2808 from Mazar et. al. (2020 v. 3: Chapter 15)
Photo 15.104
Square Q/4, D-3 Pit 2808 (1998)
Mazar et. al. (2020 v.3) - Photo 15.105
Squares P–Q/4, looking west at upper D-3 pits from Mazar et. al. (2020 v. 3: Chapter 15)
Photo 15.105
Squares P–Q/4, looking west at upper D-3 pits (1998)
Mazar et. al. (2020 v.3) - Photo 15.106
Square Q/4, looking south at D-3 Pit 2872 from Mazar et. al. (2020 v. 3: Chapter 15)
Photo 15.106
Square Q/4, looking south at D-3 Pit 2872 (1998)
Mazar et. al. (2020 v.3) - Photo 15.107
Square Q/4, looking west at D-3 Pit 2850 from Mazar et. al. (2020 v. 3: Chapter 15)
Photo 15.107
Square Q/4, looking west at D-3 Pit 2850 (1998)
Mazar et. al. (2020 v.3) - Photo 15.108
Square P/4 from Mazar et. al. (2020 v. 3: Chapter 15)
Photo 15.108
Square P/4, looking east at D-2 Room 4826 (2000)
Mazar et. al. (2020 v.3) - Photo 15.109
Square P/5 from Mazar et. al. (2020 v. 3: Chapter 15)
Photo 15.109
Square P/5, looking west at D-2 Room 4828 (2000)
Mazar et. al. (2020 v.3) - Photo 15.110
Square P/5 from Mazar et. al. (2020 v. 3: Chapter 15)
Photo 15.110
Square P/5, looking east at D-2 Room 4828; right: trench cutting northern end of Floor 4825 (2000)
Mazar et. al. (2020 v.3) - Photo 15.111
Square P/5, looking south at reed impressions (ceiling collapse?) on plaster layer from Mazar et. al. (2020 v. 3: Chapter 15)
Photo 15.111
Square P/5, looking south at reed impressions (ceiling collapse?) on plaster layer, below foundations of D-2 Wall 4808; foreground: D-4b basalt basin (8807) in Installation 8810 (2007)
Mazar et. al. (2020 v.3) - Photo 15.112
Closeup of layer in Photo 15.111 from Mazar et. al. (2020 v. 3: Chapter 15)
Photo 15.112
Closeup of layer in Photo 15.111
Mazar et. al. (2020 v.3) - Photo 15.113
Square Q/5 from Mazar et. al. (2020 v. 3: Chapter 15)
Photo 15.113
Square Q/5, looking north at D-2 Wall 4808, built into D-4a Building DJ (2007)
Mazar et. al. (2020 v.3) - Photo 15.114
Square Q/5 from Mazar et. al. (2020 v. 3: Chapter 15)
Photo 15.114
Square Q/5, looking north; eastern part of D-2 Wall 4808, built against Wall 7851 (2007)
Mazar et. al. (2020 v.3) - Photo 15.115
Square Q/5 from Mazar et. al. (2020 v. 3: Chapter 15)
Photo 15.115
Square Q/5, looking west; D-1b–c walls above D-2 Wall 4808 (2005)
Mazar et. al. (2020 v.3) - Photo 15.116
Square Q/5 from Mazar et. al. (2020 v. 3: Chapter 15)
Photo 15.116
Square Q/5, looking east; top and center: D-1 walls and layers; bottom: D-4 Rooms 4872 and 4858 (2005)
Mazar et. al. (2020 v.3) - Photo 15.117
Square Q/5 from Mazar et. al. (2020 v. 3: Chapter 15)
Photo 15.117
Square Q/5, looking south at D-1b–c Wall 7803; Debris 7810 (in left section) on Floor 7837 (2005)
Mazar et. al. (2020 v.3) - Photo 15.118
Square Q/5 from Mazar et. al. (2020 v. 3: Chapter 15)
Photo 15.118
Square Q/5, looking west at Stratum D-1b–c elements (2005)
Mazar et. al. (2020 v.3) - Photo 15.119
Square Q/5 from Mazar et. al. (2020 v. 3: Chapter 15)
Photo 15.119
Square Q/5 looking north; D-2 Floor 7837 below D-1b–c walls (2005)
Mazar et. al. (2020 v.3) - Photo 15.120
Square Q/5 from Mazar et. al. (2020 v. 3: Chapter 15)
Photo 15.120
Square Q/5, eastern section with D-1c Debris 7826 above Floor 7830/7837 (1998)
Mazar et. al. (2020 v.3) - Photo 15.121
Square Q/4 from Mazar et. al. (2020 v. 3: Chapter 15)
Photo 15.121
Square Q/4, looking north at D-1a Wall 1816 (1997)
Mazar et. al. (2020 v.3) - Photo 15.122
Square Q/4 from Mazar et. al. (2020 v. 3: Chapter 15)
Photo 15.122
Square Q/4, looking north at D-1b Oven 1817 (center) and D-1a Wall 1808 (right) (1997)
Mazar et. al. (2020 v.3) - Photo 15.123
Square Q/4 from Mazar et. al. (2020 v. 3: Chapter 15)
 Photo 15.123
Square Q/4, looking north at D-1a Walls 1808 and 1816 (1997)
Mazar et. al. (2020 v.3)
- Table 17.1
Locus and basket numbers from Mazar et. al. (2020 v. 3: Chapter 17)
 Table 17.1
Locus and basket numbers
Mazar et. al. (2020 v.3) - Table 17.2
Correlation of the Iron Age stratigraphic sequence in Areas C, D, E, and F from Mazar et. al. (2020 v. 3: Chapter 17)
Table 17.2
Correlation of the Iron Age stratigraphic sequence in Areas C, D, E, and F
Mazar et. al. (2020 v.3) - Figure 17.1
Schematic plan of Areas E and F; Iron IIA Stratum F-1 in black from Mazar et. al. (2020 v. 3: Chapter 17)
Figure 17.1
Schematic plan of Areas E and F; Iron IIA Stratum F-1 in black
Mazar et. al. (2020 v.3) - Figure 17.2a
Plan of Stratum E-3 (Square E/15) from Mazar et. al. (2020 v. 3: Chapter 17)
Figure 17.2a
Plan of Stratum E-3 (Square E/15)
Mazar et. al. (2020 v.3) - Figure 17.2b
Plan of Stratum E-2 from Mazar et. al. (2020 v. 3: Chapter 17)
Figure 17.2b
Plan of Stratum E-2
Mazar et. al. (2020 v.3) - Figure 17.3
Plan of Stratum E-1b in Squares D–F/13–16 from Mazar et. al. (2020 v. 3: Chapter 17)
Figure 17.3
Plan of Stratum E-1b in Squares D–F/13–16
Mazar et. al. (2020 v.3) - Figure 17.4
Schematic plan of Stratum E-1a, marked with location of sub-plans from Mazar et. al. (2020 v. 3: Chapter 17)
Figure 17.4
Schematic plan of Stratum E-1a, marked with location of sub-plans
Mazar et. al. (2020 v.3) - Figure 17.5
General plan of Stratum E-1a from Mazar et. al. (2020 v. 3: Chapter 17)
Figure 17.5
General plan of Stratum E-1a
Mazar et. al. (2020 v.3) - Figure 17.13
Location of section drawings marked on schematic plan of Stratum E-1a from Mazar et. al. (2020 v. 3: Chapter 17)
 Figure 17.13
Location of section drawings marked on schematic plan of Stratum E-1a
Mazar et. al. (2020 v.3)
- Table 17.1 -
Locus and basket numbers from Mazar et. al. (2020 v. 3: Chapter 17)
Table 17.1
Locus and basket numbers
Mazar et. al. (2020 v.3) - Table 17.2 -
Correlation of the Iron Age stratigraphic sequence in Areas C, D, E, and F from Mazar et. al. (2020 v. 3: Chapter 17)
Table 17.2
Correlation of the Iron Age stratigraphic sequence in Areas C, D, E, and F
Mazar et. al. (2020 v.3) - Figure 17.1 -
Schematic plan of Areas E and F; Iron IIA Stratum F-1 in black from Mazar et. al. (2020 v. 3: Chapter 17)
Figure 17.1
Schematic plan of Areas E and F; Iron IIA Stratum F-1 in black
Mazar et. al. (2020 v.3) - Figure 17.2a -
Plan of Stratum E-3 (Square E/15) from Mazar et. al. (2020 v. 3: Chapter 17)
Figure 17.2a
Plan of Stratum E-3 (Square E/15)
Mazar et. al. (2020 v.3) - Figure 17.2b -
Plan of Stratum E-2 from Mazar et. al. (2020 v. 3: Chapter 17)
Figure 17.2b
Plan of Stratum E-2
Mazar et. al. (2020 v.3) - Figure 17.3 -
Plan of Stratum E-1b in Squares D–F/13–16 from Mazar et. al. (2020 v. 3: Chapter 17)
Figure 17.3
Plan of Stratum E-1b in Squares D–F/13–16
Mazar et. al. (2020 v.3) - Figure 17.4 -
Schematic plan of Stratum E-1a, marked with location of sub-plans from Mazar et. al. (2020 v. 3: Chapter 17)
Figure 17.4
Schematic plan of Stratum E-1a, marked with location of sub-plans
Mazar et. al. (2020 v.3) - Figure 17.5 -
General plan of Stratum E-1a from Mazar et. al. (2020 v. 3: Chapter 17)
Figure 17.5
General plan of Stratum E-1a
Mazar et. al. (2020 v.3) - Figure 17.13 -
Location of section drawings marked on schematic plan of Stratum E-1a from Mazar et. al. (2020 v. 3: Chapter 17)
Figure 17.13
Location of section drawings marked on schematic plan of Stratum E-1a
Mazar et. al. (2020 v.3)
Area E was located in the northeastern part of Tel Rehov in main grid square 16 (Chapter 3) at the highest point of the eastern part of the lower mound, although it was 13.5 m lower than the highest point in Area C in the northwestern part. The area was close to the northern and eastern edges of the mound, reaching the top of the steep northern slope in only one narrow probe (Squares E/20, E/1). The area included fourteen fully excavated squares and four half squares, a total of 400 sq m, and an additional narrow trench of 25 sq m north of the main area. The topsoil slightly descended southwards, creating an elevation difference of 0.82 m over a distance of 20 m between the northern and southern ends of the area.
The goal of the excavation was to determine the occupational history of the uppermost strata in this part of the mound. It turned out that most of this area can be interpreted as a sacred precinct or sanctuary during the Iron Age IIA, comprising a large open courtyard, a raised platform, several installations and two structural units which can be related to this sanctuary (Buildings EA and EB). On the western edge of the area, part of a dwelling was excavated (Building EC)
The excavation in Area E began in 1997 in six squares: E–F/13–15. During the 1998 season, the area was extended to the north (Squares D–E/15– 16, F/16). In 2000, the area was extended to Square D/14, the northern half of D/13, and 2.0 m-wide probes in Squares E/17–18 and G/16, intended to locate the edge of the open courtyard in the northern part of the area. In 2001, three new squares were opened (C/14–16) and a 2.5 m-wide probe was excavated in Squares E/20 and E/1 (in main grid square 20), intended to answer the question whether there were fortifications along the northern edge of the mound (Photos 17.1–17.3).
The excavations in Area E were supervised by Se Jin Koh (1997–1998, 2000) and James Paul Cowie, Diana Edelman and Naama Yahalom-Mack (2001).
Area F, located 5.0 m south of Area E, was directly related to the latter (Fig. 17.1; see Chapter 19).
Stratum E-3 (perhaps to be correlated with general Stratum VII) is known from only one debris layer in a narrow probe in Square E/15. Stratum E-2 (correlated with general Stratum VI) was examined in only a few probes in Squares D–F/15, E/13–14 and the nature of the area in that stratum remains virtually unknown. The few floors from this phase were 0.7–1.0 m below those of Stratum E-1b, at levels 71.07–71.30 m.
The main feature in this area was an architectural complex which we define as an open-air sanctuary, attributed to Strata E-1b and E-1a, correlated with general Strata V and IV. In Stratum E-1a, the heart of this complex was Building EB, containing a platform with masseboth at its northeastern corner. This building was preceded by Building ED of Stratum E-1b, although only one room and a few fragmentary walls of the latter were excavated. A spacious courtyard east and north of Buildings ED and EB was in use in both Strata E-1b and E-1a. Outer walls of this courtyard, located in Squares E/17–18 and G/16, appear to have been in use in both strata. In the courtyard, floors with an accumulation of debris that contained pottery, animal bones, various artifacts and installations, as well as ovens, circular clay bins and benches, were found in a total accumulation of almost 1.0 m. It was sometimes difficult to define which of these layers and installations belonged to Stratum E-1b and which to E-1a, as the courtyard continued to be in use throughout both these strata, with occasional alterations. Floors of Stratum E-1a seem to have been eroded in certain parts of the courtyard (in Squares E/17–18, F–G/16) but were well defined close to Building EB in Squares D–E/15–16. In certain cases, it was difficult to determine whether a certain installation was founded in E-1b or E-1a. Building EA in the southeastern part of the area was an auxiliary structure which, in fact, may have included parts of two or three different buildings. It was founded in Stratum E-1b and continued to be in use in Stratum E-1a, with a few changes and floor raisings.
Building EC in the western part of the area was a partly excavated dwelling located west of the sanctuary; it is known from Stratum E-1a, but was perhaps founded in E-1b.
- Table 17.1 -
Locus and basket numbers from Mazar et. al. (2020 v. 3: Chapter 17)
Table 17.1
Locus and basket numbers
Mazar et. al. (2020 v.3) - Table 17.2 -
Correlation of the Iron Age stratigraphic sequence in Areas C, D, E, and F from Mazar et. al. (2020 v. 3: Chapter 17)
Table 17.2
Correlation of the Iron Age stratigraphic sequence in Areas C, D, E, and F
Mazar et. al. (2020 v.3) - Figure 17.1 -
Schematic plan of Areas E and F; Iron IIA Stratum F-1 in black from Mazar et. al. (2020 v. 3: Chapter 17)
Figure 17.1
Schematic plan of Areas E and F; Iron IIA Stratum F-1 in black
Mazar et. al. (2020 v.3) - Figure 17.3 -
Plan of Stratum E-1b in Squares D–F/13–16 from Mazar et. al. (2020 v. 3: Chapter 17)
Figure 17.3
Plan of Stratum E-1b in Squares D–F/13–16
Mazar et. al. (2020 v.3) - Figure 17.4 -
Schematic plan of Stratum E-1a, marked with location of sub-plans from Mazar et. al. (2020 v. 3: Chapter 17)
Figure 17.4
Schematic plan of Stratum E-1a, marked with location of sub-plans
Mazar et. al. (2020 v.3) - Figure 17.5 -
General plan of Stratum E-1a from Mazar et. al. (2020 v. 3: Chapter 17)
Figure 17.5
General plan of Stratum E-1a
Mazar et. al. (2020 v.3) - Figure 17.6 -
Stratum E-1a in Squares D–F/13–15 from Mazar et. al. (2020 v. 3: Chapter 17)
 Figure 17.6
Stratum E-1a in Squares D–F/13–15
Mazar et. al. (2020 v.3) - Figure 17.7 -
Squares C–E/13–16 in Stratum E-1a from Mazar et. al. (2020 v. 3: Chapter 17)
 Figure 17.7
Squares C–E/13–16 in Stratum E-1a
Mazar et. al. (2020 v.3) - Figure 17.8 -
Detailed plan and elevations of Platform 2654 and standing stones from Mazar et. al. (2020 v. 3: Chapter 17)
 Figure 17.8
Detailed plan and elevations of Platform 2654 and standing stones
Mazar et. al. (2020 v.3) - Figure 17.9 -
Stratum E-1a in Squares E/15–16 and Stratum E-1a–b (or just E-1b) in Squares E/17–18 and G/16 from Mazar et. al. (2020 v. 3: Chapter 17)
 Figure 17.9
Stratum E-1a in Squares E/15–16 and Stratum E-1a–b (or just E-1b) in Squares E/17–18 and G/16
Mazar et. al. (2020 v.3) - Figure 17.14a -
Section 1 from Mazar et. al. (2020 v. 3: Chapter 17)
 Figure 17.14a
Section 1 (Squares E/13–15, looking west)
Mazar et. al. (2020 v.3) - Figure 17.14b -
Section 1 from Mazar et. al. (2020 v. 3: Chapter 17)
 Figure 17.14b
Section 1 (Squares E/13–15, looking west)
Mazar et. al. (2020 v.3) - Figure 17.15a -
Section 2 from Mazar et. al. (2020 v. 3: Chapter 17)
 Figure 17.15a
Section 2 (Squares F/14–15, looking west)
Mazar et. al. (2020 v.3) - Figure 17.15b -
Section 2 from Mazar et. al. (2020 v. 3: Chapter 17)
 Figure 17.15b
Section 2 (Squares F/14–15, looking west)
Mazar et. al. (2020 v.3) - Figure 17.16a -
Section 3 from Mazar et. al. (2020 v. 3: Chapter 17)
 Figure 17.16a
Section 3 (Squares F/13–16, looking east)
Mazar et. al. (2020 v.3) - Figure 17.16b -
Section 3 from Mazar et. al. (2020 v. 3: Chapter 17)
 Figure 17.16b
Section 3 (Squares F/13–16, looking east)
Mazar et. al. (2020 v.3) - Figure 17.17 -
Section 4 from Mazar et. al. (2020 v. 3: Chapter 17)
 Figure 17.17
Section 4 (Squares D–E/15, looking north)
Mazar et. al. (2020 v.3) - Figure 17.18a -
Section 5 from Mazar et. al. (2020 v. 3: Chapter 17)
 Figure 17.18a
Section 5 (Squares D–F/15, looking south)
Mazar et. al. (2020 v.3) - Figure 17.18b -
Section 5 from Mazar et. al. (2020 v. 3: Chapter 17)
 Figure 17.18b
Section 5 (Squares D–F/15, looking south)
Mazar et. al. (2020 v.3) - Figure 17.19 -
Section 6 from Mazar et. al. (2020 v. 3: Chapter 17)
 Figure 17.19
Section 6 (Squares E–F/14, looking north)
Mazar et. al. (2020 v.3) - Figure 17.20 -
Section 7 from Mazar et. al. (2020 v. 3: Chapter 17)
 Figure 17.20
Section 7 (Square E/13, looking north)
Mazar et. al. (2020 v.3) - Figure 17.21 -
Section 8 from Mazar et. al. (2020 v. 3: Chapter 17)
 Figure 17.21
Section 8 (Squares E–F/13, looking south)
Mazar et. al. (2020 v.3) - Figure 17.22 -
Section 9 from Mazar et. al. (2020 v. 3: Chapter 17)
 Figure 17.22
Section 9 (Squares E/20–21, looking west)
Mazar et. al. (2020 v.3)
- Schematic plans: Figs. 17.1, 17.4
- Detailed plans: Figs. 17.3, 17.5–17.9
- Sections: Figs. 17.14–17.22;
- Pottery: Figs. 18.3–18.21
Five architectural units were defined:
- Building EA in Squares E–F/13–1 4, Strata E-1b and E-1a.
- Building ED in Squares D–E/15. This building preceded Building EB; only one room and parts of additional walls were excavated.
- Building EB in Squares C–D/13–16 and E/15, Stratum E-1a.
- Open area/courtyard in Squares E–F/14–16, D/16, E/17–18, Strata E-1b and E-1a.
- Building EC in Squares C/13–16, Stratum E-1a.
In the following discussion, the stratigraphic development and architectural features of both Strata E-1a and E-1b in each architectural unit are described according to the order of the main units defined above.
- Table 17.1 -
Locus and basket numbers from Mazar et. al. (2020 v. 3: Chapter 17)
Table 17.1
Locus and basket numbers
Mazar et. al. (2020 v.3) - Table 17.2 -
Correlation of the Iron Age stratigraphic sequence in Areas C, D, E, and F from Mazar et. al. (2020 v. 3: Chapter 17)
Table 17.2
Correlation of the Iron Age stratigraphic sequence in Areas C, D, E, and F
Mazar et. al. (2020 v.3) - Figure 17.3 -
Plan of Stratum E-1b in Squares D–F/13–16 from Mazar et. al. (2020 v. 3: Chapter 17)
Figure 17.3
Plan of Stratum E-1b in Squares D–F/13–16
Mazar et. al. (2020 v.3) - Figure 17.4 -
Schematic plan of Stratum E-1a, marked with location of sub-plans from Mazar et. al. (2020 v. 3: Chapter 17)
Figure 17.4
Schematic plan of Stratum E-1a, marked with location of sub-plans
Mazar et. al. (2020 v.3) - Figure 17.5 -
General plan of Stratum E-1a from Mazar et. al. (2020 v. 3: Chapter 17)
Figure 17.5
General plan of Stratum E-1a
Mazar et. al. (2020 v.3) - Figure 17.6 -
Stratum E-1a in Squares D–F/13–15 from Mazar et. al. (2020 v. 3: Chapter 17)
Figure 17.6
Stratum E-1a in Squares D–F/13–15
Mazar et. al. (2020 v.3) - Photo 17.1 -
General view of Area E, end of 1997 season, looking east from Mazar et. al. (2020 v. 3: Chapter 17)
 Photo 17.1
General view of Area E, end of 1997 season, looking east; Building EA and courtyard to its north
Mazar et. al. (2020 v.3) - Photo 17.2 -
General view of Area E, end of 2000 season, looking east from Mazar et. al. (2020 v. 3: Chapter 17)
 Photo 17.2
General view of Area E, end of 2000 season, looking east; Buildings EA and EB and courtyard to their north; lower center: E-1b–2 Room 4653 of Building ED
Mazar et. al. (2020 v.3) - Photo 17.9 -
Building EA, general view, end of 1998 season, looking east from Mazar et. al. (2020 v. 3: Chapter 17)
 Photo 17.9
Building EA, general view, end of 1998 season, looking east
Mazar et. al. (2020 v.3) - Photo 17.10 -
Building EA, Square F/14, looking south from Mazar et. al. (2020 v. 3: Chapter 17)
 Photo 17.10
Building EA, Square F/14, looking south (1998)
Mazar et. al. (2020 v.3) - Photo 17.11 -
Building EA, Square F/14, looking south from Mazar et. al. (2020 v. 3: Chapter 17)
 Photo 17.11
Building EA, Square F/14, looking south; bottom left: E-1a Wall 1688; center: E-1b Wall 1687; right: E-1b-1a Wall 1669 (1998)
Mazar et. al. (2020 v.3) - Photo 17.12 -
Building EA, Square F/14, looking north from Mazar et. al. (2020 v. 3: Chapter 17)
 Photo 17.12
Building EA, Square F/14, looking north; lower left: Walls 1661 and 1619; right center: Room 1704 of E-1b and Wall 1687; left: E-1a Floor 1670 and Installation 1668 (1998)
Mazar et. al. (2020 v.3) - Photo 17.13 -
Building EA, Square F/14, looking west; E-1a Floor 1677 with pottery in destruction debris from Mazar et. al. (2020 v. 3: Chapter 17)
 Photo 17.13
Building EA, Square F/14, looking west; E-1a Floor 1677 with pottery in destruction debris (1997)
Mazar et. al. (2020 v.3) - Photo 17.14 -
Building EA, detail of Room 1701 and compartments 1666 and 1700 from Mazar et. al. (2020 v. 3: Chapter 17)
 Photo 17.14
Building EA, detail of Room 1701 and compartments 1666 and 1700, looking southwest (1997)
Mazar et. al. (2020 v.3) - Photo 17.15 -
Building EA, detail of compartments 1666 and 1700 and double wall 1618/1612 from Mazar et. al. (2020 v. 3: Chapter 17)
 Photo 17.15
Building EA, detail of compartments 1666 and 1700 and double wall 1618/1612, looking north (1997)
Mazar et. al. (2020 v.3) - Photo 17.16 -
Building EA, Square E/13, looking east, E-1b Room 2651 from Mazar et. al. (2020 v. 3: Chapter 17)
 Photo 17.16
Building EA, Square E/13, looking east, E-1b Room 2651 (1998)
Mazar et. al. (2020 v.3) - Photo 17.17 -
Building EA, Square E/13, looking east; right: E-1a–b Wall 1629 from Mazar et. al. (2020 v. 3: Chapter 17)
 Photo 17.17
Building EA, Square E/13, looking east; right: E-1a–b Wall 1629 (1998)
Mazar et. al. (2020 v.3) - Photo 17.18 -
Building EA, Square E/13, looking southeast from Mazar et. al. (2020 v. 3: Chapter 17)
 Photo 17.18
Building EA, Square E/13, looking southeast; E-1b Room 1699, Platform 2657 below floating level of Wall 1672 (1998)
Mazar et. al. (2020 v.3) - Photo 17.19 -
Squares E/13–14, Building EA, looking south from Mazar et. al. (2020 v. 3: Chapter 17)
 Photo 17.19
Squares E/13–14, Building EA, looking south; E-1b Floors 1699 and 2651 (1998)
Mazar et. al. (2020 v.3) - Photo 17.20 -
Room 4653, Square D/15 from Mazar et. al. (2020 v. 3: Chapter 17)
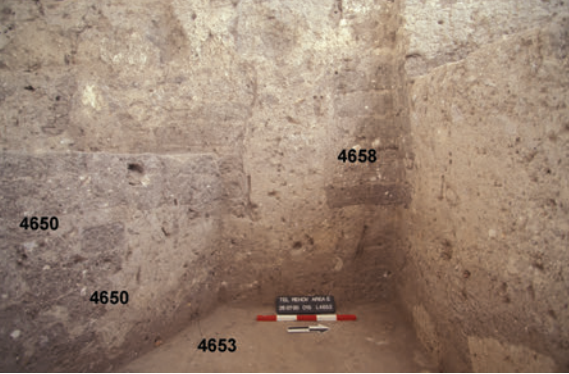 Photo 17.20
Room 4653, Square D/15, looking west; left: Wall 4650; center: Wall 4658, disturbed by a later trench (2000)
Mazar et. al. (2020 v.3)
- Plans: Figs. 17.3–17.6
- Photos 17.1–17.2, 17.9–17.20
- Pottery: Figs. 18.3–18.5
- Table 17.1 -
Locus and basket numbers from Mazar et. al. (2020 v. 3: Chapter 17)
Table 17.1
Locus and basket numbers
Mazar et. al. (2020 v.3) - Table 17.2 -
Correlation of the Iron Age stratigraphic sequence in Areas C, D, E, and F from Mazar et. al. (2020 v. 3: Chapter 17)
Table 17.2
Correlation of the Iron Age stratigraphic sequence in Areas C, D, E, and F
Mazar et. al. (2020 v.3) - Figure 17.2b -
Plan of Stratum E-2 from Mazar et. al. (2020 v. 3: Chapter 17)
Figure 17.2b
Plan of Stratum E-2
Mazar et. al. (2020 v.3) - Figure 17.3 -
Plan of Stratum E-1b in Squares D–F/13–16 from Mazar et. al. (2020 v. 3: Chapter 17)
Figure 17.3
Plan of Stratum E-1b in Squares D–F/13–16
Mazar et. al. (2020 v.3) - Photo 17.2 -
General view of Area E, end of 2000 season, looking east from Mazar et. al. (2020 v. 3: Chapter 17)
Photo 17.2
General view of Area E, end of 2000 season, looking east; Buildings EA and EB and courtyard to their north; lower center: E-1b–2 Room 4653 of Building ED
Mazar et. al. (2020 v.3) - Photo 17.20 -
Room 4653, Square D/15 from Mazar et. al. (2020 v. 3: Chapter 17)
Photo 17.20
Room 4653, Square D/15, looking west; left: Wall 4650; center: Wall 4658, disturbed by a later trench (2000)
Mazar et. al. (2020 v.3) - Photo 17.22 -
General view of Stratum E-1a Buildings EB and EC from Mazar et. al. (2020 v. 3: Chapter 17)
 Photo 17.22
General view of Stratum E-1a Buildings EB and EC, looking east, after dismantling Platform 2654 and Room 2629 (2001)
Mazar et. al. (2020 v.3) - Photo 17.59 -
Buildings EB and EC from Mazar et. al. (2020 v. 3: Chapter 17)
 Photo 17.59
Right: Building EC, looking south; left: Building EB; lower left: E-1b–2 Room 4653 (2001)
Mazar et. al. (2020 v.3)
- Plans: Figs. 17.2b – 17.3
- Photos 17.2, 17.20, 17.22, 17.59
- Table 17.1 -
Locus and basket numbers from Mazar et. al. (2020 v. 3: Chapter 17)
Table 17.1
Locus and basket numbers
Mazar et. al. (2020 v.3) - Table 17.2 -
Correlation of the Iron Age stratigraphic sequence in Areas C, D, E, and F from Mazar et. al. (2020 v. 3: Chapter 17)
Table 17.2
Correlation of the Iron Age stratigraphic sequence in Areas C, D, E, and F
Mazar et. al. (2020 v.3) - Figure 17.5 -
General plan of Stratum E-1a from Mazar et. al. (2020 v. 3: Chapter 17)
Figure 17.5
General plan of Stratum E-1a
Mazar et. al. (2020 v.3) - Figure 17.7 -
Squares C–E/13–16 in Stratum E-1a from Mazar et. al. (2020 v. 3: Chapter 17)
Figure 17.7
Squares C–E/13–16 in Stratum E-1a
Mazar et. al. (2020 v.3) - Photo 17.2 -
General view of Area E, end of 2000 season, looking east from Mazar et. al. (2020 v. 3: Chapter 17)
Photo 17.2
General view of Area E, end of 2000 season, looking east; Buildings EA and EB and courtyard to their north; lower center: E-1b–2 Room 4653 of Building ED
Mazar et. al. (2020 v.3) - Photo 17.3 -
General view of Area E, end of 2001 season, looking south from Mazar et. al. (2020 v. 3: Chapter 17)
 Photo 17.3
General view of Area E, end of 2001 season, looking south; right: Building EC; center: Buildings EB and ED, left: courtyard and Building EA
Mazar et. al. (2020 v.3) - Photo 17.22 -
General view of Stratum E-1a Buildings EB and EC from Mazar et. al. (2020 v. 3: Chapter 17)
Photo 17.22
General view of Stratum E-1a Buildings EB and EC, looking east, after dismantling Platform 2654 and Room 2629 (2001)
Mazar et. al. (2020 v.3) - Photo 17.23a -
Destruction debris in Locus 5621 in the western part of Space 2641 in Building EB from Mazar et. al. (2020 v. 3: Chapter 17)
 Photo 17.23a
Building EB, western part of Space 2641, looking north, destruction debris with pottery in Locus 5621 (2001)
Mazar et. al. (2020 v.3) - Photo 17.23b -
Detail of cooking amphora in Locus 4630 from Mazar et. al. (2020 v. 3: Chapter 17)
 Photo 17.23b
detail of cooking amphora (Fig. 18.10:4), Locus 4630 (2001)
Mazar et. al. (2020 v.3) - Photo 17.24 -
Building EB, Floor 4654 from Mazar et. al. (2020 v. 3: Chapter 17)
 Photo 17.24
Building EB, Floor 4654 (Square D/14), looking north, before dismantling balks (2000)
Mazar et. al. (2020 v.3) - Photo 17.25 -
Building EB, Floor 4654 from Mazar et. al. (2020 v. 3: Chapter 17)
 Photo 17.25
Building EB, Floor 4654, looking west (2000)
Mazar et. al. (2020 v.3) - Photo 17.26 -
E-1a Building EB, Room 2629 from Mazar et. al. (2020 v. 3: Chapter 17)
 Photo 17.26
E-1a Building EB, Room 2629, looking east (1998)
Mazar et. al. (2020 v.3) - Photo 17.27 -
E-1a Building EB, Room 2629 from Mazar et. al. (2020 v. 3: Chapter 17)
 Photo 17.27
E-1a Building EB, Room 2629, looking north; note two stones attached to Walls 2632 and 2634 (1998)
Mazar et. al. (2020 v.3) - Photo 17.28 -
E-1a Building EB, Room 2629, destruction debris and fallen roof material from Mazar et. al. (2020 v. 3: Chapter 17)
 Photo 17.28
E-1a Building EB, Room 2629, destruction debris and fallen roof material (1998)
Mazar et. al. (2020 v.3) - Photo 17.29 -
E-1a Building EB, Room 4616 from Mazar et. al. (2020 v. 3: Chapter 17)
 Photo 17.29
E-1a Building EB, Room 4616, looking east (2001)
Mazar et. al. (2020 v.3) - Photo 17.30 -
Destruction debris in eastern part of E-1a Building EB, Room 4616 from Mazar et. al. (2020 v. 3: Chapter 17)
 Photo 17.30
E-1a Building EB, Room 4616, destruction debris in eastern part, looking east (2000)
Mazar et. al. (2020 v.3) - Photo 17.31 -
Grinding stone leaning on wall 5609 in E-1a Building EB from Mazar et. al. (2020 v. 3: Chapter 17)
 Photo 17.31
E-1a Building EB, lower grinding stone leaning on Wall 5609 in front of entrance to southern room, looking south (2001)
Mazar et. al. (2020 v.3) - Photo 17.32 -
Destruction debris in southeastern corner of E-1a Building EB from Mazar et. al. (2020 v. 3: Chapter 17)
 Photo 17.32
Building EB, Stratum E-1a, Room 4616; destruction debris in southeastern corner; note plaster on Wall 4614 (2000)
Mazar et. al. (2020 v.3) - Photo 17.33 -
Seal impressions on plaster of Room 4616 in E-1a Building EB from Mazar et. al. (2020 v. 3: Chapter 17)
 Photo 17.33
E-1a Building EB, Room 4616, seal impressions on plaster (2000)
Mazar et. al. (2020 v.3) - Photo 17.34 -
E-1a Building EB, Platform 2654, looking south; below platform: E-1b Walls 4634 and 4623 from Mazar et. al. (2020 v. 3: Chapter 17)
 Photo 17.34
E-1a Building EB, Platform 2654, looking south; below platform: E-1b Walls 4634 and 4623 (1998)
Mazar et. al. (2020 v.3) - Photo 17.35 -
Brick platform (2654) and stone platform with standing stones (1624) from Mazar et. al. (2020 v. 3: Chapter 17)
 Photo 17.35
Brick platform (2654) and stone platform with standing stones (1624), looking east; note posthole (2000)
Mazar et. al. (2020 v.3) - Photo 17.36 -
Detail of stone platform (1624) and standing stones, on top of brick platform (2654) from Mazar et. al. (2020 v. 3: Chapter 17)
 Photo 17.36
Detail of stone platform (1624) and standing stones, on top of brick platform (2654), looking south (1998)
Mazar et. al. (2020 v.3) - Photo 17.37 -
Section below Platform 2654 from Mazar et. al. (2020 v. 3: Chapter 17)
 Photo 17.37
Section below Platform 2654, looking west (1999)
Mazar et. al. (2020 v.3)
- Plans: Figs. 17.5, 17.7,
- Photos 17.2–17.3, 17.22–17.37
- Pottery: Figs. 18.6–18.14
- Table 17.1 -
Locus and basket numbers from Mazar et. al. (2020 v. 3: Chapter 17)
Table 17.1
Locus and basket numbers
Mazar et. al. (2020 v.3) - Table 17.2 -
Correlation of the Iron Age stratigraphic sequence in Areas C, D, E, and F from Mazar et. al. (2020 v. 3: Chapter 17)
Table 17.2
Correlation of the Iron Age stratigraphic sequence in Areas C, D, E, and F
Mazar et. al. (2020 v.3) - Figure 17.3 -
Plan of Stratum E-1b in Squares D–F/13–16 from Mazar et. al. (2020 v. 3: Chapter 17)
Figure 17.3
Plan of Stratum E-1b in Squares D–F/13–16
Mazar et. al. (2020 v.3) - Figure 17.4 -
Schematic plan of Stratum E-1a, marked with location of sub-plans from Mazar et. al. (2020 v. 3: Chapter 17)
Figure 17.4
Schematic plan of Stratum E-1a, marked with location of sub-plans
Mazar et. al. (2020 v.3) - Figure 17.5 -
General plan of Stratum E-1a from Mazar et. al. (2020 v. 3: Chapter 17)
Figure 17.5
General plan of Stratum E-1a
Mazar et. al. (2020 v.3) - Figure 17.6 -
Stratum E-1a in Squares D–F/13–15 from Mazar et. al. (2020 v. 3: Chapter 17)
Figure 17.6
Stratum E-1a in Squares D–F/13–15
Mazar et. al. (2020 v.3) - Figure 17.7 -
Squares C–E/13–16 in Stratum E-1a from Mazar et. al. (2020 v. 3: Chapter 17)
Figure 17.7
Squares C–E/13–16 in Stratum E-1a
Mazar et. al. (2020 v.3) - Figure 17.8 -
Detailed plan and elevations of Platform 2654 and standing stones from Mazar et. al. (2020 v. 3: Chapter 17)
Figure 17.8
Detailed plan and elevations of Platform 2654 and standing stones
Mazar et. al. (2020 v.3) - Figure 17.9 -
Stratum E-1a in Squares E/15–16 and Stratum E-1a–b (or just E-1b) in Squares E/17–18 and G/16 from Mazar et. al. (2020 v. 3: Chapter 17)
Figure 17.9
Stratum E-1a in Squares E/15–16 and Stratum E-1a–b (or just E-1b) in Squares E/17–18 and G/16
Mazar et. al. (2020 v.3) - Figure 17.15a -
Section 2 from Mazar et. al. (2020 v. 3: Chapter 17)
Figure 17.15a
Section 2 (Squares F/14–15, looking west)
Mazar et. al. (2020 v.3) - Figure 17.15b -
Section 2 from Mazar et. al. (2020 v. 3: Chapter 17)
Figure 17.15b
Section 2 (Squares F/14–15, looking west)
Mazar et. al. (2020 v.3) - Figure 17.16a -
Section 3 from Mazar et. al. (2020 v. 3: Chapter 17)
Figure 17.16a
Section 3 (Squares F/13–16, looking east)
Mazar et. al. (2020 v.3) - Figure 17.16b -
Section 3 from Mazar et. al. (2020 v. 3: Chapter 17)
Figure 17.16b
Section 3 (Squares F/13–16, looking east)
Mazar et. al. (2020 v.3) - Figure 17.18a -
Section 5 from Mazar et. al. (2020 v. 3: Chapter 17)
Figure 17.18a
Section 5 (Squares D–F/15, looking south)
Mazar et. al. (2020 v.3) - Figure 17.18b -
Section 5 from Mazar et. al. (2020 v. 3: Chapter 17)
Figure 17.18b
Section 5 (Squares D–F/15, looking south)
Mazar et. al. (2020 v.3) - Photo 17.2 -
General view of Area E, end of 2000 season, looking east from Mazar et. al. (2020 v. 3: Chapter 17)
Photo 17.2
General view of Area E, end of 2000 season, looking east; Buildings EA and EB and courtyard to their north; lower center: E-1b–2 Room 4653 of Building ED
Mazar et. al. (2020 v.3) - Photo 17.5 -
South section of probe in Square F/15, with E-1b–2 layers from Mazar et. al. (2020 v. 3: Chapter 17)
 Photo 17.5
South section of probe in Square F/15, with E-1b–2 layers (1998)
Mazar et. al. (2020 v.3) - Photo 17.9 -
Building EA, general view, end of 1998 season, looking east from Mazar et. al. (2020 v. 3: Chapter 17)
Photo 17.9
Building EA, general view, end of 1998 season, looking east
Mazar et. al. (2020 v.3) - Photo 17.38 -
Probe in Squares E/17–18 from Mazar et. al. (2020 v. 3: Chapter 17)
 Photo 17.38
Probe in Squares E/17–18, looking south (2000)
Mazar et. al. (2020 v.3) - Photo 17.39 -
Probe in Square E/18 from Mazar et. al. (2020 v. 3: Chapter 17)
 Photo 17.39
Probe in Square E/18, looking east (2000)
Mazar et. al. (2020 v.3) - Photo 17.40 -
Probe in Square E/18 from Mazar et. al. (2020 v. 3: Chapter 17)
 Photo 17.40
Probe in Square E/18, looking west (2000)
Mazar et. al. (2020 v.3) - Photo 17.41 -
Oven 4608, Square E/17 from Mazar et. al. (2020 v. 3: Chapter 17)
 Photo 17.41
Oven 4608, Square E/17, looking east (2000)
Mazar et. al. (2020 v.3) - Photo 17.42 -
Courtyard in Squares D–F/15–16 from Mazar et. al. (2020 v. 3: Chapter 17)
 Photo 17.42
Courtyard in Squares D–F/15–16, looking south; Platform 2654 partly exposed (1998)
Mazar et. al. (2020 v.3) - Photo 17.43 -
E-1b Floor 2618 with pits in 4665 from Mazar et. al. (2020 v. 3: Chapter 17)
 Photo 17.43
Probe in Square E/16, looking north; E-1b Floor 2618 with pits in 4665 in the north (2000)
Mazar et. al. (2020 v.3) - Photo 17.44 -
Buildings EB and EA from Mazar et. al. (2020 v. 3: Chapter 17)
 Photo 17.44
Squares D–F/13–15, looking east; bottom: eastern part of Building EB; center: floors of the courtyard; upper right: Building EA (1998)
Mazar et. al. (2020 v.3) - Photo 17.45 -
Square E/15 from Mazar et. al. (2020 v. 3: Chapter 17)
 Photo 17.45
Square E/15, looking south; upper left: E-1b circular bins on Floor 1647; upper right: Platform 2654 (2000)
Mazar et. al. (2020 v.3) - Photo 17.46 -
Square E/15 from Mazar et. al. (2020 v. 3: Chapter 17)
 Photo 17.46
Square E/15, detail of circular bins, looking east (2000) (2000)
Mazar et. al. (2020 v.3) - Photo 17.47 -
Square E/15 detail from Mazar et. al. (2020 v. 3: Chapter 17)
 Photo 17.47
Square E/15, detail of Bin 1671 (2000) (2000)
Mazar et. al. (2020 v.3) - Photo 17.48 -
Square E/15 detail from Mazar et. al. (2020 v. 3: Chapter 17)
 Photo 17.48
Square E/15, detail of clay floor and walls of Bin 1685 (2000)
Mazar et. al. (2020 v.3) - Photo 17.49 -
Square E/15 with debris from Mazar et. al. (2020 v. 3: Chapter 17)
 Photo 17.49
Square E/15, looking west; left: E-1b Floor 1647; right: E-1a debris 1611with stone 1623 and Oven 1614 (1997)
Mazar et. al. (2020 v.3) - Photo 17.50 -
Detail of stone 1623 from Mazar et. al. (2020 v. 3: Chapter 17)
 Photo 17.50
Detail of stone 1623 (1997)
Mazar et. al. (2020 v.3) - Photo 17.51 -
Square E/15, foundation stones under stone 1623 from Mazar et. al. (2020 v. 3: Chapter 17)
 Photo 17.51
Square E/15, foundation stones under stone 1623, looking west (1997)
Mazar et. al. (2020 v.3) - Photo 17.52 -
Squares E–F/15–16 from Mazar et. al. (2020 v. 3: Chapter 17)
 Photo 17.52
Squares E–F/15–16, looking north; right: Benches 1674 and 1673; center: courtyard (1998)
Mazar et. al. (2020 v.3) - Photo 17.53 -
Square F/15 from Mazar et. al. (2020 v. 3: Chapter 17)
 Photo 17.53
Square F/15, looking north; Benches 1674 and 1673; Floor 1659 (E-1a) in back (1998)
Mazar et. al. (2020 v.3)
- Plans: Figs. 17.3–17.9
- Photos 17.2, 17.38–17.53
- Pottery: Figs. 18.17–18.19
- Table 17.1 -
Locus and basket numbers from Mazar et. al. (2020 v. 3: Chapter 17)
Table 17.1
Locus and basket numbers
Mazar et. al. (2020 v.3) - Table 17.2 -
Correlation of the Iron Age stratigraphic sequence in Areas C, D, E, and F from Mazar et. al. (2020 v. 3: Chapter 17)
Table 17.2
Correlation of the Iron Age stratigraphic sequence in Areas C, D, E, and F
Mazar et. al. (2020 v.3) - Figure 17.5 -
General plan of Stratum E-1a from Mazar et. al. (2020 v. 3: Chapter 17)
Figure 17.5
General plan of Stratum E-1a
Mazar et. al. (2020 v.3) - Figure 17.7 -
Squares C–E/13–16 in Stratum E-1a from Mazar et. al. (2020 v. 3: Chapter 17)
Figure 17.7
Squares C–E/13–16 in Stratum E-1a
Mazar et. al. (2020 v.3) - Photo 17.55 -
Squares C–D/15–16, Building EC (right) from Mazar et. al. (2020 v. 3: Chapter 17)
 Photo 17.55
Squares C–D/15–16, Building EC (right), looking south (2001)
Mazar et. al. (2020 v.3) - Photo 17.56 -
E-1a Building EC, circular installations in Room 5637 from Mazar et. al. (2020 v. 3: Chapter 17)
 Photo 17.56
E-1a Building EC, circular installations in Room 5637, looking north; post-E-1a Bin 5611 in center (2001)
Mazar et. al. (2020 v.3) - Photo 17.57 -
E-1a Building EC, Room 5637, detail of Bin 5630 from Mazar et. al. (2020 v. 3: Chapter 17)
 Photo 17.57
E-1a Building EC, Room 5637, detail of Bin 5630 (2001)
Mazar et. al. (2020 v.3) - Photo 17.58 -
Building EC, Room 5637, detail of Oven 5632 from Mazar et. al. (2020 v. 3: Chapter 17)
 Photo 17.58
Building EC, Room 5637, detail of Oven 5632 (2001)
Mazar et. al. (2020 v.3) - Photo 17.59 -
Buildings EB and EC from Mazar et. al. (2020 v. 3: Chapter 17)
Photo 17.59
Right: Building EC, looking south; left: Building EB; lower left: E-1b–2 Room 4653 (2001)
Mazar et. al. (2020 v.3)
- Plans: Figs. 17.5, 17.7
- Photos 17.55–17.59
- Pottery: Figs. 18.15–18.16
- Figure 17.18a -
Section 5 from Mazar et. al. (2020 v. 3: Chapter 17)
Figure 17.18a
Section 5 (Squares D–F/15, looking south)
Mazar et. al. (2020 v.3)
- Figure 17.10 -
Plan of Post-E-1a phase in Square C/16 from Mazar et. al. (2020 v. 3: Chapter 17)
 Figure 17.10
Plan of Post-E-1a phase in Square C/16
Mazar et. al. (2020 v.3)
- Table 17.1 -
Locus and basket numbers from Mazar et. al. (2020 v. 3: Chapter 17)
Table 17.1
Locus and basket numbers
Mazar et. al. (2020 v.3) - Table 17.2 -
Correlation of the Iron Age stratigraphic sequence in Areas C, D, E, and F from Mazar et. al. (2020 v. 3: Chapter 17)
Table 17.2
Correlation of the Iron Age stratigraphic sequence in Areas C, D, E, and F
Mazar et. al. (2020 v.3) - Figure 17.11 -
Plan of probe in Squares E/20, E/1 from Mazar et. al. (2020 v. 3: Chapter 17)
 Figure 17.11
Plan of probe in Squares E/20, E/1
Mazar et. al. (2020 v.3) - Photo 17.60 -
Probe in Squares E/20, E/1 from Mazar et. al. (2020 v. 3: Chapter 17)
 Photo 17.60
Probe in Squares E/20, E/1, looking east (2001)
Mazar et. al. (2020 v.3) - Photo 17.61 -
Probe in Square E/1 with Oven 5903 and large stone from Mazar et. al. (2020 v. 3: Chapter 17)
 Photo 17.61
Probe in Square E/1 with Oven 5903 and large stone, looking east (2001)
Mazar et. al. (2020 v.3)
- Schematic plans: Fig. 17.11
- Photos 17.60–17.61
The probe was located on the upper part of the northern slope of the mound, whose top was at level 72.30 m in the southwestern corner of Square E/20 and descended to 70.77 m in the northeastern corner of Square E/1, 10 m to the north. The loose topsoil contained Iron IIA and Early Islamic pottery sherds. A layer of yellowish-white brick debris (5902) was uncovered, although no individual bricks were discernible. In the southern end of Square E/20, the probe revealed that the brick debris continued to a depth of 0.85 m, until level 71.42 m, which may correspond with Stratum E-1b in the northern part of Area E.
In Square E/1, fragmentary remains of an oven (5903) were found on top of this debris layer at level 71.05 m (Photo 17.61), although no floor could be discerned. The walls of this oven were only partly preserved to a height of 0.03–0.06 m; the interior diameter was ca. 0.65 m. A few Iron IIA pottery sherds were found inside the oven, which appears to post-date the brick debris layer and thus, may signify a post E-1a activity, like Oven 5611 in Building EC, although it could be that the brick debris layer marked the top of Stratum E-1b and the oven was constructed in Stratum E-1a; this was impossible to determine due to the limited excavation.
An exceptionally large stone, 0.57×0.87×1.6 m, was found protruding from the floor in the northeastern corner of the probe, where the slope of the mound began (Photo 17.61). A probe dug along the faces of this stone indicated that it was isolated and not part of a wall line, although it seemed to be deliberately positioned on a foundation of five small stones (0.2–0.3 m in length) underneath it. The top of these smaller stones was at level 70.40 m. Since stones are generally lacking in the architecture of the Iron IIA city at Tel Rehov, this large stone may have had a special significance that eludes us. This may be compared to several large stones found in Area F, just south of Area E (Chapter 19).
- Table 17.1 -
Locus and basket numbers from Mazar et. al. (2020 v. 3: Chapter 17)
Table 17.1
Locus and basket numbers
Mazar et. al. (2020 v.3) - Table 17.2 -
Correlation of the Iron Age stratigraphic sequence in Areas C, D, E, and F from Mazar et. al. (2020 v. 3: Chapter 17)
Table 17.2
Correlation of the Iron Age stratigraphic sequence in Areas C, D, E, and F
Mazar et. al. (2020 v.3) - Figure 17.1 -
Schematic plan of Areas E and F; Iron IIA Stratum F-1 in black from Mazar et. al. (2020 v. 3: Chapter 17)
Figure 17.1
Schematic plan of Areas E and F; Iron IIA Stratum F-1 in black
Mazar et. al. (2020 v.3) - Figure 17.2a -
Plan of Stratum E-3 (Square E/15) from Mazar et. al. (2020 v. 3: Chapter 17)
Figure 17.2a
Plan of Stratum E-3 (Square E/15)
Mazar et. al. (2020 v.3) - Figure 17.2b -
Plan of Stratum E-2 from Mazar et. al. (2020 v. 3: Chapter 17)
Figure 17.2b
Plan of Stratum E-2
Mazar et. al. (2020 v.3) - Figure 17.3 -
Plan of Stratum E-1b in Squares D–F/13–16 from Mazar et. al. (2020 v. 3: Chapter 17)
Figure 17.3
Plan of Stratum E-1b in Squares D–F/13–16
Mazar et. al. (2020 v.3) - Figure 17.4 -
Schematic plan of Stratum E-1a, marked with location of sub-plans from Mazar et. al. (2020 v. 3: Chapter 17)
Figure 17.4
Schematic plan of Stratum E-1a, marked with location of sub-plans
Mazar et. al. (2020 v.3) - Figure 17.5 -
General plan of Stratum E-1a from Mazar et. al. (2020 v. 3: Chapter 17)
Figure 17.5
General plan of Stratum E-1a
Mazar et. al. (2020 v.3) - Figure 17.13 -
Location of section drawings marked on schematic plan of Stratum E-1a from Mazar et. al. (2020 v. 3: Chapter 17)
Figure 17.13
Location of section drawings marked on schematic plan of Stratum E-1a
Mazar et. al. (2020 v.3)
The open space, Building EB, and perhaps Building EA, can be interpreted as belonging to a sanctuary or high place (the biblical bamah) that served the neighborhood. The platform and standing stones, that can be interpreted as masseboth, were the focal point of this sanctuary in Stratum E-1a. In the spacious courtyard to the north and east of this platform, ovens and the circular bins were perhaps used in relation to feasting. Although they were attributed to late Stratum E-1b, they possibly continued to be in use in Stratum E-1a. The flat stone in front of the platform can be explained as an offering table and the pottery altar could have been used for burning offerings, including incense or small animals, such as pigeons. The rectangular area with benches in Squares F–E/14–15 could have been used for public feasting.
It could not be securely determined whether the area served as a sanctuary in Stratum E-1b, as it did in Stratum E-1a. Yet, the architectural continuity in the courtyard and surrounding buildings alludes to a similar function in both phases. Alterations in Stratum E-1a were needed due to the rise of floor levels in the courtyard. This may explain the need to rebuild Building ED of Stratum E-1b (of which only one room was exposed) as Building EB in Stratum E-1a. The continuity between these two buildings was demonstrated in the similar plan and location of Rooms 4653 (E-1b) and 2629 (E-1a). The platform and standing stones, which were the focal point of cult in Stratum E-1a, were preceded by an earlier structure defined by Walls 4624 and 4623, yet its nature could not be clarified. Building EA in the southeastern part of the area appears to have been founded in Stratum E-1b and continued to be in use in E-1a, with only minor modifications.
This is a rare example of an Iron Age II openair sanctuary. The concept of a small cult place which served a local neighborhood is known from approximately the same time at Lachish (Stratum V Cult Room 49), Megiddo (Stratum VA–IVB Building 2081) and perhaps at Ta'anach (Dever 1983; Holladay 1987: 249–299; Zevit 2001: 213– 266). Yet, all three differ from our sanctuary in many aspects; they are either an independent cult room (Lachish),1 a cult room in a large building (Megiddo), or a cult corner in a dwelling (Ta'anach). None of these sites have standing stones (masseboth) and a platform (bamah). Platforms and standing stones are known from several Iron Age public cult places, such as at Bethsaida (Zevit 2001: 149–152) and the 9th century BCE temple at Khirbet 'Atarus ('Atarot) in Moab (Ji 2012).2 Standing stones of a similar rough shape and small size as ours are known from the city gate area at Dan (Biran 1994: 244, Photos 203–204; Zevit 2001: 191–196). Our sanctuary, if correctly identified, is the most complete example in Israel of an open-air sanctuary with a platform, standing stones, a spacious courtyard with cooking and food-preparation facilities, and auxiliary rooms. The cultic paraphernalia included a pottery altar, an offering table, and artifacts such as clay figurines. Other special objects included the impressed plaster and the painted Phoenician-style storage jar. The evidence of metal and flint-scraper production in the center of the open courtyard (although attributed to Stratum E-1b) is striking, since the combination of industry with a cult place is known in other cases as well, such as the copper industry at Timna' (Rothenberg 1988: 276–278) and at Kition in Cyprus (Karageorghis 1985: 253), the olive oil industry at Tel Miqne-Ekron (Gitin 2003), and the apiary in Area C at Tel Rehov (Chapters 12, 14A). The large quantity of animal bones found in the open area in front and east of the platform may be taken as evidence for sacrifices and sacred meals (marzeah) that took place in this sanctuary (see Chapter 49; cf., Greer 2013).
- Table 17.1
Locus and basket numbers from Mazar et. al. (2020 v. 3: Chapter 17)
Table 17.1
Locus and basket numbers
Mazar et. al. (2020 v.3) - Table 17.2
Correlation of the Iron Age stratigraphic sequence in Areas C, D, E, and F from Mazar et. al. (2020 v. 3: Chapter 17)
Table 17.2
Correlation of the Iron Age stratigraphic sequence in Areas C, D, E, and F
Mazar et. al. (2020 v.3) - Figure 17.1
Schematic plan of Areas E and F; Iron IIA Stratum F-1 in black from Mazar et. al. (2020 v. 3: Chapter 17)
Figure 17.1
Schematic plan of Areas E and F; Iron IIA Stratum F-1 in black
Mazar et. al. (2020 v.3) - Figure 17.2a
Plan of Stratum E-3 (Square E/15) from Mazar et. al. (2020 v. 3: Chapter 17)
Figure 17.2a
Plan of Stratum E-3 (Square E/15)
Mazar et. al. (2020 v.3) - Figure 17.2b
Plan of Stratum E-2 from Mazar et. al. (2020 v. 3: Chapter 17)
Figure 17.2b
Plan of Stratum E-2
Mazar et. al. (2020 v.3) - Figure 17.3
Plan of Stratum E-1b in Squares D–F/13–16 from Mazar et. al. (2020 v. 3: Chapter 17)
Figure 17.3
Plan of Stratum E-1b in Squares D–F/13–16
Mazar et. al. (2020 v.3) - Figure 17.4
Schematic plan of Stratum E-1a, marked with location of sub-plans from Mazar et. al. (2020 v. 3: Chapter 17)
Figure 17.4
Schematic plan of Stratum E-1a, marked with location of sub-plans
Mazar et. al. (2020 v.3) - Figure 17.5
General plan of Stratum E-1a from Mazar et. al. (2020 v. 3: Chapter 17)
Figure 17.5
General plan of Stratum E-1a
Mazar et. al. (2020 v.3) - Figure 17.6
Stratum E-1a in Squares D–F/13–15 from Mazar et. al. (2020 v. 3: Chapter 17)
Figure 17.6
Stratum E-1a in Squares D–F/13–15
Mazar et. al. (2020 v.3) - Figure 17.7
Squares C–E/13–16 in Stratum E-1a from Mazar et. al. (2020 v. 3: Chapter 17)
Figure 17.7
Squares C–E/13–16 in Stratum E-1a
Mazar et. al. (2020 v.3) - Figure 17.8
Detailed plan and elevations of Platform 2654 and standing stones from Mazar et. al. (2020 v. 3: Chapter 17)
Figure 17.8
Detailed plan and elevations of Platform 2654 and standing stones
Mazar et. al. (2020 v.3) - Figure 17.9
Stratum E-1a in Squares E/15–16 and Stratum E-1a–b (or just E-1b) in Squares E/17–18 and G/16 from Mazar et. al. (2020 v. 3: Chapter 17)
Figure 17.9
Stratum E-1a in Squares E/15–16 and Stratum E-1a–b (or just E-1b) in Squares E/17–18 and G/16
Mazar et. al. (2020 v.3) - Figure 17.10
Plan of Post-E-1a phase in Square C/16 from Mazar et. al. (2020 v. 3: Chapter 17)
Figure 17.10
Plan of Post-E-1a phase in Square C/16
Mazar et. al. (2020 v.3) - Figure 17.11
Plan of probe in Squares E/20, E/1 from Mazar et. al. (2020 v. 3: Chapter 17)
Figure 17.11
Plan of probe in Squares E/20, E/1
Mazar et. al. (2020 v.3) - Figure 17.12
Plan of Stratum E-0 and topsoil loci from Mazar et. al. (2020 v. 3: Chapter 17)
 Figure 17.12
Plan of Stratum E-0 and topsoil loci
Mazar et. al. (2020 v.3) - Figure 17.13
Location of section drawings marked on schematic plan of Stratum E-1a from Mazar et. al. (2020 v. 3: Chapter 17)
Figure 17.13
Location of section drawings marked on schematic plan of Stratum E-1a
Mazar et. al. (2020 v.3) - Figure 17.14a
Section 1 from Mazar et. al. (2020 v. 3: Chapter 17)
Figure 17.14a
Section 1 (Squares E/13–15, looking west)
Mazar et. al. (2020 v.3) - Figure 17.14b
Section 1 from Mazar et. al. (2020 v. 3: Chapter 17)
Figure 17.14b
Section 1 (Squares E/13–15, looking west)
Mazar et. al. (2020 v.3) - Figure 17.15a
Section 2 from Mazar et. al. (2020 v. 3: Chapter 17)
Figure 17.15a
Section 2 (Squares F/14–15, looking west)
Mazar et. al. (2020 v.3) - Figure 17.15b
Section 2 from Mazar et. al. (2020 v. 3: Chapter 17)
Figure 17.15b
Section 2 (Squares F/14–15, looking west)
Mazar et. al. (2020 v.3) - Figure 17.16a
Section 3 from Mazar et. al. (2020 v. 3: Chapter 17)
Figure 17.16a
Section 3 (Squares F/13–16, looking east)
Mazar et. al. (2020 v.3) - Figure 17.16b
Section 3 from Mazar et. al. (2020 v. 3: Chapter 17)
Figure 17.16b
Section 3 (Squares F/13–16, looking east)
Mazar et. al. (2020 v.3) - Figure 17.17
Section 4 from Mazar et. al. (2020 v. 3: Chapter 17)
Figure 17.17
Section 4 (Squares D–E/15, looking north)
Mazar et. al. (2020 v.3) - Figure 17.18a
Section 5 from Mazar et. al. (2020 v. 3: Chapter 17)
Figure 17.18a
Section 5 (Squares D–F/15, looking south)
Mazar et. al. (2020 v.3) - Figure 17.18b
Section 5 from Mazar et. al. (2020 v. 3: Chapter 17)
Figure 17.18b
Section 5 (Squares D–F/15, looking south)
Mazar et. al. (2020 v.3) - Figure 17.19
Section 6 from Mazar et. al. (2020 v. 3: Chapter 17)
Figure 17.19
Section 6 (Squares E–F/14, looking north)
Mazar et. al. (2020 v.3) - Figure 17.20
Section 7 from Mazar et. al. (2020 v. 3: Chapter 17)
Figure 17.20
Section 7 (Square E/13, looking north)
Mazar et. al. (2020 v.3) - Figure 17.21
Section 8 from Mazar et. al. (2020 v. 3: Chapter 17)
Figure 17.21
Section 8 (Squares E–F/13, looking south)
Mazar et. al. (2020 v.3) - Figure 17.22
Section 9 from Mazar et. al. (2020 v. 3: Chapter 17)
Figure 17.22
Section 9 (Squares E/20–21, looking west)
Mazar et. al. (2020 v.3)
- Photo 17.1
General view of Area E, end of 1997 season, looking east from Mazar et. al. (2020 v. 3: Chapter 17)
Photo 17.1
General view of Area E, end of 1997 season, looking east; Building EA and courtyard to its north
Mazar et. al. (2020 v.3) - Photo 17.2
General view of Area E, end of 2000 season, looking east from Mazar et. al. (2020 v. 3: Chapter 17)
Photo 17.2
General view of Area E, end of 2000 season, looking east; Buildings EA and EB and courtyard to their north; lower center: E-1b–2 Room 4653 of Building ED
Mazar et. al. (2020 v.3) - Photo 17.3
General view of Area E, end of 2001 season, looking south from Mazar et. al. (2020 v. 3: Chapter 17)
Photo 17.3
General view of Area E, end of 2001 season, looking south; right: Building EC; center: Buildings EB and ED, left: courtyard and Building EA
Mazar et. al. (2020 v.3) - Photo 17.4
Squares D–E/15, excavated to level of Strata E-2–E-1b from Mazar et. al. (2020 v. 3: Chapter 17)
 Photo 17.4
Squares D–E/15, excavated to level of Strata E-2–E-1b; left: E-2 Floor 4661; center: E-1a Platform 2654; right: Room 4653 of E-1b-2 Building ED (2001)
Mazar et. al. (2020 v.3) - Photo 17.5
South section of probe in Square F/15, with E-1b–2 layers from Mazar et. al. (2020 v. 3: Chapter 17)
Photo 17.5
South section of probe in Square F/15, with E-1b–2 layers (1998)
Mazar et. al. (2020 v.3) - Photo 17.6
Probe in Square F/15, looking north; E-2 Floor 2662 from Mazar et. al. (2020 v. 3: Chapter 17)
 Photo 17.6
Probe in Square F/15, looking north; E-2 Floor 2662 (1998)
Mazar et. al. (2020 v.3) - Photo 17.7
Southeastern corner of Square E/14 from Mazar et. al. (2020 v. 3: Chapter 17)
 Photo 17.7
Southeastern corner of Square E/14, looking east; E-2 Oven 4662 and E-1b Wall 1657 (left) (2000)
Mazar et. al. (2020 v.3) - Photo 17.8
Building EA, general view, end of 1997 season, looking north from Mazar et. al. (2020 v. 3: Chapter 17)
 Photo 17.8
Building EA, general view, end of 1997 season, looking north
Mazar et. al. (2020 v.3) - Photo 17.9
Building EA, general view, end of 1998 season, looking east from Mazar et. al. (2020 v. 3: Chapter 17)
Photo 17.9
Building EA, general view, end of 1998 season, looking east
Mazar et. al. (2020 v.3) - Photo 17.10
Building EA, Square F/14, looking south from Mazar et. al. (2020 v. 3: Chapter 17)
Photo 17.10
Building EA, Square F/14, looking south (1998)
Mazar et. al. (2020 v.3) - Photo 17.11
Building EA, Square F/14, looking south from Mazar et. al. (2020 v. 3: Chapter 17)
Photo 17.11
Building EA, Square F/14, looking south; bottom left: E-1a Wall 1688; center: E-1b Wall 1687; right: E-1b-1a Wall 1669 (1998)
Mazar et. al. (2020 v.3) - Photo 17.12
Building EA, Square F/14, looking north from Mazar et. al. (2020 v. 3: Chapter 17)
Photo 17.12
Building EA, Square F/14, looking north; lower left: Walls 1661 and 1619; right center: Room 1704 of E-1b and Wall 1687; left: E-1a Floor 1670 and Installation 1668 (1998)
Mazar et. al. (2020 v.3) - Photo 17.13
Building EA, Square F/14, looking west; E-1a Floor 1677 with pottery in destruction debris from Mazar et. al. (2020 v. 3: Chapter 17)
Photo 17.13
Building EA, Square F/14, looking west; E-1a Floor 1677 with pottery in destruction debris (1997)
Mazar et. al. (2020 v.3) - Photo 17.14
Building EA, detail of Room 1701 and compartments 1666 and 1700 from Mazar et. al. (2020 v. 3: Chapter 17)
Photo 17.14
Building EA, detail of Room 1701 and compartments 1666 and 1700, looking southwest (1997)
Mazar et. al. (2020 v.3) - Photo 17.15
Building EA, detail of compartments 1666 and 1700 and double wall 1618/1612 from Mazar et. al. (2020 v. 3: Chapter 17)
Photo 17.15
Building EA, detail of compartments 1666 and 1700 and double wall 1618/1612, looking north (1997)
Mazar et. al. (2020 v.3) - Photo 17.16
Building EA, Square E/13, looking east, E-1b Room 2651 from Mazar et. al. (2020 v. 3: Chapter 17)
Photo 17.16
Building EA, Square E/13, looking east, E-1b Room 2651 (1998)
Mazar et. al. (2020 v.3) - Photo 17.17
Building EA, Square E/13, looking east; right: E-1a–b Wall 1629 from Mazar et. al. (2020 v. 3: Chapter 17)
Photo 17.17
Building EA, Square E/13, looking east; right: E-1a–b Wall 1629 (1998)
Mazar et. al. (2020 v.3) - Photo 17.18
Building EA, Square E/13, looking southeast from Mazar et. al. (2020 v. 3: Chapter 17)
Photo 17.18
Building EA, Square E/13, looking southeast; E-1b Room 1699, Platform 2657 below floating level of Wall 1672 (1998)
Mazar et. al. (2020 v.3) - Photo 17.19
Squares E/13–14, Building EA, looking south from Mazar et. al. (2020 v. 3: Chapter 17)
Photo 17.19
Squares E/13–14, Building EA, looking south; E-1b Floors 1699 and 2651 (1998)
Mazar et. al. (2020 v.3) - Photo 17.20
Room 4653, Square D/15 from Mazar et. al. (2020 v. 3: Chapter 17)
Photo 17.20
Room 4653, Square D/15, looking west; left: Wall 4650; center: Wall 4658, disturbed by a later trench (2000)
Mazar et. al. (2020 v.3) - Photo 17.21
Squares D–E/15, section through E-1a Platform 2654 with brick collapse below platform from Mazar et. al. (2020 v. 3: Chapter 17)
 Photo 17.21
Squares D–E/15, section through E-1a Platform 2654, looking south; above meter scale: single brick course of platform and stone platform above; brick collapse/fill 5623 below platform (2001)
Mazar et. al. (2020 v.3) - Photo 17.22
General view of Stratum E-1a Buildings EB and EC from Mazar et. al. (2020 v. 3: Chapter 17)
Photo 17.22
General view of Stratum E-1a Buildings EB and EC, looking east, after dismantling Platform 2654 and Room 2629 (2001)
Mazar et. al. (2020 v.3) - Photo 17.23a
Destruction debris in Locus 5621 in the western part of Space 2641 in Building EB from Mazar et. al. (2020 v. 3: Chapter 17)
Photo 17.23a
Building EB, western part of Space 2641, looking north, destruction debris with pottery in Locus 5621 (2001)
Mazar et. al. (2020 v.3) - Photo 17.23b
Detail of cooking amphora in Locus 4630 from Mazar et. al. (2020 v. 3: Chapter 17)
Photo 17.23b
detail of cooking amphora (Fig. 18.10:4), Locus 4630 (2001)
Mazar et. al. (2020 v.3) - Photo 17.24
Building EB, Floor 4654 from Mazar et. al. (2020 v. 3: Chapter 17)
Photo 17.24
Building EB, Floor 4654 (Square D/14), looking north, before dismantling balks (2000)
Mazar et. al. (2020 v.3) - Photo 17.25
Building EB, Floor 4654 from Mazar et. al. (2020 v. 3: Chapter 17)
Photo 17.25
Building EB, Floor 4654, looking west (2000)
Mazar et. al. (2020 v.3) - Photo 17.26
E-1a Building EB, Room 2629 from Mazar et. al. (2020 v. 3: Chapter 17)
Photo 17.26
E-1a Building EB, Room 2629, looking east (1998)
Mazar et. al. (2020 v.3) - Photo 17.27
E-1a Building EB, Room 2629 from Mazar et. al. (2020 v. 3: Chapter 17)
Photo 17.27
E-1a Building EB, Room 2629, looking north; note two stones attached to Walls 2632 and 2634 (1998)
Mazar et. al. (2020 v.3) - Photo 17.28
E-1a Building EB, Room 2629, destruction debris and fallen roof material from Mazar et. al. (2020 v. 3: Chapter 17)
Photo 17.28
E-1a Building EB, Room 2629, destruction debris and fallen roof material (1998)
Mazar et. al. (2020 v.3) - Photo 17.29
E-1a Building EB, Room 4616 from Mazar et. al. (2020 v. 3: Chapter 17)
Photo 17.29
E-1a Building EB, Room 4616, looking east (2001)
Mazar et. al. (2020 v.3) - Photo 17.30
Destruction debris in eastern part of E-1a Building EB, Room 4616 from Mazar et. al. (2020 v. 3: Chapter 17)
Photo 17.30
E-1a Building EB, Room 4616, destruction debris in eastern part, looking east (2000)
Mazar et. al. (2020 v.3) - Photo 17.31
Grinding stone leaning on wall 5609 in E-1a Building EB from Mazar et. al. (2020 v. 3: Chapter 17)
Photo 17.31
E-1a Building EB, lower grinding stone leaning on Wall 5609 in front of entrance to southern room, looking south (2001)
Mazar et. al. (2020 v.3) - Photo 17.32
Destruction debris in southeastern corner of E-1a Building EB from Mazar et. al. (2020 v. 3: Chapter 17)
Photo 17.32
Building EB, Stratum E-1a, Room 4616; destruction debris in southeastern corner; note plaster on Wall 4614 (2000)
Mazar et. al. (2020 v.3) - Photo 17.33
Seal impressions on plaster of Room 4616 in E-1a Building EB from Mazar et. al. (2020 v. 3: Chapter 17)
Photo 17.33
E-1a Building EB, Room 4616, seal impressions on plaster (2000)
Mazar et. al. (2020 v.3) - Photo 17.34
E-1a Building EB, Platform 2654, looking south; below platform: E-1b Walls 4634 and 4623 from Mazar et. al. (2020 v. 3: Chapter 17)
Photo 17.34
E-1a Building EB, Platform 2654, looking south; below platform: E-1b Walls 4634 and 4623 (1998)
Mazar et. al. (2020 v.3) - Photo 17.35
Brick platform (2654) and stone platform with standing stones (1624) from Mazar et. al. (2020 v. 3: Chapter 17)
Photo 17.35
Brick platform (2654) and stone platform with standing stones (1624), looking east; note posthole (2000)
Mazar et. al. (2020 v.3) - Photo 17.36
Detail of stone platform (1624) and standing stones, on top of brick platform (2654) from Mazar et. al. (2020 v. 3: Chapter 17)
Photo 17.36
Detail of stone platform (1624) and standing stones, on top of brick platform (2654), looking south (1998)
Mazar et. al. (2020 v.3) - Photo 17.37
Section below Platform 2654 from Mazar et. al. (2020 v. 3: Chapter 17)
Photo 17.37
Section below Platform 2654, looking west (1999)
Mazar et. al. (2020 v.3) - Photo 17.38
Probe in Squares E/17–18 from Mazar et. al. (2020 v. 3: Chapter 17)
Photo 17.38
Probe in Squares E/17–18, looking south (2000)
Mazar et. al. (2020 v.3) - Photo 17.39
Probe in Square E/18 from Mazar et. al. (2020 v. 3: Chapter 17)
Photo 17.39
Probe in Square E/18, looking east (2000)
Mazar et. al. (2020 v.3) - Photo 17.40
Probe in Square E/18 from Mazar et. al. (2020 v. 3: Chapter 17)
Photo 17.40
Probe in Square E/18, looking west (2000)
Mazar et. al. (2020 v.3) - Photo 17.41
Oven 4608, Square E/17 from Mazar et. al. (2020 v. 3: Chapter 17)
Photo 17.41
Oven 4608, Square E/17, looking east (2000)
Mazar et. al. (2020 v.3) - Photo 17.42
Courtyard in Squares D–F/15–16 from Mazar et. al. (2020 v. 3: Chapter 17)
Photo 17.42
Courtyard in Squares D–F/15–16, looking south; Platform 2654 partly exposed (1998)
Mazar et. al. (2020 v.3) - Photo 17.43
E-1b Floor 2618 with pits in 4665 from Mazar et. al. (2020 v. 3: Chapter 17)
Photo 17.43
Probe in Square E/16, looking north; E-1b Floor 2618 with pits in 4665 in the north (2000)
Mazar et. al. (2020 v.3) - Photo 17.44
Buildings EB and EA from Mazar et. al. (2020 v. 3: Chapter 17)
Photo 17.44
Squares D–F/13–15, looking east; bottom: eastern part of Building EB; center: floors of the courtyard; upper right: Building EA (1998)
Mazar et. al. (2020 v.3) - Photo 17.45
Square E/15 from Mazar et. al. (2020 v. 3: Chapter 17)
Photo 17.45
Square E/15, looking south; upper left: E-1b circular bins on Floor 1647; upper right: Platform 2654 (2000)
Mazar et. al. (2020 v.3) - Photo 17.46
Square E/15 from Mazar et. al. (2020 v. 3: Chapter 17)
Photo 17.46
Square E/15, detail of circular bins, looking east (2000) (2000)
Mazar et. al. (2020 v.3) - Photo 17.47
Square E/15 detail from Mazar et. al. (2020 v. 3: Chapter 17)
Photo 17.47
Square E/15, detail of Bin 1671 (2000) (2000)
Mazar et. al. (2020 v.3) - Photo 17.48
Square E/15 detail from Mazar et. al. (2020 v. 3: Chapter 17)
Photo 17.48
Square E/15, detail of clay floor and walls of Bin 1685 (2000)
Mazar et. al. (2020 v.3) - Photo 17.49
Square E/15 with debris from Mazar et. al. (2020 v. 3: Chapter 17)
Photo 17.49
Square E/15, looking west; left: E-1b Floor 1647; right: E-1a debris 1611with stone 1623 and Oven 1614 (1997)
Mazar et. al. (2020 v.3) - Photo 17.50
Detail of stone 1623 from Mazar et. al. (2020 v. 3: Chapter 17)
Photo 17.50
Detail of stone 1623 (1997)
Mazar et. al. (2020 v.3) - Photo 17.51
Square E/15, foundation stones under stone 1623 from Mazar et. al. (2020 v. 3: Chapter 17)
Photo 17.51
Square E/15, foundation stones under stone 1623, looking west (1997)
Mazar et. al. (2020 v.3) - Photo 17.52
Squares E–F/15–16 from Mazar et. al. (2020 v. 3: Chapter 17)
Photo 17.52
Squares E–F/15–16, looking north; right: Benches 1674 and 1673; center: courtyard (1998)
Mazar et. al. (2020 v.3) - Photo 17.53
Square F/15 from Mazar et. al. (2020 v. 3: Chapter 17)
Photo 17.53
Square F/15, looking north; Benches 1674 and 1673; Floor 1659 (E-1a) in back (1998)
Mazar et. al. (2020 v.3) - Photo 17.54
Square E/14 from Mazar et. al. (2020 v. 3: Chapter 17)
 Photo 17.54
Square E/14, looking east; bottom: Floor 1653; center right: entrance to Building EA (2001)
Mazar et. al. (2020 v.3) - Photo 17.55
Squares C–D/15–16, Building EC (right) from Mazar et. al. (2020 v. 3: Chapter 17)
Photo 17.55
Squares C–D/15–16, Building EC (right), looking south (2001)
Mazar et. al. (2020 v.3) - Photo 17.56
E-1a Building EC, circular installations in Room 5637 from Mazar et. al. (2020 v. 3: Chapter 17)
Photo 17.56
E-1a Building EC, circular installations in Room 5637, looking north; post-E-1a Bin 5611 in center (2001)
Mazar et. al. (2020 v.3) - Photo 17.57
E-1a Building EC, Room 5637, detail of Bin 5630 from Mazar et. al. (2020 v. 3: Chapter 17)
Photo 17.57
E-1a Building EC, Room 5637, detail of Bin 5630 (2001)
Mazar et. al. (2020 v.3) - Photo 17.58
Building EC, Room 5637, detail of Oven 5632 from Mazar et. al. (2020 v. 3: Chapter 17)
Photo 17.58
Building EC, Room 5637, detail of Oven 5632 (2001)
Mazar et. al. (2020 v.3) - Photo 17.59
Buildings EB and EC from Mazar et. al. (2020 v. 3: Chapter 17)
Photo 17.59
Right: Building EC, looking south; left: Building EB; lower left: E-1b–2 Room 4653 (2001)
Mazar et. al. (2020 v.3) - Photo 17.60
Probe in Squares E/20, E/1 from Mazar et. al. (2020 v. 3: Chapter 17)
Photo 17.60
Probe in Squares E/20, E/1, looking east (2001)
Mazar et. al. (2020 v.3) - Photo 17.61
Probe in Square E/1 with Oven 5903 and large stone from Mazar et. al. (2020 v. 3: Chapter 17)
Photo 17.61
Probe in Square E/1 with Oven 5903 and large stone, looking east (2001)
Mazar et. al. (2020 v.3)
- Table 20.1
Correlation of strata – Areas G and C from Mazar et. al. (2020 v. 3: Chapter 20)
Table 20.1
Correlation of strata – Areas G and C
Mazar et. al. (2020 v.3) - Table 20.2
Locus and basket numbers of Area G from Mazar et. al. (2020 v. 3: Chapter 20)
 Table 20.2
Locus and basket numbers [of Area G]
Mazar et. al. (2020 v.3) - Figure 20.1
Plan of Stratum G-2b from Mazar et. al. (2020 v. 3: Chapter 20)
Figure 20.1
Plan of Stratum G-2b
Mazar et. al. (2020 v.3) - Figure 20.2a
Plan of Stratum G-2a from Mazar et. al. (2020 v. 3: Chapter 20)
Figure 20.2a
Plan of Stratum G-2a
Mazar et. al. (2020 v.3) - Figure 20.2b
Plan of Stratum G-2a' from Mazar et. al. (2020 v. 3: Chapter 20)
Figure 20.2a
Plan of Stratum G-2a'
Mazar et. al. (2020 v.3) - Figure 20.3
Plan of wooden beams in the foundations of Stratum G-1 walls from Mazar et. al. (2020 v. 3: Chapter 20)
Figure 20.3
Plan of wooden beams in the foundations of Stratum G-1 walls
Mazar et. al. (2020 v.3) - Figure 20.4
Plan of Stratum G-1b from Mazar et. al. (2020 v. 3: Chapter 20)
Figure 20.4
Plan of Stratum G-1b
Mazar et. al. (2020 v.3) - Figure 20.5
Plan of Stratum G-1a from Mazar et. al. (2020 v. 3: Chapter 20)
Figure 20.5
Plan of Stratum G-1a
Mazar et. al. (2020 v.3)
- Table 20.1 -
Correlation of strata – Areas G and C from Mazar et. al. (2020 v. 3: Chapter 20)
Table 20.1
Correlation of strata – Areas G and C
Mazar et. al. (2020 v.3) - Table 20.2 -
Locus and basket numbers of Area G from Mazar et. al. (2020 v. 3: Chapter 20)
Table 20.2
Locus and basket numbers [of Area G]
Mazar et. al. (2020 v.3) - Figure 20.17 -
Section 10 from Mazar et. al. (2020 v. 3: Chapter 20)
 Figure 20.17
Section 10 (Square Q/3, section below Wall 5018, looking north)
Mazar et. al. (2020 v.3) - Photo 20.1 -
Area G at the end of 2000 season, looking west from Mazar et. al. (2020 v. 3: Chapter 20)
 Photo 20.1
Area G at the end of 2000 season, looking west
Mazar et. al. (2020 v.3)
Area G was located at the western edge of the lower mound, near the foot of the upper mound. The area occupies a small hillock, bordered on the north and the south by small ravines which presently serve as approach roads to the tell. The goals of excavating this area were:
- to examine the prominent small hill in that area in order to determine architectural or other features that caused this element, such as a city gate
- to examine the stratigraphic sequence and nature of settlement in this part of the tell.
The supervisors were Adi-Ziv Esudri (2000) and Naama Yahalom-Mack (2001, 2007).
The excavation in Area G uncovered an Iron Age IIA domestic area with two major strata, each divided into two sub-phases. Table 20.1 shows the stratigraphic correlation to Area C and to the general strata numbers in Tel Rehov. Table 20.2 specifies the locus and basket numbers given in the three seasons.
The large architectural units revealed in Stratum G-2 were part of larger buildings of unknown plans. An open courtyard in the eastern and northern parts of the area included many installations and storage pits; the walls were preserved to a height of up to 1.0 m and in Square Q/3, up to 2.0 m. The buildings of Stratum G-2 were abandoned in a similar way as those of Stratum VI in Areas B and C and the floors were found almost empty of finds. One possibility is that the buildings suffered from an earthquake; possible evidence for this can be seen in the severe tilt eastwards of Wall 5063 in Square Q/3 (Fig. 20.17). In Stratum G-1b, new buildings were constructed, which continued to be in use in Stratum G-1a with slight changes. Here too, only parts of buildings were excavated and no complete plan of a single building is known. In all strata, brick walls without stone foundations were the common building practice; only one wall attributed to Stratum G-1b (5040) had a stone foundation. Extensive use of wooden beams was made in the foundations of Stratum G-1b walls and floors, similar to the situation in Areas B and C. Stratum G-1a (Stratum IV) ended in violent destruction, evidenced in particular in Building GG in Squares P–Q/3.
- Table 20.1 -
Correlation of strata – Areas G and C from Mazar et. al. (2020 v. 3: Chapter 20)
Table 20.1
Correlation of strata – Areas G and C
Mazar et. al. (2020 v.3) - Figure 20.1 -
Plan of Stratum G-2b from Mazar et. al. (2020 v. 3: Chapter 20)
Figure 20.1
Plan of Stratum G-2b
Mazar et. al. (2020 v.3) - Figure 20.2a -
Plan of Stratum G-2a from Mazar et. al. (2020 v. 3: Chapter 20)
Figure 20.2a
Plan of Stratum G-2a
Mazar et. al. (2020 v.3) - Figure 20.2b -
Plan of Stratum G-2a' from Mazar et. al. (2020 v. 3: Chapter 20)
Figure 20.2a
Plan of Stratum G-2a'
Mazar et. al. (2020 v.3)
- Plans: Figs. 20.1–20.2
- Table 20.1 -
Correlation of strata – Areas G and C from Mazar et. al. (2020 v. 3: Chapter 20)
Table 20.1
Correlation of strata – Areas G and C
Mazar et. al. (2020 v.3) - Figure 20.1 -
Plan of Stratum G-2b from Mazar et. al. (2020 v. 3: Chapter 20)
Figure 20.1
Plan of Stratum G-2b
Mazar et. al. (2020 v.3) - Figure 20.2a -
Plan of Stratum G-2a from Mazar et. al. (2020 v. 3: Chapter 20)
Figure 20.2a
Plan of Stratum G-2a
Mazar et. al. (2020 v.3) - Figure 20.2b -
Plan of Stratum G-2a' from Mazar et. al. (2020 v. 3: Chapter 20)
Figure 20.2a
Plan of Stratum G-2a'
Mazar et. al. (2020 v.3) - Photo 20.1 -
Area G at the end of 2000 season, looking west from Mazar et. al. (2020 v. 3: Chapter 20)
Photo 20.1
Area G at the end of 2000 season, looking west
Mazar et. al. (2020 v.3) - Photo 20.2 -
Area G at the end of 2007 season, looking northwest from Mazar et. al. (2020 v. 3: Chapter 20)
 Photo 20.2
Area G at the end of 2007 season, looking northwest
Mazar et. al. (2020 v.3) - Photo 20.3 -
Squares P–Q/4–5, looking north from Mazar et. al. (2020 v. 3: Chapter 20)
 Photo 20.3
Squares P–Q/4–5, looking north.
- Left: Stratum G2a Building GB
- center left:Room 8045
-
upper left:
- Room 4039
- balk between Squares P–Q/5 and P–Q/4 in center
- bottom left: Wall 4070 of Stratum G-1
(2007)
Mazar et. al. (2020 v.3) - Photo 20.4 -
Collapsed mudbricks on left corner in G-2b Building GA from Mazar et. al. (2020 v. 3: Chapter 20)
 Photo 20.4
Square P/5, looking north. Wall 5044 of G-2b Building GA
- to its left: Locus 8052 with loomweights
- right: Wall 5061 of G-2a Building GB (bird nest holes in section)
(2007)
JW: Collapsed mudbricks in left corner of room
Mazar et. al. (2020 v.3)
Floor 8052 and the various debris layers above it are attributed to Phase G-2b. It seems that Building GA went out of use in Phase G-2a, since an upper floor (4039, level 86.20 m) covered Wall 5044 and possibly also Wall 5061, although this could not be securely determined.
- Table 20.1 -
Correlation of strata – Areas G and C from Mazar et. al. (2020 v. 3: Chapter 20)
Table 20.1
Correlation of strata – Areas G and C
Mazar et. al. (2020 v.3) - Figure 20.1 -
Plan of Stratum G-2b from Mazar et. al. (2020 v. 3: Chapter 20)
Figure 20.1
Plan of Stratum G-2b
Mazar et. al. (2020 v.3) - Figure 20.2a -
Plan of Stratum G-2a from Mazar et. al. (2020 v. 3: Chapter 20)
Figure 20.2a
Plan of Stratum G-2a
Mazar et. al. (2020 v.3) - Figure 20.2b -
Plan of Stratum G-2a' from Mazar et. al. (2020 v. 3: Chapter 20)
Figure 20.2a
Plan of Stratum G-2a'
Mazar et. al. (2020 v.3)
- Table 20.1 -
Correlation of strata – Areas G and C from Mazar et. al. (2020 v. 3: Chapter 20)
Table 20.1
Correlation of strata – Areas G and C
Mazar et. al. (2020 v.3) - Figure 20.1 -
Plan of Stratum G-2b from Mazar et. al. (2020 v. 3: Chapter 20)
Figure 20.1
Plan of Stratum G-2b
Mazar et. al. (2020 v.3) - Figure 20.2a -
Plan of Stratum G-2a from Mazar et. al. (2020 v. 3: Chapter 20)
Figure 20.2a
Plan of Stratum G-2a
Mazar et. al. (2020 v.3) - Figure 20.2b -
Plan of Stratum G-2a' from Mazar et. al. (2020 v. 3: Chapter 20)
Figure 20.2a
Plan of Stratum G-2a'
Mazar et. al. (2020 v.3) - Photo 20.3 -
Squares P–Q/4–5, looking north from Mazar et. al. (2020 v. 3: Chapter 20)
Photo 20.3
Squares P–Q/4–5, looking north.
- Left: Stratum G2a Building GB
- center left:Room 8045
-
upper left:
- Room 4039
- balk between Squares P–Q/5 and P–Q/4 in center
- bottom left: Wall 4070 of Stratum G-1
(2007)
Mazar et. al. (2020 v.3) - Photo 20.8 -
G-2 Building GB from Mazar et. al. (2020 v. 3: Chapter 20)
 Photo 20.8
Squares P–Q/4–5 looking west. G-2 Building GB with circular installations
(2007)
Mazar et. al. (2020 v.3) - Photo 20.10 -
G-2b and G-2a circular bins from Mazar et. al. (2020 v. 3: Chapter 20)
 Photo 20.10
Square Q/4, detail of G-2b and G-2a circular bins
(2007)
Mazar et. al. (2020 v.3) - Photo 20.25 -
Square P/4 from Mazar et. al. (2020 v. 3: Chapter 20)
 Photo 20.25
Square P/4, looking south at wooden beams 4071. Wall 5012 and projection to north; meter stick on G2a Locus 8023
(2000)
Mazar et. al. (2020 v.3)
In Square P/5, just east of Wall 5061, the top of a large completely preserved oven (8063) was exposed at 84.90 m, surrounded by a layer of black ash and brick debris (8062) excavated until level 84.84 m; the bottom of the oven and the related floor were not reached Above the accumulation in 8062 was a layer of brick debris (8036), sealed by a Phase G-2a floor (8035). In Square P/4, a floor (8054) was detected at level 85.50 m in the area enclosed by G-2a Walls 8055 and 8056. This was a reddish-brown clay floor with pottery and bones found on it. A layer of brick debris and chunks of collapsed bricks (8028) above this floor separated it from a higher floor (8023) attributed to Stratum G2a (Photo 20.25).
In the southern part of Square Q/4 was a beaten-earth floor (8041) which tilted drastically from east to west (85.34–85.74 m). Near the center of this area was a unique installation (8048) built of plastered bricks with a rounded hollow (Photos 20.3, 20.8). In the east, the floor had been disturbed and so it is not possible to determine whether or not it initially abutted Wall 8030. The attribution of this floor to either G-2b or G-2a, or to both, remains enigmatic. In the northern part of Square Q/4, a series of floors was found between levels 85.71– 86.27 m. The upper three were attributed to Phase G-2a (see below), while the lowest (8044 at level 85.71 m) was tentatively attributed to G-2b, although the separation between these two phases was not certain. Floor 8044 was made of clay, which differed from the matrix of Floor 8041 to its south, although they are at the same height and no architectural feature separated them. A plastered circular bin (8047), 0.55 m in diameter and 0.37 m deep, was related to this floor (Photo 20.10). It was perhaps the earliest in a series of such installations, mostly attributed to Phase G-2a, described below.
- Table 20.1 -
Correlation of strata – Areas G and C from Mazar et. al. (2020 v. 3: Chapter 20)
Table 20.1
Correlation of strata – Areas G and C
Mazar et. al. (2020 v.3) - Figure 20.1 -
Plan of Stratum G-2b from Mazar et. al. (2020 v. 3: Chapter 20)
Figure 20.1
Plan of Stratum G-2b
Mazar et. al. (2020 v.3) - Figure 20.2a -
Plan of Stratum G-2a from Mazar et. al. (2020 v. 3: Chapter 20)
Figure 20.2a
Plan of Stratum G-2a
Mazar et. al. (2020 v.3) - Figure 20.2b -
Plan of Stratum G-2a' from Mazar et. al. (2020 v. 3: Chapter 20)
Figure 20.2a
Plan of Stratum G-2a'
Mazar et. al. (2020 v.3) - Figure 20.3 -
Plan of wooden beams in the foundations of Stratum G-1 walls from Mazar et. al. (2020 v. 3: Chapter 20)
Figure 20.3
Plan of wooden beams in the foundations of Stratum G-1 walls
Mazar et. al. (2020 v.3) - Photo 20.2 -
Area G at the end of 2007 season, looking northwest from Mazar et. al. (2020 v. 3: Chapter 20)
Photo 20.2
Area G at the end of 2007 season, looking northwest
Mazar et. al. (2020 v.3) - Photo 20.5 -
Tilted Wall from Mazar et. al. (2020 v. 3: Chapter 20)
 Photo 20.5
Squares P–Q/4–5, looking east.
- Right: G-1 Wall 5012
- center: balk
- center, right of balk: G-2a Walls 8055 and 8056
- meter stick on G-2a Floor 8023
(2007)
JW: Tilted wall just up frame from Wall 5044 G-2
Mazar et. al. (2020 v.3) - Photo 20.6 -
G-2 Building GB from Mazar et. al. (2020 v. 3: Chapter 20)
 Photo 20.6
Square P/4 looking south. G-2 Building GB
- Wall 5061 (right)
- Wall 8055 (center)
- G-1 Wall 5012 (top)
- meter stick on G-2a Floor 8023
(2007)
Mazar et. al. (2020 v.3) - Photo 20.7 -
Building GA, G-2 Building GB, and Building GC from Mazar et. al. (2020 v. 3: Chapter 20)
 Photo 20.7
Squares P–Q/5-6, looking northwest.
- Center: Wall 5064 of G-2 Building GB
- far left: Building GA
- right: installations and floor in courtyard
- upper right: Building GC
(2007)
Mazar et. al. (2020 v.3) - Photo 20.8 -
G-2 Building GB from Mazar et. al. (2020 v. 3: Chapter 20)
Photo 20.8
Squares P–Q/4–5 looking west. G-2 Building GB with circular installations
(2007)
Mazar et. al. (2020 v.3) - Photo 20.9 -
Wall 5064 and G-2a courtyard from Mazar et. al. (2020 v. 3: Chapter 20)
 Photo 20.9
Square Q/5, looking west. Top: Wall 5064 and G-2a courtyard with ovens and installations
Mazar et. al. (2020 v.3) - Photo 20.10 -
G-2b and G-2a circular bins from Mazar et. al. (2020 v. 3: Chapter 20)
Photo 20.10
Square Q/4, detail of G-2b and G-2a circular bins
(2007)
Mazar et. al. (2020 v.3) - Photo 20.16 -
Squares Q–P/3–4 from Mazar et. al. (2020 v. 3: Chapter 20)
 Photo 20.16
Squares Q–P/3–4, looking west.
- Right: G-2a circular installations
- front left: G-2b Floor 8046 (deepest excavated point)
- front center: G-2 Building GD
(2007)
Mazar et. al. (2020 v.3)
Room 8035, bounded by Walls 5061, 8064, 5064 and 8055, had inner dimensions of 2.35×6.55 m (Photo 20.7). The floor (8035) was at level 85.60 m, at least 0.75 m (and perhaps more) above the assumed floor of G-2b in the same place.
In Square P/4, a corner of two short walls (8055 and 8056; Photos 20.5–20.6) created a small room with an entrance leading from Room 8035 to its north. A floor in this room (8023), located at level 85.64 m, was sealed by the brick platform (5069) of Stratum G-1b. Wooden beams (4071) found close to the top of the walls of this room at levels 85.82– 85.92 m (Fig. 20.3) were related to the construction of Stratum G-1b.
The area east of Wall 5064, bounded on the south by Wall 8039 in Squares P–Q/3 and on the east by Wall 8030 in Square Q/4, served as a spacious courtyard, ca. 4.0–4.5 m wide and up to 13 m long (if continuing until Wall 4029 in Square Q/6 on the north). In fact, in Square Q/6, this open area continued to the west, thus creating an L-shaped open space.
In Squares Q/4–5, several plastered surfaces were identified, alongside other floor types, with some 13 related installations that were not all used contemporaneously; note an additional one (8047) that was attributed to Phase G-2b (see above). The installations comprise mainly two types: plastered circular or oval bins and clay ovens (Table 20.3; Photos 20.2, 20.7–20.10, 20.16).
In Square Q/4, three superimposed plaster floors (8053 at level 85.76 m, 8024 at level 86.07 m and 8008 at level 86.27 m) were exposed above the earlier floor (8044) attributed to Phase G-2b. The floors were exposed mainly in the northern half of the square, with three related plastered bins (8060, 8051, 8059) and a single poorly preserved oven (8025). The plastered bins were exposed between 85.99 and 85.88 m, while the oven was exposed at level 86.19 m (Photos 20.8, 20.10). In the southern half of the square, only one floor was detected (8041), sloping from east to west; it was attributed to Stratum G-2b, yet probably continued to be in use in G-2a.
In Square Q-5, two superimposed plaster floors were exposed between levels 86.28 and 85.98 m. Related to these floors were four circular bins and two superimposed ovens (Table 20.3; Photos 20.7– 20.9). None of the floors clearly abutted the poorly preserved Wall 5064.
Small circular bins of the type found here (as well as in Squares P–Q/6; see below) were also found in Areas B (Chapter 8) and E (Chapter 17). Their capacity was ca. 10 liters or slightly more; thus, the seven bins found in these two squares may have been used for storing ca. 70–100 liters, perhaps of grain used for baking in the three ovens found nearby. However, it was difficult to attribute these installations to each of the several floor surfaces found here and thus, it remains unknown whether all of them served at the same time. At least in one instance, it seems that there was subphasing here, where Oven 4074 cut Oven 4084. In any case, this appears to have been an area used for intensive baking.
- Table 20.1 -
Correlation of strata – Areas G and C from Mazar et. al. (2020 v. 3: Chapter 20)
Table 20.1
Correlation of strata – Areas G and C
Mazar et. al. (2020 v.3) - Figure 20.1 -
Plan of Stratum G-2b from Mazar et. al. (2020 v. 3: Chapter 20)
Figure 20.1
Plan of Stratum G-2b
Mazar et. al. (2020 v.3) - Figure 20.2a -
Plan of Stratum G-2a from Mazar et. al. (2020 v. 3: Chapter 20)
Figure 20.2a
Plan of Stratum G-2a
Mazar et. al. (2020 v.3) - Figure 20.2b -
Plan of Stratum G-2a' from Mazar et. al. (2020 v. 3: Chapter 20)
Figure 20.2a
Plan of Stratum G-2a'
Mazar et. al. (2020 v.3) - Photo 20.12 -
G-2a courtyard, G-2 Building GC, and G-1 Building GF from Mazar et. al. (2020 v. 3: Chapter 20)
 Photo 20.12
- Right: Squares P–Q/5–6, looking east.
- Lower left: G-2a courtyard with related circular bins in Square P/6
- background left: G-2 Building GC, Room 4050
- right: G-1 Building GF Walls 4014 and 4017
(2000)
Mazar et. al. (2020 v.3) - Photo 20.13 -
Stratum G-2a Square P/6 and Building GC from Mazar et. al. (2020 v. 3: Chapter 20)
 Photo 20.13
Square P/6, looking down at floors and circular bins attributed to Stratum G-2a; lower left: Building GC
(2000)
Mazar et. al. (2020 v.3) - Photo 20.14 -
Stratum G-2a Floors 4016 and 5004 from Mazar et. al. (2020 v. 3: Chapter 20)
 Photo 20.14
Square P/6, looking east at Floors 4016 and 5004 and circular bins attributed to Stratum G-2a
(2000)
Mazar et. al. (2020 v.3)
The lowest floor found here in Square P/6 was a clay floor (5050) at level 85.46 m. It was covered by a 0.15 m-deep accumulation containing sherds and bones (5036); the latter was covered by a brick debris layer (5043). These layers were all attributed to Stratum G-2b, since they were lower than Floors 5026 and 5004 and the installations of Phase G-2a.
In the eastern part of the square, a floor comprised of striations (5004 and 5026 to its north) was found above G-2b layer 5021, between levels 85.92–86.28 m; the top of this layer (4016) appeared to be a continuation of Floor 4022 in Square Q/6 (level 86.28 m). No floor could be identified in the western part of the square (4011, 4012).
In Square Q/6, excavation stopped at the level of the uppermost floor (4022) (level 86.30 m); the floor was exposed over most of the square, comprising patches of grayish-white plaster and beaten earth with pottery sherds mixed with small stones.
Eleven bins of various sizes were found in this area, four in Square Q/6 and seven in Square P/6 (Table 20.4, Photos 20.12–20.14). Most of these were exposed along one line in the central part of Square P/6, while the others were scattered along the southern part of Squares P–Q/6 and one was located in Building GC. The definition of these installations as bins is the most reasonable one, although they could have been used for other purposes as well, such as for some industrial activity that was conducted in the courtyard.
These plaster-lined installations were cut into the floor. They were oval to round, with a diameter of 0.45–0.70 m (except 4018, which was 1.2 in diameter) and a depth of 0.30–0.38 m, although the state of preservation does not allow an exact measurement. Thus, the average capacity of the smaller bins was ca. 33 liters (based on an average diameter of 0.55 m and depth of 0.35 m). All were lined with a very friable greyish-white plaster. The thickness of the walls was 0.02–0.04 m, aside from reinforcements which were added where two neighboring bins were close together. These installations contained grayish earth mixed with light-colored brick debris, as well as a few sherds, flint fragments and bones; no grain or organic materials were recovered.
Like in Squares Q/4–5, the bins marked several successive construction phases and thus, not all of them were in use at the same time. Three (4008, 4009, 5009) appear to be contemporary and earlier than the others (Photos 20.12–20.14). They were all exposed at approximately level 86.20 m; Bins 4008 and 4009 share a wall. Bin 4008 appears to cut into a very poorly preserved wall or built installation (5014, not on the plan), chipped along its southern face, of which only one course was preserved.
Bin 4010 abutted 4019 on the west and appears to be contemporary with it, while 4019 cut into 4009 and thus replaced it. Bin 4018 was the largest (diameter 1.2 m) and latest of all, as it cut into 4010; it was 0.96 m deep. Its walls were plastered and it contained crumbly grayish-brown earth mixed with pieces of brick, as well as many sherds, flint, bones, shells and some charcoal. In the eastern side of Square P/6, Bin 4032 (Fig. 20.8) was 0.9 m wide; it may have been contemporary with the large bin (4018).
At least two successive floors were located in Square P/6 (5004, 4016) above Floor 5050 of Phase G-2b. They were difficult to trace, but were identifiable by their related plastered installations. Contemporary Bins 5009, 4008 and 4009 apparently were related to the earliest floor. Installations 4019, 4010 and 4032 were possibly contemporary and related to a later floor. Bin 4018, which was larger than the others, apparently coexisted with the similar installation (4032) near the eastern balk of the square and was related to the latest floor.
The attribution of these installations and floors to Stratum G-2a was based on their levels compared to similar remains in Square Q/5. However, it should be noted that the building remains and installations in Squares P–Q/6 were exposed below topsoil, with no stratigraphic elements above them. Their attribution to Stratum G-2a means that Stratum G-1 was completely eroded away in Squares P–Q/6. Indeed, Wall 4014 of G-1a–b in Square P/5 was founded at its northern end at level 86.48 m, which was higher than the bins and Building GC. The continuation of Wall 4014 and other elements of G-1a in Squares P–Q/6 were eroded away and thus, Squares P–Q/6 are not shown on the plans of Stratum G-1a–b.
- Table 20.1 -
Correlation of strata – Areas G and C from Mazar et. al. (2020 v. 3: Chapter 20)
Table 20.1
Correlation of strata – Areas G and C
Mazar et. al. (2020 v.3) - Figure 20.1 -
Plan of Stratum G-2b from Mazar et. al. (2020 v. 3: Chapter 20)
Figure 20.1
Plan of Stratum G-2b
Mazar et. al. (2020 v.3) - Figure 20.2a -
Plan of Stratum G-2a from Mazar et. al. (2020 v. 3: Chapter 20)
Figure 20.2a
Plan of Stratum G-2a
Mazar et. al. (2020 v.3) - Figure 20.2b -
Plan of Stratum G-2a' from Mazar et. al. (2020 v. 3: Chapter 20)
Figure 20.2a
Plan of Stratum G-2a'
Mazar et. al. (2020 v.3) - Photo 20.1 -
Area G at the end of 2000 season, looking west from Mazar et. al. (2020 v. 3: Chapter 20)
Photo 20.1
Area G at the end of 2000 season, looking west
Mazar et. al. (2020 v.3) - Photo 20.13 -
Stratum G-2a Square P/6 and Building GC from Mazar et. al. (2020 v. 3: Chapter 20)
Photo 20.13
Square P/6, looking down at floors and circular bins attributed to Stratum G-2a; lower left: Building GC
(2000)
Mazar et. al. (2020 v.3) - Photo 20.15 -
Building GC from Mazar et. al. (2020 v. 3: Chapter 20)
 Photo 20.15
Square Q/6, looking east at Building GC
(2000)
Mazar et. al. (2020 v.3)
Like the open space and installations to the west and south in Squares P–Q/6, Building GC was exposed immediately below topsoil, with no later stratigraphic features, and its attribution to Stratum G-2 was based on its relation to the open space to its south.
- Table 20.1 -
Correlation of strata – Areas G and C from Mazar et. al. (2020 v. 3: Chapter 20)
Table 20.1
Correlation of strata – Areas G and C
Mazar et. al. (2020 v.3) - Figure 20.1 -
Plan of Stratum G-2b from Mazar et. al. (2020 v. 3: Chapter 20)
Figure 20.1
Plan of Stratum G-2b
Mazar et. al. (2020 v.3) - Figure 20.2a -
Plan of Stratum G-2a from Mazar et. al. (2020 v. 3: Chapter 20)
Figure 20.2a
Plan of Stratum G-2a
Mazar et. al. (2020 v.3) - Figure 20.2b -
Plan of Stratum G-2a' from Mazar et. al. (2020 v. 3: Chapter 20)
Figure 20.2a
Plan of Stratum G-2a'
Mazar et. al. (2020 v.3)
- Table 20.1 -
Correlation of strata – Areas G and C from Mazar et. al. (2020 v. 3: Chapter 20)
Table 20.1
Correlation of strata – Areas G and C
Mazar et. al. (2020 v.3) - Figure 20.1 -
Plan of Stratum G-2b from Mazar et. al. (2020 v. 3: Chapter 20)
Figure 20.1
Plan of Stratum G-2b
Mazar et. al. (2020 v.3) - Figure 20.2a -
Plan of Stratum G-2a from Mazar et. al. (2020 v. 3: Chapter 20)
Figure 20.2a
Plan of Stratum G-2a
Mazar et. al. (2020 v.3) - Figure 20.2b -
Plan of Stratum G-2a' from Mazar et. al. (2020 v. 3: Chapter 20)
Figure 20.2a
Plan of Stratum G-2a'
Mazar et. al. (2020 v.3) - Photo 20.20 -
Tilted G-2 Wall 4081 from Mazar et. al. (2020 v. 3: Chapter 20)
 Photo 20.20
Square P/3, looking east. Meter stick leaning on G-2 Wall 4081; upper left: G-1 Wall 4047; note two phases in this wall
(2007)
JW: Also note that G-2 Wall 4081 is strongly tilted
Mazar et. al. (2020 v.3) - Photo 20.21 -
Closeup on Tilted G-2 Wall 4081 from Mazar et. al. (2020 v. 3: Chapter 20)
 Photo 20.21
Square P/3, looking south. Meter stick leaning on G-2 Wall 4081; right: G-2a Floor 4087
(2007)
JW: G-2 Wall 4081 is tilted
Mazar et. al. (2020 v.3)
Inside this room was a layer of brick collapse (8038) that was exposed down to level 85.28 m. This locus was attributed to Stratum G-2b, although a floor was not reached. A higher patchy floor in this room (4090) at level 85.66 m is attributed to Stratum G-2a.
- Table 20.1 -
Correlation of strata – Areas G and C from Mazar et. al. (2020 v. 3: Chapter 20)
Table 20.1
Correlation of strata – Areas G and C
Mazar et. al. (2020 v.3) - Figure 20.1 -
Plan of Stratum G-2b from Mazar et. al. (2020 v. 3: Chapter 20)
Figure 20.1
Plan of Stratum G-2b
Mazar et. al. (2020 v.3) - Figure 20.2a -
Plan of Stratum G-2a from Mazar et. al. (2020 v. 3: Chapter 20)
Figure 20.2a
Plan of Stratum G-2a
Mazar et. al. (2020 v.3) - Figure 20.2b -
Plan of Stratum G-2a' from Mazar et. al. (2020 v. 3: Chapter 20)
Figure 20.2a
Plan of Stratum G-2a'
Mazar et. al. (2020 v.3) - Photo 20.20 -
Tilted G-2 Wall 4081 from Mazar et. al. (2020 v. 3: Chapter 20)
Photo 20.20
Square P/3, looking east. Meter stick leaning on G-2 Wall 4081; upper left: G-1 Wall 4047; note two phases in this wall
(2007)
JW: Also note that G-2 Wall 4081 is strongly tilted
Mazar et. al. (2020 v.3) - Photo 20.21 -
Closeup on Tilted G-2 Wall 4081 from Mazar et. al. (2020 v. 3: Chapter 20)
Photo 20.21
Square P/3, looking south. Meter stick leaning on G-2 Wall 4081; right: G-2a Floor 4087
(2007)
JW: G-2 Wall 4081 is tilted
Mazar et. al. (2020 v.3)
A new floor (4087), beaten-earth and ash, was laid at 85.61 m; it did not clearly abut Wall 4081. This floor is attributed to Stratum G-2a, but might be related to Stratum G-1 Building GG, since destruction layer 4065 of that building is directly above it.
- Table 20.1 -
Correlation of strata – Areas G and C from Mazar et. al. (2020 v. 3: Chapter 20)
Table 20.1
Correlation of strata – Areas G and C
Mazar et. al. (2020 v.3) - Figure 20.1 -
Plan of Stratum G-2b from Mazar et. al. (2020 v. 3: Chapter 20)
Figure 20.1
Plan of Stratum G-2b
Mazar et. al. (2020 v.3) - Figure 20.2a -
Plan of Stratum G-2a from Mazar et. al. (2020 v. 3: Chapter 20)
Figure 20.2a
Plan of Stratum G-2a
Mazar et. al. (2020 v.3) - Figure 20.2b -
Plan of Stratum G-2a' from Mazar et. al. (2020 v. 3: Chapter 20)
Figure 20.2a
Plan of Stratum G-2a'
Mazar et. al. (2020 v.3) - Figure 20.7 -
Superposition of walls in Area G with location of section drawings from Mazar et. al. (2020 v. 3: Chapter 20)
 Figure 20.7
Superposition of walls in Area G with location of section drawings
Mazar et. al. (2020 v.3) - Figure 20.17 -
Section 10 from Mazar et. al. (2020 v. 3: Chapter 20)
Figure 20.17
Section 10 (Square Q/3, section below Wall 5018, looking north)
Mazar et. al. (2020 v.3) - Figure 20.18 -
Section 11 from Mazar et. al. (2020 v. 3: Chapter 20)
 Figure 20.18
Section 11 (Square Q/3, looking east; wall above Wall 5062 was seen only in section, attributed to G-1b, unnumbered)
Mazar et. al. (2020 v.3) - Photo 20.1 -
Area G at the end of 2000 season, looking west from Mazar et. al. (2020 v. 3: Chapter 20)
Photo 20.1
Area G at the end of 2000 season, looking west
Mazar et. al. (2020 v.3) - Photo 20.2 -
Area G at the end of 2007 season, looking northwest from Mazar et. al. (2020 v. 3: Chapter 20)
Photo 20.2
Area G at the end of 2007 season, looking northwest
Mazar et. al. (2020 v.3) - Photo 20.16 -
Squares Q–P/3–4 from Mazar et. al. (2020 v. 3: Chapter 20)
Photo 20.16
Squares Q–P/3–4, looking west.
- Right: G-2a circular installations
- front left: G-2b Floor 8046 (deepest excavated point)
- front center: G-2 Building GD
(2007)
Mazar et. al. (2020 v.3) - Photo 20.17 -
Squares Q–P/3–4 from Mazar et. al. (2020 v. 3: Chapter 20)
 Photo 20.17
Squares Q–P/3–4, looking north. Center: G-1 Wall 5012
(2007)
Mazar et. al. (2020 v.3) - Photo 20.18 -
Square Q/3 from Mazar et. al. (2020 v. 3: Chapter 20)
 Photo 20.18
Square Q/3, northeastern corner, looking north. Upper left: G-1a Wall 5008 with brick debris (5011) above layer of charred wood (5029); G-2a–b layers below the G-1a destruction debris
(2007)
Mazar et. al. (2020 v.3)
In the northern room, a clear distinction between Strata G-2b and G-2a could be made (Figs. 20.17–20.18; Photo 20.18). The lowest layer reached was a beaten-earth floor (8046) exposed in a small area at level 84.16 m, which appeared to abut the foundation of Walls 5062 and 5063. This floor was covered by a layer of small chunks of brick debris (8040) and a higher layer of large collapsed bricks (8018). Note that the floor in Room 8046 was much lower than the surrounding floors of the same phase, 8041/8044 in Square Q/4 west of Wall 8030, as well as Floor 8017 to the south. Thus, it may be suggested that Room 8046 was, to some extent, subterranean.
In Phase G-2a, new floor composed of soft red and gray striations (5053) accumulated between levels 85.00–85.68 m, sloping to the north and sealing the earlier brick collapse (Figs. 20.17– 20.18; Photo 20.18). Many pottery sherds (some restorable) were found here (Figs. 21.6–21.7), as well as three clay loomweights.
In the southern room, a series of at least three successive floors (8017) attributed to Stratum G-2b was found at levels 84.95–85.35 m; a soft brown floor, a reddish floor and a grey floor with bits of plaster and ash, all containing many sherds, bones and olive pits. The highest floor was covered by a layer of brick debris (8004). A patchy clay floor (5047) at level 85.69 m covering the brick debris layer was attributed to Stratum G-2a. Its relation to Walls 5063 and 5062 was insecure, although very likely.
- Table 20.1 -
Correlation of strata – Areas G and C from Mazar et. al. (2020 v. 3: Chapter 20)
Table 20.1
Correlation of strata – Areas G and C
Mazar et. al. (2020 v.3) - Figure 20.1 -
Plan of Stratum G-2b from Mazar et. al. (2020 v. 3: Chapter 20)
Figure 20.1
Plan of Stratum G-2b
Mazar et. al. (2020 v.3) - Figure 20.2a -
Plan of Stratum G-2a from Mazar et. al. (2020 v. 3: Chapter 20)
Figure 20.2a
Plan of Stratum G-2a
Mazar et. al. (2020 v.3) - Figure 20.2b -
Plan of Stratum G-2a' from Mazar et. al. (2020 v. 3: Chapter 20)
Figure 20.2a
Plan of Stratum G-2a'
Mazar et. al. (2020 v.3) - Photo 20.22 -
Squares P–Q/5 from Mazar et. al. (2020 v. 3: Chapter 20)
 Photo 20.22
Squares P–Q/5, looking south at remains in G-1 Building GF; center: G-1 Walls 4014 and 4017 and wooden beams (4031, 4020)
(2000)
Mazar et. al. (2020 v.3) - Photo 20.23 -
Squares P–Q/5 from Mazar et. al. (2020 v. 3: Chapter 20)
 Photo 20.23
Squares P–Q/5, looking southwest, detail of Photo 20.22
(2000)
Mazar et. al. (2020 v.3)
- Table 20.1 -
Correlation of strata – Areas G and C from Mazar et. al. (2020 v. 3: Chapter 20)
Table 20.1
Correlation of strata – Areas G and C
Mazar et. al. (2020 v.3) - Figure 20.3 -
Plan of wooden beams in the foundations of Stratum G-1 walls from Mazar et. al. (2020 v. 3: Chapter 20)
Figure 20.3
Plan of wooden beams in the foundations of Stratum G-1 walls
Mazar et. al. (2020 v.3) - Figure 20.4 -
Plan of Stratum G-1b from Mazar et. al. (2020 v. 3: Chapter 20)
Figure 20.4
Plan of Stratum G-1b
Mazar et. al. (2020 v.3) - Figure 20.5 -
Plan of Stratum G-1a from Mazar et. al. (2020 v. 3: Chapter 20)
Figure 20.5
Plan of Stratum G-1a
Mazar et. al. (2020 v.3)
- Plans: Figs. Figs. 20.3–20.5
Two major architectural units were detected: Building GF in the central and northern part of the area and Building GG in the southern part, separated by a double wall (4047/5012). The eastern wall of the northern building (5017) was attached to another wall (5018), which probably belonged to an adjacent building to the east, beyond the limits of the excavation area. In the southwestern part of Area G, erosion destroyed much of Building GG.
In Building GG, very few changes were made between Strata G-1a and G-1b. The building was destroyed in G-1a by heavy fire, probably corresponding to the destruction of Stratum C-1a in Area C and E-1a in Area E. In Building GF, distinctions between the two strata could be observed in several cases, but since no violent destruction layer was detected, it might be conjectured that most of the Stratum G-1a floors in this building were eroded away, although this remains an open question. As noted above, building remains of Stratum G-1 were eroded away in Squares P–Q/6, the floors were almost completely eroded away in Squares P–Q/5, and erosion also destroyed the G-1 structures in the southwestern corner of the area in Square P/3.
- Table 20.1 -
Correlation of strata – Areas G and C from Mazar et. al. (2020 v. 3: Chapter 20)
Table 20.1
Correlation of strata – Areas G and C
Mazar et. al. (2020 v.3) - Figure 20.3 -
Plan of wooden beams in the foundations of Stratum G-1 walls from Mazar et. al. (2020 v. 3: Chapter 20)
Figure 20.3
Plan of wooden beams in the foundations of Stratum G-1 walls
Mazar et. al. (2020 v.3) - Figure 20.4 -
Plan of Stratum G-1b from Mazar et. al. (2020 v. 3: Chapter 20)
Figure 20.4
Plan of Stratum G-1b
Mazar et. al. (2020 v.3) - Figure 20.5 -
Plan of Stratum G-1a from Mazar et. al. (2020 v. 3: Chapter 20)
Figure 20.5
Plan of Stratum G-1a
Mazar et. al. (2020 v.3) - Photo 20.22 -
Squares P–Q/5 from Mazar et. al. (2020 v. 3: Chapter 20)
Photo 20.22
Squares P–Q/5, looking south at remains in G-1 Building GF; center: G-1 Walls 4014 and 4017 and wooden beams (4031, 4020)
(2000)
Mazar et. al. (2020 v.3) - Photo 20.23 -
Squares P–Q/5 from Mazar et. al. (2020 v. 3: Chapter 20)
Photo 20.23
Squares P–Q/5, looking southwest, detail of Photo 20.22
(2000)
Mazar et. al. (2020 v.3) - Photo 20.24 -
Square P/5 from Mazar et. al. (2020 v. 3: Chapter 20)
 Photo 20.24
Square P/5, looking east at detail of wooden beams 4020, east of Wall 4014 and below Wall 4017
(2000)
Mazar et. al. (2020 v.3) - Photo 20.25 -
Square P/4 from Mazar et. al. (2020 v. 3: Chapter 20)
Photo 20.25
Square P/4, looking south at wooden beams 4071. Wall 5012 and projection to north; meter stick on G2a Locus 8023
(2000)
Mazar et. al. (2020 v.3) - Photo 20.26 -
Square P/4 from Mazar et. al. (2020 v. 3: Chapter 20)
 Photo 20.26
Square P/4, looking west at double wall 5012/4047, with wooden beams 4066 to its north
(2007)
Mazar et. al. (2020 v.3) - Photo 20.27 -
Squares Q–P/4 from Mazar et. al. (2020 v. 3: Chapter 20)
 Photo 20.27
Squares Q–P/4, looking south at Wall 5012 and section below it. Note thick layer of wooden beams below the wall; foreground: G-2b Installation 8048
(2007)
Mazar et. al. (2020 v.3) - Photo 20.28 -
Square P/4 from Mazar et. al. (2020 v. 3: Chapter 20)
 Photo 20.28
Square P/4, looking south at G-1 Wall 5012 and section below it. Note thick layer of wooden beams below the wall; foreground: G-2b Floor 8054 (2007)
(2007)
Mazar et. al. (2020 v.3) - Photo 20.29 -
Square Q/4 from Mazar et. al. (2020 v. 3: Chapter 20)
 Photo 20.29
Square Q/4, looking east at G-1 Wall 5017, with wooden beams in its foundation
Mazar et. al. (2020 v.3) - Photo 20.30 -
Square P/5 from Mazar et. al. (2020 v. 3: Chapter 20)
 Photo 20.30
Square P/5, looking east at G-1 Wall 4014, with wooden beams in its foundation
(2000)
Mazar et. al. (2020 v.3)
- Table 20.1 -
Correlation of strata – Areas G and C from Mazar et. al. (2020 v. 3: Chapter 20)
Table 20.1
Correlation of strata – Areas G and C
Mazar et. al. (2020 v.3) - Figure 20.3 -
Plan of wooden beams in the foundations of Stratum G-1 walls from Mazar et. al. (2020 v. 3: Chapter 20)
Figure 20.3
Plan of wooden beams in the foundations of Stratum G-1 walls
Mazar et. al. (2020 v.3) - Figure 20.4 -
Plan of Stratum G-1b from Mazar et. al. (2020 v. 3: Chapter 20)
Figure 20.4
Plan of Stratum G-1b
Mazar et. al. (2020 v.3) - Figure 20.5 -
Plan of Stratum G-1a from Mazar et. al. (2020 v. 3: Chapter 20)
Figure 20.5
Plan of Stratum G-1a
Mazar et. al. (2020 v.3) - Figure 20.10 -
Section 3 from Mazar et. al. (2020 v. 3: Chapter 20)
 Figure 20.10
Section 3 (Square P/5, Walls 5044 and 4014, looking east)
Mazar et. al. (2020 v.3) - Photo 20.22 -
Squares P–Q/5 from Mazar et. al. (2020 v. 3: Chapter 20)
Photo 20.22
Squares P–Q/5, looking south at remains in G-1 Building GF; center: G-1 Walls 4014 and 4017 and wooden beams (4031, 4020)
(2000)
Mazar et. al. (2020 v.3) - Photo 20.23 -
Squares P–Q/5 from Mazar et. al. (2020 v. 3: Chapter 20)
Photo 20.23
Squares P–Q/5, looking southwest, detail of Photo 20.22
(2000)
Mazar et. al. (2020 v.3) - Photo 20.24 -
Square P/5 from Mazar et. al. (2020 v. 3: Chapter 20)
Photo 20.24
Square P/5, looking east at detail of wooden beams 4020, east of Wall 4014 and below Wall 4017
(2000)
Mazar et. al. (2020 v.3) - Photo 20.30 -
Square P/5 from Mazar et. al. (2020 v. 3: Chapter 20)
Photo 20.30
Square P/5, looking east at G-1 Wall 4014, with wooden beams in its foundation
(2000)
Mazar et. al. (2020 v.3)
It should be noted that when the poorly preserved bricks of Wall 4014 were dismantled, a 0.5 m-thick layer of burnt orange brick debris was revealed, separating the wall from the wooden beams described above (Fig. 20.10). This raised questions as to the relationship of the wooden beams to the construction of the wall; however, since the connection of the beams to other G-1 walls was established with great certainty, we maintain that Wall 4014 was supported by the wooden beams and that this crumbly brick layer was created during the heavy conflagration which strongly affected the lowest brick courses of the wall, because of its proximity to the wood.
- Table 20.1 -
Correlation of strata – Areas G and C from Mazar et. al. (2020 v. 3: Chapter 20)
Table 20.1
Correlation of strata – Areas G and C
Mazar et. al. (2020 v.3) - Figure 20.3 -
Plan of wooden beams in the foundations of Stratum G-1 walls from Mazar et. al. (2020 v. 3: Chapter 20)
Figure 20.3
Plan of wooden beams in the foundations of Stratum G-1 walls
Mazar et. al. (2020 v.3) - Figure 20.4 -
Plan of Stratum G-1b from Mazar et. al. (2020 v. 3: Chapter 20)
Figure 20.4
Plan of Stratum G-1b
Mazar et. al. (2020 v.3) - Figure 20.5 -
Plan of Stratum G-1a from Mazar et. al. (2020 v. 3: Chapter 20)
Figure 20.5
Plan of Stratum G-1a
Mazar et. al. (2020 v.3) - Photo 20.11 -
Squares Q–P/3–4 looking southwest from Mazar et. al. (2020 v. 3: Chapter 20)
 Photo 20.11
Squares Q–P/3–4 looking southwest. Right: Wall 4083 (with bucket) and G-1b Platform 5069
(2007)
Mazar et. al. (2020 v.3)
- Table 20.1 -
Correlation of strata – Areas G and C from Mazar et. al. (2020 v. 3: Chapter 20)
Table 20.1
Correlation of strata – Areas G and C
Mazar et. al. (2020 v.3) - Figure 20.3 -
Plan of wooden beams in the foundations of Stratum G-1 walls from Mazar et. al. (2020 v. 3: Chapter 20)
Figure 20.3
Plan of wooden beams in the foundations of Stratum G-1 walls
Mazar et. al. (2020 v.3) - Figure 20.4 -
Plan of Stratum G-1b from Mazar et. al. (2020 v. 3: Chapter 20)
Figure 20.4
Plan of Stratum G-1b
Mazar et. al. (2020 v.3) - Figure 20.5 -
Plan of Stratum G-1a from Mazar et. al. (2020 v. 3: Chapter 20)
Figure 20.5
Plan of Stratum G-1a
Mazar et. al. (2020 v.3) - Figure 20.16 -
Section 9 from Mazar et. al. (2020 v. 3: Chapter 20)
 Figure 20.16
Section 9 (Squares P–Q/3, Wall 4047 with wooden beams, looking north)
Mazar et. al. (2020 v.3) - Photo 20.25 -
Square P/4 from Mazar et. al. (2020 v. 3: Chapter 20)
Photo 20.25
Square P/4, looking south at wooden beams 4071. Wall 5012 and projection to north; meter stick on G2a Locus 8023
(2000)
Mazar et. al. (2020 v.3) - Photo 20.26 -
Square P/4 from Mazar et. al. (2020 v. 3: Chapter 20)
Photo 20.26
Square P/4, looking west at double wall 5012/4047, with wooden beams 4066 to its north
(2007)
Mazar et. al. (2020 v.3) - Photo 20.31 -
Tilted G-1b Wall 4047 from Mazar et. al. (2020 v. 3: Chapter 20)
 Photo 20.31
Squares P–Q/3, looking north. Top: Wall 4047 with wooden beams in its foundation; note two possible phases in this wall; bottom: G-1 Installation 4064 on top of G-2 Wall 4081
(2007)
JW: G-1b Wall 4047 is tilted. Wall 5008 also looks tilted.
Mazar et. al. (2020 v.3)
In the northeastern corner of the square was a layer of beams laid at a northeastern–southeastern orientation (4071, between 86.53–86.29 m) that was the continuation of the southern group of beams (4020) in Square P/5, described above (Photo 20.25). Two elongated beams were located just on top of G-2 Wall 5061 at levels 86.03–86.28 m, serving as a foundation for the new wall (4070) built on the same line. West of this wall was a group of five beams which were perpendicular to the wall at level 86.00 m, probably serving as foundation for a floor that was not preserved in the small area that was excavated.
Wooden beams were also found in the foundation of Wall 4047, which created a double wall with Wall 5012, mentioned above (Fig. 20.16; Photo 20.31).
- Table 20.1 -
Correlation of strata – Areas G and C from Mazar et. al. (2020 v. 3: Chapter 20)
Table 20.1
Correlation of strata – Areas G and C
Mazar et. al. (2020 v.3) - Figure 20.3 -
Plan of wooden beams in the foundations of Stratum G-1 walls from Mazar et. al. (2020 v. 3: Chapter 20)
Figure 20.3
Plan of wooden beams in the foundations of Stratum G-1 walls
Mazar et. al. (2020 v.3) - Figure 20.4 -
Plan of Stratum G-1b from Mazar et. al. (2020 v. 3: Chapter 20)
Figure 20.4
Plan of Stratum G-1b
Mazar et. al. (2020 v.3) - Figure 20.5 -
Plan of Stratum G-1a from Mazar et. al. (2020 v. 3: Chapter 20)
Figure 20.5
Plan of Stratum G-1a
Mazar et. al. (2020 v.3) - Figure 20.13 -
Section 6 from Mazar et. al. (2020 v. 3: Chapter 20)
 Figure 20.13
Section 6 (Square Q/4, Wall 5018 and wooden beams, looking east)
Mazar et. al. (2020 v.3)
- Table 20.1 -
Correlation of strata – Areas G and C from Mazar et. al. (2020 v. 3: Chapter 20)
Table 20.1
Correlation of strata – Areas G and C
Mazar et. al. (2020 v.3) - Figure 20.3 -
Plan of wooden beams in the foundations of Stratum G-1 walls from Mazar et. al. (2020 v. 3: Chapter 20)
Figure 20.3
Plan of wooden beams in the foundations of Stratum G-1 walls
Mazar et. al. (2020 v.3) - Figure 20.4 -
Plan of Stratum G-1b from Mazar et. al. (2020 v. 3: Chapter 20)
Figure 20.4
Plan of Stratum G-1b
Mazar et. al. (2020 v.3) - Figure 20.5 -
Plan of Stratum G-1a from Mazar et. al. (2020 v. 3: Chapter 20)
Figure 20.5
Plan of Stratum G-1a
Mazar et. al. (2020 v.3) - Figure 20.17 -
Section 10 from Mazar et. al. (2020 v. 3: Chapter 20)
Figure 20.17
Section 10 (Square Q/3, section below Wall 5018, looking north)
Mazar et. al. (2020 v.3) - Photo 20.17 -
Squares Q–P/3–4 from Mazar et. al. (2020 v. 3: Chapter 20)
Photo 20.17
Squares Q–P/3–4, looking north. Center: G-1 Wall 5012
(2007)
Mazar et. al. (2020 v.3) - Photo 20.18 -
Square Q/3 from Mazar et. al. (2020 v. 3: Chapter 20)
Photo 20.18
Square Q/3, northeastern corner, looking north. Upper left: G-1a Wall 5008 with brick debris (5011) above layer of charred wood (5029); G-2a–b layers below the G-1a destruction debris
(2007)
Mazar et. al. (2020 v.3) - Photo 20.34 -
Squares P–Q/3–4 – from Mazar et. al. (2020 v. 3: Chapter 20)
 Photo 20.34
Squares P–Q/3–4, looking west, Stratum G-1
(2001)
Mazar et. al. (2020 v.3) - Photo 20.35 -
Square Q/3 – from Mazar et. al. (2020 v. 3: Chapter 20)
 Photo 20.35
Square Q/3, northeastern corner. G-1 Wall 5008 (left) abutting Wall 4047; right: section through wooden beam in the foundation of Wall 5017/5018, continuing south into Locus 5029
(2001)
Mazar et. al. (2020 v.3) - Photo 20.40 -
General view of Area G – from Mazar et. al. (2020 v. 3: Chapter 20)
 Photo 20.40
General view of Area G, looking north. Foreground: G-1 Building GG and Space 5011 to its east; background: Area C
(2000)
Mazar et. al. (2020 v.3)
It should be noted that in several places there was a considerable gap of up to 0.5 m between the uppermost beams and the lowest brick course of the wall above (i.e., the case of Wall 4014, noted above) while in other places (such as the foundations of Walls 5012 and 4047), it was clear that the beams served as a foundation for the wall, as was the case in Area C. It appears that even where there was a gap, the wood served as such a foundation and the gap was created by seismic activity or the burning of the lowest bricks until melting point during the destruction.
- Table 20.1 -
Correlation of strata – Areas G and C from Mazar et. al. (2020 v. 3: Chapter 20)
Table 20.1
Correlation of strata – Areas G and C
Mazar et. al. (2020 v.3) - Figure 20.3 -
Plan of wooden beams in the foundations of Stratum G-1 walls from Mazar et. al. (2020 v. 3: Chapter 20)
Figure 20.3
Plan of wooden beams in the foundations of Stratum G-1 walls
Mazar et. al. (2020 v.3) - Figure 20.4 -
Plan of Stratum G-1b from Mazar et. al. (2020 v. 3: Chapter 20)
Figure 20.4
Plan of Stratum G-1b
Mazar et. al. (2020 v.3) - Figure 20.5 -
Plan of Stratum G-1a from Mazar et. al. (2020 v. 3: Chapter 20)
Figure 20.5
Plan of Stratum G-1a
Mazar et. al. (2020 v.3) - Figure 20.15 -
Section 8 from Mazar et. al. (2020 v. 3: Chapter 20)
 Figure 20.15
Section 8 (Square P/4, section through Platform 5069 and wooden beams, looking east)
Mazar et. al. (2020 v.3) - Photo 20.1 -
Area G at the end of 2000 season, looking west from Mazar et. al. (2020 v. 3: Chapter 20)
Photo 20.1
Area G at the end of 2000 season, looking west
Mazar et. al. (2020 v.3) - Photo 20.11 -
Squares Q–P/3–4 looking southwest from Mazar et. al. (2020 v. 3: Chapter 20)
Photo 20.11
Squares Q–P/3–4 looking southwest. Right: Wall 4083 (with bucket) and G-1b Platform 5069
(2007)
Mazar et. al. (2020 v.3) - Photo 20.12 -
G-2a courtyard, G-2 Building GC, and G-1 Building GF from Mazar et. al. (2020 v. 3: Chapter 20)
Photo 20.12
- Right: Squares P–Q/5–6, looking east.
- Lower left: G-2a courtyard with related circular bins in Square P/6
- background left: G-2 Building GC, Room 4050
- right: G-1 Building GF Walls 4014 and 4017
(2000)
Mazar et. al. (2020 v.3) - Photo 20.22 -
Squares P–Q/5 from Mazar et. al. (2020 v. 3: Chapter 20)
Photo 20.22
Squares P–Q/5, looking south at remains in G-1 Building GF; center: G-1 Walls 4014 and 4017 and wooden beams (4031, 4020)
(2000)
Mazar et. al. (2020 v.3) - Photo 20.23 -
Squares P–Q/5 from Mazar et. al. (2020 v. 3: Chapter 20)
Photo 20.23
Squares P–Q/5, looking southwest, detail of Photo 20.22
(2000)
Mazar et. al. (2020 v.3) - Photo 20.30 -
Square P/5 from Mazar et. al. (2020 v. 3: Chapter 20)
Photo 20.30
Square P/5, looking east at G-1 Wall 4014, with wooden beams in its foundation
(2000)
Mazar et. al. (2020 v.3) - Photo 20.32 -
Squares P/4–5 from Mazar et. al. (2020 v. 3: Chapter 20)
 Photo 20.32
Squares P/4–5, looking east. Right: G-1 Platform 5069 related to Walls 5012, 4070 and 4083; background: stone wall/bench 5040; left: wooden beams in the foundation of Wall 4014 after partial removal of brick superstructure
(2001)
Mazar et. al. (2020 v.3) - Photo 20.33 -
Square Q/5 – from Mazar et. al. (2020 v. 3: Chapter 20)
 Photo 20.33
Square Q/5, looking east at G-1a Floor 4049
(2000)
Mazar et. al. (2020 v.3) - Photo 20.34 -
Squares P–Q/3–4 – from Mazar et. al. (2020 v. 3: Chapter 20)
Photo 20.34
Squares P–Q/3–4, looking west, Stratum G-1
(2001)
Mazar et. al. (2020 v.3)
In Square Q/5, no floors of Stratum G-1b were preserved above the constructional beams. In the eastern part of the square, a stone floor (4049), 3.5 m long and ca. 0.5–1.3 m wide, was exposed just below topsoil at levels 86.90–86.97 m, unrelated to any other feature (Photos 20.22, 20.33); this floor was attributed to Stratum G-1a. It is possible that this part of the building was an open courtyard. In the rest of the square, brick debris mixed with collapsed burnt bricks and grayish-brown and black ash (4007, 4013) found below topsoil, appeared to be related to the destruction of the building.
In Squares P–Q/4, Walls 4083 and 5019 were two segments of partition walls that comprised the southern border of the space described above, although they appeared to belong to two subsequent phases: Wall 4083 was founded in Stratum G1b, built on top of a wooden-beam foundation that separated it from the earlier wall (8055) of Stratum G-2 (Photo 20.11). Wall 5019 in the eastern part of Q/4 was narrower and higher; its foundation was 0.33 m higher than that of Wall 4083 and fit the level of the plaster floor (5023) to its north and was thus attributed to Stratum G-1a. It seems that in Squares Q–P/4–5 in Stratum G-1b, we may reconstruct a large space (inner dimensions 3.2×7.0 m) enclosed by Walls 4014, 4017, 4083 and an extension of Wall 5018 to the north (Photo 20.34). An element found in this space that remained enigmatic was Wall 5040, a 3.5 m-long and ca. 0.7 m wide stone foundation in the northern part of Square Q/4 (Photos 20.1, 20.32, 20.34), which was architecturally detached from the other walls of the building. It was attributed to Stratum G-1b, since it was covered by G-1a plaster floor 5023, which covered much of the northern part of Square Q/4. The nature of Wall 5040 was even more enigmatic in light of the lack of stone foundations in the Iron IIA levels at Tel Rehov. This element remains architecturally unexplained, although perhaps it served as a bench.
Plaster Floor 5023 in the northern part of Square Q/4 (levels 86.65–86.72 m) was composed of two thin superimposed layers of plaster; it did not clearly abut any wall, although it most likely did reach Wall 5019. Although it was somewhat lower than the stone floor (4049) in Square Q/5, it appears that both these floors were contemporary and belonged to Stratum G-1a.
In Square P/4, a single-course brick platform or floor (5069, 1.3×1.8 m), covered with a thick layer of plaster, was built above the wooden beams in the space between the short segment of Wall 4083 on the north and Wall 5012 on the south (Fig. 20.15; Photos 20.1, 20.11, 20.32, 20.34). Approach to this platform/floor could be through a possible opening in Wall 4083 to the north, where the bricks of this wall were found at the same level as the top of the platform (86.10 m). Note that the lowest brick course of Wall 5012 south of the platform was at level 86.26 m, 0.18 m above the top of the brick platform, but the wooden foundations of this wall started at level 85.72 m, which fit the wooden beams under the platform. It thus appears that the platform/floor and Wall 5012 were constructed at the same time. Brick debris with some small pebbles (4055, 4088) had accumulated on top of the platform. It appears that the platform/floor went out of use in Stratum G-1a, although no clear stratigraphic element was found above it, except for a small segment of an unnumbered wall, which made a corner with Wall 5012 and may be attributed to Stratum G-1a. The function of this brick platform/floor remained obscure.
- Table 20.1 -
Correlation of strata – Areas G and C from Mazar et. al. (2020 v. 3: Chapter 20)
Table 20.1
Correlation of strata – Areas G and C
Mazar et. al. (2020 v.3) - Figure 20.3 -
Plan of wooden beams in the foundations of Stratum G-1 walls from Mazar et. al. (2020 v. 3: Chapter 20)
Figure 20.3
Plan of wooden beams in the foundations of Stratum G-1 walls
Mazar et. al. (2020 v.3) - Figure 20.4 -
Plan of Stratum G-1b from Mazar et. al. (2020 v. 3: Chapter 20)
Figure 20.4
Plan of Stratum G-1b
Mazar et. al. (2020 v.3) - Figure 20.5 -
Plan of Stratum G-1a from Mazar et. al. (2020 v. 3: Chapter 20)
Figure 20.5
Plan of Stratum G-1a
Mazar et. al. (2020 v.3)
- Table 20.1 -
Correlation of strata – Areas G and C from Mazar et. al. (2020 v. 3: Chapter 20)
Table 20.1
Correlation of strata – Areas G and C
Mazar et. al. (2020 v.3) - Figure 20.3 -
Plan of wooden beams in the foundations of Stratum G-1 walls from Mazar et. al. (2020 v. 3: Chapter 20)
Figure 20.3
Plan of wooden beams in the foundations of Stratum G-1 walls
Mazar et. al. (2020 v.3) - Figure 20.4 -
Plan of Stratum G-1b from Mazar et. al. (2020 v. 3: Chapter 20)
Figure 20.4
Plan of Stratum G-1b
Mazar et. al. (2020 v.3) - Figure 20.5 -
Plan of Stratum G-1a from Mazar et. al. (2020 v. 3: Chapter 20)
Figure 20.5
Plan of Stratum G-1a
Mazar et. al. (2020 v.3) - Figure 20.16 -
Section 9 from Mazar et. al. (2020 v. 3: Chapter 20)
Figure 20.16
Section 9 (Squares P–Q/3, Wall 4047 with wooden beams, looking north)
Mazar et. al. (2020 v.3) - Photo 20.18 -
Square Q/3 from Mazar et. al. (2020 v. 3: Chapter 20)
Photo 20.18
Square Q/3, northeastern corner, looking north. Upper left: G-1a Wall 5008 with brick debris (5011) above layer of charred wood (5029); G-2a–b layers below the G-1a destruction debris
(2007)
Mazar et. al. (2020 v.3) - Photo 20.31 -
Tilted G-1b Wall 4047 from Mazar et. al. (2020 v. 3: Chapter 20)
Photo 20.31
Squares P–Q/3, looking north. Top: Wall 4047 with wooden beams in its foundation; note two possible phases in this wall; bottom: G-1 Installation 4064 on top of G-2 Wall 4081
(2007)
JW: G-1b Wall 4047 is tilted. Wall 5008 also looks tilted.
Mazar et. al. (2020 v.3) - Photo 20.34 -
Squares P–Q/3–4 – from Mazar et. al. (2020 v. 3: Chapter 20)
Photo 20.34
Squares P–Q/3–4, looking west, Stratum G-1
(2001)
Mazar et. al. (2020 v.3) - Photo 20.35 -
Square Q/3 – from Mazar et. al. (2020 v. 3: Chapter 20)
Photo 20.35
Square Q/3, northeastern corner. G-1 Wall 5008 (left) abutting Wall 4047; right: section through wooden beam in the foundation of Wall 5017/5018, continuing south into Locus 5029
(2001)
Mazar et. al. (2020 v.3)
- Table 20.1 -
Correlation of strata – Areas G and C from Mazar et. al. (2020 v. 3: Chapter 20)
Table 20.1
Correlation of strata – Areas G and C
Mazar et. al. (2020 v.3) - Figure 20.3 -
Plan of wooden beams in the foundations of Stratum G-1 walls from Mazar et. al. (2020 v. 3: Chapter 20)
Figure 20.3
Plan of wooden beams in the foundations of Stratum G-1 walls
Mazar et. al. (2020 v.3) - Figure 20.4 -
Plan of Stratum G-1b from Mazar et. al. (2020 v. 3: Chapter 20)
Figure 20.4
Plan of Stratum G-1b
Mazar et. al. (2020 v.3) - Figure 20.5 -
Plan of Stratum G-1a from Mazar et. al. (2020 v. 3: Chapter 20)
Figure 20.5
Plan of Stratum G-1a
Mazar et. al. (2020 v.3) - Photo 20.6 -
G-2 Building GB from Mazar et. al. (2020 v. 3: Chapter 20)
Photo 20.6
Square P/4 looking south. G-2 Building GB
- Wall 5061 (right)
- Wall 8055 (center)
- G-1 Wall 5012 (top)
- meter stick on G-2a Floor 8023
(2007)
Mazar et. al. (2020 v.3) - Photo 20.34 -
Squares P–Q/3–4 – from Mazar et. al. (2020 v. 3: Chapter 20)
Photo 20.34
Squares P–Q/3–4, looking west, Stratum G-1
(2001)
Mazar et. al. (2020 v.3) - Photo 20.36 -
Squares P–Q/3, G-1 Installation 5031 – from Mazar et. al. (2020 v. 3: Chapter 20)
 Photo 20.36
Squares P–Q/3, G-1 Installation 5031, looking down
(2001)
Mazar et. al. (2020 v.3) - Photo 20.37 -
Squares P–Q/3 – from Mazar et. al. (2020 v. 3: Chapter 20)
 Photo 20.37
Squares P–Q/3, looking west, Stratum G-1; four large stones north of Installation 5031 (the latter not yet uncovered) and a stone mortar (upside down); back: Installation 4064
(2001)
Mazar et. al. (2020 v.3) - Photo 20.40 -
General view of Area G – from Mazar et. al. (2020 v. 3: Chapter 20)
Photo 20.40
General view of Area G, looking north. Foreground: G-1 Building GG and Space 5011 to its east; background: Area C
(2000)
Mazar et. al. (2020 v.3)
A reddish-brown beaten-earth floor (4089) was exposed west of Installation 5031 at level 85.92 m. A 1.0 m-long charred wooden beam was found on the floor, perhaps part of a loom that stood nearby (see below). Floor 5038 was a pinkish clay surface with small ash patches that abutted Installation 5031 on its west and Wall 5008 on its east at level 85.87 m. The remains of an orange-clay oven were exposed near Wall 4047 to the north (not shown on the plan). No floor was found south of Installation 5031, where only extremely decayed debris was found due to the intense erosion.
Installation 5031 in the middle of this space was an oval of standing bricks coated inside and outside with white plaster (Fig. 20.6; Photos 20.34, 20.36, 20.40). Four open channels were carved in the upper part of the northern and southern walls of the installation, with plaster preserved inside three of these channels. The floor of the installation was composed of stones of various types and sizes, including a grinding stone fragment. A deep krater (Fig. 21.8:8) was embedded in the southwestern corner of the installation, its rim more or less flush with the stone floor and possibly used to collect liquid (olive oil?) that was processed or gathered inside the installation. Inside the installation, a layer of soft dark ashy earth contained two cooking jugs, a bowl and a krater (Figs. 21.8:7–8; 21.9:1–2).
An elongated plastered open channel north of the installation was covered by four large hard limestones (5071; Photos 20.34, 20.37, 20.40); the stones were chipped and cracked as a result of extensive heat. The largest one measured 0.38× 0.51×0.73 m. The bottom of these large stones were ca. 0.15 m above the top of the open channel and chips from these stones were found in the accumulation above Floor 4089 to the west. The stones appeared to be related to the installation and perhaps were used as weights, possibly hung on the wooden beam found lying in the destruction debris to the west of the installation. A roughly worked stone mortar was found close the large stones (Photo 20.37).
The elongated plastered channel to the north of the installation, the four open channels carved into the top of the installation’s walls and the sunken vessel, all indicate that this installation was used in the processing of liquid, perhaps olive oil. The four sunken depressions on top of the installation’s wall were perhaps intended to hold two wooden beams, which somehow were used in the operation. However the exact identification of the function and operation of this installation remains elusive.
The second installation (4064), just 0.4 m to the west of 5031, was an elongated, almost elliptical semi-circle (Photos 20.34; 20.37–20.40, 20.42), built against Wall 4060 and on top of Floor 4089, just on top of Wall 4081 of the previous stratum. It was constructed of small bricks that were covered inside and outside with a thick gray plaster; the center of the installation apparently also had been plastered, although none of this plaster was preserved. Two stones were set at the southern edge of the installation, which may be explained as a grinding installation with a mud-plastered parapet of the type found in Area C (Chapters 12, 43). This suggestion is supported by the find of an upper and a lower grinding stone in the destruction layer (4059) east and north of this installation (Photo 20.39).1
The room was destroyed in a heavy conflagration, creating a layer of burnt bricks and black ash. The thick destruction layer on top of Floor 4089 in the western part of the room (4059) included vessels (Figs. 21.8–21.13) and upper and lower grindstones. A few loomweights found near Installation 5031 were perhaps related to the cache of loomweights found to the west of the entranceway in Wall 4060 (see below). The wooden beam found on the floor could be related to Installation 5031 or to a loom that stood near the entrance to Room 5037. No separate floor that could be attributed to a later phase was found in this room and thus, it appears in identical form in the plans of both Strata G-1b and G-1a (Figs. 20.4–20.5).
- Table 20.1 -
Correlation of strata – Areas G and C from Mazar et. al. (2020 v. 3: Chapter 20)
Table 20.1
Correlation of strata – Areas G and C
Mazar et. al. (2020 v.3) - Figure 20.3 -
Plan of wooden beams in the foundations of Stratum G-1 walls from Mazar et. al. (2020 v. 3: Chapter 20)
Figure 20.3
Plan of wooden beams in the foundations of Stratum G-1 walls
Mazar et. al. (2020 v.3) - Figure 20.4 -
Plan of Stratum G-1b from Mazar et. al. (2020 v. 3: Chapter 20)
Figure 20.4
Plan of Stratum G-1b
Mazar et. al. (2020 v.3) - Figure 20.5 -
Plan of Stratum G-1a from Mazar et. al. (2020 v. 3: Chapter 20)
Figure 20.5
Plan of Stratum G-1a
Mazar et. al. (2020 v.3) - Photo 20.41 -
Smashed pottery in G-1a destruction layer (4052) – from Mazar et. al. (2020 v. 3: Chapter 20)
 Photo 20.41
Square P/3, Building GG, looking north. G-1a destruction layer (4052) with restorable pottery in Room 4088; right: Installation 4064, partly exposed
(2000)
Mazar et. al. (2020 v.3) - Photo 20.42 -
Smashed pottery in G-1a destruction layer (4052) – from Mazar et. al. (2020 v. 3: Chapter 20)
 Photo 20.42
Square P/3, G-1a Building GG, looking east. G-1a destruction layer with restorable pottery in Room 4088; note Walls 4067 and 4060 and concentration of loomweights at the entrance (see Photo 20.44)
(2000)
Mazar et. al. (2020 v.3) - Photo 20.43 -
Closeup of Smashed pottery in G-1a destruction layer (4052) – from Mazar et. al. (2020 v. 3: Chapter 20)
 Photo 20.43
Square P/3, G-1 Building GG, looking east; detail of G-1a destruction debris (4052) in Room 4088
Mazar et. al. (2020 v.3) - Photo 20.44 -
Closeup of Smashed pottery and loomweights in G-1a destruction layer (4052) – from Mazar et. al. (2020 v. 3: Chapter 20)
 Photo 20.44
Squares P–Q/3, G-1 Building GG, looking north; detail of destruction layer (4052) in Room 4088 with concentration of loomweights at the entrance to the room; right: large stones 5071 in Square Q/3
(2000)
Mazar et. al. (2020 v.3)
A higher floor (4088) made of hard gray plaster was identified in the central and northern parts of the room, between levels 85.91–86.00 m, ca. 0.1– 0.2 m higher than the earlier floor. This higher floor is related to Stratum G-1a and appears to have abutted all four walls of the room, although this was not clearly seen.
Destruction debris (4052) that covered the floor consisted of burnt bricks, light gray ash, charcoal pieces and burnt earth that contained 47 restorable vessels (Photos 20.41–2.44; Figs. 21.8–21.14). A large number of these vessels were sunk into the floor against Wall 4067. Over 80 gypsum loomweights were found in the northeastern corner of the room, near the entranceway. They were piled up, covering an area 1.5 m long and 0.65 m wide. Their configuration and dimensions apparently indicate the size and shape of the loom that stood here. Note the abovementioned possibility that the wooden beam in the room to the east might have belonged to this loom. The location of a loom at the entrance of a room recalls a similar situation at Tell Qasile Stratum X, where concentrations of about 80 loomweights each were found at the entrances of several rooms (Mazar 2008).
In the southern part of Square P/3, Loci 4065 and 4069 contain the same destruction layer, although it is slightly lower due to the topography and damaged by the erosion line.
- Table 20.1 -
Correlation of strata – Areas G and C from Mazar et. al. (2020 v. 3: Chapter 20)
Table 20.1
Correlation of strata – Areas G and C
Mazar et. al. (2020 v.3) - Figure 20.1 -
Plan of Stratum G-2b from Mazar et. al. (2020 v. 3: Chapter 20)
Figure 20.1
Plan of Stratum G-2b
Mazar et. al. (2020 v.3) - Figure 20.2a -
Plan of Stratum G-2a from Mazar et. al. (2020 v. 3: Chapter 20)
Figure 20.2a
Plan of Stratum G-2a
Mazar et. al. (2020 v.3) - Figure 20.2b -
Plan of Stratum G-2a' from Mazar et. al. (2020 v. 3: Chapter 20)
Figure 20.2a
Plan of Stratum G-2a'
Mazar et. al. (2020 v.3) - Figure 20.3 -
Plan of wooden beams in the foundations of Stratum G-1 walls from Mazar et. al. (2020 v. 3: Chapter 20)
Figure 20.3
Plan of wooden beams in the foundations of Stratum G-1 walls
Mazar et. al. (2020 v.3) - Figure 20.4 -
Plan of Stratum G-1b from Mazar et. al. (2020 v. 3: Chapter 20)
Figure 20.4
Plan of Stratum G-1b
Mazar et. al. (2020 v.3) - Figure 20.5 -
Plan of Stratum G-1a from Mazar et. al. (2020 v. 3: Chapter 20)
Figure 20.5
Plan of Stratum G-1a
Mazar et. al. (2020 v.3)
As elsewhere in Tel Rehov, no violent destruction was observed at the end of Stratum G-2, yet hints at an earthquake which caused considerable damage were found in the form of tilted and split walls. Such damages may have been the reason for abandoning the Stratum G-2 structures and for the foundation of the new buildings of Stratum G-1. The construction of Stratum G-1 was accompanied by laying wooden foundations for both walls and floors, as was detected also in Areas C and B. About half of this wood was composed of olive tree branches (Chapter 52).
Architectural continuity between Strata G-2 and G-1 was found in several places (i.e., Wall 4014 on top of Wall 5061, Wall 8030 on top of Wall 5018, Wall 5008 on top of Wall 5063), while the general plan of the structures differed from that of Stratum G-1. The new double wall 5012/4047 was a major feature, separating Building GG on the south from Building GF on the north. Both of these buildings are only partly known. Building GF continued the tradition of Building GB of the previous period in its being composed of large open spaces, although no food processing or storage installations were found in it and thus, its function may have changed. Architectural changes between Strata G-1b and G-1a were also observed. A unique feature was the brick platform/floor (5069), which perhaps served as a base for storage facilities. The preserved part of Building GG contained two installations of particular interest: a possible grinding installation with a plaster parapet and perhaps an oil-extracting installation with stone weights, which was rather rare in this period. A loom with some 80 gypsum weights apparently stood at the entrance to the small chamber (5037) and a wooden beam found outside this room might have belonged to the loom.
The dramatic destruction of Stratum G-1a yielded a rich pottery assemblage and other finds. This can be correlated to the general destruction of the city of Stratum IV in the 9th century BCE, as evidenced in other areas at Tel Rehov.
- Figure 20.1
Plan of Stratum G-2b from Mazar et. al. (2020 v. 3: Chapter 20)
Figure 20.1
Plan of Stratum G-2b
Mazar et. al. (2020 v.3) - Figure 20.2a
Plan of Stratum G-2a from Mazar et. al. (2020 v. 3: Chapter 20)
Figure 20.2a
Plan of Stratum G-2a
Mazar et. al. (2020 v.3) - Figure 20.2b
Plan of Stratum G-2a' from Mazar et. al. (2020 v. 3: Chapter 20)
Figure 20.2a
Plan of Stratum G-2a'
Mazar et. al. (2020 v.3) - Figure 20.3
Plan of wooden beams in the foundations of Stratum G-1 walls from Mazar et. al. (2020 v. 3: Chapter 20)
Figure 20.3
Plan of wooden beams in the foundations of Stratum G-1 walls
Mazar et. al. (2020 v.3) - Figure 20.4
Plan of Stratum G-1b from Mazar et. al. (2020 v. 3: Chapter 20)
Figure 20.4
Plan of Stratum G-1b
Mazar et. al. (2020 v.3) - Figure 20.5
Plan of Stratum G-1a from Mazar et. al. (2020 v. 3: Chapter 20)
Figure 20.5
Plan of Stratum G-1a
Mazar et. al. (2020 v.3) - Figure 20.7
Superposition of walls in Area G with location of section drawings from Mazar et. al. (2020 v. 3: Chapter 20)
Figure 20.7
Superposition of walls in Area G with location of section drawings
Mazar et. al. (2020 v.3) - Figure 20.8
Section 1 from Mazar et. al. (2020 v. 3: Chapter 20)
 Figure 20.8
Section 1 (Square P/6, looking east)
Mazar et. al. (2020 v.3) - Figure 20.9
Section 2 from Mazar et. al. (2020 v. 3: Chapter 20)
 Figure 20.9
Section 2: (Square P/5, looking north)
Mazar et. al. (2020 v.3) - Figure 20.10
Section 3 from Mazar et. al. (2020 v. 3: Chapter 20)
Figure 20.10
Section 3 (Square P/5, Walls 5044 and 4014, looking east)
Mazar et. al. (2020 v.3) - Figure 20.11
Section 4 from Mazar et. al. (2020 v. 3: Chapter 20)
 Figure 20.11
Section 4 (Square Q/5, looking east)
Mazar et. al. (2020 v.3) - Figure 20.12
Section 5 from Mazar et. al. (2020 v. 3: Chapter 20)
 Figure 20.12
Section 5 (Square Q/4, looking north)
Mazar et. al. (2020 v.3) - Figure 20.13
Section 6 from Mazar et. al. (2020 v. 3: Chapter 20)
Figure 20.13
Section 6 (Square Q/4, Wall 5018 and wooden beams, looking east)
Mazar et. al. (2020 v.3) - Figure 20.14
Section 7 from Mazar et. al. (2020 v. 3: Chapter 20)
 Figure 20.14
Section 7 (Square P/4, Wall 5012 and wooden beams, looking south)
Mazar et. al. (2020 v.3) - Figure 20.15
Section 8 from Mazar et. al. (2020 v. 3: Chapter 20)
Figure 20.15
Section 8 (Square P/4, section through Platform 5069 and wooden beams, looking east)
Mazar et. al. (2020 v.3) - Figure 20.16
Section 9 from Mazar et. al. (2020 v. 3: Chapter 20)
Figure 20.16
Section 9 (Squares P–Q/3, Wall 4047 with wooden beams, looking north)
Mazar et. al. (2020 v.3) - Figure 20.17
Section 10 from Mazar et. al. (2020 v. 3: Chapter 20)
Figure 20.17
Section 10 (Square Q/3, section below Wall 5018, looking north)
Mazar et. al. (2020 v.3) - Figure 20.18
Section 11 from Mazar et. al. (2020 v. 3: Chapter 20)
Figure 20.18
Section 11 (Square Q/3, looking east; wall above Wall 5062 was seen only in section, attributed to G-1b, unnumbered)
Mazar et. al. (2020 v.3)
- Photo 20.1
Area G at the end of 2000 season, looking west from Mazar et. al. (2020 v. 3: Chapter 20)
Photo 20.1
Area G at the end of 2000 season, looking west
Mazar et. al. (2020 v.3) - Photo 20.2
Area G at the end of 2007 season, looking northwest from Mazar et. al. (2020 v. 3: Chapter 20)
Photo 20.2
Area G at the end of 2007 season, looking northwest
Mazar et. al. (2020 v.3) - Photo 20.3
Squares P–Q/4–5, looking north from Mazar et. al. (2020 v. 3: Chapter 20)
Photo 20.3
Squares P–Q/4–5, looking north.
- Left: Stratum G2a Building GB
- center left:Room 8045
-
upper left:
- Room 4039
- balk between Squares P–Q/5 and P–Q/4 in center
- bottom left: Wall 4070 of Stratum G-1
(2007)
Mazar et. al. (2020 v.3) - Photo 20.4
Collapsed mudbricks on left corner in G-2b Building GA from Mazar et. al. (2020 v. 3: Chapter 20)
Photo 20.4
Square P/5, looking north. Wall 5044 of G-2b Building GA
- to its left: Locus 8052 with loomweights
- right: Wall 5061 of G-2a Building GB (bird nest holes in section)
(2007)
JW: Collapsed mudbricks in left corner of room
Mazar et. al. (2020 v.3) - Photo 20.5
Tilted Wall from Mazar et. al. (2020 v. 3: Chapter 20)
Photo 20.5
Squares P–Q/4–5, looking east.
- Right: G-1 Wall 5012
- center: balk
- center, right of balk: G-2a Walls 8055 and 8056
- meter stick on G-2a Floor 8023
(2007)
JW: Tilted wall just up frame from Wall 5044 G-2
Mazar et. al. (2020 v.3) - Photo 20.6
G-2 Building GB from Mazar et. al. (2020 v. 3: Chapter 20)
Photo 20.6
Square P/4 looking south. G-2 Building GB
- Wall 5061 (right)
- Wall 8055 (center)
- G-1 Wall 5012 (top)
- meter stick on G-2a Floor 8023
(2007)
Mazar et. al. (2020 v.3) - Photo 20.7
Building GA, G-2 Building GB, and Building GC from Mazar et. al. (2020 v. 3: Chapter 20)
Photo 20.7
Squares P–Q/5-6, looking northwest.
- Center: Wall 5064 of G-2 Building GB
- far left: Building GA
- right: installations and floor in courtyard
- upper right: Building GC
(2007)
Mazar et. al. (2020 v.3) - Photo 20.8
G-2 Building GB from Mazar et. al. (2020 v. 3: Chapter 20)
Photo 20.8
Squares P–Q/4–5 looking west. G-2 Building GB with circular installations
(2007)
Mazar et. al. (2020 v.3) - Photo 20.9
Wall 5064 and G-2a courtyard from Mazar et. al. (2020 v. 3: Chapter 20)
Photo 20.9
Square Q/5, looking west. Top: Wall 5064 and G-2a courtyard with ovens and installations
Mazar et. al. (2020 v.3) - Photo 20.10
G-2b and G-2a circular bins from Mazar et. al. (2020 v. 3: Chapter 20)
Photo 20.10
Square Q/4, detail of G-2b and G-2a circular bins
(2007)
Mazar et. al. (2020 v.3) - Photo 20.11
Squares Q–P/3–4 looking southwest from Mazar et. al. (2020 v. 3: Chapter 20)
Photo 20.11
Squares Q–P/3–4 looking southwest. Right: Wall 4083 (with bucket) and G-1b Platform 5069
(2007)
Mazar et. al. (2020 v.3) - Photo 20.12
G-2a courtyard, G-2 Building GC, and G-1 Building GF from Mazar et. al. (2020 v. 3: Chapter 20)
Photo 20.12
- Right: Squares P–Q/5–6, looking east.
- Lower left: G-2a courtyard with related circular bins in Square P/6
- background left: G-2 Building GC, Room 4050
- right: G-1 Building GF Walls 4014 and 4017
(2000)
Mazar et. al. (2020 v.3) - Photo 20.13
Stratum G-2a Square P/6 and Building GC from Mazar et. al. (2020 v. 3: Chapter 20)
Photo 20.13
Square P/6, looking down at floors and circular bins attributed to Stratum G-2a; lower left: Building GC
(2000)
Mazar et. al. (2020 v.3) - Photo 20.14
Stratum G-2a Floors 4016 and 5004 from Mazar et. al. (2020 v. 3: Chapter 20)
Photo 20.14
Square P/6, looking east at Floors 4016 and 5004 and circular bins attributed to Stratum G-2a
(2000)
Mazar et. al. (2020 v.3) - Photo 20.15
Building GC from Mazar et. al. (2020 v. 3: Chapter 20)
Photo 20.15
Square Q/6, looking east at Building GC
(2000)
Mazar et. al. (2020 v.3) - Photo 20.16
Squares Q–P/3–4 from Mazar et. al. (2020 v. 3: Chapter 20)
Photo 20.16
Squares Q–P/3–4, looking west.
- Right: G-2a circular installations
- front left: G-2b Floor 8046 (deepest excavated point)
- front center: G-2 Building GD
(2007)
Mazar et. al. (2020 v.3) - Photo 20.17
Squares Q–P/3–4 from Mazar et. al. (2020 v. 3: Chapter 20)
Photo 20.17
Squares Q–P/3–4, looking north. Center: G-1 Wall 5012
(2007)
Mazar et. al. (2020 v.3) - Photo 20.18
Square Q/3 from Mazar et. al. (2020 v. 3: Chapter 20)
Photo 20.18
Square Q/3, northeastern corner, looking north. Upper left: G-1a Wall 5008 with brick debris (5011) above layer of charred wood (5029); G-2a–b layers below the G-1a destruction debris
(2007)
Mazar et. al. (2020 v.3) - Photo 20.19
Square Q/3 from Mazar et. al. (2020 v. 3: Chapter 20)
 Photo 20.19
Square Q/3, looking south. Section through successive G-2a–2b Floors 8017 and 5047
(2007)
Mazar et. al. (2020 v.3) - Photo 20.20
Tilted G-2 Wall 4081 from Mazar et. al. (2020 v. 3: Chapter 20)
Photo 20.20
Square P/3, looking east. Meter stick leaning on G-2 Wall 4081; upper left: G-1 Wall 4047; note two phases in this wall
(2007)
JW: Also note that G-2 Wall 4081 is strongly tilted
Mazar et. al. (2020 v.3) - Photo 20.21
Closeup on Tilted G-2 Wall 4081 from Mazar et. al. (2020 v. 3: Chapter 20)
Photo 20.21
Square P/3, looking south. Meter stick leaning on G-2 Wall 4081; right: G-2a Floor 4087
(2007)
JW: G-2 Wall 4081 is tilted
Mazar et. al. (2020 v.3) - Photo 20.22
Squares P–Q/5 from Mazar et. al. (2020 v. 3: Chapter 20)
Photo 20.22
Squares P–Q/5, looking south at remains in G-1 Building GF; center: G-1 Walls 4014 and 4017 and wooden beams (4031, 4020)
(2000)
Mazar et. al. (2020 v.3) - Photo 20.23
Squares P–Q/5 from Mazar et. al. (2020 v. 3: Chapter 20)
Photo 20.23
Squares P–Q/5, looking southwest, detail of Photo 20.22
(2000)
Mazar et. al. (2020 v.3) - Photo 20.24
Square P/5 from Mazar et. al. (2020 v. 3: Chapter 20)
Photo 20.24
Square P/5, looking east at detail of wooden beams 4020, east of Wall 4014 and below Wall 4017
(2000)
Mazar et. al. (2020 v.3) - Photo 20.25
Square P/4 from Mazar et. al. (2020 v. 3: Chapter 20)
Photo 20.25
Square P/4, looking south at wooden beams 4071. Wall 5012 and projection to north; meter stick on G2a Locus 8023
(2000)
Mazar et. al. (2020 v.3) - Photo 20.26
Square P/4 from Mazar et. al. (2020 v. 3: Chapter 20)
Photo 20.26
Square P/4, looking west at double wall 5012/4047, with wooden beams 4066 to its north
(2007)
Mazar et. al. (2020 v.3) - Photo 20.27
Squares Q–P/4 from Mazar et. al. (2020 v. 3: Chapter 20)
Photo 20.27
Squares Q–P/4, looking south at Wall 5012 and section below it. Note thick layer of wooden beams below the wall; foreground: G-2b Installation 8048
(2007)
Mazar et. al. (2020 v.3) - Photo 20.28
Square P/4 from Mazar et. al. (2020 v. 3: Chapter 20)
Photo 20.28
Square P/4, looking south at G-1 Wall 5012 and section below it. Note thick layer of wooden beams below the wall; foreground: G-2b Floor 8054 (2007)
(2007)
Mazar et. al. (2020 v.3) - Photo 20.29
Square Q/4 from Mazar et. al. (2020 v. 3: Chapter 20)
Photo 20.29
Square Q/4, looking east at G-1 Wall 5017, with wooden beams in its foundation
Mazar et. al. (2020 v.3) - Photo 20.30
Square P/5 from Mazar et. al. (2020 v. 3: Chapter 20)
Photo 20.30
Square P/5, looking east at G-1 Wall 4014, with wooden beams in its foundation
(2000)
Mazar et. al. (2020 v.3) - Photo 20.31
Tilted G-1b Wall 4047 from Mazar et. al. (2020 v. 3: Chapter 20)
Photo 20.31
Squares P–Q/3, looking north. Top: Wall 4047 with wooden beams in its foundation; note two possible phases in this wall; bottom: G-1 Installation 4064 on top of G-2 Wall 4081
(2007)
JW: G-1b Wall 4047 is tilted. Wall 5008 also looks tilted.
Mazar et. al. (2020 v.3) - Photo 20.32
Squares P/4–5 from Mazar et. al. (2020 v. 3: Chapter 20)
Photo 20.32
Squares P/4–5, looking east. Right: G-1 Platform 5069 related to Walls 5012, 4070 and 4083; background: stone wall/bench 5040; left: wooden beams in the foundation of Wall 4014 after partial removal of brick superstructure
(2001)
Mazar et. al. (2020 v.3) - Photo 20.33
Square Q/5 – from Mazar et. al. (2020 v. 3: Chapter 20)
Photo 20.33
Square Q/5, looking east at G-1a Floor 4049
(2000)
Mazar et. al. (2020 v.3) - Photo 20.34
Squares P–Q/3–4 – from Mazar et. al. (2020 v. 3: Chapter 20)
Photo 20.34
Squares P–Q/3–4, looking west, Stratum G-1
(2001)
Mazar et. al. (2020 v.3) - Photo 20.35
Square Q/3 – from Mazar et. al. (2020 v. 3: Chapter 20)
Photo 20.35
Square Q/3, northeastern corner. G-1 Wall 5008 (left) abutting Wall 4047; right: section through wooden beam in the foundation of Wall 5017/5018, continuing south into Locus 5029
(2001)
Mazar et. al. (2020 v.3) - Photo 20.36
Squares P–Q/3, G-1 Installation 5031 – from Mazar et. al. (2020 v. 3: Chapter 20)
Photo 20.36
Squares P–Q/3, G-1 Installation 5031, looking down
(2001)
Mazar et. al. (2020 v.3) - Photo 20.37
Squares P–Q/3 – from Mazar et. al. (2020 v. 3: Chapter 20)
Photo 20.37
Squares P–Q/3, looking west, Stratum G-1; four large stones north of Installation 5031 (the latter not yet uncovered) and a stone mortar (upside down); back: Installation 4064
(2001)
Mazar et. al. (2020 v.3) - Photo 20.38
Square P/3 – from Mazar et. al. (2020 v. 3: Chapter 20)
 Photo 20.38
Square P/3, looking west at G-1 Installation 4064, Wall 4060 and Floor 4089
(2000)
Mazar et. al. (2020 v.3) - Photo 20.39
Square P/3 – from Mazar et. al. (2020 v. 3: Chapter 20)
 Photo 20.39
Square P/3, G-1 Installation 4064 and Wall 4060, looking north. Note grinding stone in the right corner
(2000)
Mazar et. al. (2020 v.3) - Photo 20.40
General view of Area G – from Mazar et. al. (2020 v. 3: Chapter 20)
Photo 20.40
General view of Area G, looking north. Foreground: G-1 Building GG and Space 5011 to its east; background: Area C
(2000)
Mazar et. al. (2020 v.3) - Photo 20.41
Smashed pottery in G-1a destruction layer (4052) – from Mazar et. al. (2020 v. 3: Chapter 20)
Photo 20.41
Square P/3, Building GG, looking north. G-1a destruction layer (4052) with restorable pottery in Room 4088; right: Installation 4064, partly exposed
(2000)
Mazar et. al. (2020 v.3) - Photo 20.42
Smashed pottery in G-1a destruction layer (4052) – from Mazar et. al. (2020 v. 3: Chapter 20)
Photo 20.42
Square P/3, G-1a Building GG, looking east. G-1a destruction layer with restorable pottery in Room 4088; note Walls 4067 and 4060 and concentration of loomweights at the entrance (see Photo 20.44)
(2000)
Mazar et. al. (2020 v.3) - Photo 20.43
Closeup of Smashed pottery in G-1a destruction layer (4052) – from Mazar et. al. (2020 v. 3: Chapter 20)
Photo 20.43
Square P/3, G-1 Building GG, looking east; detail of G-1a destruction debris (4052) in Room 4088
Mazar et. al. (2020 v.3) - Photo 20.44
Closeup of Smashed pottery and loomweights in G-1a destruction layer (4052) – from Mazar et. al. (2020 v. 3: Chapter 20)
Photo 20.44
Squares P–Q/3, G-1 Building GG, looking north; detail of destruction layer (4052) in Room 4088 with concentration of loomweights at the entrance to the room; right: large stones 5071 in Square Q/3
(2000)
Mazar et. al. (2020 v.3) - Photo 20.45
Room 4088 floor below G-1a destruction layer (4052) – from Mazar et. al. (2020 v. 3: Chapter 20)
 Photo 20.45
Square P/3, Room 4088, floor after removal of destruction debris, looking north
(2000)
Mazar et. al. (2020 v.3)

The earth’s magnetic field and its elements (after Ben-Yosef et al. 2008)
Ben-Yosef and Ron in Mazar et. al. (2020 v. 5) Fig. 54.2
Schematic illustration of the paleomagnetic fold test as applied
to mudbricks walls from Tel Rehov, Stratum C-1b (V)
Ben-Yosef and Ron in Mazar et. al. (2020 v. 5)
 Fig. 54.3
Sampling locations in Buildings CE and CG
Ben-Yosef and Ron in Mazar et. al. (2020 v. 5)
 Photo 54.1
Location of samples from Wall 2454
(eastern wall of Building CE, Square Y/4, looking east). The intense fire of Stratum C-1b is
indicated by the color of the mud bricks.
Ben-Yosef and Ron in Mazar et. al. (2020 v. 5)
 Photo 54.2
Location of samples from Wall 2411 (eastern
wall of Building CG, Square Y/3 looking west). The
strong tilt to the south is clearly visible.
Ben-Yosef and Ron in Mazar et. al. (2020 v. 5)
 Table 54.1
Mean geomagnetic direction for each of the tilted walls in Area C
Ben-Yosef and Ron in Mazar et. al. (2020 v. 5)
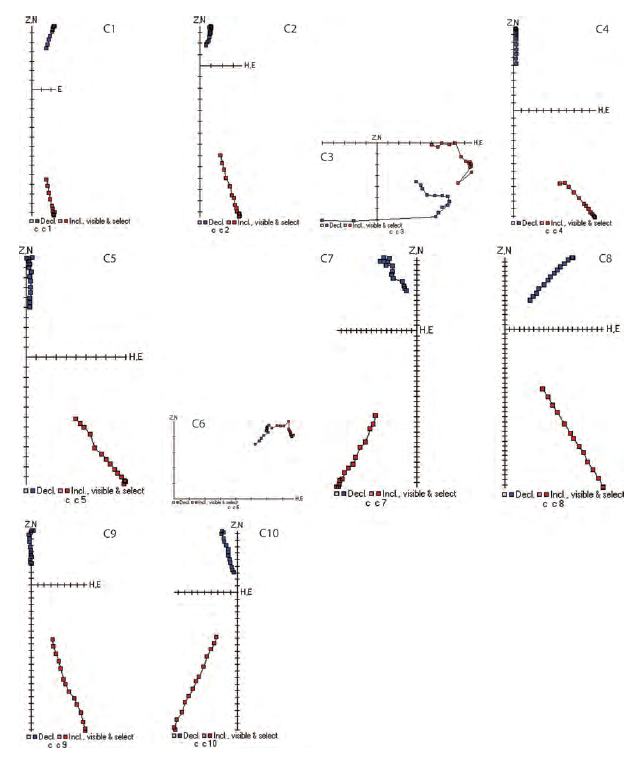 Fig. 54.4
Zijderveld diagrams (or vector end-point diagrams; see Tauxe 2010: 172)
of the AF demagnetization of samples from Tel Rehov
All samples, except C3 and C6, present one component stable magnetization.
Ben-Yosef and Ron in Mazar et. al. (2020 v. 5)
 Fig. 54.5
Equal area projection (lower hemisphere) of measured
directions from Buildings CE (squares) and CG (diamonds). The mean direction is represented
by circles and is statistically the same for both buildings.
Ben-Yosef and Ron in Mazar et. al. (2020 v. 5)
 Fig. 54.6
Equal area projection (lower hemisphere) of measured
directions from Buildings CE (squares) and CG (diamonds) after tilt correction.
Ben-Yosef and Ron in Mazar et. al. (2020 v. 5)
The earth’s magnetic field and its elements (after Ben-Yosef et al. 2008)
Ben-Yosef and Ron in Mazar et. al. (2020 v. 5)
Fig. 54.2
Schematic illustration of the paleomagnetic fold test as applied
to mudbricks walls from Tel Rehov, Stratum C-1b (V)
Ben-Yosef and Ron in Mazar et. al. (2020 v. 5)
Fig. 54.3
Sampling locations in Buildings CE and CG
Ben-Yosef and Ron in Mazar et. al. (2020 v. 5)
Photo 54.1
Location of samples from Wall 2454
(eastern wall of Building CE, Square Y/4, looking east). The intense fire of Stratum C-1b is
indicated by the color of the mud bricks.
Ben-Yosef and Ron in Mazar et. al. (2020 v. 5)
Photo 54.2
Location of samples from Wall 2411 (eastern
wall of Building CG, Square Y/3 looking west). The
strong tilt to the south is clearly visible.
Ben-Yosef and Ron in Mazar et. al. (2020 v. 5)
The archaeomagnetic study was designed to provide conclusive evidence for one of the two following possible scenarios:2
- An earthquake is the main cause for the partial destruction of Stratum C-lb and the tilting of the buildings' walls, and is also responsible for the fire.
- A fire is the main cause for the destruction of the Stratum C-lb buildings; after this, during a period in which the site was abandoned, an earthquake tilted the walls.
We collected ten samples of burnt mudbricks from the two opposing tilted walls (Fig. 54.3): six samples from the western (inner) face of Wall 2454, which served as the eastern wall of Building CE (Photo 54.1; Chapter 12; Fig. 12.27), and four from the eastern (outer) face of Wall 2411, the eastern wall of Building CG (Photo 54.2; Figs. 12.39-12.40). The sampling was done by cutting out oriented chunks of clay bricks into small (~8 cm3) plastic boxes using a Brunton compass.3 The tilting direction of the walls (their dip) was measured on flat surfaces in various locations and an average was calculated. The paleomagnetic experiments were done using alternating field (AF) demagnetization (Tauxe 2010: 127) in steps of 5µT to 40µT or 10µT to 90µT. As the signal was consistent and stable, the samples were not fully demagnetized.
Both walls are tilted at approximately 18°, the wall of Building CE towards the north and the wall of Building CG towards the south (dips 18°±3/360°±10 [n=5], 18°±1/175°±15 [n=4] respectively), demonstrating a symmetrical anticlinal fold.
The demagnetization data are presented in Fig. 54.4. Two samples (C3 and C6) from Wall 2454 were rejected, as they demonstrated an unstable magnetization (Fig. 54.4). The mean vectorial direction was calculated for the two clusters of samples using Fisher statistics. The results are presented in Table 54.1 and Fig. 54.5; Fig. 54.6 presents the results after tilt correction.
Table 54.1Mean geomagnetic direction for each of the tilted walls in Area C
Ben-Yosef and Ron in Mazar et. al. (2020 v. 5)
- Stratigraphic Table
from Mazar et. al. (2020 v.1:XVII)
Stratigraphic Table
Mazar et. al. (2020 v.1) - Fig. 3.7 Map of the
site showing grid and excavation areas from Mazar et. al. (2020 v.1)
Figure 3.7
Topographic map of Tel Rehov showing the grid and excavated areas. Note that levels are given in actual elevation below sea level followed by the relative levels used by our excavation
(triangulation point -116.26 considered as +100m)
(topography and grid by Mabat, Digital Mapping, Jerusalem; areas added by Jay Rosenberg)
Mazar et. al. (2020 v.1) - Deformation Map of Strata C1-b and D1-c
by Jefferson Williams
 Strata C1-b and D1-c Deformation Map
modified by JW from Fig. 12.18 of Mazar et. al. (2020 v.2) - Deformation Map of Stratum E1-b
by Jefferson Williams
 Stratum E1-b Deformation Map
modified by JW from Fig. 17.3 of Mazar et. al. (2020 v.3) - Fig. 2.11 Subsurface structure
of Tel Rehov interpreted from seismic - from Mazar et. al. (2020 v.1)
Figure 2.11
The subsurface structure of Tel Rehov as demonstrated by the N–S oriented seismic line 136.
- Velocity-Depth model of lower tufa sediments
- Velocity-Depth model of upper anthropogenic sediments
(Note the small hill under the higher mound) - Diffraction Stack illustrating the waves diffracted from the fault traces
- the interpreted faults under the mound - the fault between stations 40 and 60 [2nd fault from the right] underlies the step between the higher and lower mounds.
(from Zilberman et al. 2002:13; Fig. 4)
Mazar et. al. (2020 v.1) - Fig. 2.12 Seismic interpretation
of the top of the lower tufa layer along with subsurface faults - from Mazar et. al. (2020 v.1)
Figure 2.12
A subsurface map of the tufa hill, which underlies the anthropogenic sediments of Tel Rehov. The faults are reconstructed from the seismic survey. The survey lines are marked in red.
(from Zilberman et al. 2002:16; Fig. 5)
Seismic Survey lines (not shown here) are in Fig. 2.10 of Mazar et. al. (2020 v.1:28)
Mazar et. al. (2020 v.1) - Fig. 12.18 - Plan of
Stratum C-1b from Mazar et. al. (2020 v.2)
Fig. 12.18
Plan of Stratum C-1b (1:200)
Mazar et. al. (2020 v.2) - Fig. 12.54 - Superimposed
plan of Strata C-3–C-1a from Mazar et. al. (2020 v.2)
Fig. 12.19
Location of section drawings on superimposed plan of Strata C-3–C-1a (1:250)
Panitz-Cohen and Mazar in Mazar et. al. (2020 v.2)
- from Mazar in Mazar and Panitz-Cohen ed.s, (2020 v. 1:119)
- Area C stratigraphy correlated to the rest of the site
- Dating of Iron IIA strata was based on a combination of
the following:
Relative dating based on comparative study of pottery assemblages in well-stratified regional contexts
Absolute dating based on radiometric data
Historical considerations
Table 12.1Correlation of local Area C and general tell strata
Mazar et. al. (2020 v.2)
Mazar in Mazar and Panitz-Cohen ed.s, 2020 v. 1:119 n. 20 noted the following
Finkelstein (2013: 7-8, Table 1; 2017: 186) suggested to further divide the Late Iron IIA into two sub-phases - Late Iron IIA1 and Late Iron IIA2 (the latter called also "terminal Iron IIA"). I cannot see any stratigraphic or ceramic proof either for this subdivision or for the late date (ca. 760 BCE)Finkelstein (2013:7)'s Table 1 is shown below:
Table 1Dates of ceramic phases in the Levant and the transition between them according to recent radiocarbon results (based on a Bayesian model, 63 percent agreement between the model and the data)
Finkelstein (2013:7)
- Figure 4.1
Map of major archaeological and historical sites in central and northern Israel and Jordan from Mazar et. al. (2020 v.1)
Figure 4.1
Map of major archaeological and historical sites in central and northern Israel and Jordan
Mazar et. al. (2020 v.1) - Figure 4.2
Map of Tel ReHov showing the excavation areas and architecture of Stratum IV from Mazar et. al. (2020 v.1)
Figure 4.2
topographic map of Tel ReHov showing the excavation areas and architecture of Stratum IV (see also Fig.3.7)
Mazar et. al. (2020 v.1) - Table 4.1
Stratigraphic Table from Mazar et. al. (2020 v.1:XVII)
Stratigraphic Table
Mazar et. al. (2020 v.1)
- Photo 4.2
Fragments of roofing material from Stratum IV from Mazar et. al. (2020 v.1)
Photo 4.2
Fragments of roofing material made of lumps of clay with reed and beam impressions, found in Area C, Stratum IV
Mazar et. al. (2020 v.1)
- Figure 4.1 -
Map of major archaeological and historical sites in central and northern Israel and Jordan from Mazar et. al. (2020 v.1)
Figure 4.1
Map of major archaeological and historical sites in central and northern Israel and Jordan
Mazar et. al. (2020 v.1)
Stratum VI is attributed to Early Iron IIA, since it is preceded by Stratum VII of Iron IB and succeeded by Strata V-IV of Late Iron IIA. It yielded a relatively substantial pottery assemblage which, on the one hand, demonstrates many similarities with the preceding and subsequent assemblages but, on the other hand, has its own characteristics. The latter include the first appearance, mostly on serving vessels, of a relatively large amount of red slip, often hand burnished. Painted decoration is mainly limited to horizontal straight and wavy red bands in the style known at Tel Rehov in the Iron IB; most of the Canaanite-like motifs appear on small sherds, so it is difficult to say to what extent these are residual. Hippo jars appear for the first time, but are still rare. Imported Phoenician pottery includes several Bichrome sherds, and a small amount of imported Cypriot pottery includes White Painted and Bichrome sherds, but no Black-on-Red, aside from one small and ambivalent sherd in Stratum C-2.
The northern ceramic assemblages assigned by Herzog and Singer-Avitz (2004; 2006) to their Early Iron IIA horizon are (references updated):
- Beth-Shean Stratum S-lb (TBS I: Pls. 6—8)
- Megiddo Stratum VB (Arie 2013)
- Jezreel pre-enclosure fills (Zimhoni 1997: 29-56)
- Taanach Period IIA (Rast 1978: Figs.18-29)
- Yoqne'am Strata XVI-XV (Ben Tor, Zarzecki-Peleg and Cohen-Anidjar 2005: 108-112, Figs. I.36-I.38)
- Horbat Rosh Zayit Stratum III (Gal and Alexandre 2000: 30-33)
- Tell el-Farah North Stratum VIIa (Chambon 1984: Pls. 45-60)
- Dor Phase Ir1|2A (Phases 7a-b, 6b-c in Area G) (Gilboa and Sharon 2003: 21-22, Figs. 10-11; Gilboa 2018: Pls. 20:49, 20.56-20.64)
- Hazor X-IX (?)
- Tell el-Hammah, lower phase (attributed to Iron Age I, yet the few published pottery items [Cahill 2006: 436, Fig. 4] can fit Tel Rehov VI)
Several caveats to this list must be noted. The first is that all the contexts mentioned above (except Dor and, to some extent, Tell Abu al-Kharaz) yielded very small quantities of pottery, mainly sherds, and most of them are not sufficiently distinctive to be compared to our Stratum VI assemblage. In addition, the great degree of continuity between these assemblages and the following Late Iron IIA renders it difficult to distinguish between these two sub-periods. For example, at Jezreel, the pottery from the pre-enclosure fills cannot be distinguished from that found in the enclosure's destruction layer (Zimhoni 1997). At Megiddo, the pottery from Stratum VB is very similar to that of VA-IVB (Zimhoni 1997; Arie 2013) and the same may be said concerning Taanach IIA and IIB. Regional differences should also be taken into account. For example, the correlation between the pottery from Hazor Strata X-IX (Ben-Tor and Ben-Ami 1998; 2012) and our Stratum VI cannot be established with confidence, perhaps due to such regional differences and the strong Canaanite traditions which are present at Tel Rehov, but missing at Hazor. To conclude, Tel Rehov VI provides the largest pottery assemblage that can be attributed to the Early Iron IIA in northern Israel, along with Dor for the northern coastal plain. Yet, even at Tel Rehov, the continuity of many forms from Iron IB to Early Iron IIA, and from the latter to Late Iron IIA, make precise divisions difficult in many cases.
- Figure 4.1 -
Map of major archaeological and historical sites in central and northern Israel and Jordan from Mazar et. al. (2020 v.1)
Figure 4.1
Map of major archaeological and historical sites in central and northern Israel and Jordan
Mazar et. al. (2020 v.1)
The large amount of pottery from Strata V-IV (with very little distinction between the two), discussed in Chapter 24, can be attributed to Late Iron IIA, as defined by Herzog and Avitz-Singer (2006; see also surveys in TBS I: 320-323; APIN-IH: 135-188). The following contexts can be assigned to this phase:
- Tel Beth-Shean Strata S-la and P-10-P-9 (TBS I: 313-384; Plates 6-16)
- Tell el-Hammah two upper phases (Cahill 2006: Figs. 6-11)
- Tel 'Amal Strata III-IV (Levi and Edelstein 1972)
- the Jezreel 7enclosure (Zimhoni 1997: 13-28, 39-53, Figs. 1.2-1.10; 2.5-2.12)
- Megiddo VA-IVB (Finkelstein, Zimhoni and Kafri 2000; Arie 2013)
- Yoqne'am XIV (Ben Tor, Zarzecki-Peleg and Cohen-Anidjar 2005: Figs. I.50-I.52)
- Taanach Period IIB (Rast 1978: Figs. 30-69)
- Tell el-Far'ah North Stratum VIIb (Chambon 1984: 53-72, Pls. 45-62)
- Hazor X—IX(?), VIII (although see comments above and below)
- Horbat Rosh Zayit Strata IIa-Ilb (Gal and Alexandre 2000: 34-122)
- Dor Phase Ir2a (Phase 6a in Area G; Gilboa and Sharon 2003: 23-24, Figs. 12-13; Gilboa 2018: Pls. 20.6-20.67)
- Tell Abu Hawam Stratum III (Hamilton 1935)
- Tell Keisan Strata 8?-6 (Briend and Humbert 1980: Pls. 48-56)
- Tell Abu al-Kharaz Phases XI-XII (Fischer 2013)20
The absolute chronology of the Iron IIA strata is a subject of ongoing debate, based on radiometric dates and historical considerations, although it seems that by now, agreement has been reached on some major issues. The original Low Chronology date of the beginning of Iron IIA strata to ca. 900 BCE proved to be wrong, based on radiocarbon dating. On the other hand, the extension of Iron IIA into the 9th century is certainly correct, as it is anchored in the evidence from Jezreel, where the royal enclosure cannot predate Ahab [r. c. 871 - c. 852 BCE]. According to the modified chronology which I have suggested since 2003, Iron IIA started during the first half of the 10th century BCE and continued until sometime in the second half of the 9th century (Table 4.3). This approach was basically backed up by numerous radiocarbon dates, although there are different views concerning the precise time span and absolute dates of each of the two Iron IIA phases (for summaries and earlier literature, see Finkelstein and Piasetzky 2011; Mazar 2011b).
Table 4.3Three chronological systems for Iron IB-IIB
Mazar et. al. (2020 v.1)
The radiocarbon data from the Iron IIA strata at Tel Rehov is based on 27 short-lived samples, most of them measured several times, so that a total of 110 dates are available (Chapter 48, Table 48.4; partly published earlier in Mazar et al. 2005). This is the largest number of dates from a single site in this period. Several difficulties should be noted (see discussion in Chapter 48):
- The stratigraphic affiliation of several samples to specific phase of the Iron IIA is questionable: in particular, Samples R21—R23 from Area D and Samples R31—R34 from Area C, which could be either Stratum V or IV
- There are a few outliers (all Sample 27 and one determination in R36)
- Occasionally, samples from the same context or stratum yielded considerably different dates, which would provide too wide a range for our required resolution of less than half a century.
Table 4.4Results of a Bayesian model for secure dates from Areas C+D and B in lσ and 2σ CalBC showing dates for Strata VI-IV (not including unmodeled dates from Area E) - for details see Chapter 48
Mazar et. al. (2020 v.1)
The model for Areas C and D (in which most of the samples are included) resulted in the condensation of Strata VI, V and IV into a time frame of maximum 73 years between 936 (uppermost possible date) and 863 (lowest possible date) and minimum seven years (911-904 CalBC) in 1σ, while the 2σ, dates provide a longer maximal range of 145 years for this time span (and minimal -4 years!). The results in the 1σ range are much too short a time slot for three strata with several sub-phases and clear changes in the pottery assemblage between Stratum VI and Strata V-IV. The Bayesian model from Area B (from the end of Stratum VI to the end of Stratum IV) provided a wider range. It should also be recalled that the models provide considerable time spans for each of the transitions between strata, much wider than we would expect for the close dating of less than half a century that we seek for this period. Furthermore, one sample measured several times from Area E provided unmodeled calibrated dates in the late 9th century BCE which are much lower compared to both the unmodeled and modeled dates from the other areas. It appears that the more samples are measured, the problems involved in their interpretation become more complex.
Since the subject is discussed in detail in Chapter 48, I emphasize here only a few notable points. At the outset it should be noted that in the discussion of Iron Age chronology, where we expect restricted resolutions of less than half a century, it became common to cite only or mainly the 1σ CalBC dates (68% probability), and so I did as well in most cases. Yet, it should be recalled that the 2σ dates (95% probability) provide wider ranges and should be taken into consideration as well. Indeed, quite a few discussions of radiocarbon dates in archaeology refer only to the 2σ dates. In such narrow time slots as those involved in the Iron Age chronological debate, the possibilities provided by the 2σ range are sometimes crucial.
Another problem is the relationship between unmodeled and modeled dates. Unmodeled dates from Stratum VI cover most of the 10th century BCE, while the Bayesian model for Areas C+D provide, in my opinion, too short a time span for this stratum, which has in several locations two stratigraphic phases and yielded a pottery assemblage that differs somewhat from the previous and later strata. This result may have been caused by the constraint resulting from the over 100-years span provided by the Bayesian model for Stratum D-3 (see above in the discussion of Iron IB dates). I therefore suggest a much shorter time span for Stratum D-3 and a longer one for Stratum VI, supported by the unmodeled calibrated dates, and conclude that the beginning of Stratum VI could occur during the first half of the 10th century. Taking into consideration the dates of the following Stratum V, the end of Stratum VI should be dated to somewhere in the last quarter of the 10th century.
The date of Stratum V is based on five samples from secure contexts in Area C and one from Area B (a total of 24 repetitions).21 It appears that the last two decades of the 10th century and the beginning of the 9th century BCE are the most reasonable dates for this stratum.
The destruction of Stratum IV is dated by three samples from Area C and two from Area B (a total of 17 repetitions) (Samples R35-R41). The dates are partly in the 10th century and mostly in the 9th century; some reach the second half of the 9th century BCE. The Bayesian model for Areas C+D would end this stratum no later than 863 (1σ) and 817 (2σ) CalBC, while the model for Area B provides lower dates: 833 (161σ) and 822 (1σ) CalBC. In Area E, one of two samples from loci attributed to the early phase of the courtyard (E-lb, probably corresponding with Stratum V), measured several times, provided the exceptionally low date of 832-810 (unmodeled).
My suggested date of 840/830 BCE for the destruction of Stratum IV is based on attribution of this destruction to Hazael (see below). As can be seen in Table 4.4, this date is lower by 23-33 years than the lowest date in the 1σ model for the end of Stratum IV in Area C (863 CalBC), but can fit the lowest as date from Area C (812 BCE), the lowest 2σ and as dates from Area B (838, 822 BCE) and many of the unmodeled lowest dates from Areas B, C and E in the 1σ and 2σ ranges.
Radiocarbon dates from Iron IIA strata at other sites in northern Israel were widely discussed in recent years (e.g., Sharon et al. 2007; Mazar and Bronk Ramsey 2008; Finkelstein and Piasetzky 2009; 2010; 2011; Lee, Mazar and Bronk Ramsey 2013). However, in many cases, the number of measurements from a single site is insufficient, and often they provide a wide range of dates in the 10th to 9th centuries. An example is Megiddo, where only eight samples with eleven repetitions were measured from Iron IIA strata: one from Stratum H-7 (a middle phase of Stratum VB) with a CalBC 1σ date of 1000-920, three from Stratum H-5 which corresponds to general Stratum VA-IVB, two of them (RTT3948 and RTK 6429) provided dates that cover the entire 9th century BCE and the third (RTT 3949) provided a date in the 10th century (1005-930 CaIBC) (Toffolo et al. 2014: 235).22 Four additional dates were published from Stratum Q-5, a Late Iron IIA context which is phased by the excavators between Stratum VB and VA-IVB; the calibrated dates are 1050-940, 980-895, 1000-920 and 895-830 BCE (1σ) and a (yet unpublished) Bayesian model is cited as providing a date of ca. 900 BCE (Kleiman et al. 2019: 547 and Table 7). This is just one example of the potential inconsistencies in the results of 14C dating, in particular when only a few dates are available. Bayesian models are used in order to limit these wide ranges; yet, the unmodeled dates should be taken into account when weighing the results of Bayesian models, specially in cases when the models include data from many sites. The radiometric evidence is certainly important, but has its limitations when it comes down to subtle dating at a resolution of less than 50 years.
I end this section with the words of Walter Kutchera, the former director of the radiometric laboratory in the University of Vienna:
I am convinced that 14C is the most wonderful tool for archaeology, when its inherent uncertainty is properly respected. Unfortunately, pushing its use beyond these limitations puts "oil into the fire" of those who mistrust the 14C method altogether .....23These words are very true when we deal with Iron Age chronology, particularly in the 10th-9th centuries BCE.
- Figure 12.1 -
Site Plan with grid and excavation areas from Mazar et. al. (2020 v.2)
Figure 12.1
Topographic map of Tel Rehov with location of Area C
Panitz-Cohen and Mazar in Mazar et. al. (2020 v.2) - Photo 12.1 -
Aerial Photo showing Area C from Mazar et. al. (2020 v.2)
Photo 12.1
Aerial view, looking south, foreground: Area C; right: Area D (SkyView)
Panitz-Cohen and Mazar in Mazar et. al. (2020 v.2) - Stratigraphic Table
from Mazar et. al. (2020 v.1:XVII)
Stratigraphic Table
Mazar et. al. (2020 v.1)
Area C was located at the northwestern end of the lower city of Tel Rehov, which is the highest point of this part of the mound (Fig. 12.1; Photo 12.1). It was excavated with the purpose of clarifying the stratigraphic sequence and defining the nature of settlement in this part of the tell. ...
Stratigraphy
Four main strata were detected in Area C, termed from earliest to latest (Table 12.1):
- C-3
- C-2
- C-1b
- C-1a
Table 12.1Correlation of local Area C and general tell strata
Mazar et. al. (2020 v.2)
The amount of continuity between the major strata (C-3–C-1) differed. Some walls of Stratum C-2 were built directly on those of C-3, while others were constructed according to a different plan altogether. Some buildings of Stratum C-2 were rebuilt in C-1b, while others went out of use. The greatest continuity took place between Strata C-1b and C-1a, which should be viewed, in fact, as two phases of the same occupation, although there were also several marked changes, mostly in the southeastern part of the area. Strata C-3 and C-2 each had a distinct brick type, while the bricks of Strata C-1b and C-1a were similar, although of varied materials (Tables 12.27–12.30).
The correlation between the destruction/construction events in a city that was constructed entirely of bricks turned out to be complicated task. Our stratigraphic division was based on the attempt to integrate local sequences in the various parts of the area into one comprehensive scheme. Although in each context we were able to establish clear stratigraphy, there remained open questions concerning the correlation between them, in particular due to a violent event at the end of Stratum C-1b, mostly in the southeastern part of the field (Squares Y–Z, A– B/20, 1–3). However, other parts of Area C with remains attributed to Stratum C-1b did not suffer such massive destruction. Following the violent destruction at the end of Stratum C-1a, Area C, like the entire lower city, was entirely abandoned, and the architecture of this stratum was revealed just under modern topsoil.
- Fig. 12.7 -
Plan of Stratum C-2 from Mazar et. al. (2020 v.2)
Fig. 12.7
Plan of Stratum C-2 (1:250); for the continuation of this stratum in Area D, see Fig. 15.28
Mazar et. al. (2020 v.2)
Stratum C-2 was dated to Early Iron Age IIA, the 10th century BCE (for more specific dating, see below and Chapters 4, 48). It marked the initial appearance of red-slipped and hand-burnished wares; Cypriot Black-on-Red ware that appeared in subsequent strata was lacking (Chapter 27). The Hippo storage jar made its first appearance in this stratum, although in small amounts and partially ambiguous from a typological point of view, made of the same type of clay common in subsequent strata (Chapter 24). Most of the pottery was fragmentary, aside from several complete vessels, including an assemblage from Locus 1555b in Square R/4 (Figs. 13.10–13.11; Photo 13.1) whose typological attributes and decoration recall Iron IB pottery, as discussed below.
One of the most distinct characteristics of this occupation phase was that almost all the walls were constructed with hard-packed yellow bricks, very different from the crumbly gray bricks of Stratum C-3 (Table 12.28). Most of the rooms were found full of complete fallen bricks of this type. This, and traces of damage in the walls, such as cracks and slippage, allude to seismic activity at some point, possibly the reason for the end of this stratum. Despite this damage, the walls of Stratum C-2 were, in most cases, well preserved, for example in Building CB, where they stood up to 18 courses, with two intact entrances.
- Figure 12.9 -
Plan of Stratum C-2 from Mazar et. al. (2020 v.2)
Figure 12.9
Plan of Stratum C-2, west; area in Squares Y/1–2 cut by apiary (1:125)
Panitz-Cohen and Mazar in Mazar et. al. (2020 v.2) - Figure 12.97 -
Section 43 (Square R/4, looking north) from Mazar et. al. (2020 v.2)
Figure 12.97
Section 43 (Square R/4, looking north)
Panitz-Cohen and Mazar in Mazar et. al. (2020 v.2) - Photo 12.23 -
Room 1555 at the beginning of excavation from Mazar et. al. (2020 v.2)
Photo 12.23
Squares R–S/4, looking south; Room 1555 at the beginning of its excavation (2010)
Panitz-Cohen and Mazar in Mazar et. al. (2020 v.2) - Photo 12.24 -
Damaged eastern face of Wall 1563 from Mazar et. al. (2020 v.2)
Photo 12.24
Square R/4, looking southeast at Wall 1563 (left) and its corner with Wall 1572 (right) (2010)
Panitz-Cohen and Mazar in Mazar et. al. (2020 v.2) - Photo 12.25 -
Smashed vessels in Room 1555 from Mazar et. al. (2020 v.2)
Photo 12.25
Square R/4, looking south at smashed vessels in Locus 1555b (2010)
Panitz-Cohen and Mazar in Mazar et. al. (2020 v.2)
- Plan: Fig. 12.9
- Section: Fig. 12.97
- Photos 12.23–12.25
- Pottery: Figs. 13.10–13.11
The 18 restored vessels from Locus 1555b (Figs. 13.10–13.11; photo on p. 270) were attributed to Room 1555 of Stratum C-2, based on the relation of the debris layer (1555a) and the top of the pottery layer (1555b) to the surrounding walls. As such, this would be the only case where an assemblage of restorable vessels could be attributed to Stratum C-2 and the only evidence for a sudden destruction at the end of this occupation level, although no traces of fire were found; the cause might have been an earthquake. Yet, there is a certain dilemma concerning this pottery group. Unlike much of the other pottery from Stratum C-2, the vessels lacked red slip and burnish, and several were painted in a style typical of the Iron IB pottery at Tel Rehov. Typologically as well, the vessels suit an Iron IB date, although most forms also continued into Early Iron IIA. These factors, as well as the fact that the main bulk of the pottery was found at level 85.60 m, which is somewhat lower than the uppermost pits of Stratum D-3 (general Stratum VII) in the adjacent Square Q/4, raised initial doubts as to the attribution of this locus. If this pottery was on a layer relating to the debris of Locus 1555a and abutting the bottom of the room’s walls, it must belong to Stratum C-2. However, the possibility remains that this pottery concentration should be attributed to Stratum C-3a, the last Iron IB phase, in which case the thin debris layer 11428 might have been the surface on which the assemblage rested. In that case, Floor 11436 and Pits 11438 and 11439 would be attributed to an earlier phase, denoted Stratum C-3b, corresponding to the lower pits of Stratum D-3; if so, then the pottery concentration preceded the walls of the room as defined above. This is not entirely impossible when considering the location of this pottery concentration in relation to the bottom of these walls (see section, Fig. 12.97). However, in that case, Room 1555 would remain without a floor, despite the good preservation of its walls. Another problem with this explanation is that floors attributed to Stratum C-2 east of Room 1555 (in Square S/4) are almost at the same level or even lower than the pottery in Locus 1555b. Ultimately, this unique assemblage was assigned to Stratum C-2, while acknowledging that the pottery types could be either Iron IB or Early Iron IIA, demonstrating the continuity between these two periods, as discussed in Chapter 24.
West of Square R/4, where the steep western slope of the mound started, was the border between Areas C and D. In Squares R–Q/4–5 of Area D, architectural elements attributed to Stratum D-2 continued until the erosion line down the slope, with no evidence for a defense line of any sort. These remains were contemporary with Stratum C-2 and thus, we concluded that the city had not been fortified at that time.
- Figure 12.9 -
Plan of Stratum C-2 (west) from Mazar et. al. (2020 v.2)
Figure 12.9
Plan of Stratum C-2, west; area in Squares Y/1–2 cut by apiary (1:125)
Panitz-Cohen and Mazar in Mazar et. al. (2020 v.2) - Figure 12.10 -
Plan of Buildings CA and CB in Stratum C-2 from Mazar et. al. (2020 v.2)
Figure 12.10
Plan of Buildings CA and CB, Stratum C-2 (1:75)
Panitz-Cohen and Mazar in Mazar et. al. (2020 v.2) - Figure 12.65 -
Section 11 from Mazar et. al. (2020 v.2)
Figure 12.65
Section 11 (Squares T/1–4, looking west); the section in Square T/3 north of Walls 1448/4439 was drawn on a line east of Wall 1506
Panitz-Cohen and Mazar in Mazar et. al. (2020 v.2) - Figure 12.66 -
Section 12 from Mazar et. al. (2020 v.2)
Figure 12.66
Section 12 (Square S/4, looking east at walls)
Panitz-Cohen and Mazar in Mazar et. al. (2020 v.2) - Figure 12.67 -
Section 13 from Mazar et. al. (2020 v.2)
Figure 12.67
Section 13 (Square S/3, section below Wall 1448, looking south)
Panitz-Cohen and Mazar in Mazar et. al. (2020 v.2) - Figure 12.68 -
Section 14 from Mazar et. al. (2020 v.2)
Figure 12.68
Section 14 (Square T/3, looking north)
Panitz-Cohen and Mazar in Mazar et. al. (2020 v.2) - Photo 12.27 -
Looking south at Buildings CA and CB in Stratum C-2 from Mazar et. al. (2020 v.2)
Photo 12.27
View of C-2 Building CA, looking south; C-2 Building CB on the south (2000)
Panitz-Cohen and Mazar in Mazar et. al. (2020 v.2) - Photo 12.28 -
Looking south at Building CA in Stratum C-2 with a bulge in Wall 4439 from Mazar et. al. (2020 v.2)
Photo 12.28
Southeastern part of C-2 Building CA, looking south; C-1b Wall 1448 above repair line covering Wall 4439 (2000)
JW: Walls 4439 is bulging
Panitz-Cohen and Mazar in Mazar et. al. (2020 v.2) - Photo 12.29 -
Room 4426 in Building CA in Stratum C-2 with burnt grain on the floor from Mazar et. al. (2020 v.2)
Photo 12.29
Room 4426 in C-2 Building CA, looking southwest; burnt grain on floor (2000)
Panitz-Cohen and Mazar in Mazar et. al. (2020 v.2) - Photo 12.30 -
Buildings CA and CB in Stratum C-2 looking south from Mazar et. al. (2020 v.2)
Photo 12.30
C-2 Building CB adjoining Building CA on the south, looking south (2000)
Panitz-Cohen and Mazar in Mazar et. al. (2020 v.2)
- Plans: Figs. 12.9–12.10
- Sections: Figs. 12.65–12.68
- Photos 12.4–12.5, 12.27–12.30
- Pottery: Figs. 13.13–13.14
- Figure 12.9 -
Plan of Stratum C-2 (west) from Mazar et. al. (2020 v.2)
Figure 12.9
Plan of Stratum C-2, west; area in Squares Y/1–2 cut by apiary (1:125)
Panitz-Cohen and Mazar in Mazar et. al. (2020 v.2) - Figure 12.10 -
Plan of Buildings CA and CB in Stratum C-2 from Mazar et. al. (2020 v.2)
Figure 12.10
Plan of Buildings CA and CB, Stratum C-2 (1:75)
Panitz-Cohen and Mazar in Mazar et. al. (2020 v.2) - Figure 12.65 -
Section 11 from Mazar et. al. (2020 v.2)
Figure 12.65
Section 11 (Squares T/1–4, looking west); the section in Square T/3 north of Walls 1448/4439 was drawn on a line east of Wall 1506
Panitz-Cohen and Mazar in Mazar et. al. (2020 v.2) - Figure 12.69 -
Section 15 from Mazar et. al. (2020 v.2)
Figure 12.69
Section 15 (Squares S–Y/2, looking north) (1:55)
Panitz-Cohen and Mazar in Mazar et. al. (2020 v.2) - Figure 12.77 -
Section 23 from Mazar et. al. (2020 v.2)
Figure 12.77
Section 23 (Square Y/3, section below Wall 2411, looking east)
Panitz-Cohen and Mazar in Mazar et. al. (2020 v.2) - Figure 12.79 -
Section 25 from Mazar et. al. (2020 v.2)
Figure 12.79
Section 25 (Squares T–Y/3, looking south)
Panitz-Cohen and Mazar in Mazar et. al. (2020 v.2) - Photo 12.30 -
Buildings CA and CB in Stratum C-2 looking south from Mazar et. al. (2020 v.2)
Photo 12.30
C-2 Building CB adjoining Building CA on the south, looking south (2000)
Panitz-Cohen and Mazar in Mazar et. al. (2020 v.2) - Photo 12.31 -
Wall 2505 from Mazar et. al. (2020 v.2)
Photo 12.31
C-2 Building CB, looking east; Wall 2505 with entrance (1998)
Panitz-Cohen and Mazar in Mazar et. al. (2020 v.2) - Photo 12.32 -
Wall 2505 from Mazar et. al. (2020 v.2)
Photo 12.32
C-2 Building CB, entrance in Wall 2505, superimposed by C-1 Wall 1416 of Building CG, looking west (2000)
Panitz-Cohen and Mazar in Mazar et. al. (2020 v.2) - Photo 12.33 -
Wall 2505 from Mazar et. al. (2020 v.2)
Photo 12.33
C-2 Building CB, close-up of entrance in Wall 2505, looking west (2000)
Panitz-Cohen and Mazar in Mazar et. al. (2020 v.2) - Photo 12.34 -
Central Hall from Mazar et. al. (2020 v.2)
Photo 12.34
C-2 Building CB, central hall, looking south (1998)
Panitz-Cohen and Mazar in Mazar et. al. (2020 v.2) - Photo 12.35 -
Split between northern walls 1442 and 1483 of Building CB - possibly due to an earthquake - from Mazar et. al. (2020 v.2)
Photo 12.35
C-2 Building CB, northern wall; note possible earthquake damage (1998)
JW: The earthquake damage alluded to is the split between walls 1442 and 1483
Panitz-Cohen and Mazar in Mazar et. al. (2020 v.2) - Photo 12.36 -
Lamp in niche of Wall 1483 - from Mazar et. al. (2020 v.2)
Photo 12.36
C-2 Building CB; intact lamp in niche in the western doorjamb of entrance in Wall 1483, looking north (1998)
Panitz-Cohen and Mazar in Mazar et. al. (2020 v.2) - Photo 12.37 -
Large Tumbled Stone in Building CB from Mazar et. al. (2020 v.2)
Photo 12.37
C-2 Building CB; large stone south of entrance in Wall 1483, looking north (1998)
Panitz-Cohen and Mazar in Mazar et. al. (2020 v.2) - Photo 12.38 -
Wall 2481 from Mazar et. al. (2020 v.2)
Photo 12.38
C-2 Building CB Wall 2481 below Room 2444 of C-1 Building CG, looking east; note intentionally removed bricks in Wall 2481 (1998)
Panitz-Cohen and Mazar in Mazar et. al. (2020 v.2) - Photo 12.39 -
Tilted Stratum C-1 Wall 2411 overlying Stratum C-2 Wall 5476 from Mazar et. al. (2020 v.2)
Photo 12.39
Square Y/3, looking west at C-1 Building CG; C-2 walls below wood in foundation (2008)
Panitz-Cohen and Mazar in Mazar et. al. (2020 v.2)
- Plans: Figs. 12.9–12.10
- Sections: Figs.12.65, 12.69, 12.77, 12.79
- Photos 12.3–12.5, 12.8, 12.15–12.16, 12.30–12.39
- Pottery: Figs. 13.15–13.18
- Figure 12.12 -
Plan of Stratum C-2 from Mazar et. al. (2020 v.2)
Figure 12.12
Plan of Stratum C-2, northeast (1:125)
Panitz-Cohen and Mazar in Mazar et. al. (2020 v.2) - Figure 12.62 -
Section 8 from Mazar et. al. (2020 v.2)
Figure 12.62
Section 8 (Square Y/5, looking north)
Panitz-Cohen and Mazar in Mazar et. al. (2020 v.2) - Figure 12.63 -
Section 9 from Mazar et. al. (2020 v.2)
Figure 12.63
Section 9 (Square Y/5, looking west)
Panitz-Cohen and Mazar in Mazar et. al. (2020 v.2) - Figure 12.64 -
Section 10 from Mazar et. al. (2020 v.2)
Figure 12.64
Section 10 (Square T/4, looking east)
Panitz-Cohen and Mazar in Mazar et. al. (2020 v.2) - Photo 12.40 -
Tilted C1-b Wall 2454 on top of C-2 Wall 6441 from Mazar et. al. (2020 v.2)
Photo 12.40
Building CE, looking at eastern wall (2003)
Panitz-Cohen and Mazar in Mazar et. al. (2020 v.2) - Photo 12.41 -
Building CE from Mazar et. al. (2020 v.2)
Photo 12.41
Building CE, looking southeast; Stratum C-2 walls below Stratum C-1 walls (2003)
Panitz-Cohen and Mazar in Mazar et. al. (2020 v.2) - Photo 12.42 -
fallen bricks and debris in Room 6464 from Mazar et. al. (2020 v.2)
Photo 12.42
C-2 Building CE, looking east; fallen bricks and debris in Room 6464 (2003)
Panitz-Cohen and Mazar in Mazar et. al. (2020 v.2) - Photo 12.43 -
from Mazar et. al. (2020 v.2)
Photo 12.43
Squares Y-Z/4-6, looking south; right: northern spaces of Building CE; center: Stratum C-2 Building CU below C-1 Building CF (2005)
Panitz-Cohen and Mazar in Mazar et. al. (2020 v.2)
- Plan: Fig. 12.12
- Section: Figs. 12.62–12.64
- Photos 12.40–12.43
- Pottery: Fig. 13.22
- Figure 12.12 -
Plan of Stratum C-2 from Mazar et. al. (2020 v.2)
Figure 12.12
Plan of Stratum C-2, northeast (1:125)
Panitz-Cohen and Mazar in Mazar et. al. (2020 v.2) - Figure 12.14 -
Plan of Building CY, Stratum C-2 from Mazar et. al. (2020 v.2)
Figure 12.14
Plan of Building CY, Stratum C-2 (1:75)
Panitz-Cohen and Mazar in Mazar et. al. (2020 v.2) - Figure 12.55 -
Section 1 from Mazar et. al. (2020 v.2)
Figure 12.55
Section 1 (Squares A/6–C/6, looking north)
Panitz-Cohen and Mazar in Mazar et. al. (2020 v.2) - Figure 12.56 -
Section 2 from Mazar et. al. (2020 v.2)
Figure 12.56
Section 2 (Squares B/5–6, section below C-1 Walls 6420 and 6476, and below C-2 Wall 7506, looking west)
Panitz-Cohen and Mazar in Mazar et. al. (2020 v.2) - Photo 12.58 -
Building CY in Stratum C-2 from Mazar et. al. (2020 v.2)
Photo 12.58
C-2 Building CY, looking west; meter stick on Floor 7512 (2007)
Panitz-Cohen and Mazar in Mazar et. al. (2020 v.2) - Photo 12.59 -
Wall 7511 in Stratum C-2 from Mazar et. al. (2020 v.2)
Photo 12.59
C-2 Building CY, looking south at Wall 7511, covered by wood in foundation of C-1 Wall 6444 (2007)
Panitz-Cohen and Mazar in Mazar et. al. (2020 v.2) - Photo 12.60 -
Closeup on Wall 7511 in Stratum C-2 from Mazar et. al. (2020 v.2)
Photo 12.60
Detail of Wall 7511 (see Photo 12.59), looking southwest (2007)
Panitz-Cohen and Mazar in Mazar et. al. (2020 v.2) - Photo 12.61 -
brick collapse 10412 from Mazar et. al. (2020 v.2)
Photo 12.61
C-2 Building CY, stones along northern face of Wall 7511, looking south; brick collapse 10412 in center (2010)
Panitz-Cohen and Mazar in Mazar et. al. (2020 v.2) - Photo 12.62 -
Building CY from Mazar et. al. (2020 v.2)
Photo 12.62
C-2 Building CY, looking east; note blocked entrance to Room 8479; meter stick on Floor 7512 (2007)
Panitz-Cohen and Mazar in Mazar et. al. (2020 v.2) - Photo 12.63 -
Building CY from Mazar et. al. (2020 v.2)
Photo 12.63
. Eastern part of C-2 Building CY, looking south; note blockage of Room 8479 in center; meter stick on Floor 8488 (2007)
Panitz-Cohen and Mazar in Mazar et. al. (2020 v.2)
- Plan: Figs. 12.12, 12.14
- Section: Figs. 12.55–12.56
- Photos 12.58–12.63
- Pottery: Figs. 13.34–13.37
- Figure 12.9 -
Plan of Stratum C-2 from Mazar et. al. (2020 v.2)
Figure 12.9
Plan of Stratum C-2, west; area in Squares Y/1–2 cut by apiary (1:125)
Panitz-Cohen and Mazar in Mazar et. al. (2020 v.2)
The plan of Stratum C-2 included densely built units of varying architectural plans, most of which were adjoined and all built of the same type of hard yellow bricks. Notable were the absence of stone foundations for the brick walls and the architectural plans which, although fragmentary in most cases, appear to differ from most known Iron Age II buildings in northern Israel. Moreover, they differ from each other, so that each structure was unique.
The finds included red-slipped and hand-burnished, as well as red-painted pottery, mostly sherds, aside from sporadic complete vessels. The single locus that yielded restorable pottery (Locus 1555b with 18 vessels) is stratigraphically attributed to Stratum C-2, while the pottery types recall late Iron IB forms that continued into Iron IIA (see Chapter 24). Additional finds included several clay figurines, seals, three inscriptions (one on an almost-complete storage jar), and iron and bronze objects.
Stratum C-2 appears to have lasted a long time, as evidenced by the thick accumulation of striations in the open areas and inside several of the buildings. Only in three places was there clear evidence of two phases (Buildings CT, CE, and perhaps, the partial unit in Squares Y/3–4) and it is possible that most of the well-built units simply continued to be used, with very minor renovations, during the entire occupation phase.
The lack of Stratum C-2 remains in the area of the apiary of Stratum C-1b (Squares Y–Z/1–2) must be explained as resulting from their intentional removal by the builders of the apiary when they established it on a lower level than the surrounding buildings. This was evidenced by the existence of Stratum C-2 building remains west, north and northeast of the apiary area. It should be noted that the Stratum C-2 floor west of the apiary in Square T/1 was ca. 1.0 m higher than the apiary floor, while in Square B/3 (northeast of the apiary), it was almost at the same level as that of the apiary floor. This comprises additional evidence for the tilt towards the east or southeast, observed in other cases at Tel Rehov as well.
The termination of Stratum C-2 appears to have been brought about by an earthquake, based on the fact that many of the walls showed signs of damage, such as cracks, tilts and sinkage, as well as the large amount of fallen bricks consistently found on the floors in each unit. A possibility is that some of this damage was gradual and not cataclysmic, generating local renovations and internal changes during the course of this stratum. Aside from the layer in Room 1555 (Square R/4) with its 18 complete smashed vessels, the relative lack of whole vessels and other finds in situ on the floors suggests that the final termination of this occupation did not take the inhabitants by surprise and that they had enough time to evacuate. We may think of a series of earthquakes that caused the abandonment and demolition of the houses, some taking place after the abandonment of the town.
- Fig. 12.18 -
Plan of Stratum C-1b from Mazar et. al. (2020 v.2)
Fig. 12.18
Plan of Stratum C-1b (1:200)
Mazar et. al. (2020 v.2) - Fig. 12.19 -
Plan of Stratum C-1a from Mazar et. al. (2020 v.2)
Fig. 12.19
Plan of Stratum C-1a (1:200)
Mazar et. al. (2020 v.2) - Fig. 12.23 -
Isometric view of Area C, Stratum C-1a, looking northwest from Mazar et. al. (2020 v.2)
Fig. 12.23
Isometric view of Area C, Stratum C-1a, looking northwest
Mazar et. al. (2020 v.2)
- Plans: Figs. 12.16–12.53
In the western and northern parts of Area C, the continuity between Strata C-1b and C-1a was marked and, in fact, both should be considered phases of one city, with most of the changes being floor raisings and minor adjustments of walls (Fig. 12.17). However, in the southeastern quarter of the area, the apiary, Building CM and buildings to their east went of use and were replaced by entirely new buildings in Stratum C-1a. Due to this situation, the following description is organized by units, detailing the phases within them that are attributed to C-1b and C-1a. The units of Strata C-1b and C-1a in the southeast of the area are described at the end in separate sections.
Altogether, 23 architectural units were defined; they are presented below according to four main parts.
- Figure 12.24 -
Plan of Stratum C-1b from Mazar et. al. (2020 v.2)
Figure 12.9
Plan of Stratum C-1b, west (1:125)
Panitz-Cohen and Mazar in Mazar et. al. (2020 v.2) - Figure 12.25 -
Plan of Stratum C-1a from Mazar et. al. (2020 v.2)
Figure 12.9
Plan of Stratum C-1a, west (1:125)
Panitz-Cohen and Mazar in Mazar et. al. (2020 v.2) - Figure 12.97 -
Section 43 (Square R/4, looking north) from Mazar et. al. (2020 v.2)
Figure 12.97
Section 43 (Square R/4, looking north)
Panitz-Cohen and Mazar in Mazar et. al. (2020 v.2) - Photo 12.64 -
Square R/4 from Mazar et. al. (2020 v.2)
Photo 12.64
Square R/4, looking south, before removal of balk between Squares R–Q/4 (on right); meter stick on C-1b Locus 2446 (compare Photo 12.23 for lower levels in this square) (2000)
Panitz-Cohen and Mazar in Mazar et. al. (2020 v.2) - Photo 12.65 -
Square R/4 from Mazar et. al. (2020 v.2)
Photo 12.65
Square R/4; C-1a Room 2442, with plaster patch, looking north (1998)
Panitz-Cohen and Mazar in Mazar et. al. (2020 v.2)
- Plan: Figs. 12.24–12.25
- Section: Fig. 12.97
- Photos 12.8, 12.64–12.65
- Pottery: C-1b — Fig. 13.40:8–12; C-1a — Figs. 13.68–13.70
- Figure 12.24 -
Plan of Stratum C-1b from Mazar et. al. (2020 v.2)
Figure 12.24
Plan of Stratum C-1b, west (1:125)
Panitz-Cohen and Mazar in Mazar et. al. (2020 v.2) - Figure 12.65 -
Section 11 from Mazar et. al. (2020 v.2)
Figure 12.65
Section 11 (Squares T/1–4, looking west); the section in Square T/3 north of Walls 1448/4439 was drawn on a line east of Wall 1506
Panitz-Cohen and Mazar in Mazar et. al. (2020 v.2) - Figure 12.66 -
Section 12 from Mazar et. al. (2020 v.2)
Figure 12.66
Section 12 (Square S/4, looking east at walls)
Panitz-Cohen and Mazar in Mazar et. al. (2020 v.2) - Figure 12.67 -
Section 13 from Mazar et. al. (2020 v.2)
Figure 12.67
Section 13 (Square S/3, section below Wall 1448, looking south)
Panitz-Cohen and Mazar in Mazar et. al. (2020 v.2) - Figure 12.68 -
Section 14 from Mazar et. al. (2020 v.2)
Figure 12.67
Section 14 (Square T/3, looking north)
Panitz-Cohen and Mazar in Mazar et. al. (2020 v.2) - Photo 12.66 -
Tilted Wall 2495 in C-1b Building CD excavation from Mazar et. al. (2020 v.2)
Photo 12.66
C-1b Building CD, looking east; Wall 2495 above C-2 Wall 4434 (2000)
Panitz-Cohen and Mazar in Mazar et. al. (2020 v.2)
- Plan: Fig. 12.24
- Section: Figs. 12.65–12.68
- Photos 12.66
- Pottery: Fig. 13.41
- Figure 12.25 -
Plan of Stratum C-1a from Mazar et. al. (2020 v.2)
Figure 12.25
Plan of Stratum C-1a, west (1:125)
Panitz-Cohen and Mazar in Mazar et. al. (2020 v.2) - Figure 12.65 -
Section 11 from Mazar et. al. (2020 v.2)
Figure 12.65
Section 11 (Squares T/1–4, looking west); the section in Square T/3 north of Walls 1448/4439 was drawn on a line east of Wall 1506
Panitz-Cohen and Mazar in Mazar et. al. (2020 v.2) - Figure 12.69 -
Section 15 from Mazar et. al. (2020 v.2)
Figure 12.69
Section 15 (Squares S–Y/2, looking north) (1:55)
Panitz-Cohen and Mazar in Mazar et. al. (2020 v.2) - Photo 12.70 -
C-1a Piazza CK from Mazar et. al. (2020 v.2)
Photo 12.70
C-1a Piazza CK, looking east; lower center: Stones 1427 and 1496 (1997)
Panitz-Cohen and Mazar in Mazar et. al. (2020 v.2) - Photo 12.71 -
C-1a Piazza CK from Mazar et. al. (2020 v.2)
Photo 12.71
C-1a Piazza CK, looking south; Stones 1496, with cooking pots in the center (1997)
Panitz-Cohen and Mazar in Mazar et. al. (2020 v.2)
- Plan: Fig. 12.25
- Section: Figs. 12.65, 12.69
- Photos 12.70–12.71
- Pottery: Figs. 13.71–13.72
- Figure 12.27 -
Plan of Stratum C-1b from Mazar et. al. (2020 v.2)
Figure 12.27
Plan of Stratum C-1b, north-center (1:125)
Panitz-Cohen and Mazar in Mazar et. al. (2020 v.2) - Figure 12.28 -
Plan of Stratum C-1a from Mazar et. al. (2020 v.2)
Figure 12.28
Plan of Stratum C-1a, north-center (1:125)
Panitz-Cohen and Mazar in Mazar et. al. (2020 v.2) - Figure 12.62 -
Section 8 from Mazar et. al. (2020 v.2)
Figure 12.62
Section 8 (Square Y/5, looking north)
Panitz-Cohen and Mazar in Mazar et. al. (2020 v.2) - Figure 12.63 -
Section 9 from Mazar et. al. (2020 v.2)
Figure 12.63
Section 9 (Square Y/5, looking west)
Panitz-Cohen and Mazar in Mazar et. al. (2020 v.2) - Figure 12.64 -
Section 10 from Mazar et. al. (2020 v.2)
Figure 12.64
Section 10 (Square T/4, looking east)
Panitz-Cohen and Mazar in Mazar et. al. (2020 v.2) - Photo 12.75 -
Buildings CE, CF and CG from Mazar et. al. (2020 v.2)
Photo 12.75
Squares T–Z, A/3–5, general view to southeast; Buildings CE, CF and CG (2003)
Panitz-Cohen and Mazar in Mazar et. al. (2020 v.2) - Photo 12.76 -
Building CE, C-1b Room 2489 from Mazar et. al. (2020 v.2)
Photo 12.76
Building CE, C-1b Room 2489, looking north (1998)
Panitz-Cohen and Mazar in Mazar et. al. (2020 v.2) - Photo 12.77 -
Building CE, looking east at Wall 2454 from Mazar et. al. (2020 v.2)
Photo 12.77
Building CE, looking east at Wall 2454; note marginal bosses on bricks and wood in foundation (2003)
Panitz-Cohen and Mazar in Mazar et. al. (2020 v.2) - Photo 12.78 -
Building CE; corner of Walls 2454 and 1491 from Mazar et. al. (2020 v.2)
Photo 12.78
Building CE; corner of Walls 2454 and 1491, looking northeast (2003)
Panitz-Cohen and Mazar in Mazar et. al. (2020 v.2) - Photo 12.79 -
Building CE, C-1a Room 1471 from Mazar et. al. (2020 v.2)
Photo 12.79
Building CE, C-1a Room 1471, looking west (1997)
Panitz-Cohen and Mazar in Mazar et. al. (2020 v.2) - Photo 12.80 -
Northern rooms of Building CE from Mazar et. al. (2020 v.2)
Photo 12.80
Squares Y/5-6, northern rooms of Building CE, looking east (2003)
Panitz-Cohen and Mazar in Mazar et. al. (2020 v.2) - Photo 12.81 -
Building CE, Stratum C-1b, Room 6449 from Mazar et. al. (2020 v.2)
Photo 12.81
Building CE, Stratum C-1b, Room 6449, near corner of Walls 2454 and 1491, looking east (2003)
Panitz-Cohen and Mazar in Mazar et. al. (2020 v.2) - Photo 12.82 -
Destruction debris inBuilding CE, C-1b Room 6449 from Mazar et. al. (2020 v.2)
Photo 12.82
Building CE, C-1b Room 6449, looking south at bricks against Wall 1491 and chalices in destruction debris (2003)
Panitz-Cohen and Mazar in Mazar et. al. (2020 v.2) - Photo 12.83 -
Detail of marginal bosses on bricks in C-1b Wall 6452 from Mazar et. al. (2020 v.2)
Photo 12.83
Building CE, detail of marginal bosses on bricks in C-1b Wall 6452 (2003)
Panitz-Cohen and Mazar in Mazar et. al. (2020 v.2) - Photo 12.84 -
Building CE, C-1a Room 6433 from Mazar et. al. (2020 v.2)
Photo 12.84
Building CE, C-1a Room 6433, looking south at corner of Walls 1491 and 2454 (2003)
Panitz-Cohen and Mazar in Mazar et. al. (2020 v.2) - Photo 12.87 -
C-1 Building CR from Mazar et. al. (2020 v.2)
Photo 12.87
Squares Y–Z/6, looking south at southwestern corner of C-1 Building CR, cut by Pit 6498 (2005)
Panitz-Cohen and Mazar in Mazar et. al. (2020 v.2)
- Plan: Figs. 12.27–12.28
- Section: Figs. 12.62–12.64
- Photos 12.75–12.84, 12.87
- Pottery: C-1b — Figs. 13.44–13.45; C-1a — Figs. 13.75–13.76
- Figure 12.27 -
Plan of Stratum C-1b from Mazar et. al. (2020 v.2)
Figure 12.27
Plan of Stratum C-1b, north-center (1:125)
Panitz-Cohen and Mazar in Mazar et. al. (2020 v.2) - Figure 12.28 -
Plan of Stratum C-1a from Mazar et. al. (2020 v.2)
Figure 12.28
Plan of Stratum C-1a, north-center (1:125)
Panitz-Cohen and Mazar in Mazar et. al. (2020 v.2) - Figure 12.33 -
Plan of Building CR, early phase of Stratum C-1b from Mazar et. al. (2020 v.2)
Figure 12.33
Plan of Building CR, early phase of Stratum C-1b; the pits in Squares A, Z/6 are possibly an interim phase between Strata C-2 and C-1b (1:100)
Panitz-Cohen and Mazar in Mazar et. al. (2020 v.2) - Figure 12.34 -
Plan of Stratum C-1b from Mazar et. al. (2020 v.2)
Figure 12.34
Plan of Stratum C-1b, northeast (1:125)
Panitz-Cohen and Mazar in Mazar et. al. (2020 v.2) - Figure 12.35 -
Plan of Stratum C-1a from Mazar et. al. (2020 v.2)
Figure 12.35
Plan of Stratum C-1a, northeast (1:125)
Panitz-Cohen and Mazar in Mazar et. al. (2020 v.2) - Figure 12.36 -
Plan of Building CF, Stratum C-1a from Mazar et. al. (2020 v.2)
Figure 12.36
Plan of Building CF, Stratum C-1a (1:75)
Panitz-Cohen and Mazar in Mazar et. al. (2020 v.2) - Photo 12.85 -
Square Z/6, looking north at C-1a, C-1b and C-2 walls from Mazar et. al. (2020 v.2)
Photo 12.85
Square Z/6, looking north at C-1a, C-1b and C-2 walls (2003)
Panitz-Cohen and Mazar in Mazar et. al. (2020 v.2) - Photo 12.86 -
Square Z/6 from Mazar et. al. (2020 v.2)
Photo 12.86
Square Z/6, looking south; meter stick in entrance corridor of C-2 Building CU (2005)
Panitz-Cohen and Mazar in Mazar et. al. (2020 v.2) - Photo 12.87 -
Squares Y–Z/6 from Mazar et. al. (2020 v.2)
Photo 12.87
Squares Y–Z/6, looking south at southwestern corner of C-1 Building CR, cut by Pit 6498 (2005)
Panitz-Cohen and Mazar in Mazar et. al. (2020 v.2) - Photo 12.88 -
Fractured and displaced blocks of Building CR, late phase of C-1b from Mazar et. al. (2020 v.2)
Photo 12.88
Building CR, late phase of C-1b; bricks of 6512, looking east (2005)
JW: Note fractured and displaced blocks
Panitz-Cohen and Mazar in Mazar et. al. (2020 v.2) - Photo 12.89 -
Broken Jugs and charred beams in Building CR, C-1a Room 6468 from Mazar et. al. (2020 v.2)
Photo 12.89
Building CR, C-1a Room 6468, looking south; concentration of jugs along Wall 6461 and charred beams to left (east) (2003)
Panitz-Cohen and Mazar in Mazar et. al. (2020 v.2) - Photo 12.90 -
Building CR, C-1a Room 6468 from Mazar et. al. (2020 v.2)
Photo 12.90
Building CR, C-1a Room 6468, looking south, after removal of jugs seen in Photo 12.89 (2000)
Panitz-Cohen and Mazar in Mazar et. al. (2020 v.2) - Photo 12.91 -
Buildings CR, CF, and CG from Mazar et. al. (2020 v.2)
Photo 12.91
General view to south; foreground left: Building CF (2000)
Panitz-Cohen and Mazar in Mazar et. al. (2020 v.2)
- Plan: Fig. 12.27–12.29, 12.33–12.36
- Photos 12.85–12.91
- Pottery: C-1b — Fig.13.48:1–14; C-1a — Figs. 13.77–13.79
- Figure 12.33 -
Plan of Building CR, early phase of Stratum C-1b from Mazar et. al. (2020 v.2)
Figure 12.33
Plan of Building CR, early phase of Stratum C-1b; the pits in Squares A, Z/6 are possibly an interim phase between Strata C-2 and C-1b (1:100)
Panitz-Cohen and Mazar in Mazar et. al. (2020 v.2)
- Plan: Fig. 12.33
- Figure 12.27 -
Plan of Stratum C-1b from Mazar et. al. (2020 v.2)
Figure 12.27
Plan of Stratum C-1b, north-center (1:125)
Panitz-Cohen and Mazar in Mazar et. al. (2020 v.2) - Figure 12.34 -
Plan of Stratum C-1b from Mazar et. al. (2020 v.2)
Figure 12.34
Plan of Stratum C-1b, northeast (1:125)
Panitz-Cohen and Mazar in Mazar et. al. (2020 v.2)
- Plans: Figs. 12.27, 12.34
A layer of soft debris (6479) above the floor included several high quality red-slipped and burnished bowl fragments (Fig. 13.48:1–4); its upper layer might have been a fill laid in preparation for the construction of the subsequent phase.
The western room (5459) did not undergo any change in this phase of Stratum C-1b. It contained a layer of brick debris and charcoal patches, with some bones and sherds. No clear floor level was discerned.
- Figure 12.28 -
Plan of Stratum C-1a from Mazar et. al. (2020 v.2)
Figure 12.28
Plan of Stratum C-1a, north-center (1:125)
Panitz-Cohen and Mazar in Mazar et. al. (2020 v.2) - Figure 12.35 -
Plan of Stratum C-1a from Mazar et. al. (2020 v.2)
Figure 12.35
Plan of Stratum C-1a, northeast (1:125)
Panitz-Cohen and Mazar in Mazar et. al. (2020 v.2) - Figure 12.36 -
Plan of Building CF, Stratum C-1a from Mazar et. al. (2020 v.2)
Figure 12.36
Plan of Building CF, Stratum C-1a (1:75)
Panitz-Cohen and Mazar in Mazar et. al. (2020 v.2)
- Plans: Figs. 12.28, 12.35–12.36
Floors of this stratum were found 0.7–0.8 m above those of the previous phase. The floor of the eastern room (6468) covered the top of Wall 6489, so that this room, like the western one, continued to the north beyond the limit of the excavation. In Room 6468, the floor was covered by a layer of burnt destruction debris, covered in turn by fallen bricks just below topsoil. This room contained 13 loomweights, including several that were arranged in a circle against the eastern face of Wall 6461, and others that surrounded two burnt wooden beams on a north–south axis that appeared to have belonged to a loom (Photos 12.89–12.90). Among the pottery vessels (Figs. 13.77–13.79) were seven jugs, two of which were finely red slipped and burnished (Fig. 13.79:6–7).
- Figure 12.27 -
Plan of Stratum C-1b from Mazar et. al. (2020 v.2)
Figure 12.27
Plan of Stratum C-1b, north-center (1:125)
Panitz-Cohen and Mazar in Mazar et. al. (2020 v.2) - Figure 12.28 -
Plan of Stratum C-1a from Mazar et. al. (2020 v.2)
Figure 12.28
Plan of Stratum C-1a, north-center (1:125)
Panitz-Cohen and Mazar in Mazar et. al. (2020 v.2) - Figure 12.29 -
Building CE, Stratum C-1b; corner of Walls 2454 and 1491 from Mazar et. al. (2020 v.2)
Figure 12.29
Building CE, Stratum C-1b; elevation: corner of Walls 2454 and 1491 (1:50)
Panitz-Cohen and Mazar in Mazar et. al. (2020 v.2) - Figure 12.33 -
Plan of Building CR, early phase of Stratum C-1b from Mazar et. al. (2020 v.2)
Figure 12.33
Plan of Building CR, early phase of Stratum C-1b; the pits in Squares A, Z/6 are possibly an interim phase between Strata C-2 and C-1b (1:100)
Panitz-Cohen and Mazar in Mazar et. al. (2020 v.2) - Figure 12.34 -
Plan of Stratum C-1b from Mazar et. al. (2020 v.2)
Figure 12.34
Plan of Stratum C-1b, northeast (1:125)
Panitz-Cohen and Mazar in Mazar et. al. (2020 v.2) - Figure 12.35 -
Plan of Stratum C-1a from Mazar et. al. (2020 v.2)
Figure 12.35
Plan of Stratum C-1a, northeast (1:125)
Panitz-Cohen and Mazar in Mazar et. al. (2020 v.2) - Figure 12.36 -
Plan of Building CF, Stratum C-1a from Mazar et. al. (2020 v.2)
Figure 12.36
Plan of Building CF, Stratum C-1a (1:75)
Panitz-Cohen and Mazar in Mazar et. al. (2020 v.2) - Figure 12.58 -
Section 4 from Mazar et. al. (2020 v.2)
Figure 12.58
Section 4 (Squares Z/5–6, looking east)
Panitz-Cohen and Mazar in Mazar et. al. (2020 v.2) - Figure 12.59 -
Section 5 from Mazar et. al. (2020 v.2)
Figure 12.59
Section 5 (Square Y/5, section below Bench 5472, looking west)
Panitz-Cohen and Mazar in Mazar et. al. (2020 v.2) - Figure 12.60 -
Section 6 from Mazar et. al. (2020 v.2)
Figure 12.60
Section 6 (Square Y/5, section below Wall 5431, looking south)
Panitz-Cohen and Mazar in Mazar et. al. (2020 v.2) - Figure 12.61 -
Section 7 from Mazar et. al. (2020 v.2)
Figure 12.61
Section 7 (Squares Y–Z/4, section below Bench 5468, looking south)
Panitz-Cohen and Mazar in Mazar et. al. (2020 v.2) - Photo 12.91 -
Buildings CR, CF, and CG from Mazar et. al. (2020 v.2)
Photo 12.91
General view to south; foreground left: Building CF (2000)
Panitz-Cohen and Mazar in Mazar et. al. (2020 v.2) - Photo 12.92 -
Building CF from Mazar et. al. (2020 v.2)
Photo 12.92
General view to south; center: Building CF (2003)
Panitz-Cohen and Mazar in Mazar et. al. (2020 v.2) - Photo 12.93 -
Eastern balk of Square Z/6 from Mazar et. al. (2020 v.2)
Photo 12.93
Eastern balk of Square Z/6, looking east at section through entrance corridor of Building CF; meter stick on C-2 level (2003)
Panitz-Cohen and Mazar in Mazar et. al. (2020 v.2) - Photo 12.94 -
Eastern part of Building CF from Mazar et. al. (2020 v.2)
Photo 12.94
Eastern part of Building CF, looking north at northern space and entranceway (with balk) (2003)
Panitz-Cohen and Mazar in Mazar et. al. (2020 v.2) - Photo 12.95 -
Section in the middle of Square Z/5 from Mazar et. al. (2020 v.2)
Photo 12.95
Section in the middle of Square Z/5, under Floor 5498 in C-1a Building CF, looking south (2003)
Panitz-Cohen and Mazar in Mazar et. al. (2020 v.2) - Photo 12.96 -
C-1a Building CF, broken pottery in southern part of Room 5498 from Mazar et. al. (2020 v.2)
Photo 12.96
C-1a Building CF, southern part of Room 5498, looking north; center: top of pottery model shrine, wooden beam (loom?) to its north (2001)
Panitz-Cohen and Mazar in Mazar et. al. (2020 v.2) - Photo 12.97 -
C-1a Building CF, Room 5498 from Mazar et. al. (2020 v.2)
Photo 12.97
C-1a Building CF, Room 5498, looking east at eastern section of Square Z/5 and detail of wooden beam; grinding installation 5456 on right (2003)
Panitz-Cohen and Mazar in Mazar et. al. (2020 v.2) - Photo 12.98 -
C-1a Building CF, Room 5498 from Mazar et. al. (2020 v.2)
Photo 12.98
C-1a Building CF, grinding installation 5456 in south of Room 5498, looking south; woman crouching west of installation, holding an upper grinding stone found nearby (2003)
Panitz-Cohen and Mazar in Mazar et. al. (2020 v.2) - Photo 12.99 -
C-1a Building CF, Room 5499 from Mazar et. al. (2020 v.2)
Photo 12.99
C-1a Building CF, Room 5499, looking east; note plastered walls and wooden beams incorporated in floor makeup (2003)
Panitz-Cohen and Mazar in Mazar et. al. (2020 v.2) - Photo 12.100 -
C-1a Building CF, below Room 5499 from Mazar et. al. (2020 v.2)
Photo 12.100
C-1a Building CF, below Room 5499, looking south; note wooden beams in foundation of Wall 5455 (2003)
Panitz-Cohen and Mazar in Mazar et. al. (2020 v.2) - Photo 12.101 -
Building CF from Mazar et. al. (2020 v.2)
Photo 12.101
Building CF, the western wing with bench rooms, looking south (2003)
Panitz-Cohen and Mazar in Mazar et. al. (2020 v.2) - Photo 12.102 -
Building CF from Mazar et. al. (2020 v.2)
Photo 12.102
Building CF, probe under C-1a Room 5444, looking east; C-2 Wall 6454 below (2003)
Panitz-Cohen and Mazar in Mazar et. al. (2020 v.2) - Photo 12.103 -
Building CF from Mazar et. al. (2020 v.2)
Photo 12.103
Building CF, probe under C-1a Room 5444, looking southwest, after removal of Bench 5468 and part of Bench 5469 (2003)
Panitz-Cohen and Mazar in Mazar et. al. (2020 v.2) - Photo 12.104 -
Building CF, C-1a Room 5444 from Mazar et. al. (2020 v.2)
Photo 12.104
Building CF, C-1a Room 5444, looking west at Wall 4422, after partial removal of Bench 5469 and layer of fallen ceiling material and rubble below (2003)
Panitz-Cohen and Mazar in Mazar et. al. (2020 v.2) - Photo 12.105 -
Building CF from Mazar et. al. (2020 v.2)
Photo 12.105
Building CF, detail of Photo 12.104 (2003)
Panitz-Cohen and Mazar in Mazar et. al. (2020 v.2) - Photo 12.106 -
Building CF, top of destruction debris 6401 in C-1a from Mazar et. al. (2020 v.2)
Photo 12.106
Building CF, looking south; top of destruction debris 6401 in C-1a; right: Room 6435 with grinding stone Installation 6406 (2003)
Panitz-Cohen and Mazar in Mazar et. al. (2020 v.2) - Photo 12.107 -
Building CF, grinding installation 6406 and destruction debris 6401 in Room 6435 from Mazar et. al. (2020 v.2)
Photo 12.107
Building CF, grinding installation 6406 and destruction debris 6401 in Room 6435, looking south (2003)
Panitz-Cohen and Mazar in Mazar et. al. (2020 v.2) - Photo 12.108 -
Building CF, fragments of altar from Mazar et. al. (2020 v.2)
Photo 12.108
Building CF, fragments of altar in topsoil of Room 6435 (2003)
Panitz-Cohen and Mazar in Mazar et. al. (2020 v.2) - Photo 12.109 -
Building CF, grinding installation 6406 in Room 6435 from Mazar et. al. (2020 v.2)
Photo 12.109
Building CF, grinding installation 6406 in Room 6435, looking southwest at western wing of building (2003)
Panitz-Cohen and Mazar in Mazar et. al. (2020 v.2) - Photo 12.110 -
Building CF, Stratum C-1a, grinding Installation 6406 in Room 6435 from Mazar et. al. (2020 v.2)
Photo 12.110
Building CF, Stratum C-1a, grinding Installation 6406 in Room 6435, looking west (2003)
Panitz-Cohen and Mazar in Mazar et. al. (2020 v.2) - Photo 12.111 -
Smashed vessels on floor of Room 5460 in Building CF from Mazar et. al. (2020 v.2)
Photo 12.111
Building CF, looking south at western wing; front; smashed vessels on floor of Room 5460; note bricks 5458 in Room 5445 to south (2001)
Panitz-Cohen and Mazar in Mazar et. al. (2020 v.2) - Photo 12.112 -
C-1a Building CF, Room 5444 from Mazar et. al. (2020 v.2)
Photo 12.112
C-1a Building CF, Room 5444 looking north; large pottery crate in northwestern corner (2001)
Panitz-Cohen and Mazar in Mazar et. al. (2020 v.2) - Photo 12.113 -
Room 5444 from Mazar et. al. (2020 v.2)
Photo 12.113
Room 5444, looking west; floor and benches exposed (2003)
Panitz-Cohen and Mazar in Mazar et. al. (2020 v.2)
- Plan: Figs. 12.27–12.28, 12.33–12.36
- Section: Figs. 12.58–12.61
- Photos 12.5–12.6, 12.91–12.113
- Pottery: C-1b — Figs. 13.46–13.47, C-1a — Figs. 13.80–13.96
- Figure 12.33 -
Plan of Building CR, early phase of Stratum C-1b from Mazar et. al. (2020 v.2)
Figure 12.33
Plan of Building CR, early phase of Stratum C-1b; the pits in Squares A, Z/6 are possibly an interim phase between Strata C-2 and C-1b (1:100)
Panitz-Cohen and Mazar in Mazar et. al. (2020 v.2)
- Plan: Fig. 12.33
- Figure 12.27 -
Plan of Stratum C-1b from Mazar et. al. (2020 v.2)
Figure 12.27
Plan of Stratum C-1b, north-center (1:125)
Panitz-Cohen and Mazar in Mazar et. al. (2020 v.2) - Figure 12.34 -
Plan of Stratum C-1b from Mazar et. al. (2020 v.2)
Figure 12.34
Plan of Stratum C-1b, northeast (1:125)
Panitz-Cohen and Mazar in Mazar et. al. (2020 v.2)
- Plan: Figs. 12.27, 12.34
- Figure 12.29 -
Building CE, Stratum C-1b; corner of Walls 2454 and 1491 from Mazar et. al. (2020 v.2)
Figure 12.29
Building CE, Stratum C-1b; elevation: corner of Walls 2454 and 1491 (1:50)
Panitz-Cohen and Mazar in Mazar et. al. (2020 v.2) - Figure 12.35 -
Plan of Stratum C-1a from Mazar et. al. (2020 v.2)
Figure 12.35
Plan of Stratum C-1a, northeast (1:125)
Panitz-Cohen and Mazar in Mazar et. al. (2020 v.2) - Figure 12.36 -
Plan of Building CF, Stratum C-1a from Mazar et. al. (2020 v.2)
Figure 12.36
Plan of Building CF, Stratum C-1a (1:75)
Panitz-Cohen and Mazar in Mazar et. al. (2020 v.2)
- Figs. 12.29, 12.35–12.36
- Figure 12.27 -
Plan of Stratum C-1b from Mazar et. al. (2020 v.2)
Figure 12.27
Plan of Stratum C-1b, north-center (1:125)
Panitz-Cohen and Mazar in Mazar et. al. (2020 v.2) - Figure 12.34 -
Plan of Stratum C-1b from Mazar et. al. (2020 v.2)
Figure 12.34
Plan of Stratum C-1b, northeast (1:125)
Panitz-Cohen and Mazar in Mazar et. al. (2020 v.2)
- Plan: Figs. 12.27, 12.34
The northern border of this space was Wall 6493, shared with Building CR (Photos 12.85, 12.91–12.92). On the east, it was bounded by Wall 6408, and on the south, by Wall 6482 (Photos 12.94, 12.116). No entrance in Wall 6482 that would have connected the northern space with the rooms to the south was found, but possibly one had existed above the two preserved courses of this wall.
The space enclosed by these walls contained a patchy floor of red, gray and white striations (6466) at level 86.10 m, with only a few sherds and bones (Photo 12.93). The floor was covered by a layer of soft brown earth (6450) which might have been a leveling fill in preparation for the construction of the Stratum C-1a floor above. Two smooth pink mizi limestone slabs were found on the floor level, one in Square Z/6 and another near the southeastern corner of the space. They were similar to the large stone found in Room 6465 to the south.
A curious feature revealed at the bottom level of the striations in this space was the presence of several very large, amorphic blocks of brick, with a particularly large one in the center (Fig. 12.58). It is possible that these were placed as a kind of leveler above the remains of C-2 Building CU, or were simply discarded during the construction of Building CF and covered by the earliest floor of that building.
- Figure 12.27 -
Plan of Stratum C-1b from Mazar et. al. (2020 v.2)
Figure 12.27
Plan of Stratum C-1b, north-center (1:125)
Panitz-Cohen and Mazar in Mazar et. al. (2020 v.2) - Figure 12.34 -
Plan of Stratum C-1b from Mazar et. al. (2020 v.2)
Figure 12.34
Plan of Stratum C-1b, northeast (1:125)
Panitz-Cohen and Mazar in Mazar et. al. (2020 v.2)
- Plan: Figs. 12.27, 12.34
- Figure 12.29 -
Building CE, Stratum C-1b; corner of Walls 2454 and 1491 (1:50) from Mazar et. al. (2020 v.2)
Figure 12.29
Building CE, Stratum C-1b; elevation: corner of Walls 2454 and 1491 (1:50)
Panitz-Cohen and Mazar in Mazar et. al. (2020 v.2) - Figure 12.35 -
Plan of Stratum C-1a from Mazar et. al. (2020 v.2)
Figure 12.35
Plan of Stratum C-1a, northeast (1:125)
Panitz-Cohen and Mazar in Mazar et. al. (2020 v.2) - Figure 12.36 -
Plan of Building CF, Stratum C-1a from Mazar et. al. (2020 v.2)
Figure 12.36
Plan of Building CF, Stratum C-1a (1:75)
Panitz-Cohen and Mazar in Mazar et. al. (2020 v.2)
- Plans: Figs. 12.29, 12.35–12.36
The slightly higher stump of the erstwhile northern wall (6482) created a situation wherein the floor (6427, 86.50 m) in the area of the former northern space was now 0.35 m higher than the floor (5498, 86.15 m) to the south of this wall; this discrepancy was probably bridged by wooden or brick steps. Floor 6427 in the north was composed of white lime, covered with burnt debris (6417). An oven (6421) was built in the center of the northern space, against the southern face of Wall 6410, about 1.0 m to the west of the location of Oven 7428 of Stratum C-2, yet 2.0 m higher (Photo 12.109). A storage jar (Fig. 13.90:10) and a krater (Fig. 13.84:2) were found right near it, resting on the floor. On the far eastern end of this space, opposite the entrance corridor, was a large, roughly squared, 0.3 m-tall, flat-topped stone. Numerous bones found on and nearby this stone suggest that it was possibly used as a butcher block (Photo 12.94).
Floor 5498 in the south (covering the area of C-1b Room 6465) was composed of thin mud plaster below a layer of soft reddish earth, which covered the top of the cut walls of Stratum C-1b. On the floor was a 0.7 m-thick layer of very burnt destruction debris (5416, 5429, 5439), containing fallen bricks, burnt brick debris, ash and charcoal, ceiling collapse, and 49 complete (restorable and intact) vessels (Figs. 13.80–13.95; Photo 12.96). Other finds included grinding stones and stone vessels, as well as 59 stone loomweights, mostly concentrated around a wooden beam that apparently represented a loom in the middle of this space (Photos 12.96–12.97; Fig. 12.35). To the north of this beam was a poorly preserved installation (5481) composed of a low, curving parapet of clay; to its north were short pieces of wood and numerous fragments of an oven or a low-fired clay vat; none of these elements could be reconstructed due to the fierce destruction. Built against the southern wall of this space (5437) was a grinding stone installation (5456), like that found in Room 6435 (6406) (Photos 12.96, 12.98), although this one was a semi-circle attached to the wall, while the latter was a complete oval (described below). This installation was composed of a low round-topped clay parapet, 0.9 m at its widest diameter, in which a large lower grinding stone was set on an east– west axis; it was not found tilted, as it was in Installation 6406. Two complete upper grinding stones were found nearby. A unique find in this room, located 1.5 m north of the entranceway in Wall 5437, was a pottery model shrine (Chapter 35, No. 36), resting directly on the floor, its opening facing north. Its upper part was broken off, found overturned just to the southeast of the lower part, with a Hippo jar (Fig. 13.92:3) lying smashed on top of it; another storage jar (Fig. 13.89:9) was found to its east (Photo 12.96). The top of the model shrine was adorned with a unique scene of figures in relief, showing what appears to be a lion(?) grasping two human heads in its claws. Inside the box was light gray ashy material that contained an animal jaw bone and a tooth. A jug containing grain (Fig. 13.93:5) was found in this room as well. Some grain was also found spilled on the floor near the abovementioned storage jars. Grain from the jug was submitted to 14C dating (Chapter 48, Sample R35); the average calibrated dates were 922–850 BCE (1σ) and 970–838 BCE (2σ).
- Figure 12.27 -
Plan of Stratum C-1b from Mazar et. al. (2020 v.2)
Figure 12.27
Plan of Stratum C-1b, north-center (1:125)
Panitz-Cohen and Mazar in Mazar et. al. (2020 v.2) - Figure 12.29 -
Building CE, Stratum C-1b; corner of Walls 2454 and 1491 (1:50) from Mazar et. al. (2020 v.2)
Figure 12.29
Building CE, Stratum C-1b; elevation: corner of Walls 2454 and 1491 (1:50)
Panitz-Cohen and Mazar in Mazar et. al. (2020 v.2) - Figure 12.35 -
Plan of Stratum C-1a from Mazar et. al. (2020 v.2)
Figure 12.35
Plan of Stratum C-1a, northeast (1:125)
Panitz-Cohen and Mazar in Mazar et. al. (2020 v.2) - Figure 12.36 -
Plan of Building CF, Stratum C-1a from Mazar et. al. (2020 v.2)
Figure 12.36
Plan of Building CF, Stratum C-1a (1:75)
Panitz-Cohen and Mazar in Mazar et. al. (2020 v.2)
- Plans: Figs. 12.27, 12.29, 12.35–12.36
The room was filled with almost 1.0 m of very burnt destruction debris; the top layer (5426) was virtually sterile and contained extremely hard brick material and fallen bricks, as well as ceiling material, while the remainder of the debris (5461) was extremely burnt and rich in finds, including 46 intact and smashed vessels (Figs. 13.80–13.95), 19 of them storage jars, which were mostly stacked against the eastern wall. One of these jars was found full of a powdery white substance, most likely an organic material that had burnt, while another contained grain. Additional finds included grinding stones and other worked stones, a large clay ‘footbath’ (Fig. 13.96a:11), and 15 loomweights, concentrated in the entranceway (5500) (Table 12.15). In the southeastern corner of the room was a concentration of extremely burnt pinkish brick that had pulverized. This appears to have been some installation that was too damaged by the fire to define.
- Figure 12.27 -
Plan of Stratum C-1b from Mazar et. al. (2020 v.2)
Figure 12.27
Plan of Stratum C-1b, north-center (1:125)
Panitz-Cohen and Mazar in Mazar et. al. (2020 v.2)
- Plan: Fig. 12.27
- Walls 4413 and 4422 (Squares Y–Z/4) had wooden beams incorporated in their foundations; this was a consistent characteristic typical of all Stratum C-1b construction in Area C, but was almost never found in walls that were first built in Stratum C-1a.
- The bricks in the lower courses of the northern face of Wall 4413 and eastern face of Wall 4422 (southern end) had two vertical protrusions, or marginal bosses, on each end, which was a characteristic found in other walls clearly dated to Stratum C-1b in the adjacent Building CE and in the unit north of Building CD (see above).
- The wooden beams incorporated in the foundation of Wall 4479, seen in its southern face in Square Z/4 and clearly related to Stratum C-1b, were probably, based on their levels, the continuation of the beams in the foundation of Wall 4413, which ran adjacent to it on the north and served as the inner southern wall of the western wing.
- The floors abutted the lowest course of these walls.
The length of the hall was 8.6–8.8 m (due to the angle of the southern wall, 4413) and its width, 2.7 m. Its interior was revealed only in probes under the floors and benches of Stratum C-1a (Figs. 12.59– 12.61; Photos 12.102–12.105). The lowest layer was 0.4 m-thick, composed of soft, smooth, burnt black material (5488, 5487, 5475, from north to south), which abutted the lowest course of the walls, on the level of the wooden beams in their foundations, as revealed in those spots where we removed the benches of the later phase. This black layer apparently represents the floor; directly below it were the remains of Stratum C-2 Building CU. Finds from this black layer included red-slipped and hand-burnished pottery, mostly sherds, but several complete or almost-complete vessels as well (Figs. 13.46–13.47), along with loomweights, beads, stoppers, grinding stones, bone objects and some grain (Table 12.14). This layer was covered by a 0.4 m-thick layer of burnt rubble (5478, 5479, 5463, from north to south), composed of hard burnt chunks of reddish brick, gray ash, bits of charcoal and large segments of collapsed ceiling material, some of which lay flat (Photos 12.102–12.105). This rubble abutted the surrounding walls in each room and was covered by a thin layer of whitish material (phytolith?), on which the Stratum C-1a floors, walls and benches were laid.
- Figure 12.29 -
Building CE, Stratum C-1b; corner of Walls 2454 and 1491 (1:50) from Mazar et. al. (2020 v.2)
Figure 12.29
Building CE, Stratum C-1b; elevation: corner of Walls 2454 and 1491 (1:50)
Panitz-Cohen and Mazar in Mazar et. al. (2020 v.2) - Figure 12.35 -
Plan of Stratum C-1a from Mazar et. al. (2020 v.2)
Figure 12.35
Plan of Stratum C-1a, northeast (1:125)
Panitz-Cohen and Mazar in Mazar et. al. (2020 v.2) - Figure 12.36 -
Plan of Building CF, Stratum C-1a from Mazar et. al. (2020 v.2)
Figure 12.36
Plan of Building CF, Stratum C-1a (1:75)
Panitz-Cohen and Mazar in Mazar et. al. (2020 v.2)
- Plans: Figs. 12.29, 12.35–12.36
Along the north–south walls were lines of bricks, most of them 0.35 m wide, while others were narrower (0.3 m) or wider (0.45 m). All were preserved 0.25–0.35 m high (two courses); their height above the abutting floors ranged from 0.1– 0.25 m, while in the northern room they were flush with the floor. These were understood as benches, and they joined with those found under the three east–west cross walls. The bottom level of the benches was ca. 0.65 m above that of the outer walls of the building to which they were attached, and they were clearly built on top of the rubble and collapse layer ascribed to Stratum C-1b, described above (Figs. 12.59–12.61). This rubble also abutted the very bottom of the benches, suggesting that they were slightly sunk into that debris when constructed. The north–south benches lining the eastern and western walls of this wing run on one continuous line. This was particularly noticeable on the east, where the bench ran contiguously along the western face of Wall 5414. The benches were all composed of identical bricks that had been burnt to an almost stone-like consistency and to a pinkish color.
The Stratum C-1a floors in each room were composed of white lime and abutted the upper course of the benches. On these floors was a thick layer of burnt destruction debris with many finds. Following is a description of the rooms from north to south (6435, 5460, 5445, 5444)
- Figure 12.34 -
Plan of Stratum C-1b from Mazar et. al. (2020 v.2)
Figure 12.34
Plan of Stratum C-1b, northeast (1:125)
Panitz-Cohen and Mazar in Mazar et. al. (2020 v.2) - Figure 12.35 -
Plan of Stratum C-1a from Mazar et. al. (2020 v.2)
Figure 12.35
Plan of Stratum C-1a, northeast (1:125)
Panitz-Cohen and Mazar in Mazar et. al. (2020 v.2) - Figure 12.38 -
Plan of Buildings CW, CQ1 and CQ3, Stratum C-1a from Mazar et. al. (2020 v.2)
Figure 12.38
Plan of Buildings CW, CQ1 and CQ3, Stratum C-1a (1:75)
Panitz-Cohen and Mazar in Mazar et. al. (2020 v.2) - Figure 12.55 -
Section 1 from Mazar et. al. (2020 v.2)
Figure 12.55
Section 1 (Squares A/6–C/6, looking north)
Panitz-Cohen and Mazar in Mazar et. al. (2020 v.2) - Figure 12.56 -
Section 2 from Mazar et. al. (2020 v.2)
Figure 12.56
Section 2 (Squares B/5–6, section below C-1 Walls 6420 and 6476, and below C-2 Wall 7506, looking west)
Panitz-Cohen and Mazar in Mazar et. al. (2020 v.2) - Photo 12.114 -
C-1a Buildings CW, CQ1, CQ2 (west half excavated) from Mazar et. al. (2020 v.2)
Photo 12.114
C-1a Buildings CW, CQ1, CQ2 (west half excavated), general view to southeast (2005)
Panitz-Cohen and Mazar in Mazar et. al. (2020 v.2) - Photo 12.115 -
Debris on Floor 8430 in C-1a Building CW Mazar et. al. (2020 v.2)
Photo 12.115
C-1a Building CW, eastern part, looking west (2007)
JW:Debris on floor 8430
Panitz-Cohen and Mazar in Mazar et. al. (2020 v.2) - Photo 12.116 -
C-1a Building CW, looking west, Rooms 6411 and 6438 from Mazar et. al. (2020 v.2)
Photo 12.116
C-1a Building CW, looking west, Rooms 6411 and 6438 (2003)
Panitz-Cohen and Mazar in Mazar et. al. (2020 v.2) - Photo 12.117 -
C-1a Building CW, looking south; destruction debris and vessels in Room 6411 from Mazar et. al. (2020 v.2)
Photo 12.117
C-1a Building CW, looking south; destruction debris and vessels in Room 6411 (2003)
Panitz-Cohen and Mazar in Mazar et. al. (2020 v.2) - Photo 12.118 -
C-1a Building CW, Room 6411 from Mazar et. al. (2020 v.2)
Photo 12.118
C-1a Building CW, Room 6411, looking west; concentration of loomweights on western end of Bench 6496 (2003)
Panitz-Cohen and Mazar in Mazar et. al. (2020 v.2) - Photo 12.119 -
C-1a Skeleton in Square C/6 from Mazar et. al. (2020 v.2)
Photo 12.119
Square C/6, skeleton (8472) east of Wall 8424 of C-1a Building CW, looking west (2007)
Panitz-Cohen and Mazar in Mazar et. al. (2020 v.2)
- Plans: Figs. 12.34–12.35, 12.38
- Sections: Figs. 12.55–12.56
- Photos 12.114–12.119
- Pottery: C-1b — Figs. 13.48:15–20; C-1a — Figs. 13.97–13.102
- Figure 12.34 -
Plan of Stratum C-1b from Mazar et. al. (2020 v.2)
Figure 12.34
Plan of Stratum C-1b, northeast (1:125)
Panitz-Cohen and Mazar in Mazar et. al. (2020 v.2) - Figure 12.35 -
Plan of Stratum C-1a from Mazar et. al. (2020 v.2)
Figure 12.35
Plan of Stratum C-1a, northeast (1:125)
Panitz-Cohen and Mazar in Mazar et. al. (2020 v.2) - Figure 12.57 -
Section 3 from Mazar et. al. (2020 v.2)
Figure 12.57
Section 3 (Squares A/4–5, looking east)
Panitz-Cohen and Mazar in Mazar et. al. (2020 v.2) - Photo 12.120 -
Wall 7413 of C-1a Building CQ2 tilted southward towards the street from Mazar et. al. (2020 v.2)
Photo 12.120
C-1a Buildings CQ1 and CQ2 and street (Squares Z, A–C/4) to their south, looking southwest (2007)
Panitz-Cohen and Mazar in Mazar et. al. (2020 v.2) - Photo 12.121 -
C-1a Building CQ1; destruction debris in western rooms from Mazar et. al. (2020 v.2)
Photo 12.121
C-1a Building CQ1, looking west; destruction debris in western rooms (2007)
Panitz-Cohen and Mazar in Mazar et. al. (2020 v.2) - Photo 12.122 -
C-1a Building CQ1 from Mazar et. al. (2020 v.2)
Photo 12.122
C-1a Building CQ1, looking west; floors of western rooms (see Photo 12.121) (2007)
Panitz-Cohen and Mazar in Mazar et. al. (2020 v.2) - Photo 12.123 -
Wall 7413 of C-1a Building CQ2 tilted southward from Mazar et. al. (2020 v.2)
Photo 12.123
C-1a Building CQ2, looking west; meter stick on Floor 7500 (2007)
Panitz-Cohen and Mazar in Mazar et. al. (2020 v.2) - Photo 12.124 -
C-1a Building CQ1; destruction debris in Room 7490 from Mazar et. al. (2020 v.2)
Photo 12.124
C-1a Building CQ2, looking west; destruction debris in Room 7490 (2005)
Panitz-Cohen and Mazar in Mazar et. al. (2020 v.2) - Photo 12.125 -
Tilted Wall in C-1a Building CQ2 from Mazar et. al. (2020 v.2)
Photo 12.125
C-1a Building CQ2, wood in foundation of Walls 7413 and 7459 (2007)
Panitz-Cohen and Mazar in Mazar et. al. (2020 v.2) - Photo 12.126 -
Destruction debris in Room 7500 of C-1a Building CQ1 from Mazar et. al. (2020 v.2)
Photo 12.126
C-1a Building CQ2, looking west; destruction debris (7442) in western half of Room 7500 (2005)
Panitz-Cohen and Mazar in Mazar et. al. (2020 v.2)
- Plans: Figs. 12.34–12.35, 12.38
- Section: Fig. 12.57
- Photos 12.120–12.126
- Pottery: Figs. 13.103–13.119
- Figure 12.34 -
Plan of Stratum C-1b from Mazar et. al. (2020 v.2)
Figure 12.34
Plan of Stratum C-1b, northeast (1:125)
Panitz-Cohen and Mazar in Mazar et. al. (2020 v.2) - Figure 12.35 -
Plan of Stratum C-1a from Mazar et. al. (2020 v.2)
Figure 12.35
Plan of Stratum C-1a, northeast (1:125)
Panitz-Cohen and Mazar in Mazar et. al. (2020 v.2) - Figure 12.38 -
Plan of Buildings CW, CQ1 and CQ3, Stratum C-1a from Mazar et. al. (2020 v.2)
Figure 12.38
Plan of Buildings CW, CQ1 and CQ3, Stratum C-1a (1:75)
Panitz-Cohen and Mazar in Mazar et. al. (2020 v.2)
- Plans: Figs. 12.34–12.35, 12.38
- Figure 12.34 -
Plan of Stratum C-1b from Mazar et. al. (2020 v.2)
Figure 12.34
Plan of Stratum C-1b, northeast (1:125)
Panitz-Cohen and Mazar in Mazar et. al. (2020 v.2) - Figure 12.35 -
Plan of Stratum C-1a from Mazar et. al. (2020 v.2)
Figure 12.35
Plan of Stratum C-1a, northeast (1:125)
Panitz-Cohen and Mazar in Mazar et. al. (2020 v.2) - Figure 12.38 -
Plan of Buildings CW, CQ1 and CQ3, Stratum C-1a from Mazar et. al. (2020 v.2)
Figure 12.38
Plan of Buildings CW, CQ1 and CQ3, Stratum C-1a (1:75)
Panitz-Cohen and Mazar in Mazar et. al. (2020 v.2)
- Plans: Figs. 12.34–12.35, 12.38
- Figure 12.18 -
Plan of Stratum C-1b from Mazar et. al. (2020 v.2)
Figure 12.18
Plan of Stratum C-1b (1:200)
Panitz-Cohen and Mazar in Mazar et. al. (2020 v.2) - Figure 12.19 -
Plan of Stratum C-1a from Mazar et. al. (2020 v.2)
Figure 12.19
Plan of Stratum C-1a (1:200)
Panitz-Cohen and Mazar in Mazar et. al. (2020 v.2) - Figure 12.39 -
Plan of Stratum C-1b from Mazar et. al. (2020 v.2)
Figure 12.39
Plan of Stratum C-1b, south-center and southeast, with apiary (1:125)
Panitz-Cohen and Mazar in Mazar et. al. (2020 v.2) - Figure 12.40 -
Plan of Buildings CG, CH, CM and apiary, Stratum C-1b from Mazar et. al. (2020 v.2)
Figure 12.40
Plan of Buildings CG, CH, CM and apiary, Stratum C-1b (1:75)
Panitz-Cohen and Mazar in Mazar et. al. (2020 v.2) - Figure 12.68 -
Section 14 from Mazar et. al. (2020 v.2)
Figure 12.67
Section 14 (Square T/3, looking north)
Panitz-Cohen and Mazar in Mazar et. al. (2020 v.2) - Figure 12.69 -
Section 15 from Mazar et. al. (2020 v.2)
Figure 12.69
Section 15 (Squares S–Y/2, looking north) (1:55)
Panitz-Cohen and Mazar in Mazar et. al. (2020 v.2) - Figure 12.73 -
Section 19 from Mazar et. al. (2020 v.2)
Figure 12.73
Section 19 (Squares T–Y/1, looking south
Panitz-Cohen and Mazar in Mazar et. al. (2020 v.2) - Figure 12.76 -
Section 22 from Mazar et. al. (2020 v.2)
Figure 12.76
Section 22 (Squares T–Y/3, looking north in Room 2460
Panitz-Cohen and Mazar in Mazar et. al. (2020 v.2) - Figure 12.77 -
Section 23 from Mazar et. al. (2020 v.2)
Figure 12.77
Section 23 (Square Y/3, section below Wall 2411, looking east)
Panitz-Cohen and Mazar in Mazar et. al. (2020 v.2) - Photo 12.92 -
Buildings CF, CW, and CG from Mazar et. al. (2020 v.2)
Photo 12.92
General view to south; center: Building CF (2003)
Panitz-Cohen and Mazar in Mazar et. al. (2020 v.2) - Photo 12.127 -
C-1 Building CG and C-2 Buildings CA and CB from Mazar et. al. (2020 v.2)
Photo 12.127
C-1 Building CG in center, looking west; C-2 Buildings CA and CB in background. Amihai Mazar sitting on floor of C-1b Building CM (2000)
Panitz-Cohen and Mazar in Mazar et. al. (2020 v.2) - Photo 12.128 -
Tilted and Deformed Walls in Building CG from Mazar et. al. (2020 v.2)
Photo 12.128
Building CG, detail of corner of Walls 2439 (left) and 1416 (right), with wooden beams in foundations, looking south (2000)
Panitz-Cohen and Mazar in Mazar et. al. (2020 v.2) - Photo 12.129 -
Tilted and Collapsed Walls in Building CG from Mazar et. al. (2020 v.2)
Photo 12.129
Detail of additional layers of wood under Wall 2439 (see Photo 12.128), looking south; note C-1b brick collapse on left (south); entrance in C-2 Wall 2505 on right (2000)
Panitz-Cohen and Mazar in Mazar et. al. (2020 v.2) - Photo 12.130 -
Wood Beam Foundations in Building CG from Mazar et. al. (2020 v.2)
Photo 12.130
Building CG, looking south; wooden beams in wall foundations and below floor in Room 2444 (1998)
Panitz-Cohen and Mazar in Mazar et. al. (2020 v.2) - Photo 12.131 -
Destruction and slippage of lower brick courses in Room 2441 from Mazar et. al. (2020 v.2)
Photo 12.131
C-1b Building CG, Room 2441, looking north at destruction and slippage of lower brick courses in Wall 2411 (2000)
Panitz-Cohen and Mazar in Mazar et. al. (2020 v.2) - Photo 12.132 -
Destruction and slippage of lower brick courses in Room 2441 from Mazar et. al. (2020 v.2)
Photo 12.132
Same view as Photo 12.131, looking north, after excavation of destruction debris in southern part; wooden beams appearing just under floor level (2000)
Panitz-Cohen and Mazar in Mazar et. al. (2020 v.2) - Photo 12.133 -
Collapse of Wall 2439 from Mazar et. al. (2020 v.2)
Photo 12.133
Building CG, Room 2411, looking south at collapse of Wall 2439 above wooden beams, below floor of Room 2441 (2000)
Panitz-Cohen and Mazar in Mazar et. al. (2020 v.2) - Photo 12.134 -
Foundation trench of C-1 Wall 1416 from Mazar et. al. (2020 v.2)
Photo 12.134
Foundation trench of C-1 Wall 1416, cutting eastern end of C-2 Wall 1483 (1998)
Panitz-Cohen and Mazar in Mazar et. al. (2020 v.2) - Photo 12.135 -
Brick collapse from C-1b Building CG from Mazar et. al. (2020 v.2)
Photo 12.135
Square Y/2, looking northeast; right: Wall 4443 of C-1a Building CL; left: Fill 5430 above brick collapse from C-1b Building CG (2001)
Panitz-Cohen and Mazar in Mazar et. al. (2020 v.2)
- Plans: Figs. 12.18–12.19, 12.39–12.40
- Sections: Figs. 12.68–12.69, 12.73, 12.76–12.77
- Photos: 12.92, 12.127–12.135;
- Pottery: Figs. 13.52–13.55
- Figure 12.18 -
Plan of Stratum C-1b from Mazar et. al. (2020 v.2)
Figure 12.18
Plan of Stratum C-1b (1:200)
Panitz-Cohen and Mazar in Mazar et. al. (2020 v.2) - Figure 12.39 -
Plan of Stratum C-1b from Mazar et. al. (2020 v.2)
Figure 12.39
Plan of Stratum C-1b, south-center and southeast, with apiary (1:125)
Panitz-Cohen and Mazar in Mazar et. al. (2020 v.2) - Figure 12.40 -
Plan of Buildings CG, CH, CM and apiary, Stratum C-1b from Mazar et. al. (2020 v.2)
Figure 12.40
Plan of Buildings CG, CH, CM and apiary, Stratum C-1b (1:75)
Panitz-Cohen and Mazar in Mazar et. al. (2020 v.2) - Figure 12.75 -
Section 21 from Mazar et. al. (2020 v.2)
Figure 12.75
Section 21 (Square Y/3, looking north at Wall 4465)
Panitz-Cohen and Mazar in Mazar et. al. (2020 v.2) - Figure 12.78 -
Section 24 from Mazar et. al. (2020 v.2)
Figure 12.78
Section 24 (Square Z/3, looking east)
Panitz-Cohen and Mazar in Mazar et. al. (2020 v.2) - Figure 12.79 -
Section 25 from Mazar et. al. (2020 v.2)
Figure 12.79
Section 25 (Squares T–Y/3, looking south)
Panitz-Cohen and Mazar in Mazar et. al. (2020 v.2) - Photo 12.136 -
Stratigraphic section through walls in C-2 and C-1b from Mazar et. al. (2020 v.2)
Photo 12.136
Squares Y/3–4; C-2 Walls 4515, 4516 and 4465 under C-1b Walls 4432 and 4479 (right), looking west; left: higher stump of Wall 4432; top: Wall 2411 of Building CG (2000)
Panitz-Cohen and Mazar in Mazar et. al. (2020 v.2) - Photo 12.137 -
Row of chalices along eastern face of Wall 2411 from Mazar et. al. (2020 v.2)
Photo 12.137
Building CM, row of chalices along eastern face of Wall 2411, looking west; meter stick on top of Wall 4432, not yet exposed (2000)
Panitz-Cohen and Mazar in Mazar et. al. (2020 v.2) - Photo 12.138 -
Row of chalices along eastern face of Wall 2411 from Mazar et. al. (2020 v.2)
Photo 12.138
Building CM, row of chalices along eastern face of Wall 2411, looking west; meter stick on top of Wall 4432, not yet exposed (2000)
Panitz-Cohen and Mazar in Mazar et. al. (2020 v.2) - Photo 12.139 -
C-1b Building CM from Mazar et. al. (2020 v.2)
Photo 12.139
C-1b Building CM, looking west; Installation 4448 in center (after removal of cooking jug; see Photo 12.140) (2000)
Panitz-Cohen and Mazar in Mazar et. al. (2020 v.2) - Photo 12.140 -
Cracked Cooking Jar on the floor in C-1b Building CM from Mazar et. al. (2020 v.2)
Photo 12.140
C-1b Building CM, cooking jug in Installation 4448 (2000)
Panitz-Cohen and Mazar in Mazar et. al. (2020 v.2) - Photo 12.141 -
C-1b Building CM from Mazar et. al. (2020 v.2)
Photo 12.141
C-1b Building CM, looking west; left: concentration of wood near balk between Squares Y–Z/2–3 (2000)
Panitz-Cohen and Mazar in Mazar et. al. (2020 v.2)
- Plans: Figs. 12.18, 12.39–12.40;
- Sections: Figs. 12.75, 12.78–12.79
- Photos 12.136–12.142
- Pottery: Figs. 13.49–13.51
- Figure 12.18 -
Plan of Stratum C-1b from Mazar et. al. (2020 v.2)
Figure 12.18
Plan of Stratum C-1b (1:200)
Panitz-Cohen and Mazar in Mazar et. al. (2020 v.2) - Figure 12.39 -
Plan of Stratum C-1b from Mazar et. al. (2020 v.2)
Figure 12.39
Plan of Stratum C-1b, south-center and southeast, with apiary (1:125)
Panitz-Cohen and Mazar in Mazar et. al. (2020 v.2) - Figure 12.40 -
Plan of Buildings CG, CH, CM and apiary, Stratum C-1b from Mazar et. al. (2020 v.2)
Figure 12.40
Plan of Buildings CG, CH, CM and apiary, Stratum C-1b (1:75)
Panitz-Cohen and Mazar in Mazar et. al. (2020 v.2) - Figure 12.70 -
Section 16 from Mazar et. al. (2020 v.2)
Figure 12.70
Section 16 (Squares S–Y/1, looking north) (1:55)
Panitz-Cohen and Mazar in Mazar et. al. (2020 v.2) - Figure 12.72 -
Section 18 from Mazar et. al. (2020 v.2)
Figure 12.72
Section 18 (Squares T–Y/2, looking north at Wall 1437 and subsidiary balk to its east)
Panitz-Cohen and Mazar in Mazar et. al. (2020 v.2) - Figure 12.73 -
Section 19 from Mazar et. al. (2020 v.2)
Figure 12.73
Section 19 (Squares T–Y/1, looking south
Panitz-Cohen and Mazar in Mazar et. al. (2020 v.2) - Figure 12.74 -
Section 20 from Mazar et. al. (2020 v.2)
Figure 12.74
Section 20 (Squares T–Y/1, looking south at Wall 2426)
Panitz-Cohen and Mazar in Mazar et. al. (2020 v.2) - Photo 12.143 -
C-1b Building CH from Mazar et. al. (2020 v.2)
Photo 12.143
C-1b Building CH, looking west; right: southwestern corner of Building CG (1998)
Panitz-Cohen and Mazar in Mazar et. al. (2020 v.2) - Photo 12.144 -
Collapsed and Tilted Walls along a lineament from Mazar et. al. (2020 v.2)
Photo 12.144
Squares T–Y/1–2, northern part of C-1b Building CH, looking north; lower right: northwestern corner of C-1a Building CL, Stratum C-1a (2000)
JW: Note the axis of deformation and slumping from foreground to background
Panitz-Cohen and Mazar in Mazar et. al. (2020 v.2) - Photo 12.145 -
Wood foundations from Mazar et. al. (2020 v.2)
Photo 12.145
C-1b Building CH, detail of wood in the foundation of Wall 1437 at its corner with Wall 1438, looking north (1998)
JW: Note the axis of deformation and slumping from foreground to background
Panitz-Cohen and Mazar in Mazar et. al. (2020 v.2) - Photo 12.146 -
Collapsed Wall from Mazar et. al. (2020 v.2)
Photo 12.146
Square Y/1, C-1b Building CH, looking east ; wooden construction and collapsed Wall 2426 (right) cut by Wall 2413 of Building CL, Stratum C-1a (1998)
Panitz-Cohen and Mazar in Mazar et. al. (2020 v.2) - Photo 12.147 -
Collapsed Wall from Mazar et. al. (2020 v.2)
Photo 12.147
Square Y/1, C-1b Building CH, looking south; detail of eastern end of collapsed Wall 2426, cut by foundation trench of Wall 2413 of C-1a Building CL (2000)
Panitz-Cohen and Mazar in Mazar et. al. (2020 v.2) - Photo 12.148 -
Wooden Construction from Mazar et. al. (2020 v.2)
Photo 12.148
Wooden construction through C-1b Building CH, looking west; eastern end of C-2 Wall 2465 cut by wood (1998)
Panitz-Cohen and Mazar in Mazar et. al. (2020 v.2) - Photo 12.149 -
Wooden Construction from Mazar et. al. (2020 v.2)
Photo 12.149
As Photo 12.148, looking east (1998)
Panitz-Cohen and Mazar in Mazar et. al. (2020 v.2)
- (Plans: Figs. 12.18, 12.39–12.40, 12.44
- Sections: Figs. 12.70, 12.72–12.74
- Photos 12.3, 12.143–12.149;
- Pottery: Figs. 13.56–13.59
- Figure 12.39 -
Plan of Stratum C-1b from Mazar et. al. (2020 v.2)
Figure 12.39
Plan of Stratum C-1b, south-center and southeast, with apiary (1:125)
Panitz-Cohen and Mazar in Mazar et. al. (2020 v.2) - Figure 12.40 -
Plan of Buildings CG, CH, CM and apiary, Stratum C-1b from Mazar et. al. (2020 v.2)
Figure 12.40
Plan of Buildings CG, CH, CM and apiary, Stratum C-1b (1:75)
Panitz-Cohen and Mazar in Mazar et. al. (2020 v.2) - Figure 12.44 -
Plan of Building CH and apiary from Mazar et. al. (2020 v.2)
Figure 12.44
Plan of Building CH and apiary (scale 1:100)
Panitz-Cohen and Mazar in Mazar et. al. (2020 v.2) - Figure 12.73 -
Section 19 from Mazar et. al. (2020 v.2)
Figure 12.73
Section 19 (Squares T–Y/1, looking south
Panitz-Cohen and Mazar in Mazar et. al. (2020 v.2) - Figure 12.80 -
Section 26 from Mazar et. al. (2020 v.2)
Figure 12.80
Section 26 (Square Z/1, western end, looking south)
Panitz-Cohen and Mazar in Mazar et. al. (2020 v.2) - Figure 12.81 -
Section 27 from Mazar et. al. (2020 v.2)
Figure 12.81
Section 27 (Squares Y–Z/2, looking north)
Panitz-Cohen and Mazar in Mazar et. al. (2020 v.2) - Figure 12.82 -
Section 28 from Mazar et. al. (2020 v.2)
Figure 12.82
Section 28 (Squares Y–Z, A/1, looking north)
Panitz-Cohen and Mazar in Mazar et. al. (2020 v.2) - Figure 12.83 -
Section 29 from Mazar et. al. (2020 v.2)
Figure 12.83
Section 29 (Squares Z/1–2, looking east)
Panitz-Cohen and Mazar in Mazar et. al. (2020 v.2) - Figure 12.84 -
Section 30 from Mazar et. al. (2020 v.2)
Figure 12.84
Section 30 (Square Z/20, looking east)
Panitz-Cohen and Mazar in Mazar et. al. (2020 v.2) - Figure 12.85 -
Section 31 from Mazar et. al. (2020 v.2)
Figure 12.85
Section 31 (Square Z/20, looking west)
Panitz-Cohen and Mazar in Mazar et. al. (2020 v.2) - Figure 12.86 -
Section 32 from Mazar et. al. (2020 v.2)
Figure 12.86
Section 32 (Square Y/1, looking east along Wall 4443)
Panitz-Cohen and Mazar in Mazar et. al. (2020 v.2) - Figure 12.87 -
Section 33 from Mazar et. al. (2020 v.2)
Figure 12.87
Section 33 (Square Y/1, section below Wall 2504, looking south)
Panitz-Cohen and Mazar in Mazar et. al. (2020 v.2) - Photo 12.150 -
General view of C-1b apiary from Mazar et. al. (2020 v.2)
Photo 12.150
Squares Y–Z/1–2, general view of C-1b apiary, looking northeast; section on east with remains of C-1a Building CL covering apiary destruction debris (2007)
Panitz-Cohen and Mazar in Mazar et. al. (2020 v.2) - Photo 12.151 -
Another view of C-1b apiary from Mazar et. al. (2020 v.2)
Photo 12.151
As Photo 12.150, looking southeast, before exposure of the eastern wall and southern hives in middle row (2007)
Panitz-Cohen and Mazar in Mazar et. al. (2020 v.2) - Photo 12.152 -
Another view of C-1b apiary from Mazar et. al. (2020 v.2)
Photo 12.152
View of apiary, looking southeast, with eastern closing wall 9453 superimposed by C-1a Wall 9406 (2008)
Panitz-Cohen and Mazar in Mazar et. al. (2020 v.2) - Photo 12.153 -
Tilted Wall 5453 from Mazar et. al. (2020 v.2)
Photo 12.153
Square A/1, looking east at eastern wall of apiary (9453), below C-1a Wall 9406 (2008)
Panitz-Cohen and Mazar in Mazar et. al. (2020 v.2) - Photo 12.154 -
Collapsed western part of Wall 8469 from Mazar et. al. (2020 v.2)
Photo 12.154
Squares Y/2– 3; collapsed western part of Wall 8469 abutting Wall 2411 of Building CG, looking west; note wood in foundation of both walls (2007)
Panitz-Cohen and Mazar in Mazar et. al. (2020 v.2) - Photo 12.155 -
Collapsed bricks in western end of Wall 8469 from Mazar et. al. (2020 v.2)
Photo 12.155
Square Y/2, looking north at collapsed bricks in western end of Wall 8469, near corner with Wall 2411 (2007)
Panitz-Cohen and Mazar in Mazar et. al. (2020 v.2) - Photo 12.156 -
North-central and northwestern part of apiary from Mazar et. al. (2020 v.2)
Photo 12.156
North-central and northwestern part of apiary, looking west (2007)
Panitz-Cohen and Mazar in Mazar et. al. (2020 v.2) - Photo 12.157 -
Tilted Wall 8469 from Mazar et. al. (2020 v.2)
Photo 12.157
Western row of hives abutting Wall 8469, looking west (2007)
Panitz-Cohen and Mazar in Mazar et. al. (2020 v.2) - Photo 12.158 -
View of the apiary from Mazar et. al. (2020 v.2)
Photo 12.158
Apiary, looking north; meter stick on white floor (8460) between eastern and central rows of hives (2008)
Panitz-Cohen and Mazar in Mazar et. al. (2020 v.2) - Photo 12.159 -
Central and western part of the apiary from Mazar et. al. (2020 v.2)
Photo 12.159
Central and western part of the apiary, looking north; upper left: collapse of Room 2441, C-1b Building CG (2007)
Panitz-Cohen and Mazar in Mazar et. al. (2020 v.2) - Photo 12.160 -
Northern end of the apiary from Mazar et. al. (2020 v.2)
Photo 12.160
Square Z/2–3, northern end of apiary, looking northwest; lower right: eastern row of hives (2012)
Panitz-Cohen and Mazar in Mazar et. al. (2020 v.2)
- Plans: Figs. 12.39–12.40, 12.44
- Sections: Figs. 12.73, 12.80–12.87
- Photos 12.8, 12.150–12.160; additional illustrations in Chapter 14A
- Pottery: Figs. 13.60–13.67
- Figure 12.18 -
Plan of Stratum C-1b from Mazar et. al. (2020 v.2)
Figure 12.18
Plan of Stratum C-1b (1:200)
Panitz-Cohen and Mazar in Mazar et. al. (2020 v.2) - Figure 12.39 -
Plan of Stratum C-1b from Mazar et. al. (2020 v.2)
Figure 12.39
Plan of Stratum C-1b, south-center and southeast, with apiary (1:125)
Panitz-Cohen and Mazar in Mazar et. al. (2020 v.2) - Figure 12.48 -
Plan of Building CZ, Stratum C-1b from Mazar et. al. (2020 v.2)
Figure 12.48
Plan of Building CZ, Stratum C-1b (1:75)
Panitz-Cohen and Mazar in Mazar et. al. (2020 v.2) - Figure 12.89 -
Section 35 from Mazar et. al. (2020 v.2)
Figure 12.89
Section 35 (Square B/3, section below Wall 10518 (looking south)
Panitz-Cohen and Mazar in Mazar et. al. (2020 v.2) - Figure 12.90 -
Section 36 from Mazar et. al. (2020 v.2)
Figure 12.90
Section 36 (Squares B/2–3, section below Wall 10464, looking west)
Panitz-Cohen and Mazar in Mazar et. al. (2020 v.2) - Figure 12.91 -
Section 37 from Mazar et. al. (2020 v.2)
Figure 12.91
Section 37 (Square C/3, looking east)
Panitz-Cohen and Mazar in Mazar et. al. (2020 v.2) - Figure 12.92 -
Section 38 from Mazar et. al. (2020 v.2)
Figure 12.92
Section 38 (Squares B–C/3, looking north at Wall 10515 and entrance)
Panitz-Cohen and Mazar in Mazar et. al. (2020 v.2) - Figure 12.94 -
Section 40 from Mazar et. al. (2020 v.2)
Figure 12.94
Section 40 (Square A/3, looking east)
Panitz-Cohen and Mazar in Mazar et. al. (2020 v.2) - Figure 12.95 -
Section 41 from Mazar et. al. (2020 v.2)
Figure 12.95
Section 41 (Squares A/2–3, looking west at entrance in Wall 9406 and C-1b walls below)
Panitz-Cohen and Mazar in Mazar et. al. (2020 v.2) - Photo 12.161 -
Southeastern part of Area C from Mazar et. al. (2020 v.2)
Photo 12.161
Southeastern part of Area C (2012)
(photo: David Silverman)
Panitz-Cohen and Mazar in Mazar et. al. (2020 v.2) - Photo 12.162 -
C-1b Building CZ from Mazar et. al. (2020 v.2)
Photo 12.162
C-1b Building CZ, looking north (2012)
Panitz-Cohen and Mazar in Mazar et. al. (2020 v.2) - Photo 12.163 -
C-1b Building CZ, southwestern room (11449) from Mazar et. al. (2020 v.2)
Photo 12.163
C-1b Building CZ, southwestern room (11449), looking west (2012)
Panitz-Cohen and Mazar in Mazar et. al. (2020 v.2) - Photo 12.164 -
C-1b Building CZ, looking south at Wall 11427 below C-1a Wall 10482 from Mazar et. al. (2020 v.2)
Photo 12.164
Square A/2, C-1b Building CZ, looking south at Wall 11427 below C-1a Wall 10482 (2012)
Panitz-Cohen and Mazar in Mazar et. al. (2020 v.2) - Photo 12.165 -
C-1b Building CZ, southeastern part from Mazar et. al. (2020 v.2)
Photo 12.165
Squares B–C/2–3, C-1b Building CZ, southeastern part, looking south (2010)
Panitz-Cohen and Mazar in Mazar et. al. (2020 v.2) - Photo 12.166 -
C-1a Wall 10464 sealing the fallen bricks and debris on Floor 1142 of C-1b Building CZ from Mazar et. al. (2020 v.2)
Photo 12.166
C-1b Building CZ, looking west at C-1a Wall 10464 sealing the fallen bricks and debris on Floor 11426 (2012)
Panitz-Cohen and Mazar in Mazar et. al. (2020 v.2) - Photo 12.167 -
Pillar bases of C-1a Building CX set directly on top of fallen bricks from Mazar et. al. (2020 v.2)
Photo 12.167
C-1b Building CZ, central courtyard, looking south; pillar bases of C-1a Building CX set directly on top of fallen bricks (2012)
Panitz-Cohen and Mazar in Mazar et. al. (2020 v.2) - Photo 12.168 -
Layered Walls in C-1b Building CZ from Mazar et. al. (2020 v.2)
Photo 12.168
Square C/2, C-1b Building CZ, southeastern room, looking south at Walls 11458 and 11421; note entrance in eastern end of walls, blocked on top by C-1a Wall 10409, Building CP (2012)
Panitz-Cohen and Mazar in Mazar et. al. (2020 v.2)
- Plans: Figs. 12.18, 12.39, 12.48
- Sections: Figs. 12.89–12.92, 12.94–12.95
- Photos 12.9, 12.161–12.168
- Pottery: Fig. 13.51:17
- Figure 12.19 -
Plan of Stratum C-1a from Mazar et. al. (2020 v.2)
Figure 12.19
Plan of Stratum C-1a (1:200)
Panitz-Cohen and Mazar in Mazar et. al. (2020 v.2) - Figure 12.50 -
Plan of Stratum C-1a, south-center and southeast from Mazar et. al. (2020 v.2)
Figure 12.50
Plan of Stratum C-1a, south-center and southeast (1:125)
Panitz-Cohen and Mazar in Mazar et. al. (2020 v.2) - Figure 12.51 -
Plan of Buildings CQ3 and CX, Stratum C-1a from Mazar et. al. (2020 v.2)
Figure 12.51
Plan of Buildings CQ3 and CX, Stratum C-1a (1:75)
Panitz-Cohen and Mazar in Mazar et. al. (2020 v.2) - Figure 12.88 -
Section 34 from Mazar et. al. (2020 v.2)
Figure 12.88
Section 34 (A–C/2, looking north) 2504, looking south)
Panitz-Cohen and Mazar in Mazar et. al. (2020 v.2) - Figure 12.94 -
Section 40 from Mazar et. al. (2020 v.2)
Figure 12.94
Section 40 (Square A/3, looking east)
Panitz-Cohen and Mazar in Mazar et. al. (2020 v.2) - Figure 12.95 -
Section 41 from Mazar et. al. (2020 v.2)
Figure 12.95
Section 41 (Squares A/2–3, looking west at entrance in Wall 9406 and C-1b walls below)
Panitz-Cohen and Mazar in Mazar et. al. (2020 v.2) - Photo 12.169 -
General view of Area C from Mazar et. al. (2020 v.2)
Photo 12.169
General view of Area C, looking west (2010)
Panitz-Cohen and Mazar in Mazar et. al. (2020 v.2) - Photo 12.170 -
General view of southeastern part of Area C from Mazar et. al. (2020 v.2)
Photo 12.170
General view of southeastern part of Area C, looking west (2010)
Panitz-Cohen and Mazar in Mazar et. al. (2020 v.2) - Photo 12.171 -
C-1a Building CQ3 from Mazar et. al. (2020 v.2)
Photo 12.171
C-1a Building CQ3, looking north at entrance in Wall 10472; top of C-1b Wall 11407 in foreground (2012)
Panitz-Cohen and Mazar in Mazar et. al. (2020 v.2) - Photo 12.172 -
C-1a Building CQ3; wooden beams below bricks in threshold of Wall 9406 from Mazar et. al. (2020 v.2)
Photo 12.172
C-1a Building CQ3; wooden beams below bricks in threshold of Wall 9406, looking west.
Panitz-Cohen and Mazar in Mazar et. al. (2020 v.2) - Photo 12.173 -
C-1a Building CQ3, southern part of Room 10460 from Mazar et. al. (2020 v.2)
Photo 12.173
C-1a Building CQ3, southern part of Room 10460, looking west from southern part of Building CX (2010)
Panitz-Cohen and Mazar in Mazar et. al. (2020 v.2) - Photo 12.174 -
Smashed object on the floor of Room 10495 from Mazar et. al. (2020 v.2)
Photo 12.174
C-1a Building CQ3, Room 10495, Installation 10505, looking south (2010)
Panitz-Cohen and Mazar in Mazar et. al. (2020 v.2) - Photo 12.175 -
Room 10495 from Mazar et. al. (2020 v.2)
Photo 12.175
C-1a Building CQ3, Room 10495, brick parapet in south of Installation 10505, looking south; note stones of 11424 below (2012)
Panitz-Cohen and Mazar in Mazar et. al. (2020 v.2) - Photo 12.176 -
Looking south from Room 10495 to Room 10452 from Mazar et. al. (2020 v.2)
Photo 12.176
C-1a Building CQ3, looking south from Room 10495 to Room 10452 (excavation below floor); Stones 11424 under wall of Installation 10505 (see Photo 12.175 (2012)
Panitz-Cohen and Mazar in Mazar et. al. (2020 v.2) - Photo 12.177 -
Room 10452 from Mazar et. al. (2020 v.2)
Photo 12.177
C-1a Building CQ3, Room 10452, looking north at entrance (2010)
Panitz-Cohen and Mazar in Mazar et. al. (2020 v.2) - Photo 12.178 -
Smashed pottery and destruction debris against southern wall of Room 10452 from Mazar et. al. (2020 v.2)
Photo 12.178
C-1a Building CQ3, Room 10452, looking south; smashed pottery and destruction debris against southern wall, on plastered installation (see Photo 12.179) (2010)
Panitz-Cohen and Mazar in Mazar et. al. (2020 v.2) - Photo 12.179 -
Room 10452 from Mazar et. al. (2020 v.2)
Photo 12.179
C-1a Building CQ3, Room 10452, looking south at plastered installation against southern wall (2010)
Panitz-Cohen and Mazar in Mazar et. al. (2020 v.2)
- Plans: Figs. 12.19, 12.50–12.51
- Sections: Figs. 12.88, 12.94–12.95
- Photos 12.169–12.179
- Pottery: Figs. 13.130–13.135
- Figure 12.19 -
Plan of Stratum C-1a from Mazar et. al. (2020 v.2)
Figure 12.19
Plan of Stratum C-1a (1:200)
Panitz-Cohen and Mazar in Mazar et. al. (2020 v.2) - Figure 12.50 -
Plan of Stratum C-1a, south-center and southeast from Mazar et. al. (2020 v.2)
Figure 12.50
Plan of Stratum C-1a, south-center and southeast (1:125)
Panitz-Cohen and Mazar in Mazar et. al. (2020 v.2) - Figure 12.51 -
Plan of Buildings CQ3 and CX, Stratum C-1a from Mazar et. al. (2020 v.2)
Figure 12.51
Plan of Buildings CQ3 and CX, Stratum C-1a (1:75)
Panitz-Cohen and Mazar in Mazar et. al. (2020 v.2) - Figure 12.88 -
Section 34 from Mazar et. al. (2020 v.2)
Figure 12.88
Section 34 (A–C/2, looking north) 2504, looking south)
Panitz-Cohen and Mazar in Mazar et. al. (2020 v.2) - Figure 12.89 -
Section 35 from Mazar et. al. (2020 v.2)
Figure 12.89
Section 35 (Square B/3, section below Wall 10518 (looking south)
Panitz-Cohen and Mazar in Mazar et. al. (2020 v.2) - Figure 12.90 -
Section 36 from Mazar et. al. (2020 v.2)
Figure 12.90
Section 36 (Squares B/2–3, section below Wall 10464, looking west)
Panitz-Cohen and Mazar in Mazar et. al. (2020 v.2) - Figure 12.91 -
Section 37 from Mazar et. al. (2020 v.2)
Figure 12.91
Section 37 (Square C/3, looking east)
Panitz-Cohen and Mazar in Mazar et. al. (2020 v.2) - Figure 12.92 -
Section 38 from Mazar et. al. (2020 v.2)
Figure 12.92
Section 38 (Squares B–C/3, looking north at Wall 10515 and entrance)
Panitz-Cohen and Mazar in Mazar et. al. (2020 v.2) - Photo 12.180 -
C-1a Building CX, Room 10507 from Mazar et. al. (2020 v.2)
Photo 12.180
C-1a Building CX, Room 10507, looking southwest; Egon Lass standing on Bench 10502 (cut in center) (2010)
Panitz-Cohen and Mazar in Mazar et. al. (2020 v.2) - Photo 12.181 -
C-1a Building CX, Room 10507 from Mazar et. al. (2020 v.2)
Photo 12.181
C-1a Building CX, Room 10507, looking north (2010)
Panitz-Cohen and Mazar in Mazar et. al. (2020 v.2) - Photo 12.182 -
Entrance into Building CX from Mazar et. al. (2020 v.2)
Photo 12.182
Entrance into Building CX, looking north, with wooden threshold and plaster pilaster on the east (2012)
Panitz-Cohen and Mazar in Mazar et. al. (2020 v.2) - Photo 12.183 -
C-1a Building CX from Mazar et. al. (2020 v.2)
Photo 12.183
C-1a Building CX, Locus 11413 in front of entrance, with loomweights, looking west (2012)
Panitz-Cohen and Mazar in Mazar et. al. (2020 v.2) - Photo 12.184 -
C-1a Building CX, Room 10507 from Mazar et. al. (2020 v.2)
Photo 12.184
C-1a Building CX, brick pilaster 10517 in Room 10507; meter stick against balk between Squares C/2–3, looking north (2010)
Panitz-Cohen and Mazar in Mazar et. al. (2020 v.2) - Photo 12.185 -
C-1a Building CX, vessels in destruction debris in center of Room 10507 from Mazar et. al. (2020 v.2)
Photo 12.185
C-1a Building CX, vessels in destruction debris in center of Room 10507, against Bench 10502, looking north (2010)
Panitz-Cohen and Mazar in Mazar et. al. (2020 v.2) - Photo 12.186 -
C-1a Building CX, Locus 10431, vessels in burnt destruction debris from Mazar et. al. (2020 v.2)
Photo 12.186
C-1a Building CX, Locus 10431, vessels in burnt destruction debris, looking west (2010)
Panitz-Cohen and Mazar in Mazar et. al. (2020 v.2) - Photo 12.187 -
C-1a Building CX from Mazar et. al. (2020 v.2)
Photo 12.187
C-1a Building CX, Locus 10499, looking east at cache of loomweights and wooden beam (2010)
Panitz-Cohen and Mazar in Mazar et. al. (2020 v.2) - Photo 12.188 -
C-1a Building CX from Mazar et. al. (2020 v.2)
Photo 12.188
C-1a Building CX, looking north at Installation 10509 against Wall 10515. Amihai Mazar in front of entrance to building (2010)
Panitz-Cohen and Mazar in Mazar et. al. (2020 v.2)
- Plans: Figs. 12.19, 12.50–12.51
- Sections: Figs. 12.88–12.92
- Photos 12.170, 12.180–12.188
- Pottery: Figs. 13.136–13.142
Two means of roof support were identified in the large inner space of this building. One was a north–south row of five pillar bases, each made of an unworked flat stone, located in the northern half, 2.0 m east of the western wall and 3.4 m west of the eastern wall (Photos 12.180–12.181). The two northernmost bases bore traces of the burnt wood pillars on them. The other means of roof support was a unique square pilaster of gray bricks (10517), located to the southeast of the row of pillar bases and standing 1.3 m high (Photo 12.184). A large smooth stone was found southeast of this pilaster.
A T-shaped brick bench or screen wall (10502) was located along the northern two-thirds of the western wall (10464); it protruded 1.3 m into the center of the structure (Photo 12.181). Two vessels were placed in the southern niche formed by this ‘T’, a large barrel krater (Fig. 13.137:2) and a storage jar (Fig. 13.140:14) (Photo 12.185). Another bench (10491) ran along the eastern end of the southern wall (10409), built above the eastern end of C-1b Wall 11421 of Building CZ, separated by a 0.4 m-thick fill.
The floor of Building CX (10481, 10497 and 10507) was composed of reddish-brown clay interspersed with black burnt material and gray ash. In the area between the pillar bases and Bench 10502 was a strip of small travertine chunks that were incorporated into the floor (10477; Photos 12.180– 12.181). They were not suitable to serve as a pavement, since they were very loosely laid, and perhaps they played a role in some activity that took place here. They recall a similar strip of stones (7479) set in the floor of Courtyard 7471 in Building CW. Immediately below the floor level in the southeastern part of the building were the tops of C-1b Walls 10500 and 10518 of Building CZ (Figs. 12.89, 12.91; Photo 12.181).
Like the other units, Building CX was found full of very burnt destruction debris, with fallen bricks, charcoal pieces, ash, and large a amount of pottery, with 122 complete or almost-complete vessels, many of them in situ (Figs. 12.88, 13.136– 13.142; Photos 12.185–12.186). Just inside and west of the entrance, a cooking jug (Fig. 13.138:8) and part of a storage jar were found (Fig. 13.140:17; Photo 12.183). Concentrations of loomweights here, to the south of Installation 10509, and just west of the northern end of the row of pillar bases, found along with fragments of burnt wood beams (Photos 12.181, 12.187–12.188), indicate these had belonged to one, or possibly two looms. Altogether, 164 loomweights were found in this building, mostly in the northern part (Chapter 39).
Two grinding installations were located close to the entrance. One (10509), just to its west, was attached to the northern wall, comprising a large lower grinding stone slab fronted on the east by a small shallow plastered basin which was slightly lower and served as a receptacle for the grain as it was ground; it was surrounded by a flat-topped brick ‘rim’ (Photo 12.188). An additional lower grinding stone slab fragment was found below the upper one, apparently as a support, and a nicely worked rectangular smoothed pink mizi limestone, apparently in secondary use, was set under the eastern end of the large lower grinding, between it and the receptacle on the south. On the northern ‘rim’ of the plastered basin was a fine flint blade and a small upper grinding stone; two large upper grinding stones were found just to the west. To the east of Installation 10509, in front of the entranceway, was still another large lower grinding stone slab fragment, found overturned (Photo 12.188). The second installation (10519), less well preserved, was found just south of the entrance, close to the eastern wall. It comprised a similar round plastered receptacle with a brick bordering it on its west; a rounded lower grinding stone was set inside it and another such stone was found to the west of the brick.
A large concentration of grain was found inside a storage jar in the southern part of the building (10431). The grain was submitted to 14C dating (Chapter 48, Sample R36). One of the two measurements provided the calibrated dates 978–848 BCE (1σ) and 996–838 BCE (2σ); the other was way too high and was defined as an outlier.
Notably, no ovens or other cooking installations were found in any of the buildings, CQ1, CQ2, CQ3 and CX, although such installations were found in the larger buildings, CF and CP.
- Figure 12.19 -
Plan of Stratum C-1a from Mazar et. al. (2020 v.2)
Figure 12.19
Plan of Stratum C-1a (1:200)
Panitz-Cohen and Mazar in Mazar et. al. (2020 v.2) - Figure 12.50 -
Plan of Stratum C-1a, south-center and southeast from Mazar et. al. (2020 v.2)
Figure 12.50
Plan of Stratum C-1a, south-center and southeast (1:125)
Panitz-Cohen and Mazar in Mazar et. al. (2020 v.2) - Figure 12.52a -
Plan of Building CP, Stratum C-1a from Mazar et. al. (2020 v.2)
Figure 12.52a
Plan of Building CP, Stratum C-1a (1:75)
Panitz-Cohen and Mazar in Mazar et. al. (2020 v.2) - Figure 12.52b -
Isometric reconstruction, Building CP, Stratum C-1a from Mazar et. al. (2020 v.2)
Figure 12.52b
Isometric reconstruction, Building CP, Stratum C-1a, looking northwest
Panitz-Cohen and Mazar in Mazar et. al. (2020 v.2) - Figure 12.52c -
Plan of sub-floor brick construction in Building CP, Stratum C-1a from Mazar et. al. (2020 v.2)
Figure 12.52c
Plan of sub-floor brick construction in Building CP, Stratum C-1a (1:100)
Panitz-Cohen and Mazar in Mazar et. al. (2020 v.2) - Figure 12.92 -
Section 38 from Mazar et. al. (2020 v.2)
Figure 12.92
Section 38 (Squares B–C/3, looking north at Wall 10515 and entrance)
Panitz-Cohen and Mazar in Mazar et. al. (2020 v.2) - Photo 12.169 -
General view of Area C from Mazar et. al. (2020 v.2)
Photo 12.169
General view of Area C, looking west (2010)
Panitz-Cohen and Mazar in Mazar et. al. (2020 v.2) - Photo 12.170 -
General view of southeastern part of Area C from Mazar et. al. (2020 v.2)
Photo 12.170
General view of southeastern part of Area C, looking west (2010)
Panitz-Cohen and Mazar in Mazar et. al. (2020 v.2) - Photo 12.189 -
C-1a Building CP, with sub-floor construction in Room 10476 from Mazar et. al. (2020 v.2)
Photo 12.189
C-1a Building CP, with sub-floor construction in Room 10476 (top center) (2012)
(photo: David Silverman)
Panitz-Cohen and Mazar in Mazar et. al. (2020 v.2) - Photo 12.190 -
C-1a Building CP on the floor level from Mazar et. al. (2020 v.2)
Photo 12.190
C-1a Building CP on the floor level, looking west; meter stick in Room 10476 (2012)
Panitz-Cohen and Mazar in Mazar et. al. (2020 v.2) - Photo 12.191 -
C-1a Building CP from Mazar et. al. (2020 v.2)
Photo 12.191
C-1a Building CP, looking north; wall of C-1b phase (11472) in foreground; C-1b Building CZ in background (2012)
Panitz-Cohen and Mazar in Mazar et. al. (2020 v.2) - Photo 12.192 -
Wall 9406, dividing Building CL (mostly removed) and Building CP from Mazar et. al. (2020 v.2)
Photo 12.192
Wall 9406, dividing Building CL (mostly removed, left) and Building CP (right), looking north; lower left: eastern row of beehives, C-1b apiary (2008)
Panitz-Cohen and Mazar in Mazar et. al. (2020 v.2) - Photo 12.193 -
Building CP Walls from Mazar et. al. (2020 v.2)
Photo 12.193
Northern wall (11458) of the early phase of Building CP, Stratum C-1b, looking north, below Wall 10409 of C-1a (2012)
Panitz-Cohen and Mazar in Mazar et. al. (2020 v.2) - Photo 12.194 -
Building CP Walls from Mazar et. al. (2020 v.2)
Photo 12.194
Building CP, looking south at C-1b Wall 11477 and C-1a Wall 10457; center: C-1a sub-floor construction 11468 (2012)
Panitz-Cohen and Mazar in Mazar et. al. (2020 v.2) - Photo 12.195 -
Building CP Walls from Mazar et. al. (2020 v.2)
Photo 12.195
Building CP, looking east at C-1a Wall 10462 above C-1b Wall 11473; note gap between them (2012)
Panitz-Cohen and Mazar in Mazar et. al. (2020 v.2) - Photo 12.196 -
C-1a Building CP from Mazar et. al. (2020 v.2)
Photo 12.196
C-1a Building CP, looking east; top of C-1b Wall 11470, serving as a threshold leading from Room 10458 to Room 9449 (2010)
Panitz-Cohen and Mazar in Mazar et. al. (2020 v.2) - Photo 12.197 -
C-1a Building CP from Mazar et. al. (2020 v.2)
Photo 12.197
C-1a Building CP, eastern and central rooms, looking west; meter stick in Room 11441 (2012)
Panitz-Cohen and Mazar in Mazar et. al. (2020 v.2) - Photo 12.198 -
C-1a Building CP Room 10510 from Mazar et. al. (2020 v.2)
Photo 12.198
C-1a Building CP, Room 10510 (northeastern room), looking north (2010)
Panitz-Cohen and Mazar in Mazar et. al. (2020 v.2) - Photo 12.199 -
Smashed objects in C-1a Building CP, Room 10510 from Mazar et. al. (2020 v.2)
Photo 12.199
C-1a Building CP, Room 10510; incense burner (Fig. 13.158:5) and other finds (2010)
Panitz-Cohen and Mazar in Mazar et. al. (2020 v.2) - Photo 12.200 -
Rooms 11441 and 10510 in C-1a Building CP from Mazar et. al. (2020 v.2)
Photo 12.200
C-1a Building CP, Rooms 11441 and 10510, looking west; meter stick in Room 11441 (2012)
Panitz-Cohen and Mazar in Mazar et. al. (2020 v.2) - Photo 12.201 -
Destruction debris in Room 11441 in C-1a Building CP from Mazar et. al. (2020 v.2)
Photo 12.201
C-1a Building CP, destruction debris (11418) in Room 11441, looking west (2012)
Panitz-Cohen and Mazar in Mazar et. al. (2020 v.2) - Photo 12.202 -
Rooms 11441 and 11451 in C-1a Building CP from Mazar et. al. (2020 v.2)
Photo 12.202
C-1a Building CP, looking east at Room 11451 (right) and Room 11441 (left) (2012)
Panitz-Cohen and Mazar in Mazar et. al. (2020 v.2) - Photo 12.203 -
Rooms 10476 and 11451 in C-1a Building CP from Mazar et. al. (2020 v.2)
Photo 12.203
C-1a Building CP, looking west from Room 11451 to Room 10476 (2012)
Panitz-Cohen and Mazar in Mazar et. al. (2020 v.2) - Photo 12.204 -
C-1a Building CP from Mazar et. al. (2020 v.2)
Photo 12.204
C-1a Building CP, curved molded plaster in northern end of Wall 11440 at entrance into Room 11451, looking east (2012)
Panitz-Cohen and Mazar in Mazar et. al. (2020 v.2) - Photo 12.205 -
destruction debris with fallen grinding stone and loom weights in Room 11451 in C-1a Building CP from Mazar et. al. (2020 v.2)
Photo 12.205
C-1a Building CP, Room 11451, looking east; right: destruction debris with fallen grinding stone and loom weights; left foreground: plastered Bench 11452 attached to Wall 11417 (2012)
Panitz-Cohen and Mazar in Mazar et. al. (2020 v.2) - Photo 12.206 -
Room 11451 in C-1a Building CP from Mazar et. al. (2020 v.2)
Photo 12.206
C-1a Building CP, Room 11451, looking north at Wall 11417 with Bench 11452 (2012)
Panitz-Cohen and Mazar in Mazar et. al. (2020 v.2) - Photo 12.207 -
C-1a Building CP, looking north (before excavation of eastern wing) from Mazar et. al. (2020 v.2)
Photo 12.207
C-1a Building CP, looking north (before excavation of eastern wing) (2010)
Panitz-Cohen and Mazar in Mazar et. al. (2020 v.2) - Photo 12.208 -
Room 10458 in C-1a Building CP from Mazar et. al. (2020 v.2)
Photo 12.208
C-1a Building CP, Room 10458, looking west; meter stick on earth floor 10458 above plaster bedding; background: entrance to Room 9449 (2010)
Panitz-Cohen and Mazar in Mazar et. al. (2020 v.2) - Photo 12.209 -
Room 10458 in C-1a Building CP from Mazar et. al. (2020 v.2)
Photo 12.209
C-1a Building CP, western part of Room 10458, looking west to Room 9449; note plaster foundation of floor (10498) in western part of room and northern end of Bench 10463 ending at entranceway to Room 9449; left: Oven 10430 (2010)
Panitz-Cohen and Mazar in Mazar et. al. (2020 v.2) - Photo 12.210 -
Pottery altar in C-1a Building CP from Mazar et. al. (2020 v.2)
Photo 12.210
C-1a Building CP, pottery altar (Chapter 35, No. 3) against Wall 9448, before exposure of Bench 10454 (2008)
Panitz-Cohen and Mazar in Mazar et. al. (2020 v.2) - Photo 12.211 -
Broken vessels in Room 10458 of C-1a Building CP from Mazar et. al. (2020 v.2)
Photo 12.211
C-1a Building CP, southwestern corner of Room 10458, looking south at krater-pithos and Oven 10430, with concentration of vessels to their north (2010)
Panitz-Cohen and Mazar in Mazar et. al. (2020 v.2) - Photo 12.212 -
Broken vessels in Room 10458 of C-1a Building CP from Mazar et. al. (2020 v.2)
Photo 12.212
As Photo 12.211, detail of vessels, grinding stone and stand with petals, before exposure of the mortar seen in Photo 12.213 (2010)
Panitz-Cohen and Mazar in Mazar et. al. (2020 v.2) - Photo 12.213 -
Pottery in Room 10458 of C-1a Building CP from Mazar et. al. (2020 v.2)
Photo 12.213
C-1a Building CP, southwestern corner of Room 10458, looking south at krater-pithos with cooking pot inside, mortar embedded in floor, Oven 10430 and large stone to its east; woman sitting on Bench 10454 (2010)
Panitz-Cohen and Mazar in Mazar et. al. (2020 v.2) - Photo 12.214 -
Room 10458 of C-1a Building CP from Mazar et. al. (2020 v.2)
Photo 12.214
C-1a Building CP, looking west; cache of loomweights in northwestern corner of Room 10458 (2010)
Panitz-Cohen and Mazar in Mazar et. al. (2020 v.2) - Photo 12.215 -
Rooms 10476 and 10506 of C-1a Building CP from Mazar et. al. (2020 v.2)
Photo 12.215
C-1a Building CP, Rooms 10476 and 10506, looking west (2010)
Panitz-Cohen and Mazar in Mazar et. al. (2020 v.2) - Photo 12.216 -
C-1a Building CP from Mazar et. al. (2020 v.2)
Photo 12.216
C-1a Building CP, entrance between Rooms 10476 and 11451, looking south at plaster on doorjamb of Wall 10485 (2010)
Panitz-Cohen and Mazar in Mazar et. al. (2020 v.2) - Photo 12.217 -
Broken Vessels on 1 side of wall and on a Bench on other side - in C-1a Building CP from Mazar et. al. (2020 v.2)
Photo 12.217
C-1a Building CP, looking north at Room 10458 (top) and Room 10476 (bottom); note vessels on Bench 10466 (2010)
Panitz-Cohen and Mazar in Mazar et. al. (2020 v.2) - Photo 12.218 -
Room 10476 in C-1a Building CP from Mazar et. al. (2020 v.2)
Photo 12.218
Building CP, Stratum C-1a, Room 10476, looking west at Bench 10467 and entrance into Room 9450 (2010)
Panitz-Cohen and Mazar in Mazar et. al. (2020 v.2) - Photo 12.219 -
Fractured stones in sub floor construction of Room 10476 in C-1a Building CP from Mazar et. al. (2020 v.2)
Photo 12.219
C-1a Building CP, Room 10476, sub-floor construction 11468, looking north (2012)
Panitz-Cohen and Mazar in Mazar et. al. (2020 v.2) - Photo 12.220 -
Large mortar from Building CP, Room 10476 from Mazar et. al. (2020 v.2)
Photo 12.220
Large mortar from Building CP, Room 10476 (2010)
Panitz-Cohen and Mazar in Mazar et. al. (2020 v.2) - Photo 12.221 -
Destruction debris in Room 10476 of C-1a Building CP from Mazar et. al. (2020 v.2)
Photo 12.221
C-1a Building CP, looking south at destruction debris in Room 10476, with loom weights, stones and smashed top of kraterpithos (Fig. 13.146:4), east of Bin 10488 (2010)
Panitz-Cohen and Mazar in Mazar et. al. (2020 v.2) - Photo 12.222 -
Bin 10488 and krater-pithos from Mazar et. al. (2020 v.2)
Photo 12.222
As Photo 12.228, detail of Bin 10488 and krater-pithos (Fig. 12.146:4) to its east (2010)
Panitz-Cohen and Mazar in Mazar et. al. (2020 v.2) - Photo 12.223 -
C-1a Building CP from Mazar et. al. (2020 v.2)
Photo 12.223
C-1a Building CP, looking west from southwestern part of Room 10476 to Room 10506; Bin 10488 in front and Bin 10501 in back; note pottery ‘bucket’ between the bins (2010)
Panitz-Cohen and Mazar in Mazar et. al. (2020 v.2) - Photo 12.224 -
C-1a Building CP from Mazar et. al. (2020 v.2)
Photo 12.224
C-1a Building CP, detail of grain in bottom of Bin 10488 (2010)
Panitz-Cohen and Mazar in Mazar et. al. (2020 v.2) - Photo 12.225 -
Room 9449 of C-1a Building CP from Mazar et. al. (2020 v.2)
Photo 12.225
C-1a Building CP, Room 9449, during excavation, looking north; Bench 9443 in north of room; left: excavation down to floor of apiary (2008)
Panitz-Cohen and Mazar in Mazar et. al. (2020 v.2) - Photo 12.226 -
Bin 9434 in Room 9450 of C-1a Building CP from Mazar et. al. (2020 v.2)
Photo 12.226
C-1a Building CP, Bin 9434 in Room 9450, looking south (2008)
Panitz-Cohen and Mazar in Mazar et. al. (2020 v.2) - Photo 12.227 -
Room 9450 of C-1a Building CP from Mazar et. al. (2020 v.2)
Photo 12.227
C-1a Building CP, Room 9450, looking southeast (2008)
Panitz-Cohen and Mazar in Mazar et. al. (2020 v.2) - Photo 12.228 -
Copious destruction debris in Room 9450 of C-1a Building CP from Mazar et. al. (2020 v.2)
Photo 12.228
C-1a Building CP, Room 9450, pottery altar (Chapter 35, No. 2) in destruction debris (9420), looking east (2008)
Panitz-Cohen and Mazar in Mazar et. al. (2020 v.2) - Photo 12.229 -
Room 10506 of C-1a Building CP from Mazar et. al. (2020 v.2)
Photo 12.229
C-1a Building CP, Room 10506, looking east into Room 10476; two pottery bins and ‘bucket’ along Wall 10457 (2010)
Panitz-Cohen and Mazar in Mazar et. al. (2020 v.2) - Photo 12.230 -
Room 10506 of C-1a Building CP from Mazar et. al. (2020 v.2)
Photo 12.230
C-1a Building CP, Room 10506, looking west, with Bin 10501 in southwestern corner; meter stick along Bench 10504 (2010)
Panitz-Cohen and Mazar in Mazar et. al. (2020 v.2) - Photo 12.231 -
Room 10506 of C-1a Building CP from Mazar et. al. (2020 v.2)
Photo 12.231
C-1a Building CP, Room 10506, looking southwest, pottery bucket and Bin 10501 against Wall 10457 (2010)
Panitz-Cohen and Mazar in Mazar et. al. (2020 v.2) - Photo 12.232 -
Bin 10501 restored Mazar et. al. (2020 v.2)
Photo 12.232
Bin 10501 restored
Panitz-Cohen and Mazar in Mazar et. al. (2020 v.2) - Photo 12.233 -
Room 10506 of C-1a Building CP from Mazar et. al. (2020 v.2)
Photo 12.233
C-1a Building CP, Room 10506, looking southeast; juglet (Fig. 13.156:18) laid against threshold in Wall 10480 (2012)
Panitz-Cohen and Mazar in Mazar et. al. (2020 v.2) - Photo 12.234 -
Walls of Building CL from Mazar et. al. (2020 v.2)
Photo 12.234
Walls 9406, 5418 and 5453 of C-1a Building CL above C-1b Wall 9453 and apiary destruction debris (2010)
Panitz-Cohen and Mazar in Mazar et. al. (2020 v.2)
- Plans: Figs. 12.19, 12.50, 12.52a–c
- Section: Fig. 12.93
- Photos 12.169–12.170, 12.189–12.234
- Pottery: Figs. 13.143–13.160
- Figure 12.19 -
Plan of Stratum C-1a from Mazar et. al. (2020 v.2)
Figure 12.19
Plan of Stratum C-1a (1:200)
Panitz-Cohen and Mazar in Mazar et. al. (2020 v.2) - Figure 12.50 -
Plan of Stratum C-1a, south-center and southeast from Mazar et. al. (2020 v.2)
Figure 12.50
Plan of Stratum C-1a, south-center and southeast (1:125)
Panitz-Cohen and Mazar in Mazar et. al. (2020 v.2) - Figure 12.53 -
Plan of Building CL, Stratum C-1a from Mazar et. al. (2020 v.2)
Figure 12.53
Plan of Building CL, Stratum C-1a (1:75)
Panitz-Cohen and Mazar in Mazar et. al. (2020 v.2) - Figure 12.73 -
Section 19 from Mazar et. al. (2020 v.2)
Figure 12.73
Section 19 (Squares T–Y/1, looking south
Panitz-Cohen and Mazar in Mazar et. al. (2020 v.2) - Figure 12.74 -
Section 20 from Mazar et. al. (2020 v.2)
Figure 12.74
Section 20 (Squares T–Y/1, looking south at Wall 2426)
Panitz-Cohen and Mazar in Mazar et. al. (2020 v.2) - Figure 12.80 -
Section 26 from Mazar et. al. (2020 v.2)
Figure 12.80
Section 26 (Square Z/1, western end, looking south)
Panitz-Cohen and Mazar in Mazar et. al. (2020 v.2) - Figure 12.83 -
Section 29 from Mazar et. al. (2020 v.2)
Figure 12.83
Section 29 (Squares Z/1–2, looking east)
Panitz-Cohen and Mazar in Mazar et. al. (2020 v.2) - Figure 12.84 -
Section 30 from Mazar et. al. (2020 v.2)
Figure 12.84
Section 30 (Square Z/20, looking east)
Panitz-Cohen and Mazar in Mazar et. al. (2020 v.2) - Figure 12.85 -
Section 31 from Mazar et. al. (2020 v.2)
Figure 12.85
Section 31 (Square Z/20, looking west)
Panitz-Cohen and Mazar in Mazar et. al. (2020 v.2) - Figure 12.86 -
Section 32 from Mazar et. al. (2020 v.2)
Figure 12.86
Section 32 (Square Y/1, looking east along Wall 4443)
Panitz-Cohen and Mazar in Mazar et. al. (2020 v.2) - Figure 12.87 -
Section 33 from Mazar et. al. (2020 v.2)
Figure 12.87
Section 33 (Square Y/1, section below Wall 2504, looking south)
Panitz-Cohen and Mazar in Mazar et. al. (2020 v.2) - Photo 12.234 -
Walls of Building CL from Mazar et. al. (2020 v.2)
Photo 12.234
Walls 9406, 5418 and 5453 of C-1a Building CL above C-1b Wall 9453 and apiary destruction debris (2010)
Panitz-Cohen and Mazar in Mazar et. al. (2020 v.2) - Photo 12.235 -
Walls in section of C-1a Building CL above C-1b apiary destruction debris (collapsed walls) from Mazar et. al. (2020 v.2)
Photo 12.235
Square Y/1, C-1a Building CL, western wing, looking north; walls in section above apiary destruction debris (2000)
Panitz-Cohen and Mazar in Mazar et. al. (2020 v.2) - Photo 12.236 -
Wall 4443 in C-1a Building CL from Mazar et. al. (2020 v.2)
Photo 12.236
Squares Y– Z/1, C-1a Building CL, Wall 4443 with layer of black oily material; Wall 2504 on the left (north); looking east (2001)
Panitz-Cohen and Mazar in Mazar et. al. (2020 v.2) - Photo 12.237 -
Burnt material (9432) on Floor 9435 in C-1a Building CL from Mazar et. al. (2020 v.2)
Photo 12.237
Square Z/20, C-1a Building CL, looking south; burnt material (9432) on Floor 9435 (2008)
Panitz-Cohen and Mazar in Mazar et. al. (2020 v.2) - Photo 12.238 -
Burnt oily material (5435) on Floor 5482 in C-1a Building CL from Mazar et. al. (2020 v.2)
Photo 12.238
C-1a Building CL, burnt oily material (5435) on Floor 5482, looking west (2001)
Panitz-Cohen and Mazar in Mazar et. al. (2020 v.2) - Photo 12.239 -
Eastern wing and Floor 5446 in C-1a Building CL from Mazar et. al. (2020 v.2)
Photo 12.239
C-1a Building CL, eastern wing, looking south; Floor 5446 (2007)
Panitz-Cohen and Mazar in Mazar et. al. (2020 v.2)
- Plans: Figs. 12.19, 12.50, 12.53
- Sections: Figs. 12.73–12.74, 12.80, 12.83–12.87
- Photos 12.234–12.239
- Pottery: Figs. 13.125–13.129
Fig. 12.54Location of section drawings on superimposed plan of Strata C-3–C-1a (1:250)
Panitz-Cohen and Mazar in Mazar et. al. (2020 v.2)
- Figure 12.18 -
Plan of Stratum C-1b from Mazar et. al. (2020 v.2)
Figure 12.18
Plan of Stratum C-1b (1:200)
Panitz-Cohen and Mazar in Mazar et. al. (2020 v.2) - Figure 12.19 -
Plan of Stratum C-1a from Mazar et. al. (2020 v.2)
Figure 12.19
Plan of Stratum C-1a (1:200)
Panitz-Cohen and Mazar in Mazar et. al. (2020 v.2) - Figure 12.24 -
Plan of Stratum C-1b from Mazar et. al. (2020 v.2)
Figure 12.24
Plan of Stratum C-1b, west (1:125)
Panitz-Cohen and Mazar in Mazar et. al. (2020 v.2) - Figure 12.25 -
Plan of Stratum C-1a from Mazar et. al. (2020 v.2)
Figure 12.25
Plan of Stratum C-1a, west (1:125)
Panitz-Cohen and Mazar in Mazar et. al. (2020 v.2) - Figure 12.27 -
Plan of Stratum C-1b from Mazar et. al. (2020 v.2)
Figure 12.27
Plan of Stratum C-1b, north-center (1:125)
Panitz-Cohen and Mazar in Mazar et. al. (2020 v.2) - Figure 12.28 -
Plan of Stratum C-1a from Mazar et. al. (2020 v.2)
Figure 12.28
Plan of Stratum C-1a, north-center (1:125)
Panitz-Cohen and Mazar in Mazar et. al. (2020 v.2) - Figure 12.29 -
Building CE, Stratum C-1b; corner of Walls 2454 and 1491 from Mazar et. al. (2020 v.2)
Figure 12.29
Building CE, Stratum C-1b; elevation: corner of Walls 2454 and 1491 (1:50)
Panitz-Cohen and Mazar in Mazar et. al. (2020 v.2) - Figure 12.33 -
Plan of Building CR, early phase of Stratum C-1b from Mazar et. al. (2020 v.2)
Figure 12.33
Plan of Building CR, early phase of Stratum C-1b; the pits in Squares A, Z/6 are possibly an interim phase between Strata C-2 and C-1b (1:100)
Panitz-Cohen and Mazar in Mazar et. al. (2020 v.2) - Figure 12.34 -
Plan of Stratum C-1b from Mazar et. al. (2020 v.2)
Figure 12.34
Plan of Stratum C-1b, northeast (1:125)
Panitz-Cohen and Mazar in Mazar et. al. (2020 v.2) - Figure 12.35 -
Plan of Stratum C-1a from Mazar et. al. (2020 v.2)
Figure 12.35
Plan of Stratum C-1a, northeast (1:125)
Panitz-Cohen and Mazar in Mazar et. al. (2020 v.2) - Figure 12.36 -
Plan of Building CF, Stratum C-1a from Mazar et. al. (2020 v.2)
Figure 12.36
Plan of Building CF, Stratum C-1a (1:75)
Panitz-Cohen and Mazar in Mazar et. al. (2020 v.2) - Figure 12.39 -
Plan of Stratum C-1b from Mazar et. al. (2020 v.2)
Figure 12.39
Plan of Stratum C-1b, south-center and southeast, with apiary (1:125)
Panitz-Cohen and Mazar in Mazar et. al. (2020 v.2) - Figure 12.40 -
Plan of Buildings CG, CH, CM and apiary, Stratum C-1b from Mazar et. al. (2020 v.2)
Figure 12.40
Plan of Buildings CG, CH, CM and apiary, Stratum C-1b (1:75)
Panitz-Cohen and Mazar in Mazar et. al. (2020 v.2) - Figure 12.44 -
Plan of Building CH and apiary from Mazar et. al. (2020 v.2)
Figure 12.44
Plan of Building CH and apiary (scale 1:100)
Panitz-Cohen and Mazar in Mazar et. al. (2020 v.2) - Figure 12.48 -
Plan of Building CZ, Stratum C-1b from Mazar et. al. (2020 v.2)
Figure 12.48
Plan of Building CZ, Stratum C-1b (1:75)
Panitz-Cohen and Mazar in Mazar et. al. (2020 v.2) - Figure 12.50 -
Plan of Stratum C-1a, south-center and southeast from Mazar et. al. (2020 v.2)
Figure 12.50
Plan of Stratum C-1a, south-center and southeast (1:125)
Panitz-Cohen and Mazar in Mazar et. al. (2020 v.2) - Figure 12.51 -
Plan of Buildings CQ3 and CX, Stratum C-1a from Mazar et. al. (2020 v.2)
Figure 12.51
Plan of Buildings CQ3 and CX, Stratum C-1a (1:75)
Panitz-Cohen and Mazar in Mazar et. al. (2020 v.2) - Figure 12.52a -
Plan of Building CP, Stratum C-1a from Mazar et. al. (2020 v.2)
Figure 12.52a
Plan of Building CP, Stratum C-1a (1:75)
Panitz-Cohen and Mazar in Mazar et. al. (2020 v.2) - Figure 12.52b -
Isometric reconstruction, Building CP, Stratum C-1a from Mazar et. al. (2020 v.2)
Figure 12.52b
Isometric reconstruction, Building CP, Stratum C-1a, looking northwest
Panitz-Cohen and Mazar in Mazar et. al. (2020 v.2) - Figure 12.52c -
Plan of sub-floor brick construction in Building CP, Stratum C-1a from Mazar et. al. (2020 v.2)
Figure 12.52c
Plan of sub-floor brick construction in Building CP, Stratum C-1a (1:100)
Panitz-Cohen and Mazar in Mazar et. al. (2020 v.2)
- Figure 12.55 -
Section 1 from Mazar et. al. (2020 v.2)
Figure 12.55
Section 1 (Squares A/6–C/6, looking north)
Panitz-Cohen and Mazar in Mazar et. al. (2020 v.2) - Figure 12.56 -
Section 2 from Mazar et. al. (2020 v.2)
Figure 12.56
Section 2 (Squares B/5–6, section below C-1 Walls 6420 and 6476, and below C-2 Wall 7506, looking west)
Panitz-Cohen and Mazar in Mazar et. al. (2020 v.2) - Figure 12.57 -
Section 3 from Mazar et. al. (2020 v.2)
Figure 12.57
Section 3 (Squares A/4–5, looking east)
Panitz-Cohen and Mazar in Mazar et. al. (2020 v.2) - Figure 12.58 -
Section 4 from Mazar et. al. (2020 v.2)
Figure 12.58
Section 4 (Squares Z/5–6, looking east)
Panitz-Cohen and Mazar in Mazar et. al. (2020 v.2) - Figure 12.59 -
Section 5 from Mazar et. al. (2020 v.2)
Figure 12.59
Section 5 (Square Y/5, section below Bench 5472, looking west)
Panitz-Cohen and Mazar in Mazar et. al. (2020 v.2) - Figure 12.60 -
Section 6 from Mazar et. al. (2020 v.2)
Figure 12.60
Section 6 (Square Y/5, section below Wall 5431, looking south)
Panitz-Cohen and Mazar in Mazar et. al. (2020 v.2) - Figure 12.61 -
Section 7 from Mazar et. al. (2020 v.2)
Figure 12.61
Section 7 (Squares Y–Z/4, section below Bench 5468, looking south)
Panitz-Cohen and Mazar in Mazar et. al. (2020 v.2) - Figure 12.62 -
Section 8 from Mazar et. al. (2020 v.2)
Figure 12.62
Section 8 (Square Y/5, looking north)
Panitz-Cohen and Mazar in Mazar et. al. (2020 v.2) - Figure 12.63 -
Section 9 from Mazar et. al. (2020 v.2)
Figure 12.63
Section 9 (Square Y/5, looking west)
Panitz-Cohen and Mazar in Mazar et. al. (2020 v.2) - Figure 12.64 -
Section 10 from Mazar et. al. (2020 v.2)
Figure 12.64
Section 10 (Square T/4, looking east)
Panitz-Cohen and Mazar in Mazar et. al. (2020 v.2) - Figure 12.65 -
Section 11 from Mazar et. al. (2020 v.2)
Figure 12.65
Section 11 (Squares T/1–4, looking west); the section in Square T/3 north of Walls 1448/4439 was drawn on a line east of Wall 1506
Panitz-Cohen and Mazar in Mazar et. al. (2020 v.2) - Figure 12.66 -
Section 12 from Mazar et. al. (2020 v.2)
Figure 12.66
Section 12 (Square S/4, looking east at walls)
Panitz-Cohen and Mazar in Mazar et. al. (2020 v.2) - Figure 12.67 -
Section 13 from Mazar et. al. (2020 v.2)
Figure 12.67
Section 13 (Square S/3, section below Wall 1448, looking south)
Panitz-Cohen and Mazar in Mazar et. al. (2020 v.2) - Figure 12.68 -
Section 14 from Mazar et. al. (2020 v.2)
Figure 12.67
Section 14 (Square T/3, looking north)
Panitz-Cohen and Mazar in Mazar et. al. (2020 v.2) - Figure 12.69 -
Section 15 from Mazar et. al. (2020 v.2)
Figure 12.69
Section 15 (Squares S–Y/2, looking north) (1:55)
Panitz-Cohen and Mazar in Mazar et. al. (2020 v.2) - Figure 12.70 -
Section 16 from Mazar et. al. (2020 v.2)
Figure 12.70
Section 16 (Squares S–Y/1, looking north) (1:55)
Panitz-Cohen and Mazar in Mazar et. al. (2020 v.2) - Figure 12.72 -
Section 18 from Mazar et. al. (2020 v.2)
Figure 12.72
Section 18 (Squares T–Y/2, looking north at Wall 1437 and subsidiary balk to its east)
Panitz-Cohen and Mazar in Mazar et. al. (2020 v.2) - Figure 12.73 -
Section 19 from Mazar et. al. (2020 v.2)
Figure 12.73
Section 19 (Squares T–Y/1, looking south
Panitz-Cohen and Mazar in Mazar et. al. (2020 v.2) - Figure 12.74 -
Section 20 from Mazar et. al. (2020 v.2)
Figure 12.74
Section 20 (Squares T–Y/1, looking south at Wall 2426)
Panitz-Cohen and Mazar in Mazar et. al. (2020 v.2) - Figure 12.75 -
Section 21 from Mazar et. al. (2020 v.2)
Figure 12.75
Section 21 (Square Y/3, looking north at Wall 4465)
Panitz-Cohen and Mazar in Mazar et. al. (2020 v.2) - Figure 12.76 -
Section 22 from Mazar et. al. (2020 v.2)
Figure 12.76
Section 22 (Squares T–Y/3, looking north in Room 2460
Panitz-Cohen and Mazar in Mazar et. al. (2020 v.2) - Figure 12.77 -
Section 23 from Mazar et. al. (2020 v.2)
Figure 12.77
Section 23 (Square Y/3, section below Wall 2411, looking east)
Panitz-Cohen and Mazar in Mazar et. al. (2020 v.2) - Figure 12.78 -
Section 24 from Mazar et. al. (2020 v.2)
Figure 12.78
Section 24 (Square Z/3, looking east)
Panitz-Cohen and Mazar in Mazar et. al. (2020 v.2) - Figure 12.79 -
Section 25 from Mazar et. al. (2020 v.2)
Figure 12.79
Section 25 (Squares T–Y/3, looking south)
Panitz-Cohen and Mazar in Mazar et. al. (2020 v.2) - Figure 12.80 -
Section 26 from Mazar et. al. (2020 v.2)
Figure 12.80
Section 26 (Square Z/1, western end, looking south)
Panitz-Cohen and Mazar in Mazar et. al. (2020 v.2) - Figure 12.81 -
Section 27 from Mazar et. al. (2020 v.2)
Figure 12.81
Section 27 (Squares Y–Z/2, looking north)
Panitz-Cohen and Mazar in Mazar et. al. (2020 v.2) - Figure 12.82 -
Section 28 from Mazar et. al. (2020 v.2)
Figure 12.82
Section 28 (Squares Y–Z, A/1, looking north)
Panitz-Cohen and Mazar in Mazar et. al. (2020 v.2) - Figure 12.83 -
Section 29 from Mazar et. al. (2020 v.2)
Figure 12.83
Section 29 (Squares Z/1–2, looking east)
Panitz-Cohen and Mazar in Mazar et. al. (2020 v.2) - Figure 12.84 -
Section 30 from Mazar et. al. (2020 v.2)
Figure 12.84
Section 30 (Square Z/20, looking east)
Panitz-Cohen and Mazar in Mazar et. al. (2020 v.2) - Figure 12.85 -
Section 31 from Mazar et. al. (2020 v.2)
Figure 12.85
Section 31 (Square Z/20, looking west)
Panitz-Cohen and Mazar in Mazar et. al. (2020 v.2) - Figure 12.86 -
Section 32 from Mazar et. al. (2020 v.2)
Figure 12.86
Section 32 (Square Y/1, looking east along Wall 4443)
Panitz-Cohen and Mazar in Mazar et. al. (2020 v.2) - Figure 12.87 -
Section 33 from Mazar et. al. (2020 v.2)
Figure 12.87
Section 33 (Square Y/1, section below Wall 2504, looking south)
Panitz-Cohen and Mazar in Mazar et. al. (2020 v.2) - Figure 12.88 -
Section 34 from Mazar et. al. (2020 v.2)
Figure 12.88
Section 34 (A–C/2, looking north) 2504, looking south)
Panitz-Cohen and Mazar in Mazar et. al. (2020 v.2) - Figure 12.89 -
Section 35 from Mazar et. al. (2020 v.2)
Figure 12.89
Section 35 (Square B/3, section below Wall 10518 (looking south)
Panitz-Cohen and Mazar in Mazar et. al. (2020 v.2) - Figure 12.90 -
Section 36 from Mazar et. al. (2020 v.2)
Figure 12.90
Section 36 (Squares B/2–3, section below Wall 10464, looking west)
Panitz-Cohen and Mazar in Mazar et. al. (2020 v.2) - Figure 12.91 -
Section 37 from Mazar et. al. (2020 v.2)
Figure 12.91
Section 37 (Square C/3, looking east)
Panitz-Cohen and Mazar in Mazar et. al. (2020 v.2) - Figure 12.92 -
Section 38 from Mazar et. al. (2020 v.2)
Figure 12.92
Section 38 (Squares B–C/3, looking north at Wall 10515 and entrance)
Panitz-Cohen and Mazar in Mazar et. al. (2020 v.2) - Figure 12.94 -
Section 40 from Mazar et. al. (2020 v.2)
Figure 12.94
Section 40 (Square A/3, looking east)
Panitz-Cohen and Mazar in Mazar et. al. (2020 v.2) - Figure 12.95 -
Section 41 from Mazar et. al. (2020 v.2)
Figure 12.95
Section 41 (Squares A/2–3, looking west at entrance in Wall 9406 and C-1b walls below)
Panitz-Cohen and Mazar in Mazar et. al. (2020 v.2) - Figure 12.97 -
Section 43 (Square R/4, looking north) from Mazar et. al. (2020 v.2)
Figure 12.97
Section 43 (Square R/4, looking north)
Panitz-Cohen and Mazar in Mazar et. al. (2020 v.2)
- Table 15.1
Stratigraphy and chronology in Area D, with correlation to Area C from Mazar et. al. (2020 v. 3: Chapter 17)
Table 15.1
Stratigraphy and chronology in Area D, with correlation to Area C
Mazar et. al. (2020 v.3) - Table 15.2
Locus and basket numbers from Mazar et. al. (2020 v. 3: Chapter 17)
Table 15.2
Locus and basket numbers
Mazar et. al. (2020 v.3) - Figure 15.1
Location of section drawings on superimposed plan of Strata D-11–D-2 from Mazar et. al. (2020 v. 3: Chapter 17)
Figure 15.1
Location of section drawings on superimposed plan of Strata D-11–D-2
Mazar et. al. (2020 v.3) - Figure 15.2
Schematic section of Area D from Mazar et. al. (2020 v. 3: Chapter 17)
Figure 15.2
Schematic section of Area D
Mazar et. al. (2020 v.3)
- Table 15.1 -
Stratigraphy and chronology in Area D, with correlation to Area C from Mazar et. al. (2020 v. 3: Chapter 17)
Table 15.1
Stratigraphy and chronology in Area D, with correlation to Area C
Mazar et. al. (2020 v.3) - Table 15.2 -
Locus and basket numbers from Mazar et. al. (2020 v. 3: Chapter 17)
Table 15.2
Locus and basket numbers
Mazar et. al. (2020 v.3) - Figure 15.1 -
Location of section drawings on superimposed plan of Strata D-11–D-2 from Mazar et. al. (2020 v. 3: Chapter 17)
Figure 15.1
Location of section drawings on superimposed plan of Strata D-11–D-2
Mazar et. al. (2020 v.3) - Figure 15.2 -
Schematic section of Area D from Mazar et. al. (2020 v. 3: Chapter 17)
Figure 15.2
Schematic section of Area D
Mazar et. al. (2020 v.3) - Photo 15.1 -
Area D at the end of 1997 season from Mazar et. al. (2020 v. 3: Chapter 15)
Photo 15.1
General view, end of 1997 season, looking east; from top to bottom: Squares Q/4 to L/4
Mazar et. al. (2020 v.3) - Photo 15.2 -
Area D at the end of 1998 season from Mazar et. al. (2020 v. 3: Chapter 15)
Photo 15.2
General view, end of 1998 season, looking east; from top to bottom: Squares Q/4 to L/4
Mazar et. al. (2020 v.3) - Photo 15.3 -
Area D at the end of 2000 season from Mazar et. al. (2020 v. 3: Chapter 15)
Photo 15.3
General view, end of 2000 season, looking east; from top to bottom: Squares Q/4–5 to L/4
Mazar et. al. (2020 v.3) - Photo 15.4 -
Area D at the end of 2005 season from Mazar et. al. (2020 v. 3: Chapter 15)
Photo 15.4
General view, end of 2005 season, looking east; from top to bottom: Squares Q/4–5 to L/4–5
Mazar et. al. (2020 v.3) - Photo 15.5 -
Aerial view, end of 2008 season from Mazar et. al. (2020 v. 3: Chapter 15)
Photo 15.5
Aerial view, end of 2008 season
Mazar et. al. (2020 v.3) - Photo 15.6 -
General view, end of 2010 season from Mazar et. al. (2020 v. 3: Chapter 15)
Photo 15.6
General view, end of 2010 season, looking southwest; Squares L–N/4–5
Mazar et. al. (2020 v.3)
Area D was a step trench dug in the northern part of the western slope of the lower mound, from the bottom of the tell to the uppermost level (Fig. 15.2). The area was excavated during seven seasons (1997–1998, 2000, 2005, 2007–2008, 2010). In 1997 and 1998, the area was excavated as a 4.0 m wide trench extending westwards from the northwestern square of Area C (R/4) and running five squares (25 m) down the slope (Squares Q/4–L/4) (Photos 15.1–15.2). In 2000 and 2005, the trench was extended by one square to the north (L–Q/5), while only minor probes were conducted in the original trench (Photos 15.3–15.4). Starting from 2005, Area D was divided into two sub-areas: the upper (eastern) portion of the slope (Squares P– Q/4–5) was excavated as Area D1 and the lower (western) portion (Squares L–N/4–5) as Area D2. These terms are not retained in this chapter and are replaced by Area D East (the upper part of the trench) and Area D West (the lower part of the trench) respectively. Both areas were excavated in 2005, 2007 and 2008 (Photo 15.5), while in the 2010 season, and for a few days in April 2011 (Squares N/4–5), work was carried out only in Area D West (Photo 15.6). The actual width of the excavated step trench was 9.0 m (Fig. 15.1). In addition to the manual excavation, two backhoe trenches were excavated from the base of the mound westwards, towards the present agricultural field, intended to reveal geological features and geomorphological processes at the base of the mound. In the first three seasons (1997, 1998, 2000) Area D was supervised by Amir Sumaka'i Fink, together with Yoav Schur in 1997–1998. In 2005, 2007, 2008, 2010 and 2011), Area D East was supervised by Yael Rotem and Area D West by Uri Davidovich.
The present chapter is divided between the two parts of the area: the western (lower) part and eastern (higher) part.
The goal of the excavation of Area D was to study the occupation history, stratigraphic sequence, formation processes and potential fortification lines in the lower mound. Based on results of previous surveys (see Chapter 3) and the shape of the steep, homogeneous western and northern slopes of the lower mound, it was assumed that this formation was created by an earthen rampart, possibly constructed during the Middle Bronze Age. However, excavation has unequivocally shown that the lower mound was first settled in Late Bronze I, a phenomenon which is almost unparalleled at other sites in the Southern Levant.
Continuous occupation was detected in Area D from Late Bronze I to Iron IIA, a time span of some 600 years. The excavation concentrated on defining the various strata and occupation phases and their architectural remains, as well as the nature of the transition between them. Eleven main strata and several sub-phases were defined along the slope, with an accumulation reaching 11.45 m (between levels 76.45 m and 87.90 m) (Fig. 15.2). No fortifications were found along the entire step trench and no major destruction events were identified between the strata. The correlation between Strata D-2 and D-1 to the stratigraphy in nearby Area C was a key to anchoring the local stratigraphy of Area D in relation to the rest of the tell, although the issue of the precise correlation between the Iron IB strata in Area D and those in Area C remains unresolved and is further discussed below in this chapter. Table 15.1 presents the stratigraphic sequence and suggested correlation to strata in Area C, as well as periodization and approximate dates of the various strata.1
- Table 15.1 -
Stratigraphy and chronology in Area D, with correlation to Area C from Mazar et. al. (2020 v. 3: Chapter 17)
Table 15.1
Stratigraphy and chronology in Area D, with correlation to Area C
Mazar et. al. (2020 v.3) - Table 15.2 -
Locus and basket numbers from Mazar et. al. (2020 v. 3: Chapter 17)
Table 15.2
Locus and basket numbers
Mazar et. al. (2020 v.3) - Figure 15.1 -
Location of section drawings on superimposed plan of Strata D-11–D-2 from Mazar et. al. (2020 v. 3: Chapter 17)
Figure 15.1
Location of section drawings on superimposed plan of Strata D-11–D-2
Mazar et. al. (2020 v.3) - Figure 15.2 -
Schematic section of Area D from Mazar et. al. (2020 v. 3: Chapter 17)
Figure 15.2
Schematic section of Area D
Mazar et. al. (2020 v.3) - Figure 15.17b -
Section 1b from Mazar et. al. (2020 v. 3: Chapter 15)
Figure 15.17b
Section 1b (Squares J–M/5 and part of N/5, looking north)
Mazar et. al. (2020 v.3)
The initial understanding of the formation processes of the site assumed that Tel Rehov in general, and the lower mound in particular, developed on a natural spur which protruded slightly above the level of the surrounding fields. This assumption was presumably corroborated later by the results of the geoseismic survey, which showed that both parts of the mound were built on an elevated, eastward-tilted tufa block (Zilberman et al. 2002; Chapter 2, this volume). It was also assumed that the level of the field to the west of the mound remained fairly unchanged during the time span that elapsed from the first settlement in the lower mound to the present day. The low natural hill inferred from the geoseismic survey (Zilberman et al. 2002) was not found during the excavation. In fact, the excavation in Area D has shown that the lower mound was built of successive, almost horizontal strata which show almost no terracing, beginning at a level even lower than that of the current field.
Evidence gathered both by excavation at the base of Area D (see below) and during the geoseismic survey indicates that a geological fault, probably of a stepped structure, borders the mound on the west (Chapter 2 and Zilberman et al. 2004). Young tectonic activity along this fault, which postdates at least the earlier strata of the lower mound, is indicated by the missing western portion of the monumental building of Stratum D-10 (see below), as gravitational erosion cannot account for this observation. This tectonic activity has created, together with the continuous occupation of the site east of the fault line, a clear demarcation between the mound and the down-faulted block to its west, a process which possibly enhanced post-depositional erosion on the western slope of the mound. It is hypothesized, based on the plans of most strata (e.g., the buildings of Strata D-5 and D-4), that the scale of erosion (i.e., the missing portions of most strata) is no greater than a few meters. Thus, it seems untenable to assume that fortification systems could have been entirely eroded. Combined with the evidence gathered in Areas C and E, it is concluded that the lower mound was probably never fortified.
The young tectonic activities, both in the aforementioned fault and in other faults surrounding the mound (Zilberman et al. 2004; Chapter 2, this volume), could also have caused the tilting of layers and structures towards the southeast (towards the center of the mound) that was noted in both Areas D and C. This post-depositional tilting could have occurred during the occupational sequence, either close in time to the creation of the tilted features, or much later (see Chapter 3 and below, discussion of Strata D-11 and D-10).
Based on a backhoe trench excavated in the present-day field west of the mound, it is clear that the down-faulted block is covered with at least 4.3 m of dark brown colluvium which accumulated in the last 1000–1500 years, as indicated by the appearance of worn Roman-Byzantine or later sherds which must have originated in the Late Antiquity settlement of Rehob, located ca. 700 m to the northwest of Area D (Vitto 1993). The top level of the present field is ca. 2.0 m higher than the bedrock of the uplifted tufa block, as was exposed at the base of the excavation in Area D (Fig. 15.17b, and further below).
- Table 15.1 -
Stratigraphy and chronology in Area D, with correlation to Area C from Mazar et. al. (2020 v. 3: Chapter 17)
Table 15.1
Stratigraphy and chronology in Area D, with correlation to Area C
Mazar et. al. (2020 v.3) - Table 15.2 -
Locus and basket numbers from Mazar et. al. (2020 v. 3: Chapter 17)
Table 15.2
Locus and basket numbers
Mazar et. al. (2020 v.3) - Figure 15.1 -
Location of section drawings on superimposed plan of Strata D-11–D-2 from Mazar et. al. (2020 v. 3: Chapter 17)
Figure 15.1
Location of section drawings on superimposed plan of Strata D-11–D-2
Mazar et. al. (2020 v.3) - Figure 15.2 -
Schematic section of Area D from Mazar et. al. (2020 v. 3: Chapter 17)
Figure 15.2
Schematic section of Area D
Mazar et. al. (2020 v.3) - Figure 15.17a -
Section 1a from Mazar et. al. (2020 v. 3: Chapter 15)
Figure 15.17a
Section 1a (Squares G–L/5, looking north, showing probe in alluvial field)
Mazar et. al. (2020 v.3) - Figure 15.17b -
Section 1b from Mazar et. al. (2020 v. 3: Chapter 15)
Figure 15.17b
Section 1b (Squares J–M/5 and part of N/5, looking north)
Mazar et. al. (2020 v.3) - Figure 15.18a -
Section 2a from Mazar et. al. (2020 v. 3: Chapter 15)
Figure 15.18a
Section 2a (Squares M/4–5, looking west in Probe III)
Mazar et. al. (2020 v.3) - Figure 15.18b -
Section 2b from Mazar et. al. (2020 v. 3: Chapter 15)
Figure 15.18b
Section 2a (Squares M/4–5, looking west in Probe III)
Mazar et. al. (2020 v.3)
- Sections: Fig. 15.17a–b
Apart from studying the earliest part of the stratigraphic sequence of the lower mound, the excavations at the base of Area D had two additional goals: to clarify the outline of the natural topography, whether bedrock or virgin soil, which predated the first human activity in this area, and to explore the relationship between the formation processes of the lower mound in its initial phases and of the nearby plain located to the west of the mound. These investigations were carried out in three deep manually excavated probes and in two narrow backhoe trenches, all located at the lowermost part of the step trench.
Three probes were dug in order to explore the constructional fill of Stratum D-10 and occupation layers of Stratum D-11 (Fig. 15.3):
- Probe I, located at the northwestern corner of Square L/4 (excavated in 1998, 1.0×2.0 m)
- Probe II, located at the southwestern corner of Square M/4 (excavated in 2008 and 2010, ca. 1.0×2.5 m)
- Probe III, located at the southern part of Square M/5 and northern part of Square M/4 (excavated in 2010, ca. 9.0 sq m).
A 17 m-long backhoe trench, 0.7 m wide and up to 4.0 m deep, was first dug in 1998 in Squares K–L/5 (4.0 m long) and was extended and deepened during the 2005 and 2008 seasons, along the line of Squares J–M/5 (Fig. 15.3, lower part of Fig. 15.17a). The purpose of this trench was to examine the depth and extent of the 2.0 m-deep artificial fill of Stratum D-10 (which, at the time, was thought to be a natural phenomenon), as well as to uncover geological features related to the edge of the mound and its relation to the colluvial field to the west. During the 2008 season, another short trench (1.0 m wide, 2.5 m long, 4.3 m deep) was dug in this field (Squares H–G/5) (Fig. 15.17a). Although done with a backhoe, the work was closely supervised, with pottery collected and assigned to the various layers. Yet, most of this trench contained either topsoil wash (Squares J–K/5) or a deep fill devoid of finds (Squares L–M/5).
Bedrock, reached at the bottom of Probes I and III, as well as in the backhoe trench (Squares L– M/4–5) (Figs. 15.3, 15.17a, 15.18a), is composed of chunky yellowish tufa, belonging most probably to the Beth-Shean formation of the Late Pleistocene, at the margins of the tilted, uplifted block detected in the geoseismic survey (Chapter 2 and Zilberman et al. 2002). The tufa bedrock forms a roughly horizontal surface, detected at level 76.15 m in Squares K–M/5 in the backhoe trench, at 76.30 m at the bottom of Probe I, and at 75.95 m at the bottom of Probe III. In the western portion of the backhoe trench, at the eastern side of Square J/5, a natural fault was observed in the tufa bedrock. The fault, 1.3 m high, separates an eastern uplifted block from a down-faulted area to its west, where bedrock forms a horizontal surface at level 74.85 m (Figs. 15.17a–b). This fault may constitute only one branch of a wider, stepped fault, since the continuation of the long backhoe trench, dug in the field ca. 8.0 m to the west of the aforementioned fault, was excavated to level 73.85 m without reaching bedrock (Fig. 15.17a). This level is lower by ca. 1.0 m compared to the bedrock level of the down-faulted block detected in the long trench, thus implying a step-like fault zone west of the mound, which is probably part of the fault bordering Tel Rehov on the west, detected during the geoseismic survey (Chapter 2). Regarding the possibility of young tectonic activity along this fault line and its implications for the formation of the lower mound, see discussion above and further below.
The field which lies to the west of the lower mound, intensively cultivated in the last decades, gradually slopes from the west (near today’s Road 90) to the east, towards its lowest part just at the foot of the mound, where a north–south dirt road currently runs. The present level of the field at the base of Area D is 78.50 m, ca. 2.3 m above the uplifted tufa bedrock surface described above. As already mentioned, the short backhoe trench that was dug in the field ca. 8.0 m west of the aforementioned fault (Fig. 15.17a; Photo 15.7), descended from the surface of the field to level 73.85 m (4.3 m deep) without reaching bedrock.
The first anthropogenic activity in Squares K– L/4–5 seems to have taken place immediately above bedrock. Considering that the uplifted tufa bedrock had been exposed above ground when the first occupants arrived, the field would have been at least 2.0 m below its present level. However, due to the possibility of young tectonic activities, discussed above, the actual level of the field could have been much lower with regard to the initial occupation.
- Table 15.1 -
Stratigraphy and chronology in Area D, with correlation to Area C from Mazar et. al. (2020 v. 3: Chapter 17)
Table 15.1
Stratigraphy and chronology in Area D, with correlation to Area C
Mazar et. al. (2020 v.3) - Table 15.2 -
Locus and basket numbers from Mazar et. al. (2020 v. 3: Chapter 17)
Table 15.2
Locus and basket numbers
Mazar et. al. (2020 v.3) - Figure 15.1 -
Location of section drawings on superimposed plan of Strata D-11–D-2 from Mazar et. al. (2020 v. 3: Chapter 17)
Figure 15.1
Location of section drawings on superimposed plan of Strata D-11–D-2
Mazar et. al. (2020 v.3) - Figure 15.2 -
Schematic section of Area D from Mazar et. al. (2020 v. 3: Chapter 17)
Figure 15.2
Schematic section of Area D
Mazar et. al. (2020 v.3) - Figure 15.3 -
Plan of Stratum D-11b from Mazar et. al. (2020 v. 3: Chapter 15)
Figure 15.3
Plan of Stratum D-11b
Mazar et. al. (2020 v.3) - Figure 15.4 -
Plan of Stratum D-11a from Mazar et. al. (2020 v. 3: Chapter 15)
Figure 15.4
Plan of Stratum D-11a
Mazar et. al. (2020 v.3) - Figure 15.17a -
Section 1a from Mazar et. al. (2020 v. 3: Chapter 15)
Figure 15.17a
Section 1a (Squares G–L/5, looking north, showing probe in alluvial field)
Mazar et. al. (2020 v.3) - Figure 15.17b -
Section 1b from Mazar et. al. (2020 v. 3: Chapter 15)
Figure 15.17b
Section 1b (Squares J–M/5 and part of N/5, looking north)
Mazar et. al. (2020 v.3) - Figure 15.18a -
Section 2a from Mazar et. al. (2020 v. 3: Chapter 15)
Figure 15.18a
Section 2a (Squares M/4–5, looking west in Probe III)
Mazar et. al. (2020 v.3) - Figure 15.18b -
Section 2b from Mazar et. al. (2020 v. 3: Chapter 15)
Figure 15.18b
Section 2a (Squares M/4–5, looking west in Probe III)
Mazar et. al. (2020 v.3) - Figure 15.19 -
Section 3 from Mazar et. al. (2020 v. 3: Chapter 15)
Figure 15.19
Section 3 (Squares L–N/4, looking north)
Mazar et. al. (2020 v.3) - Figure 15.20 -
Section 4 from Mazar et. al. (2020 v. 3: Chapter 15)
Figure 15.20
Section 4 (Squares N–L/4, looking south)
Mazar et. al. (2020 v.3) - Photo 15.6 -
General view, end of 2010 season from Mazar et. al. (2020 v. 3: Chapter 15)
Photo 15.6
General view, end of 2010 season, looking southwest; Squares L–N/4–5
Mazar et. al. (2020 v.3) - Photo 15.8 -
Probe III in Squares M/4–5 from Mazar et. al. (2020 v. 3: Chapter 15)
Photo 15.8
Probe III in Squares M/4–5; looking south at Stratum D-10 Buttress 2889 and Wall 2886; right: section in 2.0 m-high tufa fill, Stratum D-10; bottom left: D-11b Hearth 1926
Mazar et. al. (2020 v.3) - Photo 15.9 -
Probe III in Squares M/4–5 from Mazar et. al. (2020 v. 3: Chapter 15)
Photo 15.9
Probe III in Squares M/4–5; looking south at Buttress 2889 and Wall 2886, Stratum D-10; bottom: D-11b Hearths 1926 (left) and 1925 (right), Wall 1927 to their north
Mazar et. al. (2020 v.3) - Photo 15.10 -
Probe III in Squares M/4–5 from Mazar et. al. (2020 v. 3: Chapter 15)
Photo 15.10
Probe III in Squares M/4–5; looking north at Stratum D-10 Buttress 8938 and Wall 8942; bottom: D-11a Wall 1915 and ash pile (1919) to its north; northern and western sections: D-10 tufa fill
Mazar et. al. (2020 v.3) - Photo 15.11 -
Probe III in Squares M/4–5 from Mazar et. al. (2020 v. 3: Chapter 15)
Photo 15.11
Probe III in Squares M/4–5, looking north at D-11a Wall 1923 covered by layer (1907) and tufa fill (2814) of D-10
Mazar et. al. (2020 v.3) - Photo 15.12 -
Probe II in Square M/4 from Mazar et. al. (2020 v. 3: Chapter 15)
Photo 15.12
Probe II in Square M/4, looking east; D-11a stone floor (9917) covering D-11b layers; on top: successive D-10 fill layers (9914, 9905) and Floor 8939
Mazar et. al. (2020 v.3) - Photo 15.13 -
Backhoe trench in Square M/5 from Mazar et. al. (2020 v. 3: Chapter 15)
Photo 15.13
Backhoe trench in Square M/5, looking east; D-10 Wall 8942 with large stone below it at end of trench; thick tufa fill 2814 in trench sections
Mazar et. al. (2020 v.3)
- Plans: Figs. 15.3–15.4
- Sections: Figs. 15.17–15.20
- Photos 15.6, 15.8–15.13
- Pottery: Figs. 16.1–16.3
- Table 15.1 -
Stratigraphy and chronology in Area D, with correlation to Area C from Mazar et. al. (2020 v. 3: Chapter 17)
Table 15.1
Stratigraphy and chronology in Area D, with correlation to Area C
Mazar et. al. (2020 v.3) - Table 15.2 -
Locus and basket numbers from Mazar et. al. (2020 v. 3: Chapter 17)
Table 15.2
Locus and basket numbers
Mazar et. al. (2020 v.3) - Figure 15.1 -
Location of section drawings on superimposed plan of Strata D-11–D-2 from Mazar et. al. (2020 v. 3: Chapter 17)
Figure 15.1
Location of section drawings on superimposed plan of Strata D-11–D-2
Mazar et. al. (2020 v.3) - Figure 15.2 -
Schematic section of Area D from Mazar et. al. (2020 v. 3: Chapter 17)
Figure 15.2
Schematic section of Area D
Mazar et. al. (2020 v.3) - Figure 15.5 -
Plan of Stratum D-10 constructional fills from Mazar et. al. (2020 v. 3: Chapter 15)
Figure 15.5
Plan of Stratum D-10 constructional fills
Mazar et. al. (2020 v.3) - Figure 15.6 -
Plan of Stratum D-10 from Mazar et. al. (2020 v. 3: Chapter 15)
Figure 15.6
Plan of Stratum D-10
Mazar et. al. (2020 v.3) - Figure 15.17a -
Section 1a from Mazar et. al. (2020 v. 3: Chapter 15)
Figure 15.17a
Section 1a (Squares G–L/5, looking north, showing probe in alluvial field)
Mazar et. al. (2020 v.3) - Figure 15.17b -
Section 1b from Mazar et. al. (2020 v. 3: Chapter 15)
Figure 15.17b
Section 1b (Squares J–M/5 and part of N/5, looking north)
Mazar et. al. (2020 v.3) - Figure 15.18a -
Section 2a from Mazar et. al. (2020 v. 3: Chapter 15)
Figure 15.18a
Section 2a (Squares M/4–5, looking west in Probe III)
Mazar et. al. (2020 v.3) - Figure 15.18b -
Section 2b from Mazar et. al. (2020 v. 3: Chapter 15)
Figure 15.18b
Section 2a (Squares M/4–5, looking west in Probe III)
Mazar et. al. (2020 v.3) - Figure 15.19 -
Section 3 from Mazar et. al. (2020 v. 3: Chapter 15)
Figure 15.19
Section 3 (Squares L–N/4, looking north)
Mazar et. al. (2020 v.3) - Figure 15.20 -
Section 4 from Mazar et. al. (2020 v. 3: Chapter 15)
Figure 15.20
Section 4 (Squares N–L/4, looking south)
Mazar et. al. (2020 v.3) - Photo 15.4 -
Area D at the end of 2005 season from Mazar et. al. (2020 v. 3: Chapter 15)
Photo 15.4
General view, end of 2005 season, looking east; from top to bottom: Squares Q/4–5 to L/4–5
Mazar et. al. (2020 v.3) - Photo 15.5 -
Aerial view, end of 2008 season from Mazar et. al. (2020 v. 3: Chapter 15)
Photo 15.5
Aerial view, end of 2008 season
Mazar et. al. (2020 v.3) - Photo 15.6 -
General view, end of 2010 season from Mazar et. al. (2020 v. 3: Chapter 15)
Photo 15.6
General view, end of 2010 season, looking southwest; Squares L–N/4–5
Mazar et. al. (2020 v.3) - Photo 15.8 -
Probe III in Squares M/4–5 from Mazar et. al. (2020 v. 3: Chapter 15)
Photo 15.8
Probe III in Squares M/4–5; looking south at Stratum D-10 Buttress 2889 and Wall 2886; right: section in 2.0 m-high tufa fill, Stratum D-10; bottom left: D-11b Hearth 1926
Mazar et. al. (2020 v.3) - Photo 15.9 -
Probe III in Squares M/4–5 from Mazar et. al. (2020 v. 3: Chapter 15)
Photo 15.9
Probe III in Squares M/4–5; looking south at Buttress 2889 and Wall 2886, Stratum D-10; bottom: D-11b Hearths 1926 (left) and 1925 (right), Wall 1927 to their north
Mazar et. al. (2020 v.3) - Photo 15.10 -
Probe III in Squares M/4–5 from Mazar et. al. (2020 v. 3: Chapter 15)
Photo 15.10
Probe III in Squares M/4–5; looking north at Stratum D-10 Buttress 8938 and Wall 8942; bottom: D-11a Wall 1915 and ash pile (1919) to its north; northern and western sections: D-10 tufa fill
Mazar et. al. (2020 v.3) - Photo 15.11 -
Probe III in Squares M/4–5 from Mazar et. al. (2020 v. 3: Chapter 15)
Photo 15.11
Probe III in Squares M/4–5, looking north at D-11a Wall 1923 covered by layer (1907) and tufa fill (2814) of D-10
Mazar et. al. (2020 v.3) - Photo 15.12 -
Probe II in Square M/4 from Mazar et. al. (2020 v. 3: Chapter 15)
Photo 15.12
Probe II in Square M/4, looking east; D-11a stone floor (9917) covering D-11b layers; on top: successive D-10 fill layers (9914, 9905) and Floor 8939
Mazar et. al. (2020 v.3) - Photo 15.13 -
Backhoe trench in Square M/5 from Mazar et. al. (2020 v. 3: Chapter 15)
Photo 15.13
Backhoe trench in Square M/5, looking east; D-10 Wall 8942 with large stone below it at end of trench; thick tufa fill 2814 in trench sections
Mazar et. al. (2020 v.3) - Photo 15.14 -
Probe III in Squares M/4–5 from Mazar et. al. (2020 v. 3: Chapter 15)
Photo 15.14
Probe III in Squares M/4–5, looking south; left: stone foundation of D-9b Wall 8943 on top of D-10 Wall 8942 and Buttress 8938; background: D-10 Wall 2886 and Buttress 2889 (2010)
Mazar et. al. (2020 v.3) - Photo 15.15 -
Detail of Probe III from Mazar et. al. (2020 v. 3: Chapter 15)
Photo 15.15
Detail of Probe III, looking south at Wall 2886 and Buttress 2889 (2010)
Mazar et. al. (2020 v.3) - Photo 15.16 -
Detail of Probe III from Mazar et. al. (2020 v. 3: Chapter 15)
Photo 15.16
Detail of Probe III, looking east at Wall 8942 and Buttress 8938 (left) (2010)
Mazar et. al. (2020 v.3) - Photo 15.18 -
Squares L–M/4 at end of 2010 season from Mazar et. al. (2020 v. 3: Chapter 15)
Photo 15.18
Squares L–M/4 at end of 2010 season, looking south at D-10 Walls 2886 and 2890 and Buttresses 2889, 1902, 1903; Probe II (9905) in Square M/4 east of Wall 2890
Mazar et. al. (2020 v.3) - Photo 15.19 -
Probe II in Square M/4 from Mazar et. al. (2020 v. 3: Chapter 15)
Photo 15.19
Probe II in Square M/4, looking east; D-10 constructional fill (9914, 9905) and Floor 8939 in section (1998)
Mazar et. al. (2020 v.3) - Photo 15.20 -
Probe II in Square M/4 from Mazar et. al. (2020 v. 3: Chapter 15)
Photo 15.20
Probe II in Square M/4, looking south; D-10 constructional fill (9914, 9905) and Floor 8939 in section (2008)
Mazar et. al. (2020 v.3) - Photo 15.21 -
Squares L–M/4 from Mazar et. al. (2020 v. 3: Chapter 15)
Photo 15.21
Squares L–M/4, looking east at corner of Wall 2890 and Buttresses 1902 and 1903; left: Courtyard 8934 (2010)
Mazar et. al. (2020 v.3) - Photo 15.22 -
Square M/5, Buttress 8938 and Wall 8942 abutted by D-10 Courtyard 8934 from Mazar et. al. (2020 v. 3: Chapter 15)
Photo 15.22
Square M/5, Buttress 8938 and Wall 8942 abutted by D-10 Courtyard 8934, looking northeast (2008)
Mazar et. al. (2020 v.3) - Photo 15.23 -
Squares L–N/4–5 from Mazar et. al. (2020 v. 3: Chapter 15)
Photo 15.23
Squares L–N/4–5, looking east; front: D-10 Courtyard 8934 and top of Buttresses 2889 (right) and 8938 (left); background: Strata D-9 to D-5 (2007)
Mazar et. al. (2020 v.3) - Photo 15.24 -
Squares L–N/4–5 from Mazar et. al. (2020 v. 3: Chapter 15)
Photo 15.24
Squares L–N/4–5, looking south; center: D-10 Courtyard 8934; left: Wall 8942 and Buttress 8938; top: Wall 2886 and Buttress 2889, partly superimposed by D-9b 2816 and 2892; in southern section: D-9 and D-8 layers (2007)
Mazar et. al. (2020 v.3) - Photo 15.25 -
Squares L–N/4–5 from Mazar et. al. (2020 v. 3: Chapter 15)
Photo 15.25
Squares L–N/4–5, looking north; center: D-10 Courtyard 8934; right: Buttress 8938; bottom: Wall 2886 and Buttress 2889 partly superimposed by D-9b Walls 2816 and 2892 (2007)
Mazar et. al. (2020 v.3) - Photo 15.26 -
Squares L–M/4 from Mazar et. al. (2020 v. 3: Chapter 15)
Photo 15.26
Squares L–M/4, looking south at section; bottom: D-9b Wall 2816; D-9a stone floor (2855) at top of meter stick, sealing D-10 and D-9b floors (bird-nest holes in section) (2007)
Mazar et. al. (2020 v.3) - Photo 15.27 -
Squares M–N/4 from Mazar et. al. (2020 v. 3: Chapter 15)
Photo 15.27
Squares M–N/4, looking southeast; D-10 Courtyard 8934 in corner of Walls 8942 and 2886; top left: stone foundation of D-9b Wall 8943 (2008).
Mazar et. al. (2020 v.3) - Photo 15.37 -
Squares L–M/4 from Mazar et. al. (2020 v. 3: Chapter 15)
Photo 15.37
Squares L–M/4, looking north at foundations of D-9b Wall 2816 above D-10 Wall 2886 and Buttress 1903, with D-10 Wall 2890 at the bottom
Mazar et. al. (2020 v.3) - Photo 15.38 -
Square N/4 from Mazar et. al. (2020 v. 3: Chapter 15)
Photo 15.38
Square N/4, sloping striations in D-10 Locus 8939 below D-9 stone foundations of Walls 8943 and 1906, looking east; background: D-8–9a Wall 8932 (2010)
Mazar et. al. (2020 v.3)
- Plans: Figs. 15.5–15.6
- Sections: Figs. 15.17–15.20
- Photos 15.4–15.6, 15.8–15.16, 15.18–15.27, 15.37–15.38
- Pottery: Figs. 16.4–16.8
- Table 15.1 -
Stratigraphy and chronology in Area D, with correlation to Area C from Mazar et. al. (2020 v. 3: Chapter 17)
Table 15.1
Stratigraphy and chronology in Area D, with correlation to Area C
Mazar et. al. (2020 v.3) - Table 15.2 -
Locus and basket numbers from Mazar et. al. (2020 v. 3: Chapter 17)
Table 15.2
Locus and basket numbers
Mazar et. al. (2020 v.3) - Figure 15.1 -
Location of section drawings on superimposed plan of Strata D-11–D-2 from Mazar et. al. (2020 v. 3: Chapter 17)
Figure 15.1
Location of section drawings on superimposed plan of Strata D-11–D-2
Mazar et. al. (2020 v.3) - Figure 15.2 -
Schematic section of Area D from Mazar et. al. (2020 v. 3: Chapter 17)
Figure 15.2
Schematic section of Area D
Mazar et. al. (2020 v.3) - Figure 15.7 -
Plan of Stratum D-9b from Mazar et. al. (2020 v. 3: Chapter 15)
Figure 15.7
Plan of Stratum D-9b
Mazar et. al. (2020 v.3) - Figure 15.8 -
Plan of Stratum D-9a from Mazar et. al. (2020 v. 3: Chapter 15)
Figure 15.8
Plan of Stratum D-9a
Mazar et. al. (2020 v.3) - Figure 15.17a -
Section 1a from Mazar et. al. (2020 v. 3: Chapter 15)
Figure 15.17a
Section 1a (Squares G–L/5, looking north, showing probe in alluvial field)
Mazar et. al. (2020 v.3) - Figure 15.17b -
Section 1b from Mazar et. al. (2020 v. 3: Chapter 15)
Figure 15.17b
Section 1b (Squares J–M/5 and part of N/5, looking north)
Mazar et. al. (2020 v.3) - Figure 15.18a -
Section 2a from Mazar et. al. (2020 v. 3: Chapter 15)
Figure 15.18a
Section 2a (Squares M/4–5, looking west in Probe III)
Mazar et. al. (2020 v.3) - Figure 15.18b -
Section 2b from Mazar et. al. (2020 v. 3: Chapter 15)
Figure 15.18b
Section 2a (Squares M/4–5, looking west in Probe III)
Mazar et. al. (2020 v.3) - Figure 15.19 -
Section 3 from Mazar et. al. (2020 v. 3: Chapter 15)
Figure 15.19
Section 3 (Squares L–N/4, looking north)
Mazar et. al. (2020 v.3) - Figure 15.20 -
Section 4 from Mazar et. al. (2020 v. 3: Chapter 15)
Figure 15.20
Section 4 (Squares N–L/4, looking south)
Mazar et. al. (2020 v.3) - Figure 15.21 -
Section 5 from Mazar et. al. (2020 v. 3: Chapter 15)
Figure 15.21
Section 5 (Squares N/4–5, looking east)
Mazar et. al. (2020 v.3) - Photo 15.23 -
Squares L–N/4–5 from Mazar et. al. (2020 v. 3: Chapter 15)
Photo 15.23
Squares L–N/4–5, looking east; front: D-10 Courtyard 8934 and top of Buttresses 2889 (right) and 8938 (left); background: Strata D-9 to D-5 (2007)
Mazar et. al. (2020 v.3) - Photo 15.24 -
Squares L–N/4–5 from Mazar et. al. (2020 v. 3: Chapter 15)
Photo 15.24
Squares L–N/4–5, looking south; center: D-10 Courtyard 8934; left: Wall 8942 and Buttress 8938; top: Wall 2886 and Buttress 2889, partly superimposed by D-9b 2816 and 2892; in southern section: D-9 and D-8 layers (2007)
Mazar et. al. (2020 v.3) - Photo 15.25 -
Squares L–N/4–5 from Mazar et. al. (2020 v. 3: Chapter 15)
Photo 15.25
Squares L–N/4–5, looking north; center: D-10 Courtyard 8934; right: Buttress 8938; bottom: Wall 2886 and Buttress 2889 partly superimposed by D-9b Walls 2816 and 2892 (2007)
Mazar et. al. (2020 v.3) - Photo 15.26 -
Squares L–M/4 from Mazar et. al. (2020 v. 3: Chapter 15)
Photo 15.26
Squares L–M/4, looking south at section; bottom: D-9b Wall 2816; D-9a stone floor (2855) at top of meter stick, sealing D-10 and D-9b floors (bird-nest holes in section) (2007)
Mazar et. al. (2020 v.3) - Photo 15.27 -
Squares M–N/4 from Mazar et. al. (2020 v. 3: Chapter 15)
Photo 15.27
Squares M–N/4, looking southeast; D-10 Courtyard 8934 in corner of Walls 8942 and 2886; top left: stone foundation of D-9b Wall 8943 (2008).
Mazar et. al. (2020 v.3) - Photo 15.28 -
Squares M–N/4–5 from Mazar et. al. (2020 v. 3: Chapter 15)
Photo 15.28
Squares M–N/4–5, looking south at D-9a–b stone foundations (2010)
Mazar et. al. (2020 v.3) - Photo 15.29 -
Squares M–N/4–5, from Mazar et. al. (2020 v. 3: Chapter 15)
Photo 15.29
Squares M–N/4–5, looking south; left: D-9a Wall 8932 and Post-holes 1912; right: D-9b stone foundations (2010)
Mazar et. al. (2020 v.3) - Photo 15.30 -
Squares N/4–5 from Mazar et. al. (2020 v. 3: Chapter 15)
Photo 15.30
Squares N/4–5, looking west; top: D-9b stone foundations; bottom: D-9a Wall 8932 and Post-holes 1912; right: D-9a Wall 1916 (2010)
Mazar et. al. (2020 v.3) - Photo 15.31 -
Squares N/5 from Mazar et. al. (2020 v. 3: Chapter 15)
Photo 15.31
Square N/5, looking south; bottom: D-9a Wall 1916; right and top: D-9b Walls 8943 and 9923; left: D-9a Post-holes 1912 (2010)
Mazar et. al. (2020 v.3) - Photo 15.32 -
Squares N/4 from Mazar et. al. (2020 v. 3: Chapter 15)
Photo 15.32
Square N/4, looking south at D-9b Floor 9927, Oven 9918 and Installation 1905; right: Wall 8943; background: Wall 1904 (2010)
Mazar et. al. (2020 v.3) - Photo 15.33 -
Square M/5 from Mazar et. al. (2020 v. 3: Chapter 15)
Photo 15.33
Square M/5, looking south at D-9b bronze-melting canal (8921) and Installation 8925 (2007)
Mazar et. al. (2020 v.3) - Photo 15.34 -
Detail of bronze-melting canal (8921) with fragments of bellow, charcoal, and metal object in situ from Mazar et. al. (2020 v. 3: Chapter 15)
Photo 15.34
Detail of bronze-melting canal (8921) with fragments of bellow, charcoal, and metal object in situ, looking west (2007)
Mazar et. al. (2020 v.3) - Photo 15.35 -
Square M/5 from Mazar et. al. (2020 v. 3: Chapter 15)
Photo 15.35
Square M/5, detail of Installation 8925 near bronze-melting canal (8921), looking south (2007)
Mazar et. al. (2020 v.3) - Photo 15.36 -
Square M/5 from Mazar et. al. (2020 v. 3: Chapter 15)
Photo 15.36
Square M/5, D-9b Installation 8936 and stone foundation of Wall 8943, looking west; left: D-10 Buttress 8938 (2007)
Mazar et. al. (2020 v.3) - Photo 15.37 -
Squares L–M/4 from Mazar et. al. (2020 v. 3: Chapter 15)
Photo 15.37
Squares L–M/4, looking north at foundations of D-9b Wall 2816 above D-10 Wall 2886 and Buttress 1903, with D-10 Wall 2890 at the bottom
Mazar et. al. (2020 v.3) - Photo 15.38 -
Square N/4 from Mazar et. al. (2020 v. 3: Chapter 15)
Photo 15.38
Square N/4, sloping striations in D-10 Locus 8939 below D-9 stone foundations of Walls 8943 and 1906, looking east; background: D-8–9a Wall 8932 (2010)
Mazar et. al. (2020 v.3) - Photo 15.39 -
Square N/4 from Mazar et. al. (2020 v. 3: Chapter 15)
Photo 15.39
Square N/4, Locus 8919, foundation deposit (basalt bowl and lamp) in corner of Walls 8943 and 1906, looking southeast (2010)
Mazar et. al. (2020 v.3) - Photo 15.40 -
Squares M–N/4–5 from Mazar et. al. (2020 v. 3: Chapter 15)
Photo 15.40
Squares M–N/4–5, looking east; left: backhoe trench into D-10 tufa fill near porcupine hole; D-9 to D-6b floors and installations in middle and upper steps (2005)
Mazar et. al. (2020 v.3) - Photo 15.41 -
Squares N/4–5 from Mazar et. al. (2020 v. 3: Chapter 15)
Photo 15.41
Squares N/4–5, looking east; D-8–9a Wall 8932 on D-9b Floor 9927, cut on the south by D-7b Pit 8916
Mazar et. al. (2020 v.3) - Photo 15.42 -
Squares L–N/4 from Mazar et. al. (2020 v. 3: Chapter 15)
Photo 15.42
Squares L–N/4, looking east; bottom: foundation of D-9b Wall 2816; center: D-9a stone floor 2855; above, right: D-7a Wall 1818 (1998)
Mazar et. al. (2020 v.3) - Photo 15.43 -
Square M/4 from Mazar et. al. (2020 v. 3: Chapter 15)
Photo 15.43
Square M/4, looking east at D-9a stone floor 2855 (1998)
Mazar et. al. (2020 v.3) - Photo 15.44 -
Square M/4 from Mazar et. al. (2020 v. 3: Chapter 15)
Photo 15.44
Square M/4, looking east at sloping layers 8939 (D-10) and 8919 (D-9b), sealed below D-9a stone Floor 2855 (2008)
Mazar et. al. (2020 v.3)
- Plans: Figs. 15.7–15.8
- Sections: Figs. 15.17, 15.18b, 15.19–15.21
- Photos 15.23–15.44
- Pottery: Figs. 16.9–16.15
- Table 15.1 -
Stratigraphy and chronology in Area D, with correlation to Area C from Mazar et. al. (2020 v. 3: Chapter 17)
Table 15.1
Stratigraphy and chronology in Area D, with correlation to Area C
Mazar et. al. (2020 v.3) - Table 15.2 -
Locus and basket numbers from Mazar et. al. (2020 v. 3: Chapter 17)
Table 15.2
Locus and basket numbers
Mazar et. al. (2020 v.3) - Figure 15.1 -
Location of section drawings on superimposed plan of Strata D-11–D-2 from Mazar et. al. (2020 v. 3: Chapter 17)
Figure 15.1
Location of section drawings on superimposed plan of Strata D-11–D-2
Mazar et. al. (2020 v.3) - Figure 15.2 -
Schematic section of Area D from Mazar et. al. (2020 v. 3: Chapter 17)
Figure 15.2
Schematic section of Area D
Mazar et. al. (2020 v.3) - Figure 15.9 -
Plan of Stratum D-8 from Mazar et. al. (2020 v. 3: Chapter 15)
Figure 15.9
Plan of Stratum D-8
Mazar et. al. (2020 v.3) - Figure 15.10 -
Plan of Stratum D-8' from Mazar et. al. (2020 v. 3: Chapter 15)
Figure 15.10
Plan of Stratum D-8'
Mazar et. al. (2020 v.3) - Figure 15.11 -
Plan of post Stratum D-8 fills from Mazar et. al. (2020 v. 3: Chapter 15)
Figure 15.11
Plan of post Stratum D-8 fills
Mazar et. al. (2020 v.3) - Figure 15.17a -
Section 1a from Mazar et. al. (2020 v. 3: Chapter 15)
Figure 15.17a
Section 1a (Squares G–L/5, looking north, showing probe in alluvial field)
Mazar et. al. (2020 v.3) - Figure 15.17b -
Section 1b from Mazar et. al. (2020 v. 3: Chapter 15)
Figure 15.17b
Section 1b (Squares J–M/5 and part of N/5, looking north)
Mazar et. al. (2020 v.3) - Figure 15.19 -
Section 3 from Mazar et. al. (2020 v. 3: Chapter 15)
Figure 15.19
Section 3 (Squares L–N/4, looking north)
Mazar et. al. (2020 v.3) - Figure 15.20 -
Section 4 from Mazar et. al. (2020 v. 3: Chapter 15)
Figure 15.20
Section 4 (Squares N–L/4, looking south)
Mazar et. al. (2020 v.3) - Figure 15.21 -
Section 5 from Mazar et. al. (2020 v. 3: Chapter 15)
Figure 15.21
Section 5 (Squares N/4–5, looking east)
Mazar et. al. (2020 v.3)
- Plans: Figs. 15.9–15.11
- Sections: Figs. 15.17b, 15.19–15.21
- Pottery: Figs. 16.16–16.23
In Stratum D-8, a large open area covered with a thick white beaten-earth floor replaced the halfopen spaces of Stratum D-9a, while the main wall line of the latter (8932 and row of pillar bases 1912) continued to be in use. The function of this spacious courtyard was hard to define, as only its eastern border was found within the excavated area and it was totally devoid of installations.
The white floor (2824 in Square M/4, 7944 in M/5, 8933 in N/4 and 9909 in N/5) extended over an area of ca. 70 sq. m and was cut by the erosion line in the west. The floor sloped in various directions at levels between 80.06 m–80.27 m, the former only 0.2–0.4 m above the floors that were attributed to Stratum D-9a, described above. It also covered the two rows of pillar bases of the previous stratum, as well as Wall 9922 in the southern part of Square N/4. The floor abutted Wall 8932 and perhaps also the wooden pillars that had stood on the stone bases 1912 (although the bases were now ca. 0.7 m lower than the new floor). The southeastern corner of the floor was cut by Stratum D-7b Pit 8916. A large complete krater (Fig. 16.18:4) was found leaning against Wall 8932 and a complete Mycenaean IIB stirrup jar (Fig. 16.22:5) was found on Floor 7944 (Square M/5). It should be noted that while the floor was clearly observed in most parts, the northern and northeastern portion of it, near the pillar bases (1912) and the northern section of Squares M–N/5, was harder to discern, possibly as the floor there was thinner or less well preserved.
In the narrow strip excavated east of Wall 8932 and pillar bases 1912, was a ca. 0.5 m-thick layer (1908, 1909) comprised mostly of brown layered sediments that might have been floors, with bones and sherds (Figs. 16.16–16.17, 16.19–16.22). An almost-complete small jug (Fig. 16.21:1) was found on top of a rather continuous thin whitish layer which might represent a floor level (79.73– 79.84 m).
The ceramic assemblage of Stratum D-8 that included several Mycenaean and Cypriot imports is typical of LB IIB and should be dated to the 13th century BCE.
- Table 15.1 -
Stratigraphy and chronology in Area D, with correlation to Area C from Mazar et. al. (2020 v. 3: Chapter 17)
Table 15.1
Stratigraphy and chronology in Area D, with correlation to Area C
Mazar et. al. (2020 v.3) - Table 15.2 -
Locus and basket numbers from Mazar et. al. (2020 v. 3: Chapter 17)
Table 15.2
Locus and basket numbers
Mazar et. al. (2020 v.3) - Figure 15.1 -
Location of section drawings on superimposed plan of Strata D-11–D-2 from Mazar et. al. (2020 v. 3: Chapter 17)
Figure 15.1
Location of section drawings on superimposed plan of Strata D-11–D-2
Mazar et. al. (2020 v.3) - Figure 15.2 -
Schematic section of Area D from Mazar et. al. (2020 v. 3: Chapter 17)
Figure 15.2
Schematic section of Area D
Mazar et. al. (2020 v.3) - Figure 15.10 -
Plan of Stratum D-8' from Mazar et. al. (2020 v. 3: Chapter 15)
Figure 15.10
Plan of Stratum D-8'
Mazar et. al. (2020 v.3)
- Plans: Figs. 15.10
The Stratum D-8 floor to the west of Wall 8932 was covered with a 0.3–0.4 m-thick layer of brick debris, containing compacted whitish brick fragments, which most probably originated from Wall 8932. In Square M/5, this debris layer was superimposed by a 0.01–0.02 m-thick pinkish clay layer (7938; Figs. 15.10, 15.17), which was covered by a thick (0.05–0.1 m) layer of dark gray ash. This layer sloped from west (80.40 m) to east (80.26 m); it extended into the northern section of the square, but faded away in its southern part, as well as in Square N/5 (9908; Fig. 15.10). On 7938 was a 0.15–0.2 m-thick accumulation, rich in sherds and animal bones, which may be explained as some kind of a localized ephemeral activity, post-dating Stratum D-8 and pre-dating Stratum D-7b; this phase was denoted D-8'. No evidence for this activity was found in Squares M–N/4.
Pottery from loci attributed to this layer is presented together with that of Stratum D-8 (Figs. 16.16–16.22), and is dated to LB IIB.
- Table 15.1 -
Stratigraphy and chronology in Area D, with correlation to Area C from Mazar et. al. (2020 v. 3: Chapter 17)
Table 15.1
Stratigraphy and chronology in Area D, with correlation to Area C
Mazar et. al. (2020 v.3) - Table 15.2 -
Locus and basket numbers from Mazar et. al. (2020 v. 3: Chapter 17)
Table 15.2
Locus and basket numbers
Mazar et. al. (2020 v.3) - Figure 15.1 -
Location of section drawings on superimposed plan of Strata D-11–D-2 from Mazar et. al. (2020 v. 3: Chapter 17)
Figure 15.1
Location of section drawings on superimposed plan of Strata D-11–D-2
Mazar et. al. (2020 v.3) - Figure 15.2 -
Schematic section of Area D from Mazar et. al. (2020 v. 3: Chapter 17)
Figure 15.2
Schematic section of Area D
Mazar et. al. (2020 v.3) - Figure 15.10 -
Plan of Stratum D-8' from Mazar et. al. (2020 v. 3: Chapter 15)
Figure 15.10
Plan of Stratum D-8'
Mazar et. al. (2020 v.3)
- Plans: Figs. 15.10
Covering the brick debris and walls related to Stratum D-8, a 0.35–0.6 m-thick layered accumulation was found all over the excavated area (2826 in Square M/4, 7915 and 7937 in M/5, 8927 and 8929 in N/4, 9904 in N/5) (Fig. 15.11). It was characterized by a soft brown layered matrix containing a few brick fragments, very rich in charred material (charcoal and grain), as well as sherds, bones, and fine plaster fragments of unknown origin. The layering of this accumulation was more pronounced in the eastern part, where the layers sloped down into the eastern section of Squares N/4–5. Several thin layers consisted of grayish material, possibly the remains of ash or decayed organics.
No architectural elements were noted in association with this thick accumulation. It clearly sealed the remains of Stratum D-8 and was superimposed by Stratum D-7b elements, most of which were pits dug into the aforementioned accumulation (see below). Therefore, it seems to belong to a post-D-8 and pre-D-7 phase. Nevertheless, it is difficult to suggest any clear explanation for such a thick accumulation, unless a gap in occupation enabled natural forces of sedimentation to operate undisrupted for an unknown time span. Another option is that this layer was a constructional fill related to the building of Stratum D-7b. Although no substantial architecture was found in the latter, the small size of the excavated area does not allow us to reach secure conclusions, and this option remains viable.
Pottery from loci attributed to this layer is presented together with that of Stratum D-8 in Figs. 16.16–16.23.
- Table 15.1 -
Stratigraphy and chronology in Area D, with correlation to Area C from Mazar et. al. (2020 v. 3: Chapter 17)
Table 15.1
Stratigraphy and chronology in Area D, with correlation to Area C
Mazar et. al. (2020 v.3) - Table 15.2 -
Locus and basket numbers from Mazar et. al. (2020 v. 3: Chapter 17)
Table 15.2
Locus and basket numbers
Mazar et. al. (2020 v.3) - Figure 15.1 -
Location of section drawings on superimposed plan of Strata D-11–D-2 from Mazar et. al. (2020 v. 3: Chapter 17)
Figure 15.1
Location of section drawings on superimposed plan of Strata D-11–D-2
Mazar et. al. (2020 v.3) - Figure 15.2 -
Schematic section of Area D from Mazar et. al. (2020 v. 3: Chapter 17)
Figure 15.2
Schematic section of Area D
Mazar et. al. (2020 v.3) - Figure 15.12 -
Plan of Stratum D-7b from Mazar et. al. (2020 v. 3: Chapter 15)
Figure 15.12
Plan of Stratum D-7b
Mazar et. al. (2020 v.3) - Figure 15.13 -
Plan of Stratum D-7a (encircled numbers denote foundation deposits as listed in the text) from Mazar et. al. (2020 v. 3: Chapter 15)
Figure 15.13
Plan of Stratum D-7a (encircled numbers denote foundation deposits as listed in the text)
Mazar et. al. (2020 v.3) - Figure 15.14 -
Plan of Stratum D-7a' from Mazar et. al. (2020 v. 3: Chapter 15)
Figure 15.14
Plan of Stratum D-7a'
Mazar et. al. (2020 v.3) - Figure 15.17a -
Section 1a from Mazar et. al. (2020 v. 3: Chapter 15)
Figure 15.17a
Section 1a (Squares G–L/5, looking north, showing probe in alluvial field)
Mazar et. al. (2020 v.3) - Figure 15.17b -
Section 1b from Mazar et. al. (2020 v. 3: Chapter 15)
Figure 15.17b
Section 1b (Squares J–M/5 and part of N/5, looking north)
Mazar et. al. (2020 v.3) - Figure 15.19 -
Section 3 from Mazar et. al. (2020 v. 3: Chapter 15)
Figure 15.19
Section 3 (Squares L–N/4, looking north)
Mazar et. al. (2020 v.3) - Figure 15.20 -
Section 4 from Mazar et. al. (2020 v. 3: Chapter 15)
Figure 15.20
Section 4 (Squares N–L/4, looking south)
Mazar et. al. (2020 v.3) - Figure 15.21 -
Section 5 from Mazar et. al. (2020 v. 3: Chapter 15)
Figure 15.21
Section 5 (Squares N/4–5, looking east)
Mazar et. al. (2020 v.3) - Photo 15.40 -
Squares M–N/4–5 from Mazar et. al. (2020 v. 3: Chapter 15)
Photo 15.40
Squares M–N/4–5, looking east; left: backhoe trench into D-10 tufa fill near porcupine hole; D-9 to D-6b floors and installations in middle and upper steps (2005)
Mazar et. al. (2020 v.3) - Photo 15.41 -
Squares N/4–5 from Mazar et. al. (2020 v. 3: Chapter 15)
Photo 15.41
Squares N/4–5, looking east; D-8–9a Wall 8932 on D-9b Floor 9927, cut on the south by D-7b Pit 8916
Mazar et. al. (2020 v.3) - Photo 15.42 -
Squares L–N/4 from Mazar et. al. (2020 v. 3: Chapter 15)
Photo 15.42
Squares L–N/4, looking east; bottom: foundation of D-9b Wall 2816; center: D-9a stone floor 2855; above, right: D-7a Wall 1818 (1998)
Mazar et. al. (2020 v.3) - Photo 15.45 -
Squares N–M/4–5 from Mazar et. al. (2020 v. 3: Chapter 15)
Photo 15.45
Squares N–M/4–5, looking southeast; center: D-7a' pillar bases; top: stone foundation of D-4 Wall 1883 (2007)
Mazar et. al. (2020 v.3) - Photo 15.46-
Northeast corner of Square M/5 from Mazar et. al. (2020 v. 3: Chapter 15)
Photo 15.46
Northeast corner of Square M/5, looking north; lamp-and-bowl foundation deposit below D-7a Wall 7906, cut into stone lining of D-7b Oven 7924 (2007)
Mazar et. al. (2020 v.3) - Photo 15.47-
Square M/5 from Mazar et. al. (2020 v. 3: Chapter 15)
Photo 15.47
Square M/5, looking south at section through D-7b Installation 7919 (2005); bowl: Fig. 16.26:2
Mazar et. al. (2020 v.3) - Photo 15.48-
Square N/4 from Mazar et. al. (2020 v. 3: Chapter 15)
Photo 15.48
Square N/4, looking northeast at D-7b Floor 8914, cut by D-7a Installation 8906 (2007)
Mazar et. al. (2020 v.3) - Photo 15.49-
Square M/5 from Mazar et. al. (2020 v. 3: Chapter 15)
Photo 15.49
Square M/5, looking north at stone foundation of D-7a Wall 7906 with floor striations in section; below the wall: ashy layer of D-7b Floor 7903 (2005)
Mazar et. al. (2020 v.3) - Photo 15.50-
Square N/5 from Mazar et. al. (2020 v. 3: Chapter 15)
Photo 15.50
Square N/5, looking north at D-7a stone floor 9906, pillar bases 9907 and Wall 8917 (2008)
Mazar et. al. (2020 v.3) - Photo 15.51-
Square N/5 from Mazar et. al. (2020 v. 3: Chapter 15)
Photo 15.51
Square N/5, looking west at D-7a stone floor 9906 and pillar bases 9907 (2008)
Mazar et. al. (2020 v.3) - Photo 15.52-
Square N/4 from Mazar et. al. (2020 v. 3: Chapter 15)
Photo 15.52
Square N/4, looking north; left: foundation of D-7a–6b Wall 2842; center: D-7a Floor 8907 and Installation 8906 (2007)
Mazar et. al. (2020 v.3) - Photo 15.53-
Square N/4 from Mazar et. al. (2020 v. 3: Chapter 15)
Photo 15.53
Square N/4, looking west; bottom left: D-7a Ovens 7946 and 8902; center: D-7b Pit 8916 (2007)
Mazar et. al. (2020 v.3) - Photo 15.54a-
Square M/4 from Mazar et. al. (2020 v. 3: Chapter 15)
Photo 15.54a
Square M/4; D-7a lamp and bowl deposits - deposit No. 2, looking southeast east (1997)
Mazar et. al. (2020 v.3) - Photo 15.54b-
Square M/4 from Mazar et. al. (2020 v. 3: Chapter 15)
Photo 15.54b
Square M/4; D-7a lamp and bowl deposits - deposit No. 3, looking east (1997)
Mazar et. al. (2020 v.3) - Photo 15.55-
Square N/5 from Mazar et. al. (2020 v. 3: Chapter 15)
Photo 15.55
Square N/5, looking west at D-7a' pillar bases 8944 and Walls 8904 and 4856 (2007)
Mazar et. al. (2020 v.3) - Photo 15.56-
Squares N/4–5 from Mazar et. al. (2020 v. 3: Chapter 15)
Photo 15.56
Squares N/4–5, looking east; left: D-6b Installations 7931 and 7939; right: D-7a Wall 8904, superimposed by D-6b Installation 2874 (2005)
Mazar et. al. (2020 v.3) - Photo 15.57-
Squares N/4–5 from Mazar et. al. (2020 v. 3: Chapter 15)
Photo 15.57
Squares N/4–5, looking south; bottom: D-6b Installations 7931 and 7939; center: D-7a Wall 8904, superimposed by D-6a–b Installation 2874 (2005)
Mazar et. al. (2020 v.3)
- Plans: Figs. 15.12–15.14
- Sections: Figs. 15.17b, 15.19–15.21
- Photos 15.40–15.42,15.45–15.57
- Pottery: Figs. 16.24–16.33
Stratum D-7 comprised two main and one local stratigraphic phases, denoted D-7b, D-7a and D-7a'.
- Table 15.1 -
Stratigraphy and chronology in Area D, with correlation to Area C from Mazar et. al. (2020 v. 3: Chapter 17)
Table 15.1
Stratigraphy and chronology in Area D, with correlation to Area C
Mazar et. al. (2020 v.3) - Table 15.2 -
Locus and basket numbers from Mazar et. al. (2020 v. 3: Chapter 17)
Table 15.2
Locus and basket numbers
Mazar et. al. (2020 v.3) - Figure 15.1 -
Location of section drawings on superimposed plan of Strata D-11–D-2 from Mazar et. al. (2020 v. 3: Chapter 17)
Figure 15.1
Location of section drawings on superimposed plan of Strata D-11–D-2
Mazar et. al. (2020 v.3) - Figure 15.2 -
Schematic section of Area D from Mazar et. al. (2020 v. 3: Chapter 17)
Figure 15.2
Schematic section of Area D
Mazar et. al. (2020 v.3) - Figure 15.15 -
Plan of Stratum D-6b from Mazar et. al. (2020 v. 3: Chapter 15)
Figure 15.15
Plan of Stratum D-6b
Mazar et. al. (2020 v.3) - Figure 15.16 -
Plan of Stratum D-6a from Mazar et. al. (2020 v. 3: Chapter 15)
Figure 15.16
Plan of Stratum D-6a
Mazar et. al. (2020 v.3) - Figure 15.19 -
Section 3 from Mazar et. al. (2020 v. 3: Chapter 15)
Figure 15.19
Section 3 (Squares L–N/4, looking north)
Mazar et. al. (2020 v.3) - Figure 15.20 -
Section 4 from Mazar et. al. (2020 v. 3: Chapter 15)
Figure 15.20
Section 4 (Squares N–L/4, looking south)
Mazar et. al. (2020 v.3) - Figure 15.21 -
Section 5 from Mazar et. al. (2020 v. 3: Chapter 15)
Figure 15.21
Section 5 (Squares N/4–5, looking east)
Mazar et. al. (2020 v.3) - Photo 15.56-
Squares N/4–5 from Mazar et. al. (2020 v. 3: Chapter 15)
Photo 15.56
Squares N/4–5, looking east; left: D-6b Installations 7931 and 7939; right: D-7a Wall 8904, superimposed by D-6b Installation 2874 (2005)
Mazar et. al. (2020 v.3) - Photo 15.57-
Squares N/4–5 from Mazar et. al. (2020 v. 3: Chapter 15)
Photo 15.57
Squares N/4–5, looking south; bottom: D-6b Installations 7931 and 7939; center: D-7a Wall 8904, superimposed by D-6a–b Installation 2874 (2005)
Mazar et. al. (2020 v.3) - Photo 15.58-
Square N/5 from Mazar et. al. (2020 v. 3: Chapter 15)
Photo 15.58
Square N/5, looking west; detail of D-6b Installations 7939 (bottom) and 7931 (top); top right: red clay patch 7925 above D-6a Wall 7926 (2005)
Mazar et. al. (2020 v.3) - Photo 15.59-
Square N/4 from Mazar et. al. (2020 v. 3: Chapter 15)
Photo 15.59
Square N/4, looking east; detail of D-6b Installation 2874 (2005)
Mazar et. al. (2020 v.3) - Photo 15.60-
Square N/4 from Mazar et. al. (2020 v. 3: Chapter 15)
Photo 15.60
Square N/4, southern section showing D-6 striations and ash layers (bird-nest holes in section).
Mazar et. al. (2020 v.3) - Photo 15.61-
Square N/4 from Mazar et. al. (2020 v. 3: Chapter 15)
Photo 15.61
Square N/4; D-6a Oven 2841 below D-4b Floor 1845 (1998)
Mazar et. al. (2020 v.3) - Photo 15.62-
Square P/4 from Mazar et. al. (2020 v. 3: Chapter 15)
Photo 15.62
Square P/4, section in D-6a Oven 2841
Mazar et. al. (2020 v.3)
- Plans: 15.15–15.16
- Sections: : Figs. 15.19–15.21
- Photos 15.56–15.62
- Pottery: Figs. 16.34–16.37
- Table 15.1 -
Stratigraphy and chronology in Area D, with correlation to Area C from Mazar et. al. (2020 v. 3: Chapter 17)
Table 15.1
Stratigraphy and chronology in Area D, with correlation to Area C
Mazar et. al. (2020 v.3) - Table 15.2 -
Locus and basket numbers from Mazar et. al. (2020 v. 3: Chapter 17)
Table 15.2
Locus and basket numbers
Mazar et. al. (2020 v.3) - Figure 15.1 -
Location of section drawings on superimposed plan of Strata D-11–D-2 from Mazar et. al. (2020 v. 3: Chapter 17)
Figure 15.1
Location of section drawings on superimposed plan of Strata D-11–D-2
Mazar et. al. (2020 v.3) - Figure 15.2 -
Schematic section of Area D from Mazar et. al. (2020 v. 3: Chapter 17)
Figure 15.2
Schematic section of Area D
Mazar et. al. (2020 v.3) - Figure 15.19 -
Section 3 from Mazar et. al. (2020 v. 3: Chapter 15)
Figure 15.19
Section 3 (Squares L–N/4, looking north)
Mazar et. al. (2020 v.3) - Figure 15.20 -
Section 4 from Mazar et. al. (2020 v. 3: Chapter 15)
Figure 15.20
Section 4 (Squares N–L/4, looking south)
Mazar et. al. (2020 v.3) - Figure 15.21 -
Section 5 from Mazar et. al. (2020 v. 3: Chapter 15)
Figure 15.21
Section 5 (Squares N/4–5, looking east)
Mazar et. al. (2020 v.3) - Figure 15.22 -
Plan of Stratum D-5 from Mazar et. al. (2020 v. 3: Chapter 15)
Figure 15.22
Plan of Stratum D-5
Mazar et. al. (2020 v.3) - Figure 15.32 -
Section 6 from Mazar et. al. (2020 v. 3: Chapter 15)
Figure 15.32
Section 6 (Squares P–Q/5, looking north)
Mazar et. al. (2020 v.3) - Figure 15.33 -
Section 7 from Mazar et. al. (2020 v. 3: Chapter 15)
Figure 15.33
Section 7 (Squares P–Q/4, looking north)
Mazar et. al. (2020 v.3) - Figure 15.34 -
Section 8 from Mazar et. al. (2020 v. 3: Chapter 15)
Figure 15.34
Section 8 (Squares Q–N/4, looking south)
Mazar et. al. (2020 v.3) - Figure 15.35 -
Section 9 from Mazar et. al. (2020 v. 3: Chapter 15)
Figure 15.35
Section 9 (Squares Q/4–5, looking east)
Mazar et. al. (2020 v.3) - Photo 15.45 -
Squares N–M/4–5 from Mazar et. al. (2020 v. 3: Chapter 15)
Photo 15.45
Squares N–M/4–5, looking southeast; center: D-7a' pillar bases; top: stone foundation of D-4 Wall 1883 (2007)
Mazar et. al. (2020 v.3) - Photo 15.56-
Squares N/4–5 from Mazar et. al. (2020 v. 3: Chapter 15)
Photo 15.56
Squares N/4–5, looking east; left: D-6b Installations 7931 and 7939; right: D-7a Wall 8904, superimposed by D-6b Installation 2874 (2005)
Mazar et. al. (2020 v.3) - Photo 15.57-
Squares N/4–5 from Mazar et. al. (2020 v. 3: Chapter 15)
Photo 15.57
Squares N/4–5, looking south; bottom: D-6b Installations 7931 and 7939; center: D-7a Wall 8904, superimposed by D-6a–b Installation 2874 (2005)
Mazar et. al. (2020 v.3) - Photo 15.61-
Square N/4 from Mazar et. al. (2020 v. 3: Chapter 15)
Photo 15.61
Square N/4; D-6a Oven 2841 below D-4b Floor 1845 (1998)
Mazar et. al. (2020 v.3) - Photo 15.63-
Squares N–Q/4–5 from Mazar et. al. (2020 v. 3: Chapter 15)
Photo 15.63
Squares N–Q/4–5 at end of 2007 season; center: north–south street (Photo: SkyView).
Mazar et. al. (2020 v.3) - Photo 15.64-
Square N–P/4 from Mazar et. al. (2020 v. 3: Chapter 15)
Photo 15.64
Square N–P/4, looking east; right: stone foundation of D-4 Wall 1811; center right: D-6a Oven 2841 (1998)
Mazar et. al. (2020 v.3) - Photo 15.65-
Probe in street, Square P/4 from Mazar et. al. (2020 v. 3: Chapter 15)
Photo 15.65
Probe in street, Square P/4; D-5 stone fill 9810, east of Wall 2882 (2008)
Mazar et. al. (2020 v.3) - Photo 15.66-
Squares P/4–5 from Mazar et. al. (2020 v. 3: Chapter 15)
Photo 15.66
Squares P/4–5, looking south, D-4b Street 8803, bordered by Wall 1883 (right) and Walls 8850, 1860, above 2881 (left); lower left: Installation 8810 (2007)
Mazar et. al. (2020 v.3) - Photo 15.67-
Squares P/4–5; fallen bricks (7847) along eastern face of Wall 1883 from Mazar et. al. (2020 v. 3: Chapter 15)
Photo 15.67
Squares P/4–5, same as Photo 15.66, looking north; fallen bricks (7847) along eastern face of Wall 1883 (2007)
Mazar et. al. (2020 v.3) - Photo 15.68-
Square P-5, looking west at Wall 1883; foreground: brick collapse in street from Mazar et. al. (2020 v. 3: Chapter 15)
Photo 15.68
Square P-5, looking west at Wall 1883; foreground: brick collapse in street (2005)
Mazar et. al. (2020 v.3) - Photo 15.69-
Squares P–Q/4–5 from Mazar et. al. (2020 v. 3: Chapter 15)
Photo 15.69
Squares P–Q/4–5, looking north at D-5 Buildings DD and DE, (2008)
Mazar et. al. (2020 v.3) - Photo 15.70-
Squares Q/4–5, looking north at D-5 Room 8867 from Mazar et. al. (2020 v. 3: Chapter 15)
Photo 15.70
Squares Q/4–5, looking north at D-5 Room 8867; bottom: Pit 8883 (2008)
Mazar et. al. (2020 v.3) - Photo 15.71-
Square Q/5, looking west at D-4 Building DG; lower right: brick collapse 8865 in D-5 Building DE from Mazar et. al. (2020 v. 3: Chapter 15)
Photo 15.71
Square Q/5, looking west at D-4 Building DG; lower right: brick collapse 8865 in D-5 Building DE (2007)
Mazar et. al. (2020 v.3) - Photo 15.72-
Square Q/5 from Mazar et. al. (2020 v. 3: Chapter 15)
Photo 15.72
Square Q/5, looking west; lower right: Room 8865 of D-5 Building DD; left: walls of D-4 Buildings DG and DH (2007)
Mazar et. al. (2020 v.3) - Photo 15.73-
Square P/5 from Mazar et. al. (2020 v. 3: Chapter 15)
Photo 15.73
Square P/5, looking west; center: D-5 Room 8874 with ‘steps’ 8879; D-4b Installation 8810 on top of D-5 Wall 8878 (2007).
Mazar et. al. (2020 v.3) - Photo 15.74-
Squares Q/4–5 from Mazar et. al. (2020 v. 3: Chapter 15)
Photo 15.74
Squares Q/4–5, looking east at D-5 Building DD; Installation 9805 on Floor 8867 (2008)
Mazar et. al. (2020 v.3) - Photo 15.75-
Square Q/4 from Mazar et. al. (2020 v. 3: Chapter 15)
Photo 15.75
Square Q/4, looking north at D-5 Building DD; Floor 8867, cut by Pit 8883 (2008)
Mazar et. al. (2020 v.3) - Photo 15.76-
Square P/4 from Mazar et. al. (2020 v. 3: Chapter 15)
Photo 15.76
Square P/4, looking southwest at D-5 Building DD; left: Floor 8871 and Pit 8876; top right: street between Walls 2881 and 2882 (2008)
Mazar et. al. (2020 v.3) - Photo 15.77-
Squares P–Q/4 from Mazar et. al. (2020 v. 3: Chapter 15)
Photo 15.77
Squares P–Q/4, looking southwest at D-5 Building DD; Floor 8871, cut by Pits 8876 (center) and 8880 (left); D-4 Wall 1884 floating above floor (2007)
Mazar et. al. (2020 v.3) - Photo 15.88-
Square Q/5 from Mazar et. al. (2020 v. 3: Chapter 15)
Photo 15.88
Square Q/5, looking east; D-4a Building DJ, with elements of D-4b Buildings DH and DG below (2007)
Mazar et. al. (2020 v.3)
- Plan: Fig. 15.22
- Sections: Figs. 15.19–15.21; 15.32–15.35
- Photos 15.45, 15.56–15.57, 15.61, 15.63–15.77, 15.88
- Pottery: Buildings: Figs. 16.38–16.40; Street: Figs. 16.41–16.47)
- Table 15.1 -
Stratigraphy and chronology in Area D, with correlation to Area C from Mazar et. al. (2020 v. 3: Chapter 17)
Table 15.1
Stratigraphy and chronology in Area D, with correlation to Area C
Mazar et. al. (2020 v.3) - Table 15.2 -
Locus and basket numbers from Mazar et. al. (2020 v. 3: Chapter 17)
Table 15.2
Locus and basket numbers
Mazar et. al. (2020 v.3) - Figure 15.1 -
Location of section drawings on superimposed plan of Strata D-11–D-2 from Mazar et. al. (2020 v. 3: Chapter 17)
Figure 15.1
Location of section drawings on superimposed plan of Strata D-11–D-2
Mazar et. al. (2020 v.3) - Figure 15.2 -
Schematic section of Area D from Mazar et. al. (2020 v. 3: Chapter 17)
Figure 15.2
Schematic section of Area D
Mazar et. al. (2020 v.3) - Figure 15.19 -
Section 3 from Mazar et. al. (2020 v. 3: Chapter 15)
Figure 15.19
Section 3 (Squares L–N/4, looking north)
Mazar et. al. (2020 v.3) - Figure 15.20 -
Section 4 from Mazar et. al. (2020 v. 3: Chapter 15)
Figure 15.20
Section 4 (Squares N–L/4, looking south)
Mazar et. al. (2020 v.3) - Figure 15.21 -
Section 5 from Mazar et. al. (2020 v. 3: Chapter 15)
Figure 15.21
Section 5 (Squares N/4–5, looking east)
Mazar et. al. (2020 v.3) - Figure 15.23 -
Plan of Stratum D-4b from Mazar et. al. (2020 v. 3: Chapter 15)
Figure 15.23
Plan of Stratum D-4b
Mazar et. al. (2020 v.3) - Figure 15.24 -
Plan of Stratum D-4a from Mazar et. al. (2020 v. 3: Chapter 15)
Figure 15.24
Plan of Stratum D-4a
Mazar et. al. (2020 v.3) - Figure 15.25a -
Iron IB remains in Areas D and C from Mazar et. al. (2020 v. 3: Chapter 15)
Figure 15.25a
Schematic plan of Iron IB remains in Areas D and C, showing possible correlation: Strata D-5 and C-3b
Mazar et. al. (2020 v.3) - Figure 15.25b -
Iron IB remains in Areas D and C from Mazar et. al. (2020 v. 3: Chapter 15)
Figure 15.25b
Schematic plan of Iron IB remains in Areas D and C, showing possible correlation: Strata D-4b and C-3a
Mazar et. al. (2020 v.3) - Figure 15.32 -
Section 6 from Mazar et. al. (2020 v. 3: Chapter 15)
Figure 15.32
Section 6 (Squares P–Q/5, looking north)
Mazar et. al. (2020 v.3) - Figure 15.33 -
Section 7 from Mazar et. al. (2020 v. 3: Chapter 15)
Figure 15.33
Section 7 (Squares P–Q/4, looking north)
Mazar et. al. (2020 v.3) - Figure 15.34 -
Section 8 from Mazar et. al. (2020 v. 3: Chapter 15)
Figure 15.34
Section 8 (Squares Q–N/4, looking south)
Mazar et. al. (2020 v.3) - Figure 15.35 -
Section 9 from Mazar et. al. (2020 v. 3: Chapter 15)
Figure 15.35
Section 9 (Squares Q/4–5, looking east)
Mazar et. al. (2020 v.3) - Photo 15.61-
Square N/4 from Mazar et. al. (2020 v. 3: Chapter 15)
Photo 15.61
Square N/4; D-6a Oven 2841 below D-4b Floor 1845 (1998)
Mazar et. al. (2020 v.3) - Photo 15.63-
Squares N–Q/4–5 from Mazar et. al. (2020 v. 3: Chapter 15)
Photo 15.63
Squares N–Q/4–5 at end of 2007 season; center: north–south street (Photo: SkyView).
Mazar et. al. (2020 v.3) - Photo 15.64-
Square N–P/4 from Mazar et. al. (2020 v. 3: Chapter 15)
Photo 15.64
Square N–P/4, looking east; right: stone foundation of D-4 Wall 1811; center right: D-6a Oven 2841 (1998)
Mazar et. al. (2020 v.3) - Photo 15.65-
Probe in street, Square P/4 from Mazar et. al. (2020 v. 3: Chapter 15)
Photo 15.65
Probe in street, Square P/4; D-5 stone fill 9810, east of Wall 2882 (2008)
Mazar et. al. (2020 v.3) - Photo 15.66-
Squares P/4–5 from Mazar et. al. (2020 v. 3: Chapter 15)
Photo 15.66
Squares P/4–5, looking south, D-4b Street 8803, bordered by Wall 1883 (right) and Walls 8850, 1860, above 2881 (left); lower left: Installation 8810 (2007)
Mazar et. al. (2020 v.3) - Photo 15.71-
Square Q/5, looking west at D-4 Building DG; lower right: brick collapse 8865 in D-5 Building DE from Mazar et. al. (2020 v. 3: Chapter 15)
Photo 15.71
Square Q/5, looking west at D-4 Building DG; lower right: brick collapse 8865 in D-5 Building DE (2007)
Mazar et. al. (2020 v.3) - Photo 15.72-
Square Q/5 from Mazar et. al. (2020 v. 3: Chapter 15)
Photo 15.72
Square Q/5, looking west; lower right: Room 8865 of D-5 Building DD; left: walls of D-4 Buildings DG and DH (2007)
Mazar et. al. (2020 v.3) - Photo 15.77-
Squares P–Q/4 from Mazar et. al. (2020 v. 3: Chapter 15)
Photo 15.77
Squares P–Q/4, looking southwest at D-5 Building DD; Floor 8871, cut by Pits 8876 (center) and 8880 (left); D-4 Wall 1884 floating above floor (2007)
Mazar et. al. (2020 v.3) - Photo 15.78-
General view of Area D from Mazar et. al. (2020 v. 3: Chapter 15)
Photo 15.78
General view, looking west, end of 2000 season
Mazar et. al. (2020 v.3) - Photo 15.79-
Squares N–P/4,from Mazar et. al. (2020 v. 3: Chapter 15)
Photo 15.79
Squares N–P/4, looking north at D-4 Building DF (2000)
Mazar et. al. (2020 v.3) - Photo 15.80-
Squares N–P/4 from Mazar et. al. (2020 v. 3: Chapter 15)
Photo 15.80
Squares N–P/4, looking east; Building DF; D-4b stone floor 1845 covered by pebbles (1842); D-4a brick collapse and stratified layers above (1997)
Mazar et. al. (2020 v.3) - Photo 15.81-
Square N/4 from Mazar et. al. (2020 v. 3: Chapter 15)
Photo 15.81
Square N/4, looking east; D-4b Building DF; background: Wall 1811; foreground: accumulation 1805 on Floor 1822; note two rows of bricks separated by a line in Wall 1811 (1997)
Mazar et. al. (2020 v.3) - Photo 15.82-
Squares N–P/4 from Mazar et. al. (2020 v. 3: Chapter 15)
Photo 15.82
Squares N–P/4, looking west; D-5 Building DF, stone floor 1845 (2000)
Mazar et. al. (2020 v.3) - Photo 15.83-
Square P/4 from Mazar et. al. (2020 v. 3: Chapter 15)
Photo 15.83
Square P/4, looking north; right: D-4a street surface 1873; meter stick on Wall 1883 (1997).
Mazar et. al. (2020 v.3) - Photo 15.84-
Square P/5 from Mazar et. al. (2020 v. 3: Chapter 15)
Photo 15.84
Square P/5, looking south at D-4a stone pavement (7805/7828) in street (2005)
Mazar et. al. (2020 v.3) - Photo 15.85-
Squares P–N/4–5 from Mazar et. al. (2020 v. 3: Chapter 15)
Photo 15.85
Squares P–N/4–5, looking west; D-4b Buildings DG and DH; center: D-4a Floor 8820, Building DJ (2007)
Mazar et. al. (2020 v.3) - Photo 15.86-
Square P/4 from Mazar et. al. (2020 v. 3: Chapter 15)
Photo 15.86
Square P/4, looking east; D-4b Building DG, Installation 8824 (2007)
Mazar et. al. (2020 v.3) - Photo 15.87-
Square Q/5 from Mazar et. al. (2020 v. 3: Chapter 15)
Photo 15.87
Square Q/5, looking north; D-4b Building DG, Room 8830; Installation 8837 in northeastern corner of room (2007)
Mazar et. al. (2020 v.3) - Photo 15.88-
Square Q/5 from Mazar et. al. (2020 v. 3: Chapter 15)
Photo 15.88
Square Q/5, looking east; D-4a Building DJ, with elements of D-4b Buildings DH and DG below (2007)
Mazar et. al. (2020 v.3) - Photo 15.89-
Square Q/5 from Mazar et. al. (2020 v. 3: Chapter 15)
Photo 15.89
Square Q/5, eastern section; D-4a Building DJ above elements of D-4b Buildings DH and DG (2007)
Mazar et. al. (2020 v.3) - Photo 15.90-
Square Q/5 from Mazar et. al. (2020 v. 3: Chapter 15)
Photo 15.90
Square Q/5, looking north; D-4b Building DH (2007)
Mazar et. al. (2020 v.3) - Photo 15.95 -
Square P/5 from Mazar et. al. (2020 v. 3: Chapter 15)
Photo 15.95
Square P/5, D-4a Building DJ, Rooms 4858 (bottom) and 4872 (top) (2000)
Mazar et. al. (2020 v.3) - Photo 15.96 -
Square P/5, looking west; D-4a Building DJ, debris and vessels in Room 4872 from Mazar et. al. (2020 v. 3: Chapter 15)
Photo 15.96
Square P/5, looking west; D-4a Building DJ, debris and vessels in Room 4872 (2000)
Mazar et. al. (2020 v.3) - Photo 15.97 -
Smashed Pottery in Square P/5 D-4a Building DJ, Room 4872 from Mazar et. al. (2020 v. 3: Chapter 15)
Photo 15.97
Square P/5, looking west; detail of D-4a Building DJ, Room 4872 (see Photo 15.96) (2000)
Mazar et. al. (2020 v.3) - Photo 15.98 -
Squares P–Q/4 from Mazar et. al. (2020 v. 3: Chapter 15)
Photo 15.98
Squares P–Q/4, looking south; D-4a Building DJ, Rooms 4863 (left) and 2869 (right) (2000)
Mazar et. al. (2020 v.3) - Photo 15.99 -
Square P/4 from Mazar et. al. (2020 v. 3: Chapter 15)
Photo 15.99
Square P/4, looking east at entrance from street to Room 2869, D-4a Building DJ; foreground: stones (2886) in D-4b street surface (1998)
Mazar et. al. (2020 v.3) - Photo 15.101 -
Square Q/4 from Mazar et. al. (2020 v. 3: Chapter 15)
Photo 15.101
Square Q/4, looking south at D-3 pits cutting into D-4 debris. Right: D-4 Wall 1860 (1998)
Mazar et. al. (2020 v.3) - Photo 15.102 -
Squares P–Q/4 from Mazar et. al. (2020 v. 3: Chapter 15)
Photo 15.102
Squares P–Q/4, looking north at lower D-3 pits, dug into D-4 architecture (2000)
Mazar et. al. (2020 v.3) - Photo 15.111 -
Square P/5, looking south at reed impressions (ceiling collapse?) on plaster layer from Mazar et. al. (2020 v. 3: Chapter 15)
Photo 15.111
Square P/5, looking south at reed impressions (ceiling collapse?) on plaster layer, below foundations of D-2 Wall 4808; foreground: D-4b basalt basin (8807) in Installation 8810 (2007)
Mazar et. al. (2020 v.3) - Photo 15.112 -
Closeup of layer in Photo 15.111 from Mazar et. al. (2020 v. 3: Chapter 15)
Photo 15.112
Closeup of layer in Photo 15.111
Mazar et. al. (2020 v.3) - Photo 15.113 -
Square Q/5 from Mazar et. al. (2020 v. 3: Chapter 15)
Photo 15.113
Square Q/5, looking north at D-2 Wall 4808, built into D-4a Building DJ (2007)
Mazar et. al. (2020 v.3) - Photo 15.114 -
Square Q/5 from Mazar et. al. (2020 v. 3: Chapter 15)
Photo 15.114
Square Q/5, looking north; eastern part of D-2 Wall 4808, built against Wall 7851 (2007)
Mazar et. al. (2020 v.3) - Photo 15.116 -
Square Q/5 from Mazar et. al. (2020 v. 3: Chapter 15)
Photo 15.116
Square Q/5, looking east; top and center: D-1 walls and layers; bottom: D-4 Rooms 4872 and 4858 (2005)
Mazar et. al. (2020 v.3)
- Plans: Figs. 15.23–15.25
- Sections: Figs. 15.19a–15.21, 15.32–15.35
- Photos 15.61, 15.63–15.66, 15.71–15.72, 15.77–15.90, 15.95–15.99, 15.101–15.102, 15.111–15.114, 15.116;
- Pottery: Buildings: Figs. 16.48–16.54; Street: Figs. 16.41–16.47
- Table 15.1 -
Stratigraphy and chronology in Area D, with correlation to Area C from Mazar et. al. (2020 v. 3: Chapter 17)
Table 15.1
Stratigraphy and chronology in Area D, with correlation to Area C
Mazar et. al. (2020 v.3) - Table 15.2 -
Locus and basket numbers from Mazar et. al. (2020 v. 3: Chapter 17)
Table 15.2
Locus and basket numbers
Mazar et. al. (2020 v.3) - Figure 15.1 -
Location of section drawings on superimposed plan of Strata D-11–D-2 from Mazar et. al. (2020 v. 3: Chapter 17)
Figure 15.1
Location of section drawings on superimposed plan of Strata D-11–D-2
Mazar et. al. (2020 v.3) - Figure 15.2 -
Schematic section of Area D from Mazar et. al. (2020 v. 3: Chapter 17)
Figure 15.2
Schematic section of Area D
Mazar et. al. (2020 v.3) - Figure 15.21 -
Section 5 from Mazar et. al. (2020 v. 3: Chapter 15)
Figure 15.21
Section 5 (Squares N/4–5, looking east)
Mazar et. al. (2020 v.3) - Figure 15.26 -
Plan of Stratum D-3, lower pits from Mazar et. al. (2020 v. 3: Chapter 15)
Figure 15.26
Plan of Stratum D-3, lower pits
Mazar et. al. (2020 v.3) - Figure 15.27 -
Plan of Stratum D-3, upper pits from Mazar et. al. (2020 v. 3: Chapter 15)
Figure 15.27
Plan of Stratum D-3, upper pits
Mazar et. al. (2020 v.3) - Figure 15.33 -
Section 7 from Mazar et. al. (2020 v. 3: Chapter 15)
Figure 15.33
Section 7 (Squares P–Q/4, looking north)
Mazar et. al. (2020 v.3) - Figure 15.34 -
Section 8 from Mazar et. al. (2020 v. 3: Chapter 15)
Figure 15.34
Section 8 (Squares Q–N/4, looking south)
Mazar et. al. (2020 v.3) - Figure 15.35 -
Section 9 from Mazar et. al. (2020 v. 3: Chapter 15)
Figure 15.35
Section 9 (Squares Q/4–5, looking east)
Mazar et. al. (2020 v.3) - Photo 15.100 -
Squares Q–P/4 from Mazar et. al. (2020 v. 3: Chapter 15)
Photo 15.100
Squares Q–P/4, looking west; upper D-3 pits (1998)
Mazar et. al. (2020 v.3) - Photo 15.101 -
Square Q/4 from Mazar et. al. (2020 v. 3: Chapter 15)
Photo 15.101
Square Q/4, looking south at D-3 pits cutting into D-4 debris. Right: D-4 Wall 1860 (1998)
Mazar et. al. (2020 v.3) - Photo 15.102 -
Squares P–Q/4 from Mazar et. al. (2020 v. 3: Chapter 15)
Photo 15.102
Squares P–Q/4, looking north at lower D-3 pits, dug into D-4 architecture (2000)
Mazar et. al. (2020 v.3) - Photo 15.103 -
Square Q/4 from Mazar et. al. (2020 v. 3: Chapter 15)
Photo 15.103
Square Q/4, looking south at D-3 Pits 4805 (bottom) and 4806 (top) (2000)
Mazar et. al. (2020 v.3) - Photo 15.104 -
Square Q/4, D-3 Pit 2808 from Mazar et. al. (2020 v. 3: Chapter 15)
Photo 15.104
Square Q/4, D-3 Pit 2808 (1998)
Mazar et. al. (2020 v.3) - Photo 15.105 -
Squares P–Q/4, looking west at upper D-3 pits from Mazar et. al. (2020 v. 3: Chapter 15)
Photo 15.105
Squares P–Q/4, looking west at upper D-3 pits (1998)
Mazar et. al. (2020 v.3) - Photo 15.106 -
Square Q/4, looking south at D-3 Pit 2872 from Mazar et. al. (2020 v. 3: Chapter 15)
Photo 15.106
Square Q/4, looking south at D-3 Pit 2872 (1998)
Mazar et. al. (2020 v.3) - Photo 15.107 -
Square Q/4, looking west at D-3 Pit 2850 from Mazar et. al. (2020 v. 3: Chapter 15)
Photo 15.107
Square Q/4, looking west at D-3 Pit 2850 (1998)
Mazar et. al. (2020 v.3)
- Plans: Figs. 15.26–15.27
- Sections: Figs. 15.21, 15.33–15.35
- Photos 15.100–15.107
- Pottery: Figs. 16.55–16.58
- Table 15.1 -
Stratigraphy and chronology in Area D, with correlation to Area C from Mazar et. al. (2020 v. 3: Chapter 17)
Table 15.1
Stratigraphy and chronology in Area D, with correlation to Area C
Mazar et. al. (2020 v.3) - Table 15.2 -
Locus and basket numbers from Mazar et. al. (2020 v. 3: Chapter 17)
Table 15.2
Locus and basket numbers
Mazar et. al. (2020 v.3) - Figure 15.1 -
Location of section drawings on superimposed plan of Strata D-11–D-2 from Mazar et. al. (2020 v. 3: Chapter 17)
Figure 15.1
Location of section drawings on superimposed plan of Strata D-11–D-2
Mazar et. al. (2020 v.3) - Figure 15.2 -
Schematic section of Area D from Mazar et. al. (2020 v. 3: Chapter 17)
Figure 15.2
Schematic section of Area D
Mazar et. al. (2020 v.3) - Figure 15.28 -
Plan of Stratum D-2 from Mazar et. al. (2020 v. 3: Chapter 15)
Figure 15.28
Plan of Stratum D-2
Mazar et. al. (2020 v.3) - Figure 15.32 -
Section 6 from Mazar et. al. (2020 v. 3: Chapter 15)
Figure 15.32
Section 6 (Squares P–Q/5, looking north)
Mazar et. al. (2020 v.3) - Figure 15.33 -
Section 7 from Mazar et. al. (2020 v. 3: Chapter 15)
Figure 15.33
Section 7 (Squares P–Q/4, looking north)
Mazar et. al. (2020 v.3) - Figure 15.34 -
Section 8 from Mazar et. al. (2020 v. 3: Chapter 15)
Figure 15.34
Section 8 (Squares Q–N/4, looking south)
Mazar et. al. (2020 v.3) - Figure 15.35 -
Section 9 from Mazar et. al. (2020 v. 3: Chapter 15)
Figure 15.35
Section 9 (Squares Q/4–5, looking east)
Mazar et. al. (2020 v.3) - Photo 15.108 -
Square P/4 from Mazar et. al. (2020 v. 3: Chapter 15)
Photo 15.108
Square P/4, looking east at D-2 Room 4826 (2000)
Mazar et. al. (2020 v.3) - Photo 15.109 -
Square P/5 from Mazar et. al. (2020 v. 3: Chapter 15)
Photo 15.109
Square P/5, looking west at D-2 Room 4828 (2000)
Mazar et. al. (2020 v.3) - Photo 15.110 -
Square P/5 from Mazar et. al. (2020 v. 3: Chapter 15)
Photo 15.110
Square P/5, looking east at D-2 Room 4828; right: trench cutting northern end of Floor 4825 (2000)
Mazar et. al. (2020 v.3) - Photo 15.111 -
Square P/5, looking south at reed impressions (ceiling collapse?) on plaster layer from Mazar et. al. (2020 v. 3: Chapter 15)
Photo 15.111
Square P/5, looking south at reed impressions (ceiling collapse?) on plaster layer, below foundations of D-2 Wall 4808; foreground: D-4b basalt basin (8807) in Installation 8810 (2007)
Mazar et. al. (2020 v.3) - Photo 15.112 -
Closeup of layer in Photo 15.111 from Mazar et. al. (2020 v. 3: Chapter 15)
Photo 15.112
Closeup of layer in Photo 15.111
Mazar et. al. (2020 v.3) - Photo 15.113 -
Square Q/5 from Mazar et. al. (2020 v. 3: Chapter 15)
Photo 15.113
Square Q/5, looking north at D-2 Wall 4808, built into D-4a Building DJ (2007)
Mazar et. al. (2020 v.3) - Photo 15.114 -
Square Q/5 from Mazar et. al. (2020 v. 3: Chapter 15)
Photo 15.114
Square Q/5, looking north; eastern part of D-2 Wall 4808, built against Wall 7851 (2007)
Mazar et. al. (2020 v.3) - Photo 15.115 -
Square Q/5 from Mazar et. al. (2020 v. 3: Chapter 15)
Photo 15.115
Square Q/5, looking west; D-1b–c walls above D-2 Wall 4808 (2005)
Mazar et. al. (2020 v.3)
- Plan: Fig. 15.28
- Sections: Figs. 15.32–15.35
- Photos 15.108–15.115
- Pottery: Fig. 16.59
- Table 15.1 -
Stratigraphy and chronology in Area D, with correlation to Area C from Mazar et. al. (2020 v. 3: Chapter 17)
Table 15.1
Stratigraphy and chronology in Area D, with correlation to Area C
Mazar et. al. (2020 v.3) - Table 15.2 -
Locus and basket numbers from Mazar et. al. (2020 v. 3: Chapter 17)
Table 15.2
Locus and basket numbers
Mazar et. al. (2020 v.3) - Figure 15.1 -
Location of section drawings on superimposed plan of Strata D-11–D-2 from Mazar et. al. (2020 v. 3: Chapter 17)
Figure 15.1
Location of section drawings on superimposed plan of Strata D-11–D-2
Mazar et. al. (2020 v.3) - Figure 15.2 -
Schematic section of Area D from Mazar et. al. (2020 v. 3: Chapter 17)
Figure 15.2
Schematic section of Area D
Mazar et. al. (2020 v.3) - Figure 15.29 -
Plan of Stratum D-1c from Mazar et. al. (2020 v. 3: Chapter 15)
Figure 15.29
Plan of Stratum D-1c
Mazar et. al. (2020 v.3) - Figure 15.30 -
Plan of Stratum D-1b from Mazar et. al. (2020 v. 3: Chapter 15)
Figure 15.30
Plan of Stratum D-1b
Mazar et. al. (2020 v.3) - Figure 15.31 -
Plan of Stratum D-1a from Mazar et. al. (2020 v. 3: Chapter 15)
Figure 15.31
Plan of Stratum D-1a
Mazar et. al. (2020 v.3) - Figure 15.32 -
Section 6 from Mazar et. al. (2020 v. 3: Chapter 15)
Figure 15.32
Section 6 (Squares P–Q/5, looking north)
Mazar et. al. (2020 v.3) - Figure 15.33 -
Section 7 from Mazar et. al. (2020 v. 3: Chapter 15)
Figure 15.33
Section 7 (Squares P–Q/4, looking north)
Mazar et. al. (2020 v.3) - Figure 15.34 -
Section 8 from Mazar et. al. (2020 v. 3: Chapter 15)
Figure 15.34
Section 8 (Squares Q–N/4, looking south)
Mazar et. al. (2020 v.3) - Figure 15.35 -
Section 9 from Mazar et. al. (2020 v. 3: Chapter 15)
Figure 15.35
Section 9 (Squares Q/4–5, looking east)
Mazar et. al. (2020 v.3) - Photo 15.115 -
Square Q/5 from Mazar et. al. (2020 v. 3: Chapter 15)
Photo 15.115
Square Q/5, looking west; D-1b–c walls above D-2 Wall 4808 (2005)
Mazar et. al. (2020 v.3) - Photo 15.116 -
Square Q/5 from Mazar et. al. (2020 v. 3: Chapter 15)
Photo 15.116
Square Q/5, looking east; top and center: D-1 walls and layers; bottom: D-4 Rooms 4872 and 4858 (2005)
Mazar et. al. (2020 v.3) - Photo 15.117 -
Square Q/5 from Mazar et. al. (2020 v. 3: Chapter 15)
Photo 15.117
Square Q/5, looking south at D-1b–c Wall 7803; Debris 7810 (in left section) on Floor 7837 (2005)
Mazar et. al. (2020 v.3) - Photo 15.118 -
Square Q/5 from Mazar et. al. (2020 v. 3: Chapter 15)
Photo 15.118
Square Q/5, looking west at Stratum D-1b–c elements (2005)
Mazar et. al. (2020 v.3) - Photo 15.119 -
Square Q/5 from Mazar et. al. (2020 v. 3: Chapter 15)
Photo 15.119
Square Q/5 looking north; D-2 Floor 7837 below D-1b–c walls (2005)
Mazar et. al. (2020 v.3) - Photo 15.120 -
Square Q/5 from Mazar et. al. (2020 v. 3: Chapter 15)
Photo 15.120
Square Q/5, eastern section with D-1c Debris 7826 above Floor 7830/7837 (1998)
Mazar et. al. (2020 v.3) - Photo 15.121 -
Square Q/4 from Mazar et. al. (2020 v. 3: Chapter 15)
Photo 15.121
Square Q/4, looking north at D-1a Wall 1816 (1997)
Mazar et. al. (2020 v.3) - Photo 15.122 -
Square Q/4 from Mazar et. al. (2020 v. 3: Chapter 15)
Photo 15.122
Square Q/4, looking north at D-1b Oven 1817 (center) and D-1a Wall 1808 (right) (1997)
Mazar et. al. (2020 v.3)
- Plans: Figs. 15.29–15.31
- Sections: Figs. 15.32–15.35
- Photos 15.115–15.122
- Pottery: Fig. 16.60
- Table 15.1 -
Stratigraphy and chronology in Area D, with correlation to Area C from Mazar et. al. (2020 v. 3: Chapter 17)
Table 15.1
Stratigraphy and chronology in Area D, with correlation to Area C
Mazar et. al. (2020 v.3) - Table 15.2 -
Locus and basket numbers from Mazar et. al. (2020 v. 3: Chapter 17)
Table 15.2
Locus and basket numbers
Mazar et. al. (2020 v.3) - Figure 15.1 -
Location of section drawings on superimposed plan of Strata D-11–D-2 from Mazar et. al. (2020 v. 3: Chapter 17)
Figure 15.1
Location of section drawings on superimposed plan of Strata D-11–D-2
Mazar et. al. (2020 v.3) - Figure 15.2 -
Schematic section of Area D from Mazar et. al. (2020 v. 3: Chapter 17)
Figure 15.2
Schematic section of Area D
Mazar et. al. (2020 v.3)
- Figure 15.1
Location of section drawings on superimposed plan of Strata D-11–D-2 from Mazar et. al. (2020 v. 3: Chapter 15)
Figure 15.1
Location of section drawings on superimposed plan of Strata D-11–D-2
Mazar et. al. (2020 v.3) - Figure 15.2
Schematic section of Area D from Mazar et. al. (2020 v. 3: Chapter 15)
Figure 15.2
Schematic section of Area D
Mazar et. al. (2020 v.3) - Figure 15.3
Plan of Stratum D-11b from Mazar et. al. (2020 v. 3: Chapter 15)
Figure 15.3
Plan of Stratum D-11b
Mazar et. al. (2020 v.3) - Figure 15.4
Plan of Stratum D-11a from Mazar et. al. (2020 v. 3: Chapter 15)
Figure 15.4
Plan of Stratum D-11a
Mazar et. al. (2020 v.3) - Figure 15.5
Plan of Stratum D-10 constructional fills from Mazar et. al. (2020 v. 3: Chapter 15)
Figure 15.5
Plan of Stratum D-10 constructional fills
Mazar et. al. (2020 v.3) - Figure 15.6
Plan of Stratum D-10 from Mazar et. al. (2020 v. 3: Chapter 15)
Figure 15.6
Plan of Stratum D-10
Mazar et. al. (2020 v.3) - Figure 15.7
Plan of Stratum D-9b from Mazar et. al. (2020 v. 3: Chapter 15)
Figure 15.7
Plan of Stratum D-9b
Mazar et. al. (2020 v.3) - Figure 15.8
Plan of Stratum D-9a from Mazar et. al. (2020 v. 3: Chapter 15)
Figure 15.8
Plan of Stratum D-9a
Mazar et. al. (2020 v.3) - Figure 15.9
Plan of Stratum D-8 from Mazar et. al. (2020 v. 3: Chapter 15)
Figure 15.9
Plan of Stratum D-8
Mazar et. al. (2020 v.3) - Figure 15.10
Plan of Stratum D-8' from Mazar et. al. (2020 v. 3: Chapter 15)
Figure 15.10
Plan of Stratum D-8'
Mazar et. al. (2020 v.3) - Figure 15.11
Plan of post Stratum D-8 fills from Mazar et. al. (2020 v. 3: Chapter 15)
Figure 15.11
Plan of post Stratum D-8 fills
Mazar et. al. (2020 v.3) - Figure 15.12
Plan of Stratum D-7b from Mazar et. al. (2020 v. 3: Chapter 15)
Figure 15.12
Plan of Stratum D-7b
Mazar et. al. (2020 v.3) - Figure 15.13
Plan of Stratum D-7a (encircled numbers denote foundation deposits as listed in the text) from Mazar et. al. (2020 v. 3: Chapter 15)
Figure 15.13
Plan of Stratum D-7a (encircled numbers denote foundation deposits as listed in the text)
Mazar et. al. (2020 v.3) - Figure 15.14
Plan of Stratum D-7a' from Mazar et. al. (2020 v. 3: Chapter 15)
Figure 15.14
Plan of Stratum D-7a'
Mazar et. al. (2020 v.3) - Figure 15.15
Plan of Stratum D-6b from Mazar et. al. (2020 v. 3: Chapter 15)
Figure 15.15
Plan of Stratum D-6b
Mazar et. al. (2020 v.3) - Figure 15.16
Plan of Stratum D-6a from Mazar et. al. (2020 v. 3: Chapter 15)
Figure 15.16
Plan of Stratum D-6a
Mazar et. al. (2020 v.3) - Figure 15.17a
Section 1a from Mazar et. al. (2020 v. 3: Chapter 15)
Figure 15.17a
Section 1a (Squares G–L/5, looking north, showing probe in alluvial field)
Mazar et. al. (2020 v.3) - Figure 15.17b
Section 1b from Mazar et. al. (2020 v. 3: Chapter 15)
Figure 15.17b
Section 1b (Squares J–M/5 and part of N/5, looking north)
Mazar et. al. (2020 v.3) - Figure 15.18a
Section 2a from Mazar et. al. (2020 v. 3: Chapter 15)
Figure 15.18a
Section 2a (Squares M/4–5, looking west in Probe III)
Mazar et. al. (2020 v.3) - Figure 15.18b
Section 2b from Mazar et. al. (2020 v. 3: Chapter 15)
Figure 15.18b
Section 2a (Squares M/4–5, looking west in Probe III)
Mazar et. al. (2020 v.3) - Figure 15.19
Section 3 from Mazar et. al. (2020 v. 3: Chapter 15)
Figure 15.19
Section 3 (Squares L–N/4, looking north)
Mazar et. al. (2020 v.3) - Figure 15.20
Section 4 from Mazar et. al. (2020 v. 3: Chapter 15)
Figure 15.20
Section 4 (Squares N–L/4, looking south)
Mazar et. al. (2020 v.3) - Figure 15.21
Section 5 from Mazar et. al. (2020 v. 3: Chapter 15)
Figure 15.21
Section 5 (Squares N/4–5, looking east)
Mazar et. al. (2020 v.3) - Figure 15.22
Plan of Stratum D-5 from Mazar et. al. (2020 v. 3: Chapter 15)
Figure 15.22
Plan of Stratum D-5
Mazar et. al. (2020 v.3) - Figure 15.23
Plan of Stratum D-4b from Mazar et. al. (2020 v. 3: Chapter 15)
Figure 15.23
Plan of Stratum D-4b
Mazar et. al. (2020 v.3) - Figure 15.24
Plan of Stratum D-4a from Mazar et. al. (2020 v. 3: Chapter 15)
Figure 15.24
Plan of Stratum D-4a
Mazar et. al. (2020 v.3) - Figure 15.25a
Iron IB remains in Areas D and C from Mazar et. al. (2020 v. 3: Chapter 15)
Figure 15.25a
Schematic plan of Iron IB remains in Areas D and C, showing possible correlation: Strata D-5 and C-3b
Mazar et. al. (2020 v.3) - Figure 15.25b
Iron IB remains in Areas D and C from Mazar et. al. (2020 v. 3: Chapter 15)
Figure 15.25b
Schematic plan of Iron IB remains in Areas D and C, showing possible correlation: Strata D-4b and C-3a
Mazar et. al. (2020 v.3) - Figure 15.26
Plan of Stratum D-3, lower pits from Mazar et. al. (2020 v. 3: Chapter 15)
Figure 15.26
Plan of Stratum D-3, lower pits
Mazar et. al. (2020 v.3) - Figure 15.27
Plan of Stratum D-3, upper pits from Mazar et. al. (2020 v. 3: Chapter 15)
Figure 15.27
Plan of Stratum D-3, upper pits
Mazar et. al. (2020 v.3) - Figure 15.28
Plan of Stratum D-2 from Mazar et. al. (2020 v. 3: Chapter 15)
Figure 15.28
Plan of Stratum D-2
Mazar et. al. (2020 v.3) - Figure 15.29
Plan of Stratum D-1c from Mazar et. al. (2020 v. 3: Chapter 15)
Figure 15.29
Plan of Stratum D-1c
Mazar et. al. (2020 v.3) - Figure 15.30
Plan of Stratum D-1b from Mazar et. al. (2020 v. 3: Chapter 15)
Figure 15.30
Plan of Stratum D-1b
Mazar et. al. (2020 v.3) - Figure 15.31
Plan of Stratum D-1a from Mazar et. al. (2020 v. 3: Chapter 15)
Figure 15.31
Plan of Stratum D-1a
Mazar et. al. (2020 v.3) - Figure 15.32
Section 6 from Mazar et. al. (2020 v. 3: Chapter 15)
Figure 15.32
Section 6 (Squares P–Q/5, looking north)
Mazar et. al. (2020 v.3) - Figure 15.33
Section 7 from Mazar et. al. (2020 v. 3: Chapter 15)
Figure 15.33
Section 7 (Squares P–Q/4, looking north)
Mazar et. al. (2020 v.3) - Figure 15.34
Section 8 from Mazar et. al. (2020 v. 3: Chapter 15)
Figure 15.34
Section 8 (Squares Q–N/4, looking south)
Mazar et. al. (2020 v.3) - Figure 15.35
Section 9 from Mazar et. al. (2020 v. 3: Chapter 15)
Figure 15.35
Section 9 (Squares Q/4–5, looking east)
Mazar et. al. (2020 v.3)
- Photo 15.1
Area D at the end of 1997 season from Mazar et. al. (2020 v. 3: Chapter 15)
Photo 15.1
General view, end of 1997 season, looking east; from top to bottom: Squares Q/4 to L/4
Mazar et. al. (2020 v.3) - Photo 15.2
Area D at the end of 1998 season from Mazar et. al. (2020 v. 3: Chapter 15)
Photo 15.2
General view, end of 1998 season, looking east; from top to bottom: Squares Q/4 to L/4
Mazar et. al. (2020 v.3) - Photo 15.3
Area D at the end of 2000 season from Mazar et. al. (2020 v. 3: Chapter 15)
Photo 15.3
General view, end of 2000 season, looking east; from top to bottom: Squares Q/4–5 to L/4
Mazar et. al. (2020 v.3) - Photo 15.4
Area D at the end of 2005 season from Mazar et. al. (2020 v. 3: Chapter 15)
Photo 15.4
General view, end of 2005 season, looking east; from top to bottom: Squares Q/4–5 to L/4–5
Mazar et. al. (2020 v.3) - Photo 15.5
Aerial view, end of 2008 season from Mazar et. al. (2020 v. 3: Chapter 15)
Photo 15.5
Aerial view, end of 2008 season
Mazar et. al. (2020 v.3) - Photo 15.6
General view, end of 2010 season from Mazar et. al. (2020 v. 3: Chapter 15)
Photo 15.6
General view, end of 2010 season, looking southwest; Squares L–N/4–5
Mazar et. al. (2020 v.3) - Photo 15.7
General view, with backhoe digging a trench in the alluvial plain west of the mound, end of 2008 season from Mazar et. al. (2020 v. 3: Chapter 15)
Photo 15.7
General view, with backhoe digging a trench in the alluvial plain west of the mound, end of 2008 season
Mazar et. al. (2020 v.3) - Photo 15.8
Probe III in Squares M/4–5 from Mazar et. al. (2020 v. 3: Chapter 15)
Photo 15.8
Probe III in Squares M/4–5; looking south at Stratum D-10 Buttress 2889 and Wall 2886; right: section in 2.0 m-high tufa fill, Stratum D-10; bottom left: D-11b Hearth 1926
Mazar et. al. (2020 v.3) - Photo 15.9
Probe III in Squares M/4–5 from Mazar et. al. (2020 v. 3: Chapter 15)
Photo 15.9
Probe III in Squares M/4–5; looking south at Buttress 2889 and Wall 2886, Stratum D-10; bottom: D-11b Hearths 1926 (left) and 1925 (right), Wall 1927 to their north
Mazar et. al. (2020 v.3) - Photo 15.10
Probe III in Squares M/4–5 from Mazar et. al. (2020 v. 3: Chapter 15)
Photo 15.10
Probe III in Squares M/4–5; looking north at Stratum D-10 Buttress 8938 and Wall 8942; bottom: D-11a Wall 1915 and ash pile (1919) to its north; northern and western sections: D-10 tufa fill
Mazar et. al. (2020 v.3) - Photo 15.11
Probe III in Squares M/4–5 from Mazar et. al. (2020 v. 3: Chapter 15)
Photo 15.11
Probe III in Squares M/4–5, looking north at D-11a Wall 1923 covered by layer (1907) and tufa fill (2814) of D-10
Mazar et. al. (2020 v.3) - Photo 15.12
Probe II in Square M/4 from Mazar et. al. (2020 v. 3: Chapter 15)
Photo 15.12
Probe II in Square M/4, looking east; D-11a stone floor (9917) covering D-11b layers; on top: successive D-10 fill layers (9914, 9905) and Floor 8939
Mazar et. al. (2020 v.3) - Photo 15.13
Backhoe trench in Square M/5 from Mazar et. al. (2020 v. 3: Chapter 15)
Photo 15.13
Backhoe trench in Square M/5, looking east; D-10 Wall 8942 with large stone below it at end of trench; thick tufa fill 2814 in trench sections
Mazar et. al. (2020 v.3) - Photo 15.14
Probe III in Squares M/4–5 from Mazar et. al. (2020 v. 3: Chapter 15)
Photo 15.14
Probe III in Squares M/4–5, looking south; left: stone foundation of D-9b Wall 8943 on top of D-10 Wall 8942 and Buttress 8938; background: D-10 Wall 2886 and Buttress 2889 (2010)
Mazar et. al. (2020 v.3) - Photo 15.15
Detail of Probe III from Mazar et. al. (2020 v. 3: Chapter 15)
Photo 15.15
Detail of Probe III, looking south at Wall 2886 and Buttress 2889 (2010)
Mazar et. al. (2020 v.3) - Photo 15.16
Detail of Probe III from Mazar et. al. (2020 v. 3: Chapter 15)
Photo 15.16
Detail of Probe III, looking east at Wall 8942 and Buttress 8938 (left) (2010)
Mazar et. al. (2020 v.3) - Photo 15.17
Backhoe trench in Square M/10 from Mazar et. al. (2020 v. 3: Chapter 15)
Photo 15.17
Backhoe trench in Square M/10, north of Area D, showing D-10 tufa fill, looking east (1998)
Mazar et. al. (2020 v.3) - Photo 15.18
Squares L–M/4 at end of 2010 season from Mazar et. al. (2020 v. 3: Chapter 15)
Photo 15.18
Squares L–M/4 at end of 2010 season, looking south at D-10 Walls 2886 and 2890 and Buttresses 2889, 1902, 1903; Probe II (9905) in Square M/4 east of Wall 2890
Mazar et. al. (2020 v.3) - Photo 15.19
Probe II in Square M/4 from Mazar et. al. (2020 v. 3: Chapter 15)
Photo 15.19
Probe II in Square M/4, looking east; D-10 constructional fill (9914, 9905) and Floor 8939 in section (1998)
Mazar et. al. (2020 v.3) - Photo 15.20
Probe II in Square M/4 from Mazar et. al. (2020 v. 3: Chapter 15)
Photo 15.20
Probe II in Square M/4, looking south; D-10 constructional fill (9914, 9905) and Floor 8939 in section (2008)
Mazar et. al. (2020 v.3) - Photo 15.21
Squares L–M/4 from Mazar et. al. (2020 v. 3: Chapter 15)
Photo 15.21
Squares L–M/4, looking east at corner of Wall 2890 and Buttresses 1902 and 1903; left: Courtyard 8934 (2010)
Mazar et. al. (2020 v.3) - Photo 15.22
Square M/5, Buttress 8938 and Wall 8942 abutted by D-10 Courtyard 8934 from Mazar et. al. (2020 v. 3: Chapter 15)
Photo 15.22
Square M/5, Buttress 8938 and Wall 8942 abutted by D-10 Courtyard 8934, looking northeast (2008)
Mazar et. al. (2020 v.3) - Photo 15.23
Squares L–N/4–5 from Mazar et. al. (2020 v. 3: Chapter 15)
Photo 15.23
Squares L–N/4–5, looking east; front: D-10 Courtyard 8934 and top of Buttresses 2889 (right) and 8938 (left); background: Strata D-9 to D-5 (2007)
Mazar et. al. (2020 v.3) - Photo 15.24
Squares L–N/4–5 from Mazar et. al. (2020 v. 3: Chapter 15)
Photo 15.24
Squares L–N/4–5, looking south; center: D-10 Courtyard 8934; left: Wall 8942 and Buttress 8938; top: Wall 2886 and Buttress 2889, partly superimposed by D-9b 2816 and 2892; in southern section: D-9 and D-8 layers (2007)
Mazar et. al. (2020 v.3) - Photo 15.25
Squares L–N/4–5 from Mazar et. al. (2020 v. 3: Chapter 15)
Photo 15.25
Squares L–N/4–5, looking north; center: D-10 Courtyard 8934; right: Buttress 8938; bottom: Wall 2886 and Buttress 2889 partly superimposed by D-9b Walls 2816 and 2892 (2007)
Mazar et. al. (2020 v.3) - Photo 15.26
Squares L–M/4 from Mazar et. al. (2020 v. 3: Chapter 15)
Photo 15.26
Squares L–M/4, looking south at section; bottom: D-9b Wall 2816; D-9a stone floor (2855) at top of meter stick, sealing D-10 and D-9b floors (bird-nest holes in section) (2007)
Mazar et. al. (2020 v.3) - Photo 15.27
Squares M–N/4 from Mazar et. al. (2020 v. 3: Chapter 15)
Photo 15.27
Squares M–N/4, looking southeast; D-10 Courtyard 8934 in corner of Walls 8942 and 2886; top left: stone foundation of D-9b Wall 8943 (2008).
Mazar et. al. (2020 v.3) - Photo 15.28
Squares M–N/4–5 from Mazar et. al. (2020 v. 3: Chapter 15)
Photo 15.28
Squares M–N/4–5, looking south at D-9a–b stone foundations (2010)
Mazar et. al. (2020 v.3) - Photo 15.29
Squares M–N/4–5, from Mazar et. al. (2020 v. 3: Chapter 15)
Photo 15.29
Squares M–N/4–5, looking south; left: D-9a Wall 8932 and Post-holes 1912; right: D-9b stone foundations (2010)
Mazar et. al. (2020 v.3) - Photo 15.30
Squares N/4–5 from Mazar et. al. (2020 v. 3: Chapter 15)
Photo 15.30
Squares N/4–5, looking west; top: D-9b stone foundations; bottom: D-9a Wall 8932 and Post-holes 1912; right: D-9a Wall 1916 (2010)
Mazar et. al. (2020 v.3) - Photo 15.31
Squares N/5 from Mazar et. al. (2020 v. 3: Chapter 15)
Photo 15.31
Square N/5, looking south; bottom: D-9a Wall 1916; right and top: D-9b Walls 8943 and 9923; left: D-9a Post-holes 1912 (2010)
Mazar et. al. (2020 v.3) - Photo 15.32
Squares N/4 from Mazar et. al. (2020 v. 3: Chapter 15)
Photo 15.32
Square N/4, looking south at D-9b Floor 9927, Oven 9918 and Installation 1905; right: Wall 8943; background: Wall 1904 (2010)
Mazar et. al. (2020 v.3) - Photo 15.33
Square M/5 from Mazar et. al. (2020 v. 3: Chapter 15)
Photo 15.33
Square M/5, looking south at D-9b bronze-melting canal (8921) and Installation 8925 (2007)
Mazar et. al. (2020 v.3) - Photo 15.34
Detail of bronze-melting canal (8921) with fragments of bellow, charcoal, and metal object in situ from Mazar et. al. (2020 v. 3: Chapter 15)
Photo 15.34
Detail of bronze-melting canal (8921) with fragments of bellow, charcoal, and metal object in situ, looking west (2007)
Mazar et. al. (2020 v.3) - Photo 15.35
Square M/5 from Mazar et. al. (2020 v. 3: Chapter 15)
Photo 15.35
Square M/5, detail of Installation 8925 near bronze-melting canal (8921), looking south (2007)
Mazar et. al. (2020 v.3) - Photo 15.36
Square M/5 from Mazar et. al. (2020 v. 3: Chapter 15)
Photo 15.36
Square M/5, D-9b Installation 8936 and stone foundation of Wall 8943, looking west; left: D-10 Buttress 8938 (2007)
Mazar et. al. (2020 v.3) - Photo 15.37
Squares L–M/4 from Mazar et. al. (2020 v. 3: Chapter 15)
Photo 15.37
Squares L–M/4, looking north at foundations of D-9b Wall 2816 above D-10 Wall 2886 and Buttress 1903, with D-10 Wall 2890 at the bottom
Mazar et. al. (2020 v.3) - Photo 15.38
Square N/4 from Mazar et. al. (2020 v. 3: Chapter 15)
Photo 15.38
Square N/4, sloping striations in D-10 Locus 8939 below D-9 stone foundations of Walls 8943 and 1906, looking east; background: D-8–9a Wall 8932 (2010)
Mazar et. al. (2020 v.3) - Photo 15.39
Square N/4 from Mazar et. al. (2020 v. 3: Chapter 15)
Photo 15.39
Square N/4, Locus 8919, foundation deposit (basalt bowl and lamp) in corner of Walls 8943 and 1906, looking southeast (2010)
Mazar et. al. (2020 v.3) - Photo 15.40
Squares M–N/4–5 from Mazar et. al. (2020 v. 3: Chapter 15)
Photo 15.40
Squares M–N/4–5, looking east; left: backhoe trench into D-10 tufa fill near porcupine hole; D-9 to D-6b floors and installations in middle and upper steps (2005)
Mazar et. al. (2020 v.3) - Photo 15.41
Squares N/4–5 from Mazar et. al. (2020 v. 3: Chapter 15)
Photo 15.41
Squares N/4–5, looking east; D-8–9a Wall 8932 on D-9b Floor 9927, cut on the south by D-7b Pit 8916
Mazar et. al. (2020 v.3) - Photo 15.42
Squares L–N/4 from Mazar et. al. (2020 v. 3: Chapter 15)
Photo 15.42
Squares L–N/4, looking east; bottom: foundation of D-9b Wall 2816; center: D-9a stone floor 2855; above, right: D-7a Wall 1818 (1998)
Mazar et. al. (2020 v.3) - Photo 15.43
Square M/4 from Mazar et. al. (2020 v. 3: Chapter 15)
Photo 15.43
Square M/4, looking east at D-9a stone floor 2855 (1998)
Mazar et. al. (2020 v.3) - Photo 15.44
Square M/4 from Mazar et. al. (2020 v. 3: Chapter 15)
Photo 15.44
Square M/4, looking east at sloping layers 8939 (D-10) and 8919 (D-9b), sealed below D-9a stone Floor 2855 (2008)
Mazar et. al. (2020 v.3) - Photo 15.45
Squares N–M/4–5 from Mazar et. al. (2020 v. 3: Chapter 15)
Photo 15.45
Squares N–M/4–5, looking southeast; center: D-7a' pillar bases; top: stone foundation of D-4 Wall 1883 (2007)
Mazar et. al. (2020 v.3) - Photo 15.46
Northeast corner of Square M/5 from Mazar et. al. (2020 v. 3: Chapter 15)
Photo 15.46
Northeast corner of Square M/5, looking north; lamp-and-bowl foundation deposit below D-7a Wall 7906, cut into stone lining of D-7b Oven 7924 (2007)
Mazar et. al. (2020 v.3) - Photo 15.47
Square M/5 from Mazar et. al. (2020 v. 3: Chapter 15)
Photo 15.47
Square M/5, looking south at section through D-7b Installation 7919 (2005); bowl: Fig. 16.26:2
Mazar et. al. (2020 v.3) - Photo 15.48
Square N/4 from Mazar et. al. (2020 v. 3: Chapter 15)
Photo 15.48
Square N/4, looking northeast at D-7b Floor 8914, cut by D-7a Installation 8906 (2007)
Mazar et. al. (2020 v.3) - Photo 15.49
Square M/5 from Mazar et. al. (2020 v. 3: Chapter 15)
Photo 15.49
Square M/5, looking north at stone foundation of D-7a Wall 7906 with floor striations in section; below the wall: ashy layer of D-7b Floor 7903 (2005)
Mazar et. al. (2020 v.3) - Photo 15.50
Square N/5 from Mazar et. al. (2020 v. 3: Chapter 15)
Photo 15.50
Square N/5, looking north at D-7a stone floor 9906, pillar bases 9907 and Wall 8917 (2008)
Mazar et. al. (2020 v.3) - Photo 15.51
Square N/5 from Mazar et. al. (2020 v. 3: Chapter 15)
Photo 15.51
Square N/5, looking west at D-7a stone floor 9906 and pillar bases 9907 (2008)
Mazar et. al. (2020 v.3) - Photo 15.52
Square N/4 from Mazar et. al. (2020 v. 3: Chapter 15)
Photo 15.52
Square N/4, looking north; left: foundation of D-7a–6b Wall 2842; center: D-7a Floor 8907 and Installation 8906 (2007)
Mazar et. al. (2020 v.3) - Photo 15.53
Square N/4 from Mazar et. al. (2020 v. 3: Chapter 15)
Photo 15.53
Square N/4, looking west; bottom left: D-7a Ovens 7946 and 8902; center: D-7b Pit 8916 (2007)
Mazar et. al. (2020 v.3) - Photo 15.54a
Square M/4 from Mazar et. al. (2020 v. 3: Chapter 15)
Photo 15.54a
Square M/4; D-7a lamp and bowl deposits - deposit No. 2, looking southeast east (1997)
Mazar et. al. (2020 v.3) - Photo 15.54b
Square M/4 from Mazar et. al. (2020 v. 3: Chapter 15)
Photo 15.54b
Square M/4; D-7a lamp and bowl deposits - deposit No. 3, looking east (1997)
Mazar et. al. (2020 v.3) - Photo 15.55
Square N/5 from Mazar et. al. (2020 v. 3: Chapter 15)
Photo 15.55
Square N/5, looking west at D-7a' pillar bases 8944 and Walls 8904 and 4856 (2007)
Mazar et. al. (2020 v.3) - Photo 15.56
Squares N/4–5 from Mazar et. al. (2020 v. 3: Chapter 15)
Photo 15.56
Squares N/4–5, looking east; left: D-6b Installations 7931 and 7939; right: D-7a Wall 8904, superimposed by D-6b Installation 2874 (2005)
Mazar et. al. (2020 v.3) - Photo 15.57
Squares N/4–5 from Mazar et. al. (2020 v. 3: Chapter 15)
Photo 15.57
Squares N/4–5, looking south; bottom: D-6b Installations 7931 and 7939; center: D-7a Wall 8904, superimposed by D-6a–b Installation 2874 (2005)
Mazar et. al. (2020 v.3) - Photo 15.58
Square N/5 from Mazar et. al. (2020 v. 3: Chapter 15)
Photo 15.58
Square N/5, looking west; detail of D-6b Installations 7939 (bottom) and 7931 (top); top right: red clay patch 7925 above D-6a Wall 7926 (2005)
Mazar et. al. (2020 v.3) - Photo 15.59
Square N/4 from Mazar et. al. (2020 v. 3: Chapter 15)
Photo 15.59
Square N/4, looking east; detail of D-6b Installation 2874 (2005)
Mazar et. al. (2020 v.3) - Photo 15.60
Square N/4 from Mazar et. al. (2020 v. 3: Chapter 15)
Photo 15.60
Square N/4, southern section showing D-6 striations and ash layers (bird-nest holes in section).
Mazar et. al. (2020 v.3) - Photo 15.61
Square N/4 from Mazar et. al. (2020 v. 3: Chapter 15)
Photo 15.61
Square N/4; D-6a Oven 2841 below D-4b Floor 1845 (1998)
Mazar et. al. (2020 v.3) - Photo 15.62
Square P/4 from Mazar et. al. (2020 v. 3: Chapter 15)
Photo 15.62
Square P/4, section in D-6a Oven 2841
Mazar et. al. (2020 v.3) - Photo 15.63
Squares N–Q/4–5 from Mazar et. al. (2020 v. 3: Chapter 15)
Photo 15.63
Squares N–Q/4–5 at end of 2007 season; center: north–south street (Photo: SkyView).
Mazar et. al. (2020 v.3) - Photo 15.64
Square N–P/4 from Mazar et. al. (2020 v. 3: Chapter 15)
Photo 15.64
Square N–P/4, looking east; right: stone foundation of D-4 Wall 1811; center right: D-6a Oven 2841 (1998)
Mazar et. al. (2020 v.3) - Photo 15.65
Probe in street, Square P/4 from Mazar et. al. (2020 v. 3: Chapter 15)
Photo 15.65
Probe in street, Square P/4; D-5 stone fill 9810, east of Wall 2882 (2008)
Mazar et. al. (2020 v.3) - Photo 15.66
Squares P/4–5 from Mazar et. al. (2020 v. 3: Chapter 15)
Photo 15.66
Squares P/4–5, looking south, D-4b Street 8803, bordered by Wall 1883 (right) and Walls 8850, 1860, above 2881 (left); lower left: Installation 8810 (2007)
Mazar et. al. (2020 v.3) - Photo 15.67
Squares P/4–5; fallen bricks (7847) along eastern face of Wall 1883 from Mazar et. al. (2020 v. 3: Chapter 15)
Photo 15.67
Squares P/4–5, same as Photo 15.66, looking north; fallen bricks (7847) along eastern face of Wall 1883 (2007)
Mazar et. al. (2020 v.3) - Photo 15.68
Square P-5, looking west at Wall 1883; foreground: brick collapse in street from Mazar et. al. (2020 v. 3: Chapter 15)
Photo 15.68
Square P-5, looking west at Wall 1883; foreground: brick collapse in street (2005)
Mazar et. al. (2020 v.3) - Photo 15.69
Squares P–Q/4–5 from Mazar et. al. (2020 v. 3: Chapter 15)
Photo 15.69
Squares P–Q/4–5, looking north at D-5 Buildings DD and DE, (2008)
Mazar et. al. (2020 v.3) - Photo 15.70
Squares Q/4–5, looking north at D-5 Room 8867 from Mazar et. al. (2020 v. 3: Chapter 15)
Photo 15.70
Squares Q/4–5, looking north at D-5 Room 8867; bottom: Pit 8883 (2008)
Mazar et. al. (2020 v.3) - Photo 15.71
Square Q/5, looking west at D-4 Building DG; lower right: brick collapse 8865 in D-5 Building DE from Mazar et. al. (2020 v. 3: Chapter 15)
Photo 15.71
Square Q/5, looking west at D-4 Building DG; lower right: brick collapse 8865 in D-5 Building DE (2007)
Mazar et. al. (2020 v.3) - Photo 15.72
Square Q/5 from Mazar et. al. (2020 v. 3: Chapter 15)
Photo 15.72
Square Q/5, looking west; lower right: Room 8865 of D-5 Building DD; left: walls of D-4 Buildings DG and DH (2007)
Mazar et. al. (2020 v.3) - Photo 15.73
Square P/5 from Mazar et. al. (2020 v. 3: Chapter 15)
Photo 15.73
Square P/5, looking west; center: D-5 Room 8874 with ‘steps’ 8879; D-4b Installation 8810 on top of D-5 Wall 8878 (2007).
Mazar et. al. (2020 v.3) - Photo 15.74
Squares Q/4–5 from Mazar et. al. (2020 v. 3: Chapter 15)
Photo 15.74
Squares Q/4–5, looking east at D-5 Building DD; Installation 9805 on Floor 8867 (2008)
Mazar et. al. (2020 v.3) - Photo 15.75
Square Q/4 from Mazar et. al. (2020 v. 3: Chapter 15)
Photo 15.75
Square Q/4, looking north at D-5 Building DD; Floor 8867, cut by Pit 8883 (2008)
Mazar et. al. (2020 v.3) - Photo 15.76
Square P/4 from Mazar et. al. (2020 v. 3: Chapter 15)
Photo 15.76
Square P/4, looking southwest at D-5 Building DD; left: Floor 8871 and Pit 8876; top right: street between Walls 2881 and 2882 (2008)
Mazar et. al. (2020 v.3) - Photo 15.77
Squares P–Q/4 from Mazar et. al. (2020 v. 3: Chapter 15)
Photo 15.77
Squares P–Q/4, looking southwest at D-5 Building DD; Floor 8871, cut by Pits 8876 (center) and 8880 (left); D-4 Wall 1884 floating above floor (2007)
Mazar et. al. (2020 v.3) - Photo 15.78
General view of Area D from Mazar et. al. (2020 v. 3: Chapter 15)
Photo 15.78
General view, looking west, end of 2000 season
Mazar et. al. (2020 v.3) - Photo 15.79
Squares N–P/4,from Mazar et. al. (2020 v. 3: Chapter 15)
Photo 15.79
Squares N–P/4, looking north at D-4 Building DF (2000)
Mazar et. al. (2020 v.3) - Photo 15.80
Squares N–P/4 from Mazar et. al. (2020 v. 3: Chapter 15)
Photo 15.80
Squares N–P/4, looking east; Building DF; D-4b stone floor 1845 covered by pebbles (1842); D-4a brick collapse and stratified layers above (1997)
Mazar et. al. (2020 v.3) - Photo 15.81
Square N/4 from Mazar et. al. (2020 v. 3: Chapter 15)
Photo 15.81
Square N/4, looking east; D-4b Building DF; background: Wall 1811; foreground: accumulation 1805 on Floor 1822; note two rows of bricks separated by a line in Wall 1811 (1997)
Mazar et. al. (2020 v.3) - Photo 15.82
Squares N–P/4 from Mazar et. al. (2020 v. 3: Chapter 15)
Photo 15.82
Squares N–P/4, looking west; D-5 Building DF, stone floor 1845 (2000)
Mazar et. al. (2020 v.3) - Photo 15.83
Square P/4 from Mazar et. al. (2020 v. 3: Chapter 15)
Photo 15.83
Square P/4, looking north; right: D-4a street surface 1873; meter stick on Wall 1883 (1997).
Mazar et. al. (2020 v.3) - Photo 15.84
Square P/5 from Mazar et. al. (2020 v. 3: Chapter 15)
Photo 15.84
Square P/5, looking south at D-4a stone pavement (7805/7828) in street (2005)
Mazar et. al. (2020 v.3) - Photo 15.85
Squares P–N/4–5 from Mazar et. al. (2020 v. 3: Chapter 15)
Photo 15.85
Squares P–N/4–5, looking west; D-4b Buildings DG and DH; center: D-4a Floor 8820, Building DJ (2007)
Mazar et. al. (2020 v.3) - Photo 15.86
Square P/4 from Mazar et. al. (2020 v. 3: Chapter 15)
Photo 15.86
Square P/4, looking east; D-4b Building DG, Installation 8824 (2007)
Mazar et. al. (2020 v.3) - Photo 15.87
Square Q/5 from Mazar et. al. (2020 v. 3: Chapter 15)
Photo 15.87
Square Q/5, looking north; D-4b Building DG, Room 8830; Installation 8837 in northeastern corner of room (2007)
Mazar et. al. (2020 v.3) - Photo 15.88
Square Q/5 from Mazar et. al. (2020 v. 3: Chapter 15)
Photo 15.88
Square Q/5, looking east; D-4a Building DJ, with elements of D-4b Buildings DH and DG below (2007)
Mazar et. al. (2020 v.3) - Photo 15.89
Square Q/5 from Mazar et. al. (2020 v. 3: Chapter 15)
Photo 15.89
Square Q/5, eastern section; D-4a Building DJ above elements of D-4b Buildings DH and DG (2007)
Mazar et. al. (2020 v.3) - Photo 15.90
Square Q/5 from Mazar et. al. (2020 v. 3: Chapter 15)
Photo 15.90
Square Q/5, looking north; D-4b Building DH (2007)
Mazar et. al. (2020 v.3) - Photo 15.91
Square Q/5 from Mazar et. al. (2020 v. 3: Chapter 15)
Photo 15.91
Square Q/5, looking south; D-4b Building DH, Room 8844; note pottery just below the floor (2007)
Mazar et. al. (2020 v.3) - Photo 15.92
Square P/5 from Mazar et. al. (2020 v. 3: Chapter 15)
Photo 15.92
Square P/5, looking south; D-4b Building DH, Room 8842; right: Installation 8810 covered by large stones 8856 to east of installation (2007)
Mazar et. al. (2020 v.3) - Photo 15.93
Squares Q–P/4–5 from Mazar et. al. (2020 v. 3: Chapter 15)
Photo 15.93
Squares Q–P/4–5, end of 2005 season, looking west; right: D-4a Building DJ, Rooms 7853, 4858 and 4872
Mazar et. al. (2020 v.3) - Photo 15.94
Square Q/5, looking east; D-4a Building DJ, brick collapse in Room 7853 from Mazar et. al. (2020 v. 3: Chapter 15)
Photo 15.94
Square Q/5, looking east; D-4a Building DJ, brick collapse in Room 7853 (2005)
Mazar et. al. (2020 v.3) - Photo 15.95
Square P/5 from Mazar et. al. (2020 v. 3: Chapter 15)
Photo 15.95
Square P/5, D-4a Building DJ, Rooms 4858 (bottom) and 4872 (top) (2000)
Mazar et. al. (2020 v.3) - Photo 15.96
Square P/5, looking west; D-4a Building DJ, debris and vessels in Room 4872 from Mazar et. al. (2020 v. 3: Chapter 15)
Photo 15.96
Square P/5, looking west; D-4a Building DJ, debris and vessels in Room 4872 (2000)
Mazar et. al. (2020 v.3) - Photo 15.97
Smashed Pottery in Square P/5 D-4a Building DJ, Room 4872 from Mazar et. al. (2020 v. 3: Chapter 15)
Photo 15.97
Square P/5, looking west; detail of D-4a Building DJ, Room 4872 (see Photo 15.96) (2000)
Mazar et. al. (2020 v.3) - Photo 15.98
Squares P–Q/4 from Mazar et. al. (2020 v. 3: Chapter 15)
Photo 15.98
Squares P–Q/4, looking south; D-4a Building DJ, Rooms 4863 (left) and 2869 (right) (2000)
Mazar et. al. (2020 v.3) - Photo 15.99
Square P/4 from Mazar et. al. (2020 v. 3: Chapter 15)
Photo 15.99
Square P/4, looking east at entrance from street to Room 2869, D-4a Building DJ; foreground: stones (2886) in D-4b street surface (1998)
Mazar et. al. (2020 v.3) - Photo 15.100
Squares Q–P/4 from Mazar et. al. (2020 v. 3: Chapter 15)
Photo 15.100
Squares Q–P/4, looking west; upper D-3 pits (1998)
Mazar et. al. (2020 v.3) - Photo 15.101
Square Q/4 from Mazar et. al. (2020 v. 3: Chapter 15)
Photo 15.101
Square Q/4, looking south at D-3 pits cutting into D-4 debris. Right: D-4 Wall 1860 (1998)
Mazar et. al. (2020 v.3) - Photo 15.102
Squares P–Q/4 from Mazar et. al. (2020 v. 3: Chapter 15)
Photo 15.102
Squares P–Q/4, looking north at lower D-3 pits, dug into D-4 architecture (2000)
Mazar et. al. (2020 v.3) - Photo 15.103
Square Q/4 from Mazar et. al. (2020 v. 3: Chapter 15)
Photo 15.103
Square Q/4, looking south at D-3 Pits 4805 (bottom) and 4806 (top) (2000)
Mazar et. al. (2020 v.3) - Photo 15.104
Square Q/4, D-3 Pit 2808 from Mazar et. al. (2020 v. 3: Chapter 15)
Photo 15.104
Square Q/4, D-3 Pit 2808 (1998)
Mazar et. al. (2020 v.3) - Photo 15.105
Squares P–Q/4, looking west at upper D-3 pits from Mazar et. al. (2020 v. 3: Chapter 15)
Photo 15.105
Squares P–Q/4, looking west at upper D-3 pits (1998)
Mazar et. al. (2020 v.3) - Photo 15.106
Square Q/4, looking south at D-3 Pit 2872 from Mazar et. al. (2020 v. 3: Chapter 15)
Photo 15.106
Square Q/4, looking south at D-3 Pit 2872 (1998)
Mazar et. al. (2020 v.3) - Photo 15.107
Square Q/4, looking west at D-3 Pit 2850 from Mazar et. al. (2020 v. 3: Chapter 15)
Photo 15.107
Square Q/4, looking west at D-3 Pit 2850 (1998)
Mazar et. al. (2020 v.3) - Photo 15.108
Square P/4 from Mazar et. al. (2020 v. 3: Chapter 15)
Photo 15.108
Square P/4, looking east at D-2 Room 4826 (2000)
Mazar et. al. (2020 v.3) - Photo 15.109
Square P/5 from Mazar et. al. (2020 v. 3: Chapter 15)
Photo 15.109
Square P/5, looking west at D-2 Room 4828 (2000)
Mazar et. al. (2020 v.3) - Photo 15.110
Square P/5 from Mazar et. al. (2020 v. 3: Chapter 15)
Photo 15.110
Square P/5, looking east at D-2 Room 4828; right: trench cutting northern end of Floor 4825 (2000)
Mazar et. al. (2020 v.3) - Photo 15.111
Square P/5, looking south at reed impressions (ceiling collapse?) on plaster layer from Mazar et. al. (2020 v. 3: Chapter 15)
Photo 15.111
Square P/5, looking south at reed impressions (ceiling collapse?) on plaster layer, below foundations of D-2 Wall 4808; foreground: D-4b basalt basin (8807) in Installation 8810 (2007)
Mazar et. al. (2020 v.3) - Photo 15.112
Closeup of layer in Photo 15.111 from Mazar et. al. (2020 v. 3: Chapter 15)
Photo 15.112
Closeup of layer in Photo 15.111
Mazar et. al. (2020 v.3) - Photo 15.113
Square Q/5 from Mazar et. al. (2020 v. 3: Chapter 15)
Photo 15.113
Square Q/5, looking north at D-2 Wall 4808, built into D-4a Building DJ (2007)
Mazar et. al. (2020 v.3) - Photo 15.114
Square Q/5 from Mazar et. al. (2020 v. 3: Chapter 15)
Photo 15.114
Square Q/5, looking north; eastern part of D-2 Wall 4808, built against Wall 7851 (2007)
Mazar et. al. (2020 v.3) - Photo 15.115
Square Q/5 from Mazar et. al. (2020 v. 3: Chapter 15)
Photo 15.115
Square Q/5, looking west; D-1b–c walls above D-2 Wall 4808 (2005)
Mazar et. al. (2020 v.3) - Photo 15.116
Square Q/5 from Mazar et. al. (2020 v. 3: Chapter 15)
Photo 15.116
Square Q/5, looking east; top and center: D-1 walls and layers; bottom: D-4 Rooms 4872 and 4858 (2005)
Mazar et. al. (2020 v.3) - Photo 15.117
Square Q/5 from Mazar et. al. (2020 v. 3: Chapter 15)
Photo 15.117
Square Q/5, looking south at D-1b–c Wall 7803; Debris 7810 (in left section) on Floor 7837 (2005)
Mazar et. al. (2020 v.3) - Photo 15.118
Square Q/5 from Mazar et. al. (2020 v. 3: Chapter 15)
Photo 15.118
Square Q/5, looking west at Stratum D-1b–c elements (2005)
Mazar et. al. (2020 v.3) - Photo 15.119
Square Q/5 from Mazar et. al. (2020 v. 3: Chapter 15)
Photo 15.119
Square Q/5 looking north; D-2 Floor 7837 below D-1b–c walls (2005)
Mazar et. al. (2020 v.3) - Photo 15.120
Square Q/5 from Mazar et. al. (2020 v. 3: Chapter 15)
Photo 15.120
Square Q/5, eastern section with D-1c Debris 7826 above Floor 7830/7837 (1998)
Mazar et. al. (2020 v.3) - Photo 15.121
Square Q/4 from Mazar et. al. (2020 v. 3: Chapter 15)
Photo 15.121
Square Q/4, looking north at D-1a Wall 1816 (1997)
Mazar et. al. (2020 v.3) - Photo 15.122
Square Q/4 from Mazar et. al. (2020 v. 3: Chapter 15)
Photo 15.122
Square Q/4, looking north at D-1b Oven 1817 (center) and D-1a Wall 1808 (right) (1997)
Mazar et. al. (2020 v.3) - Photo 15.123
Square Q/4 from Mazar et. al. (2020 v. 3: Chapter 15)
Photo 15.123
Square Q/4, looking north at D-1a Walls 1808 and 1816 (1997)
Mazar et. al. (2020 v.3)
- Table 17.1
Locus and basket numbers from Mazar et. al. (2020 v. 3: Chapter 17)
Table 17.1
Locus and basket numbers
Mazar et. al. (2020 v.3) - Table 17.2
Correlation of the Iron Age stratigraphic sequence in Areas C, D, E, and F from Mazar et. al. (2020 v. 3: Chapter 17)
Table 17.2
Correlation of the Iron Age stratigraphic sequence in Areas C, D, E, and F
Mazar et. al. (2020 v.3) - Figure 17.1
Schematic plan of Areas E and F; Iron IIA Stratum F-1 in black from Mazar et. al. (2020 v. 3: Chapter 17)
Figure 17.1
Schematic plan of Areas E and F; Iron IIA Stratum F-1 in black
Mazar et. al. (2020 v.3) - Figure 17.2a
Plan of Stratum E-3 (Square E/15) from Mazar et. al. (2020 v. 3: Chapter 17)
Figure 17.2a
Plan of Stratum E-3 (Square E/15)
Mazar et. al. (2020 v.3) - Figure 17.2b
Plan of Stratum E-2 from Mazar et. al. (2020 v. 3: Chapter 17)
Figure 17.2b
Plan of Stratum E-2
Mazar et. al. (2020 v.3) - Figure 17.3
Plan of Stratum E-1b in Squares D–F/13–16 from Mazar et. al. (2020 v. 3: Chapter 17)
Figure 17.3
Plan of Stratum E-1b in Squares D–F/13–16
Mazar et. al. (2020 v.3) - Figure 17.4
Schematic plan of Stratum E-1a, marked with location of sub-plans from Mazar et. al. (2020 v. 3: Chapter 17)
Figure 17.4
Schematic plan of Stratum E-1a, marked with location of sub-plans
Mazar et. al. (2020 v.3) - Figure 17.5
General plan of Stratum E-1a from Mazar et. al. (2020 v. 3: Chapter 17)
Figure 17.5
General plan of Stratum E-1a
Mazar et. al. (2020 v.3) - Figure 17.13
Location of section drawings marked on schematic plan of Stratum E-1a from Mazar et. al. (2020 v. 3: Chapter 17)
Figure 17.13
Location of section drawings marked on schematic plan of Stratum E-1a
Mazar et. al. (2020 v.3)
- Table 17.1 -
Locus and basket numbers from Mazar et. al. (2020 v. 3: Chapter 17)
Table 17.1
Locus and basket numbers
Mazar et. al. (2020 v.3) - Table 17.2 -
Correlation of the Iron Age stratigraphic sequence in Areas C, D, E, and F from Mazar et. al. (2020 v. 3: Chapter 17)
Table 17.2
Correlation of the Iron Age stratigraphic sequence in Areas C, D, E, and F
Mazar et. al. (2020 v.3) - Figure 17.1 -
Schematic plan of Areas E and F; Iron IIA Stratum F-1 in black from Mazar et. al. (2020 v. 3: Chapter 17)
Figure 17.1
Schematic plan of Areas E and F; Iron IIA Stratum F-1 in black
Mazar et. al. (2020 v.3) - Figure 17.2a -
Plan of Stratum E-3 (Square E/15) from Mazar et. al. (2020 v. 3: Chapter 17)
Figure 17.2a
Plan of Stratum E-3 (Square E/15)
Mazar et. al. (2020 v.3) - Figure 17.2b -
Plan of Stratum E-2 from Mazar et. al. (2020 v. 3: Chapter 17)
Figure 17.2b
Plan of Stratum E-2
Mazar et. al. (2020 v.3) - Figure 17.3 -
Plan of Stratum E-1b in Squares D–F/13–16 from Mazar et. al. (2020 v. 3: Chapter 17)
Figure 17.3
Plan of Stratum E-1b in Squares D–F/13–16
Mazar et. al. (2020 v.3) - Figure 17.4 -
Schematic plan of Stratum E-1a, marked with location of sub-plans from Mazar et. al. (2020 v. 3: Chapter 17)
Figure 17.4
Schematic plan of Stratum E-1a, marked with location of sub-plans
Mazar et. al. (2020 v.3) - Figure 17.5 -
General plan of Stratum E-1a from Mazar et. al. (2020 v. 3: Chapter 17)
Figure 17.5
General plan of Stratum E-1a
Mazar et. al. (2020 v.3) - Figure 17.13 -
Location of section drawings marked on schematic plan of Stratum E-1a from Mazar et. al. (2020 v. 3: Chapter 17)
Figure 17.13
Location of section drawings marked on schematic plan of Stratum E-1a
Mazar et. al. (2020 v.3)
Area E was located in the northeastern part of Tel Rehov in main grid square 16 (Chapter 3) at the highest point of the eastern part of the lower mound, although it was 13.5 m lower than the highest point in Area C in the northwestern part. The area was close to the northern and eastern edges of the mound, reaching the top of the steep northern slope in only one narrow probe (Squares E/20, E/1). The area included fourteen fully excavated squares and four half squares, a total of 400 sq m, and an additional narrow trench of 25 sq m north of the main area. The topsoil slightly descended southwards, creating an elevation difference of 0.82 m over a distance of 20 m between the northern and southern ends of the area.
The goal of the excavation was to determine the occupational history of the uppermost strata in this part of the mound. It turned out that most of this area can be interpreted as a sacred precinct or sanctuary during the Iron Age IIA, comprising a large open courtyard, a raised platform, several installations and two structural units which can be related to this sanctuary (Buildings EA and EB). On the western edge of the area, part of a dwelling was excavated (Building EC)
The excavation in Area E began in 1997 in six squares: E–F/13–15. During the 1998 season, the area was extended to the north (Squares D–E/15– 16, F/16). In 2000, the area was extended to Square D/14, the northern half of D/13, and 2.0 m-wide probes in Squares E/17–18 and G/16, intended to locate the edge of the open courtyard in the northern part of the area. In 2001, three new squares were opened (C/14–16) and a 2.5 m-wide probe was excavated in Squares E/20 and E/1 (in main grid square 20), intended to answer the question whether there were fortifications along the northern edge of the mound (Photos 17.1–17.3).
The excavations in Area E were supervised by Se Jin Koh (1997–1998, 2000) and James Paul Cowie, Diana Edelman and Naama Yahalom-Mack (2001).
Area F, located 5.0 m south of Area E, was directly related to the latter (Fig. 17.1; see Chapter 19).
Stratum E-3 (perhaps to be correlated with general Stratum VII) is known from only one debris layer in a narrow probe in Square E/15. Stratum E-2 (correlated with general Stratum VI) was examined in only a few probes in Squares D–F/15, E/13–14 and the nature of the area in that stratum remains virtually unknown. The few floors from this phase were 0.7–1.0 m below those of Stratum E-1b, at levels 71.07–71.30 m.
The main feature in this area was an architectural complex which we define as an open-air sanctuary, attributed to Strata E-1b and E-1a, correlated with general Strata V and IV. In Stratum E-1a, the heart of this complex was Building EB, containing a platform with masseboth at its northeastern corner. This building was preceded by Building ED of Stratum E-1b, although only one room and a few fragmentary walls of the latter were excavated. A spacious courtyard east and north of Buildings ED and EB was in use in both Strata E-1b and E-1a. Outer walls of this courtyard, located in Squares E/17–18 and G/16, appear to have been in use in both strata. In the courtyard, floors with an accumulation of debris that contained pottery, animal bones, various artifacts and installations, as well as ovens, circular clay bins and benches, were found in a total accumulation of almost 1.0 m. It was sometimes difficult to define which of these layers and installations belonged to Stratum E-1b and which to E-1a, as the courtyard continued to be in use throughout both these strata, with occasional alterations. Floors of Stratum E-1a seem to have been eroded in certain parts of the courtyard (in Squares E/17–18, F–G/16) but were well defined close to Building EB in Squares D–E/15–16. In certain cases, it was difficult to determine whether a certain installation was founded in E-1b or E-1a. Building EA in the southeastern part of the area was an auxiliary structure which, in fact, may have included parts of two or three different buildings. It was founded in Stratum E-1b and continued to be in use in Stratum E-1a, with a few changes and floor raisings.
Building EC in the western part of the area was a partly excavated dwelling located west of the sanctuary; it is known from Stratum E-1a, but was perhaps founded in E-1b.
- Table 17.1 -
Locus and basket numbers from Mazar et. al. (2020 v. 3: Chapter 17)
Table 17.1
Locus and basket numbers
Mazar et. al. (2020 v.3) - Table 17.2 -
Correlation of the Iron Age stratigraphic sequence in Areas C, D, E, and F from Mazar et. al. (2020 v. 3: Chapter 17)
Table 17.2
Correlation of the Iron Age stratigraphic sequence in Areas C, D, E, and F
Mazar et. al. (2020 v.3) - Figure 17.1 -
Schematic plan of Areas E and F; Iron IIA Stratum F-1 in black from Mazar et. al. (2020 v. 3: Chapter 17)
Figure 17.1
Schematic plan of Areas E and F; Iron IIA Stratum F-1 in black
Mazar et. al. (2020 v.3) - Figure 17.3 -
Plan of Stratum E-1b in Squares D–F/13–16 from Mazar et. al. (2020 v. 3: Chapter 17)
Figure 17.3
Plan of Stratum E-1b in Squares D–F/13–16
Mazar et. al. (2020 v.3) - Figure 17.4 -
Schematic plan of Stratum E-1a, marked with location of sub-plans from Mazar et. al. (2020 v. 3: Chapter 17)
Figure 17.4
Schematic plan of Stratum E-1a, marked with location of sub-plans
Mazar et. al. (2020 v.3) - Figure 17.5 -
General plan of Stratum E-1a from Mazar et. al. (2020 v. 3: Chapter 17)
Figure 17.5
General plan of Stratum E-1a
Mazar et. al. (2020 v.3) - Figure 17.6 -
Stratum E-1a in Squares D–F/13–15 from Mazar et. al. (2020 v. 3: Chapter 17)
Figure 17.6
Stratum E-1a in Squares D–F/13–15
Mazar et. al. (2020 v.3) - Figure 17.7 -
Squares C–E/13–16 in Stratum E-1a from Mazar et. al. (2020 v. 3: Chapter 17)
Figure 17.7
Squares C–E/13–16 in Stratum E-1a
Mazar et. al. (2020 v.3) - Figure 17.8 -
Detailed plan and elevations of Platform 2654 and standing stones from Mazar et. al. (2020 v. 3: Chapter 17)
Figure 17.8
Detailed plan and elevations of Platform 2654 and standing stones
Mazar et. al. (2020 v.3) - Figure 17.9 -
Stratum E-1a in Squares E/15–16 and Stratum E-1a–b (or just E-1b) in Squares E/17–18 and G/16 from Mazar et. al. (2020 v. 3: Chapter 17)
Figure 17.9
Stratum E-1a in Squares E/15–16 and Stratum E-1a–b (or just E-1b) in Squares E/17–18 and G/16
Mazar et. al. (2020 v.3) - Figure 17.14a -
Section 1 from Mazar et. al. (2020 v. 3: Chapter 17)
Figure 17.14a
Section 1 (Squares E/13–15, looking west)
Mazar et. al. (2020 v.3) - Figure 17.14b -
Section 1 from Mazar et. al. (2020 v. 3: Chapter 17)
Figure 17.14b
Section 1 (Squares E/13–15, looking west)
Mazar et. al. (2020 v.3) - Figure 17.15a -
Section 2 from Mazar et. al. (2020 v. 3: Chapter 17)
Figure 17.15a
Section 2 (Squares F/14–15, looking west)
Mazar et. al. (2020 v.3) - Figure 17.15b -
Section 2 from Mazar et. al. (2020 v. 3: Chapter 17)
Figure 17.15b
Section 2 (Squares F/14–15, looking west)
Mazar et. al. (2020 v.3) - Figure 17.16a -
Section 3 from Mazar et. al. (2020 v. 3: Chapter 17)
Figure 17.16a
Section 3 (Squares F/13–16, looking east)
Mazar et. al. (2020 v.3) - Figure 17.16b -
Section 3 from Mazar et. al. (2020 v. 3: Chapter 17)
Figure 17.16b
Section 3 (Squares F/13–16, looking east)
Mazar et. al. (2020 v.3) - Figure 17.17 -
Section 4 from Mazar et. al. (2020 v. 3: Chapter 17)
Figure 17.17
Section 4 (Squares D–E/15, looking north)
Mazar et. al. (2020 v.3) - Figure 17.18a -
Section 5 from Mazar et. al. (2020 v. 3: Chapter 17)
Figure 17.18a
Section 5 (Squares D–F/15, looking south)
Mazar et. al. (2020 v.3) - Figure 17.18b -
Section 5 from Mazar et. al. (2020 v. 3: Chapter 17)
Figure 17.18b
Section 5 (Squares D–F/15, looking south)
Mazar et. al. (2020 v.3) - Figure 17.19 -
Section 6 from Mazar et. al. (2020 v. 3: Chapter 17)
Figure 17.19
Section 6 (Squares E–F/14, looking north)
Mazar et. al. (2020 v.3) - Figure 17.20 -
Section 7 from Mazar et. al. (2020 v. 3: Chapter 17)
Figure 17.20
Section 7 (Square E/13, looking north)
Mazar et. al. (2020 v.3) - Figure 17.21 -
Section 8 from Mazar et. al. (2020 v. 3: Chapter 17)
Figure 17.21
Section 8 (Squares E–F/13, looking south)
Mazar et. al. (2020 v.3) - Figure 17.22 -
Section 9 from Mazar et. al. (2020 v. 3: Chapter 17)
Figure 17.22
Section 9 (Squares E/20–21, looking west)
Mazar et. al. (2020 v.3)
- Schematic plans: Figs. 17.1, 17.4
- Detailed plans: Figs. 17.3, 17.5–17.9
- Sections: Figs. 17.14–17.22;
- Pottery: Figs. 18.3–18.21
Five architectural units were defined:
- Building EA in Squares E–F/13–1 4, Strata E-1b and E-1a.
- Building ED in Squares D–E/15. This building preceded Building EB; only one room and parts of additional walls were excavated.
- Building EB in Squares C–D/13–16 and E/15, Stratum E-1a.
- Open area/courtyard in Squares E–F/14–16, D/16, E/17–18, Strata E-1b and E-1a.
- Building EC in Squares C/13–16, Stratum E-1a.
In the following discussion, the stratigraphic development and architectural features of both Strata E-1a and E-1b in each architectural unit are described according to the order of the main units defined above.
- Table 17.1 -
Locus and basket numbers from Mazar et. al. (2020 v. 3: Chapter 17)
Table 17.1
Locus and basket numbers
Mazar et. al. (2020 v.3) - Table 17.2 -
Correlation of the Iron Age stratigraphic sequence in Areas C, D, E, and F from Mazar et. al. (2020 v. 3: Chapter 17)
Table 17.2
Correlation of the Iron Age stratigraphic sequence in Areas C, D, E, and F
Mazar et. al. (2020 v.3) - Figure 17.3 -
Plan of Stratum E-1b in Squares D–F/13–16 from Mazar et. al. (2020 v. 3: Chapter 17)
Figure 17.3
Plan of Stratum E-1b in Squares D–F/13–16
Mazar et. al. (2020 v.3) - Figure 17.4 -
Schematic plan of Stratum E-1a, marked with location of sub-plans from Mazar et. al. (2020 v. 3: Chapter 17)
Figure 17.4
Schematic plan of Stratum E-1a, marked with location of sub-plans
Mazar et. al. (2020 v.3) - Figure 17.5 -
General plan of Stratum E-1a from Mazar et. al. (2020 v. 3: Chapter 17)
Figure 17.5
General plan of Stratum E-1a
Mazar et. al. (2020 v.3) - Figure 17.6 -
Stratum E-1a in Squares D–F/13–15 from Mazar et. al. (2020 v. 3: Chapter 17)
Figure 17.6
Stratum E-1a in Squares D–F/13–15
Mazar et. al. (2020 v.3) - Photo 17.1 -
General view of Area E, end of 1997 season, looking east from Mazar et. al. (2020 v. 3: Chapter 17)
Photo 17.1
General view of Area E, end of 1997 season, looking east; Building EA and courtyard to its north
Mazar et. al. (2020 v.3) - Photo 17.2 -
General view of Area E, end of 2000 season, looking east from Mazar et. al. (2020 v. 3: Chapter 17)
Photo 17.2
General view of Area E, end of 2000 season, looking east; Buildings EA and EB and courtyard to their north; lower center: E-1b–2 Room 4653 of Building ED
Mazar et. al. (2020 v.3) - Photo 17.9 -
Building EA, general view, end of 1998 season, looking east from Mazar et. al. (2020 v. 3: Chapter 17)
Photo 17.9
Building EA, general view, end of 1998 season, looking east
Mazar et. al. (2020 v.3) - Photo 17.10 -
Building EA, Square F/14, looking south from Mazar et. al. (2020 v. 3: Chapter 17)
Photo 17.10
Building EA, Square F/14, looking south (1998)
Mazar et. al. (2020 v.3) - Photo 17.11 -
Building EA, Square F/14, looking south from Mazar et. al. (2020 v. 3: Chapter 17)
Photo 17.11
Building EA, Square F/14, looking south; bottom left: E-1a Wall 1688; center: E-1b Wall 1687; right: E-1b-1a Wall 1669 (1998)
Mazar et. al. (2020 v.3) - Photo 17.12 -
Building EA, Square F/14, looking north from Mazar et. al. (2020 v. 3: Chapter 17)
Photo 17.12
Building EA, Square F/14, looking north; lower left: Walls 1661 and 1619; right center: Room 1704 of E-1b and Wall 1687; left: E-1a Floor 1670 and Installation 1668 (1998)
Mazar et. al. (2020 v.3) - Photo 17.13 -
Building EA, Square F/14, looking west; E-1a Floor 1677 with pottery in destruction debris from Mazar et. al. (2020 v. 3: Chapter 17)
Photo 17.13
Building EA, Square F/14, looking west; E-1a Floor 1677 with pottery in destruction debris (1997)
Mazar et. al. (2020 v.3) - Photo 17.14 -
Building EA, detail of Room 1701 and compartments 1666 and 1700 from Mazar et. al. (2020 v. 3: Chapter 17)
Photo 17.14
Building EA, detail of Room 1701 and compartments 1666 and 1700, looking southwest (1997)
Mazar et. al. (2020 v.3) - Photo 17.15 -
Building EA, detail of compartments 1666 and 1700 and double wall 1618/1612 from Mazar et. al. (2020 v. 3: Chapter 17)
Photo 17.15
Building EA, detail of compartments 1666 and 1700 and double wall 1618/1612, looking north (1997)
Mazar et. al. (2020 v.3) - Photo 17.16 -
Building EA, Square E/13, looking east, E-1b Room 2651 from Mazar et. al. (2020 v. 3: Chapter 17)
Photo 17.16
Building EA, Square E/13, looking east, E-1b Room 2651 (1998)
Mazar et. al. (2020 v.3) - Photo 17.17 -
Building EA, Square E/13, looking east; right: E-1a–b Wall 1629 from Mazar et. al. (2020 v. 3: Chapter 17)
Photo 17.17
Building EA, Square E/13, looking east; right: E-1a–b Wall 1629 (1998)
Mazar et. al. (2020 v.3) - Photo 17.18 -
Building EA, Square E/13, looking southeast from Mazar et. al. (2020 v. 3: Chapter 17)
Photo 17.18
Building EA, Square E/13, looking southeast; E-1b Room 1699, Platform 2657 below floating level of Wall 1672 (1998)
Mazar et. al. (2020 v.3) - Photo 17.19 -
Squares E/13–14, Building EA, looking south from Mazar et. al. (2020 v. 3: Chapter 17)
Photo 17.19
Squares E/13–14, Building EA, looking south; E-1b Floors 1699 and 2651 (1998)
Mazar et. al. (2020 v.3) - Photo 17.20 -
Room 4653, Square D/15 from Mazar et. al. (2020 v. 3: Chapter 17)
Photo 17.20
Room 4653, Square D/15, looking west; left: Wall 4650; center: Wall 4658, disturbed by a later trench (2000)
Mazar et. al. (2020 v.3)
- Plans: Figs. 17.3–17.6
- Photos 17.1–17.2, 17.9–17.20
- Pottery: Figs. 18.3–18.5
- Table 17.1 -
Locus and basket numbers from Mazar et. al. (2020 v. 3: Chapter 17)
Table 17.1
Locus and basket numbers
Mazar et. al. (2020 v.3) - Table 17.2 -
Correlation of the Iron Age stratigraphic sequence in Areas C, D, E, and F from Mazar et. al. (2020 v. 3: Chapter 17)
Table 17.2
Correlation of the Iron Age stratigraphic sequence in Areas C, D, E, and F
Mazar et. al. (2020 v.3) - Figure 17.2b -
Plan of Stratum E-2 from Mazar et. al. (2020 v. 3: Chapter 17)
Figure 17.2b
Plan of Stratum E-2
Mazar et. al. (2020 v.3) - Figure 17.3 -
Plan of Stratum E-1b in Squares D–F/13–16 from Mazar et. al. (2020 v. 3: Chapter 17)
Figure 17.3
Plan of Stratum E-1b in Squares D–F/13–16
Mazar et. al. (2020 v.3) - Photo 17.2 -
General view of Area E, end of 2000 season, looking east from Mazar et. al. (2020 v. 3: Chapter 17)
Photo 17.2
General view of Area E, end of 2000 season, looking east; Buildings EA and EB and courtyard to their north; lower center: E-1b–2 Room 4653 of Building ED
Mazar et. al. (2020 v.3) - Photo 17.20 -
Room 4653, Square D/15 from Mazar et. al. (2020 v. 3: Chapter 17)
Photo 17.20
Room 4653, Square D/15, looking west; left: Wall 4650; center: Wall 4658, disturbed by a later trench (2000)
Mazar et. al. (2020 v.3) - Photo 17.22 -
General view of Stratum E-1a Buildings EB and EC from Mazar et. al. (2020 v. 3: Chapter 17)
Photo 17.22
General view of Stratum E-1a Buildings EB and EC, looking east, after dismantling Platform 2654 and Room 2629 (2001)
Mazar et. al. (2020 v.3) - Photo 17.59 -
Buildings EB and EC from Mazar et. al. (2020 v. 3: Chapter 17)
Photo 17.59
Right: Building EC, looking south; left: Building EB; lower left: E-1b–2 Room 4653 (2001)
Mazar et. al. (2020 v.3)
- Plans: Figs. 17.2b – 17.3
- Photos 17.2, 17.20, 17.22, 17.59
- Table 17.1 -
Locus and basket numbers from Mazar et. al. (2020 v. 3: Chapter 17)
Table 17.1
Locus and basket numbers
Mazar et. al. (2020 v.3) - Table 17.2 -
Correlation of the Iron Age stratigraphic sequence in Areas C, D, E, and F from Mazar et. al. (2020 v. 3: Chapter 17)
Table 17.2
Correlation of the Iron Age stratigraphic sequence in Areas C, D, E, and F
Mazar et. al. (2020 v.3) - Figure 17.5 -
General plan of Stratum E-1a from Mazar et. al. (2020 v. 3: Chapter 17)
Figure 17.5
General plan of Stratum E-1a
Mazar et. al. (2020 v.3) - Figure 17.7 -
Squares C–E/13–16 in Stratum E-1a from Mazar et. al. (2020 v. 3: Chapter 17)
Figure 17.7
Squares C–E/13–16 in Stratum E-1a
Mazar et. al. (2020 v.3) - Photo 17.2 -
General view of Area E, end of 2000 season, looking east from Mazar et. al. (2020 v. 3: Chapter 17)
Photo 17.2
General view of Area E, end of 2000 season, looking east; Buildings EA and EB and courtyard to their north; lower center: E-1b–2 Room 4653 of Building ED
Mazar et. al. (2020 v.3) - Photo 17.3 -
General view of Area E, end of 2001 season, looking south from Mazar et. al. (2020 v. 3: Chapter 17)
Photo 17.3
General view of Area E, end of 2001 season, looking south; right: Building EC; center: Buildings EB and ED, left: courtyard and Building EA
Mazar et. al. (2020 v.3) - Photo 17.22 -
General view of Stratum E-1a Buildings EB and EC from Mazar et. al. (2020 v. 3: Chapter 17)
Photo 17.22
General view of Stratum E-1a Buildings EB and EC, looking east, after dismantling Platform 2654 and Room 2629 (2001)
Mazar et. al. (2020 v.3) - Photo 17.23a -
Destruction debris in Locus 5621 in the western part of Space 2641 in Building EB from Mazar et. al. (2020 v. 3: Chapter 17)
Photo 17.23a
Building EB, western part of Space 2641, looking north, destruction debris with pottery in Locus 5621 (2001)
Mazar et. al. (2020 v.3) - Photo 17.23b -
Detail of cooking amphora in Locus 4630 from Mazar et. al. (2020 v. 3: Chapter 17)
Photo 17.23b
detail of cooking amphora (Fig. 18.10:4), Locus 4630 (2001)
Mazar et. al. (2020 v.3) - Photo 17.24 -
Building EB, Floor 4654 from Mazar et. al. (2020 v. 3: Chapter 17)
Photo 17.24
Building EB, Floor 4654 (Square D/14), looking north, before dismantling balks (2000)
Mazar et. al. (2020 v.3) - Photo 17.25 -
Building EB, Floor 4654 from Mazar et. al. (2020 v. 3: Chapter 17)
Photo 17.25
Building EB, Floor 4654, looking west (2000)
Mazar et. al. (2020 v.3) - Photo 17.26 -
E-1a Building EB, Room 2629 from Mazar et. al. (2020 v. 3: Chapter 17)
Photo 17.26
E-1a Building EB, Room 2629, looking east (1998)
Mazar et. al. (2020 v.3) - Photo 17.27 -
E-1a Building EB, Room 2629 from Mazar et. al. (2020 v. 3: Chapter 17)
Photo 17.27
E-1a Building EB, Room 2629, looking north; note two stones attached to Walls 2632 and 2634 (1998)
Mazar et. al. (2020 v.3) - Photo 17.28 -
E-1a Building EB, Room 2629, destruction debris and fallen roof material from Mazar et. al. (2020 v. 3: Chapter 17)
Photo 17.28
E-1a Building EB, Room 2629, destruction debris and fallen roof material (1998)
Mazar et. al. (2020 v.3) - Photo 17.29 -
E-1a Building EB, Room 4616 from Mazar et. al. (2020 v. 3: Chapter 17)
Photo 17.29
E-1a Building EB, Room 4616, looking east (2001)
Mazar et. al. (2020 v.3) - Photo 17.30 -
Destruction debris in eastern part of E-1a Building EB, Room 4616 from Mazar et. al. (2020 v. 3: Chapter 17)
Photo 17.30
E-1a Building EB, Room 4616, destruction debris in eastern part, looking east (2000)
Mazar et. al. (2020 v.3) - Photo 17.31 -
Grinding stone leaning on wall 5609 in E-1a Building EB from Mazar et. al. (2020 v. 3: Chapter 17)
Photo 17.31
E-1a Building EB, lower grinding stone leaning on Wall 5609 in front of entrance to southern room, looking south (2001)
Mazar et. al. (2020 v.3) - Photo 17.32 -
Destruction debris in southeastern corner of E-1a Building EB from Mazar et. al. (2020 v. 3: Chapter 17)
Photo 17.32
Building EB, Stratum E-1a, Room 4616; destruction debris in southeastern corner; note plaster on Wall 4614 (2000)
Mazar et. al. (2020 v.3) - Photo 17.33 -
Seal impressions on plaster of Room 4616 in E-1a Building EB from Mazar et. al. (2020 v. 3: Chapter 17)
Photo 17.33
E-1a Building EB, Room 4616, seal impressions on plaster (2000)
Mazar et. al. (2020 v.3) - Photo 17.34 -
E-1a Building EB, Platform 2654, looking south; below platform: E-1b Walls 4634 and 4623 from Mazar et. al. (2020 v. 3: Chapter 17)
Photo 17.34
E-1a Building EB, Platform 2654, looking south; below platform: E-1b Walls 4634 and 4623 (1998)
Mazar et. al. (2020 v.3) - Photo 17.35 -
Brick platform (2654) and stone platform with standing stones (1624) from Mazar et. al. (2020 v. 3: Chapter 17)
Photo 17.35
Brick platform (2654) and stone platform with standing stones (1624), looking east; note posthole (2000)
Mazar et. al. (2020 v.3) - Photo 17.36 -
Detail of stone platform (1624) and standing stones, on top of brick platform (2654) from Mazar et. al. (2020 v. 3: Chapter 17)
Photo 17.36
Detail of stone platform (1624) and standing stones, on top of brick platform (2654), looking south (1998)
Mazar et. al. (2020 v.3) - Photo 17.37 -
Section below Platform 2654 from Mazar et. al. (2020 v. 3: Chapter 17)
Photo 17.37
Section below Platform 2654, looking west (1999)
Mazar et. al. (2020 v.3)
- Plans: Figs. 17.5, 17.7,
- Photos 17.2–17.3, 17.22–17.37
- Pottery: Figs. 18.6–18.14
- Table 17.1 -
Locus and basket numbers from Mazar et. al. (2020 v. 3: Chapter 17)
Table 17.1
Locus and basket numbers
Mazar et. al. (2020 v.3) - Table 17.2 -
Correlation of the Iron Age stratigraphic sequence in Areas C, D, E, and F from Mazar et. al. (2020 v. 3: Chapter 17)
Table 17.2
Correlation of the Iron Age stratigraphic sequence in Areas C, D, E, and F
Mazar et. al. (2020 v.3) - Figure 17.3 -
Plan of Stratum E-1b in Squares D–F/13–16 from Mazar et. al. (2020 v. 3: Chapter 17)
Figure 17.3
Plan of Stratum E-1b in Squares D–F/13–16
Mazar et. al. (2020 v.3) - Figure 17.4 -
Schematic plan of Stratum E-1a, marked with location of sub-plans from Mazar et. al. (2020 v. 3: Chapter 17)
Figure 17.4
Schematic plan of Stratum E-1a, marked with location of sub-plans
Mazar et. al. (2020 v.3) - Figure 17.5 -
General plan of Stratum E-1a from Mazar et. al. (2020 v. 3: Chapter 17)
Figure 17.5
General plan of Stratum E-1a
Mazar et. al. (2020 v.3) - Figure 17.6 -
Stratum E-1a in Squares D–F/13–15 from Mazar et. al. (2020 v. 3: Chapter 17)
Figure 17.6
Stratum E-1a in Squares D–F/13–15
Mazar et. al. (2020 v.3) - Figure 17.7 -
Squares C–E/13–16 in Stratum E-1a from Mazar et. al. (2020 v. 3: Chapter 17)
Figure 17.7
Squares C–E/13–16 in Stratum E-1a
Mazar et. al. (2020 v.3) - Figure 17.8 -
Detailed plan and elevations of Platform 2654 and standing stones from Mazar et. al. (2020 v. 3: Chapter 17)
Figure 17.8
Detailed plan and elevations of Platform 2654 and standing stones
Mazar et. al. (2020 v.3) - Figure 17.9 -
Stratum E-1a in Squares E/15–16 and Stratum E-1a–b (or just E-1b) in Squares E/17–18 and G/16 from Mazar et. al. (2020 v. 3: Chapter 17)
Figure 17.9
Stratum E-1a in Squares E/15–16 and Stratum E-1a–b (or just E-1b) in Squares E/17–18 and G/16
Mazar et. al. (2020 v.3) - Figure 17.15a -
Section 2 from Mazar et. al. (2020 v. 3: Chapter 17)
Figure 17.15a
Section 2 (Squares F/14–15, looking west)
Mazar et. al. (2020 v.3) - Figure 17.15b -
Section 2 from Mazar et. al. (2020 v. 3: Chapter 17)
Figure 17.15b
Section 2 (Squares F/14–15, looking west)
Mazar et. al. (2020 v.3) - Figure 17.16a -
Section 3 from Mazar et. al. (2020 v. 3: Chapter 17)
Figure 17.16a
Section 3 (Squares F/13–16, looking east)
Mazar et. al. (2020 v.3) - Figure 17.16b -
Section 3 from Mazar et. al. (2020 v. 3: Chapter 17)
Figure 17.16b
Section 3 (Squares F/13–16, looking east)
Mazar et. al. (2020 v.3) - Figure 17.18a -
Section 5 from Mazar et. al. (2020 v. 3: Chapter 17)
Figure 17.18a
Section 5 (Squares D–F/15, looking south)
Mazar et. al. (2020 v.3) - Figure 17.18b -
Section 5 from Mazar et. al. (2020 v. 3: Chapter 17)
Figure 17.18b
Section 5 (Squares D–F/15, looking south)
Mazar et. al. (2020 v.3) - Photo 17.2 -
General view of Area E, end of 2000 season, looking east from Mazar et. al. (2020 v. 3: Chapter 17)
Photo 17.2
General view of Area E, end of 2000 season, looking east; Buildings EA and EB and courtyard to their north; lower center: E-1b–2 Room 4653 of Building ED
Mazar et. al. (2020 v.3) - Photo 17.5 -
South section of probe in Square F/15, with E-1b–2 layers from Mazar et. al. (2020 v. 3: Chapter 17)
Photo 17.5
South section of probe in Square F/15, with E-1b–2 layers (1998)
Mazar et. al. (2020 v.3) - Photo 17.9 -
Building EA, general view, end of 1998 season, looking east from Mazar et. al. (2020 v. 3: Chapter 17)
Photo 17.9
Building EA, general view, end of 1998 season, looking east
Mazar et. al. (2020 v.3) - Photo 17.38 -
Probe in Squares E/17–18 from Mazar et. al. (2020 v. 3: Chapter 17)
Photo 17.38
Probe in Squares E/17–18, looking south (2000)
Mazar et. al. (2020 v.3) - Photo 17.39 -
Probe in Square E/18 from Mazar et. al. (2020 v. 3: Chapter 17)
Photo 17.39
Probe in Square E/18, looking east (2000)
Mazar et. al. (2020 v.3) - Photo 17.40 -
Probe in Square E/18 from Mazar et. al. (2020 v. 3: Chapter 17)
Photo 17.40
Probe in Square E/18, looking west (2000)
Mazar et. al. (2020 v.3) - Photo 17.41 -
Oven 4608, Square E/17 from Mazar et. al. (2020 v. 3: Chapter 17)
Photo 17.41
Oven 4608, Square E/17, looking east (2000)
Mazar et. al. (2020 v.3) - Photo 17.42 -
Courtyard in Squares D–F/15–16 from Mazar et. al. (2020 v. 3: Chapter 17)
Photo 17.42
Courtyard in Squares D–F/15–16, looking south; Platform 2654 partly exposed (1998)
Mazar et. al. (2020 v.3) - Photo 17.43 -
E-1b Floor 2618 with pits in 4665 from Mazar et. al. (2020 v. 3: Chapter 17)
Photo 17.43
Probe in Square E/16, looking north; E-1b Floor 2618 with pits in 4665 in the north (2000)
Mazar et. al. (2020 v.3) - Photo 17.44 -
Buildings EB and EA from Mazar et. al. (2020 v. 3: Chapter 17)
Photo 17.44
Squares D–F/13–15, looking east; bottom: eastern part of Building EB; center: floors of the courtyard; upper right: Building EA (1998)
Mazar et. al. (2020 v.3) - Photo 17.45 -
Square E/15 from Mazar et. al. (2020 v. 3: Chapter 17)
Photo 17.45
Square E/15, looking south; upper left: E-1b circular bins on Floor 1647; upper right: Platform 2654 (2000)
Mazar et. al. (2020 v.3) - Photo 17.46 -
Square E/15 from Mazar et. al. (2020 v. 3: Chapter 17)
Photo 17.46
Square E/15, detail of circular bins, looking east (2000) (2000)
Mazar et. al. (2020 v.3) - Photo 17.47 -
Square E/15 detail from Mazar et. al. (2020 v. 3: Chapter 17)
Photo 17.47
Square E/15, detail of Bin 1671 (2000) (2000)
Mazar et. al. (2020 v.3) - Photo 17.48 -
Square E/15 detail from Mazar et. al. (2020 v. 3: Chapter 17)
Photo 17.48
Square E/15, detail of clay floor and walls of Bin 1685 (2000)
Mazar et. al. (2020 v.3) - Photo 17.49 -
Square E/15 with debris from Mazar et. al. (2020 v. 3: Chapter 17)
Photo 17.49
Square E/15, looking west; left: E-1b Floor 1647; right: E-1a debris 1611with stone 1623 and Oven 1614 (1997)
Mazar et. al. (2020 v.3) - Photo 17.50 -
Detail of stone 1623 from Mazar et. al. (2020 v. 3: Chapter 17)
Photo 17.50
Detail of stone 1623 (1997)
Mazar et. al. (2020 v.3) - Photo 17.51 -
Square E/15, foundation stones under stone 1623 from Mazar et. al. (2020 v. 3: Chapter 17)
Photo 17.51
Square E/15, foundation stones under stone 1623, looking west (1997)
Mazar et. al. (2020 v.3) - Photo 17.52 -
Squares E–F/15–16 from Mazar et. al. (2020 v. 3: Chapter 17)
Photo 17.52
Squares E–F/15–16, looking north; right: Benches 1674 and 1673; center: courtyard (1998)
Mazar et. al. (2020 v.3) - Photo 17.53 -
Square F/15 from Mazar et. al. (2020 v. 3: Chapter 17)
Photo 17.53
Square F/15, looking north; Benches 1674 and 1673; Floor 1659 (E-1a) in back (1998)
Mazar et. al. (2020 v.3)
- Plans: Figs. 17.3–17.9
- Photos 17.2, 17.38–17.53
- Pottery: Figs. 18.17–18.19
- Table 17.1 -
Locus and basket numbers from Mazar et. al. (2020 v. 3: Chapter 17)
Table 17.1
Locus and basket numbers
Mazar et. al. (2020 v.3) - Table 17.2 -
Correlation of the Iron Age stratigraphic sequence in Areas C, D, E, and F from Mazar et. al. (2020 v. 3: Chapter 17)
Table 17.2
Correlation of the Iron Age stratigraphic sequence in Areas C, D, E, and F
Mazar et. al. (2020 v.3) - Figure 17.5 -
General plan of Stratum E-1a from Mazar et. al. (2020 v. 3: Chapter 17)
Figure 17.5
General plan of Stratum E-1a
Mazar et. al. (2020 v.3) - Figure 17.7 -
Squares C–E/13–16 in Stratum E-1a from Mazar et. al. (2020 v. 3: Chapter 17)
Figure 17.7
Squares C–E/13–16 in Stratum E-1a
Mazar et. al. (2020 v.3) - Photo 17.55 -
Squares C–D/15–16, Building EC (right) from Mazar et. al. (2020 v. 3: Chapter 17)
Photo 17.55
Squares C–D/15–16, Building EC (right), looking south (2001)
Mazar et. al. (2020 v.3) - Photo 17.56 -
E-1a Building EC, circular installations in Room 5637 from Mazar et. al. (2020 v. 3: Chapter 17)
Photo 17.56
E-1a Building EC, circular installations in Room 5637, looking north; post-E-1a Bin 5611 in center (2001)
Mazar et. al. (2020 v.3) - Photo 17.57 -
E-1a Building EC, Room 5637, detail of Bin 5630 from Mazar et. al. (2020 v. 3: Chapter 17)
Photo 17.57
E-1a Building EC, Room 5637, detail of Bin 5630 (2001)
Mazar et. al. (2020 v.3) - Photo 17.58 -
Building EC, Room 5637, detail of Oven 5632 from Mazar et. al. (2020 v. 3: Chapter 17)
Photo 17.58
Building EC, Room 5637, detail of Oven 5632 (2001)
Mazar et. al. (2020 v.3) - Photo 17.59 -
Buildings EB and EC from Mazar et. al. (2020 v. 3: Chapter 17)
Photo 17.59
Right: Building EC, looking south; left: Building EB; lower left: E-1b–2 Room 4653 (2001)
Mazar et. al. (2020 v.3)
- Plans: Figs. 17.5, 17.7
- Photos 17.55–17.59
- Pottery: Figs. 18.15–18.16
- Figure 17.18a -
Section 5 from Mazar et. al. (2020 v. 3: Chapter 17)
Figure 17.18a
Section 5 (Squares D–F/15, looking south)
Mazar et. al. (2020 v.3)
- Figure 17.10 -
Plan of Post-E-1a phase in Square C/16 from Mazar et. al. (2020 v. 3: Chapter 17)
Figure 17.10
Plan of Post-E-1a phase in Square C/16
Mazar et. al. (2020 v.3)
- Table 17.1 -
Locus and basket numbers from Mazar et. al. (2020 v. 3: Chapter 17)
Table 17.1
Locus and basket numbers
Mazar et. al. (2020 v.3) - Table 17.2 -
Correlation of the Iron Age stratigraphic sequence in Areas C, D, E, and F from Mazar et. al. (2020 v. 3: Chapter 17)
Table 17.2
Correlation of the Iron Age stratigraphic sequence in Areas C, D, E, and F
Mazar et. al. (2020 v.3) - Figure 17.11 -
Plan of probe in Squares E/20, E/1 from Mazar et. al. (2020 v. 3: Chapter 17)
Figure 17.11
Plan of probe in Squares E/20, E/1
Mazar et. al. (2020 v.3) - Photo 17.60 -
Probe in Squares E/20, E/1 from Mazar et. al. (2020 v. 3: Chapter 17)
Photo 17.60
Probe in Squares E/20, E/1, looking east (2001)
Mazar et. al. (2020 v.3) - Photo 17.61 -
Probe in Square E/1 with Oven 5903 and large stone from Mazar et. al. (2020 v. 3: Chapter 17)
Photo 17.61
Probe in Square E/1 with Oven 5903 and large stone, looking east (2001)
Mazar et. al. (2020 v.3)
- Schematic plans: Fig. 17.11
- Photos 17.60–17.61
The probe was located on the upper part of the northern slope of the mound, whose top was at level 72.30 m in the southwestern corner of Square E/20 and descended to 70.77 m in the northeastern corner of Square E/1, 10 m to the north. The loose topsoil contained Iron IIA and Early Islamic pottery sherds. A layer of yellowish-white brick debris (5902) was uncovered, although no individual bricks were discernible. In the southern end of Square E/20, the probe revealed that the brick debris continued to a depth of 0.85 m, until level 71.42 m, which may correspond with Stratum E-1b in the northern part of Area E.
In Square E/1, fragmentary remains of an oven (5903) were found on top of this debris layer at level 71.05 m (Photo 17.61), although no floor could be discerned. The walls of this oven were only partly preserved to a height of 0.03–0.06 m; the interior diameter was ca. 0.65 m. A few Iron IIA pottery sherds were found inside the oven, which appears to post-date the brick debris layer and thus, may signify a post E-1a activity, like Oven 5611 in Building EC, although it could be that the brick debris layer marked the top of Stratum E-1b and the oven was constructed in Stratum E-1a; this was impossible to determine due to the limited excavation.
An exceptionally large stone, 0.57×0.87×1.6 m, was found protruding from the floor in the northeastern corner of the probe, where the slope of the mound began (Photo 17.61). A probe dug along the faces of this stone indicated that it was isolated and not part of a wall line, although it seemed to be deliberately positioned on a foundation of five small stones (0.2–0.3 m in length) underneath it. The top of these smaller stones was at level 70.40 m. Since stones are generally lacking in the architecture of the Iron IIA city at Tel Rehov, this large stone may have had a special significance that eludes us. This may be compared to several large stones found in Area F, just south of Area E (Chapter 19).
- Table 17.1 -
Locus and basket numbers from Mazar et. al. (2020 v. 3: Chapter 17)
Table 17.1
Locus and basket numbers
Mazar et. al. (2020 v.3) - Table 17.2 -
Correlation of the Iron Age stratigraphic sequence in Areas C, D, E, and F from Mazar et. al. (2020 v. 3: Chapter 17)
Table 17.2
Correlation of the Iron Age stratigraphic sequence in Areas C, D, E, and F
Mazar et. al. (2020 v.3) - Figure 17.1 -
Schematic plan of Areas E and F; Iron IIA Stratum F-1 in black from Mazar et. al. (2020 v. 3: Chapter 17)
Figure 17.1
Schematic plan of Areas E and F; Iron IIA Stratum F-1 in black
Mazar et. al. (2020 v.3) - Figure 17.2a -
Plan of Stratum E-3 (Square E/15) from Mazar et. al. (2020 v. 3: Chapter 17)
Figure 17.2a
Plan of Stratum E-3 (Square E/15)
Mazar et. al. (2020 v.3) - Figure 17.2b -
Plan of Stratum E-2 from Mazar et. al. (2020 v. 3: Chapter 17)
Figure 17.2b
Plan of Stratum E-2
Mazar et. al. (2020 v.3) - Figure 17.3 -
Plan of Stratum E-1b in Squares D–F/13–16 from Mazar et. al. (2020 v. 3: Chapter 17)
Figure 17.3
Plan of Stratum E-1b in Squares D–F/13–16
Mazar et. al. (2020 v.3) - Figure 17.4 -
Schematic plan of Stratum E-1a, marked with location of sub-plans from Mazar et. al. (2020 v. 3: Chapter 17)
Figure 17.4
Schematic plan of Stratum E-1a, marked with location of sub-plans
Mazar et. al. (2020 v.3) - Figure 17.5 -
General plan of Stratum E-1a from Mazar et. al. (2020 v. 3: Chapter 17)
Figure 17.5
General plan of Stratum E-1a
Mazar et. al. (2020 v.3) - Figure 17.13 -
Location of section drawings marked on schematic plan of Stratum E-1a from Mazar et. al. (2020 v. 3: Chapter 17)
Figure 17.13
Location of section drawings marked on schematic plan of Stratum E-1a
Mazar et. al. (2020 v.3)
The open space, Building EB, and perhaps Building EA, can be interpreted as belonging to a sanctuary or high place (the biblical bamah) that served the neighborhood. The platform and standing stones, that can be interpreted as masseboth, were the focal point of this sanctuary in Stratum E-1a. In the spacious courtyard to the north and east of this platform, ovens and the circular bins were perhaps used in relation to feasting. Although they were attributed to late Stratum E-1b, they possibly continued to be in use in Stratum E-1a. The flat stone in front of the platform can be explained as an offering table and the pottery altar could have been used for burning offerings, including incense or small animals, such as pigeons. The rectangular area with benches in Squares F–E/14–15 could have been used for public feasting.
It could not be securely determined whether the area served as a sanctuary in Stratum E-1b, as it did in Stratum E-1a. Yet, the architectural continuity in the courtyard and surrounding buildings alludes to a similar function in both phases. Alterations in Stratum E-1a were needed due to the rise of floor levels in the courtyard. This may explain the need to rebuild Building ED of Stratum E-1b (of which only one room was exposed) as Building EB in Stratum E-1a. The continuity between these two buildings was demonstrated in the similar plan and location of Rooms 4653 (E-1b) and 2629 (E-1a). The platform and standing stones, which were the focal point of cult in Stratum E-1a, were preceded by an earlier structure defined by Walls 4624 and 4623, yet its nature could not be clarified. Building EA in the southeastern part of the area appears to have been founded in Stratum E-1b and continued to be in use in E-1a, with only minor modifications.
This is a rare example of an Iron Age II openair sanctuary. The concept of a small cult place which served a local neighborhood is known from approximately the same time at Lachish (Stratum V Cult Room 49), Megiddo (Stratum VA–IVB Building 2081) and perhaps at Ta'anach (Dever 1983; Holladay 1987: 249–299; Zevit 2001: 213– 266). Yet, all three differ from our sanctuary in many aspects; they are either an independent cult room (Lachish),1 a cult room in a large building (Megiddo), or a cult corner in a dwelling (Ta'anach). None of these sites have standing stones (masseboth) and a platform (bamah). Platforms and standing stones are known from several Iron Age public cult places, such as at Bethsaida (Zevit 2001: 149–152) and the 9th century BCE temple at Khirbet 'Atarus ('Atarot) in Moab (Ji 2012).2 Standing stones of a similar rough shape and small size as ours are known from the city gate area at Dan (Biran 1994: 244, Photos 203–204; Zevit 2001: 191–196). Our sanctuary, if correctly identified, is the most complete example in Israel of an open-air sanctuary with a platform, standing stones, a spacious courtyard with cooking and food-preparation facilities, and auxiliary rooms. The cultic paraphernalia included a pottery altar, an offering table, and artifacts such as clay figurines. Other special objects included the impressed plaster and the painted Phoenician-style storage jar. The evidence of metal and flint-scraper production in the center of the open courtyard (although attributed to Stratum E-1b) is striking, since the combination of industry with a cult place is known in other cases as well, such as the copper industry at Timna' (Rothenberg 1988: 276–278) and at Kition in Cyprus (Karageorghis 1985: 253), the olive oil industry at Tel Miqne-Ekron (Gitin 2003), and the apiary in Area C at Tel Rehov (Chapters 12, 14A). The large quantity of animal bones found in the open area in front and east of the platform may be taken as evidence for sacrifices and sacred meals (marzeah) that took place in this sanctuary (see Chapter 49; cf., Greer 2013).
- Table 17.1
Locus and basket numbers from Mazar et. al. (2020 v. 3: Chapter 17)
Table 17.1
Locus and basket numbers
Mazar et. al. (2020 v.3) - Table 17.2
Correlation of the Iron Age stratigraphic sequence in Areas C, D, E, and F from Mazar et. al. (2020 v. 3: Chapter 17)
Table 17.2
Correlation of the Iron Age stratigraphic sequence in Areas C, D, E, and F
Mazar et. al. (2020 v.3) - Figure 17.1
Schematic plan of Areas E and F; Iron IIA Stratum F-1 in black from Mazar et. al. (2020 v. 3: Chapter 17)
Figure 17.1
Schematic plan of Areas E and F; Iron IIA Stratum F-1 in black
Mazar et. al. (2020 v.3) - Figure 17.2a
Plan of Stratum E-3 (Square E/15) from Mazar et. al. (2020 v. 3: Chapter 17)
Figure 17.2a
Plan of Stratum E-3 (Square E/15)
Mazar et. al. (2020 v.3) - Figure 17.2b
Plan of Stratum E-2 from Mazar et. al. (2020 v. 3: Chapter 17)
Figure 17.2b
Plan of Stratum E-2
Mazar et. al. (2020 v.3) - Figure 17.3
Plan of Stratum E-1b in Squares D–F/13–16 from Mazar et. al. (2020 v. 3: Chapter 17)
Figure 17.3
Plan of Stratum E-1b in Squares D–F/13–16
Mazar et. al. (2020 v.3) - Figure 17.4
Schematic plan of Stratum E-1a, marked with location of sub-plans from Mazar et. al. (2020 v. 3: Chapter 17)
Figure 17.4
Schematic plan of Stratum E-1a, marked with location of sub-plans
Mazar et. al. (2020 v.3) - Figure 17.5
General plan of Stratum E-1a from Mazar et. al. (2020 v. 3: Chapter 17)
Figure 17.5
General plan of Stratum E-1a
Mazar et. al. (2020 v.3) - Figure 17.6
Stratum E-1a in Squares D–F/13–15 from Mazar et. al. (2020 v. 3: Chapter 17)
Figure 17.6
Stratum E-1a in Squares D–F/13–15
Mazar et. al. (2020 v.3) - Figure 17.7
Squares C–E/13–16 in Stratum E-1a from Mazar et. al. (2020 v. 3: Chapter 17)
Figure 17.7
Squares C–E/13–16 in Stratum E-1a
Mazar et. al. (2020 v.3) - Figure 17.8
Detailed plan and elevations of Platform 2654 and standing stones from Mazar et. al. (2020 v. 3: Chapter 17)
Figure 17.8
Detailed plan and elevations of Platform 2654 and standing stones
Mazar et. al. (2020 v.3) - Figure 17.9
Stratum E-1a in Squares E/15–16 and Stratum E-1a–b (or just E-1b) in Squares E/17–18 and G/16 from Mazar et. al. (2020 v. 3: Chapter 17)
Figure 17.9
Stratum E-1a in Squares E/15–16 and Stratum E-1a–b (or just E-1b) in Squares E/17–18 and G/16
Mazar et. al. (2020 v.3) - Figure 17.10
Plan of Post-E-1a phase in Square C/16 from Mazar et. al. (2020 v. 3: Chapter 17)
Figure 17.10
Plan of Post-E-1a phase in Square C/16
Mazar et. al. (2020 v.3) - Figure 17.11
Plan of probe in Squares E/20, E/1 from Mazar et. al. (2020 v. 3: Chapter 17)
Figure 17.11
Plan of probe in Squares E/20, E/1
Mazar et. al. (2020 v.3) - Figure 17.12
Plan of Stratum E-0 and topsoil loci from Mazar et. al. (2020 v. 3: Chapter 17)
Figure 17.12
Plan of Stratum E-0 and topsoil loci
Mazar et. al. (2020 v.3) - Figure 17.13
Location of section drawings marked on schematic plan of Stratum E-1a from Mazar et. al. (2020 v. 3: Chapter 17)
Figure 17.13
Location of section drawings marked on schematic plan of Stratum E-1a
Mazar et. al. (2020 v.3) - Figure 17.14a
Section 1 from Mazar et. al. (2020 v. 3: Chapter 17)
Figure 17.14a
Section 1 (Squares E/13–15, looking west)
Mazar et. al. (2020 v.3) - Figure 17.14b
Section 1 from Mazar et. al. (2020 v. 3: Chapter 17)
Figure 17.14b
Section 1 (Squares E/13–15, looking west)
Mazar et. al. (2020 v.3) - Figure 17.15a
Section 2 from Mazar et. al. (2020 v. 3: Chapter 17)
Figure 17.15a
Section 2 (Squares F/14–15, looking west)
Mazar et. al. (2020 v.3) - Figure 17.15b
Section 2 from Mazar et. al. (2020 v. 3: Chapter 17)
Figure 17.15b
Section 2 (Squares F/14–15, looking west)
Mazar et. al. (2020 v.3) - Figure 17.16a
Section 3 from Mazar et. al. (2020 v. 3: Chapter 17)
Figure 17.16a
Section 3 (Squares F/13–16, looking east)
Mazar et. al. (2020 v.3) - Figure 17.16b
Section 3 from Mazar et. al. (2020 v. 3: Chapter 17)
Figure 17.16b
Section 3 (Squares F/13–16, looking east)
Mazar et. al. (2020 v.3) - Figure 17.17
Section 4 from Mazar et. al. (2020 v. 3: Chapter 17)
Figure 17.17
Section 4 (Squares D–E/15, looking north)
Mazar et. al. (2020 v.3) - Figure 17.18a
Section 5 from Mazar et. al. (2020 v. 3: Chapter 17)
Figure 17.18a
Section 5 (Squares D–F/15, looking south)
Mazar et. al. (2020 v.3) - Figure 17.18b
Section 5 from Mazar et. al. (2020 v. 3: Chapter 17)
Figure 17.18b
Section 5 (Squares D–F/15, looking south)
Mazar et. al. (2020 v.3) - Figure 17.19
Section 6 from Mazar et. al. (2020 v. 3: Chapter 17)
Figure 17.19
Section 6 (Squares E–F/14, looking north)
Mazar et. al. (2020 v.3) - Figure 17.20
Section 7 from Mazar et. al. (2020 v. 3: Chapter 17)
Figure 17.20
Section 7 (Square E/13, looking north)
Mazar et. al. (2020 v.3) - Figure 17.21
Section 8 from Mazar et. al. (2020 v. 3: Chapter 17)
Figure 17.21
Section 8 (Squares E–F/13, looking south)
Mazar et. al. (2020 v.3) - Figure 17.22
Section 9 from Mazar et. al. (2020 v. 3: Chapter 17)
Figure 17.22
Section 9 (Squares E/20–21, looking west)
Mazar et. al. (2020 v.3)
- Photo 17.1
General view of Area E, end of 1997 season, looking east from Mazar et. al. (2020 v. 3: Chapter 17)
Photo 17.1
General view of Area E, end of 1997 season, looking east; Building EA and courtyard to its north
Mazar et. al. (2020 v.3) - Photo 17.2
General view of Area E, end of 2000 season, looking east from Mazar et. al. (2020 v. 3: Chapter 17)
Photo 17.2
General view of Area E, end of 2000 season, looking east; Buildings EA and EB and courtyard to their north; lower center: E-1b–2 Room 4653 of Building ED
Mazar et. al. (2020 v.3) - Photo 17.3
General view of Area E, end of 2001 season, looking south from Mazar et. al. (2020 v. 3: Chapter 17)
Photo 17.3
General view of Area E, end of 2001 season, looking south; right: Building EC; center: Buildings EB and ED, left: courtyard and Building EA
Mazar et. al. (2020 v.3) - Photo 17.4
Squares D–E/15, excavated to level of Strata E-2–E-1b from Mazar et. al. (2020 v. 3: Chapter 17)
Photo 17.4
Squares D–E/15, excavated to level of Strata E-2–E-1b; left: E-2 Floor 4661; center: E-1a Platform 2654; right: Room 4653 of E-1b-2 Building ED (2001)
Mazar et. al. (2020 v.3) - Photo 17.5
South section of probe in Square F/15, with E-1b–2 layers from Mazar et. al. (2020 v. 3: Chapter 17)
Photo 17.5
South section of probe in Square F/15, with E-1b–2 layers (1998)
Mazar et. al. (2020 v.3) - Photo 17.6
Probe in Square F/15, looking north; E-2 Floor 2662 from Mazar et. al. (2020 v. 3: Chapter 17)
Photo 17.6
Probe in Square F/15, looking north; E-2 Floor 2662 (1998)
Mazar et. al. (2020 v.3) - Photo 17.7
Southeastern corner of Square E/14 from Mazar et. al. (2020 v. 3: Chapter 17)
Photo 17.7
Southeastern corner of Square E/14, looking east; E-2 Oven 4662 and E-1b Wall 1657 (left) (2000)
Mazar et. al. (2020 v.3) - Photo 17.8
Building EA, general view, end of 1997 season, looking north from Mazar et. al. (2020 v. 3: Chapter 17)
Photo 17.8
Building EA, general view, end of 1997 season, looking north
Mazar et. al. (2020 v.3) - Photo 17.9
Building EA, general view, end of 1998 season, looking east from Mazar et. al. (2020 v. 3: Chapter 17)
Photo 17.9
Building EA, general view, end of 1998 season, looking east
Mazar et. al. (2020 v.3) - Photo 17.10
Building EA, Square F/14, looking south from Mazar et. al. (2020 v. 3: Chapter 17)
Photo 17.10
Building EA, Square F/14, looking south (1998)
Mazar et. al. (2020 v.3) - Photo 17.11
Building EA, Square F/14, looking south from Mazar et. al. (2020 v. 3: Chapter 17)
Photo 17.11
Building EA, Square F/14, looking south; bottom left: E-1a Wall 1688; center: E-1b Wall 1687; right: E-1b-1a Wall 1669 (1998)
Mazar et. al. (2020 v.3) - Photo 17.12
Building EA, Square F/14, looking north from Mazar et. al. (2020 v. 3: Chapter 17)
Photo 17.12
Building EA, Square F/14, looking north; lower left: Walls 1661 and 1619; right center: Room 1704 of E-1b and Wall 1687; left: E-1a Floor 1670 and Installation 1668 (1998)
Mazar et. al. (2020 v.3) - Photo 17.13
Building EA, Square F/14, looking west; E-1a Floor 1677 with pottery in destruction debris from Mazar et. al. (2020 v. 3: Chapter 17)
Photo 17.13
Building EA, Square F/14, looking west; E-1a Floor 1677 with pottery in destruction debris (1997)
Mazar et. al. (2020 v.3) - Photo 17.14
Building EA, detail of Room 1701 and compartments 1666 and 1700 from Mazar et. al. (2020 v. 3: Chapter 17)
Photo 17.14
Building EA, detail of Room 1701 and compartments 1666 and 1700, looking southwest (1997)
Mazar et. al. (2020 v.3) - Photo 17.15
Building EA, detail of compartments 1666 and 1700 and double wall 1618/1612 from Mazar et. al. (2020 v. 3: Chapter 17)
Photo 17.15
Building EA, detail of compartments 1666 and 1700 and double wall 1618/1612, looking north (1997)
Mazar et. al. (2020 v.3) - Photo 17.16
Building EA, Square E/13, looking east, E-1b Room 2651 from Mazar et. al. (2020 v. 3: Chapter 17)
Photo 17.16
Building EA, Square E/13, looking east, E-1b Room 2651 (1998)
Mazar et. al. (2020 v.3) - Photo 17.17
Building EA, Square E/13, looking east; right: E-1a–b Wall 1629 from Mazar et. al. (2020 v. 3: Chapter 17)
Photo 17.17
Building EA, Square E/13, looking east; right: E-1a–b Wall 1629 (1998)
Mazar et. al. (2020 v.3) - Photo 17.18
Building EA, Square E/13, looking southeast from Mazar et. al. (2020 v. 3: Chapter 17)
Photo 17.18
Building EA, Square E/13, looking southeast; E-1b Room 1699, Platform 2657 below floating level of Wall 1672 (1998)
Mazar et. al. (2020 v.3) - Photo 17.19
Squares E/13–14, Building EA, looking south from Mazar et. al. (2020 v. 3: Chapter 17)
Photo 17.19
Squares E/13–14, Building EA, looking south; E-1b Floors 1699 and 2651 (1998)
Mazar et. al. (2020 v.3) - Photo 17.20
Room 4653, Square D/15 from Mazar et. al. (2020 v. 3: Chapter 17)
Photo 17.20
Room 4653, Square D/15, looking west; left: Wall 4650; center: Wall 4658, disturbed by a later trench (2000)
Mazar et. al. (2020 v.3) - Photo 17.21
Squares D–E/15, section through E-1a Platform 2654 with brick collapse below platform from Mazar et. al. (2020 v. 3: Chapter 17)
Photo 17.21
Squares D–E/15, section through E-1a Platform 2654, looking south; above meter scale: single brick course of platform and stone platform above; brick collapse/fill 5623 below platform (2001)
Mazar et. al. (2020 v.3) - Photo 17.22
General view of Stratum E-1a Buildings EB and EC from Mazar et. al. (2020 v. 3: Chapter 17)
Photo 17.22
General view of Stratum E-1a Buildings EB and EC, looking east, after dismantling Platform 2654 and Room 2629 (2001)
Mazar et. al. (2020 v.3) - Photo 17.23a
Destruction debris in Locus 5621 in the western part of Space 2641 in Building EB from Mazar et. al. (2020 v. 3: Chapter 17)
Photo 17.23a
Building EB, western part of Space 2641, looking north, destruction debris with pottery in Locus 5621 (2001)
Mazar et. al. (2020 v.3) - Photo 17.23b
Detail of cooking amphora in Locus 4630 from Mazar et. al. (2020 v. 3: Chapter 17)
Photo 17.23b
detail of cooking amphora (Fig. 18.10:4), Locus 4630 (2001)
Mazar et. al. (2020 v.3) - Photo 17.24
Building EB, Floor 4654 from Mazar et. al. (2020 v. 3: Chapter 17)
Photo 17.24
Building EB, Floor 4654 (Square D/14), looking north, before dismantling balks (2000)
Mazar et. al. (2020 v.3) - Photo 17.25
Building EB, Floor 4654 from Mazar et. al. (2020 v. 3: Chapter 17)
Photo 17.25
Building EB, Floor 4654, looking west (2000)
Mazar et. al. (2020 v.3) - Photo 17.26
E-1a Building EB, Room 2629 from Mazar et. al. (2020 v. 3: Chapter 17)
Photo 17.26
E-1a Building EB, Room 2629, looking east (1998)
Mazar et. al. (2020 v.3) - Photo 17.27
E-1a Building EB, Room 2629 from Mazar et. al. (2020 v. 3: Chapter 17)
Photo 17.27
E-1a Building EB, Room 2629, looking north; note two stones attached to Walls 2632 and 2634 (1998)
Mazar et. al. (2020 v.3) - Photo 17.28
E-1a Building EB, Room 2629, destruction debris and fallen roof material from Mazar et. al. (2020 v. 3: Chapter 17)
Photo 17.28
E-1a Building EB, Room 2629, destruction debris and fallen roof material (1998)
Mazar et. al. (2020 v.3) - Photo 17.29
E-1a Building EB, Room 4616 from Mazar et. al. (2020 v. 3: Chapter 17)
Photo 17.29
E-1a Building EB, Room 4616, looking east (2001)
Mazar et. al. (2020 v.3) - Photo 17.30
Destruction debris in eastern part of E-1a Building EB, Room 4616 from Mazar et. al. (2020 v. 3: Chapter 17)
Photo 17.30
E-1a Building EB, Room 4616, destruction debris in eastern part, looking east (2000)
Mazar et. al. (2020 v.3) - Photo 17.31
Grinding stone leaning on wall 5609 in E-1a Building EB from Mazar et. al. (2020 v. 3: Chapter 17)
Photo 17.31
E-1a Building EB, lower grinding stone leaning on Wall 5609 in front of entrance to southern room, looking south (2001)
Mazar et. al. (2020 v.3) - Photo 17.32
Destruction debris in southeastern corner of E-1a Building EB from Mazar et. al. (2020 v. 3: Chapter 17)
Photo 17.32
Building EB, Stratum E-1a, Room 4616; destruction debris in southeastern corner; note plaster on Wall 4614 (2000)
Mazar et. al. (2020 v.3) - Photo 17.33
Seal impressions on plaster of Room 4616 in E-1a Building EB from Mazar et. al. (2020 v. 3: Chapter 17)
Photo 17.33
E-1a Building EB, Room 4616, seal impressions on plaster (2000)
Mazar et. al. (2020 v.3) - Photo 17.34
E-1a Building EB, Platform 2654, looking south; below platform: E-1b Walls 4634 and 4623 from Mazar et. al. (2020 v. 3: Chapter 17)
Photo 17.34
E-1a Building EB, Platform 2654, looking south; below platform: E-1b Walls 4634 and 4623 (1998)
Mazar et. al. (2020 v.3) - Photo 17.35
Brick platform (2654) and stone platform with standing stones (1624) from Mazar et. al. (2020 v. 3: Chapter 17)
Photo 17.35
Brick platform (2654) and stone platform with standing stones (1624), looking east; note posthole (2000)
Mazar et. al. (2020 v.3) - Photo 17.36
Detail of stone platform (1624) and standing stones, on top of brick platform (2654) from Mazar et. al. (2020 v. 3: Chapter 17)
Photo 17.36
Detail of stone platform (1624) and standing stones, on top of brick platform (2654), looking south (1998)
Mazar et. al. (2020 v.3) - Photo 17.37
Section below Platform 2654 from Mazar et. al. (2020 v. 3: Chapter 17)
Photo 17.37
Section below Platform 2654, looking west (1999)
Mazar et. al. (2020 v.3) - Photo 17.38
Probe in Squares E/17–18 from Mazar et. al. (2020 v. 3: Chapter 17)
Photo 17.38
Probe in Squares E/17–18, looking south (2000)
Mazar et. al. (2020 v.3) - Photo 17.39
Probe in Square E/18 from Mazar et. al. (2020 v. 3: Chapter 17)
Photo 17.39
Probe in Square E/18, looking east (2000)
Mazar et. al. (2020 v.3) - Photo 17.40
Probe in Square E/18 from Mazar et. al. (2020 v. 3: Chapter 17)
Photo 17.40
Probe in Square E/18, looking west (2000)
Mazar et. al. (2020 v.3) - Photo 17.41
Oven 4608, Square E/17 from Mazar et. al. (2020 v. 3: Chapter 17)
Photo 17.41
Oven 4608, Square E/17, looking east (2000)
Mazar et. al. (2020 v.3) - Photo 17.42
Courtyard in Squares D–F/15–16 from Mazar et. al. (2020 v. 3: Chapter 17)
Photo 17.42
Courtyard in Squares D–F/15–16, looking south; Platform 2654 partly exposed (1998)
Mazar et. al. (2020 v.3) - Photo 17.43
E-1b Floor 2618 with pits in 4665 from Mazar et. al. (2020 v. 3: Chapter 17)
Photo 17.43
Probe in Square E/16, looking north; E-1b Floor 2618 with pits in 4665 in the north (2000)
Mazar et. al. (2020 v.3) - Photo 17.44
Buildings EB and EA from Mazar et. al. (2020 v. 3: Chapter 17)
Photo 17.44
Squares D–F/13–15, looking east; bottom: eastern part of Building EB; center: floors of the courtyard; upper right: Building EA (1998)
Mazar et. al. (2020 v.3) - Photo 17.45
Square E/15 from Mazar et. al. (2020 v. 3: Chapter 17)
Photo 17.45
Square E/15, looking south; upper left: E-1b circular bins on Floor 1647; upper right: Platform 2654 (2000)
Mazar et. al. (2020 v.3) - Photo 17.46
Square E/15 from Mazar et. al. (2020 v. 3: Chapter 17)
Photo 17.46
Square E/15, detail of circular bins, looking east (2000) (2000)
Mazar et. al. (2020 v.3) - Photo 17.47
Square E/15 detail from Mazar et. al. (2020 v. 3: Chapter 17)
Photo 17.47
Square E/15, detail of Bin 1671 (2000) (2000)
Mazar et. al. (2020 v.3) - Photo 17.48
Square E/15 detail from Mazar et. al. (2020 v. 3: Chapter 17)
Photo 17.48
Square E/15, detail of clay floor and walls of Bin 1685 (2000)
Mazar et. al. (2020 v.3) - Photo 17.49
Square E/15 with debris from Mazar et. al. (2020 v. 3: Chapter 17)
Photo 17.49
Square E/15, looking west; left: E-1b Floor 1647; right: E-1a debris 1611with stone 1623 and Oven 1614 (1997)
Mazar et. al. (2020 v.3) - Photo 17.50
Detail of stone 1623 from Mazar et. al. (2020 v. 3: Chapter 17)
Photo 17.50
Detail of stone 1623 (1997)
Mazar et. al. (2020 v.3) - Photo 17.51
Square E/15, foundation stones under stone 1623 from Mazar et. al. (2020 v. 3: Chapter 17)
Photo 17.51
Square E/15, foundation stones under stone 1623, looking west (1997)
Mazar et. al. (2020 v.3) - Photo 17.52
Squares E–F/15–16 from Mazar et. al. (2020 v. 3: Chapter 17)
Photo 17.52
Squares E–F/15–16, looking north; right: Benches 1674 and 1673; center: courtyard (1998)
Mazar et. al. (2020 v.3) - Photo 17.53
Square F/15 from Mazar et. al. (2020 v. 3: Chapter 17)
Photo 17.53
Square F/15, looking north; Benches 1674 and 1673; Floor 1659 (E-1a) in back (1998)
Mazar et. al. (2020 v.3) - Photo 17.54
Square E/14 from Mazar et. al. (2020 v. 3: Chapter 17)
Photo 17.54
Square E/14, looking east; bottom: Floor 1653; center right: entrance to Building EA (2001)
Mazar et. al. (2020 v.3) - Photo 17.55
Squares C–D/15–16, Building EC (right) from Mazar et. al. (2020 v. 3: Chapter 17)
Photo 17.55
Squares C–D/15–16, Building EC (right), looking south (2001)
Mazar et. al. (2020 v.3) - Photo 17.56
E-1a Building EC, circular installations in Room 5637 from Mazar et. al. (2020 v. 3: Chapter 17)
Photo 17.56
E-1a Building EC, circular installations in Room 5637, looking north; post-E-1a Bin 5611 in center (2001)
Mazar et. al. (2020 v.3) - Photo 17.57
E-1a Building EC, Room 5637, detail of Bin 5630 from Mazar et. al. (2020 v. 3: Chapter 17)
Photo 17.57
E-1a Building EC, Room 5637, detail of Bin 5630 (2001)
Mazar et. al. (2020 v.3) - Photo 17.58
Building EC, Room 5637, detail of Oven 5632 from Mazar et. al. (2020 v. 3: Chapter 17)
Photo 17.58
Building EC, Room 5637, detail of Oven 5632 (2001)
Mazar et. al. (2020 v.3) - Photo 17.59
Buildings EB and EC from Mazar et. al. (2020 v. 3: Chapter 17)
Photo 17.59
Right: Building EC, looking south; left: Building EB; lower left: E-1b–2 Room 4653 (2001)
Mazar et. al. (2020 v.3) - Photo 17.60
Probe in Squares E/20, E/1 from Mazar et. al. (2020 v. 3: Chapter 17)
Photo 17.60
Probe in Squares E/20, E/1, looking east (2001)
Mazar et. al. (2020 v.3) - Photo 17.61
Probe in Square E/1 with Oven 5903 and large stone from Mazar et. al. (2020 v. 3: Chapter 17)
Photo 17.61
Probe in Square E/1 with Oven 5903 and large stone, looking east (2001)
Mazar et. al. (2020 v.3)
- Table 20.1
Correlation of strata – Areas G and C from Mazar et. al. (2020 v. 3: Chapter 20)
Table 20.1
Correlation of strata – Areas G and C
Mazar et. al. (2020 v.3) - Table 20.2
Locus and basket numbers of Area G from Mazar et. al. (2020 v. 3: Chapter 20)
Table 20.2
Locus and basket numbers [of Area G]
Mazar et. al. (2020 v.3) - Figure 20.1
Plan of Stratum G-2b from Mazar et. al. (2020 v. 3: Chapter 20)
Figure 20.1
Plan of Stratum G-2b
Mazar et. al. (2020 v.3) - Figure 20.2a
Plan of Stratum G-2a from Mazar et. al. (2020 v. 3: Chapter 20)
Figure 20.2a
Plan of Stratum G-2a
Mazar et. al. (2020 v.3) - Figure 20.2b
Plan of Stratum G-2a' from Mazar et. al. (2020 v. 3: Chapter 20)
Figure 20.2a
Plan of Stratum G-2a'
Mazar et. al. (2020 v.3) - Figure 20.3
Plan of wooden beams in the foundations of Stratum G-1 walls from Mazar et. al. (2020 v. 3: Chapter 20)
Figure 20.3
Plan of wooden beams in the foundations of Stratum G-1 walls
Mazar et. al. (2020 v.3) - Figure 20.4
Plan of Stratum G-1b from Mazar et. al. (2020 v. 3: Chapter 20)
Figure 20.4
Plan of Stratum G-1b
Mazar et. al. (2020 v.3) - Figure 20.5
Plan of Stratum G-1a from Mazar et. al. (2020 v. 3: Chapter 20)
Figure 20.5
Plan of Stratum G-1a
Mazar et. al. (2020 v.3)
- Table 20.1 -
Correlation of strata – Areas G and C from Mazar et. al. (2020 v. 3: Chapter 20)
Table 20.1
Correlation of strata – Areas G and C
Mazar et. al. (2020 v.3) - Table 20.2 -
Locus and basket numbers of Area G from Mazar et. al. (2020 v. 3: Chapter 20)
Table 20.2
Locus and basket numbers [of Area G]
Mazar et. al. (2020 v.3) - Figure 20.17 -
Section 10 from Mazar et. al. (2020 v. 3: Chapter 20)
Figure 20.17
Section 10 (Square Q/3, section below Wall 5018, looking north)
Mazar et. al. (2020 v.3) - Photo 20.1 -
Area G at the end of 2000 season, looking west from Mazar et. al. (2020 v. 3: Chapter 20)
Photo 20.1
Area G at the end of 2000 season, looking west
Mazar et. al. (2020 v.3)
Area G was located at the western edge of the lower mound, near the foot of the upper mound. The area occupies a small hillock, bordered on the north and the south by small ravines which presently serve as approach roads to the tell. The goals of excavating this area were:
- to examine the prominent small hill in that area in order to determine architectural or other features that caused this element, such as a city gate
- to examine the stratigraphic sequence and nature of settlement in this part of the tell.
The supervisors were Adi-Ziv Esudri (2000) and Naama Yahalom-Mack (2001, 2007).
The excavation in Area G uncovered an Iron Age IIA domestic area with two major strata, each divided into two sub-phases. Table 20.1 shows the stratigraphic correlation to Area C and to the general strata numbers in Tel Rehov. Table 20.2 specifies the locus and basket numbers given in the three seasons.
The large architectural units revealed in Stratum G-2 were part of larger buildings of unknown plans. An open courtyard in the eastern and northern parts of the area included many installations and storage pits; the walls were preserved to a height of up to 1.0 m and in Square Q/3, up to 2.0 m. The buildings of Stratum G-2 were abandoned in a similar way as those of Stratum VI in Areas B and C and the floors were found almost empty of finds. One possibility is that the buildings suffered from an earthquake; possible evidence for this can be seen in the severe tilt eastwards of Wall 5063 in Square Q/3 (Fig. 20.17). In Stratum G-1b, new buildings were constructed, which continued to be in use in Stratum G-1a with slight changes. Here too, only parts of buildings were excavated and no complete plan of a single building is known. In all strata, brick walls without stone foundations were the common building practice; only one wall attributed to Stratum G-1b (5040) had a stone foundation. Extensive use of wooden beams was made in the foundations of Stratum G-1b walls and floors, similar to the situation in Areas B and C. Stratum G-1a (Stratum IV) ended in violent destruction, evidenced in particular in Building GG in Squares P–Q/3.
- Table 20.1 -
Correlation of strata – Areas G and C from Mazar et. al. (2020 v. 3: Chapter 20)
Table 20.1
Correlation of strata – Areas G and C
Mazar et. al. (2020 v.3) - Figure 20.1 -
Plan of Stratum G-2b from Mazar et. al. (2020 v. 3: Chapter 20)
Figure 20.1
Plan of Stratum G-2b
Mazar et. al. (2020 v.3) - Figure 20.2a -
Plan of Stratum G-2a from Mazar et. al. (2020 v. 3: Chapter 20)
Figure 20.2a
Plan of Stratum G-2a
Mazar et. al. (2020 v.3) - Figure 20.2b -
Plan of Stratum G-2a' from Mazar et. al. (2020 v. 3: Chapter 20)
Figure 20.2a
Plan of Stratum G-2a'
Mazar et. al. (2020 v.3)
- Plans: Figs. 20.1–20.2
- Table 20.1 -
Correlation of strata – Areas G and C from Mazar et. al. (2020 v. 3: Chapter 20)
Table 20.1
Correlation of strata – Areas G and C
Mazar et. al. (2020 v.3) - Figure 20.1 -
Plan of Stratum G-2b from Mazar et. al. (2020 v. 3: Chapter 20)
Figure 20.1
Plan of Stratum G-2b
Mazar et. al. (2020 v.3) - Figure 20.2a -
Plan of Stratum G-2a from Mazar et. al. (2020 v. 3: Chapter 20)
Figure 20.2a
Plan of Stratum G-2a
Mazar et. al. (2020 v.3) - Figure 20.2b -
Plan of Stratum G-2a' from Mazar et. al. (2020 v. 3: Chapter 20)
Figure 20.2a
Plan of Stratum G-2a'
Mazar et. al. (2020 v.3) - Photo 20.1 -
Area G at the end of 2000 season, looking west from Mazar et. al. (2020 v. 3: Chapter 20)
Photo 20.1
Area G at the end of 2000 season, looking west
Mazar et. al. (2020 v.3) - Photo 20.2 -
Area G at the end of 2007 season, looking northwest from Mazar et. al. (2020 v. 3: Chapter 20)
Photo 20.2
Area G at the end of 2007 season, looking northwest
Mazar et. al. (2020 v.3) - Photo 20.3 -
Squares P–Q/4–5, looking north from Mazar et. al. (2020 v. 3: Chapter 20)
Photo 20.3
Squares P–Q/4–5, looking north.
- Left: Stratum G2a Building GB
- center left:Room 8045
-
upper left:
- Room 4039
- balk between Squares P–Q/5 and P–Q/4 in center
- bottom left: Wall 4070 of Stratum G-1
(2007)
Mazar et. al. (2020 v.3) - Photo 20.4 -
Collapsed mudbricks on left corner in G-2b Building GA from Mazar et. al. (2020 v. 3: Chapter 20)
Photo 20.4
Square P/5, looking north. Wall 5044 of G-2b Building GA
- to its left: Locus 8052 with loomweights
- right: Wall 5061 of G-2a Building GB (bird nest holes in section)
(2007)
JW: Collapsed mudbricks in left corner of room
Mazar et. al. (2020 v.3)
Floor 8052 and the various debris layers above it are attributed to Phase G-2b. It seems that Building GA went out of use in Phase G-2a, since an upper floor (4039, level 86.20 m) covered Wall 5044 and possibly also Wall 5061, although this could not be securely determined.
- Table 20.1 -
Correlation of strata – Areas G and C from Mazar et. al. (2020 v. 3: Chapter 20)
Table 20.1
Correlation of strata – Areas G and C
Mazar et. al. (2020 v.3) - Figure 20.1 -
Plan of Stratum G-2b from Mazar et. al. (2020 v. 3: Chapter 20)
Figure 20.1
Plan of Stratum G-2b
Mazar et. al. (2020 v.3) - Figure 20.2a -
Plan of Stratum G-2a from Mazar et. al. (2020 v. 3: Chapter 20)
Figure 20.2a
Plan of Stratum G-2a
Mazar et. al. (2020 v.3) - Figure 20.2b -
Plan of Stratum G-2a' from Mazar et. al. (2020 v. 3: Chapter 20)
Figure 20.2a
Plan of Stratum G-2a'
Mazar et. al. (2020 v.3)
- Table 20.1 -
Correlation of strata – Areas G and C from Mazar et. al. (2020 v. 3: Chapter 20)
Table 20.1
Correlation of strata – Areas G and C
Mazar et. al. (2020 v.3) - Figure 20.1 -
Plan of Stratum G-2b from Mazar et. al. (2020 v. 3: Chapter 20)
Figure 20.1
Plan of Stratum G-2b
Mazar et. al. (2020 v.3) - Figure 20.2a -
Plan of Stratum G-2a from Mazar et. al. (2020 v. 3: Chapter 20)
Figure 20.2a
Plan of Stratum G-2a
Mazar et. al. (2020 v.3) - Figure 20.2b -
Plan of Stratum G-2a' from Mazar et. al. (2020 v. 3: Chapter 20)
Figure 20.2a
Plan of Stratum G-2a'
Mazar et. al. (2020 v.3) - Photo 20.3 -
Squares P–Q/4–5, looking north from Mazar et. al. (2020 v. 3: Chapter 20)
Photo 20.3
Squares P–Q/4–5, looking north.
- Left: Stratum G2a Building GB
- center left:Room 8045
-
upper left:
- Room 4039
- balk between Squares P–Q/5 and P–Q/4 in center
- bottom left: Wall 4070 of Stratum G-1
(2007)
Mazar et. al. (2020 v.3) - Photo 20.8 -
G-2 Building GB from Mazar et. al. (2020 v. 3: Chapter 20)
Photo 20.8
Squares P–Q/4–5 looking west. G-2 Building GB with circular installations
(2007)
Mazar et. al. (2020 v.3) - Photo 20.10 -
G-2b and G-2a circular bins from Mazar et. al. (2020 v. 3: Chapter 20)
Photo 20.10
Square Q/4, detail of G-2b and G-2a circular bins
(2007)
Mazar et. al. (2020 v.3) - Photo 20.25 -
Square P/4 from Mazar et. al. (2020 v. 3: Chapter 20)
Photo 20.25
Square P/4, looking south at wooden beams 4071. Wall 5012 and projection to north; meter stick on G2a Locus 8023
(2000)
Mazar et. al. (2020 v.3)
In Square P/5, just east of Wall 5061, the top of a large completely preserved oven (8063) was exposed at 84.90 m, surrounded by a layer of black ash and brick debris (8062) excavated until level 84.84 m; the bottom of the oven and the related floor were not reached Above the accumulation in 8062 was a layer of brick debris (8036), sealed by a Phase G-2a floor (8035). In Square P/4, a floor (8054) was detected at level 85.50 m in the area enclosed by G-2a Walls 8055 and 8056. This was a reddish-brown clay floor with pottery and bones found on it. A layer of brick debris and chunks of collapsed bricks (8028) above this floor separated it from a higher floor (8023) attributed to Stratum G2a (Photo 20.25).
In the southern part of Square Q/4 was a beaten-earth floor (8041) which tilted drastically from east to west (85.34–85.74 m). Near the center of this area was a unique installation (8048) built of plastered bricks with a rounded hollow (Photos 20.3, 20.8). In the east, the floor had been disturbed and so it is not possible to determine whether or not it initially abutted Wall 8030. The attribution of this floor to either G-2b or G-2a, or to both, remains enigmatic. In the northern part of Square Q/4, a series of floors was found between levels 85.71– 86.27 m. The upper three were attributed to Phase G-2a (see below), while the lowest (8044 at level 85.71 m) was tentatively attributed to G-2b, although the separation between these two phases was not certain. Floor 8044 was made of clay, which differed from the matrix of Floor 8041 to its south, although they are at the same height and no architectural feature separated them. A plastered circular bin (8047), 0.55 m in diameter and 0.37 m deep, was related to this floor (Photo 20.10). It was perhaps the earliest in a series of such installations, mostly attributed to Phase G-2a, described below.
- Table 20.1 -
Correlation of strata – Areas G and C from Mazar et. al. (2020 v. 3: Chapter 20)
Table 20.1
Correlation of strata – Areas G and C
Mazar et. al. (2020 v.3) - Figure 20.1 -
Plan of Stratum G-2b from Mazar et. al. (2020 v. 3: Chapter 20)
Figure 20.1
Plan of Stratum G-2b
Mazar et. al. (2020 v.3) - Figure 20.2a -
Plan of Stratum G-2a from Mazar et. al. (2020 v. 3: Chapter 20)
Figure 20.2a
Plan of Stratum G-2a
Mazar et. al. (2020 v.3) - Figure 20.2b -
Plan of Stratum G-2a' from Mazar et. al. (2020 v. 3: Chapter 20)
Figure 20.2a
Plan of Stratum G-2a'
Mazar et. al. (2020 v.3) - Figure 20.3 -
Plan of wooden beams in the foundations of Stratum G-1 walls from Mazar et. al. (2020 v. 3: Chapter 20)
Figure 20.3
Plan of wooden beams in the foundations of Stratum G-1 walls
Mazar et. al. (2020 v.3) - Photo 20.2 -
Area G at the end of 2007 season, looking northwest from Mazar et. al. (2020 v. 3: Chapter 20)
Photo 20.2
Area G at the end of 2007 season, looking northwest
Mazar et. al. (2020 v.3) - Photo 20.5 -
Tilted Wall from Mazar et. al. (2020 v. 3: Chapter 20)
Photo 20.5
Squares P–Q/4–5, looking east.
- Right: G-1 Wall 5012
- center: balk
- center, right of balk: G-2a Walls 8055 and 8056
- meter stick on G-2a Floor 8023
(2007)
JW: Tilted wall just up frame from Wall 5044 G-2
Mazar et. al. (2020 v.3) - Photo 20.6 -
G-2 Building GB from Mazar et. al. (2020 v. 3: Chapter 20)
Photo 20.6
Square P/4 looking south. G-2 Building GB
- Wall 5061 (right)
- Wall 8055 (center)
- G-1 Wall 5012 (top)
- meter stick on G-2a Floor 8023
(2007)
Mazar et. al. (2020 v.3) - Photo 20.7 -
Building GA, G-2 Building GB, and Building GC from Mazar et. al. (2020 v. 3: Chapter 20)
Photo 20.7
Squares P–Q/5-6, looking northwest.
- Center: Wall 5064 of G-2 Building GB
- far left: Building GA
- right: installations and floor in courtyard
- upper right: Building GC
(2007)
Mazar et. al. (2020 v.3) - Photo 20.8 -
G-2 Building GB from Mazar et. al. (2020 v. 3: Chapter 20)
Photo 20.8
Squares P–Q/4–5 looking west. G-2 Building GB with circular installations
(2007)
Mazar et. al. (2020 v.3) - Photo 20.9 -
Wall 5064 and G-2a courtyard from Mazar et. al. (2020 v. 3: Chapter 20)
Photo 20.9
Square Q/5, looking west. Top: Wall 5064 and G-2a courtyard with ovens and installations
Mazar et. al. (2020 v.3) - Photo 20.10 -
G-2b and G-2a circular bins from Mazar et. al. (2020 v. 3: Chapter 20)
Photo 20.10
Square Q/4, detail of G-2b and G-2a circular bins
(2007)
Mazar et. al. (2020 v.3) - Photo 20.16 -
Squares Q–P/3–4 from Mazar et. al. (2020 v. 3: Chapter 20)
Photo 20.16
Squares Q–P/3–4, looking west.
- Right: G-2a circular installations
- front left: G-2b Floor 8046 (deepest excavated point)
- front center: G-2 Building GD
(2007)
Mazar et. al. (2020 v.3)
Room 8035, bounded by Walls 5061, 8064, 5064 and 8055, had inner dimensions of 2.35×6.55 m (Photo 20.7). The floor (8035) was at level 85.60 m, at least 0.75 m (and perhaps more) above the assumed floor of G-2b in the same place.
In Square P/4, a corner of two short walls (8055 and 8056; Photos 20.5–20.6) created a small room with an entrance leading from Room 8035 to its north. A floor in this room (8023), located at level 85.64 m, was sealed by the brick platform (5069) of Stratum G-1b. Wooden beams (4071) found close to the top of the walls of this room at levels 85.82– 85.92 m (Fig. 20.3) were related to the construction of Stratum G-1b.
The area east of Wall 5064, bounded on the south by Wall 8039 in Squares P–Q/3 and on the east by Wall 8030 in Square Q/4, served as a spacious courtyard, ca. 4.0–4.5 m wide and up to 13 m long (if continuing until Wall 4029 in Square Q/6 on the north). In fact, in Square Q/6, this open area continued to the west, thus creating an L-shaped open space.
In Squares Q/4–5, several plastered surfaces were identified, alongside other floor types, with some 13 related installations that were not all used contemporaneously; note an additional one (8047) that was attributed to Phase G-2b (see above). The installations comprise mainly two types: plastered circular or oval bins and clay ovens (Table 20.3; Photos 20.2, 20.7–20.10, 20.16).
In Square Q/4, three superimposed plaster floors (8053 at level 85.76 m, 8024 at level 86.07 m and 8008 at level 86.27 m) were exposed above the earlier floor (8044) attributed to Phase G-2b. The floors were exposed mainly in the northern half of the square, with three related plastered bins (8060, 8051, 8059) and a single poorly preserved oven (8025). The plastered bins were exposed between 85.99 and 85.88 m, while the oven was exposed at level 86.19 m (Photos 20.8, 20.10). In the southern half of the square, only one floor was detected (8041), sloping from east to west; it was attributed to Stratum G-2b, yet probably continued to be in use in G-2a.
In Square Q-5, two superimposed plaster floors were exposed between levels 86.28 and 85.98 m. Related to these floors were four circular bins and two superimposed ovens (Table 20.3; Photos 20.7– 20.9). None of the floors clearly abutted the poorly preserved Wall 5064.
Small circular bins of the type found here (as well as in Squares P–Q/6; see below) were also found in Areas B (Chapter 8) and E (Chapter 17). Their capacity was ca. 10 liters or slightly more; thus, the seven bins found in these two squares may have been used for storing ca. 70–100 liters, perhaps of grain used for baking in the three ovens found nearby. However, it was difficult to attribute these installations to each of the several floor surfaces found here and thus, it remains unknown whether all of them served at the same time. At least in one instance, it seems that there was subphasing here, where Oven 4074 cut Oven 4084. In any case, this appears to have been an area used for intensive baking.
- Table 20.1 -
Correlation of strata – Areas G and C from Mazar et. al. (2020 v. 3: Chapter 20)
Table 20.1
Correlation of strata – Areas G and C
Mazar et. al. (2020 v.3) - Figure 20.1 -
Plan of Stratum G-2b from Mazar et. al. (2020 v. 3: Chapter 20)
Figure 20.1
Plan of Stratum G-2b
Mazar et. al. (2020 v.3) - Figure 20.2a -
Plan of Stratum G-2a from Mazar et. al. (2020 v. 3: Chapter 20)
Figure 20.2a
Plan of Stratum G-2a
Mazar et. al. (2020 v.3) - Figure 20.2b -
Plan of Stratum G-2a' from Mazar et. al. (2020 v. 3: Chapter 20)
Figure 20.2a
Plan of Stratum G-2a'
Mazar et. al. (2020 v.3) - Photo 20.12 -
G-2a courtyard, G-2 Building GC, and G-1 Building GF from Mazar et. al. (2020 v. 3: Chapter 20)
Photo 20.12
- Right: Squares P–Q/5–6, looking east.
- Lower left: G-2a courtyard with related circular bins in Square P/6
- background left: G-2 Building GC, Room 4050
- right: G-1 Building GF Walls 4014 and 4017
(2000)
Mazar et. al. (2020 v.3) - Photo 20.13 -
Stratum G-2a Square P/6 and Building GC from Mazar et. al. (2020 v. 3: Chapter 20)
Photo 20.13
Square P/6, looking down at floors and circular bins attributed to Stratum G-2a; lower left: Building GC
(2000)
Mazar et. al. (2020 v.3) - Photo 20.14 -
Stratum G-2a Floors 4016 and 5004 from Mazar et. al. (2020 v. 3: Chapter 20)
Photo 20.14
Square P/6, looking east at Floors 4016 and 5004 and circular bins attributed to Stratum G-2a
(2000)
Mazar et. al. (2020 v.3)
The lowest floor found here in Square P/6 was a clay floor (5050) at level 85.46 m. It was covered by a 0.15 m-deep accumulation containing sherds and bones (5036); the latter was covered by a brick debris layer (5043). These layers were all attributed to Stratum G-2b, since they were lower than Floors 5026 and 5004 and the installations of Phase G-2a.
In the eastern part of the square, a floor comprised of striations (5004 and 5026 to its north) was found above G-2b layer 5021, between levels 85.92–86.28 m; the top of this layer (4016) appeared to be a continuation of Floor 4022 in Square Q/6 (level 86.28 m). No floor could be identified in the western part of the square (4011, 4012).
In Square Q/6, excavation stopped at the level of the uppermost floor (4022) (level 86.30 m); the floor was exposed over most of the square, comprising patches of grayish-white plaster and beaten earth with pottery sherds mixed with small stones.
Eleven bins of various sizes were found in this area, four in Square Q/6 and seven in Square P/6 (Table 20.4, Photos 20.12–20.14). Most of these were exposed along one line in the central part of Square P/6, while the others were scattered along the southern part of Squares P–Q/6 and one was located in Building GC. The definition of these installations as bins is the most reasonable one, although they could have been used for other purposes as well, such as for some industrial activity that was conducted in the courtyard.
These plaster-lined installations were cut into the floor. They were oval to round, with a diameter of 0.45–0.70 m (except 4018, which was 1.2 in diameter) and a depth of 0.30–0.38 m, although the state of preservation does not allow an exact measurement. Thus, the average capacity of the smaller bins was ca. 33 liters (based on an average diameter of 0.55 m and depth of 0.35 m). All were lined with a very friable greyish-white plaster. The thickness of the walls was 0.02–0.04 m, aside from reinforcements which were added where two neighboring bins were close together. These installations contained grayish earth mixed with light-colored brick debris, as well as a few sherds, flint fragments and bones; no grain or organic materials were recovered.
Like in Squares Q/4–5, the bins marked several successive construction phases and thus, not all of them were in use at the same time. Three (4008, 4009, 5009) appear to be contemporary and earlier than the others (Photos 20.12–20.14). They were all exposed at approximately level 86.20 m; Bins 4008 and 4009 share a wall. Bin 4008 appears to cut into a very poorly preserved wall or built installation (5014, not on the plan), chipped along its southern face, of which only one course was preserved.
Bin 4010 abutted 4019 on the west and appears to be contemporary with it, while 4019 cut into 4009 and thus replaced it. Bin 4018 was the largest (diameter 1.2 m) and latest of all, as it cut into 4010; it was 0.96 m deep. Its walls were plastered and it contained crumbly grayish-brown earth mixed with pieces of brick, as well as many sherds, flint, bones, shells and some charcoal. In the eastern side of Square P/6, Bin 4032 (Fig. 20.8) was 0.9 m wide; it may have been contemporary with the large bin (4018).
At least two successive floors were located in Square P/6 (5004, 4016) above Floor 5050 of Phase G-2b. They were difficult to trace, but were identifiable by their related plastered installations. Contemporary Bins 5009, 4008 and 4009 apparently were related to the earliest floor. Installations 4019, 4010 and 4032 were possibly contemporary and related to a later floor. Bin 4018, which was larger than the others, apparently coexisted with the similar installation (4032) near the eastern balk of the square and was related to the latest floor.
The attribution of these installations and floors to Stratum G-2a was based on their levels compared to similar remains in Square Q/5. However, it should be noted that the building remains and installations in Squares P–Q/6 were exposed below topsoil, with no stratigraphic elements above them. Their attribution to Stratum G-2a means that Stratum G-1 was completely eroded away in Squares P–Q/6. Indeed, Wall 4014 of G-1a–b in Square P/5 was founded at its northern end at level 86.48 m, which was higher than the bins and Building GC. The continuation of Wall 4014 and other elements of G-1a in Squares P–Q/6 were eroded away and thus, Squares P–Q/6 are not shown on the plans of Stratum G-1a–b.
- Table 20.1 -
Correlation of strata – Areas G and C from Mazar et. al. (2020 v. 3: Chapter 20)
Table 20.1
Correlation of strata – Areas G and C
Mazar et. al. (2020 v.3) - Figure 20.1 -
Plan of Stratum G-2b from Mazar et. al. (2020 v. 3: Chapter 20)
Figure 20.1
Plan of Stratum G-2b
Mazar et. al. (2020 v.3) - Figure 20.2a -
Plan of Stratum G-2a from Mazar et. al. (2020 v. 3: Chapter 20)
Figure 20.2a
Plan of Stratum G-2a
Mazar et. al. (2020 v.3) - Figure 20.2b -
Plan of Stratum G-2a' from Mazar et. al. (2020 v. 3: Chapter 20)
Figure 20.2a
Plan of Stratum G-2a'
Mazar et. al. (2020 v.3) - Photo 20.1 -
Area G at the end of 2000 season, looking west from Mazar et. al. (2020 v. 3: Chapter 20)
Photo 20.1
Area G at the end of 2000 season, looking west
Mazar et. al. (2020 v.3) - Photo 20.13 -
Stratum G-2a Square P/6 and Building GC from Mazar et. al. (2020 v. 3: Chapter 20)
Photo 20.13
Square P/6, looking down at floors and circular bins attributed to Stratum G-2a; lower left: Building GC
(2000)
Mazar et. al. (2020 v.3) - Photo 20.15 -
Building GC from Mazar et. al. (2020 v. 3: Chapter 20)
Photo 20.15
Square Q/6, looking east at Building GC
(2000)
Mazar et. al. (2020 v.3)
Like the open space and installations to the west and south in Squares P–Q/6, Building GC was exposed immediately below topsoil, with no later stratigraphic features, and its attribution to Stratum G-2 was based on its relation to the open space to its south.
- Table 20.1 -
Correlation of strata – Areas G and C from Mazar et. al. (2020 v. 3: Chapter 20)
Table 20.1
Correlation of strata – Areas G and C
Mazar et. al. (2020 v.3) - Figure 20.1 -
Plan of Stratum G-2b from Mazar et. al. (2020 v. 3: Chapter 20)
Figure 20.1
Plan of Stratum G-2b
Mazar et. al. (2020 v.3) - Figure 20.2a -
Plan of Stratum G-2a from Mazar et. al. (2020 v. 3: Chapter 20)
Figure 20.2a
Plan of Stratum G-2a
Mazar et. al. (2020 v.3) - Figure 20.2b -
Plan of Stratum G-2a' from Mazar et. al. (2020 v. 3: Chapter 20)
Figure 20.2a
Plan of Stratum G-2a'
Mazar et. al. (2020 v.3)
- Table 20.1 -
Correlation of strata – Areas G and C from Mazar et. al. (2020 v. 3: Chapter 20)
Table 20.1
Correlation of strata – Areas G and C
Mazar et. al. (2020 v.3) - Figure 20.1 -
Plan of Stratum G-2b from Mazar et. al. (2020 v. 3: Chapter 20)
Figure 20.1
Plan of Stratum G-2b
Mazar et. al. (2020 v.3) - Figure 20.2a -
Plan of Stratum G-2a from Mazar et. al. (2020 v. 3: Chapter 20)
Figure 20.2a
Plan of Stratum G-2a
Mazar et. al. (2020 v.3) - Figure 20.2b -
Plan of Stratum G-2a' from Mazar et. al. (2020 v. 3: Chapter 20)
Figure 20.2a
Plan of Stratum G-2a'
Mazar et. al. (2020 v.3) - Photo 20.20 -
Tilted G-2 Wall 4081 from Mazar et. al. (2020 v. 3: Chapter 20)
Photo 20.20
Square P/3, looking east. Meter stick leaning on G-2 Wall 4081; upper left: G-1 Wall 4047; note two phases in this wall
(2007)
JW: Also note that G-2 Wall 4081 is strongly tilted
Mazar et. al. (2020 v.3) - Photo 20.21 -
Closeup on Tilted G-2 Wall 4081 from Mazar et. al. (2020 v. 3: Chapter 20)
Photo 20.21
Square P/3, looking south. Meter stick leaning on G-2 Wall 4081; right: G-2a Floor 4087
(2007)
JW: G-2 Wall 4081 is tilted
Mazar et. al. (2020 v.3)
Inside this room was a layer of brick collapse (8038) that was exposed down to level 85.28 m. This locus was attributed to Stratum G-2b, although a floor was not reached. A higher patchy floor in this room (4090) at level 85.66 m is attributed to Stratum G-2a.
- Table 20.1 -
Correlation of strata – Areas G and C from Mazar et. al. (2020 v. 3: Chapter 20)
Table 20.1
Correlation of strata – Areas G and C
Mazar et. al. (2020 v.3) - Figure 20.1 -
Plan of Stratum G-2b from Mazar et. al. (2020 v. 3: Chapter 20)
Figure 20.1
Plan of Stratum G-2b
Mazar et. al. (2020 v.3) - Figure 20.2a -
Plan of Stratum G-2a from Mazar et. al. (2020 v. 3: Chapter 20)
Figure 20.2a
Plan of Stratum G-2a
Mazar et. al. (2020 v.3) - Figure 20.2b -
Plan of Stratum G-2a' from Mazar et. al. (2020 v. 3: Chapter 20)
Figure 20.2a
Plan of Stratum G-2a'
Mazar et. al. (2020 v.3) - Photo 20.20 -
Tilted G-2 Wall 4081 from Mazar et. al. (2020 v. 3: Chapter 20)
Photo 20.20
Square P/3, looking east. Meter stick leaning on G-2 Wall 4081; upper left: G-1 Wall 4047; note two phases in this wall
(2007)
JW: Also note that G-2 Wall 4081 is strongly tilted
Mazar et. al. (2020 v.3) - Photo 20.21 -
Closeup on Tilted G-2 Wall 4081 from Mazar et. al. (2020 v. 3: Chapter 20)
Photo 20.21
Square P/3, looking south. Meter stick leaning on G-2 Wall 4081; right: G-2a Floor 4087
(2007)
JW: G-2 Wall 4081 is tilted
Mazar et. al. (2020 v.3)
A new floor (4087), beaten-earth and ash, was laid at 85.61 m; it did not clearly abut Wall 4081. This floor is attributed to Stratum G-2a, but might be related to Stratum G-1 Building GG, since destruction layer 4065 of that building is directly above it.
- Table 20.1 -
Correlation of strata – Areas G and C from Mazar et. al. (2020 v. 3: Chapter 20)
Table 20.1
Correlation of strata – Areas G and C
Mazar et. al. (2020 v.3) - Figure 20.1 -
Plan of Stratum G-2b from Mazar et. al. (2020 v. 3: Chapter 20)
Figure 20.1
Plan of Stratum G-2b
Mazar et. al. (2020 v.3) - Figure 20.2a -
Plan of Stratum G-2a from Mazar et. al. (2020 v. 3: Chapter 20)
Figure 20.2a
Plan of Stratum G-2a
Mazar et. al. (2020 v.3) - Figure 20.2b -
Plan of Stratum G-2a' from Mazar et. al. (2020 v. 3: Chapter 20)
Figure 20.2a
Plan of Stratum G-2a'
Mazar et. al. (2020 v.3) - Figure 20.7 -
Superposition of walls in Area G with location of section drawings from Mazar et. al. (2020 v. 3: Chapter 20)
Figure 20.7
Superposition of walls in Area G with location of section drawings
Mazar et. al. (2020 v.3) - Figure 20.17 -
Section 10 from Mazar et. al. (2020 v. 3: Chapter 20)
Figure 20.17
Section 10 (Square Q/3, section below Wall 5018, looking north)
Mazar et. al. (2020 v.3) - Figure 20.18 -
Section 11 from Mazar et. al. (2020 v. 3: Chapter 20)
Figure 20.18
Section 11 (Square Q/3, looking east; wall above Wall 5062 was seen only in section, attributed to G-1b, unnumbered)
Mazar et. al. (2020 v.3) - Photo 20.1 -
Area G at the end of 2000 season, looking west from Mazar et. al. (2020 v. 3: Chapter 20)
Photo 20.1
Area G at the end of 2000 season, looking west
Mazar et. al. (2020 v.3) - Photo 20.2 -
Area G at the end of 2007 season, looking northwest from Mazar et. al. (2020 v. 3: Chapter 20)
Photo 20.2
Area G at the end of 2007 season, looking northwest
Mazar et. al. (2020 v.3) - Photo 20.16 -
Squares Q–P/3–4 from Mazar et. al. (2020 v. 3: Chapter 20)
Photo 20.16
Squares Q–P/3–4, looking west.
- Right: G-2a circular installations
- front left: G-2b Floor 8046 (deepest excavated point)
- front center: G-2 Building GD
(2007)
Mazar et. al. (2020 v.3) - Photo 20.17 -
Squares Q–P/3–4 from Mazar et. al. (2020 v. 3: Chapter 20)
Photo 20.17
Squares Q–P/3–4, looking north. Center: G-1 Wall 5012
(2007)
Mazar et. al. (2020 v.3) - Photo 20.18 -
Square Q/3 from Mazar et. al. (2020 v. 3: Chapter 20)
Photo 20.18
Square Q/3, northeastern corner, looking north. Upper left: G-1a Wall 5008 with brick debris (5011) above layer of charred wood (5029); G-2a–b layers below the G-1a destruction debris
(2007)
Mazar et. al. (2020 v.3)
In the northern room, a clear distinction between Strata G-2b and G-2a could be made (Figs. 20.17–20.18; Photo 20.18). The lowest layer reached was a beaten-earth floor (8046) exposed in a small area at level 84.16 m, which appeared to abut the foundation of Walls 5062 and 5063. This floor was covered by a layer of small chunks of brick debris (8040) and a higher layer of large collapsed bricks (8018). Note that the floor in Room 8046 was much lower than the surrounding floors of the same phase, 8041/8044 in Square Q/4 west of Wall 8030, as well as Floor 8017 to the south. Thus, it may be suggested that Room 8046 was, to some extent, subterranean.
In Phase G-2a, new floor composed of soft red and gray striations (5053) accumulated between levels 85.00–85.68 m, sloping to the north and sealing the earlier brick collapse (Figs. 20.17– 20.18; Photo 20.18). Many pottery sherds (some restorable) were found here (Figs. 21.6–21.7), as well as three clay loomweights.
In the southern room, a series of at least three successive floors (8017) attributed to Stratum G-2b was found at levels 84.95–85.35 m; a soft brown floor, a reddish floor and a grey floor with bits of plaster and ash, all containing many sherds, bones and olive pits. The highest floor was covered by a layer of brick debris (8004). A patchy clay floor (5047) at level 85.69 m covering the brick debris layer was attributed to Stratum G-2a. Its relation to Walls 5063 and 5062 was insecure, although very likely.
- Table 20.1 -
Correlation of strata – Areas G and C from Mazar et. al. (2020 v. 3: Chapter 20)
Table 20.1
Correlation of strata – Areas G and C
Mazar et. al. (2020 v.3) - Figure 20.1 -
Plan of Stratum G-2b from Mazar et. al. (2020 v. 3: Chapter 20)
Figure 20.1
Plan of Stratum G-2b
Mazar et. al. (2020 v.3) - Figure 20.2a -
Plan of Stratum G-2a from Mazar et. al. (2020 v. 3: Chapter 20)
Figure 20.2a
Plan of Stratum G-2a
Mazar et. al. (2020 v.3) - Figure 20.2b -
Plan of Stratum G-2a' from Mazar et. al. (2020 v. 3: Chapter 20)
Figure 20.2a
Plan of Stratum G-2a'
Mazar et. al. (2020 v.3) - Photo 20.22 -
Squares P–Q/5 from Mazar et. al. (2020 v. 3: Chapter 20)
Photo 20.22
Squares P–Q/5, looking south at remains in G-1 Building GF; center: G-1 Walls 4014 and 4017 and wooden beams (4031, 4020)
(2000)
Mazar et. al. (2020 v.3) - Photo 20.23 -
Squares P–Q/5 from Mazar et. al. (2020 v. 3: Chapter 20)
Photo 20.23
Squares P–Q/5, looking southwest, detail of Photo 20.22
(2000)
Mazar et. al. (2020 v.3)
- Table 20.1 -
Correlation of strata – Areas G and C from Mazar et. al. (2020 v. 3: Chapter 20)
Table 20.1
Correlation of strata – Areas G and C
Mazar et. al. (2020 v.3) - Figure 20.3 -
Plan of wooden beams in the foundations of Stratum G-1 walls from Mazar et. al. (2020 v. 3: Chapter 20)
Figure 20.3
Plan of wooden beams in the foundations of Stratum G-1 walls
Mazar et. al. (2020 v.3) - Figure 20.4 -
Plan of Stratum G-1b from Mazar et. al. (2020 v. 3: Chapter 20)
Figure 20.4
Plan of Stratum G-1b
Mazar et. al. (2020 v.3) - Figure 20.5 -
Plan of Stratum G-1a from Mazar et. al. (2020 v. 3: Chapter 20)
Figure 20.5
Plan of Stratum G-1a
Mazar et. al. (2020 v.3)
- Plans: Figs. Figs. 20.3–20.5
Two major architectural units were detected: Building GF in the central and northern part of the area and Building GG in the southern part, separated by a double wall (4047/5012). The eastern wall of the northern building (5017) was attached to another wall (5018), which probably belonged to an adjacent building to the east, beyond the limits of the excavation area. In the southwestern part of Area G, erosion destroyed much of Building GG.
In Building GG, very few changes were made between Strata G-1a and G-1b. The building was destroyed in G-1a by heavy fire, probably corresponding to the destruction of Stratum C-1a in Area C and E-1a in Area E. In Building GF, distinctions between the two strata could be observed in several cases, but since no violent destruction layer was detected, it might be conjectured that most of the Stratum G-1a floors in this building were eroded away, although this remains an open question. As noted above, building remains of Stratum G-1 were eroded away in Squares P–Q/6, the floors were almost completely eroded away in Squares P–Q/5, and erosion also destroyed the G-1 structures in the southwestern corner of the area in Square P/3.
- Table 20.1 -
Correlation of strata – Areas G and C from Mazar et. al. (2020 v. 3: Chapter 20)
Table 20.1
Correlation of strata – Areas G and C
Mazar et. al. (2020 v.3) - Figure 20.3 -
Plan of wooden beams in the foundations of Stratum G-1 walls from Mazar et. al. (2020 v. 3: Chapter 20)
Figure 20.3
Plan of wooden beams in the foundations of Stratum G-1 walls
Mazar et. al. (2020 v.3) - Figure 20.4 -
Plan of Stratum G-1b from Mazar et. al. (2020 v. 3: Chapter 20)
Figure 20.4
Plan of Stratum G-1b
Mazar et. al. (2020 v.3) - Figure 20.5 -
Plan of Stratum G-1a from Mazar et. al. (2020 v. 3: Chapter 20)
Figure 20.5
Plan of Stratum G-1a
Mazar et. al. (2020 v.3) - Photo 20.22 -
Squares P–Q/5 from Mazar et. al. (2020 v. 3: Chapter 20)
Photo 20.22
Squares P–Q/5, looking south at remains in G-1 Building GF; center: G-1 Walls 4014 and 4017 and wooden beams (4031, 4020)
(2000)
Mazar et. al. (2020 v.3) - Photo 20.23 -
Squares P–Q/5 from Mazar et. al. (2020 v. 3: Chapter 20)
Photo 20.23
Squares P–Q/5, looking southwest, detail of Photo 20.22
(2000)
Mazar et. al. (2020 v.3) - Photo 20.24 -
Square P/5 from Mazar et. al. (2020 v. 3: Chapter 20)
Photo 20.24
Square P/5, looking east at detail of wooden beams 4020, east of Wall 4014 and below Wall 4017
(2000)
Mazar et. al. (2020 v.3) - Photo 20.25 -
Square P/4 from Mazar et. al. (2020 v. 3: Chapter 20)
Photo 20.25
Square P/4, looking south at wooden beams 4071. Wall 5012 and projection to north; meter stick on G2a Locus 8023
(2000)
Mazar et. al. (2020 v.3) - Photo 20.26 -
Square P/4 from Mazar et. al. (2020 v. 3: Chapter 20)
Photo 20.26
Square P/4, looking west at double wall 5012/4047, with wooden beams 4066 to its north
(2007)
Mazar et. al. (2020 v.3) - Photo 20.27 -
Squares Q–P/4 from Mazar et. al. (2020 v. 3: Chapter 20)
Photo 20.27
Squares Q–P/4, looking south at Wall 5012 and section below it. Note thick layer of wooden beams below the wall; foreground: G-2b Installation 8048
(2007)
Mazar et. al. (2020 v.3) - Photo 20.28 -
Square P/4 from Mazar et. al. (2020 v. 3: Chapter 20)
Photo 20.28
Square P/4, looking south at G-1 Wall 5012 and section below it. Note thick layer of wooden beams below the wall; foreground: G-2b Floor 8054 (2007)
(2007)
Mazar et. al. (2020 v.3) - Photo 20.29 -
Square Q/4 from Mazar et. al. (2020 v. 3: Chapter 20)
Photo 20.29
Square Q/4, looking east at G-1 Wall 5017, with wooden beams in its foundation
Mazar et. al. (2020 v.3) - Photo 20.30 -
Square P/5 from Mazar et. al. (2020 v. 3: Chapter 20)
Photo 20.30
Square P/5, looking east at G-1 Wall 4014, with wooden beams in its foundation
(2000)
Mazar et. al. (2020 v.3)
- Table 20.1 -
Correlation of strata – Areas G and C from Mazar et. al. (2020 v. 3: Chapter 20)
Table 20.1
Correlation of strata – Areas G and C
Mazar et. al. (2020 v.3) - Figure 20.3 -
Plan of wooden beams in the foundations of Stratum G-1 walls from Mazar et. al. (2020 v. 3: Chapter 20)
Figure 20.3
Plan of wooden beams in the foundations of Stratum G-1 walls
Mazar et. al. (2020 v.3) - Figure 20.4 -
Plan of Stratum G-1b from Mazar et. al. (2020 v. 3: Chapter 20)
Figure 20.4
Plan of Stratum G-1b
Mazar et. al. (2020 v.3) - Figure 20.5 -
Plan of Stratum G-1a from Mazar et. al. (2020 v. 3: Chapter 20)
Figure 20.5
Plan of Stratum G-1a
Mazar et. al. (2020 v.3) - Figure 20.10 -
Section 3 from Mazar et. al. (2020 v. 3: Chapter 20)
Figure 20.10
Section 3 (Square P/5, Walls 5044 and 4014, looking east)
Mazar et. al. (2020 v.3) - Photo 20.22 -
Squares P–Q/5 from Mazar et. al. (2020 v. 3: Chapter 20)
Photo 20.22
Squares P–Q/5, looking south at remains in G-1 Building GF; center: G-1 Walls 4014 and 4017 and wooden beams (4031, 4020)
(2000)
Mazar et. al. (2020 v.3) - Photo 20.23 -
Squares P–Q/5 from Mazar et. al. (2020 v. 3: Chapter 20)
Photo 20.23
Squares P–Q/5, looking southwest, detail of Photo 20.22
(2000)
Mazar et. al. (2020 v.3) - Photo 20.24 -
Square P/5 from Mazar et. al. (2020 v. 3: Chapter 20)
Photo 20.24
Square P/5, looking east at detail of wooden beams 4020, east of Wall 4014 and below Wall 4017
(2000)
Mazar et. al. (2020 v.3) - Photo 20.30 -
Square P/5 from Mazar et. al. (2020 v. 3: Chapter 20)
Photo 20.30
Square P/5, looking east at G-1 Wall 4014, with wooden beams in its foundation
(2000)
Mazar et. al. (2020 v.3)
It should be noted that when the poorly preserved bricks of Wall 4014 were dismantled, a 0.5 m-thick layer of burnt orange brick debris was revealed, separating the wall from the wooden beams described above (Fig. 20.10). This raised questions as to the relationship of the wooden beams to the construction of the wall; however, since the connection of the beams to other G-1 walls was established with great certainty, we maintain that Wall 4014 was supported by the wooden beams and that this crumbly brick layer was created during the heavy conflagration which strongly affected the lowest brick courses of the wall, because of its proximity to the wood.
- Table 20.1 -
Correlation of strata – Areas G and C from Mazar et. al. (2020 v. 3: Chapter 20)
Table 20.1
Correlation of strata – Areas G and C
Mazar et. al. (2020 v.3) - Figure 20.3 -
Plan of wooden beams in the foundations of Stratum G-1 walls from Mazar et. al. (2020 v. 3: Chapter 20)
Figure 20.3
Plan of wooden beams in the foundations of Stratum G-1 walls
Mazar et. al. (2020 v.3) - Figure 20.4 -
Plan of Stratum G-1b from Mazar et. al. (2020 v. 3: Chapter 20)
Figure 20.4
Plan of Stratum G-1b
Mazar et. al. (2020 v.3) - Figure 20.5 -
Plan of Stratum G-1a from Mazar et. al. (2020 v. 3: Chapter 20)
Figure 20.5
Plan of Stratum G-1a
Mazar et. al. (2020 v.3) - Photo 20.11 -
Squares Q–P/3–4 looking southwest from Mazar et. al. (2020 v. 3: Chapter 20)
Photo 20.11
Squares Q–P/3–4 looking southwest. Right: Wall 4083 (with bucket) and G-1b Platform 5069
(2007)
Mazar et. al. (2020 v.3)
- Table 20.1 -
Correlation of strata – Areas G and C from Mazar et. al. (2020 v. 3: Chapter 20)
Table 20.1
Correlation of strata – Areas G and C
Mazar et. al. (2020 v.3) - Figure 20.3 -
Plan of wooden beams in the foundations of Stratum G-1 walls from Mazar et. al. (2020 v. 3: Chapter 20)
Figure 20.3
Plan of wooden beams in the foundations of Stratum G-1 walls
Mazar et. al. (2020 v.3) - Figure 20.4 -
Plan of Stratum G-1b from Mazar et. al. (2020 v. 3: Chapter 20)
Figure 20.4
Plan of Stratum G-1b
Mazar et. al. (2020 v.3) - Figure 20.5 -
Plan of Stratum G-1a from Mazar et. al. (2020 v. 3: Chapter 20)
Figure 20.5
Plan of Stratum G-1a
Mazar et. al. (2020 v.3) - Figure 20.16 -
Section 9 from Mazar et. al. (2020 v. 3: Chapter 20)
Figure 20.16
Section 9 (Squares P–Q/3, Wall 4047 with wooden beams, looking north)
Mazar et. al. (2020 v.3) - Photo 20.25 -
Square P/4 from Mazar et. al. (2020 v. 3: Chapter 20)
Photo 20.25
Square P/4, looking south at wooden beams 4071. Wall 5012 and projection to north; meter stick on G2a Locus 8023
(2000)
Mazar et. al. (2020 v.3) - Photo 20.26 -
Square P/4 from Mazar et. al. (2020 v. 3: Chapter 20)
Photo 20.26
Square P/4, looking west at double wall 5012/4047, with wooden beams 4066 to its north
(2007)
Mazar et. al. (2020 v.3) - Photo 20.31 -
Tilted G-1b Wall 4047 from Mazar et. al. (2020 v. 3: Chapter 20)
Photo 20.31
Squares P–Q/3, looking north. Top: Wall 4047 with wooden beams in its foundation; note two possible phases in this wall; bottom: G-1 Installation 4064 on top of G-2 Wall 4081
(2007)
JW: G-1b Wall 4047 is tilted. Wall 5008 also looks tilted.
Mazar et. al. (2020 v.3)
In the northeastern corner of the square was a layer of beams laid at a northeastern–southeastern orientation (4071, between 86.53–86.29 m) that was the continuation of the southern group of beams (4020) in Square P/5, described above (Photo 20.25). Two elongated beams were located just on top of G-2 Wall 5061 at levels 86.03–86.28 m, serving as a foundation for the new wall (4070) built on the same line. West of this wall was a group of five beams which were perpendicular to the wall at level 86.00 m, probably serving as foundation for a floor that was not preserved in the small area that was excavated.
Wooden beams were also found in the foundation of Wall 4047, which created a double wall with Wall 5012, mentioned above (Fig. 20.16; Photo 20.31).
- Table 20.1 -
Correlation of strata – Areas G and C from Mazar et. al. (2020 v. 3: Chapter 20)
Table 20.1
Correlation of strata – Areas G and C
Mazar et. al. (2020 v.3) - Figure 20.3 -
Plan of wooden beams in the foundations of Stratum G-1 walls from Mazar et. al. (2020 v. 3: Chapter 20)
Figure 20.3
Plan of wooden beams in the foundations of Stratum G-1 walls
Mazar et. al. (2020 v.3) - Figure 20.4 -
Plan of Stratum G-1b from Mazar et. al. (2020 v. 3: Chapter 20)
Figure 20.4
Plan of Stratum G-1b
Mazar et. al. (2020 v.3) - Figure 20.5 -
Plan of Stratum G-1a from Mazar et. al. (2020 v. 3: Chapter 20)
Figure 20.5
Plan of Stratum G-1a
Mazar et. al. (2020 v.3) - Figure 20.13 -
Section 6 from Mazar et. al. (2020 v. 3: Chapter 20)
Figure 20.13
Section 6 (Square Q/4, Wall 5018 and wooden beams, looking east)
Mazar et. al. (2020 v.3)
- Table 20.1 -
Correlation of strata – Areas G and C from Mazar et. al. (2020 v. 3: Chapter 20)
Table 20.1
Correlation of strata – Areas G and C
Mazar et. al. (2020 v.3) - Figure 20.3 -
Plan of wooden beams in the foundations of Stratum G-1 walls from Mazar et. al. (2020 v. 3: Chapter 20)
Figure 20.3
Plan of wooden beams in the foundations of Stratum G-1 walls
Mazar et. al. (2020 v.3) - Figure 20.4 -
Plan of Stratum G-1b from Mazar et. al. (2020 v. 3: Chapter 20)
Figure 20.4
Plan of Stratum G-1b
Mazar et. al. (2020 v.3) - Figure 20.5 -
Plan of Stratum G-1a from Mazar et. al. (2020 v. 3: Chapter 20)
Figure 20.5
Plan of Stratum G-1a
Mazar et. al. (2020 v.3) - Figure 20.17 -
Section 10 from Mazar et. al. (2020 v. 3: Chapter 20)
Figure 20.17
Section 10 (Square Q/3, section below Wall 5018, looking north)
Mazar et. al. (2020 v.3) - Photo 20.17 -
Squares Q–P/3–4 from Mazar et. al. (2020 v. 3: Chapter 20)
Photo 20.17
Squares Q–P/3–4, looking north. Center: G-1 Wall 5012
(2007)
Mazar et. al. (2020 v.3) - Photo 20.18 -
Square Q/3 from Mazar et. al. (2020 v. 3: Chapter 20)
Photo 20.18
Square Q/3, northeastern corner, looking north. Upper left: G-1a Wall 5008 with brick debris (5011) above layer of charred wood (5029); G-2a–b layers below the G-1a destruction debris
(2007)
Mazar et. al. (2020 v.3) - Photo 20.34 -
Squares P–Q/3–4 – from Mazar et. al. (2020 v. 3: Chapter 20)
Photo 20.34
Squares P–Q/3–4, looking west, Stratum G-1
(2001)
Mazar et. al. (2020 v.3) - Photo 20.35 -
Square Q/3 – from Mazar et. al. (2020 v. 3: Chapter 20)
Photo 20.35
Square Q/3, northeastern corner. G-1 Wall 5008 (left) abutting Wall 4047; right: section through wooden beam in the foundation of Wall 5017/5018, continuing south into Locus 5029
(2001)
Mazar et. al. (2020 v.3) - Photo 20.40 -
General view of Area G – from Mazar et. al. (2020 v. 3: Chapter 20)
Photo 20.40
General view of Area G, looking north. Foreground: G-1 Building GG and Space 5011 to its east; background: Area C
(2000)
Mazar et. al. (2020 v.3)
It should be noted that in several places there was a considerable gap of up to 0.5 m between the uppermost beams and the lowest brick course of the wall above (i.e., the case of Wall 4014, noted above) while in other places (such as the foundations of Walls 5012 and 4047), it was clear that the beams served as a foundation for the wall, as was the case in Area C. It appears that even where there was a gap, the wood served as such a foundation and the gap was created by seismic activity or the burning of the lowest bricks until melting point during the destruction.
- Table 20.1 -
Correlation of strata – Areas G and C from Mazar et. al. (2020 v. 3: Chapter 20)
Table 20.1
Correlation of strata – Areas G and C
Mazar et. al. (2020 v.3) - Figure 20.3 -
Plan of wooden beams in the foundations of Stratum G-1 walls from Mazar et. al. (2020 v. 3: Chapter 20)
Figure 20.3
Plan of wooden beams in the foundations of Stratum G-1 walls
Mazar et. al. (2020 v.3) - Figure 20.4 -
Plan of Stratum G-1b from Mazar et. al. (2020 v. 3: Chapter 20)
Figure 20.4
Plan of Stratum G-1b
Mazar et. al. (2020 v.3) - Figure 20.5 -
Plan of Stratum G-1a from Mazar et. al. (2020 v. 3: Chapter 20)
Figure 20.5
Plan of Stratum G-1a
Mazar et. al. (2020 v.3) - Figure 20.15 -
Section 8 from Mazar et. al. (2020 v. 3: Chapter 20)
Figure 20.15
Section 8 (Square P/4, section through Platform 5069 and wooden beams, looking east)
Mazar et. al. (2020 v.3) - Photo 20.1 -
Area G at the end of 2000 season, looking west from Mazar et. al. (2020 v. 3: Chapter 20)
Photo 20.1
Area G at the end of 2000 season, looking west
Mazar et. al. (2020 v.3) - Photo 20.11 -
Squares Q–P/3–4 looking southwest from Mazar et. al. (2020 v. 3: Chapter 20)
Photo 20.11
Squares Q–P/3–4 looking southwest. Right: Wall 4083 (with bucket) and G-1b Platform 5069
(2007)
Mazar et. al. (2020 v.3) - Photo 20.12 -
G-2a courtyard, G-2 Building GC, and G-1 Building GF from Mazar et. al. (2020 v. 3: Chapter 20)
Photo 20.12
- Right: Squares P–Q/5–6, looking east.
- Lower left: G-2a courtyard with related circular bins in Square P/6
- background left: G-2 Building GC, Room 4050
- right: G-1 Building GF Walls 4014 and 4017
(2000)
Mazar et. al. (2020 v.3) - Photo 20.22 -
Squares P–Q/5 from Mazar et. al. (2020 v. 3: Chapter 20)
Photo 20.22
Squares P–Q/5, looking south at remains in G-1 Building GF; center: G-1 Walls 4014 and 4017 and wooden beams (4031, 4020)
(2000)
Mazar et. al. (2020 v.3) - Photo 20.23 -
Squares P–Q/5 from Mazar et. al. (2020 v. 3: Chapter 20)
Photo 20.23
Squares P–Q/5, looking southwest, detail of Photo 20.22
(2000)
Mazar et. al. (2020 v.3) - Photo 20.30 -
Square P/5 from Mazar et. al. (2020 v. 3: Chapter 20)
Photo 20.30
Square P/5, looking east at G-1 Wall 4014, with wooden beams in its foundation
(2000)
Mazar et. al. (2020 v.3) - Photo 20.32 -
Squares P/4–5 from Mazar et. al. (2020 v. 3: Chapter 20)
Photo 20.32
Squares P/4–5, looking east. Right: G-1 Platform 5069 related to Walls 5012, 4070 and 4083; background: stone wall/bench 5040; left: wooden beams in the foundation of Wall 4014 after partial removal of brick superstructure
(2001)
Mazar et. al. (2020 v.3) - Photo 20.33 -
Square Q/5 – from Mazar et. al. (2020 v. 3: Chapter 20)
Photo 20.33
Square Q/5, looking east at G-1a Floor 4049
(2000)
Mazar et. al. (2020 v.3) - Photo 20.34 -
Squares P–Q/3–4 – from Mazar et. al. (2020 v. 3: Chapter 20)
Photo 20.34
Squares P–Q/3–4, looking west, Stratum G-1
(2001)
Mazar et. al. (2020 v.3)
In Square Q/5, no floors of Stratum G-1b were preserved above the constructional beams. In the eastern part of the square, a stone floor (4049), 3.5 m long and ca. 0.5–1.3 m wide, was exposed just below topsoil at levels 86.90–86.97 m, unrelated to any other feature (Photos 20.22, 20.33); this floor was attributed to Stratum G-1a. It is possible that this part of the building was an open courtyard. In the rest of the square, brick debris mixed with collapsed burnt bricks and grayish-brown and black ash (4007, 4013) found below topsoil, appeared to be related to the destruction of the building.
In Squares P–Q/4, Walls 4083 and 5019 were two segments of partition walls that comprised the southern border of the space described above, although they appeared to belong to two subsequent phases: Wall 4083 was founded in Stratum G1b, built on top of a wooden-beam foundation that separated it from the earlier wall (8055) of Stratum G-2 (Photo 20.11). Wall 5019 in the eastern part of Q/4 was narrower and higher; its foundation was 0.33 m higher than that of Wall 4083 and fit the level of the plaster floor (5023) to its north and was thus attributed to Stratum G-1a. It seems that in Squares Q–P/4–5 in Stratum G-1b, we may reconstruct a large space (inner dimensions 3.2×7.0 m) enclosed by Walls 4014, 4017, 4083 and an extension of Wall 5018 to the north (Photo 20.34). An element found in this space that remained enigmatic was Wall 5040, a 3.5 m-long and ca. 0.7 m wide stone foundation in the northern part of Square Q/4 (Photos 20.1, 20.32, 20.34), which was architecturally detached from the other walls of the building. It was attributed to Stratum G-1b, since it was covered by G-1a plaster floor 5023, which covered much of the northern part of Square Q/4. The nature of Wall 5040 was even more enigmatic in light of the lack of stone foundations in the Iron IIA levels at Tel Rehov. This element remains architecturally unexplained, although perhaps it served as a bench.
Plaster Floor 5023 in the northern part of Square Q/4 (levels 86.65–86.72 m) was composed of two thin superimposed layers of plaster; it did not clearly abut any wall, although it most likely did reach Wall 5019. Although it was somewhat lower than the stone floor (4049) in Square Q/5, it appears that both these floors were contemporary and belonged to Stratum G-1a.
In Square P/4, a single-course brick platform or floor (5069, 1.3×1.8 m), covered with a thick layer of plaster, was built above the wooden beams in the space between the short segment of Wall 4083 on the north and Wall 5012 on the south (Fig. 20.15; Photos 20.1, 20.11, 20.32, 20.34). Approach to this platform/floor could be through a possible opening in Wall 4083 to the north, where the bricks of this wall were found at the same level as the top of the platform (86.10 m). Note that the lowest brick course of Wall 5012 south of the platform was at level 86.26 m, 0.18 m above the top of the brick platform, but the wooden foundations of this wall started at level 85.72 m, which fit the wooden beams under the platform. It thus appears that the platform/floor and Wall 5012 were constructed at the same time. Brick debris with some small pebbles (4055, 4088) had accumulated on top of the platform. It appears that the platform/floor went out of use in Stratum G-1a, although no clear stratigraphic element was found above it, except for a small segment of an unnumbered wall, which made a corner with Wall 5012 and may be attributed to Stratum G-1a. The function of this brick platform/floor remained obscure.
- Table 20.1 -
Correlation of strata – Areas G and C from Mazar et. al. (2020 v. 3: Chapter 20)
Table 20.1
Correlation of strata – Areas G and C
Mazar et. al. (2020 v.3) - Figure 20.3 -
Plan of wooden beams in the foundations of Stratum G-1 walls from Mazar et. al. (2020 v. 3: Chapter 20)
Figure 20.3
Plan of wooden beams in the foundations of Stratum G-1 walls
Mazar et. al. (2020 v.3) - Figure 20.4 -
Plan of Stratum G-1b from Mazar et. al. (2020 v. 3: Chapter 20)
Figure 20.4
Plan of Stratum G-1b
Mazar et. al. (2020 v.3) - Figure 20.5 -
Plan of Stratum G-1a from Mazar et. al. (2020 v. 3: Chapter 20)
Figure 20.5
Plan of Stratum G-1a
Mazar et. al. (2020 v.3)
- Table 20.1 -
Correlation of strata – Areas G and C from Mazar et. al. (2020 v. 3: Chapter 20)
Table 20.1
Correlation of strata – Areas G and C
Mazar et. al. (2020 v.3) - Figure 20.3 -
Plan of wooden beams in the foundations of Stratum G-1 walls from Mazar et. al. (2020 v. 3: Chapter 20)
Figure 20.3
Plan of wooden beams in the foundations of Stratum G-1 walls
Mazar et. al. (2020 v.3) - Figure 20.4 -
Plan of Stratum G-1b from Mazar et. al. (2020 v. 3: Chapter 20)
Figure 20.4
Plan of Stratum G-1b
Mazar et. al. (2020 v.3) - Figure 20.5 -
Plan of Stratum G-1a from Mazar et. al. (2020 v. 3: Chapter 20)
Figure 20.5
Plan of Stratum G-1a
Mazar et. al. (2020 v.3) - Figure 20.16 -
Section 9 from Mazar et. al. (2020 v. 3: Chapter 20)
Figure 20.16
Section 9 (Squares P–Q/3, Wall 4047 with wooden beams, looking north)
Mazar et. al. (2020 v.3) - Photo 20.18 -
Square Q/3 from Mazar et. al. (2020 v. 3: Chapter 20)
Photo 20.18
Square Q/3, northeastern corner, looking north. Upper left: G-1a Wall 5008 with brick debris (5011) above layer of charred wood (5029); G-2a–b layers below the G-1a destruction debris
(2007)
Mazar et. al. (2020 v.3) - Photo 20.31 -
Tilted G-1b Wall 4047 from Mazar et. al. (2020 v. 3: Chapter 20)
Photo 20.31
Squares P–Q/3, looking north. Top: Wall 4047 with wooden beams in its foundation; note two possible phases in this wall; bottom: G-1 Installation 4064 on top of G-2 Wall 4081
(2007)
JW: G-1b Wall 4047 is tilted. Wall 5008 also looks tilted.
Mazar et. al. (2020 v.3) - Photo 20.34 -
Squares P–Q/3–4 – from Mazar et. al. (2020 v. 3: Chapter 20)
Photo 20.34
Squares P–Q/3–4, looking west, Stratum G-1
(2001)
Mazar et. al. (2020 v.3) - Photo 20.35 -
Square Q/3 – from Mazar et. al. (2020 v. 3: Chapter 20)
Photo 20.35
Square Q/3, northeastern corner. G-1 Wall 5008 (left) abutting Wall 4047; right: section through wooden beam in the foundation of Wall 5017/5018, continuing south into Locus 5029
(2001)
Mazar et. al. (2020 v.3)
- Table 20.1 -
Correlation of strata – Areas G and C from Mazar et. al. (2020 v. 3: Chapter 20)
Table 20.1
Correlation of strata – Areas G and C
Mazar et. al. (2020 v.3) - Figure 20.3 -
Plan of wooden beams in the foundations of Stratum G-1 walls from Mazar et. al. (2020 v. 3: Chapter 20)
Figure 20.3
Plan of wooden beams in the foundations of Stratum G-1 walls
Mazar et. al. (2020 v.3) - Figure 20.4 -
Plan of Stratum G-1b from Mazar et. al. (2020 v. 3: Chapter 20)
Figure 20.4
Plan of Stratum G-1b
Mazar et. al. (2020 v.3) - Figure 20.5 -
Plan of Stratum G-1a from Mazar et. al. (2020 v. 3: Chapter 20)
Figure 20.5
Plan of Stratum G-1a
Mazar et. al. (2020 v.3) - Photo 20.6 -
G-2 Building GB from Mazar et. al. (2020 v. 3: Chapter 20)
Photo 20.6
Square P/4 looking south. G-2 Building GB
- Wall 5061 (right)
- Wall 8055 (center)
- G-1 Wall 5012 (top)
- meter stick on G-2a Floor 8023
(2007)
Mazar et. al. (2020 v.3) - Photo 20.34 -
Squares P–Q/3–4 – from Mazar et. al. (2020 v. 3: Chapter 20)
Photo 20.34
Squares P–Q/3–4, looking west, Stratum G-1
(2001)
Mazar et. al. (2020 v.3) - Photo 20.36 -
Squares P–Q/3, G-1 Installation 5031 – from Mazar et. al. (2020 v. 3: Chapter 20)
Photo 20.36
Squares P–Q/3, G-1 Installation 5031, looking down
(2001)
Mazar et. al. (2020 v.3) - Photo 20.37 -
Squares P–Q/3 – from Mazar et. al. (2020 v. 3: Chapter 20)
Photo 20.37
Squares P–Q/3, looking west, Stratum G-1; four large stones north of Installation 5031 (the latter not yet uncovered) and a stone mortar (upside down); back: Installation 4064
(2001)
Mazar et. al. (2020 v.3) - Photo 20.40 -
General view of Area G – from Mazar et. al. (2020 v. 3: Chapter 20)
Photo 20.40
General view of Area G, looking north. Foreground: G-1 Building GG and Space 5011 to its east; background: Area C
(2000)
Mazar et. al. (2020 v.3)
A reddish-brown beaten-earth floor (4089) was exposed west of Installation 5031 at level 85.92 m. A 1.0 m-long charred wooden beam was found on the floor, perhaps part of a loom that stood nearby (see below). Floor 5038 was a pinkish clay surface with small ash patches that abutted Installation 5031 on its west and Wall 5008 on its east at level 85.87 m. The remains of an orange-clay oven were exposed near Wall 4047 to the north (not shown on the plan). No floor was found south of Installation 5031, where only extremely decayed debris was found due to the intense erosion.
Installation 5031 in the middle of this space was an oval of standing bricks coated inside and outside with white plaster (Fig. 20.6; Photos 20.34, 20.36, 20.40). Four open channels were carved in the upper part of the northern and southern walls of the installation, with plaster preserved inside three of these channels. The floor of the installation was composed of stones of various types and sizes, including a grinding stone fragment. A deep krater (Fig. 21.8:8) was embedded in the southwestern corner of the installation, its rim more or less flush with the stone floor and possibly used to collect liquid (olive oil?) that was processed or gathered inside the installation. Inside the installation, a layer of soft dark ashy earth contained two cooking jugs, a bowl and a krater (Figs. 21.8:7–8; 21.9:1–2).
An elongated plastered open channel north of the installation was covered by four large hard limestones (5071; Photos 20.34, 20.37, 20.40); the stones were chipped and cracked as a result of extensive heat. The largest one measured 0.38× 0.51×0.73 m. The bottom of these large stones were ca. 0.15 m above the top of the open channel and chips from these stones were found in the accumulation above Floor 4089 to the west. The stones appeared to be related to the installation and perhaps were used as weights, possibly hung on the wooden beam found lying in the destruction debris to the west of the installation. A roughly worked stone mortar was found close the large stones (Photo 20.37).
The elongated plastered channel to the north of the installation, the four open channels carved into the top of the installation’s walls and the sunken vessel, all indicate that this installation was used in the processing of liquid, perhaps olive oil. The four sunken depressions on top of the installation’s wall were perhaps intended to hold two wooden beams, which somehow were used in the operation. However the exact identification of the function and operation of this installation remains elusive.
The second installation (4064), just 0.4 m to the west of 5031, was an elongated, almost elliptical semi-circle (Photos 20.34; 20.37–20.40, 20.42), built against Wall 4060 and on top of Floor 4089, just on top of Wall 4081 of the previous stratum. It was constructed of small bricks that were covered inside and outside with a thick gray plaster; the center of the installation apparently also had been plastered, although none of this plaster was preserved. Two stones were set at the southern edge of the installation, which may be explained as a grinding installation with a mud-plastered parapet of the type found in Area C (Chapters 12, 43). This suggestion is supported by the find of an upper and a lower grinding stone in the destruction layer (4059) east and north of this installation (Photo 20.39).1
The room was destroyed in a heavy conflagration, creating a layer of burnt bricks and black ash. The thick destruction layer on top of Floor 4089 in the western part of the room (4059) included vessels (Figs. 21.8–21.13) and upper and lower grindstones. A few loomweights found near Installation 5031 were perhaps related to the cache of loomweights found to the west of the entranceway in Wall 4060 (see below). The wooden beam found on the floor could be related to Installation 5031 or to a loom that stood near the entrance to Room 5037. No separate floor that could be attributed to a later phase was found in this room and thus, it appears in identical form in the plans of both Strata G-1b and G-1a (Figs. 20.4–20.5).
- Table 20.1 -
Correlation of strata – Areas G and C from Mazar et. al. (2020 v. 3: Chapter 20)
Table 20.1
Correlation of strata – Areas G and C
Mazar et. al. (2020 v.3) - Figure 20.3 -
Plan of wooden beams in the foundations of Stratum G-1 walls from Mazar et. al. (2020 v. 3: Chapter 20)
Figure 20.3
Plan of wooden beams in the foundations of Stratum G-1 walls
Mazar et. al. (2020 v.3) - Figure 20.4 -
Plan of Stratum G-1b from Mazar et. al. (2020 v. 3: Chapter 20)
Figure 20.4
Plan of Stratum G-1b
Mazar et. al. (2020 v.3) - Figure 20.5 -
Plan of Stratum G-1a from Mazar et. al. (2020 v. 3: Chapter 20)
Figure 20.5
Plan of Stratum G-1a
Mazar et. al. (2020 v.3) - Photo 20.41 -
Smashed pottery in G-1a destruction layer (4052) – from Mazar et. al. (2020 v. 3: Chapter 20)
Photo 20.41
Square P/3, Building GG, looking north. G-1a destruction layer (4052) with restorable pottery in Room 4088; right: Installation 4064, partly exposed
(2000)
Mazar et. al. (2020 v.3) - Photo 20.42 -
Smashed pottery in G-1a destruction layer (4052) – from Mazar et. al. (2020 v. 3: Chapter 20)
Photo 20.42
Square P/3, G-1a Building GG, looking east. G-1a destruction layer with restorable pottery in Room 4088; note Walls 4067 and 4060 and concentration of loomweights at the entrance (see Photo 20.44)
(2000)
Mazar et. al. (2020 v.3) - Photo 20.43 -
Closeup of Smashed pottery in G-1a destruction layer (4052) – from Mazar et. al. (2020 v. 3: Chapter 20)
Photo 20.43
Square P/3, G-1 Building GG, looking east; detail of G-1a destruction debris (4052) in Room 4088
Mazar et. al. (2020 v.3) - Photo 20.44 -
Closeup of Smashed pottery and loomweights in G-1a destruction layer (4052) – from Mazar et. al. (2020 v. 3: Chapter 20)
Photo 20.44
Squares P–Q/3, G-1 Building GG, looking north; detail of destruction layer (4052) in Room 4088 with concentration of loomweights at the entrance to the room; right: large stones 5071 in Square Q/3
(2000)
Mazar et. al. (2020 v.3)
A higher floor (4088) made of hard gray plaster was identified in the central and northern parts of the room, between levels 85.91–86.00 m, ca. 0.1– 0.2 m higher than the earlier floor. This higher floor is related to Stratum G-1a and appears to have abutted all four walls of the room, although this was not clearly seen.
Destruction debris (4052) that covered the floor consisted of burnt bricks, light gray ash, charcoal pieces and burnt earth that contained 47 restorable vessels (Photos 20.41–2.44; Figs. 21.8–21.14). A large number of these vessels were sunk into the floor against Wall 4067. Over 80 gypsum loomweights were found in the northeastern corner of the room, near the entranceway. They were piled up, covering an area 1.5 m long and 0.65 m wide. Their configuration and dimensions apparently indicate the size and shape of the loom that stood here. Note the abovementioned possibility that the wooden beam in the room to the east might have belonged to this loom. The location of a loom at the entrance of a room recalls a similar situation at Tell Qasile Stratum X, where concentrations of about 80 loomweights each were found at the entrances of several rooms (Mazar 2008).
In the southern part of Square P/3, Loci 4065 and 4069 contain the same destruction layer, although it is slightly lower due to the topography and damaged by the erosion line.
- Table 20.1 -
Correlation of strata – Areas G and C from Mazar et. al. (2020 v. 3: Chapter 20)
Table 20.1
Correlation of strata – Areas G and C
Mazar et. al. (2020 v.3) - Figure 20.1 -
Plan of Stratum G-2b from Mazar et. al. (2020 v. 3: Chapter 20)
Figure 20.1
Plan of Stratum G-2b
Mazar et. al. (2020 v.3) - Figure 20.2a -
Plan of Stratum G-2a from Mazar et. al. (2020 v. 3: Chapter 20)
Figure 20.2a
Plan of Stratum G-2a
Mazar et. al. (2020 v.3) - Figure 20.2b -
Plan of Stratum G-2a' from Mazar et. al. (2020 v. 3: Chapter 20)
Figure 20.2a
Plan of Stratum G-2a'
Mazar et. al. (2020 v.3) - Figure 20.3 -
Plan of wooden beams in the foundations of Stratum G-1 walls from Mazar et. al. (2020 v. 3: Chapter 20)
Figure 20.3
Plan of wooden beams in the foundations of Stratum G-1 walls
Mazar et. al. (2020 v.3) - Figure 20.4 -
Plan of Stratum G-1b from Mazar et. al. (2020 v. 3: Chapter 20)
Figure 20.4
Plan of Stratum G-1b
Mazar et. al. (2020 v.3) - Figure 20.5 -
Plan of Stratum G-1a from Mazar et. al. (2020 v. 3: Chapter 20)
Figure 20.5
Plan of Stratum G-1a
Mazar et. al. (2020 v.3)
As elsewhere in Tel Rehov, no violent destruction was observed at the end of Stratum G-2, yet hints at an earthquake which caused considerable damage were found in the form of tilted and split walls. Such damages may have been the reason for abandoning the Stratum G-2 structures and for the foundation of the new buildings of Stratum G-1. The construction of Stratum G-1 was accompanied by laying wooden foundations for both walls and floors, as was detected also in Areas C and B. About half of this wood was composed of olive tree branches (Chapter 52).
Architectural continuity between Strata G-2 and G-1 was found in several places (i.e., Wall 4014 on top of Wall 5061, Wall 8030 on top of Wall 5018, Wall 5008 on top of Wall 5063), while the general plan of the structures differed from that of Stratum G-1. The new double wall 5012/4047 was a major feature, separating Building GG on the south from Building GF on the north. Both of these buildings are only partly known. Building GF continued the tradition of Building GB of the previous period in its being composed of large open spaces, although no food processing or storage installations were found in it and thus, its function may have changed. Architectural changes between Strata G-1b and G-1a were also observed. A unique feature was the brick platform/floor (5069), which perhaps served as a base for storage facilities. The preserved part of Building GG contained two installations of particular interest: a possible grinding installation with a plaster parapet and perhaps an oil-extracting installation with stone weights, which was rather rare in this period. A loom with some 80 gypsum weights apparently stood at the entrance to the small chamber (5037) and a wooden beam found outside this room might have belonged to the loom.
The dramatic destruction of Stratum G-1a yielded a rich pottery assemblage and other finds. This can be correlated to the general destruction of the city of Stratum IV in the 9th century BCE, as evidenced in other areas at Tel Rehov.
- Figure 20.1
Plan of Stratum G-2b from Mazar et. al. (2020 v. 3: Chapter 20)
Figure 20.1
Plan of Stratum G-2b
Mazar et. al. (2020 v.3) - Figure 20.2a
Plan of Stratum G-2a from Mazar et. al. (2020 v. 3: Chapter 20)
Figure 20.2a
Plan of Stratum G-2a
Mazar et. al. (2020 v.3) - Figure 20.2b
Plan of Stratum G-2a' from Mazar et. al. (2020 v. 3: Chapter 20)
Figure 20.2a
Plan of Stratum G-2a'
Mazar et. al. (2020 v.3) - Figure 20.3
Plan of wooden beams in the foundations of Stratum G-1 walls from Mazar et. al. (2020 v. 3: Chapter 20)
Figure 20.3
Plan of wooden beams in the foundations of Stratum G-1 walls
Mazar et. al. (2020 v.3) - Figure 20.4
Plan of Stratum G-1b from Mazar et. al. (2020 v. 3: Chapter 20)
Figure 20.4
Plan of Stratum G-1b
Mazar et. al. (2020 v.3) - Figure 20.5
Plan of Stratum G-1a from Mazar et. al. (2020 v. 3: Chapter 20)
Figure 20.5
Plan of Stratum G-1a
Mazar et. al. (2020 v.3) - Figure 20.7
Superposition of walls in Area G with location of section drawings from Mazar et. al. (2020 v. 3: Chapter 20)
Figure 20.7
Superposition of walls in Area G with location of section drawings
Mazar et. al. (2020 v.3) - Figure 20.8
Section 1 from Mazar et. al. (2020 v. 3: Chapter 20)
Figure 20.8
Section 1 (Square P/6, looking east)
Mazar et. al. (2020 v.3) - Figure 20.9
Section 2 from Mazar et. al. (2020 v. 3: Chapter 20)
Figure 20.9
Section 2: (Square P/5, looking north)
Mazar et. al. (2020 v.3) - Figure 20.10
Section 3 from Mazar et. al. (2020 v. 3: Chapter 20)
Figure 20.10
Section 3 (Square P/5, Walls 5044 and 4014, looking east)
Mazar et. al. (2020 v.3) - Figure 20.11
Section 4 from Mazar et. al. (2020 v. 3: Chapter 20)
Figure 20.11
Section 4 (Square Q/5, looking east)
Mazar et. al. (2020 v.3) - Figure 20.12
Section 5 from Mazar et. al. (2020 v. 3: Chapter 20)
Figure 20.12
Section 5 (Square Q/4, looking north)
Mazar et. al. (2020 v.3) - Figure 20.13
Section 6 from Mazar et. al. (2020 v. 3: Chapter 20)
Figure 20.13
Section 6 (Square Q/4, Wall 5018 and wooden beams, looking east)
Mazar et. al. (2020 v.3) - Figure 20.14
Section 7 from Mazar et. al. (2020 v. 3: Chapter 20)
Figure 20.14
Section 7 (Square P/4, Wall 5012 and wooden beams, looking south)
Mazar et. al. (2020 v.3) - Figure 20.15
Section 8 from Mazar et. al. (2020 v. 3: Chapter 20)
Figure 20.15
Section 8 (Square P/4, section through Platform 5069 and wooden beams, looking east)
Mazar et. al. (2020 v.3) - Figure 20.16
Section 9 from Mazar et. al. (2020 v. 3: Chapter 20)
Figure 20.16
Section 9 (Squares P–Q/3, Wall 4047 with wooden beams, looking north)
Mazar et. al. (2020 v.3) - Figure 20.17
Section 10 from Mazar et. al. (2020 v. 3: Chapter 20)
Figure 20.17
Section 10 (Square Q/3, section below Wall 5018, looking north)
Mazar et. al. (2020 v.3) - Figure 20.18
Section 11 from Mazar et. al. (2020 v. 3: Chapter 20)
Figure 20.18
Section 11 (Square Q/3, looking east; wall above Wall 5062 was seen only in section, attributed to G-1b, unnumbered)
Mazar et. al. (2020 v.3)
- Photo 20.1
Area G at the end of 2000 season, looking west from Mazar et. al. (2020 v. 3: Chapter 20)
Photo 20.1
Area G at the end of 2000 season, looking west
Mazar et. al. (2020 v.3) - Photo 20.2
Area G at the end of 2007 season, looking northwest from Mazar et. al. (2020 v. 3: Chapter 20)
Photo 20.2
Area G at the end of 2007 season, looking northwest
Mazar et. al. (2020 v.3) - Photo 20.3
Squares P–Q/4–5, looking north from Mazar et. al. (2020 v. 3: Chapter 20)
Photo 20.3
Squares P–Q/4–5, looking north.
- Left: Stratum G2a Building GB
- center left:Room 8045
-
upper left:
- Room 4039
- balk between Squares P–Q/5 and P–Q/4 in center
- bottom left: Wall 4070 of Stratum G-1
(2007)
Mazar et. al. (2020 v.3) - Photo 20.4
Collapsed mudbricks on left corner in G-2b Building GA from Mazar et. al. (2020 v. 3: Chapter 20)
Photo 20.4
Square P/5, looking north. Wall 5044 of G-2b Building GA
- to its left: Locus 8052 with loomweights
- right: Wall 5061 of G-2a Building GB (bird nest holes in section)
(2007)
JW: Collapsed mudbricks in left corner of room
Mazar et. al. (2020 v.3) - Photo 20.5
Tilted Wall from Mazar et. al. (2020 v. 3: Chapter 20)
Photo 20.5
Squares P–Q/4–5, looking east.
- Right: G-1 Wall 5012
- center: balk
- center, right of balk: G-2a Walls 8055 and 8056
- meter stick on G-2a Floor 8023
(2007)
JW: Tilted wall just up frame from Wall 5044 G-2
Mazar et. al. (2020 v.3) - Photo 20.6
G-2 Building GB from Mazar et. al. (2020 v. 3: Chapter 20)
Photo 20.6
Square P/4 looking south. G-2 Building GB
- Wall 5061 (right)
- Wall 8055 (center)
- G-1 Wall 5012 (top)
- meter stick on G-2a Floor 8023
(2007)
Mazar et. al. (2020 v.3) - Photo 20.7
Building GA, G-2 Building GB, and Building GC from Mazar et. al. (2020 v. 3: Chapter 20)
Photo 20.7
Squares P–Q/5-6, looking northwest.
- Center: Wall 5064 of G-2 Building GB
- far left: Building GA
- right: installations and floor in courtyard
- upper right: Building GC
(2007)
Mazar et. al. (2020 v.3) - Photo 20.8
G-2 Building GB from Mazar et. al. (2020 v. 3: Chapter 20)
Photo 20.8
Squares P–Q/4–5 looking west. G-2 Building GB with circular installations
(2007)
Mazar et. al. (2020 v.3) - Photo 20.9
Wall 5064 and G-2a courtyard from Mazar et. al. (2020 v. 3: Chapter 20)
Photo 20.9
Square Q/5, looking west. Top: Wall 5064 and G-2a courtyard with ovens and installations
Mazar et. al. (2020 v.3) - Photo 20.10
G-2b and G-2a circular bins from Mazar et. al. (2020 v. 3: Chapter 20)
Photo 20.10
Square Q/4, detail of G-2b and G-2a circular bins
(2007)
Mazar et. al. (2020 v.3) - Photo 20.11
Squares Q–P/3–4 looking southwest from Mazar et. al. (2020 v. 3: Chapter 20)
Photo 20.11
Squares Q–P/3–4 looking southwest. Right: Wall 4083 (with bucket) and G-1b Platform 5069
(2007)
Mazar et. al. (2020 v.3) - Photo 20.12
G-2a courtyard, G-2 Building GC, and G-1 Building GF from Mazar et. al. (2020 v. 3: Chapter 20)
Photo 20.12
- Right: Squares P–Q/5–6, looking east.
- Lower left: G-2a courtyard with related circular bins in Square P/6
- background left: G-2 Building GC, Room 4050
- right: G-1 Building GF Walls 4014 and 4017
(2000)
Mazar et. al. (2020 v.3) - Photo 20.13
Stratum G-2a Square P/6 and Building GC from Mazar et. al. (2020 v. 3: Chapter 20)
Photo 20.13
Square P/6, looking down at floors and circular bins attributed to Stratum G-2a; lower left: Building GC
(2000)
Mazar et. al. (2020 v.3) - Photo 20.14
Stratum G-2a Floors 4016 and 5004 from Mazar et. al. (2020 v. 3: Chapter 20)
Photo 20.14
Square P/6, looking east at Floors 4016 and 5004 and circular bins attributed to Stratum G-2a
(2000)
Mazar et. al. (2020 v.3) - Photo 20.15
Building GC from Mazar et. al. (2020 v. 3: Chapter 20)
Photo 20.15
Square Q/6, looking east at Building GC
(2000)
Mazar et. al. (2020 v.3) - Photo 20.16
Squares Q–P/3–4 from Mazar et. al. (2020 v. 3: Chapter 20)
Photo 20.16
Squares Q–P/3–4, looking west.
- Right: G-2a circular installations
- front left: G-2b Floor 8046 (deepest excavated point)
- front center: G-2 Building GD
(2007)
Mazar et. al. (2020 v.3) - Photo 20.17
Squares Q–P/3–4 from Mazar et. al. (2020 v. 3: Chapter 20)
Photo 20.17
Squares Q–P/3–4, looking north. Center: G-1 Wall 5012
(2007)
Mazar et. al. (2020 v.3) - Photo 20.18
Square Q/3 from Mazar et. al. (2020 v. 3: Chapter 20)
Photo 20.18
Square Q/3, northeastern corner, looking north. Upper left: G-1a Wall 5008 with brick debris (5011) above layer of charred wood (5029); G-2a–b layers below the G-1a destruction debris
(2007)
Mazar et. al. (2020 v.3) - Photo 20.19
Square Q/3 from Mazar et. al. (2020 v. 3: Chapter 20)
Photo 20.19
Square Q/3, looking south. Section through successive G-2a–2b Floors 8017 and 5047
(2007)
Mazar et. al. (2020 v.3) - Photo 20.20
Tilted G-2 Wall 4081 from Mazar et. al. (2020 v. 3: Chapter 20)
Photo 20.20
Square P/3, looking east. Meter stick leaning on G-2 Wall 4081; upper left: G-1 Wall 4047; note two phases in this wall
(2007)
JW: Also note that G-2 Wall 4081 is strongly tilted
Mazar et. al. (2020 v.3) - Photo 20.21
Closeup on Tilted G-2 Wall 4081 from Mazar et. al. (2020 v. 3: Chapter 20)
Photo 20.21
Square P/3, looking south. Meter stick leaning on G-2 Wall 4081; right: G-2a Floor 4087
(2007)
JW: G-2 Wall 4081 is tilted
Mazar et. al. (2020 v.3) - Photo 20.22
Squares P–Q/5 from Mazar et. al. (2020 v. 3: Chapter 20)
Photo 20.22
Squares P–Q/5, looking south at remains in G-1 Building GF; center: G-1 Walls 4014 and 4017 and wooden beams (4031, 4020)
(2000)
Mazar et. al. (2020 v.3) - Photo 20.23
Squares P–Q/5 from Mazar et. al. (2020 v. 3: Chapter 20)
Photo 20.23
Squares P–Q/5, looking southwest, detail of Photo 20.22
(2000)
Mazar et. al. (2020 v.3) - Photo 20.24
Square P/5 from Mazar et. al. (2020 v. 3: Chapter 20)
Photo 20.24
Square P/5, looking east at detail of wooden beams 4020, east of Wall 4014 and below Wall 4017
(2000)
Mazar et. al. (2020 v.3) - Photo 20.25
Square P/4 from Mazar et. al. (2020 v. 3: Chapter 20)
Photo 20.25
Square P/4, looking south at wooden beams 4071. Wall 5012 and projection to north; meter stick on G2a Locus 8023
(2000)
Mazar et. al. (2020 v.3) - Photo 20.26
Square P/4 from Mazar et. al. (2020 v. 3: Chapter 20)
Photo 20.26
Square P/4, looking west at double wall 5012/4047, with wooden beams 4066 to its north
(2007)
Mazar et. al. (2020 v.3) - Photo 20.27
Squares Q–P/4 from Mazar et. al. (2020 v. 3: Chapter 20)
Photo 20.27
Squares Q–P/4, looking south at Wall 5012 and section below it. Note thick layer of wooden beams below the wall; foreground: G-2b Installation 8048
(2007)
Mazar et. al. (2020 v.3) - Photo 20.28
Square P/4 from Mazar et. al. (2020 v. 3: Chapter 20)
Photo 20.28
Square P/4, looking south at G-1 Wall 5012 and section below it. Note thick layer of wooden beams below the wall; foreground: G-2b Floor 8054 (2007)
(2007)
Mazar et. al. (2020 v.3) - Photo 20.29
Square Q/4 from Mazar et. al. (2020 v. 3: Chapter 20)
Photo 20.29
Square Q/4, looking east at G-1 Wall 5017, with wooden beams in its foundation
Mazar et. al. (2020 v.3) - Photo 20.30
Square P/5 from Mazar et. al. (2020 v. 3: Chapter 20)
Photo 20.30
Square P/5, looking east at G-1 Wall 4014, with wooden beams in its foundation
(2000)
Mazar et. al. (2020 v.3) - Photo 20.31
Tilted G-1b Wall 4047 from Mazar et. al. (2020 v. 3: Chapter 20)
Photo 20.31
Squares P–Q/3, looking north. Top: Wall 4047 with wooden beams in its foundation; note two possible phases in this wall; bottom: G-1 Installation 4064 on top of G-2 Wall 4081
(2007)
JW: G-1b Wall 4047 is tilted. Wall 5008 also looks tilted.
Mazar et. al. (2020 v.3) - Photo 20.32
Squares P/4–5 from Mazar et. al. (2020 v. 3: Chapter 20)
Photo 20.32
Squares P/4–5, looking east. Right: G-1 Platform 5069 related to Walls 5012, 4070 and 4083; background: stone wall/bench 5040; left: wooden beams in the foundation of Wall 4014 after partial removal of brick superstructure
(2001)
Mazar et. al. (2020 v.3) - Photo 20.33
Square Q/5 – from Mazar et. al. (2020 v. 3: Chapter 20)
Photo 20.33
Square Q/5, looking east at G-1a Floor 4049
(2000)
Mazar et. al. (2020 v.3) - Photo 20.34
Squares P–Q/3–4 – from Mazar et. al. (2020 v. 3: Chapter 20)
Photo 20.34
Squares P–Q/3–4, looking west, Stratum G-1
(2001)
Mazar et. al. (2020 v.3) - Photo 20.35
Square Q/3 – from Mazar et. al. (2020 v. 3: Chapter 20)
Photo 20.35
Square Q/3, northeastern corner. G-1 Wall 5008 (left) abutting Wall 4047; right: section through wooden beam in the foundation of Wall 5017/5018, continuing south into Locus 5029
(2001)
Mazar et. al. (2020 v.3) - Photo 20.36
Squares P–Q/3, G-1 Installation 5031 – from Mazar et. al. (2020 v. 3: Chapter 20)
Photo 20.36
Squares P–Q/3, G-1 Installation 5031, looking down
(2001)
Mazar et. al. (2020 v.3) - Photo 20.37
Squares P–Q/3 – from Mazar et. al. (2020 v. 3: Chapter 20)
Photo 20.37
Squares P–Q/3, looking west, Stratum G-1; four large stones north of Installation 5031 (the latter not yet uncovered) and a stone mortar (upside down); back: Installation 4064
(2001)
Mazar et. al. (2020 v.3) - Photo 20.38
Square P/3 – from Mazar et. al. (2020 v. 3: Chapter 20)
Photo 20.38
Square P/3, looking west at G-1 Installation 4064, Wall 4060 and Floor 4089
(2000)
Mazar et. al. (2020 v.3) - Photo 20.39
Square P/3 – from Mazar et. al. (2020 v. 3: Chapter 20)
Photo 20.39
Square P/3, G-1 Installation 4064 and Wall 4060, looking north. Note grinding stone in the right corner
(2000)
Mazar et. al. (2020 v.3) - Photo 20.40
General view of Area G – from Mazar et. al. (2020 v. 3: Chapter 20)
Photo 20.40
General view of Area G, looking north. Foreground: G-1 Building GG and Space 5011 to its east; background: Area C
(2000)
Mazar et. al. (2020 v.3) - Photo 20.41
Smashed pottery in G-1a destruction layer (4052) – from Mazar et. al. (2020 v. 3: Chapter 20)
Photo 20.41
Square P/3, Building GG, looking north. G-1a destruction layer (4052) with restorable pottery in Room 4088; right: Installation 4064, partly exposed
(2000)
Mazar et. al. (2020 v.3) - Photo 20.42
Smashed pottery in G-1a destruction layer (4052) – from Mazar et. al. (2020 v. 3: Chapter 20)
Photo 20.42
Square P/3, G-1a Building GG, looking east. G-1a destruction layer with restorable pottery in Room 4088; note Walls 4067 and 4060 and concentration of loomweights at the entrance (see Photo 20.44)
(2000)
Mazar et. al. (2020 v.3) - Photo 20.43
Closeup of Smashed pottery in G-1a destruction layer (4052) – from Mazar et. al. (2020 v. 3: Chapter 20)
Photo 20.43
Square P/3, G-1 Building GG, looking east; detail of G-1a destruction debris (4052) in Room 4088
Mazar et. al. (2020 v.3) - Photo 20.44
Closeup of Smashed pottery and loomweights in G-1a destruction layer (4052) – from Mazar et. al. (2020 v. 3: Chapter 20)
Photo 20.44
Squares P–Q/3, G-1 Building GG, looking north; detail of destruction layer (4052) in Room 4088 with concentration of loomweights at the entrance to the room; right: large stones 5071 in Square Q/3
(2000)
Mazar et. al. (2020 v.3) - Photo 20.45
Room 4088 floor below G-1a destruction layer (4052) – from Mazar et. al. (2020 v. 3: Chapter 20)
Photo 20.45
Square P/3, Room 4088, floor after removal of destruction debris, looking north
(2000)
Mazar et. al. (2020 v.3)
The earth’s magnetic field and its elements (after Ben-Yosef et al. 2008)
Ben-Yosef and Ron in Mazar et. al. (2020 v. 5)
Fig. 54.2
Schematic illustration of the paleomagnetic fold test as applied
to mudbricks walls from Tel Rehov, Stratum C-1b (V)
Ben-Yosef and Ron in Mazar et. al. (2020 v. 5)
Fig. 54.3
Sampling locations in Buildings CE and CG
Ben-Yosef and Ron in Mazar et. al. (2020 v. 5)
Photo 54.1
Location of samples from Wall 2454
(eastern wall of Building CE, Square Y/4, looking east). The intense fire of Stratum C-1b is
indicated by the color of the mud bricks.
Ben-Yosef and Ron in Mazar et. al. (2020 v. 5)
Photo 54.2
Location of samples from Wall 2411 (eastern
wall of Building CG, Square Y/3 looking west). The
strong tilt to the south is clearly visible.
Ben-Yosef and Ron in Mazar et. al. (2020 v. 5)
Table 54.1
Mean geomagnetic direction for each of the tilted walls in Area C
Ben-Yosef and Ron in Mazar et. al. (2020 v. 5)
Fig. 54.4
Zijderveld diagrams (or vector end-point diagrams; see Tauxe 2010: 172)
of the AF demagnetization of samples from Tel Rehov
All samples, except C3 and C6, present one component stable magnetization.
Ben-Yosef and Ron in Mazar et. al. (2020 v. 5)
Fig. 54.5
Equal area projection (lower hemisphere) of measured
directions from Buildings CE (squares) and CG (diamonds). The mean direction is represented
by circles and is statistically the same for both buildings.
Ben-Yosef and Ron in Mazar et. al. (2020 v. 5)
Fig. 54.6
Equal area projection (lower hemisphere) of measured
directions from Buildings CE (squares) and CG (diamonds) after tilt correction.
Ben-Yosef and Ron in Mazar et. al. (2020 v. 5)
The earth’s magnetic field and its elements (after Ben-Yosef et al. 2008)
Ben-Yosef and Ron in Mazar et. al. (2020 v. 5)
Fig. 54.2
Schematic illustration of the paleomagnetic fold test as applied
to mudbricks walls from Tel Rehov, Stratum C-1b (V)
Ben-Yosef and Ron in Mazar et. al. (2020 v. 5)
Fig. 54.3
Sampling locations in Buildings CE and CG
Ben-Yosef and Ron in Mazar et. al. (2020 v. 5)
Photo 54.1
Location of samples from Wall 2454
(eastern wall of Building CE, Square Y/4, looking east). The intense fire of Stratum C-1b is
indicated by the color of the mud bricks.
Ben-Yosef and Ron in Mazar et. al. (2020 v. 5)
Photo 54.2
Location of samples from Wall 2411 (eastern
wall of Building CG, Square Y/3 looking west). The
strong tilt to the south is clearly visible.
Ben-Yosef and Ron in Mazar et. al. (2020 v. 5)
The archaeomagnetic study was designed to provide conclusive evidence for one of the two following possible scenarios:2
- An earthquake is the main cause for the partial destruction of Stratum C-lb and the tilting of the buildings' walls, and is also responsible for the fire.
- A fire is the main cause for the destruction of the Stratum C-lb buildings; after this, during a period in which the site was abandoned, an earthquake tilted the walls.
We collected ten samples of burnt mudbricks from the two opposing tilted walls (Fig. 54.3): six samples from the western (inner) face of Wall 2454, which served as the eastern wall of Building CE (Photo 54.1; Chapter 12; Fig. 12.27), and four from the eastern (outer) face of Wall 2411, the eastern wall of Building CG (Photo 54.2; Figs. 12.39-12.40). The sampling was done by cutting out oriented chunks of clay bricks into small (~8 cm3) plastic boxes using a Brunton compass.3 The tilting direction of the walls (their dip) was measured on flat surfaces in various locations and an average was calculated. The paleomagnetic experiments were done using alternating field (AF) demagnetization (Tauxe 2010: 127) in steps of 5µT to 40µT or 10µT to 90µT. As the signal was consistent and stable, the samples were not fully demagnetized.
Both walls are tilted at approximately 18°, the wall of Building CE towards the north and the wall of Building CG towards the south (dips 18°±3/360°±10 [n=5], 18°±1/175°±15 [n=4] respectively), demonstrating a symmetrical anticlinal fold.
The demagnetization data are presented in Fig. 54.4. Two samples (C3 and C6) from Wall 2454 were rejected, as they demonstrated an unstable magnetization (Fig. 54.4). The mean vectorial direction was calculated for the two clusters of samples using Fisher statistics. The results are presented in Table 54.1 and Fig. 54.5; Fig. 54.6 presents the results after tilt correction.
Table 54.1Mean geomagnetic direction for each of the tilted walls in Area C
Ben-Yosef and Ron in Mazar et. al. (2020 v. 5)
- Stratigraphic Table
from Mazar et. al. (2020 v.1:XVII)
Stratigraphic Table
Mazar et. al. (2020 v.1) - Fig. 3.7 Map of the
site showing grid and excavation areas from Mazar et. al. (2020 v.1)
Figure 3.7
Topographic map of Tel Rehov showing the grid and excavated areas. Note that levels are given in actual elevation below sea level followed by the relative levels used by our excavation
(triangulation point -116.26 considered as +100m)
(topography and grid by Mabat, Digital Mapping, Jerusalem; areas added by Jay Rosenberg)
Mazar et. al. (2020 v.1) - Deformation Map of Strata C1-a and D1-a
by Jefferson Williams
 Stratum C1-a and D1-a Deformation Map
modified by JW from Fig. 12.19 of Mazar et. al. (2020 v.2) - Deformation Map of Stratum E1-a
by Jefferson Williams
 Stratum E1-a Deformation Map
modified by JW from Fig. 17.5 of Mazar et. al. (2020 v.3) - Deformation Map of Stratum G-1
by Jefferson Williams
 Stratum G1 Deformation Map
modified by JW from Fig. 20.4 of Mazar et. al. (2020 v.3) - Fig. 2.11 Subsurface structure
of Tel Rehov interpreted from seismic - from Mazar et. al. (2020 v.1)
Figure 2.11
The subsurface structure of Tel Rehov as demonstrated by the N–S oriented seismic line 136.
- Velocity-Depth model of lower tufa sediments
- Velocity-Depth model of upper anthropogenic sediments
(Note the small hill under the higher mound) - Diffraction Stack illustrating the waves diffracted from the fault traces
- the interpreted faults under the mound - the fault between stations 40 and 60 [2nd fault from the right] underlies the step between the higher and lower mounds.
(from Zilberman et al. 2002:13; Fig. 4)
Mazar et. al. (2020 v.1) - Fig. 2.12 Seismic interpretation
of the top of the lower tufa layer along with subsurface faults - from Mazar et. al. (2020 v.1)
Figure 2.12
A subsurface map of the tufa hill, which underlies the anthropogenic sediments of Tel Rehov. The faults are reconstructed from the seismic survey. The survey lines are marked in red.
(from Zilberman et al. 2002:16; Fig. 5)
Seismic Survey lines (not shown here) are in Fig. 2.10 of Mazar et. al. (2020 v.1:28)
Mazar et. al. (2020 v.1) - Fig. 12.19 - Plan of
Stratum C-1a from Mazar et. al. (2020 v.2)
Fig. 12.19
Plan of Stratum C-1a (1:200)
Mazar et. al. (2020 v.2) - Fig. 12.54 - Superimposed
plan of Strata C-3–C-1a from Mazar et. al. (2020 v.2)
Fig. 12.19
Location of section drawings on superimposed plan of Strata C-3–C-1a (1:250)
Panitz-Cohen and Mazar in Mazar et. al. (2020 v.2)
- from Mazar in Mazar and Panitz-Cohen ed.s, (2020 v. 1:119)
- Area C stratigraphy correlated to the rest of the site
- Dating of Iron IIA strata was based on a combination of
the following:
Relative dating based on comparative study of pottery assemblages in well-stratified regional contexts
Absolute dating based on radiometric data
Historical considerations
Table 12.1Correlation of local Area C and general tell strata
Mazar et. al. (2020 v.2)
Mazar in Mazar and Panitz-Cohen ed.s, 2020 v. 1:119 n. 20 noted the following
Finkelstein (2013: 7-8, Table 1; 2017: 186) suggested to further divide the Late Iron IIA into two sub-phases - Late Iron IIA1 and Late Iron IIA2 (the latter called also "terminal Iron IIA"). I cannot see any stratigraphic or ceramic proof either for this subdivision or for the late date (ca. 760 BCE)Finkelstein (2013:7)'s Table 1 is shown below:
Table 1Dates of ceramic phases in the Levant and the transition between them according to recent radiocarbon results (based on a Bayesian model, 63 percent agreement between the model and the data)
Finkelstein (2013:7)
- Figure 4.1
Map of major archaeological and historical sites in central and northern Israel and Jordan from Mazar et. al. (2020 v.1)
Figure 4.1
Map of major archaeological and historical sites in central and northern Israel and Jordan
Mazar et. al. (2020 v.1) - Figure 4.2
Map of Tel ReHov showing the excavation areas and architecture of Stratum IV from Mazar et. al. (2020 v.1)
Figure 4.2
topographic map of Tel ReHov showing the excavation areas and architecture of Stratum IV (see also Fig.3.7)
Mazar et. al. (2020 v.1) - Table 4.1
Stratigraphic Table from Mazar et. al. (2020 v.1:XVII)
Stratigraphic Table
Mazar et. al. (2020 v.1)
- Photo 4.2
Fragments of roofing material from Stratum IV from Mazar et. al. (2020 v.1)
Photo 4.2
Fragments of roofing material made of lumps of clay with reed and beam impressions, found in Area C, Stratum IV
Mazar et. al. (2020 v.1)
- Figure 4.1 -
Map of major archaeological and historical sites in central and northern Israel and Jordan from Mazar et. al. (2020 v.1)
Figure 4.1
Map of major archaeological and historical sites in central and northern Israel and Jordan
Mazar et. al. (2020 v.1)
Stratum VI is attributed to Early Iron IIA, since it is preceded by Stratum VII of Iron IB and succeeded by Strata V-IV of Late Iron IIA. It yielded a relatively substantial pottery assemblage which, on the one hand, demonstrates many similarities with the preceding and subsequent assemblages but, on the other hand, has its own characteristics. The latter include the first appearance, mostly on serving vessels, of a relatively large amount of red slip, often hand burnished. Painted decoration is mainly limited to horizontal straight and wavy red bands in the style known at Tel Rehov in the Iron IB; most of the Canaanite-like motifs appear on small sherds, so it is difficult to say to what extent these are residual. Hippo jars appear for the first time, but are still rare. Imported Phoenician pottery includes several Bichrome sherds, and a small amount of imported Cypriot pottery includes White Painted and Bichrome sherds, but no Black-on-Red, aside from one small and ambivalent sherd in Stratum C-2.
The northern ceramic assemblages assigned by Herzog and Singer-Avitz (2004; 2006) to their Early Iron IIA horizon are (references updated):
- Beth-Shean Stratum S-lb (TBS I: Pls. 6—8)
- Megiddo Stratum VB (Arie 2013)
- Jezreel pre-enclosure fills (Zimhoni 1997: 29-56)
- Taanach Period IIA (Rast 1978: Figs.18-29)
- Yoqne'am Strata XVI-XV (Ben Tor, Zarzecki-Peleg and Cohen-Anidjar 2005: 108-112, Figs. I.36-I.38)
- Horbat Rosh Zayit Stratum III (Gal and Alexandre 2000: 30-33)
- Tell el-Farah North Stratum VIIa (Chambon 1984: Pls. 45-60)
- Dor Phase Ir1|2A (Phases 7a-b, 6b-c in Area G) (Gilboa and Sharon 2003: 21-22, Figs. 10-11; Gilboa 2018: Pls. 20:49, 20.56-20.64)
- Hazor X-IX (?)
- Tell el-Hammah, lower phase (attributed to Iron Age I, yet the few published pottery items [Cahill 2006: 436, Fig. 4] can fit Tel Rehov VI)
Several caveats to this list must be noted. The first is that all the contexts mentioned above (except Dor and, to some extent, Tell Abu al-Kharaz) yielded very small quantities of pottery, mainly sherds, and most of them are not sufficiently distinctive to be compared to our Stratum VI assemblage. In addition, the great degree of continuity between these assemblages and the following Late Iron IIA renders it difficult to distinguish between these two sub-periods. For example, at Jezreel, the pottery from the pre-enclosure fills cannot be distinguished from that found in the enclosure's destruction layer (Zimhoni 1997). At Megiddo, the pottery from Stratum VB is very similar to that of VA-IVB (Zimhoni 1997; Arie 2013) and the same may be said concerning Taanach IIA and IIB. Regional differences should also be taken into account. For example, the correlation between the pottery from Hazor Strata X-IX (Ben-Tor and Ben-Ami 1998; 2012) and our Stratum VI cannot be established with confidence, perhaps due to such regional differences and the strong Canaanite traditions which are present at Tel Rehov, but missing at Hazor. To conclude, Tel Rehov VI provides the largest pottery assemblage that can be attributed to the Early Iron IIA in northern Israel, along with Dor for the northern coastal plain. Yet, even at Tel Rehov, the continuity of many forms from Iron IB to Early Iron IIA, and from the latter to Late Iron IIA, make precise divisions difficult in many cases.
- Figure 4.1 -
Map of major archaeological and historical sites in central and northern Israel and Jordan from Mazar et. al. (2020 v.1)
Figure 4.1
Map of major archaeological and historical sites in central and northern Israel and Jordan
Mazar et. al. (2020 v.1)
The large amount of pottery from Strata V-IV (with very little distinction between the two), discussed in Chapter 24, can be attributed to Late Iron IIA, as defined by Herzog and Avitz-Singer (2006; see also surveys in TBS I: 320-323; APIN-IH: 135-188). The following contexts can be assigned to this phase:
- Tel Beth-Shean Strata S-la and P-10-P-9 (TBS I: 313-384; Plates 6-16)
- Tell el-Hammah two upper phases (Cahill 2006: Figs. 6-11)
- Tel 'Amal Strata III-IV (Levi and Edelstein 1972)
- the Jezreel 7enclosure (Zimhoni 1997: 13-28, 39-53, Figs. 1.2-1.10; 2.5-2.12)
- Megiddo VA-IVB (Finkelstein, Zimhoni and Kafri 2000; Arie 2013)
- Yoqne'am XIV (Ben Tor, Zarzecki-Peleg and Cohen-Anidjar 2005: Figs. I.50-I.52)
- Taanach Period IIB (Rast 1978: Figs. 30-69)
- Tell el-Far'ah North Stratum VIIb (Chambon 1984: 53-72, Pls. 45-62)
- Hazor X—IX(?), VIII (although see comments above and below)
- Horbat Rosh Zayit Strata IIa-Ilb (Gal and Alexandre 2000: 34-122)
- Dor Phase Ir2a (Phase 6a in Area G; Gilboa and Sharon 2003: 23-24, Figs. 12-13; Gilboa 2018: Pls. 20.6-20.67)
- Tell Abu Hawam Stratum III (Hamilton 1935)
- Tell Keisan Strata 8?-6 (Briend and Humbert 1980: Pls. 48-56)
- Tell Abu al-Kharaz Phases XI-XII (Fischer 2013)20
The absolute chronology of the Iron IIA strata is a subject of ongoing debate, based on radiometric dates and historical considerations, although it seems that by now, agreement has been reached on some major issues. The original Low Chronology date of the beginning of Iron IIA strata to ca. 900 BCE proved to be wrong, based on radiocarbon dating. On the other hand, the extension of Iron IIA into the 9th century is certainly correct, as it is anchored in the evidence from Jezreel, where the royal enclosure cannot predate Ahab [r. c. 871 - c. 852 BCE]. According to the modified chronology which I have suggested since 2003, Iron IIA started during the first half of the 10th century BCE and continued until sometime in the second half of the 9th century (Table 4.3). This approach was basically backed up by numerous radiocarbon dates, although there are different views concerning the precise time span and absolute dates of each of the two Iron IIA phases (for summaries and earlier literature, see Finkelstein and Piasetzky 2011; Mazar 2011b).
Table 4.3Three chronological systems for Iron IB-IIB
Mazar et. al. (2020 v.1)
The radiocarbon data from the Iron IIA strata at Tel Rehov is based on 27 short-lived samples, most of them measured several times, so that a total of 110 dates are available (Chapter 48, Table 48.4; partly published earlier in Mazar et al. 2005). This is the largest number of dates from a single site in this period. Several difficulties should be noted (see discussion in Chapter 48):
- The stratigraphic affiliation of several samples to specific phase of the Iron IIA is questionable: in particular, Samples R21—R23 from Area D and Samples R31—R34 from Area C, which could be either Stratum V or IV
- There are a few outliers (all Sample 27 and one determination in R36)
- Occasionally, samples from the same context or stratum yielded considerably different dates, which would provide too wide a range for our required resolution of less than half a century.
Table 4.4Results of a Bayesian model for secure dates from Areas C+D and B in lσ and 2σ CalBC showing dates for Strata VI-IV (not including unmodeled dates from Area E) - for details see Chapter 48
Mazar et. al. (2020 v.1)
The model for Areas C and D (in which most of the samples are included) resulted in the condensation of Strata VI, V and IV into a time frame of maximum 73 years between 936 (uppermost possible date) and 863 (lowest possible date) and minimum seven years (911-904 CalBC) in 1σ, while the 2σ, dates provide a longer maximal range of 145 years for this time span (and minimal -4 years!). The results in the 1σ range are much too short a time slot for three strata with several sub-phases and clear changes in the pottery assemblage between Stratum VI and Strata V-IV. The Bayesian model from Area B (from the end of Stratum VI to the end of Stratum IV) provided a wider range. It should also be recalled that the models provide considerable time spans for each of the transitions between strata, much wider than we would expect for the close dating of less than half a century that we seek for this period. Furthermore, one sample measured several times from Area E provided unmodeled calibrated dates in the late 9th century BCE which are much lower compared to both the unmodeled and modeled dates from the other areas. It appears that the more samples are measured, the problems involved in their interpretation become more complex.
Since the subject is discussed in detail in Chapter 48, I emphasize here only a few notable points. At the outset it should be noted that in the discussion of Iron Age chronology, where we expect restricted resolutions of less than half a century, it became common to cite only or mainly the 1σ CalBC dates (68% probability), and so I did as well in most cases. Yet, it should be recalled that the 2σ dates (95% probability) provide wider ranges and should be taken into consideration as well. Indeed, quite a few discussions of radiocarbon dates in archaeology refer only to the 2σ dates. In such narrow time slots as those involved in the Iron Age chronological debate, the possibilities provided by the 2σ range are sometimes crucial.
Another problem is the relationship between unmodeled and modeled dates. Unmodeled dates from Stratum VI cover most of the 10th century BCE, while the Bayesian model for Areas C+D provide, in my opinion, too short a time span for this stratum, which has in several locations two stratigraphic phases and yielded a pottery assemblage that differs somewhat from the previous and later strata. This result may have been caused by the constraint resulting from the over 100-years span provided by the Bayesian model for Stratum D-3 (see above in the discussion of Iron IB dates). I therefore suggest a much shorter time span for Stratum D-3 and a longer one for Stratum VI, supported by the unmodeled calibrated dates, and conclude that the beginning of Stratum VI could occur during the first half of the 10th century. Taking into consideration the dates of the following Stratum V, the end of Stratum VI should be dated to somewhere in the last quarter of the 10th century.
The date of Stratum V is based on five samples from secure contexts in Area C and one from Area B (a total of 24 repetitions).21 It appears that the last two decades of the 10th century and the beginning of the 9th century BCE are the most reasonable dates for this stratum.
The destruction of Stratum IV is dated by three samples from Area C and two from Area B (a total of 17 repetitions) (Samples R35-R41). The dates are partly in the 10th century and mostly in the 9th century; some reach the second half of the 9th century BCE. The Bayesian model for Areas C+D would end this stratum no later than 863 (1σ) and 817 (2σ) CalBC, while the model for Area B provides lower dates: 833 (161σ) and 822 (1σ) CalBC. In Area E, one of two samples from loci attributed to the early phase of the courtyard (E-lb, probably corresponding with Stratum V), measured several times, provided the exceptionally low date of 832-810 (unmodeled).
My suggested date of 840/830 BCE for the destruction of Stratum IV is based on attribution of this destruction to Hazael (see below). As can be seen in Table 4.4, this date is lower by 23-33 years than the lowest date in the 1σ model for the end of Stratum IV in Area C (863 CalBC), but can fit the lowest as date from Area C (812 BCE), the lowest 2σ and as dates from Area B (838, 822 BCE) and many of the unmodeled lowest dates from Areas B, C and E in the 1σ and 2σ ranges.
Radiocarbon dates from Iron IIA strata at other sites in northern Israel were widely discussed in recent years (e.g., Sharon et al. 2007; Mazar and Bronk Ramsey 2008; Finkelstein and Piasetzky 2009; 2010; 2011; Lee, Mazar and Bronk Ramsey 2013). However, in many cases, the number of measurements from a single site is insufficient, and often they provide a wide range of dates in the 10th to 9th centuries. An example is Megiddo, where only eight samples with eleven repetitions were measured from Iron IIA strata: one from Stratum H-7 (a middle phase of Stratum VB) with a CalBC 1σ date of 1000-920, three from Stratum H-5 which corresponds to general Stratum VA-IVB, two of them (RTT3948 and RTK 6429) provided dates that cover the entire 9th century BCE and the third (RTT 3949) provided a date in the 10th century (1005-930 CaIBC) (Toffolo et al. 2014: 235).22 Four additional dates were published from Stratum Q-5, a Late Iron IIA context which is phased by the excavators between Stratum VB and VA-IVB; the calibrated dates are 1050-940, 980-895, 1000-920 and 895-830 BCE (1σ) and a (yet unpublished) Bayesian model is cited as providing a date of ca. 900 BCE (Kleiman et al. 2019: 547 and Table 7). This is just one example of the potential inconsistencies in the results of 14C dating, in particular when only a few dates are available. Bayesian models are used in order to limit these wide ranges; yet, the unmodeled dates should be taken into account when weighing the results of Bayesian models, specially in cases when the models include data from many sites. The radiometric evidence is certainly important, but has its limitations when it comes down to subtle dating at a resolution of less than 50 years.
I end this section with the words of Walter Kutchera, the former director of the radiometric laboratory in the University of Vienna:
I am convinced that 14C is the most wonderful tool for archaeology, when its inherent uncertainty is properly respected. Unfortunately, pushing its use beyond these limitations puts "oil into the fire" of those who mistrust the 14C method altogether .....23These words are very true when we deal with Iron Age chronology, particularly in the 10th-9th centuries BCE.
- Figure 12.1 -
Site Plan with grid and excavation areas from Mazar et. al. (2020 v.2)
Figure 12.1
Topographic map of Tel Rehov with location of Area C
Panitz-Cohen and Mazar in Mazar et. al. (2020 v.2) - Photo 12.1 -
Aerial Photo showing Area C from Mazar et. al. (2020 v.2)
Photo 12.1
Aerial view, looking south, foreground: Area C; right: Area D (SkyView)
Panitz-Cohen and Mazar in Mazar et. al. (2020 v.2) - Stratigraphic Table
from Mazar et. al. (2020 v.1:XVII)
Stratigraphic Table
Mazar et. al. (2020 v.1)
Area C was located at the northwestern end of the lower city of Tel Rehov, which is the highest point of this part of the mound (Fig. 12.1; Photo 12.1). It was excavated with the purpose of clarifying the stratigraphic sequence and defining the nature of settlement in this part of the tell. ...
Stratigraphy
Four main strata were detected in Area C, termed from earliest to latest (Table 12.1):
- C-3
- C-2
- C-1b
- C-1a
Table 12.1Correlation of local Area C and general tell strata
Mazar et. al. (2020 v.2)
The amount of continuity between the major strata (C-3–C-1) differed. Some walls of Stratum C-2 were built directly on those of C-3, while others were constructed according to a different plan altogether. Some buildings of Stratum C-2 were rebuilt in C-1b, while others went out of use. The greatest continuity took place between Strata C-1b and C-1a, which should be viewed, in fact, as two phases of the same occupation, although there were also several marked changes, mostly in the southeastern part of the area. Strata C-3 and C-2 each had a distinct brick type, while the bricks of Strata C-1b and C-1a were similar, although of varied materials (Tables 12.27–12.30).
The correlation between the destruction/construction events in a city that was constructed entirely of bricks turned out to be complicated task. Our stratigraphic division was based on the attempt to integrate local sequences in the various parts of the area into one comprehensive scheme. Although in each context we were able to establish clear stratigraphy, there remained open questions concerning the correlation between them, in particular due to a violent event at the end of Stratum C-1b, mostly in the southeastern part of the field (Squares Y–Z, A– B/20, 1–3). However, other parts of Area C with remains attributed to Stratum C-1b did not suffer such massive destruction. Following the violent destruction at the end of Stratum C-1a, Area C, like the entire lower city, was entirely abandoned, and the architecture of this stratum was revealed just under modern topsoil.
- Fig. 12.7 -
Plan of Stratum C-2 from Mazar et. al. (2020 v.2)
Fig. 12.7
Plan of Stratum C-2 (1:250); for the continuation of this stratum in Area D, see Fig. 15.28
Mazar et. al. (2020 v.2)
Stratum C-2 was dated to Early Iron Age IIA, the 10th century BCE (for more specific dating, see below and Chapters 4, 48). It marked the initial appearance of red-slipped and hand-burnished wares; Cypriot Black-on-Red ware that appeared in subsequent strata was lacking (Chapter 27). The Hippo storage jar made its first appearance in this stratum, although in small amounts and partially ambiguous from a typological point of view, made of the same type of clay common in subsequent strata (Chapter 24). Most of the pottery was fragmentary, aside from several complete vessels, including an assemblage from Locus 1555b in Square R/4 (Figs. 13.10–13.11; Photo 13.1) whose typological attributes and decoration recall Iron IB pottery, as discussed below.
One of the most distinct characteristics of this occupation phase was that almost all the walls were constructed with hard-packed yellow bricks, very different from the crumbly gray bricks of Stratum C-3 (Table 12.28). Most of the rooms were found full of complete fallen bricks of this type. This, and traces of damage in the walls, such as cracks and slippage, allude to seismic activity at some point, possibly the reason for the end of this stratum. Despite this damage, the walls of Stratum C-2 were, in most cases, well preserved, for example in Building CB, where they stood up to 18 courses, with two intact entrances.
- Figure 12.9 -
Plan of Stratum C-2 from Mazar et. al. (2020 v.2)
Figure 12.9
Plan of Stratum C-2, west; area in Squares Y/1–2 cut by apiary (1:125)
Panitz-Cohen and Mazar in Mazar et. al. (2020 v.2) - Figure 12.97 -
Section 43 (Square R/4, looking north) from Mazar et. al. (2020 v.2)
Figure 12.97
Section 43 (Square R/4, looking north)
Panitz-Cohen and Mazar in Mazar et. al. (2020 v.2) - Photo 12.23 -
Room 1555 at the beginning of excavation from Mazar et. al. (2020 v.2)
Photo 12.23
Squares R–S/4, looking south; Room 1555 at the beginning of its excavation (2010)
Panitz-Cohen and Mazar in Mazar et. al. (2020 v.2) - Photo 12.24 -
Damaged eastern face of Wall 1563 from Mazar et. al. (2020 v.2)
Photo 12.24
Square R/4, looking southeast at Wall 1563 (left) and its corner with Wall 1572 (right) (2010)
Panitz-Cohen and Mazar in Mazar et. al. (2020 v.2) - Photo 12.25 -
Smashed vessels in Room 1555 from Mazar et. al. (2020 v.2)
Photo 12.25
Square R/4, looking south at smashed vessels in Locus 1555b (2010)
Panitz-Cohen and Mazar in Mazar et. al. (2020 v.2)
- Plan: Fig. 12.9
- Section: Fig. 12.97
- Photos 12.23–12.25
- Pottery: Figs. 13.10–13.11
The 18 restored vessels from Locus 1555b (Figs. 13.10–13.11; photo on p. 270) were attributed to Room 1555 of Stratum C-2, based on the relation of the debris layer (1555a) and the top of the pottery layer (1555b) to the surrounding walls. As such, this would be the only case where an assemblage of restorable vessels could be attributed to Stratum C-2 and the only evidence for a sudden destruction at the end of this occupation level, although no traces of fire were found; the cause might have been an earthquake. Yet, there is a certain dilemma concerning this pottery group. Unlike much of the other pottery from Stratum C-2, the vessels lacked red slip and burnish, and several were painted in a style typical of the Iron IB pottery at Tel Rehov. Typologically as well, the vessels suit an Iron IB date, although most forms also continued into Early Iron IIA. These factors, as well as the fact that the main bulk of the pottery was found at level 85.60 m, which is somewhat lower than the uppermost pits of Stratum D-3 (general Stratum VII) in the adjacent Square Q/4, raised initial doubts as to the attribution of this locus. If this pottery was on a layer relating to the debris of Locus 1555a and abutting the bottom of the room’s walls, it must belong to Stratum C-2. However, the possibility remains that this pottery concentration should be attributed to Stratum C-3a, the last Iron IB phase, in which case the thin debris layer 11428 might have been the surface on which the assemblage rested. In that case, Floor 11436 and Pits 11438 and 11439 would be attributed to an earlier phase, denoted Stratum C-3b, corresponding to the lower pits of Stratum D-3; if so, then the pottery concentration preceded the walls of the room as defined above. This is not entirely impossible when considering the location of this pottery concentration in relation to the bottom of these walls (see section, Fig. 12.97). However, in that case, Room 1555 would remain without a floor, despite the good preservation of its walls. Another problem with this explanation is that floors attributed to Stratum C-2 east of Room 1555 (in Square S/4) are almost at the same level or even lower than the pottery in Locus 1555b. Ultimately, this unique assemblage was assigned to Stratum C-2, while acknowledging that the pottery types could be either Iron IB or Early Iron IIA, demonstrating the continuity between these two periods, as discussed in Chapter 24.
West of Square R/4, where the steep western slope of the mound started, was the border between Areas C and D. In Squares R–Q/4–5 of Area D, architectural elements attributed to Stratum D-2 continued until the erosion line down the slope, with no evidence for a defense line of any sort. These remains were contemporary with Stratum C-2 and thus, we concluded that the city had not been fortified at that time.
- Figure 12.9 -
Plan of Stratum C-2 (west) from Mazar et. al. (2020 v.2)
Figure 12.9
Plan of Stratum C-2, west; area in Squares Y/1–2 cut by apiary (1:125)
Panitz-Cohen and Mazar in Mazar et. al. (2020 v.2) - Figure 12.10 -
Plan of Buildings CA and CB in Stratum C-2 from Mazar et. al. (2020 v.2)
Figure 12.10
Plan of Buildings CA and CB, Stratum C-2 (1:75)
Panitz-Cohen and Mazar in Mazar et. al. (2020 v.2) - Figure 12.65 -
Section 11 from Mazar et. al. (2020 v.2)
Figure 12.65
Section 11 (Squares T/1–4, looking west); the section in Square T/3 north of Walls 1448/4439 was drawn on a line east of Wall 1506
Panitz-Cohen and Mazar in Mazar et. al. (2020 v.2) - Figure 12.66 -
Section 12 from Mazar et. al. (2020 v.2)
Figure 12.66
Section 12 (Square S/4, looking east at walls)
Panitz-Cohen and Mazar in Mazar et. al. (2020 v.2) - Figure 12.67 -
Section 13 from Mazar et. al. (2020 v.2)
Figure 12.67
Section 13 (Square S/3, section below Wall 1448, looking south)
Panitz-Cohen and Mazar in Mazar et. al. (2020 v.2) - Figure 12.68 -
Section 14 from Mazar et. al. (2020 v.2)
Figure 12.68
Section 14 (Square T/3, looking north)
Panitz-Cohen and Mazar in Mazar et. al. (2020 v.2) - Photo 12.27 -
Looking south at Buildings CA and CB in Stratum C-2 from Mazar et. al. (2020 v.2)
Photo 12.27
View of C-2 Building CA, looking south; C-2 Building CB on the south (2000)
Panitz-Cohen and Mazar in Mazar et. al. (2020 v.2) - Photo 12.28 -
Looking south at Building CA in Stratum C-2 with a bulge in Wall 4439 from Mazar et. al. (2020 v.2)
Photo 12.28
Southeastern part of C-2 Building CA, looking south; C-1b Wall 1448 above repair line covering Wall 4439 (2000)
JW: Walls 4439 is bulging
Panitz-Cohen and Mazar in Mazar et. al. (2020 v.2) - Photo 12.29 -
Room 4426 in Building CA in Stratum C-2 with burnt grain on the floor from Mazar et. al. (2020 v.2)
Photo 12.29
Room 4426 in C-2 Building CA, looking southwest; burnt grain on floor (2000)
Panitz-Cohen and Mazar in Mazar et. al. (2020 v.2) - Photo 12.30 -
Buildings CA and CB in Stratum C-2 looking south from Mazar et. al. (2020 v.2)
Photo 12.30
C-2 Building CB adjoining Building CA on the south, looking south (2000)
Panitz-Cohen and Mazar in Mazar et. al. (2020 v.2)
- Plans: Figs. 12.9–12.10
- Sections: Figs. 12.65–12.68
- Photos 12.4–12.5, 12.27–12.30
- Pottery: Figs. 13.13–13.14
- Figure 12.9 -
Plan of Stratum C-2 (west) from Mazar et. al. (2020 v.2)
Figure 12.9
Plan of Stratum C-2, west; area in Squares Y/1–2 cut by apiary (1:125)
Panitz-Cohen and Mazar in Mazar et. al. (2020 v.2) - Figure 12.10 -
Plan of Buildings CA and CB in Stratum C-2 from Mazar et. al. (2020 v.2)
Figure 12.10
Plan of Buildings CA and CB, Stratum C-2 (1:75)
Panitz-Cohen and Mazar in Mazar et. al. (2020 v.2) - Figure 12.65 -
Section 11 from Mazar et. al. (2020 v.2)
Figure 12.65
Section 11 (Squares T/1–4, looking west); the section in Square T/3 north of Walls 1448/4439 was drawn on a line east of Wall 1506
Panitz-Cohen and Mazar in Mazar et. al. (2020 v.2) - Figure 12.69 -
Section 15 from Mazar et. al. (2020 v.2)
Figure 12.69
Section 15 (Squares S–Y/2, looking north) (1:55)
Panitz-Cohen and Mazar in Mazar et. al. (2020 v.2) - Figure 12.77 -
Section 23 from Mazar et. al. (2020 v.2)
Figure 12.77
Section 23 (Square Y/3, section below Wall 2411, looking east)
Panitz-Cohen and Mazar in Mazar et. al. (2020 v.2) - Figure 12.79 -
Section 25 from Mazar et. al. (2020 v.2)
Figure 12.79
Section 25 (Squares T–Y/3, looking south)
Panitz-Cohen and Mazar in Mazar et. al. (2020 v.2) - Photo 12.30 -
Buildings CA and CB in Stratum C-2 looking south from Mazar et. al. (2020 v.2)
Photo 12.30
C-2 Building CB adjoining Building CA on the south, looking south (2000)
Panitz-Cohen and Mazar in Mazar et. al. (2020 v.2) - Photo 12.31 -
Wall 2505 from Mazar et. al. (2020 v.2)
Photo 12.31
C-2 Building CB, looking east; Wall 2505 with entrance (1998)
Panitz-Cohen and Mazar in Mazar et. al. (2020 v.2) - Photo 12.32 -
Wall 2505 from Mazar et. al. (2020 v.2)
Photo 12.32
C-2 Building CB, entrance in Wall 2505, superimposed by C-1 Wall 1416 of Building CG, looking west (2000)
Panitz-Cohen and Mazar in Mazar et. al. (2020 v.2) - Photo 12.33 -
Wall 2505 from Mazar et. al. (2020 v.2)
Photo 12.33
C-2 Building CB, close-up of entrance in Wall 2505, looking west (2000)
Panitz-Cohen and Mazar in Mazar et. al. (2020 v.2) - Photo 12.34 -
Central Hall from Mazar et. al. (2020 v.2)
Photo 12.34
C-2 Building CB, central hall, looking south (1998)
Panitz-Cohen and Mazar in Mazar et. al. (2020 v.2) - Photo 12.35 -
Split between northern walls 1442 and 1483 of Building CB - possibly due to an earthquake - from Mazar et. al. (2020 v.2)
Photo 12.35
C-2 Building CB, northern wall; note possible earthquake damage (1998)
JW: The earthquake damage alluded to is the split between walls 1442 and 1483
Panitz-Cohen and Mazar in Mazar et. al. (2020 v.2) - Photo 12.36 -
Lamp in niche of Wall 1483 - from Mazar et. al. (2020 v.2)
Photo 12.36
C-2 Building CB; intact lamp in niche in the western doorjamb of entrance in Wall 1483, looking north (1998)
Panitz-Cohen and Mazar in Mazar et. al. (2020 v.2) - Photo 12.37 -
Large Tumbled Stone in Building CB from Mazar et. al. (2020 v.2)
Photo 12.37
C-2 Building CB; large stone south of entrance in Wall 1483, looking north (1998)
Panitz-Cohen and Mazar in Mazar et. al. (2020 v.2) - Photo 12.38 -
Wall 2481 from Mazar et. al. (2020 v.2)
Photo 12.38
C-2 Building CB Wall 2481 below Room 2444 of C-1 Building CG, looking east; note intentionally removed bricks in Wall 2481 (1998)
Panitz-Cohen and Mazar in Mazar et. al. (2020 v.2) - Photo 12.39 -
Tilted Stratum C-1 Wall 2411 overlying Stratum C-2 Wall 5476 from Mazar et. al. (2020 v.2)
Photo 12.39
Square Y/3, looking west at C-1 Building CG; C-2 walls below wood in foundation (2008)
Panitz-Cohen and Mazar in Mazar et. al. (2020 v.2)
- Plans: Figs. 12.9–12.10
- Sections: Figs.12.65, 12.69, 12.77, 12.79
- Photos 12.3–12.5, 12.8, 12.15–12.16, 12.30–12.39
- Pottery: Figs. 13.15–13.18
- Figure 12.12 -
Plan of Stratum C-2 from Mazar et. al. (2020 v.2)
Figure 12.12
Plan of Stratum C-2, northeast (1:125)
Panitz-Cohen and Mazar in Mazar et. al. (2020 v.2) - Figure 12.62 -
Section 8 from Mazar et. al. (2020 v.2)
Figure 12.62
Section 8 (Square Y/5, looking north)
Panitz-Cohen and Mazar in Mazar et. al. (2020 v.2) - Figure 12.63 -
Section 9 from Mazar et. al. (2020 v.2)
Figure 12.63
Section 9 (Square Y/5, looking west)
Panitz-Cohen and Mazar in Mazar et. al. (2020 v.2) - Figure 12.64 -
Section 10 from Mazar et. al. (2020 v.2)
Figure 12.64
Section 10 (Square T/4, looking east)
Panitz-Cohen and Mazar in Mazar et. al. (2020 v.2) - Photo 12.40 -
Tilted C1-b Wall 2454 on top of C-2 Wall 6441 from Mazar et. al. (2020 v.2)
Photo 12.40
Building CE, looking at eastern wall (2003)
Panitz-Cohen and Mazar in Mazar et. al. (2020 v.2) - Photo 12.41 -
Building CE from Mazar et. al. (2020 v.2)
Photo 12.41
Building CE, looking southeast; Stratum C-2 walls below Stratum C-1 walls (2003)
Panitz-Cohen and Mazar in Mazar et. al. (2020 v.2) - Photo 12.42 -
fallen bricks and debris in Room 6464 from Mazar et. al. (2020 v.2)
Photo 12.42
C-2 Building CE, looking east; fallen bricks and debris in Room 6464 (2003)
Panitz-Cohen and Mazar in Mazar et. al. (2020 v.2) - Photo 12.43 -
from Mazar et. al. (2020 v.2)
Photo 12.43
Squares Y-Z/4-6, looking south; right: northern spaces of Building CE; center: Stratum C-2 Building CU below C-1 Building CF (2005)
Panitz-Cohen and Mazar in Mazar et. al. (2020 v.2)
- Plan: Fig. 12.12
- Section: Figs. 12.62–12.64
- Photos 12.40–12.43
- Pottery: Fig. 13.22
- Figure 12.12 -
Plan of Stratum C-2 from Mazar et. al. (2020 v.2)
Figure 12.12
Plan of Stratum C-2, northeast (1:125)
Panitz-Cohen and Mazar in Mazar et. al. (2020 v.2) - Figure 12.14 -
Plan of Building CY, Stratum C-2 from Mazar et. al. (2020 v.2)
Figure 12.14
Plan of Building CY, Stratum C-2 (1:75)
Panitz-Cohen and Mazar in Mazar et. al. (2020 v.2) - Figure 12.55 -
Section 1 from Mazar et. al. (2020 v.2)
Figure 12.55
Section 1 (Squares A/6–C/6, looking north)
Panitz-Cohen and Mazar in Mazar et. al. (2020 v.2) - Figure 12.56 -
Section 2 from Mazar et. al. (2020 v.2)
Figure 12.56
Section 2 (Squares B/5–6, section below C-1 Walls 6420 and 6476, and below C-2 Wall 7506, looking west)
Panitz-Cohen and Mazar in Mazar et. al. (2020 v.2) - Photo 12.58 -
Building CY in Stratum C-2 from Mazar et. al. (2020 v.2)
Photo 12.58
C-2 Building CY, looking west; meter stick on Floor 7512 (2007)
Panitz-Cohen and Mazar in Mazar et. al. (2020 v.2) - Photo 12.59 -
Wall 7511 in Stratum C-2 from Mazar et. al. (2020 v.2)
Photo 12.59
C-2 Building CY, looking south at Wall 7511, covered by wood in foundation of C-1 Wall 6444 (2007)
Panitz-Cohen and Mazar in Mazar et. al. (2020 v.2) - Photo 12.60 -
Closeup on Wall 7511 in Stratum C-2 from Mazar et. al. (2020 v.2)
Photo 12.60
Detail of Wall 7511 (see Photo 12.59), looking southwest (2007)
Panitz-Cohen and Mazar in Mazar et. al. (2020 v.2) - Photo 12.61 -
brick collapse 10412 from Mazar et. al. (2020 v.2)
Photo 12.61
C-2 Building CY, stones along northern face of Wall 7511, looking south; brick collapse 10412 in center (2010)
Panitz-Cohen and Mazar in Mazar et. al. (2020 v.2) - Photo 12.62 -
Building CY from Mazar et. al. (2020 v.2)
Photo 12.62
C-2 Building CY, looking east; note blocked entrance to Room 8479; meter stick on Floor 7512 (2007)
Panitz-Cohen and Mazar in Mazar et. al. (2020 v.2) - Photo 12.63 -
Building CY from Mazar et. al. (2020 v.2)
Photo 12.63
. Eastern part of C-2 Building CY, looking south; note blockage of Room 8479 in center; meter stick on Floor 8488 (2007)
Panitz-Cohen and Mazar in Mazar et. al. (2020 v.2)
- Plan: Figs. 12.12, 12.14
- Section: Figs. 12.55–12.56
- Photos 12.58–12.63
- Pottery: Figs. 13.34–13.37
- Figure 12.9 -
Plan of Stratum C-2 from Mazar et. al. (2020 v.2)
Figure 12.9
Plan of Stratum C-2, west; area in Squares Y/1–2 cut by apiary (1:125)
Panitz-Cohen and Mazar in Mazar et. al. (2020 v.2)
The plan of Stratum C-2 included densely built units of varying architectural plans, most of which were adjoined and all built of the same type of hard yellow bricks. Notable were the absence of stone foundations for the brick walls and the architectural plans which, although fragmentary in most cases, appear to differ from most known Iron Age II buildings in northern Israel. Moreover, they differ from each other, so that each structure was unique.
The finds included red-slipped and hand-burnished, as well as red-painted pottery, mostly sherds, aside from sporadic complete vessels. The single locus that yielded restorable pottery (Locus 1555b with 18 vessels) is stratigraphically attributed to Stratum C-2, while the pottery types recall late Iron IB forms that continued into Iron IIA (see Chapter 24). Additional finds included several clay figurines, seals, three inscriptions (one on an almost-complete storage jar), and iron and bronze objects.
Stratum C-2 appears to have lasted a long time, as evidenced by the thick accumulation of striations in the open areas and inside several of the buildings. Only in three places was there clear evidence of two phases (Buildings CT, CE, and perhaps, the partial unit in Squares Y/3–4) and it is possible that most of the well-built units simply continued to be used, with very minor renovations, during the entire occupation phase.
The lack of Stratum C-2 remains in the area of the apiary of Stratum C-1b (Squares Y–Z/1–2) must be explained as resulting from their intentional removal by the builders of the apiary when they established it on a lower level than the surrounding buildings. This was evidenced by the existence of Stratum C-2 building remains west, north and northeast of the apiary area. It should be noted that the Stratum C-2 floor west of the apiary in Square T/1 was ca. 1.0 m higher than the apiary floor, while in Square B/3 (northeast of the apiary), it was almost at the same level as that of the apiary floor. This comprises additional evidence for the tilt towards the east or southeast, observed in other cases at Tel Rehov as well.
The termination of Stratum C-2 appears to have been brought about by an earthquake, based on the fact that many of the walls showed signs of damage, such as cracks, tilts and sinkage, as well as the large amount of fallen bricks consistently found on the floors in each unit. A possibility is that some of this damage was gradual and not cataclysmic, generating local renovations and internal changes during the course of this stratum. Aside from the layer in Room 1555 (Square R/4) with its 18 complete smashed vessels, the relative lack of whole vessels and other finds in situ on the floors suggests that the final termination of this occupation did not take the inhabitants by surprise and that they had enough time to evacuate. We may think of a series of earthquakes that caused the abandonment and demolition of the houses, some taking place after the abandonment of the town.
- Fig. 12.18 -
Plan of Stratum C-1b from Mazar et. al. (2020 v.2)
Fig. 12.18
Plan of Stratum C-1b (1:200)
Mazar et. al. (2020 v.2) - Fig. 12.19 -
Plan of Stratum C-1a from Mazar et. al. (2020 v.2)
Fig. 12.19
Plan of Stratum C-1a (1:200)
Mazar et. al. (2020 v.2) - Fig. 12.23 -
Isometric view of Area C, Stratum C-1a, looking northwest from Mazar et. al. (2020 v.2)
Fig. 12.23
Isometric view of Area C, Stratum C-1a, looking northwest
Mazar et. al. (2020 v.2)
- Plans: Figs. 12.16–12.53
In the western and northern parts of Area C, the continuity between Strata C-1b and C-1a was marked and, in fact, both should be considered phases of one city, with most of the changes being floor raisings and minor adjustments of walls (Fig. 12.17). However, in the southeastern quarter of the area, the apiary, Building CM and buildings to their east went of use and were replaced by entirely new buildings in Stratum C-1a. Due to this situation, the following description is organized by units, detailing the phases within them that are attributed to C-1b and C-1a. The units of Strata C-1b and C-1a in the southeast of the area are described at the end in separate sections.
Altogether, 23 architectural units were defined; they are presented below according to four main parts.
- Figure 12.24 -
Plan of Stratum C-1b from Mazar et. al. (2020 v.2)
Figure 12.9
Plan of Stratum C-1b, west (1:125)
Panitz-Cohen and Mazar in Mazar et. al. (2020 v.2) - Figure 12.25 -
Plan of Stratum C-1a from Mazar et. al. (2020 v.2)
Figure 12.9
Plan of Stratum C-1a, west (1:125)
Panitz-Cohen and Mazar in Mazar et. al. (2020 v.2) - Figure 12.97 -
Section 43 (Square R/4, looking north) from Mazar et. al. (2020 v.2)
Figure 12.97
Section 43 (Square R/4, looking north)
Panitz-Cohen and Mazar in Mazar et. al. (2020 v.2) - Photo 12.64 -
Square R/4 from Mazar et. al. (2020 v.2)
Photo 12.64
Square R/4, looking south, before removal of balk between Squares R–Q/4 (on right); meter stick on C-1b Locus 2446 (compare Photo 12.23 for lower levels in this square) (2000)
Panitz-Cohen and Mazar in Mazar et. al. (2020 v.2) - Photo 12.65 -
Square R/4 from Mazar et. al. (2020 v.2)
Photo 12.65
Square R/4; C-1a Room 2442, with plaster patch, looking north (1998)
Panitz-Cohen and Mazar in Mazar et. al. (2020 v.2)
- Plan: Figs. 12.24–12.25
- Section: Fig. 12.97
- Photos 12.8, 12.64–12.65
- Pottery: C-1b — Fig. 13.40:8–12; C-1a — Figs. 13.68–13.70
- Figure 12.24 -
Plan of Stratum C-1b from Mazar et. al. (2020 v.2)
Figure 12.24
Plan of Stratum C-1b, west (1:125)
Panitz-Cohen and Mazar in Mazar et. al. (2020 v.2) - Figure 12.65 -
Section 11 from Mazar et. al. (2020 v.2)
Figure 12.65
Section 11 (Squares T/1–4, looking west); the section in Square T/3 north of Walls 1448/4439 was drawn on a line east of Wall 1506
Panitz-Cohen and Mazar in Mazar et. al. (2020 v.2) - Figure 12.66 -
Section 12 from Mazar et. al. (2020 v.2)
Figure 12.66
Section 12 (Square S/4, looking east at walls)
Panitz-Cohen and Mazar in Mazar et. al. (2020 v.2) - Figure 12.67 -
Section 13 from Mazar et. al. (2020 v.2)
Figure 12.67
Section 13 (Square S/3, section below Wall 1448, looking south)
Panitz-Cohen and Mazar in Mazar et. al. (2020 v.2) - Figure 12.68 -
Section 14 from Mazar et. al. (2020 v.2)
Figure 12.67
Section 14 (Square T/3, looking north)
Panitz-Cohen and Mazar in Mazar et. al. (2020 v.2) - Photo 12.66 -
Tilted Wall 2495 in C-1b Building CD excavation from Mazar et. al. (2020 v.2)
Photo 12.66
C-1b Building CD, looking east; Wall 2495 above C-2 Wall 4434 (2000)
Panitz-Cohen and Mazar in Mazar et. al. (2020 v.2)
- Plan: Fig. 12.24
- Section: Figs. 12.65–12.68
- Photos 12.66
- Pottery: Fig. 13.41
- Figure 12.25 -
Plan of Stratum C-1a from Mazar et. al. (2020 v.2)
Figure 12.25
Plan of Stratum C-1a, west (1:125)
Panitz-Cohen and Mazar in Mazar et. al. (2020 v.2) - Figure 12.65 -
Section 11 from Mazar et. al. (2020 v.2)
Figure 12.65
Section 11 (Squares T/1–4, looking west); the section in Square T/3 north of Walls 1448/4439 was drawn on a line east of Wall 1506
Panitz-Cohen and Mazar in Mazar et. al. (2020 v.2) - Figure 12.69 -
Section 15 from Mazar et. al. (2020 v.2)
Figure 12.69
Section 15 (Squares S–Y/2, looking north) (1:55)
Panitz-Cohen and Mazar in Mazar et. al. (2020 v.2) - Photo 12.70 -
C-1a Piazza CK from Mazar et. al. (2020 v.2)
Photo 12.70
C-1a Piazza CK, looking east; lower center: Stones 1427 and 1496 (1997)
Panitz-Cohen and Mazar in Mazar et. al. (2020 v.2) - Photo 12.71 -
C-1a Piazza CK from Mazar et. al. (2020 v.2)
Photo 12.71
C-1a Piazza CK, looking south; Stones 1496, with cooking pots in the center (1997)
Panitz-Cohen and Mazar in Mazar et. al. (2020 v.2)
- Plan: Fig. 12.25
- Section: Figs. 12.65, 12.69
- Photos 12.70–12.71
- Pottery: Figs. 13.71–13.72
- Figure 12.27 -
Plan of Stratum C-1b from Mazar et. al. (2020 v.2)
Figure 12.27
Plan of Stratum C-1b, north-center (1:125)
Panitz-Cohen and Mazar in Mazar et. al. (2020 v.2) - Figure 12.28 -
Plan of Stratum C-1a from Mazar et. al. (2020 v.2)
Figure 12.28
Plan of Stratum C-1a, north-center (1:125)
Panitz-Cohen and Mazar in Mazar et. al. (2020 v.2) - Figure 12.62 -
Section 8 from Mazar et. al. (2020 v.2)
Figure 12.62
Section 8 (Square Y/5, looking north)
Panitz-Cohen and Mazar in Mazar et. al. (2020 v.2) - Figure 12.63 -
Section 9 from Mazar et. al. (2020 v.2)
Figure 12.63
Section 9 (Square Y/5, looking west)
Panitz-Cohen and Mazar in Mazar et. al. (2020 v.2) - Figure 12.64 -
Section 10 from Mazar et. al. (2020 v.2)
Figure 12.64
Section 10 (Square T/4, looking east)
Panitz-Cohen and Mazar in Mazar et. al. (2020 v.2) - Photo 12.75 -
Buildings CE, CF and CG from Mazar et. al. (2020 v.2)
Photo 12.75
Squares T–Z, A/3–5, general view to southeast; Buildings CE, CF and CG (2003)
Panitz-Cohen and Mazar in Mazar et. al. (2020 v.2) - Photo 12.76 -
Building CE, C-1b Room 2489 from Mazar et. al. (2020 v.2)
Photo 12.76
Building CE, C-1b Room 2489, looking north (1998)
Panitz-Cohen and Mazar in Mazar et. al. (2020 v.2) - Photo 12.77 -
Building CE, looking east at Wall 2454 from Mazar et. al. (2020 v.2)
Photo 12.77
Building CE, looking east at Wall 2454; note marginal bosses on bricks and wood in foundation (2003)
Panitz-Cohen and Mazar in Mazar et. al. (2020 v.2) - Photo 12.78 -
Building CE; corner of Walls 2454 and 1491 from Mazar et. al. (2020 v.2)
Photo 12.78
Building CE; corner of Walls 2454 and 1491, looking northeast (2003)
Panitz-Cohen and Mazar in Mazar et. al. (2020 v.2) - Photo 12.79 -
Building CE, C-1a Room 1471 from Mazar et. al. (2020 v.2)
Photo 12.79
Building CE, C-1a Room 1471, looking west (1997)
Panitz-Cohen and Mazar in Mazar et. al. (2020 v.2) - Photo 12.80 -
Northern rooms of Building CE from Mazar et. al. (2020 v.2)
Photo 12.80
Squares Y/5-6, northern rooms of Building CE, looking east (2003)
Panitz-Cohen and Mazar in Mazar et. al. (2020 v.2) - Photo 12.81 -
Building CE, Stratum C-1b, Room 6449 from Mazar et. al. (2020 v.2)
Photo 12.81
Building CE, Stratum C-1b, Room 6449, near corner of Walls 2454 and 1491, looking east (2003)
Panitz-Cohen and Mazar in Mazar et. al. (2020 v.2) - Photo 12.82 -
Destruction debris inBuilding CE, C-1b Room 6449 from Mazar et. al. (2020 v.2)
Photo 12.82
Building CE, C-1b Room 6449, looking south at bricks against Wall 1491 and chalices in destruction debris (2003)
Panitz-Cohen and Mazar in Mazar et. al. (2020 v.2) - Photo 12.83 -
Detail of marginal bosses on bricks in C-1b Wall 6452 from Mazar et. al. (2020 v.2)
Photo 12.83
Building CE, detail of marginal bosses on bricks in C-1b Wall 6452 (2003)
Panitz-Cohen and Mazar in Mazar et. al. (2020 v.2) - Photo 12.84 -
Building CE, C-1a Room 6433 from Mazar et. al. (2020 v.2)
Photo 12.84
Building CE, C-1a Room 6433, looking south at corner of Walls 1491 and 2454 (2003)
Panitz-Cohen and Mazar in Mazar et. al. (2020 v.2) - Photo 12.87 -
C-1 Building CR from Mazar et. al. (2020 v.2)
Photo 12.87
Squares Y–Z/6, looking south at southwestern corner of C-1 Building CR, cut by Pit 6498 (2005)
Panitz-Cohen and Mazar in Mazar et. al. (2020 v.2)
- Plan: Figs. 12.27–12.28
- Section: Figs. 12.62–12.64
- Photos 12.75–12.84, 12.87
- Pottery: C-1b — Figs. 13.44–13.45; C-1a — Figs. 13.75–13.76
- Figure 12.27 -
Plan of Stratum C-1b from Mazar et. al. (2020 v.2)
Figure 12.27
Plan of Stratum C-1b, north-center (1:125)
Panitz-Cohen and Mazar in Mazar et. al. (2020 v.2) - Figure 12.28 -
Plan of Stratum C-1a from Mazar et. al. (2020 v.2)
Figure 12.28
Plan of Stratum C-1a, north-center (1:125)
Panitz-Cohen and Mazar in Mazar et. al. (2020 v.2) - Figure 12.33 -
Plan of Building CR, early phase of Stratum C-1b from Mazar et. al. (2020 v.2)
Figure 12.33
Plan of Building CR, early phase of Stratum C-1b; the pits in Squares A, Z/6 are possibly an interim phase between Strata C-2 and C-1b (1:100)
Panitz-Cohen and Mazar in Mazar et. al. (2020 v.2) - Figure 12.34 -
Plan of Stratum C-1b from Mazar et. al. (2020 v.2)
Figure 12.34
Plan of Stratum C-1b, northeast (1:125)
Panitz-Cohen and Mazar in Mazar et. al. (2020 v.2) - Figure 12.35 -
Plan of Stratum C-1a from Mazar et. al. (2020 v.2)
Figure 12.35
Plan of Stratum C-1a, northeast (1:125)
Panitz-Cohen and Mazar in Mazar et. al. (2020 v.2) - Figure 12.36 -
Plan of Building CF, Stratum C-1a from Mazar et. al. (2020 v.2)
Figure 12.36
Plan of Building CF, Stratum C-1a (1:75)
Panitz-Cohen and Mazar in Mazar et. al. (2020 v.2) - Photo 12.85 -
Square Z/6, looking north at C-1a, C-1b and C-2 walls from Mazar et. al. (2020 v.2)
Photo 12.85
Square Z/6, looking north at C-1a, C-1b and C-2 walls (2003)
Panitz-Cohen and Mazar in Mazar et. al. (2020 v.2) - Photo 12.86 -
Square Z/6 from Mazar et. al. (2020 v.2)
Photo 12.86
Square Z/6, looking south; meter stick in entrance corridor of C-2 Building CU (2005)
Panitz-Cohen and Mazar in Mazar et. al. (2020 v.2) - Photo 12.87 -
Squares Y–Z/6 from Mazar et. al. (2020 v.2)
Photo 12.87
Squares Y–Z/6, looking south at southwestern corner of C-1 Building CR, cut by Pit 6498 (2005)
Panitz-Cohen and Mazar in Mazar et. al. (2020 v.2) - Photo 12.88 -
Fractured and displaced blocks of Building CR, late phase of C-1b from Mazar et. al. (2020 v.2)
Photo 12.88
Building CR, late phase of C-1b; bricks of 6512, looking east (2005)
JW: Note fractured and displaced blocks
Panitz-Cohen and Mazar in Mazar et. al. (2020 v.2) - Photo 12.89 -
Broken Jugs and charred beams in Building CR, C-1a Room 6468 from Mazar et. al. (2020 v.2)
Photo 12.89
Building CR, C-1a Room 6468, looking south; concentration of jugs along Wall 6461 and charred beams to left (east) (2003)
Panitz-Cohen and Mazar in Mazar et. al. (2020 v.2) - Photo 12.90 -
Building CR, C-1a Room 6468 from Mazar et. al. (2020 v.2)
Photo 12.90
Building CR, C-1a Room 6468, looking south, after removal of jugs seen in Photo 12.89 (2000)
Panitz-Cohen and Mazar in Mazar et. al. (2020 v.2) - Photo 12.91 -
Buildings CR, CF, and CG from Mazar et. al. (2020 v.2)
Photo 12.91
General view to south; foreground left: Building CF (2000)
Panitz-Cohen and Mazar in Mazar et. al. (2020 v.2)
- Plan: Fig. 12.27–12.29, 12.33–12.36
- Photos 12.85–12.91
- Pottery: C-1b — Fig.13.48:1–14; C-1a — Figs. 13.77–13.79
- Figure 12.33 -
Plan of Building CR, early phase of Stratum C-1b from Mazar et. al. (2020 v.2)
Figure 12.33
Plan of Building CR, early phase of Stratum C-1b; the pits in Squares A, Z/6 are possibly an interim phase between Strata C-2 and C-1b (1:100)
Panitz-Cohen and Mazar in Mazar et. al. (2020 v.2)
- Plan: Fig. 12.33
- Figure 12.27 -
Plan of Stratum C-1b from Mazar et. al. (2020 v.2)
Figure 12.27
Plan of Stratum C-1b, north-center (1:125)
Panitz-Cohen and Mazar in Mazar et. al. (2020 v.2) - Figure 12.34 -
Plan of Stratum C-1b from Mazar et. al. (2020 v.2)
Figure 12.34
Plan of Stratum C-1b, northeast (1:125)
Panitz-Cohen and Mazar in Mazar et. al. (2020 v.2)
- Plans: Figs. 12.27, 12.34
A layer of soft debris (6479) above the floor included several high quality red-slipped and burnished bowl fragments (Fig. 13.48:1–4); its upper layer might have been a fill laid in preparation for the construction of the subsequent phase.
The western room (5459) did not undergo any change in this phase of Stratum C-1b. It contained a layer of brick debris and charcoal patches, with some bones and sherds. No clear floor level was discerned.
- Figure 12.28 -
Plan of Stratum C-1a from Mazar et. al. (2020 v.2)
Figure 12.28
Plan of Stratum C-1a, north-center (1:125)
Panitz-Cohen and Mazar in Mazar et. al. (2020 v.2) - Figure 12.35 -
Plan of Stratum C-1a from Mazar et. al. (2020 v.2)
Figure 12.35
Plan of Stratum C-1a, northeast (1:125)
Panitz-Cohen and Mazar in Mazar et. al. (2020 v.2) - Figure 12.36 -
Plan of Building CF, Stratum C-1a from Mazar et. al. (2020 v.2)
Figure 12.36
Plan of Building CF, Stratum C-1a (1:75)
Panitz-Cohen and Mazar in Mazar et. al. (2020 v.2)
- Plans: Figs. 12.28, 12.35–12.36
Floors of this stratum were found 0.7–0.8 m above those of the previous phase. The floor of the eastern room (6468) covered the top of Wall 6489, so that this room, like the western one, continued to the north beyond the limit of the excavation. In Room 6468, the floor was covered by a layer of burnt destruction debris, covered in turn by fallen bricks just below topsoil. This room contained 13 loomweights, including several that were arranged in a circle against the eastern face of Wall 6461, and others that surrounded two burnt wooden beams on a north–south axis that appeared to have belonged to a loom (Photos 12.89–12.90). Among the pottery vessels (Figs. 13.77–13.79) were seven jugs, two of which were finely red slipped and burnished (Fig. 13.79:6–7).
- Figure 12.27 -
Plan of Stratum C-1b from Mazar et. al. (2020 v.2)
Figure 12.27
Plan of Stratum C-1b, north-center (1:125)
Panitz-Cohen and Mazar in Mazar et. al. (2020 v.2) - Figure 12.28 -
Plan of Stratum C-1a from Mazar et. al. (2020 v.2)
Figure 12.28
Plan of Stratum C-1a, north-center (1:125)
Panitz-Cohen and Mazar in Mazar et. al. (2020 v.2) - Figure 12.29 -
Building CE, Stratum C-1b; corner of Walls 2454 and 1491 from Mazar et. al. (2020 v.2)
Figure 12.29
Building CE, Stratum C-1b; elevation: corner of Walls 2454 and 1491 (1:50)
Panitz-Cohen and Mazar in Mazar et. al. (2020 v.2) - Figure 12.33 -
Plan of Building CR, early phase of Stratum C-1b from Mazar et. al. (2020 v.2)
Figure 12.33
Plan of Building CR, early phase of Stratum C-1b; the pits in Squares A, Z/6 are possibly an interim phase between Strata C-2 and C-1b (1:100)
Panitz-Cohen and Mazar in Mazar et. al. (2020 v.2) - Figure 12.34 -
Plan of Stratum C-1b from Mazar et. al. (2020 v.2)
Figure 12.34
Plan of Stratum C-1b, northeast (1:125)
Panitz-Cohen and Mazar in Mazar et. al. (2020 v.2) - Figure 12.35 -
Plan of Stratum C-1a from Mazar et. al. (2020 v.2)
Figure 12.35
Plan of Stratum C-1a, northeast (1:125)
Panitz-Cohen and Mazar in Mazar et. al. (2020 v.2) - Figure 12.36 -
Plan of Building CF, Stratum C-1a from Mazar et. al. (2020 v.2)
Figure 12.36
Plan of Building CF, Stratum C-1a (1:75)
Panitz-Cohen and Mazar in Mazar et. al. (2020 v.2) - Figure 12.58 -
Section 4 from Mazar et. al. (2020 v.2)
Figure 12.58
Section 4 (Squares Z/5–6, looking east)
Panitz-Cohen and Mazar in Mazar et. al. (2020 v.2) - Figure 12.59 -
Section 5 from Mazar et. al. (2020 v.2)
Figure 12.59
Section 5 (Square Y/5, section below Bench 5472, looking west)
Panitz-Cohen and Mazar in Mazar et. al. (2020 v.2) - Figure 12.60 -
Section 6 from Mazar et. al. (2020 v.2)
Figure 12.60
Section 6 (Square Y/5, section below Wall 5431, looking south)
Panitz-Cohen and Mazar in Mazar et. al. (2020 v.2) - Figure 12.61 -
Section 7 from Mazar et. al. (2020 v.2)
Figure 12.61
Section 7 (Squares Y–Z/4, section below Bench 5468, looking south)
Panitz-Cohen and Mazar in Mazar et. al. (2020 v.2) - Photo 12.91 -
Buildings CR, CF, and CG from Mazar et. al. (2020 v.2)
Photo 12.91
General view to south; foreground left: Building CF (2000)
Panitz-Cohen and Mazar in Mazar et. al. (2020 v.2) - Photo 12.92 -
Building CF from Mazar et. al. (2020 v.2)
Photo 12.92
General view to south; center: Building CF (2003)
Panitz-Cohen and Mazar in Mazar et. al. (2020 v.2) - Photo 12.93 -
Eastern balk of Square Z/6 from Mazar et. al. (2020 v.2)
Photo 12.93
Eastern balk of Square Z/6, looking east at section through entrance corridor of Building CF; meter stick on C-2 level (2003)
Panitz-Cohen and Mazar in Mazar et. al. (2020 v.2) - Photo 12.94 -
Eastern part of Building CF from Mazar et. al. (2020 v.2)
Photo 12.94
Eastern part of Building CF, looking north at northern space and entranceway (with balk) (2003)
Panitz-Cohen and Mazar in Mazar et. al. (2020 v.2) - Photo 12.95 -
Section in the middle of Square Z/5 from Mazar et. al. (2020 v.2)
Photo 12.95
Section in the middle of Square Z/5, under Floor 5498 in C-1a Building CF, looking south (2003)
Panitz-Cohen and Mazar in Mazar et. al. (2020 v.2) - Photo 12.96 -
C-1a Building CF, broken pottery in southern part of Room 5498 from Mazar et. al. (2020 v.2)
Photo 12.96
C-1a Building CF, southern part of Room 5498, looking north; center: top of pottery model shrine, wooden beam (loom?) to its north (2001)
Panitz-Cohen and Mazar in Mazar et. al. (2020 v.2) - Photo 12.97 -
C-1a Building CF, Room 5498 from Mazar et. al. (2020 v.2)
Photo 12.97
C-1a Building CF, Room 5498, looking east at eastern section of Square Z/5 and detail of wooden beam; grinding installation 5456 on right (2003)
Panitz-Cohen and Mazar in Mazar et. al. (2020 v.2) - Photo 12.98 -
C-1a Building CF, Room 5498 from Mazar et. al. (2020 v.2)
Photo 12.98
C-1a Building CF, grinding installation 5456 in south of Room 5498, looking south; woman crouching west of installation, holding an upper grinding stone found nearby (2003)
Panitz-Cohen and Mazar in Mazar et. al. (2020 v.2) - Photo 12.99 -
C-1a Building CF, Room 5499 from Mazar et. al. (2020 v.2)
Photo 12.99
C-1a Building CF, Room 5499, looking east; note plastered walls and wooden beams incorporated in floor makeup (2003)
Panitz-Cohen and Mazar in Mazar et. al. (2020 v.2) - Photo 12.100 -
C-1a Building CF, below Room 5499 from Mazar et. al. (2020 v.2)
Photo 12.100
C-1a Building CF, below Room 5499, looking south; note wooden beams in foundation of Wall 5455 (2003)
Panitz-Cohen and Mazar in Mazar et. al. (2020 v.2) - Photo 12.101 -
Building CF from Mazar et. al. (2020 v.2)
Photo 12.101
Building CF, the western wing with bench rooms, looking south (2003)
Panitz-Cohen and Mazar in Mazar et. al. (2020 v.2) - Photo 12.102 -
Building CF from Mazar et. al. (2020 v.2)
Photo 12.102
Building CF, probe under C-1a Room 5444, looking east; C-2 Wall 6454 below (2003)
Panitz-Cohen and Mazar in Mazar et. al. (2020 v.2) - Photo 12.103 -
Building CF from Mazar et. al. (2020 v.2)
Photo 12.103
Building CF, probe under C-1a Room 5444, looking southwest, after removal of Bench 5468 and part of Bench 5469 (2003)
Panitz-Cohen and Mazar in Mazar et. al. (2020 v.2) - Photo 12.104 -
Building CF, C-1a Room 5444 from Mazar et. al. (2020 v.2)
Photo 12.104
Building CF, C-1a Room 5444, looking west at Wall 4422, after partial removal of Bench 5469 and layer of fallen ceiling material and rubble below (2003)
Panitz-Cohen and Mazar in Mazar et. al. (2020 v.2) - Photo 12.105 -
Building CF from Mazar et. al. (2020 v.2)
Photo 12.105
Building CF, detail of Photo 12.104 (2003)
Panitz-Cohen and Mazar in Mazar et. al. (2020 v.2) - Photo 12.106 -
Building CF, top of destruction debris 6401 in C-1a from Mazar et. al. (2020 v.2)
Photo 12.106
Building CF, looking south; top of destruction debris 6401 in C-1a; right: Room 6435 with grinding stone Installation 6406 (2003)
Panitz-Cohen and Mazar in Mazar et. al. (2020 v.2) - Photo 12.107 -
Building CF, grinding installation 6406 and destruction debris 6401 in Room 6435 from Mazar et. al. (2020 v.2)
Photo 12.107
Building CF, grinding installation 6406 and destruction debris 6401 in Room 6435, looking south (2003)
Panitz-Cohen and Mazar in Mazar et. al. (2020 v.2) - Photo 12.108 -
Building CF, fragments of altar from Mazar et. al. (2020 v.2)
Photo 12.108
Building CF, fragments of altar in topsoil of Room 6435 (2003)
Panitz-Cohen and Mazar in Mazar et. al. (2020 v.2) - Photo 12.109 -
Building CF, grinding installation 6406 in Room 6435 from Mazar et. al. (2020 v.2)
Photo 12.109
Building CF, grinding installation 6406 in Room 6435, looking southwest at western wing of building (2003)
Panitz-Cohen and Mazar in Mazar et. al. (2020 v.2) - Photo 12.110 -
Building CF, Stratum C-1a, grinding Installation 6406 in Room 6435 from Mazar et. al. (2020 v.2)
Photo 12.110
Building CF, Stratum C-1a, grinding Installation 6406 in Room 6435, looking west (2003)
Panitz-Cohen and Mazar in Mazar et. al. (2020 v.2) - Photo 12.111 -
Smashed vessels on floor of Room 5460 in Building CF from Mazar et. al. (2020 v.2)
Photo 12.111
Building CF, looking south at western wing; front; smashed vessels on floor of Room 5460; note bricks 5458 in Room 5445 to south (2001)
Panitz-Cohen and Mazar in Mazar et. al. (2020 v.2) - Photo 12.112 -
C-1a Building CF, Room 5444 from Mazar et. al. (2020 v.2)
Photo 12.112
C-1a Building CF, Room 5444 looking north; large pottery crate in northwestern corner (2001)
Panitz-Cohen and Mazar in Mazar et. al. (2020 v.2) - Photo 12.113 -
Room 5444 from Mazar et. al. (2020 v.2)
Photo 12.113
Room 5444, looking west; floor and benches exposed (2003)
Panitz-Cohen and Mazar in Mazar et. al. (2020 v.2)
- Plan: Figs. 12.27–12.28, 12.33–12.36
- Section: Figs. 12.58–12.61
- Photos 12.5–12.6, 12.91–12.113
- Pottery: C-1b — Figs. 13.46–13.47, C-1a — Figs. 13.80–13.96
- Figure 12.33 -
Plan of Building CR, early phase of Stratum C-1b from Mazar et. al. (2020 v.2)
Figure 12.33
Plan of Building CR, early phase of Stratum C-1b; the pits in Squares A, Z/6 are possibly an interim phase between Strata C-2 and C-1b (1:100)
Panitz-Cohen and Mazar in Mazar et. al. (2020 v.2)
- Plan: Fig. 12.33
- Figure 12.27 -
Plan of Stratum C-1b from Mazar et. al. (2020 v.2)
Figure 12.27
Plan of Stratum C-1b, north-center (1:125)
Panitz-Cohen and Mazar in Mazar et. al. (2020 v.2) - Figure 12.34 -
Plan of Stratum C-1b from Mazar et. al. (2020 v.2)
Figure 12.34
Plan of Stratum C-1b, northeast (1:125)
Panitz-Cohen and Mazar in Mazar et. al. (2020 v.2)
- Plan: Figs. 12.27, 12.34
- Figure 12.29 -
Building CE, Stratum C-1b; corner of Walls 2454 and 1491 from Mazar et. al. (2020 v.2)
Figure 12.29
Building CE, Stratum C-1b; elevation: corner of Walls 2454 and 1491 (1:50)
Panitz-Cohen and Mazar in Mazar et. al. (2020 v.2) - Figure 12.35 -
Plan of Stratum C-1a from Mazar et. al. (2020 v.2)
Figure 12.35
Plan of Stratum C-1a, northeast (1:125)
Panitz-Cohen and Mazar in Mazar et. al. (2020 v.2) - Figure 12.36 -
Plan of Building CF, Stratum C-1a from Mazar et. al. (2020 v.2)
Figure 12.36
Plan of Building CF, Stratum C-1a (1:75)
Panitz-Cohen and Mazar in Mazar et. al. (2020 v.2)
- Figs. 12.29, 12.35–12.36
- Figure 12.27 -
Plan of Stratum C-1b from Mazar et. al. (2020 v.2)
Figure 12.27
Plan of Stratum C-1b, north-center (1:125)
Panitz-Cohen and Mazar in Mazar et. al. (2020 v.2) - Figure 12.34 -
Plan of Stratum C-1b from Mazar et. al. (2020 v.2)
Figure 12.34
Plan of Stratum C-1b, northeast (1:125)
Panitz-Cohen and Mazar in Mazar et. al. (2020 v.2)
- Plan: Figs. 12.27, 12.34
The northern border of this space was Wall 6493, shared with Building CR (Photos 12.85, 12.91–12.92). On the east, it was bounded by Wall 6408, and on the south, by Wall 6482 (Photos 12.94, 12.116). No entrance in Wall 6482 that would have connected the northern space with the rooms to the south was found, but possibly one had existed above the two preserved courses of this wall.
The space enclosed by these walls contained a patchy floor of red, gray and white striations (6466) at level 86.10 m, with only a few sherds and bones (Photo 12.93). The floor was covered by a layer of soft brown earth (6450) which might have been a leveling fill in preparation for the construction of the Stratum C-1a floor above. Two smooth pink mizi limestone slabs were found on the floor level, one in Square Z/6 and another near the southeastern corner of the space. They were similar to the large stone found in Room 6465 to the south.
A curious feature revealed at the bottom level of the striations in this space was the presence of several very large, amorphic blocks of brick, with a particularly large one in the center (Fig. 12.58). It is possible that these were placed as a kind of leveler above the remains of C-2 Building CU, or were simply discarded during the construction of Building CF and covered by the earliest floor of that building.
- Figure 12.27 -
Plan of Stratum C-1b from Mazar et. al. (2020 v.2)
Figure 12.27
Plan of Stratum C-1b, north-center (1:125)
Panitz-Cohen and Mazar in Mazar et. al. (2020 v.2) - Figure 12.34 -
Plan of Stratum C-1b from Mazar et. al. (2020 v.2)
Figure 12.34
Plan of Stratum C-1b, northeast (1:125)
Panitz-Cohen and Mazar in Mazar et. al. (2020 v.2)
- Plan: Figs. 12.27, 12.34
- Figure 12.29 -
Building CE, Stratum C-1b; corner of Walls 2454 and 1491 (1:50) from Mazar et. al. (2020 v.2)
Figure 12.29
Building CE, Stratum C-1b; elevation: corner of Walls 2454 and 1491 (1:50)
Panitz-Cohen and Mazar in Mazar et. al. (2020 v.2) - Figure 12.35 -
Plan of Stratum C-1a from Mazar et. al. (2020 v.2)
Figure 12.35
Plan of Stratum C-1a, northeast (1:125)
Panitz-Cohen and Mazar in Mazar et. al. (2020 v.2) - Figure 12.36 -
Plan of Building CF, Stratum C-1a from Mazar et. al. (2020 v.2)
Figure 12.36
Plan of Building CF, Stratum C-1a (1:75)
Panitz-Cohen and Mazar in Mazar et. al. (2020 v.2)
- Plans: Figs. 12.29, 12.35–12.36
The slightly higher stump of the erstwhile northern wall (6482) created a situation wherein the floor (6427, 86.50 m) in the area of the former northern space was now 0.35 m higher than the floor (5498, 86.15 m) to the south of this wall; this discrepancy was probably bridged by wooden or brick steps. Floor 6427 in the north was composed of white lime, covered with burnt debris (6417). An oven (6421) was built in the center of the northern space, against the southern face of Wall 6410, about 1.0 m to the west of the location of Oven 7428 of Stratum C-2, yet 2.0 m higher (Photo 12.109). A storage jar (Fig. 13.90:10) and a krater (Fig. 13.84:2) were found right near it, resting on the floor. On the far eastern end of this space, opposite the entrance corridor, was a large, roughly squared, 0.3 m-tall, flat-topped stone. Numerous bones found on and nearby this stone suggest that it was possibly used as a butcher block (Photo 12.94).
Floor 5498 in the south (covering the area of C-1b Room 6465) was composed of thin mud plaster below a layer of soft reddish earth, which covered the top of the cut walls of Stratum C-1b. On the floor was a 0.7 m-thick layer of very burnt destruction debris (5416, 5429, 5439), containing fallen bricks, burnt brick debris, ash and charcoal, ceiling collapse, and 49 complete (restorable and intact) vessels (Figs. 13.80–13.95; Photo 12.96). Other finds included grinding stones and stone vessels, as well as 59 stone loomweights, mostly concentrated around a wooden beam that apparently represented a loom in the middle of this space (Photos 12.96–12.97; Fig. 12.35). To the north of this beam was a poorly preserved installation (5481) composed of a low, curving parapet of clay; to its north were short pieces of wood and numerous fragments of an oven or a low-fired clay vat; none of these elements could be reconstructed due to the fierce destruction. Built against the southern wall of this space (5437) was a grinding stone installation (5456), like that found in Room 6435 (6406) (Photos 12.96, 12.98), although this one was a semi-circle attached to the wall, while the latter was a complete oval (described below). This installation was composed of a low round-topped clay parapet, 0.9 m at its widest diameter, in which a large lower grinding stone was set on an east– west axis; it was not found tilted, as it was in Installation 6406. Two complete upper grinding stones were found nearby. A unique find in this room, located 1.5 m north of the entranceway in Wall 5437, was a pottery model shrine (Chapter 35, No. 36), resting directly on the floor, its opening facing north. Its upper part was broken off, found overturned just to the southeast of the lower part, with a Hippo jar (Fig. 13.92:3) lying smashed on top of it; another storage jar (Fig. 13.89:9) was found to its east (Photo 12.96). The top of the model shrine was adorned with a unique scene of figures in relief, showing what appears to be a lion(?) grasping two human heads in its claws. Inside the box was light gray ashy material that contained an animal jaw bone and a tooth. A jug containing grain (Fig. 13.93:5) was found in this room as well. Some grain was also found spilled on the floor near the abovementioned storage jars. Grain from the jug was submitted to 14C dating (Chapter 48, Sample R35); the average calibrated dates were 922–850 BCE (1σ) and 970–838 BCE (2σ).
- Figure 12.27 -
Plan of Stratum C-1b from Mazar et. al. (2020 v.2)
Figure 12.27
Plan of Stratum C-1b, north-center (1:125)
Panitz-Cohen and Mazar in Mazar et. al. (2020 v.2) - Figure 12.29 -
Building CE, Stratum C-1b; corner of Walls 2454 and 1491 (1:50) from Mazar et. al. (2020 v.2)
Figure 12.29
Building CE, Stratum C-1b; elevation: corner of Walls 2454 and 1491 (1:50)
Panitz-Cohen and Mazar in Mazar et. al. (2020 v.2) - Figure 12.35 -
Plan of Stratum C-1a from Mazar et. al. (2020 v.2)
Figure 12.35
Plan of Stratum C-1a, northeast (1:125)
Panitz-Cohen and Mazar in Mazar et. al. (2020 v.2) - Figure 12.36 -
Plan of Building CF, Stratum C-1a from Mazar et. al. (2020 v.2)
Figure 12.36
Plan of Building CF, Stratum C-1a (1:75)
Panitz-Cohen and Mazar in Mazar et. al. (2020 v.2)
- Plans: Figs. 12.27, 12.29, 12.35–12.36
The room was filled with almost 1.0 m of very burnt destruction debris; the top layer (5426) was virtually sterile and contained extremely hard brick material and fallen bricks, as well as ceiling material, while the remainder of the debris (5461) was extremely burnt and rich in finds, including 46 intact and smashed vessels (Figs. 13.80–13.95), 19 of them storage jars, which were mostly stacked against the eastern wall. One of these jars was found full of a powdery white substance, most likely an organic material that had burnt, while another contained grain. Additional finds included grinding stones and other worked stones, a large clay ‘footbath’ (Fig. 13.96a:11), and 15 loomweights, concentrated in the entranceway (5500) (Table 12.15). In the southeastern corner of the room was a concentration of extremely burnt pinkish brick that had pulverized. This appears to have been some installation that was too damaged by the fire to define.
- Figure 12.27 -
Plan of Stratum C-1b from Mazar et. al. (2020 v.2)
Figure 12.27
Plan of Stratum C-1b, north-center (1:125)
Panitz-Cohen and Mazar in Mazar et. al. (2020 v.2)
- Plan: Fig. 12.27
- Walls 4413 and 4422 (Squares Y–Z/4) had wooden beams incorporated in their foundations; this was a consistent characteristic typical of all Stratum C-1b construction in Area C, but was almost never found in walls that were first built in Stratum C-1a.
- The bricks in the lower courses of the northern face of Wall 4413 and eastern face of Wall 4422 (southern end) had two vertical protrusions, or marginal bosses, on each end, which was a characteristic found in other walls clearly dated to Stratum C-1b in the adjacent Building CE and in the unit north of Building CD (see above).
- The wooden beams incorporated in the foundation of Wall 4479, seen in its southern face in Square Z/4 and clearly related to Stratum C-1b, were probably, based on their levels, the continuation of the beams in the foundation of Wall 4413, which ran adjacent to it on the north and served as the inner southern wall of the western wing.
- The floors abutted the lowest course of these walls.
The length of the hall was 8.6–8.8 m (due to the angle of the southern wall, 4413) and its width, 2.7 m. Its interior was revealed only in probes under the floors and benches of Stratum C-1a (Figs. 12.59– 12.61; Photos 12.102–12.105). The lowest layer was 0.4 m-thick, composed of soft, smooth, burnt black material (5488, 5487, 5475, from north to south), which abutted the lowest course of the walls, on the level of the wooden beams in their foundations, as revealed in those spots where we removed the benches of the later phase. This black layer apparently represents the floor; directly below it were the remains of Stratum C-2 Building CU. Finds from this black layer included red-slipped and hand-burnished pottery, mostly sherds, but several complete or almost-complete vessels as well (Figs. 13.46–13.47), along with loomweights, beads, stoppers, grinding stones, bone objects and some grain (Table 12.14). This layer was covered by a 0.4 m-thick layer of burnt rubble (5478, 5479, 5463, from north to south), composed of hard burnt chunks of reddish brick, gray ash, bits of charcoal and large segments of collapsed ceiling material, some of which lay flat (Photos 12.102–12.105). This rubble abutted the surrounding walls in each room and was covered by a thin layer of whitish material (phytolith?), on which the Stratum C-1a floors, walls and benches were laid.
- Figure 12.29 -
Building CE, Stratum C-1b; corner of Walls 2454 and 1491 (1:50) from Mazar et. al. (2020 v.2)
Figure 12.29
Building CE, Stratum C-1b; elevation: corner of Walls 2454 and 1491 (1:50)
Panitz-Cohen and Mazar in Mazar et. al. (2020 v.2) - Figure 12.35 -
Plan of Stratum C-1a from Mazar et. al. (2020 v.2)
Figure 12.35
Plan of Stratum C-1a, northeast (1:125)
Panitz-Cohen and Mazar in Mazar et. al. (2020 v.2) - Figure 12.36 -
Plan of Building CF, Stratum C-1a from Mazar et. al. (2020 v.2)
Figure 12.36
Plan of Building CF, Stratum C-1a (1:75)
Panitz-Cohen and Mazar in Mazar et. al. (2020 v.2)
- Plans: Figs. 12.29, 12.35–12.36
Along the north–south walls were lines of bricks, most of them 0.35 m wide, while others were narrower (0.3 m) or wider (0.45 m). All were preserved 0.25–0.35 m high (two courses); their height above the abutting floors ranged from 0.1– 0.25 m, while in the northern room they were flush with the floor. These were understood as benches, and they joined with those found under the three east–west cross walls. The bottom level of the benches was ca. 0.65 m above that of the outer walls of the building to which they were attached, and they were clearly built on top of the rubble and collapse layer ascribed to Stratum C-1b, described above (Figs. 12.59–12.61). This rubble also abutted the very bottom of the benches, suggesting that they were slightly sunk into that debris when constructed. The north–south benches lining the eastern and western walls of this wing run on one continuous line. This was particularly noticeable on the east, where the bench ran contiguously along the western face of Wall 5414. The benches were all composed of identical bricks that had been burnt to an almost stone-like consistency and to a pinkish color.
The Stratum C-1a floors in each room were composed of white lime and abutted the upper course of the benches. On these floors was a thick layer of burnt destruction debris with many finds. Following is a description of the rooms from north to south (6435, 5460, 5445, 5444)
- Figure 12.34 -
Plan of Stratum C-1b from Mazar et. al. (2020 v.2)
Figure 12.34
Plan of Stratum C-1b, northeast (1:125)
Panitz-Cohen and Mazar in Mazar et. al. (2020 v.2) - Figure 12.35 -
Plan of Stratum C-1a from Mazar et. al. (2020 v.2)
Figure 12.35
Plan of Stratum C-1a, northeast (1:125)
Panitz-Cohen and Mazar in Mazar et. al. (2020 v.2) - Figure 12.38 -
Plan of Buildings CW, CQ1 and CQ3, Stratum C-1a from Mazar et. al. (2020 v.2)
Figure 12.38
Plan of Buildings CW, CQ1 and CQ3, Stratum C-1a (1:75)
Panitz-Cohen and Mazar in Mazar et. al. (2020 v.2) - Figure 12.55 -
Section 1 from Mazar et. al. (2020 v.2)
Figure 12.55
Section 1 (Squares A/6–C/6, looking north)
Panitz-Cohen and Mazar in Mazar et. al. (2020 v.2) - Figure 12.56 -
Section 2 from Mazar et. al. (2020 v.2)
Figure 12.56
Section 2 (Squares B/5–6, section below C-1 Walls 6420 and 6476, and below C-2 Wall 7506, looking west)
Panitz-Cohen and Mazar in Mazar et. al. (2020 v.2) - Photo 12.114 -
C-1a Buildings CW, CQ1, CQ2 (west half excavated) from Mazar et. al. (2020 v.2)
Photo 12.114
C-1a Buildings CW, CQ1, CQ2 (west half excavated), general view to southeast (2005)
Panitz-Cohen and Mazar in Mazar et. al. (2020 v.2) - Photo 12.115 -
Debris on Floor 8430 in C-1a Building CW Mazar et. al. (2020 v.2)
Photo 12.115
C-1a Building CW, eastern part, looking west (2007)
JW:Debris on floor 8430
Panitz-Cohen and Mazar in Mazar et. al. (2020 v.2) - Photo 12.116 -
C-1a Building CW, looking west, Rooms 6411 and 6438 from Mazar et. al. (2020 v.2)
Photo 12.116
C-1a Building CW, looking west, Rooms 6411 and 6438 (2003)
Panitz-Cohen and Mazar in Mazar et. al. (2020 v.2) - Photo 12.117 -
C-1a Building CW, looking south; destruction debris and vessels in Room 6411 from Mazar et. al. (2020 v.2)
Photo 12.117
C-1a Building CW, looking south; destruction debris and vessels in Room 6411 (2003)
Panitz-Cohen and Mazar in Mazar et. al. (2020 v.2) - Photo 12.118 -
C-1a Building CW, Room 6411 from Mazar et. al. (2020 v.2)
Photo 12.118
C-1a Building CW, Room 6411, looking west; concentration of loomweights on western end of Bench 6496 (2003)
Panitz-Cohen and Mazar in Mazar et. al. (2020 v.2) - Photo 12.119 -
C-1a Skeleton in Square C/6 from Mazar et. al. (2020 v.2)
Photo 12.119
Square C/6, skeleton (8472) east of Wall 8424 of C-1a Building CW, looking west (2007)
Panitz-Cohen and Mazar in Mazar et. al. (2020 v.2)
- Plans: Figs. 12.34–12.35, 12.38
- Sections: Figs. 12.55–12.56
- Photos 12.114–12.119
- Pottery: C-1b — Figs. 13.48:15–20; C-1a — Figs. 13.97–13.102
- Figure 12.34 -
Plan of Stratum C-1b from Mazar et. al. (2020 v.2)
Figure 12.34
Plan of Stratum C-1b, northeast (1:125)
Panitz-Cohen and Mazar in Mazar et. al. (2020 v.2) - Figure 12.35 -
Plan of Stratum C-1a from Mazar et. al. (2020 v.2)
Figure 12.35
Plan of Stratum C-1a, northeast (1:125)
Panitz-Cohen and Mazar in Mazar et. al. (2020 v.2) - Figure 12.57 -
Section 3 from Mazar et. al. (2020 v.2)
Figure 12.57
Section 3 (Squares A/4–5, looking east)
Panitz-Cohen and Mazar in Mazar et. al. (2020 v.2) - Photo 12.120 -
Wall 7413 of C-1a Building CQ2 tilted southward towards the street from Mazar et. al. (2020 v.2)
Photo 12.120
C-1a Buildings CQ1 and CQ2 and street (Squares Z, A–C/4) to their south, looking southwest (2007)
Panitz-Cohen and Mazar in Mazar et. al. (2020 v.2) - Photo 12.121 -
C-1a Building CQ1; destruction debris in western rooms from Mazar et. al. (2020 v.2)
Photo 12.121
C-1a Building CQ1, looking west; destruction debris in western rooms (2007)
Panitz-Cohen and Mazar in Mazar et. al. (2020 v.2) - Photo 12.122 -
C-1a Building CQ1 from Mazar et. al. (2020 v.2)
Photo 12.122
C-1a Building CQ1, looking west; floors of western rooms (see Photo 12.121) (2007)
Panitz-Cohen and Mazar in Mazar et. al. (2020 v.2) - Photo 12.123 -
Wall 7413 of C-1a Building CQ2 tilted southward from Mazar et. al. (2020 v.2)
Photo 12.123
C-1a Building CQ2, looking west; meter stick on Floor 7500 (2007)
Panitz-Cohen and Mazar in Mazar et. al. (2020 v.2) - Photo 12.124 -
C-1a Building CQ1; destruction debris in Room 7490 from Mazar et. al. (2020 v.2)
Photo 12.124
C-1a Building CQ2, looking west; destruction debris in Room 7490 (2005)
Panitz-Cohen and Mazar in Mazar et. al. (2020 v.2) - Photo 12.125 -
Tilted Wall in C-1a Building CQ2 from Mazar et. al. (2020 v.2)
Photo 12.125
C-1a Building CQ2, wood in foundation of Walls 7413 and 7459 (2007)
Panitz-Cohen and Mazar in Mazar et. al. (2020 v.2) - Photo 12.126 -
Destruction debris in Room 7500 of C-1a Building CQ1 from Mazar et. al. (2020 v.2)
Photo 12.126
C-1a Building CQ2, looking west; destruction debris (7442) in western half of Room 7500 (2005)
Panitz-Cohen and Mazar in Mazar et. al. (2020 v.2)
- Plans: Figs. 12.34–12.35, 12.38
- Section: Fig. 12.57
- Photos 12.120–12.126
- Pottery: Figs. 13.103–13.119
- Figure 12.34 -
Plan of Stratum C-1b from Mazar et. al. (2020 v.2)
Figure 12.34
Plan of Stratum C-1b, northeast (1:125)
Panitz-Cohen and Mazar in Mazar et. al. (2020 v.2) - Figure 12.35 -
Plan of Stratum C-1a from Mazar et. al. (2020 v.2)
Figure 12.35
Plan of Stratum C-1a, northeast (1:125)
Panitz-Cohen and Mazar in Mazar et. al. (2020 v.2) - Figure 12.38 -
Plan of Buildings CW, CQ1 and CQ3, Stratum C-1a from Mazar et. al. (2020 v.2)
Figure 12.38
Plan of Buildings CW, CQ1 and CQ3, Stratum C-1a (1:75)
Panitz-Cohen and Mazar in Mazar et. al. (2020 v.2)
- Plans: Figs. 12.34–12.35, 12.38
- Figure 12.34 -
Plan of Stratum C-1b from Mazar et. al. (2020 v.2)
Figure 12.34
Plan of Stratum C-1b, northeast (1:125)
Panitz-Cohen and Mazar in Mazar et. al. (2020 v.2) - Figure 12.35 -
Plan of Stratum C-1a from Mazar et. al. (2020 v.2)
Figure 12.35
Plan of Stratum C-1a, northeast (1:125)
Panitz-Cohen and Mazar in Mazar et. al. (2020 v.2) - Figure 12.38 -
Plan of Buildings CW, CQ1 and CQ3, Stratum C-1a from Mazar et. al. (2020 v.2)
Figure 12.38
Plan of Buildings CW, CQ1 and CQ3, Stratum C-1a (1:75)
Panitz-Cohen and Mazar in Mazar et. al. (2020 v.2)
- Plans: Figs. 12.34–12.35, 12.38
- Figure 12.18 -
Plan of Stratum C-1b from Mazar et. al. (2020 v.2)
Figure 12.18
Plan of Stratum C-1b (1:200)
Panitz-Cohen and Mazar in Mazar et. al. (2020 v.2) - Figure 12.19 -
Plan of Stratum C-1a from Mazar et. al. (2020 v.2)
Figure 12.19
Plan of Stratum C-1a (1:200)
Panitz-Cohen and Mazar in Mazar et. al. (2020 v.2) - Figure 12.39 -
Plan of Stratum C-1b from Mazar et. al. (2020 v.2)
Figure 12.39
Plan of Stratum C-1b, south-center and southeast, with apiary (1:125)
Panitz-Cohen and Mazar in Mazar et. al. (2020 v.2) - Figure 12.40 -
Plan of Buildings CG, CH, CM and apiary, Stratum C-1b from Mazar et. al. (2020 v.2)
Figure 12.40
Plan of Buildings CG, CH, CM and apiary, Stratum C-1b (1:75)
Panitz-Cohen and Mazar in Mazar et. al. (2020 v.2) - Figure 12.68 -
Section 14 from Mazar et. al. (2020 v.2)
Figure 12.67
Section 14 (Square T/3, looking north)
Panitz-Cohen and Mazar in Mazar et. al. (2020 v.2) - Figure 12.69 -
Section 15 from Mazar et. al. (2020 v.2)
Figure 12.69
Section 15 (Squares S–Y/2, looking north) (1:55)
Panitz-Cohen and Mazar in Mazar et. al. (2020 v.2) - Figure 12.73 -
Section 19 from Mazar et. al. (2020 v.2)
Figure 12.73
Section 19 (Squares T–Y/1, looking south
Panitz-Cohen and Mazar in Mazar et. al. (2020 v.2) - Figure 12.76 -
Section 22 from Mazar et. al. (2020 v.2)
Figure 12.76
Section 22 (Squares T–Y/3, looking north in Room 2460
Panitz-Cohen and Mazar in Mazar et. al. (2020 v.2) - Figure 12.77 -
Section 23 from Mazar et. al. (2020 v.2)
Figure 12.77
Section 23 (Square Y/3, section below Wall 2411, looking east)
Panitz-Cohen and Mazar in Mazar et. al. (2020 v.2) - Photo 12.92 -
Buildings CF, CW, and CG from Mazar et. al. (2020 v.2)
Photo 12.92
General view to south; center: Building CF (2003)
Panitz-Cohen and Mazar in Mazar et. al. (2020 v.2) - Photo 12.127 -
C-1 Building CG and C-2 Buildings CA and CB from Mazar et. al. (2020 v.2)
Photo 12.127
C-1 Building CG in center, looking west; C-2 Buildings CA and CB in background. Amihai Mazar sitting on floor of C-1b Building CM (2000)
Panitz-Cohen and Mazar in Mazar et. al. (2020 v.2) - Photo 12.128 -
Tilted and Deformed Walls in Building CG from Mazar et. al. (2020 v.2)
Photo 12.128
Building CG, detail of corner of Walls 2439 (left) and 1416 (right), with wooden beams in foundations, looking south (2000)
Panitz-Cohen and Mazar in Mazar et. al. (2020 v.2) - Photo 12.129 -
Tilted and Collapsed Walls in Building CG from Mazar et. al. (2020 v.2)
Photo 12.129
Detail of additional layers of wood under Wall 2439 (see Photo 12.128), looking south; note C-1b brick collapse on left (south); entrance in C-2 Wall 2505 on right (2000)
Panitz-Cohen and Mazar in Mazar et. al. (2020 v.2) - Photo 12.130 -
Wood Beam Foundations in Building CG from Mazar et. al. (2020 v.2)
Photo 12.130
Building CG, looking south; wooden beams in wall foundations and below floor in Room 2444 (1998)
Panitz-Cohen and Mazar in Mazar et. al. (2020 v.2) - Photo 12.131 -
Destruction and slippage of lower brick courses in Room 2441 from Mazar et. al. (2020 v.2)
Photo 12.131
C-1b Building CG, Room 2441, looking north at destruction and slippage of lower brick courses in Wall 2411 (2000)
Panitz-Cohen and Mazar in Mazar et. al. (2020 v.2) - Photo 12.132 -
Destruction and slippage of lower brick courses in Room 2441 from Mazar et. al. (2020 v.2)
Photo 12.132
Same view as Photo 12.131, looking north, after excavation of destruction debris in southern part; wooden beams appearing just under floor level (2000)
Panitz-Cohen and Mazar in Mazar et. al. (2020 v.2) - Photo 12.133 -
Collapse of Wall 2439 from Mazar et. al. (2020 v.2)
Photo 12.133
Building CG, Room 2411, looking south at collapse of Wall 2439 above wooden beams, below floor of Room 2441 (2000)
Panitz-Cohen and Mazar in Mazar et. al. (2020 v.2) - Photo 12.134 -
Foundation trench of C-1 Wall 1416 from Mazar et. al. (2020 v.2)
Photo 12.134
Foundation trench of C-1 Wall 1416, cutting eastern end of C-2 Wall 1483 (1998)
Panitz-Cohen and Mazar in Mazar et. al. (2020 v.2) - Photo 12.135 -
Brick collapse from C-1b Building CG from Mazar et. al. (2020 v.2)
Photo 12.135
Square Y/2, looking northeast; right: Wall 4443 of C-1a Building CL; left: Fill 5430 above brick collapse from C-1b Building CG (2001)
Panitz-Cohen and Mazar in Mazar et. al. (2020 v.2)
- Plans: Figs. 12.18–12.19, 12.39–12.40
- Sections: Figs. 12.68–12.69, 12.73, 12.76–12.77
- Photos: 12.92, 12.127–12.135;
- Pottery: Figs. 13.52–13.55
- Figure 12.18 -
Plan of Stratum C-1b from Mazar et. al. (2020 v.2)
Figure 12.18
Plan of Stratum C-1b (1:200)
Panitz-Cohen and Mazar in Mazar et. al. (2020 v.2) - Figure 12.39 -
Plan of Stratum C-1b from Mazar et. al. (2020 v.2)
Figure 12.39
Plan of Stratum C-1b, south-center and southeast, with apiary (1:125)
Panitz-Cohen and Mazar in Mazar et. al. (2020 v.2) - Figure 12.40 -
Plan of Buildings CG, CH, CM and apiary, Stratum C-1b from Mazar et. al. (2020 v.2)
Figure 12.40
Plan of Buildings CG, CH, CM and apiary, Stratum C-1b (1:75)
Panitz-Cohen and Mazar in Mazar et. al. (2020 v.2) - Figure 12.75 -
Section 21 from Mazar et. al. (2020 v.2)
Figure 12.75
Section 21 (Square Y/3, looking north at Wall 4465)
Panitz-Cohen and Mazar in Mazar et. al. (2020 v.2) - Figure 12.78 -
Section 24 from Mazar et. al. (2020 v.2)
Figure 12.78
Section 24 (Square Z/3, looking east)
Panitz-Cohen and Mazar in Mazar et. al. (2020 v.2) - Figure 12.79 -
Section 25 from Mazar et. al. (2020 v.2)
Figure 12.79
Section 25 (Squares T–Y/3, looking south)
Panitz-Cohen and Mazar in Mazar et. al. (2020 v.2) - Photo 12.136 -
Stratigraphic section through walls in C-2 and C-1b from Mazar et. al. (2020 v.2)
Photo 12.136
Squares Y/3–4; C-2 Walls 4515, 4516 and 4465 under C-1b Walls 4432 and 4479 (right), looking west; left: higher stump of Wall 4432; top: Wall 2411 of Building CG (2000)
Panitz-Cohen and Mazar in Mazar et. al. (2020 v.2) - Photo 12.137 -
Row of chalices along eastern face of Wall 2411 from Mazar et. al. (2020 v.2)
Photo 12.137
Building CM, row of chalices along eastern face of Wall 2411, looking west; meter stick on top of Wall 4432, not yet exposed (2000)
Panitz-Cohen and Mazar in Mazar et. al. (2020 v.2) - Photo 12.138 -
Row of chalices along eastern face of Wall 2411 from Mazar et. al. (2020 v.2)
Photo 12.138
Building CM, row of chalices along eastern face of Wall 2411, looking west; meter stick on top of Wall 4432, not yet exposed (2000)
Panitz-Cohen and Mazar in Mazar et. al. (2020 v.2) - Photo 12.139 -
C-1b Building CM from Mazar et. al. (2020 v.2)
Photo 12.139
C-1b Building CM, looking west; Installation 4448 in center (after removal of cooking jug; see Photo 12.140) (2000)
Panitz-Cohen and Mazar in Mazar et. al. (2020 v.2) - Photo 12.140 -
Cracked Cooking Jar on the floor in C-1b Building CM from Mazar et. al. (2020 v.2)
Photo 12.140
C-1b Building CM, cooking jug in Installation 4448 (2000)
Panitz-Cohen and Mazar in Mazar et. al. (2020 v.2) - Photo 12.141 -
C-1b Building CM from Mazar et. al. (2020 v.2)
Photo 12.141
C-1b Building CM, looking west; left: concentration of wood near balk between Squares Y–Z/2–3 (2000)
Panitz-Cohen and Mazar in Mazar et. al. (2020 v.2)
- Plans: Figs. 12.18, 12.39–12.40;
- Sections: Figs. 12.75, 12.78–12.79
- Photos 12.136–12.142
- Pottery: Figs. 13.49–13.51
- Figure 12.18 -
Plan of Stratum C-1b from Mazar et. al. (2020 v.2)
Figure 12.18
Plan of Stratum C-1b (1:200)
Panitz-Cohen and Mazar in Mazar et. al. (2020 v.2) - Figure 12.39 -
Plan of Stratum C-1b from Mazar et. al. (2020 v.2)
Figure 12.39
Plan of Stratum C-1b, south-center and southeast, with apiary (1:125)
Panitz-Cohen and Mazar in Mazar et. al. (2020 v.2) - Figure 12.40 -
Plan of Buildings CG, CH, CM and apiary, Stratum C-1b from Mazar et. al. (2020 v.2)
Figure 12.40
Plan of Buildings CG, CH, CM and apiary, Stratum C-1b (1:75)
Panitz-Cohen and Mazar in Mazar et. al. (2020 v.2) - Figure 12.70 -
Section 16 from Mazar et. al. (2020 v.2)
Figure 12.70
Section 16 (Squares S–Y/1, looking north) (1:55)
Panitz-Cohen and Mazar in Mazar et. al. (2020 v.2) - Figure 12.72 -
Section 18 from Mazar et. al. (2020 v.2)
Figure 12.72
Section 18 (Squares T–Y/2, looking north at Wall 1437 and subsidiary balk to its east)
Panitz-Cohen and Mazar in Mazar et. al. (2020 v.2) - Figure 12.73 -
Section 19 from Mazar et. al. (2020 v.2)
Figure 12.73
Section 19 (Squares T–Y/1, looking south
Panitz-Cohen and Mazar in Mazar et. al. (2020 v.2) - Figure 12.74 -
Section 20 from Mazar et. al. (2020 v.2)
Figure 12.74
Section 20 (Squares T–Y/1, looking south at Wall 2426)
Panitz-Cohen and Mazar in Mazar et. al. (2020 v.2) - Photo 12.143 -
C-1b Building CH from Mazar et. al. (2020 v.2)
Photo 12.143
C-1b Building CH, looking west; right: southwestern corner of Building CG (1998)
Panitz-Cohen and Mazar in Mazar et. al. (2020 v.2) - Photo 12.144 -
Collapsed and Tilted Walls along a lineament from Mazar et. al. (2020 v.2)
Photo 12.144
Squares T–Y/1–2, northern part of C-1b Building CH, looking north; lower right: northwestern corner of C-1a Building CL, Stratum C-1a (2000)
JW: Note the axis of deformation and slumping from foreground to background
Panitz-Cohen and Mazar in Mazar et. al. (2020 v.2) - Photo 12.145 -
Wood foundations from Mazar et. al. (2020 v.2)
Photo 12.145
C-1b Building CH, detail of wood in the foundation of Wall 1437 at its corner with Wall 1438, looking north (1998)
JW: Note the axis of deformation and slumping from foreground to background
Panitz-Cohen and Mazar in Mazar et. al. (2020 v.2) - Photo 12.146 -
Collapsed Wall from Mazar et. al. (2020 v.2)
Photo 12.146
Square Y/1, C-1b Building CH, looking east ; wooden construction and collapsed Wall 2426 (right) cut by Wall 2413 of Building CL, Stratum C-1a (1998)
Panitz-Cohen and Mazar in Mazar et. al. (2020 v.2) - Photo 12.147 -
Collapsed Wall from Mazar et. al. (2020 v.2)
Photo 12.147
Square Y/1, C-1b Building CH, looking south; detail of eastern end of collapsed Wall 2426, cut by foundation trench of Wall 2413 of C-1a Building CL (2000)
Panitz-Cohen and Mazar in Mazar et. al. (2020 v.2) - Photo 12.148 -
Wooden Construction from Mazar et. al. (2020 v.2)
Photo 12.148
Wooden construction through C-1b Building CH, looking west; eastern end of C-2 Wall 2465 cut by wood (1998)
Panitz-Cohen and Mazar in Mazar et. al. (2020 v.2) - Photo 12.149 -
Wooden Construction from Mazar et. al. (2020 v.2)
Photo 12.149
As Photo 12.148, looking east (1998)
Panitz-Cohen and Mazar in Mazar et. al. (2020 v.2)
- (Plans: Figs. 12.18, 12.39–12.40, 12.44
- Sections: Figs. 12.70, 12.72–12.74
- Photos 12.3, 12.143–12.149;
- Pottery: Figs. 13.56–13.59
- Figure 12.39 -
Plan of Stratum C-1b from Mazar et. al. (2020 v.2)
Figure 12.39
Plan of Stratum C-1b, south-center and southeast, with apiary (1:125)
Panitz-Cohen and Mazar in Mazar et. al. (2020 v.2) - Figure 12.40 -
Plan of Buildings CG, CH, CM and apiary, Stratum C-1b from Mazar et. al. (2020 v.2)
Figure 12.40
Plan of Buildings CG, CH, CM and apiary, Stratum C-1b (1:75)
Panitz-Cohen and Mazar in Mazar et. al. (2020 v.2) - Figure 12.44 -
Plan of Building CH and apiary from Mazar et. al. (2020 v.2)
Figure 12.44
Plan of Building CH and apiary (scale 1:100)
Panitz-Cohen and Mazar in Mazar et. al. (2020 v.2) - Figure 12.73 -
Section 19 from Mazar et. al. (2020 v.2)
Figure 12.73
Section 19 (Squares T–Y/1, looking south
Panitz-Cohen and Mazar in Mazar et. al. (2020 v.2) - Figure 12.80 -
Section 26 from Mazar et. al. (2020 v.2)
Figure 12.80
Section 26 (Square Z/1, western end, looking south)
Panitz-Cohen and Mazar in Mazar et. al. (2020 v.2) - Figure 12.81 -
Section 27 from Mazar et. al. (2020 v.2)
Figure 12.81
Section 27 (Squares Y–Z/2, looking north)
Panitz-Cohen and Mazar in Mazar et. al. (2020 v.2) - Figure 12.82 -
Section 28 from Mazar et. al. (2020 v.2)
Figure 12.82
Section 28 (Squares Y–Z, A/1, looking north)
Panitz-Cohen and Mazar in Mazar et. al. (2020 v.2) - Figure 12.83 -
Section 29 from Mazar et. al. (2020 v.2)
Figure 12.83
Section 29 (Squares Z/1–2, looking east)
Panitz-Cohen and Mazar in Mazar et. al. (2020 v.2) - Figure 12.84 -
Section 30 from Mazar et. al. (2020 v.2)
Figure 12.84
Section 30 (Square Z/20, looking east)
Panitz-Cohen and Mazar in Mazar et. al. (2020 v.2) - Figure 12.85 -
Section 31 from Mazar et. al. (2020 v.2)
Figure 12.85
Section 31 (Square Z/20, looking west)
Panitz-Cohen and Mazar in Mazar et. al. (2020 v.2) - Figure 12.86 -
Section 32 from Mazar et. al. (2020 v.2)
Figure 12.86
Section 32 (Square Y/1, looking east along Wall 4443)
Panitz-Cohen and Mazar in Mazar et. al. (2020 v.2) - Figure 12.87 -
Section 33 from Mazar et. al. (2020 v.2)
Figure 12.87
Section 33 (Square Y/1, section below Wall 2504, looking south)
Panitz-Cohen and Mazar in Mazar et. al. (2020 v.2) - Photo 12.150 -
General view of C-1b apiary from Mazar et. al. (2020 v.2)
Photo 12.150
Squares Y–Z/1–2, general view of C-1b apiary, looking northeast; section on east with remains of C-1a Building CL covering apiary destruction debris (2007)
Panitz-Cohen and Mazar in Mazar et. al. (2020 v.2) - Photo 12.151 -
Another view of C-1b apiary from Mazar et. al. (2020 v.2)
Photo 12.151
As Photo 12.150, looking southeast, before exposure of the eastern wall and southern hives in middle row (2007)
Panitz-Cohen and Mazar in Mazar et. al. (2020 v.2) - Photo 12.152 -
Another view of C-1b apiary from Mazar et. al. (2020 v.2)
Photo 12.152
View of apiary, looking southeast, with eastern closing wall 9453 superimposed by C-1a Wall 9406 (2008)
Panitz-Cohen and Mazar in Mazar et. al. (2020 v.2) - Photo 12.153 -
Tilted Wall 5453 from Mazar et. al. (2020 v.2)
Photo 12.153
Square A/1, looking east at eastern wall of apiary (9453), below C-1a Wall 9406 (2008)
Panitz-Cohen and Mazar in Mazar et. al. (2020 v.2) - Photo 12.154 -
Collapsed western part of Wall 8469 from Mazar et. al. (2020 v.2)
Photo 12.154
Squares Y/2– 3; collapsed western part of Wall 8469 abutting Wall 2411 of Building CG, looking west; note wood in foundation of both walls (2007)
Panitz-Cohen and Mazar in Mazar et. al. (2020 v.2) - Photo 12.155 -
Collapsed bricks in western end of Wall 8469 from Mazar et. al. (2020 v.2)
Photo 12.155
Square Y/2, looking north at collapsed bricks in western end of Wall 8469, near corner with Wall 2411 (2007)
Panitz-Cohen and Mazar in Mazar et. al. (2020 v.2) - Photo 12.156 -
North-central and northwestern part of apiary from Mazar et. al. (2020 v.2)
Photo 12.156
North-central and northwestern part of apiary, looking west (2007)
Panitz-Cohen and Mazar in Mazar et. al. (2020 v.2) - Photo 12.157 -
Tilted Wall 8469 from Mazar et. al. (2020 v.2)
Photo 12.157
Western row of hives abutting Wall 8469, looking west (2007)
Panitz-Cohen and Mazar in Mazar et. al. (2020 v.2) - Photo 12.158 -
View of the apiary from Mazar et. al. (2020 v.2)
Photo 12.158
Apiary, looking north; meter stick on white floor (8460) between eastern and central rows of hives (2008)
Panitz-Cohen and Mazar in Mazar et. al. (2020 v.2) - Photo 12.159 -
Central and western part of the apiary from Mazar et. al. (2020 v.2)
Photo 12.159
Central and western part of the apiary, looking north; upper left: collapse of Room 2441, C-1b Building CG (2007)
Panitz-Cohen and Mazar in Mazar et. al. (2020 v.2) - Photo 12.160 -
Northern end of the apiary from Mazar et. al. (2020 v.2)
Photo 12.160
Square Z/2–3, northern end of apiary, looking northwest; lower right: eastern row of hives (2012)
Panitz-Cohen and Mazar in Mazar et. al. (2020 v.2)
- Plans: Figs. 12.39–12.40, 12.44
- Sections: Figs. 12.73, 12.80–12.87
- Photos 12.8, 12.150–12.160; additional illustrations in Chapter 14A
- Pottery: Figs. 13.60–13.67
- Figure 12.18 -
Plan of Stratum C-1b from Mazar et. al. (2020 v.2)
Figure 12.18
Plan of Stratum C-1b (1:200)
Panitz-Cohen and Mazar in Mazar et. al. (2020 v.2) - Figure 12.39 -
Plan of Stratum C-1b from Mazar et. al. (2020 v.2)
Figure 12.39
Plan of Stratum C-1b, south-center and southeast, with apiary (1:125)
Panitz-Cohen and Mazar in Mazar et. al. (2020 v.2) - Figure 12.48 -
Plan of Building CZ, Stratum C-1b from Mazar et. al. (2020 v.2)
Figure 12.48
Plan of Building CZ, Stratum C-1b (1:75)
Panitz-Cohen and Mazar in Mazar et. al. (2020 v.2) - Figure 12.89 -
Section 35 from Mazar et. al. (2020 v.2)
Figure 12.89
Section 35 (Square B/3, section below Wall 10518 (looking south)
Panitz-Cohen and Mazar in Mazar et. al. (2020 v.2) - Figure 12.90 -
Section 36 from Mazar et. al. (2020 v.2)
Figure 12.90
Section 36 (Squares B/2–3, section below Wall 10464, looking west)
Panitz-Cohen and Mazar in Mazar et. al. (2020 v.2) - Figure 12.91 -
Section 37 from Mazar et. al. (2020 v.2)
Figure 12.91
Section 37 (Square C/3, looking east)
Panitz-Cohen and Mazar in Mazar et. al. (2020 v.2) - Figure 12.92 -
Section 38 from Mazar et. al. (2020 v.2)
Figure 12.92
Section 38 (Squares B–C/3, looking north at Wall 10515 and entrance)
Panitz-Cohen and Mazar in Mazar et. al. (2020 v.2) - Figure 12.94 -
Section 40 from Mazar et. al. (2020 v.2)
Figure 12.94
Section 40 (Square A/3, looking east)
Panitz-Cohen and Mazar in Mazar et. al. (2020 v.2) - Figure 12.95 -
Section 41 from Mazar et. al. (2020 v.2)
Figure 12.95
Section 41 (Squares A/2–3, looking west at entrance in Wall 9406 and C-1b walls below)
Panitz-Cohen and Mazar in Mazar et. al. (2020 v.2) - Photo 12.161 -
Southeastern part of Area C from Mazar et. al. (2020 v.2)
Photo 12.161
Southeastern part of Area C (2012)
(photo: David Silverman)
Panitz-Cohen and Mazar in Mazar et. al. (2020 v.2) - Photo 12.162 -
C-1b Building CZ from Mazar et. al. (2020 v.2)
Photo 12.162
C-1b Building CZ, looking north (2012)
Panitz-Cohen and Mazar in Mazar et. al. (2020 v.2) - Photo 12.163 -
C-1b Building CZ, southwestern room (11449) from Mazar et. al. (2020 v.2)
Photo 12.163
C-1b Building CZ, southwestern room (11449), looking west (2012)
Panitz-Cohen and Mazar in Mazar et. al. (2020 v.2) - Photo 12.164 -
C-1b Building CZ, looking south at Wall 11427 below C-1a Wall 10482 from Mazar et. al. (2020 v.2)
Photo 12.164
Square A/2, C-1b Building CZ, looking south at Wall 11427 below C-1a Wall 10482 (2012)
Panitz-Cohen and Mazar in Mazar et. al. (2020 v.2) - Photo 12.165 -
C-1b Building CZ, southeastern part from Mazar et. al. (2020 v.2)
Photo 12.165
Squares B–C/2–3, C-1b Building CZ, southeastern part, looking south (2010)
Panitz-Cohen and Mazar in Mazar et. al. (2020 v.2) - Photo 12.166 -
C-1a Wall 10464 sealing the fallen bricks and debris on Floor 1142 of C-1b Building CZ from Mazar et. al. (2020 v.2)
Photo 12.166
C-1b Building CZ, looking west at C-1a Wall 10464 sealing the fallen bricks and debris on Floor 11426 (2012)
Panitz-Cohen and Mazar in Mazar et. al. (2020 v.2) - Photo 12.167 -
Pillar bases of C-1a Building CX set directly on top of fallen bricks from Mazar et. al. (2020 v.2)
Photo 12.167
C-1b Building CZ, central courtyard, looking south; pillar bases of C-1a Building CX set directly on top of fallen bricks (2012)
Panitz-Cohen and Mazar in Mazar et. al. (2020 v.2) - Photo 12.168 -
Layered Walls in C-1b Building CZ from Mazar et. al. (2020 v.2)
Photo 12.168
Square C/2, C-1b Building CZ, southeastern room, looking south at Walls 11458 and 11421; note entrance in eastern end of walls, blocked on top by C-1a Wall 10409, Building CP (2012)
Panitz-Cohen and Mazar in Mazar et. al. (2020 v.2)
- Plans: Figs. 12.18, 12.39, 12.48
- Sections: Figs. 12.89–12.92, 12.94–12.95
- Photos 12.9, 12.161–12.168
- Pottery: Fig. 13.51:17
- Figure 12.19 -
Plan of Stratum C-1a from Mazar et. al. (2020 v.2)
Figure 12.19
Plan of Stratum C-1a (1:200)
Panitz-Cohen and Mazar in Mazar et. al. (2020 v.2) - Figure 12.50 -
Plan of Stratum C-1a, south-center and southeast from Mazar et. al. (2020 v.2)
Figure 12.50
Plan of Stratum C-1a, south-center and southeast (1:125)
Panitz-Cohen and Mazar in Mazar et. al. (2020 v.2) - Figure 12.51 -
Plan of Buildings CQ3 and CX, Stratum C-1a from Mazar et. al. (2020 v.2)
Figure 12.51
Plan of Buildings CQ3 and CX, Stratum C-1a (1:75)
Panitz-Cohen and Mazar in Mazar et. al. (2020 v.2) - Figure 12.88 -
Section 34 from Mazar et. al. (2020 v.2)
Figure 12.88
Section 34 (A–C/2, looking north) 2504, looking south)
Panitz-Cohen and Mazar in Mazar et. al. (2020 v.2) - Figure 12.94 -
Section 40 from Mazar et. al. (2020 v.2)
Figure 12.94
Section 40 (Square A/3, looking east)
Panitz-Cohen and Mazar in Mazar et. al. (2020 v.2) - Figure 12.95 -
Section 41 from Mazar et. al. (2020 v.2)
Figure 12.95
Section 41 (Squares A/2–3, looking west at entrance in Wall 9406 and C-1b walls below)
Panitz-Cohen and Mazar in Mazar et. al. (2020 v.2) - Photo 12.169 -
General view of Area C from Mazar et. al. (2020 v.2)
Photo 12.169
General view of Area C, looking west (2010)
Panitz-Cohen and Mazar in Mazar et. al. (2020 v.2) - Photo 12.170 -
General view of southeastern part of Area C from Mazar et. al. (2020 v.2)
Photo 12.170
General view of southeastern part of Area C, looking west (2010)
Panitz-Cohen and Mazar in Mazar et. al. (2020 v.2) - Photo 12.171 -
C-1a Building CQ3 from Mazar et. al. (2020 v.2)
Photo 12.171
C-1a Building CQ3, looking north at entrance in Wall 10472; top of C-1b Wall 11407 in foreground (2012)
Panitz-Cohen and Mazar in Mazar et. al. (2020 v.2) - Photo 12.172 -
C-1a Building CQ3; wooden beams below bricks in threshold of Wall 9406 from Mazar et. al. (2020 v.2)
Photo 12.172
C-1a Building CQ3; wooden beams below bricks in threshold of Wall 9406, looking west.
Panitz-Cohen and Mazar in Mazar et. al. (2020 v.2) - Photo 12.173 -
C-1a Building CQ3, southern part of Room 10460 from Mazar et. al. (2020 v.2)
Photo 12.173
C-1a Building CQ3, southern part of Room 10460, looking west from southern part of Building CX (2010)
Panitz-Cohen and Mazar in Mazar et. al. (2020 v.2) - Photo 12.174 -
Smashed object on the floor of Room 10495 from Mazar et. al. (2020 v.2)
Photo 12.174
C-1a Building CQ3, Room 10495, Installation 10505, looking south (2010)
Panitz-Cohen and Mazar in Mazar et. al. (2020 v.2) - Photo 12.175 -
Room 10495 from Mazar et. al. (2020 v.2)
Photo 12.175
C-1a Building CQ3, Room 10495, brick parapet in south of Installation 10505, looking south; note stones of 11424 below (2012)
Panitz-Cohen and Mazar in Mazar et. al. (2020 v.2) - Photo 12.176 -
Looking south from Room 10495 to Room 10452 from Mazar et. al. (2020 v.2)
Photo 12.176
C-1a Building CQ3, looking south from Room 10495 to Room 10452 (excavation below floor); Stones 11424 under wall of Installation 10505 (see Photo 12.175 (2012)
Panitz-Cohen and Mazar in Mazar et. al. (2020 v.2) - Photo 12.177 -
Room 10452 from Mazar et. al. (2020 v.2)
Photo 12.177
C-1a Building CQ3, Room 10452, looking north at entrance (2010)
Panitz-Cohen and Mazar in Mazar et. al. (2020 v.2) - Photo 12.178 -
Smashed pottery and destruction debris against southern wall of Room 10452 from Mazar et. al. (2020 v.2)
Photo 12.178
C-1a Building CQ3, Room 10452, looking south; smashed pottery and destruction debris against southern wall, on plastered installation (see Photo 12.179) (2010)
Panitz-Cohen and Mazar in Mazar et. al. (2020 v.2) - Photo 12.179 -
Room 10452 from Mazar et. al. (2020 v.2)
Photo 12.179
C-1a Building CQ3, Room 10452, looking south at plastered installation against southern wall (2010)
Panitz-Cohen and Mazar in Mazar et. al. (2020 v.2)
- Plans: Figs. 12.19, 12.50–12.51
- Sections: Figs. 12.88, 12.94–12.95
- Photos 12.169–12.179
- Pottery: Figs. 13.130–13.135
- Figure 12.19 -
Plan of Stratum C-1a from Mazar et. al. (2020 v.2)
Figure 12.19
Plan of Stratum C-1a (1:200)
Panitz-Cohen and Mazar in Mazar et. al. (2020 v.2) - Figure 12.50 -
Plan of Stratum C-1a, south-center and southeast from Mazar et. al. (2020 v.2)
Figure 12.50
Plan of Stratum C-1a, south-center and southeast (1:125)
Panitz-Cohen and Mazar in Mazar et. al. (2020 v.2) - Figure 12.51 -
Plan of Buildings CQ3 and CX, Stratum C-1a from Mazar et. al. (2020 v.2)
Figure 12.51
Plan of Buildings CQ3 and CX, Stratum C-1a (1:75)
Panitz-Cohen and Mazar in Mazar et. al. (2020 v.2) - Figure 12.88 -
Section 34 from Mazar et. al. (2020 v.2)
Figure 12.88
Section 34 (A–C/2, looking north) 2504, looking south)
Panitz-Cohen and Mazar in Mazar et. al. (2020 v.2) - Figure 12.89 -
Section 35 from Mazar et. al. (2020 v.2)
Figure 12.89
Section 35 (Square B/3, section below Wall 10518 (looking south)
Panitz-Cohen and Mazar in Mazar et. al. (2020 v.2) - Figure 12.90 -
Section 36 from Mazar et. al. (2020 v.2)
Figure 12.90
Section 36 (Squares B/2–3, section below Wall 10464, looking west)
Panitz-Cohen and Mazar in Mazar et. al. (2020 v.2) - Figure 12.91 -
Section 37 from Mazar et. al. (2020 v.2)
Figure 12.91
Section 37 (Square C/3, looking east)
Panitz-Cohen and Mazar in Mazar et. al. (2020 v.2) - Figure 12.92 -
Section 38 from Mazar et. al. (2020 v.2)
Figure 12.92
Section 38 (Squares B–C/3, looking north at Wall 10515 and entrance)
Panitz-Cohen and Mazar in Mazar et. al. (2020 v.2) - Photo 12.180 -
C-1a Building CX, Room 10507 from Mazar et. al. (2020 v.2)
Photo 12.180
C-1a Building CX, Room 10507, looking southwest; Egon Lass standing on Bench 10502 (cut in center) (2010)
Panitz-Cohen and Mazar in Mazar et. al. (2020 v.2) - Photo 12.181 -
C-1a Building CX, Room 10507 from Mazar et. al. (2020 v.2)
Photo 12.181
C-1a Building CX, Room 10507, looking north (2010)
Panitz-Cohen and Mazar in Mazar et. al. (2020 v.2) - Photo 12.182 -
Entrance into Building CX from Mazar et. al. (2020 v.2)
Photo 12.182
Entrance into Building CX, looking north, with wooden threshold and plaster pilaster on the east (2012)
Panitz-Cohen and Mazar in Mazar et. al. (2020 v.2) - Photo 12.183 -
C-1a Building CX from Mazar et. al. (2020 v.2)
Photo 12.183
C-1a Building CX, Locus 11413 in front of entrance, with loomweights, looking west (2012)
Panitz-Cohen and Mazar in Mazar et. al. (2020 v.2) - Photo 12.184 -
C-1a Building CX, Room 10507 from Mazar et. al. (2020 v.2)
Photo 12.184
C-1a Building CX, brick pilaster 10517 in Room 10507; meter stick against balk between Squares C/2–3, looking north (2010)
Panitz-Cohen and Mazar in Mazar et. al. (2020 v.2) - Photo 12.185 -
C-1a Building CX, vessels in destruction debris in center of Room 10507 from Mazar et. al. (2020 v.2)
Photo 12.185
C-1a Building CX, vessels in destruction debris in center of Room 10507, against Bench 10502, looking north (2010)
Panitz-Cohen and Mazar in Mazar et. al. (2020 v.2) - Photo 12.186 -
C-1a Building CX, Locus 10431, vessels in burnt destruction debris from Mazar et. al. (2020 v.2)
Photo 12.186
C-1a Building CX, Locus 10431, vessels in burnt destruction debris, looking west (2010)
Panitz-Cohen and Mazar in Mazar et. al. (2020 v.2) - Photo 12.187 -
C-1a Building CX from Mazar et. al. (2020 v.2)
Photo 12.187
C-1a Building CX, Locus 10499, looking east at cache of loomweights and wooden beam (2010)
Panitz-Cohen and Mazar in Mazar et. al. (2020 v.2) - Photo 12.188 -
C-1a Building CX from Mazar et. al. (2020 v.2)
Photo 12.188
C-1a Building CX, looking north at Installation 10509 against Wall 10515. Amihai Mazar in front of entrance to building (2010)
Panitz-Cohen and Mazar in Mazar et. al. (2020 v.2)
- Plans: Figs. 12.19, 12.50–12.51
- Sections: Figs. 12.88–12.92
- Photos 12.170, 12.180–12.188
- Pottery: Figs. 13.136–13.142
Two means of roof support were identified in the large inner space of this building. One was a north–south row of five pillar bases, each made of an unworked flat stone, located in the northern half, 2.0 m east of the western wall and 3.4 m west of the eastern wall (Photos 12.180–12.181). The two northernmost bases bore traces of the burnt wood pillars on them. The other means of roof support was a unique square pilaster of gray bricks (10517), located to the southeast of the row of pillar bases and standing 1.3 m high (Photo 12.184). A large smooth stone was found southeast of this pilaster.
A T-shaped brick bench or screen wall (10502) was located along the northern two-thirds of the western wall (10464); it protruded 1.3 m into the center of the structure (Photo 12.181). Two vessels were placed in the southern niche formed by this ‘T’, a large barrel krater (Fig. 13.137:2) and a storage jar (Fig. 13.140:14) (Photo 12.185). Another bench (10491) ran along the eastern end of the southern wall (10409), built above the eastern end of C-1b Wall 11421 of Building CZ, separated by a 0.4 m-thick fill.
The floor of Building CX (10481, 10497 and 10507) was composed of reddish-brown clay interspersed with black burnt material and gray ash. In the area between the pillar bases and Bench 10502 was a strip of small travertine chunks that were incorporated into the floor (10477; Photos 12.180– 12.181). They were not suitable to serve as a pavement, since they were very loosely laid, and perhaps they played a role in some activity that took place here. They recall a similar strip of stones (7479) set in the floor of Courtyard 7471 in Building CW. Immediately below the floor level in the southeastern part of the building were the tops of C-1b Walls 10500 and 10518 of Building CZ (Figs. 12.89, 12.91; Photo 12.181).
Like the other units, Building CX was found full of very burnt destruction debris, with fallen bricks, charcoal pieces, ash, and large a amount of pottery, with 122 complete or almost-complete vessels, many of them in situ (Figs. 12.88, 13.136– 13.142; Photos 12.185–12.186). Just inside and west of the entrance, a cooking jug (Fig. 13.138:8) and part of a storage jar were found (Fig. 13.140:17; Photo 12.183). Concentrations of loomweights here, to the south of Installation 10509, and just west of the northern end of the row of pillar bases, found along with fragments of burnt wood beams (Photos 12.181, 12.187–12.188), indicate these had belonged to one, or possibly two looms. Altogether, 164 loomweights were found in this building, mostly in the northern part (Chapter 39).
Two grinding installations were located close to the entrance. One (10509), just to its west, was attached to the northern wall, comprising a large lower grinding stone slab fronted on the east by a small shallow plastered basin which was slightly lower and served as a receptacle for the grain as it was ground; it was surrounded by a flat-topped brick ‘rim’ (Photo 12.188). An additional lower grinding stone slab fragment was found below the upper one, apparently as a support, and a nicely worked rectangular smoothed pink mizi limestone, apparently in secondary use, was set under the eastern end of the large lower grinding, between it and the receptacle on the south. On the northern ‘rim’ of the plastered basin was a fine flint blade and a small upper grinding stone; two large upper grinding stones were found just to the west. To the east of Installation 10509, in front of the entranceway, was still another large lower grinding stone slab fragment, found overturned (Photo 12.188). The second installation (10519), less well preserved, was found just south of the entrance, close to the eastern wall. It comprised a similar round plastered receptacle with a brick bordering it on its west; a rounded lower grinding stone was set inside it and another such stone was found to the west of the brick.
A large concentration of grain was found inside a storage jar in the southern part of the building (10431). The grain was submitted to 14C dating (Chapter 48, Sample R36). One of the two measurements provided the calibrated dates 978–848 BCE (1σ) and 996–838 BCE (2σ); the other was way too high and was defined as an outlier.
Notably, no ovens or other cooking installations were found in any of the buildings, CQ1, CQ2, CQ3 and CX, although such installations were found in the larger buildings, CF and CP.
- Figure 12.19 -
Plan of Stratum C-1a from Mazar et. al. (2020 v.2)
Figure 12.19
Plan of Stratum C-1a (1:200)
Panitz-Cohen and Mazar in Mazar et. al. (2020 v.2) - Figure 12.50 -
Plan of Stratum C-1a, south-center and southeast from Mazar et. al. (2020 v.2)
Figure 12.50
Plan of Stratum C-1a, south-center and southeast (1:125)
Panitz-Cohen and Mazar in Mazar et. al. (2020 v.2) - Figure 12.52a -
Plan of Building CP, Stratum C-1a from Mazar et. al. (2020 v.2)
Figure 12.52a
Plan of Building CP, Stratum C-1a (1:75)
Panitz-Cohen and Mazar in Mazar et. al. (2020 v.2) - Figure 12.52b -
Isometric reconstruction, Building CP, Stratum C-1a from Mazar et. al. (2020 v.2)
Figure 12.52b
Isometric reconstruction, Building CP, Stratum C-1a, looking northwest
Panitz-Cohen and Mazar in Mazar et. al. (2020 v.2) - Figure 12.52c -
Plan of sub-floor brick construction in Building CP, Stratum C-1a from Mazar et. al. (2020 v.2)
Figure 12.52c
Plan of sub-floor brick construction in Building CP, Stratum C-1a (1:100)
Panitz-Cohen and Mazar in Mazar et. al. (2020 v.2) - Figure 12.92 -
Section 38 from Mazar et. al. (2020 v.2)
Figure 12.92
Section 38 (Squares B–C/3, looking north at Wall 10515 and entrance)
Panitz-Cohen and Mazar in Mazar et. al. (2020 v.2) - Photo 12.169 -
General view of Area C from Mazar et. al. (2020 v.2)
Photo 12.169
General view of Area C, looking west (2010)
Panitz-Cohen and Mazar in Mazar et. al. (2020 v.2) - Photo 12.170 -
General view of southeastern part of Area C from Mazar et. al. (2020 v.2)
Photo 12.170
General view of southeastern part of Area C, looking west (2010)
Panitz-Cohen and Mazar in Mazar et. al. (2020 v.2) - Photo 12.189 -
C-1a Building CP, with sub-floor construction in Room 10476 from Mazar et. al. (2020 v.2)
Photo 12.189
C-1a Building CP, with sub-floor construction in Room 10476 (top center) (2012)
(photo: David Silverman)
Panitz-Cohen and Mazar in Mazar et. al. (2020 v.2) - Photo 12.190 -
C-1a Building CP on the floor level from Mazar et. al. (2020 v.2)
Photo 12.190
C-1a Building CP on the floor level, looking west; meter stick in Room 10476 (2012)
Panitz-Cohen and Mazar in Mazar et. al. (2020 v.2) - Photo 12.191 -
C-1a Building CP from Mazar et. al. (2020 v.2)
Photo 12.191
C-1a Building CP, looking north; wall of C-1b phase (11472) in foreground; C-1b Building CZ in background (2012)
Panitz-Cohen and Mazar in Mazar et. al. (2020 v.2) - Photo 12.192 -
Wall 9406, dividing Building CL (mostly removed) and Building CP from Mazar et. al. (2020 v.2)
Photo 12.192
Wall 9406, dividing Building CL (mostly removed, left) and Building CP (right), looking north; lower left: eastern row of beehives, C-1b apiary (2008)
Panitz-Cohen and Mazar in Mazar et. al. (2020 v.2) - Photo 12.193 -
Building CP Walls from Mazar et. al. (2020 v.2)
Photo 12.193
Northern wall (11458) of the early phase of Building CP, Stratum C-1b, looking north, below Wall 10409 of C-1a (2012)
Panitz-Cohen and Mazar in Mazar et. al. (2020 v.2) - Photo 12.194 -
Building CP Walls from Mazar et. al. (2020 v.2)
Photo 12.194
Building CP, looking south at C-1b Wall 11477 and C-1a Wall 10457; center: C-1a sub-floor construction 11468 (2012)
Panitz-Cohen and Mazar in Mazar et. al. (2020 v.2) - Photo 12.195 -
Building CP Walls from Mazar et. al. (2020 v.2)
Photo 12.195
Building CP, looking east at C-1a Wall 10462 above C-1b Wall 11473; note gap between them (2012)
Panitz-Cohen and Mazar in Mazar et. al. (2020 v.2) - Photo 12.196 -
C-1a Building CP from Mazar et. al. (2020 v.2)
Photo 12.196
C-1a Building CP, looking east; top of C-1b Wall 11470, serving as a threshold leading from Room 10458 to Room 9449 (2010)
Panitz-Cohen and Mazar in Mazar et. al. (2020 v.2) - Photo 12.197 -
C-1a Building CP from Mazar et. al. (2020 v.2)
Photo 12.197
C-1a Building CP, eastern and central rooms, looking west; meter stick in Room 11441 (2012)
Panitz-Cohen and Mazar in Mazar et. al. (2020 v.2) - Photo 12.198 -
C-1a Building CP Room 10510 from Mazar et. al. (2020 v.2)
Photo 12.198
C-1a Building CP, Room 10510 (northeastern room), looking north (2010)
Panitz-Cohen and Mazar in Mazar et. al. (2020 v.2) - Photo 12.199 -
Smashed objects in C-1a Building CP, Room 10510 from Mazar et. al. (2020 v.2)
Photo 12.199
C-1a Building CP, Room 10510; incense burner (Fig. 13.158:5) and other finds (2010)
Panitz-Cohen and Mazar in Mazar et. al. (2020 v.2) - Photo 12.200 -
Rooms 11441 and 10510 in C-1a Building CP from Mazar et. al. (2020 v.2)
Photo 12.200
C-1a Building CP, Rooms 11441 and 10510, looking west; meter stick in Room 11441 (2012)
Panitz-Cohen and Mazar in Mazar et. al. (2020 v.2) - Photo 12.201 -
Destruction debris in Room 11441 in C-1a Building CP from Mazar et. al. (2020 v.2)
Photo 12.201
C-1a Building CP, destruction debris (11418) in Room 11441, looking west (2012)
Panitz-Cohen and Mazar in Mazar et. al. (2020 v.2) - Photo 12.202 -
Rooms 11441 and 11451 in C-1a Building CP from Mazar et. al. (2020 v.2)
Photo 12.202
C-1a Building CP, looking east at Room 11451 (right) and Room 11441 (left) (2012)
Panitz-Cohen and Mazar in Mazar et. al. (2020 v.2) - Photo 12.203 -
Rooms 10476 and 11451 in C-1a Building CP from Mazar et. al. (2020 v.2)
Photo 12.203
C-1a Building CP, looking west from Room 11451 to Room 10476 (2012)
Panitz-Cohen and Mazar in Mazar et. al. (2020 v.2) - Photo 12.204 -
C-1a Building CP from Mazar et. al. (2020 v.2)
Photo 12.204
C-1a Building CP, curved molded plaster in northern end of Wall 11440 at entrance into Room 11451, looking east (2012)
Panitz-Cohen and Mazar in Mazar et. al. (2020 v.2) - Photo 12.205 -
destruction debris with fallen grinding stone and loom weights in Room 11451 in C-1a Building CP from Mazar et. al. (2020 v.2)
Photo 12.205
C-1a Building CP, Room 11451, looking east; right: destruction debris with fallen grinding stone and loom weights; left foreground: plastered Bench 11452 attached to Wall 11417 (2012)
Panitz-Cohen and Mazar in Mazar et. al. (2020 v.2) - Photo 12.206 -
Room 11451 in C-1a Building CP from Mazar et. al. (2020 v.2)
Photo 12.206
C-1a Building CP, Room 11451, looking north at Wall 11417 with Bench 11452 (2012)
Panitz-Cohen and Mazar in Mazar et. al. (2020 v.2) - Photo 12.207 -
C-1a Building CP, looking north (before excavation of eastern wing) from Mazar et. al. (2020 v.2)
Photo 12.207
C-1a Building CP, looking north (before excavation of eastern wing) (2010)
Panitz-Cohen and Mazar in Mazar et. al. (2020 v.2) - Photo 12.208 -
Room 10458 in C-1a Building CP from Mazar et. al. (2020 v.2)
Photo 12.208
C-1a Building CP, Room 10458, looking west; meter stick on earth floor 10458 above plaster bedding; background: entrance to Room 9449 (2010)
Panitz-Cohen and Mazar in Mazar et. al. (2020 v.2) - Photo 12.209 -
Room 10458 in C-1a Building CP from Mazar et. al. (2020 v.2)
Photo 12.209
C-1a Building CP, western part of Room 10458, looking west to Room 9449; note plaster foundation of floor (10498) in western part of room and northern end of Bench 10463 ending at entranceway to Room 9449; left: Oven 10430 (2010)
Panitz-Cohen and Mazar in Mazar et. al. (2020 v.2) - Photo 12.210 -
Pottery altar in C-1a Building CP from Mazar et. al. (2020 v.2)
Photo 12.210
C-1a Building CP, pottery altar (Chapter 35, No. 3) against Wall 9448, before exposure of Bench 10454 (2008)
Panitz-Cohen and Mazar in Mazar et. al. (2020 v.2) - Photo 12.211 -
Broken vessels in Room 10458 of C-1a Building CP from Mazar et. al. (2020 v.2)
Photo 12.211
C-1a Building CP, southwestern corner of Room 10458, looking south at krater-pithos and Oven 10430, with concentration of vessels to their north (2010)
Panitz-Cohen and Mazar in Mazar et. al. (2020 v.2) - Photo 12.212 -
Broken vessels in Room 10458 of C-1a Building CP from Mazar et. al. (2020 v.2)
Photo 12.212
As Photo 12.211, detail of vessels, grinding stone and stand with petals, before exposure of the mortar seen in Photo 12.213 (2010)
Panitz-Cohen and Mazar in Mazar et. al. (2020 v.2) - Photo 12.213 -
Pottery in Room 10458 of C-1a Building CP from Mazar et. al. (2020 v.2)
Photo 12.213
C-1a Building CP, southwestern corner of Room 10458, looking south at krater-pithos with cooking pot inside, mortar embedded in floor, Oven 10430 and large stone to its east; woman sitting on Bench 10454 (2010)
Panitz-Cohen and Mazar in Mazar et. al. (2020 v.2) - Photo 12.214 -
Room 10458 of C-1a Building CP from Mazar et. al. (2020 v.2)
Photo 12.214
C-1a Building CP, looking west; cache of loomweights in northwestern corner of Room 10458 (2010)
Panitz-Cohen and Mazar in Mazar et. al. (2020 v.2) - Photo 12.215 -
Rooms 10476 and 10506 of C-1a Building CP from Mazar et. al. (2020 v.2)
Photo 12.215
C-1a Building CP, Rooms 10476 and 10506, looking west (2010)
Panitz-Cohen and Mazar in Mazar et. al. (2020 v.2) - Photo 12.216 -
C-1a Building CP from Mazar et. al. (2020 v.2)
Photo 12.216
C-1a Building CP, entrance between Rooms 10476 and 11451, looking south at plaster on doorjamb of Wall 10485 (2010)
Panitz-Cohen and Mazar in Mazar et. al. (2020 v.2) - Photo 12.217 -
Broken Vessels on 1 side of wall and on a Bench on other side - in C-1a Building CP from Mazar et. al. (2020 v.2)
Photo 12.217
C-1a Building CP, looking north at Room 10458 (top) and Room 10476 (bottom); note vessels on Bench 10466 (2010)
Panitz-Cohen and Mazar in Mazar et. al. (2020 v.2) - Photo 12.218 -
Room 10476 in C-1a Building CP from Mazar et. al. (2020 v.2)
Photo 12.218
Building CP, Stratum C-1a, Room 10476, looking west at Bench 10467 and entrance into Room 9450 (2010)
Panitz-Cohen and Mazar in Mazar et. al. (2020 v.2) - Photo 12.219 -
Fractured stones in sub floor construction of Room 10476 in C-1a Building CP from Mazar et. al. (2020 v.2)
Photo 12.219
C-1a Building CP, Room 10476, sub-floor construction 11468, looking north (2012)
Panitz-Cohen and Mazar in Mazar et. al. (2020 v.2) - Photo 12.220 -
Large mortar from Building CP, Room 10476 from Mazar et. al. (2020 v.2)
Photo 12.220
Large mortar from Building CP, Room 10476 (2010)
Panitz-Cohen and Mazar in Mazar et. al. (2020 v.2) - Photo 12.221 -
Destruction debris in Room 10476 of C-1a Building CP from Mazar et. al. (2020 v.2)
Photo 12.221
C-1a Building CP, looking south at destruction debris in Room 10476, with loom weights, stones and smashed top of kraterpithos (Fig. 13.146:4), east of Bin 10488 (2010)
Panitz-Cohen and Mazar in Mazar et. al. (2020 v.2) - Photo 12.222 -
Bin 10488 and krater-pithos from Mazar et. al. (2020 v.2)
Photo 12.222
As Photo 12.228, detail of Bin 10488 and krater-pithos (Fig. 12.146:4) to its east (2010)
Panitz-Cohen and Mazar in Mazar et. al. (2020 v.2) - Photo 12.223 -
C-1a Building CP from Mazar et. al. (2020 v.2)
Photo 12.223
C-1a Building CP, looking west from southwestern part of Room 10476 to Room 10506; Bin 10488 in front and Bin 10501 in back; note pottery ‘bucket’ between the bins (2010)
Panitz-Cohen and Mazar in Mazar et. al. (2020 v.2) - Photo 12.224 -
C-1a Building CP from Mazar et. al. (2020 v.2)
Photo 12.224
C-1a Building CP, detail of grain in bottom of Bin 10488 (2010)
Panitz-Cohen and Mazar in Mazar et. al. (2020 v.2) - Photo 12.225 -
Room 9449 of C-1a Building CP from Mazar et. al. (2020 v.2)
Photo 12.225
C-1a Building CP, Room 9449, during excavation, looking north; Bench 9443 in north of room; left: excavation down to floor of apiary (2008)
Panitz-Cohen and Mazar in Mazar et. al. (2020 v.2) - Photo 12.226 -
Bin 9434 in Room 9450 of C-1a Building CP from Mazar et. al. (2020 v.2)
Photo 12.226
C-1a Building CP, Bin 9434 in Room 9450, looking south (2008)
Panitz-Cohen and Mazar in Mazar et. al. (2020 v.2) - Photo 12.227 -
Room 9450 of C-1a Building CP from Mazar et. al. (2020 v.2)
Photo 12.227
C-1a Building CP, Room 9450, looking southeast (2008)
Panitz-Cohen and Mazar in Mazar et. al. (2020 v.2) - Photo 12.228 -
Copious destruction debris in Room 9450 of C-1a Building CP from Mazar et. al. (2020 v.2)
Photo 12.228
C-1a Building CP, Room 9450, pottery altar (Chapter 35, No. 2) in destruction debris (9420), looking east (2008)
Panitz-Cohen and Mazar in Mazar et. al. (2020 v.2) - Photo 12.229 -
Room 10506 of C-1a Building CP from Mazar et. al. (2020 v.2)
Photo 12.229
C-1a Building CP, Room 10506, looking east into Room 10476; two pottery bins and ‘bucket’ along Wall 10457 (2010)
Panitz-Cohen and Mazar in Mazar et. al. (2020 v.2) - Photo 12.230 -
Room 10506 of C-1a Building CP from Mazar et. al. (2020 v.2)
Photo 12.230
C-1a Building CP, Room 10506, looking west, with Bin 10501 in southwestern corner; meter stick along Bench 10504 (2010)
Panitz-Cohen and Mazar in Mazar et. al. (2020 v.2) - Photo 12.231 -
Room 10506 of C-1a Building CP from Mazar et. al. (2020 v.2)
Photo 12.231
C-1a Building CP, Room 10506, looking southwest, pottery bucket and Bin 10501 against Wall 10457 (2010)
Panitz-Cohen and Mazar in Mazar et. al. (2020 v.2) - Photo 12.232 -
Bin 10501 restored Mazar et. al. (2020 v.2)
Photo 12.232
Bin 10501 restored
Panitz-Cohen and Mazar in Mazar et. al. (2020 v.2) - Photo 12.233 -
Room 10506 of C-1a Building CP from Mazar et. al. (2020 v.2)
Photo 12.233
C-1a Building CP, Room 10506, looking southeast; juglet (Fig. 13.156:18) laid against threshold in Wall 10480 (2012)
Panitz-Cohen and Mazar in Mazar et. al. (2020 v.2) - Photo 12.234 -
Walls of Building CL from Mazar et. al. (2020 v.2)
Photo 12.234
Walls 9406, 5418 and 5453 of C-1a Building CL above C-1b Wall 9453 and apiary destruction debris (2010)
Panitz-Cohen and Mazar in Mazar et. al. (2020 v.2)
- Plans: Figs. 12.19, 12.50, 12.52a–c
- Section: Fig. 12.93
- Photos 12.169–12.170, 12.189–12.234
- Pottery: Figs. 13.143–13.160
- Figure 12.19 -
Plan of Stratum C-1a from Mazar et. al. (2020 v.2)
Figure 12.19
Plan of Stratum C-1a (1:200)
Panitz-Cohen and Mazar in Mazar et. al. (2020 v.2) - Figure 12.50 -
Plan of Stratum C-1a, south-center and southeast from Mazar et. al. (2020 v.2)
Figure 12.50
Plan of Stratum C-1a, south-center and southeast (1:125)
Panitz-Cohen and Mazar in Mazar et. al. (2020 v.2) - Figure 12.53 -
Plan of Building CL, Stratum C-1a from Mazar et. al. (2020 v.2)
Figure 12.53
Plan of Building CL, Stratum C-1a (1:75)
Panitz-Cohen and Mazar in Mazar et. al. (2020 v.2) - Figure 12.73 -
Section 19 from Mazar et. al. (2020 v.2)
Figure 12.73
Section 19 (Squares T–Y/1, looking south
Panitz-Cohen and Mazar in Mazar et. al. (2020 v.2) - Figure 12.74 -
Section 20 from Mazar et. al. (2020 v.2)
Figure 12.74
Section 20 (Squares T–Y/1, looking south at Wall 2426)
Panitz-Cohen and Mazar in Mazar et. al. (2020 v.2) - Figure 12.80 -
Section 26 from Mazar et. al. (2020 v.2)
Figure 12.80
Section 26 (Square Z/1, western end, looking south)
Panitz-Cohen and Mazar in Mazar et. al. (2020 v.2) - Figure 12.83 -
Section 29 from Mazar et. al. (2020 v.2)
Figure 12.83
Section 29 (Squares Z/1–2, looking east)
Panitz-Cohen and Mazar in Mazar et. al. (2020 v.2) - Figure 12.84 -
Section 30 from Mazar et. al. (2020 v.2)
Figure 12.84
Section 30 (Square Z/20, looking east)
Panitz-Cohen and Mazar in Mazar et. al. (2020 v.2) - Figure 12.85 -
Section 31 from Mazar et. al. (2020 v.2)
Figure 12.85
Section 31 (Square Z/20, looking west)
Panitz-Cohen and Mazar in Mazar et. al. (2020 v.2) - Figure 12.86 -
Section 32 from Mazar et. al. (2020 v.2)
Figure 12.86
Section 32 (Square Y/1, looking east along Wall 4443)
Panitz-Cohen and Mazar in Mazar et. al. (2020 v.2) - Figure 12.87 -
Section 33 from Mazar et. al. (2020 v.2)
Figure 12.87
Section 33 (Square Y/1, section below Wall 2504, looking south)
Panitz-Cohen and Mazar in Mazar et. al. (2020 v.2) - Photo 12.234 -
Walls of Building CL from Mazar et. al. (2020 v.2)
Photo 12.234
Walls 9406, 5418 and 5453 of C-1a Building CL above C-1b Wall 9453 and apiary destruction debris (2010)
Panitz-Cohen and Mazar in Mazar et. al. (2020 v.2) - Photo 12.235 -
Walls in section of C-1a Building CL above C-1b apiary destruction debris (collapsed walls) from Mazar et. al. (2020 v.2)
Photo 12.235
Square Y/1, C-1a Building CL, western wing, looking north; walls in section above apiary destruction debris (2000)
Panitz-Cohen and Mazar in Mazar et. al. (2020 v.2) - Photo 12.236 -
Wall 4443 in C-1a Building CL from Mazar et. al. (2020 v.2)
Photo 12.236
Squares Y– Z/1, C-1a Building CL, Wall 4443 with layer of black oily material; Wall 2504 on the left (north); looking east (2001)
Panitz-Cohen and Mazar in Mazar et. al. (2020 v.2) - Photo 12.237 -
Burnt material (9432) on Floor 9435 in C-1a Building CL from Mazar et. al. (2020 v.2)
Photo 12.237
Square Z/20, C-1a Building CL, looking south; burnt material (9432) on Floor 9435 (2008)
Panitz-Cohen and Mazar in Mazar et. al. (2020 v.2) - Photo 12.238 -
Burnt oily material (5435) on Floor 5482 in C-1a Building CL from Mazar et. al. (2020 v.2)
Photo 12.238
C-1a Building CL, burnt oily material (5435) on Floor 5482, looking west (2001)
Panitz-Cohen and Mazar in Mazar et. al. (2020 v.2) - Photo 12.239 -
Eastern wing and Floor 5446 in C-1a Building CL from Mazar et. al. (2020 v.2)
Photo 12.239
C-1a Building CL, eastern wing, looking south; Floor 5446 (2007)
Panitz-Cohen and Mazar in Mazar et. al. (2020 v.2)
- Plans: Figs. 12.19, 12.50, 12.53
- Sections: Figs. 12.73–12.74, 12.80, 12.83–12.87
- Photos 12.234–12.239
- Pottery: Figs. 13.125–13.129
Fig. 12.54Location of section drawings on superimposed plan of Strata C-3–C-1a (1:250)
Panitz-Cohen and Mazar in Mazar et. al. (2020 v.2)
- Figure 12.18 -
Plan of Stratum C-1b from Mazar et. al. (2020 v.2)
Figure 12.18
Plan of Stratum C-1b (1:200)
Panitz-Cohen and Mazar in Mazar et. al. (2020 v.2) - Figure 12.19 -
Plan of Stratum C-1a from Mazar et. al. (2020 v.2)
Figure 12.19
Plan of Stratum C-1a (1:200)
Panitz-Cohen and Mazar in Mazar et. al. (2020 v.2) - Figure 12.24 -
Plan of Stratum C-1b from Mazar et. al. (2020 v.2)
Figure 12.24
Plan of Stratum C-1b, west (1:125)
Panitz-Cohen and Mazar in Mazar et. al. (2020 v.2) - Figure 12.25 -
Plan of Stratum C-1a from Mazar et. al. (2020 v.2)
Figure 12.25
Plan of Stratum C-1a, west (1:125)
Panitz-Cohen and Mazar in Mazar et. al. (2020 v.2) - Figure 12.27 -
Plan of Stratum C-1b from Mazar et. al. (2020 v.2)
Figure 12.27
Plan of Stratum C-1b, north-center (1:125)
Panitz-Cohen and Mazar in Mazar et. al. (2020 v.2) - Figure 12.28 -
Plan of Stratum C-1a from Mazar et. al. (2020 v.2)
Figure 12.28
Plan of Stratum C-1a, north-center (1:125)
Panitz-Cohen and Mazar in Mazar et. al. (2020 v.2) - Figure 12.29 -
Building CE, Stratum C-1b; corner of Walls 2454 and 1491 from Mazar et. al. (2020 v.2)
Figure 12.29
Building CE, Stratum C-1b; elevation: corner of Walls 2454 and 1491 (1:50)
Panitz-Cohen and Mazar in Mazar et. al. (2020 v.2) - Figure 12.33 -
Plan of Building CR, early phase of Stratum C-1b from Mazar et. al. (2020 v.2)
Figure 12.33
Plan of Building CR, early phase of Stratum C-1b; the pits in Squares A, Z/6 are possibly an interim phase between Strata C-2 and C-1b (1:100)
Panitz-Cohen and Mazar in Mazar et. al. (2020 v.2) - Figure 12.34 -
Plan of Stratum C-1b from Mazar et. al. (2020 v.2)
Figure 12.34
Plan of Stratum C-1b, northeast (1:125)
Panitz-Cohen and Mazar in Mazar et. al. (2020 v.2) - Figure 12.35 -
Plan of Stratum C-1a from Mazar et. al. (2020 v.2)
Figure 12.35
Plan of Stratum C-1a, northeast (1:125)
Panitz-Cohen and Mazar in Mazar et. al. (2020 v.2) - Figure 12.36 -
Plan of Building CF, Stratum C-1a from Mazar et. al. (2020 v.2)
Figure 12.36
Plan of Building CF, Stratum C-1a (1:75)
Panitz-Cohen and Mazar in Mazar et. al. (2020 v.2) - Figure 12.39 -
Plan of Stratum C-1b from Mazar et. al. (2020 v.2)
Figure 12.39
Plan of Stratum C-1b, south-center and southeast, with apiary (1:125)
Panitz-Cohen and Mazar in Mazar et. al. (2020 v.2) - Figure 12.40 -
Plan of Buildings CG, CH, CM and apiary, Stratum C-1b from Mazar et. al. (2020 v.2)
Figure 12.40
Plan of Buildings CG, CH, CM and apiary, Stratum C-1b (1:75)
Panitz-Cohen and Mazar in Mazar et. al. (2020 v.2) - Figure 12.44 -
Plan of Building CH and apiary from Mazar et. al. (2020 v.2)
Figure 12.44
Plan of Building CH and apiary (scale 1:100)
Panitz-Cohen and Mazar in Mazar et. al. (2020 v.2) - Figure 12.48 -
Plan of Building CZ, Stratum C-1b from Mazar et. al. (2020 v.2)
Figure 12.48
Plan of Building CZ, Stratum C-1b (1:75)
Panitz-Cohen and Mazar in Mazar et. al. (2020 v.2) - Figure 12.50 -
Plan of Stratum C-1a, south-center and southeast from Mazar et. al. (2020 v.2)
Figure 12.50
Plan of Stratum C-1a, south-center and southeast (1:125)
Panitz-Cohen and Mazar in Mazar et. al. (2020 v.2) - Figure 12.51 -
Plan of Buildings CQ3 and CX, Stratum C-1a from Mazar et. al. (2020 v.2)
Figure 12.51
Plan of Buildings CQ3 and CX, Stratum C-1a (1:75)
Panitz-Cohen and Mazar in Mazar et. al. (2020 v.2) - Figure 12.52a -
Plan of Building CP, Stratum C-1a from Mazar et. al. (2020 v.2)
Figure 12.52a
Plan of Building CP, Stratum C-1a (1:75)
Panitz-Cohen and Mazar in Mazar et. al. (2020 v.2) - Figure 12.52b -
Isometric reconstruction, Building CP, Stratum C-1a from Mazar et. al. (2020 v.2)
Figure 12.52b
Isometric reconstruction, Building CP, Stratum C-1a, looking northwest
Panitz-Cohen and Mazar in Mazar et. al. (2020 v.2) - Figure 12.52c -
Plan of sub-floor brick construction in Building CP, Stratum C-1a from Mazar et. al. (2020 v.2)
Figure 12.52c
Plan of sub-floor brick construction in Building CP, Stratum C-1a (1:100)
Panitz-Cohen and Mazar in Mazar et. al. (2020 v.2)
- Figure 12.55 -
Section 1 from Mazar et. al. (2020 v.2)
Figure 12.55
Section 1 (Squares A/6–C/6, looking north)
Panitz-Cohen and Mazar in Mazar et. al. (2020 v.2) - Figure 12.56 -
Section 2 from Mazar et. al. (2020 v.2)
Figure 12.56
Section 2 (Squares B/5–6, section below C-1 Walls 6420 and 6476, and below C-2 Wall 7506, looking west)
Panitz-Cohen and Mazar in Mazar et. al. (2020 v.2) - Figure 12.57 -
Section 3 from Mazar et. al. (2020 v.2)
Figure 12.57
Section 3 (Squares A/4–5, looking east)
Panitz-Cohen and Mazar in Mazar et. al. (2020 v.2) - Figure 12.58 -
Section 4 from Mazar et. al. (2020 v.2)
Figure 12.58
Section 4 (Squares Z/5–6, looking east)
Panitz-Cohen and Mazar in Mazar et. al. (2020 v.2) - Figure 12.59 -
Section 5 from Mazar et. al. (2020 v.2)
Figure 12.59
Section 5 (Square Y/5, section below Bench 5472, looking west)
Panitz-Cohen and Mazar in Mazar et. al. (2020 v.2) - Figure 12.60 -
Section 6 from Mazar et. al. (2020 v.2)
Figure 12.60
Section 6 (Square Y/5, section below Wall 5431, looking south)
Panitz-Cohen and Mazar in Mazar et. al. (2020 v.2) - Figure 12.61 -
Section 7 from Mazar et. al. (2020 v.2)
Figure 12.61
Section 7 (Squares Y–Z/4, section below Bench 5468, looking south)
Panitz-Cohen and Mazar in Mazar et. al. (2020 v.2) - Figure 12.62 -
Section 8 from Mazar et. al. (2020 v.2)
Figure 12.62
Section 8 (Square Y/5, looking north)
Panitz-Cohen and Mazar in Mazar et. al. (2020 v.2) - Figure 12.63 -
Section 9 from Mazar et. al. (2020 v.2)
Figure 12.63
Section 9 (Square Y/5, looking west)
Panitz-Cohen and Mazar in Mazar et. al. (2020 v.2) - Figure 12.64 -
Section 10 from Mazar et. al. (2020 v.2)
Figure 12.64
Section 10 (Square T/4, looking east)
Panitz-Cohen and Mazar in Mazar et. al. (2020 v.2) - Figure 12.65 -
Section 11 from Mazar et. al. (2020 v.2)
Figure 12.65
Section 11 (Squares T/1–4, looking west); the section in Square T/3 north of Walls 1448/4439 was drawn on a line east of Wall 1506
Panitz-Cohen and Mazar in Mazar et. al. (2020 v.2) - Figure 12.66 -
Section 12 from Mazar et. al. (2020 v.2)
Figure 12.66
Section 12 (Square S/4, looking east at walls)
Panitz-Cohen and Mazar in Mazar et. al. (2020 v.2) - Figure 12.67 -
Section 13 from Mazar et. al. (2020 v.2)
Figure 12.67
Section 13 (Square S/3, section below Wall 1448, looking south)
Panitz-Cohen and Mazar in Mazar et. al. (2020 v.2) - Figure 12.68 -
Section 14 from Mazar et. al. (2020 v.2)
Figure 12.67
Section 14 (Square T/3, looking north)
Panitz-Cohen and Mazar in Mazar et. al. (2020 v.2) - Figure 12.69 -
Section 15 from Mazar et. al. (2020 v.2)
Figure 12.69
Section 15 (Squares S–Y/2, looking north) (1:55)
Panitz-Cohen and Mazar in Mazar et. al. (2020 v.2) - Figure 12.70 -
Section 16 from Mazar et. al. (2020 v.2)
Figure 12.70
Section 16 (Squares S–Y/1, looking north) (1:55)
Panitz-Cohen and Mazar in Mazar et. al. (2020 v.2) - Figure 12.72 -
Section 18 from Mazar et. al. (2020 v.2)
Figure 12.72
Section 18 (Squares T–Y/2, looking north at Wall 1437 and subsidiary balk to its east)
Panitz-Cohen and Mazar in Mazar et. al. (2020 v.2) - Figure 12.73 -
Section 19 from Mazar et. al. (2020 v.2)
Figure 12.73
Section 19 (Squares T–Y/1, looking south
Panitz-Cohen and Mazar in Mazar et. al. (2020 v.2) - Figure 12.74 -
Section 20 from Mazar et. al. (2020 v.2)
Figure 12.74
Section 20 (Squares T–Y/1, looking south at Wall 2426)
Panitz-Cohen and Mazar in Mazar et. al. (2020 v.2) - Figure 12.75 -
Section 21 from Mazar et. al. (2020 v.2)
Figure 12.75
Section 21 (Square Y/3, looking north at Wall 4465)
Panitz-Cohen and Mazar in Mazar et. al. (2020 v.2) - Figure 12.76 -
Section 22 from Mazar et. al. (2020 v.2)
Figure 12.76
Section 22 (Squares T–Y/3, looking north in Room 2460
Panitz-Cohen and Mazar in Mazar et. al. (2020 v.2) - Figure 12.77 -
Section 23 from Mazar et. al. (2020 v.2)
Figure 12.77
Section 23 (Square Y/3, section below Wall 2411, looking east)
Panitz-Cohen and Mazar in Mazar et. al. (2020 v.2) - Figure 12.78 -
Section 24 from Mazar et. al. (2020 v.2)
Figure 12.78
Section 24 (Square Z/3, looking east)
Panitz-Cohen and Mazar in Mazar et. al. (2020 v.2) - Figure 12.79 -
Section 25 from Mazar et. al. (2020 v.2)
Figure 12.79
Section 25 (Squares T–Y/3, looking south)
Panitz-Cohen and Mazar in Mazar et. al. (2020 v.2) - Figure 12.80 -
Section 26 from Mazar et. al. (2020 v.2)
Figure 12.80
Section 26 (Square Z/1, western end, looking south)
Panitz-Cohen and Mazar in Mazar et. al. (2020 v.2) - Figure 12.81 -
Section 27 from Mazar et. al. (2020 v.2)
Figure 12.81
Section 27 (Squares Y–Z/2, looking north)
Panitz-Cohen and Mazar in Mazar et. al. (2020 v.2) - Figure 12.82 -
Section 28 from Mazar et. al. (2020 v.2)
Figure 12.82
Section 28 (Squares Y–Z, A/1, looking north)
Panitz-Cohen and Mazar in Mazar et. al. (2020 v.2) - Figure 12.83 -
Section 29 from Mazar et. al. (2020 v.2)
Figure 12.83
Section 29 (Squares Z/1–2, looking east)
Panitz-Cohen and Mazar in Mazar et. al. (2020 v.2) - Figure 12.84 -
Section 30 from Mazar et. al. (2020 v.2)
Figure 12.84
Section 30 (Square Z/20, looking east)
Panitz-Cohen and Mazar in Mazar et. al. (2020 v.2) - Figure 12.85 -
Section 31 from Mazar et. al. (2020 v.2)
Figure 12.85
Section 31 (Square Z/20, looking west)
Panitz-Cohen and Mazar in Mazar et. al. (2020 v.2) - Figure 12.86 -
Section 32 from Mazar et. al. (2020 v.2)
Figure 12.86
Section 32 (Square Y/1, looking east along Wall 4443)
Panitz-Cohen and Mazar in Mazar et. al. (2020 v.2) - Figure 12.87 -
Section 33 from Mazar et. al. (2020 v.2)
Figure 12.87
Section 33 (Square Y/1, section below Wall 2504, looking south)
Panitz-Cohen and Mazar in Mazar et. al. (2020 v.2) - Figure 12.88 -
Section 34 from Mazar et. al. (2020 v.2)
Figure 12.88
Section 34 (A–C/2, looking north) 2504, looking south)
Panitz-Cohen and Mazar in Mazar et. al. (2020 v.2) - Figure 12.89 -
Section 35 from Mazar et. al. (2020 v.2)
Figure 12.89
Section 35 (Square B/3, section below Wall 10518 (looking south)
Panitz-Cohen and Mazar in Mazar et. al. (2020 v.2) - Figure 12.90 -
Section 36 from Mazar et. al. (2020 v.2)
Figure 12.90
Section 36 (Squares B/2–3, section below Wall 10464, looking west)
Panitz-Cohen and Mazar in Mazar et. al. (2020 v.2) - Figure 12.91 -
Section 37 from Mazar et. al. (2020 v.2)
Figure 12.91
Section 37 (Square C/3, looking east)
Panitz-Cohen and Mazar in Mazar et. al. (2020 v.2) - Figure 12.92 -
Section 38 from Mazar et. al. (2020 v.2)
Figure 12.92
Section 38 (Squares B–C/3, looking north at Wall 10515 and entrance)
Panitz-Cohen and Mazar in Mazar et. al. (2020 v.2) - Figure 12.94 -
Section 40 from Mazar et. al. (2020 v.2)
Figure 12.94
Section 40 (Square A/3, looking east)
Panitz-Cohen and Mazar in Mazar et. al. (2020 v.2) - Figure 12.95 -
Section 41 from Mazar et. al. (2020 v.2)
Figure 12.95
Section 41 (Squares A/2–3, looking west at entrance in Wall 9406 and C-1b walls below)
Panitz-Cohen and Mazar in Mazar et. al. (2020 v.2) - Figure 12.97 -
Section 43 (Square R/4, looking north) from Mazar et. al. (2020 v.2)
Figure 12.97
Section 43 (Square R/4, looking north)
Panitz-Cohen and Mazar in Mazar et. al. (2020 v.2)
- Table 15.1
Stratigraphy and chronology in Area D, with correlation to Area C from Mazar et. al. (2020 v. 3: Chapter 17)
Table 15.1
Stratigraphy and chronology in Area D, with correlation to Area C
Mazar et. al. (2020 v.3) - Table 15.2
Locus and basket numbers from Mazar et. al. (2020 v. 3: Chapter 17)
Table 15.2
Locus and basket numbers
Mazar et. al. (2020 v.3) - Figure 15.1
Location of section drawings on superimposed plan of Strata D-11–D-2 from Mazar et. al. (2020 v. 3: Chapter 17)
Figure 15.1
Location of section drawings on superimposed plan of Strata D-11–D-2
Mazar et. al. (2020 v.3) - Figure 15.2
Schematic section of Area D from Mazar et. al. (2020 v. 3: Chapter 17)
Figure 15.2
Schematic section of Area D
Mazar et. al. (2020 v.3)
- Table 15.1 -
Stratigraphy and chronology in Area D, with correlation to Area C from Mazar et. al. (2020 v. 3: Chapter 17)
Table 15.1
Stratigraphy and chronology in Area D, with correlation to Area C
Mazar et. al. (2020 v.3) - Table 15.2 -
Locus and basket numbers from Mazar et. al. (2020 v. 3: Chapter 17)
Table 15.2
Locus and basket numbers
Mazar et. al. (2020 v.3) - Figure 15.1 -
Location of section drawings on superimposed plan of Strata D-11–D-2 from Mazar et. al. (2020 v. 3: Chapter 17)
Figure 15.1
Location of section drawings on superimposed plan of Strata D-11–D-2
Mazar et. al. (2020 v.3) - Figure 15.2 -
Schematic section of Area D from Mazar et. al. (2020 v. 3: Chapter 17)
Figure 15.2
Schematic section of Area D
Mazar et. al. (2020 v.3) - Photo 15.1 -
Area D at the end of 1997 season from Mazar et. al. (2020 v. 3: Chapter 15)
Photo 15.1
General view, end of 1997 season, looking east; from top to bottom: Squares Q/4 to L/4
Mazar et. al. (2020 v.3) - Photo 15.2 -
Area D at the end of 1998 season from Mazar et. al. (2020 v. 3: Chapter 15)
Photo 15.2
General view, end of 1998 season, looking east; from top to bottom: Squares Q/4 to L/4
Mazar et. al. (2020 v.3) - Photo 15.3 -
Area D at the end of 2000 season from Mazar et. al. (2020 v. 3: Chapter 15)
Photo 15.3
General view, end of 2000 season, looking east; from top to bottom: Squares Q/4–5 to L/4
Mazar et. al. (2020 v.3) - Photo 15.4 -
Area D at the end of 2005 season from Mazar et. al. (2020 v. 3: Chapter 15)
Photo 15.4
General view, end of 2005 season, looking east; from top to bottom: Squares Q/4–5 to L/4–5
Mazar et. al. (2020 v.3) - Photo 15.5 -
Aerial view, end of 2008 season from Mazar et. al. (2020 v. 3: Chapter 15)
Photo 15.5
Aerial view, end of 2008 season
Mazar et. al. (2020 v.3) - Photo 15.6 -
General view, end of 2010 season from Mazar et. al. (2020 v. 3: Chapter 15)
Photo 15.6
General view, end of 2010 season, looking southwest; Squares L–N/4–5
Mazar et. al. (2020 v.3)
Area D was a step trench dug in the northern part of the western slope of the lower mound, from the bottom of the tell to the uppermost level (Fig. 15.2). The area was excavated during seven seasons (1997–1998, 2000, 2005, 2007–2008, 2010). In 1997 and 1998, the area was excavated as a 4.0 m wide trench extending westwards from the northwestern square of Area C (R/4) and running five squares (25 m) down the slope (Squares Q/4–L/4) (Photos 15.1–15.2). In 2000 and 2005, the trench was extended by one square to the north (L–Q/5), while only minor probes were conducted in the original trench (Photos 15.3–15.4). Starting from 2005, Area D was divided into two sub-areas: the upper (eastern) portion of the slope (Squares P– Q/4–5) was excavated as Area D1 and the lower (western) portion (Squares L–N/4–5) as Area D2. These terms are not retained in this chapter and are replaced by Area D East (the upper part of the trench) and Area D West (the lower part of the trench) respectively. Both areas were excavated in 2005, 2007 and 2008 (Photo 15.5), while in the 2010 season, and for a few days in April 2011 (Squares N/4–5), work was carried out only in Area D West (Photo 15.6). The actual width of the excavated step trench was 9.0 m (Fig. 15.1). In addition to the manual excavation, two backhoe trenches were excavated from the base of the mound westwards, towards the present agricultural field, intended to reveal geological features and geomorphological processes at the base of the mound. In the first three seasons (1997, 1998, 2000) Area D was supervised by Amir Sumaka'i Fink, together with Yoav Schur in 1997–1998. In 2005, 2007, 2008, 2010 and 2011), Area D East was supervised by Yael Rotem and Area D West by Uri Davidovich.
The present chapter is divided between the two parts of the area: the western (lower) part and eastern (higher) part.
The goal of the excavation of Area D was to study the occupation history, stratigraphic sequence, formation processes and potential fortification lines in the lower mound. Based on results of previous surveys (see Chapter 3) and the shape of the steep, homogeneous western and northern slopes of the lower mound, it was assumed that this formation was created by an earthen rampart, possibly constructed during the Middle Bronze Age. However, excavation has unequivocally shown that the lower mound was first settled in Late Bronze I, a phenomenon which is almost unparalleled at other sites in the Southern Levant.
Continuous occupation was detected in Area D from Late Bronze I to Iron IIA, a time span of some 600 years. The excavation concentrated on defining the various strata and occupation phases and their architectural remains, as well as the nature of the transition between them. Eleven main strata and several sub-phases were defined along the slope, with an accumulation reaching 11.45 m (between levels 76.45 m and 87.90 m) (Fig. 15.2). No fortifications were found along the entire step trench and no major destruction events were identified between the strata. The correlation between Strata D-2 and D-1 to the stratigraphy in nearby Area C was a key to anchoring the local stratigraphy of Area D in relation to the rest of the tell, although the issue of the precise correlation between the Iron IB strata in Area D and those in Area C remains unresolved and is further discussed below in this chapter. Table 15.1 presents the stratigraphic sequence and suggested correlation to strata in Area C, as well as periodization and approximate dates of the various strata.1
- Table 15.1 -
Stratigraphy and chronology in Area D, with correlation to Area C from Mazar et. al. (2020 v. 3: Chapter 17)
Table 15.1
Stratigraphy and chronology in Area D, with correlation to Area C
Mazar et. al. (2020 v.3) - Table 15.2 -
Locus and basket numbers from Mazar et. al. (2020 v. 3: Chapter 17)
Table 15.2
Locus and basket numbers
Mazar et. al. (2020 v.3) - Figure 15.1 -
Location of section drawings on superimposed plan of Strata D-11–D-2 from Mazar et. al. (2020 v. 3: Chapter 17)
Figure 15.1
Location of section drawings on superimposed plan of Strata D-11–D-2
Mazar et. al. (2020 v.3) - Figure 15.2 -
Schematic section of Area D from Mazar et. al. (2020 v. 3: Chapter 17)
Figure 15.2
Schematic section of Area D
Mazar et. al. (2020 v.3) - Figure 15.17b -
Section 1b from Mazar et. al. (2020 v. 3: Chapter 15)
Figure 15.17b
Section 1b (Squares J–M/5 and part of N/5, looking north)
Mazar et. al. (2020 v.3)
The initial understanding of the formation processes of the site assumed that Tel Rehov in general, and the lower mound in particular, developed on a natural spur which protruded slightly above the level of the surrounding fields. This assumption was presumably corroborated later by the results of the geoseismic survey, which showed that both parts of the mound were built on an elevated, eastward-tilted tufa block (Zilberman et al. 2002; Chapter 2, this volume). It was also assumed that the level of the field to the west of the mound remained fairly unchanged during the time span that elapsed from the first settlement in the lower mound to the present day. The low natural hill inferred from the geoseismic survey (Zilberman et al. 2002) was not found during the excavation. In fact, the excavation in Area D has shown that the lower mound was built of successive, almost horizontal strata which show almost no terracing, beginning at a level even lower than that of the current field.
Evidence gathered both by excavation at the base of Area D (see below) and during the geoseismic survey indicates that a geological fault, probably of a stepped structure, borders the mound on the west (Chapter 2 and Zilberman et al. 2004). Young tectonic activity along this fault, which postdates at least the earlier strata of the lower mound, is indicated by the missing western portion of the monumental building of Stratum D-10 (see below), as gravitational erosion cannot account for this observation. This tectonic activity has created, together with the continuous occupation of the site east of the fault line, a clear demarcation between the mound and the down-faulted block to its west, a process which possibly enhanced post-depositional erosion on the western slope of the mound. It is hypothesized, based on the plans of most strata (e.g., the buildings of Strata D-5 and D-4), that the scale of erosion (i.e., the missing portions of most strata) is no greater than a few meters. Thus, it seems untenable to assume that fortification systems could have been entirely eroded. Combined with the evidence gathered in Areas C and E, it is concluded that the lower mound was probably never fortified.
The young tectonic activities, both in the aforementioned fault and in other faults surrounding the mound (Zilberman et al. 2004; Chapter 2, this volume), could also have caused the tilting of layers and structures towards the southeast (towards the center of the mound) that was noted in both Areas D and C. This post-depositional tilting could have occurred during the occupational sequence, either close in time to the creation of the tilted features, or much later (see Chapter 3 and below, discussion of Strata D-11 and D-10).
Based on a backhoe trench excavated in the present-day field west of the mound, it is clear that the down-faulted block is covered with at least 4.3 m of dark brown colluvium which accumulated in the last 1000–1500 years, as indicated by the appearance of worn Roman-Byzantine or later sherds which must have originated in the Late Antiquity settlement of Rehob, located ca. 700 m to the northwest of Area D (Vitto 1993). The top level of the present field is ca. 2.0 m higher than the bedrock of the uplifted tufa block, as was exposed at the base of the excavation in Area D (Fig. 15.17b, and further below).
- Table 15.1 -
Stratigraphy and chronology in Area D, with correlation to Area C from Mazar et. al. (2020 v. 3: Chapter 17)
Table 15.1
Stratigraphy and chronology in Area D, with correlation to Area C
Mazar et. al. (2020 v.3) - Table 15.2 -
Locus and basket numbers from Mazar et. al. (2020 v. 3: Chapter 17)
Table 15.2
Locus and basket numbers
Mazar et. al. (2020 v.3) - Figure 15.1 -
Location of section drawings on superimposed plan of Strata D-11–D-2 from Mazar et. al. (2020 v. 3: Chapter 17)
Figure 15.1
Location of section drawings on superimposed plan of Strata D-11–D-2
Mazar et. al. (2020 v.3) - Figure 15.2 -
Schematic section of Area D from Mazar et. al. (2020 v. 3: Chapter 17)
Figure 15.2
Schematic section of Area D
Mazar et. al. (2020 v.3) - Figure 15.17a -
Section 1a from Mazar et. al. (2020 v. 3: Chapter 15)
Figure 15.17a
Section 1a (Squares G–L/5, looking north, showing probe in alluvial field)
Mazar et. al. (2020 v.3) - Figure 15.17b -
Section 1b from Mazar et. al. (2020 v. 3: Chapter 15)
Figure 15.17b
Section 1b (Squares J–M/5 and part of N/5, looking north)
Mazar et. al. (2020 v.3) - Figure 15.18a -
Section 2a from Mazar et. al. (2020 v. 3: Chapter 15)
Figure 15.18a
Section 2a (Squares M/4–5, looking west in Probe III)
Mazar et. al. (2020 v.3) - Figure 15.18b -
Section 2b from Mazar et. al. (2020 v. 3: Chapter 15)
Figure 15.18b
Section 2a (Squares M/4–5, looking west in Probe III)
Mazar et. al. (2020 v.3)
- Sections: Fig. 15.17a–b
Apart from studying the earliest part of the stratigraphic sequence of the lower mound, the excavations at the base of Area D had two additional goals: to clarify the outline of the natural topography, whether bedrock or virgin soil, which predated the first human activity in this area, and to explore the relationship between the formation processes of the lower mound in its initial phases and of the nearby plain located to the west of the mound. These investigations were carried out in three deep manually excavated probes and in two narrow backhoe trenches, all located at the lowermost part of the step trench.
Three probes were dug in order to explore the constructional fill of Stratum D-10 and occupation layers of Stratum D-11 (Fig. 15.3):
- Probe I, located at the northwestern corner of Square L/4 (excavated in 1998, 1.0×2.0 m)
- Probe II, located at the southwestern corner of Square M/4 (excavated in 2008 and 2010, ca. 1.0×2.5 m)
- Probe III, located at the southern part of Square M/5 and northern part of Square M/4 (excavated in 2010, ca. 9.0 sq m).
A 17 m-long backhoe trench, 0.7 m wide and up to 4.0 m deep, was first dug in 1998 in Squares K–L/5 (4.0 m long) and was extended and deepened during the 2005 and 2008 seasons, along the line of Squares J–M/5 (Fig. 15.3, lower part of Fig. 15.17a). The purpose of this trench was to examine the depth and extent of the 2.0 m-deep artificial fill of Stratum D-10 (which, at the time, was thought to be a natural phenomenon), as well as to uncover geological features related to the edge of the mound and its relation to the colluvial field to the west. During the 2008 season, another short trench (1.0 m wide, 2.5 m long, 4.3 m deep) was dug in this field (Squares H–G/5) (Fig. 15.17a). Although done with a backhoe, the work was closely supervised, with pottery collected and assigned to the various layers. Yet, most of this trench contained either topsoil wash (Squares J–K/5) or a deep fill devoid of finds (Squares L–M/5).
Bedrock, reached at the bottom of Probes I and III, as well as in the backhoe trench (Squares L– M/4–5) (Figs. 15.3, 15.17a, 15.18a), is composed of chunky yellowish tufa, belonging most probably to the Beth-Shean formation of the Late Pleistocene, at the margins of the tilted, uplifted block detected in the geoseismic survey (Chapter 2 and Zilberman et al. 2002). The tufa bedrock forms a roughly horizontal surface, detected at level 76.15 m in Squares K–M/5 in the backhoe trench, at 76.30 m at the bottom of Probe I, and at 75.95 m at the bottom of Probe III. In the western portion of the backhoe trench, at the eastern side of Square J/5, a natural fault was observed in the tufa bedrock. The fault, 1.3 m high, separates an eastern uplifted block from a down-faulted area to its west, where bedrock forms a horizontal surface at level 74.85 m (Figs. 15.17a–b). This fault may constitute only one branch of a wider, stepped fault, since the continuation of the long backhoe trench, dug in the field ca. 8.0 m to the west of the aforementioned fault, was excavated to level 73.85 m without reaching bedrock (Fig. 15.17a). This level is lower by ca. 1.0 m compared to the bedrock level of the down-faulted block detected in the long trench, thus implying a step-like fault zone west of the mound, which is probably part of the fault bordering Tel Rehov on the west, detected during the geoseismic survey (Chapter 2). Regarding the possibility of young tectonic activity along this fault line and its implications for the formation of the lower mound, see discussion above and further below.
The field which lies to the west of the lower mound, intensively cultivated in the last decades, gradually slopes from the west (near today’s Road 90) to the east, towards its lowest part just at the foot of the mound, where a north–south dirt road currently runs. The present level of the field at the base of Area D is 78.50 m, ca. 2.3 m above the uplifted tufa bedrock surface described above. As already mentioned, the short backhoe trench that was dug in the field ca. 8.0 m west of the aforementioned fault (Fig. 15.17a; Photo 15.7), descended from the surface of the field to level 73.85 m (4.3 m deep) without reaching bedrock.
The first anthropogenic activity in Squares K– L/4–5 seems to have taken place immediately above bedrock. Considering that the uplifted tufa bedrock had been exposed above ground when the first occupants arrived, the field would have been at least 2.0 m below its present level. However, due to the possibility of young tectonic activities, discussed above, the actual level of the field could have been much lower with regard to the initial occupation.
- Table 15.1 -
Stratigraphy and chronology in Area D, with correlation to Area C from Mazar et. al. (2020 v. 3: Chapter 17)
Table 15.1
Stratigraphy and chronology in Area D, with correlation to Area C
Mazar et. al. (2020 v.3) - Table 15.2 -
Locus and basket numbers from Mazar et. al. (2020 v. 3: Chapter 17)
Table 15.2
Locus and basket numbers
Mazar et. al. (2020 v.3) - Figure 15.1 -
Location of section drawings on superimposed plan of Strata D-11–D-2 from Mazar et. al. (2020 v. 3: Chapter 17)
Figure 15.1
Location of section drawings on superimposed plan of Strata D-11–D-2
Mazar et. al. (2020 v.3) - Figure 15.2 -
Schematic section of Area D from Mazar et. al. (2020 v. 3: Chapter 17)
Figure 15.2
Schematic section of Area D
Mazar et. al. (2020 v.3) - Figure 15.3 -
Plan of Stratum D-11b from Mazar et. al. (2020 v. 3: Chapter 15)
Figure 15.3
Plan of Stratum D-11b
Mazar et. al. (2020 v.3) - Figure 15.4 -
Plan of Stratum D-11a from Mazar et. al. (2020 v. 3: Chapter 15)
Figure 15.4
Plan of Stratum D-11a
Mazar et. al. (2020 v.3) - Figure 15.17a -
Section 1a from Mazar et. al. (2020 v. 3: Chapter 15)
Figure 15.17a
Section 1a (Squares G–L/5, looking north, showing probe in alluvial field)
Mazar et. al. (2020 v.3) - Figure 15.17b -
Section 1b from Mazar et. al. (2020 v. 3: Chapter 15)
Figure 15.17b
Section 1b (Squares J–M/5 and part of N/5, looking north)
Mazar et. al. (2020 v.3) - Figure 15.18a -
Section 2a from Mazar et. al. (2020 v. 3: Chapter 15)
Figure 15.18a
Section 2a (Squares M/4–5, looking west in Probe III)
Mazar et. al. (2020 v.3) - Figure 15.18b -
Section 2b from Mazar et. al. (2020 v. 3: Chapter 15)
Figure 15.18b
Section 2a (Squares M/4–5, looking west in Probe III)
Mazar et. al. (2020 v.3) - Figure 15.19 -
Section 3 from Mazar et. al. (2020 v. 3: Chapter 15)
Figure 15.19
Section 3 (Squares L–N/4, looking north)
Mazar et. al. (2020 v.3) - Figure 15.20 -
Section 4 from Mazar et. al. (2020 v. 3: Chapter 15)
Figure 15.20
Section 4 (Squares N–L/4, looking south)
Mazar et. al. (2020 v.3) - Photo 15.6 -
General view, end of 2010 season from Mazar et. al. (2020 v. 3: Chapter 15)
Photo 15.6
General view, end of 2010 season, looking southwest; Squares L–N/4–5
Mazar et. al. (2020 v.3) - Photo 15.8 -
Probe III in Squares M/4–5 from Mazar et. al. (2020 v. 3: Chapter 15)
Photo 15.8
Probe III in Squares M/4–5; looking south at Stratum D-10 Buttress 2889 and Wall 2886; right: section in 2.0 m-high tufa fill, Stratum D-10; bottom left: D-11b Hearth 1926
Mazar et. al. (2020 v.3) - Photo 15.9 -
Probe III in Squares M/4–5 from Mazar et. al. (2020 v. 3: Chapter 15)
Photo 15.9
Probe III in Squares M/4–5; looking south at Buttress 2889 and Wall 2886, Stratum D-10; bottom: D-11b Hearths 1926 (left) and 1925 (right), Wall 1927 to their north
Mazar et. al. (2020 v.3) - Photo 15.10 -
Probe III in Squares M/4–5 from Mazar et. al. (2020 v. 3: Chapter 15)
Photo 15.10
Probe III in Squares M/4–5; looking north at Stratum D-10 Buttress 8938 and Wall 8942; bottom: D-11a Wall 1915 and ash pile (1919) to its north; northern and western sections: D-10 tufa fill
Mazar et. al. (2020 v.3) - Photo 15.11 -
Probe III in Squares M/4–5 from Mazar et. al. (2020 v. 3: Chapter 15)
Photo 15.11
Probe III in Squares M/4–5, looking north at D-11a Wall 1923 covered by layer (1907) and tufa fill (2814) of D-10
Mazar et. al. (2020 v.3) - Photo 15.12 -
Probe II in Square M/4 from Mazar et. al. (2020 v. 3: Chapter 15)
Photo 15.12
Probe II in Square M/4, looking east; D-11a stone floor (9917) covering D-11b layers; on top: successive D-10 fill layers (9914, 9905) and Floor 8939
Mazar et. al. (2020 v.3) - Photo 15.13 -
Backhoe trench in Square M/5 from Mazar et. al. (2020 v. 3: Chapter 15)
Photo 15.13
Backhoe trench in Square M/5, looking east; D-10 Wall 8942 with large stone below it at end of trench; thick tufa fill 2814 in trench sections
Mazar et. al. (2020 v.3)
- Plans: Figs. 15.3–15.4
- Sections: Figs. 15.17–15.20
- Photos 15.6, 15.8–15.13
- Pottery: Figs. 16.1–16.3
- Table 15.1 -
Stratigraphy and chronology in Area D, with correlation to Area C from Mazar et. al. (2020 v. 3: Chapter 17)
Table 15.1
Stratigraphy and chronology in Area D, with correlation to Area C
Mazar et. al. (2020 v.3) - Table 15.2 -
Locus and basket numbers from Mazar et. al. (2020 v. 3: Chapter 17)
Table 15.2
Locus and basket numbers
Mazar et. al. (2020 v.3) - Figure 15.1 -
Location of section drawings on superimposed plan of Strata D-11–D-2 from Mazar et. al. (2020 v. 3: Chapter 17)
Figure 15.1
Location of section drawings on superimposed plan of Strata D-11–D-2
Mazar et. al. (2020 v.3) - Figure 15.2 -
Schematic section of Area D from Mazar et. al. (2020 v. 3: Chapter 17)
Figure 15.2
Schematic section of Area D
Mazar et. al. (2020 v.3) - Figure 15.5 -
Plan of Stratum D-10 constructional fills from Mazar et. al. (2020 v. 3: Chapter 15)
Figure 15.5
Plan of Stratum D-10 constructional fills
Mazar et. al. (2020 v.3) - Figure 15.6 -
Plan of Stratum D-10 from Mazar et. al. (2020 v. 3: Chapter 15)
Figure 15.6
Plan of Stratum D-10
Mazar et. al. (2020 v.3) - Figure 15.17a -
Section 1a from Mazar et. al. (2020 v. 3: Chapter 15)
Figure 15.17a
Section 1a (Squares G–L/5, looking north, showing probe in alluvial field)
Mazar et. al. (2020 v.3) - Figure 15.17b -
Section 1b from Mazar et. al. (2020 v. 3: Chapter 15)
Figure 15.17b
Section 1b (Squares J–M/5 and part of N/5, looking north)
Mazar et. al. (2020 v.3) - Figure 15.18a -
Section 2a from Mazar et. al. (2020 v. 3: Chapter 15)
Figure 15.18a
Section 2a (Squares M/4–5, looking west in Probe III)
Mazar et. al. (2020 v.3) - Figure 15.18b -
Section 2b from Mazar et. al. (2020 v. 3: Chapter 15)
Figure 15.18b
Section 2a (Squares M/4–5, looking west in Probe III)
Mazar et. al. (2020 v.3) - Figure 15.19 -
Section 3 from Mazar et. al. (2020 v. 3: Chapter 15)
Figure 15.19
Section 3 (Squares L–N/4, looking north)
Mazar et. al. (2020 v.3) - Figure 15.20 -
Section 4 from Mazar et. al. (2020 v. 3: Chapter 15)
Figure 15.20
Section 4 (Squares N–L/4, looking south)
Mazar et. al. (2020 v.3) - Photo 15.4 -
Area D at the end of 2005 season from Mazar et. al. (2020 v. 3: Chapter 15)
Photo 15.4
General view, end of 2005 season, looking east; from top to bottom: Squares Q/4–5 to L/4–5
Mazar et. al. (2020 v.3) - Photo 15.5 -
Aerial view, end of 2008 season from Mazar et. al. (2020 v. 3: Chapter 15)
Photo 15.5
Aerial view, end of 2008 season
Mazar et. al. (2020 v.3) - Photo 15.6 -
General view, end of 2010 season from Mazar et. al. (2020 v. 3: Chapter 15)
Photo 15.6
General view, end of 2010 season, looking southwest; Squares L–N/4–5
Mazar et. al. (2020 v.3) - Photo 15.8 -
Probe III in Squares M/4–5 from Mazar et. al. (2020 v. 3: Chapter 15)
Photo 15.8
Probe III in Squares M/4–5; looking south at Stratum D-10 Buttress 2889 and Wall 2886; right: section in 2.0 m-high tufa fill, Stratum D-10; bottom left: D-11b Hearth 1926
Mazar et. al. (2020 v.3) - Photo 15.9 -
Probe III in Squares M/4–5 from Mazar et. al. (2020 v. 3: Chapter 15)
Photo 15.9
Probe III in Squares M/4–5; looking south at Buttress 2889 and Wall 2886, Stratum D-10; bottom: D-11b Hearths 1926 (left) and 1925 (right), Wall 1927 to their north
Mazar et. al. (2020 v.3) - Photo 15.10 -
Probe III in Squares M/4–5 from Mazar et. al. (2020 v. 3: Chapter 15)
Photo 15.10
Probe III in Squares M/4–5; looking north at Stratum D-10 Buttress 8938 and Wall 8942; bottom: D-11a Wall 1915 and ash pile (1919) to its north; northern and western sections: D-10 tufa fill
Mazar et. al. (2020 v.3) - Photo 15.11 -
Probe III in Squares M/4–5 from Mazar et. al. (2020 v. 3: Chapter 15)
Photo 15.11
Probe III in Squares M/4–5, looking north at D-11a Wall 1923 covered by layer (1907) and tufa fill (2814) of D-10
Mazar et. al. (2020 v.3) - Photo 15.12 -
Probe II in Square M/4 from Mazar et. al. (2020 v. 3: Chapter 15)
Photo 15.12
Probe II in Square M/4, looking east; D-11a stone floor (9917) covering D-11b layers; on top: successive D-10 fill layers (9914, 9905) and Floor 8939
Mazar et. al. (2020 v.3) - Photo 15.13 -
Backhoe trench in Square M/5 from Mazar et. al. (2020 v. 3: Chapter 15)
Photo 15.13
Backhoe trench in Square M/5, looking east; D-10 Wall 8942 with large stone below it at end of trench; thick tufa fill 2814 in trench sections
Mazar et. al. (2020 v.3) - Photo 15.14 -
Probe III in Squares M/4–5 from Mazar et. al. (2020 v. 3: Chapter 15)
Photo 15.14
Probe III in Squares M/4–5, looking south; left: stone foundation of D-9b Wall 8943 on top of D-10 Wall 8942 and Buttress 8938; background: D-10 Wall 2886 and Buttress 2889 (2010)
Mazar et. al. (2020 v.3) - Photo 15.15 -
Detail of Probe III from Mazar et. al. (2020 v. 3: Chapter 15)
Photo 15.15
Detail of Probe III, looking south at Wall 2886 and Buttress 2889 (2010)
Mazar et. al. (2020 v.3) - Photo 15.16 -
Detail of Probe III from Mazar et. al. (2020 v. 3: Chapter 15)
Photo 15.16
Detail of Probe III, looking east at Wall 8942 and Buttress 8938 (left) (2010)
Mazar et. al. (2020 v.3) - Photo 15.18 -
Squares L–M/4 at end of 2010 season from Mazar et. al. (2020 v. 3: Chapter 15)
Photo 15.18
Squares L–M/4 at end of 2010 season, looking south at D-10 Walls 2886 and 2890 and Buttresses 2889, 1902, 1903; Probe II (9905) in Square M/4 east of Wall 2890
Mazar et. al. (2020 v.3) - Photo 15.19 -
Probe II in Square M/4 from Mazar et. al. (2020 v. 3: Chapter 15)
Photo 15.19
Probe II in Square M/4, looking east; D-10 constructional fill (9914, 9905) and Floor 8939 in section (1998)
Mazar et. al. (2020 v.3) - Photo 15.20 -
Probe II in Square M/4 from Mazar et. al. (2020 v. 3: Chapter 15)
Photo 15.20
Probe II in Square M/4, looking south; D-10 constructional fill (9914, 9905) and Floor 8939 in section (2008)
Mazar et. al. (2020 v.3) - Photo 15.21 -
Squares L–M/4 from Mazar et. al. (2020 v. 3: Chapter 15)
Photo 15.21
Squares L–M/4, looking east at corner of Wall 2890 and Buttresses 1902 and 1903; left: Courtyard 8934 (2010)
Mazar et. al. (2020 v.3) - Photo 15.22 -
Square M/5, Buttress 8938 and Wall 8942 abutted by D-10 Courtyard 8934 from Mazar et. al. (2020 v. 3: Chapter 15)
Photo 15.22
Square M/5, Buttress 8938 and Wall 8942 abutted by D-10 Courtyard 8934, looking northeast (2008)
Mazar et. al. (2020 v.3) - Photo 15.23 -
Squares L–N/4–5 from Mazar et. al. (2020 v. 3: Chapter 15)
Photo 15.23
Squares L–N/4–5, looking east; front: D-10 Courtyard 8934 and top of Buttresses 2889 (right) and 8938 (left); background: Strata D-9 to D-5 (2007)
Mazar et. al. (2020 v.3) - Photo 15.24 -
Squares L–N/4–5 from Mazar et. al. (2020 v. 3: Chapter 15)
Photo 15.24
Squares L–N/4–5, looking south; center: D-10 Courtyard 8934; left: Wall 8942 and Buttress 8938; top: Wall 2886 and Buttress 2889, partly superimposed by D-9b 2816 and 2892; in southern section: D-9 and D-8 layers (2007)
Mazar et. al. (2020 v.3) - Photo 15.25 -
Squares L–N/4–5 from Mazar et. al. (2020 v. 3: Chapter 15)
Photo 15.25
Squares L–N/4–5, looking north; center: D-10 Courtyard 8934; right: Buttress 8938; bottom: Wall 2886 and Buttress 2889 partly superimposed by D-9b Walls 2816 and 2892 (2007)
Mazar et. al. (2020 v.3) - Photo 15.26 -
Squares L–M/4 from Mazar et. al. (2020 v. 3: Chapter 15)
Photo 15.26
Squares L–M/4, looking south at section; bottom: D-9b Wall 2816; D-9a stone floor (2855) at top of meter stick, sealing D-10 and D-9b floors (bird-nest holes in section) (2007)
Mazar et. al. (2020 v.3) - Photo 15.27 -
Squares M–N/4 from Mazar et. al. (2020 v. 3: Chapter 15)
Photo 15.27
Squares M–N/4, looking southeast; D-10 Courtyard 8934 in corner of Walls 8942 and 2886; top left: stone foundation of D-9b Wall 8943 (2008).
Mazar et. al. (2020 v.3) - Photo 15.37 -
Squares L–M/4 from Mazar et. al. (2020 v. 3: Chapter 15)
Photo 15.37
Squares L–M/4, looking north at foundations of D-9b Wall 2816 above D-10 Wall 2886 and Buttress 1903, with D-10 Wall 2890 at the bottom
Mazar et. al. (2020 v.3) - Photo 15.38 -
Square N/4 from Mazar et. al. (2020 v. 3: Chapter 15)
Photo 15.38
Square N/4, sloping striations in D-10 Locus 8939 below D-9 stone foundations of Walls 8943 and 1906, looking east; background: D-8–9a Wall 8932 (2010)
Mazar et. al. (2020 v.3)
- Plans: Figs. 15.5–15.6
- Sections: Figs. 15.17–15.20
- Photos 15.4–15.6, 15.8–15.16, 15.18–15.27, 15.37–15.38
- Pottery: Figs. 16.4–16.8
- Table 15.1 -
Stratigraphy and chronology in Area D, with correlation to Area C from Mazar et. al. (2020 v. 3: Chapter 17)
Table 15.1
Stratigraphy and chronology in Area D, with correlation to Area C
Mazar et. al. (2020 v.3) - Table 15.2 -
Locus and basket numbers from Mazar et. al. (2020 v. 3: Chapter 17)
Table 15.2
Locus and basket numbers
Mazar et. al. (2020 v.3) - Figure 15.1 -
Location of section drawings on superimposed plan of Strata D-11–D-2 from Mazar et. al. (2020 v. 3: Chapter 17)
Figure 15.1
Location of section drawings on superimposed plan of Strata D-11–D-2
Mazar et. al. (2020 v.3) - Figure 15.2 -
Schematic section of Area D from Mazar et. al. (2020 v. 3: Chapter 17)
Figure 15.2
Schematic section of Area D
Mazar et. al. (2020 v.3) - Figure 15.7 -
Plan of Stratum D-9b from Mazar et. al. (2020 v. 3: Chapter 15)
Figure 15.7
Plan of Stratum D-9b
Mazar et. al. (2020 v.3) - Figure 15.8 -
Plan of Stratum D-9a from Mazar et. al. (2020 v. 3: Chapter 15)
Figure 15.8
Plan of Stratum D-9a
Mazar et. al. (2020 v.3) - Figure 15.17a -
Section 1a from Mazar et. al. (2020 v. 3: Chapter 15)
Figure 15.17a
Section 1a (Squares G–L/5, looking north, showing probe in alluvial field)
Mazar et. al. (2020 v.3) - Figure 15.17b -
Section 1b from Mazar et. al. (2020 v. 3: Chapter 15)
Figure 15.17b
Section 1b (Squares J–M/5 and part of N/5, looking north)
Mazar et. al. (2020 v.3) - Figure 15.18a -
Section 2a from Mazar et. al. (2020 v. 3: Chapter 15)
Figure 15.18a
Section 2a (Squares M/4–5, looking west in Probe III)
Mazar et. al. (2020 v.3) - Figure 15.18b -
Section 2b from Mazar et. al. (2020 v. 3: Chapter 15)
Figure 15.18b
Section 2a (Squares M/4–5, looking west in Probe III)
Mazar et. al. (2020 v.3) - Figure 15.19 -
Section 3 from Mazar et. al. (2020 v. 3: Chapter 15)
Figure 15.19
Section 3 (Squares L–N/4, looking north)
Mazar et. al. (2020 v.3) - Figure 15.20 -
Section 4 from Mazar et. al. (2020 v. 3: Chapter 15)
Figure 15.20
Section 4 (Squares N–L/4, looking south)
Mazar et. al. (2020 v.3) - Figure 15.21 -
Section 5 from Mazar et. al. (2020 v. 3: Chapter 15)
Figure 15.21
Section 5 (Squares N/4–5, looking east)
Mazar et. al. (2020 v.3) - Photo 15.23 -
Squares L–N/4–5 from Mazar et. al. (2020 v. 3: Chapter 15)
Photo 15.23
Squares L–N/4–5, looking east; front: D-10 Courtyard 8934 and top of Buttresses 2889 (right) and 8938 (left); background: Strata D-9 to D-5 (2007)
Mazar et. al. (2020 v.3) - Photo 15.24 -
Squares L–N/4–5 from Mazar et. al. (2020 v. 3: Chapter 15)
Photo 15.24
Squares L–N/4–5, looking south; center: D-10 Courtyard 8934; left: Wall 8942 and Buttress 8938; top: Wall 2886 and Buttress 2889, partly superimposed by D-9b 2816 and 2892; in southern section: D-9 and D-8 layers (2007)
Mazar et. al. (2020 v.3) - Photo 15.25 -
Squares L–N/4–5 from Mazar et. al. (2020 v. 3: Chapter 15)
Photo 15.25
Squares L–N/4–5, looking north; center: D-10 Courtyard 8934; right: Buttress 8938; bottom: Wall 2886 and Buttress 2889 partly superimposed by D-9b Walls 2816 and 2892 (2007)
Mazar et. al. (2020 v.3) - Photo 15.26 -
Squares L–M/4 from Mazar et. al. (2020 v. 3: Chapter 15)
Photo 15.26
Squares L–M/4, looking south at section; bottom: D-9b Wall 2816; D-9a stone floor (2855) at top of meter stick, sealing D-10 and D-9b floors (bird-nest holes in section) (2007)
Mazar et. al. (2020 v.3) - Photo 15.27 -
Squares M–N/4 from Mazar et. al. (2020 v. 3: Chapter 15)
Photo 15.27
Squares M–N/4, looking southeast; D-10 Courtyard 8934 in corner of Walls 8942 and 2886; top left: stone foundation of D-9b Wall 8943 (2008).
Mazar et. al. (2020 v.3) - Photo 15.28 -
Squares M–N/4–5 from Mazar et. al. (2020 v. 3: Chapter 15)
Photo 15.28
Squares M–N/4–5, looking south at D-9a–b stone foundations (2010)
Mazar et. al. (2020 v.3) - Photo 15.29 -
Squares M–N/4–5, from Mazar et. al. (2020 v. 3: Chapter 15)
Photo 15.29
Squares M–N/4–5, looking south; left: D-9a Wall 8932 and Post-holes 1912; right: D-9b stone foundations (2010)
Mazar et. al. (2020 v.3) - Photo 15.30 -
Squares N/4–5 from Mazar et. al. (2020 v. 3: Chapter 15)
Photo 15.30
Squares N/4–5, looking west; top: D-9b stone foundations; bottom: D-9a Wall 8932 and Post-holes 1912; right: D-9a Wall 1916 (2010)
Mazar et. al. (2020 v.3) - Photo 15.31 -
Squares N/5 from Mazar et. al. (2020 v. 3: Chapter 15)
Photo 15.31
Square N/5, looking south; bottom: D-9a Wall 1916; right and top: D-9b Walls 8943 and 9923; left: D-9a Post-holes 1912 (2010)
Mazar et. al. (2020 v.3) - Photo 15.32 -
Squares N/4 from Mazar et. al. (2020 v. 3: Chapter 15)
Photo 15.32
Square N/4, looking south at D-9b Floor 9927, Oven 9918 and Installation 1905; right: Wall 8943; background: Wall 1904 (2010)
Mazar et. al. (2020 v.3) - Photo 15.33 -
Square M/5 from Mazar et. al. (2020 v. 3: Chapter 15)
Photo 15.33
Square M/5, looking south at D-9b bronze-melting canal (8921) and Installation 8925 (2007)
Mazar et. al. (2020 v.3) - Photo 15.34 -
Detail of bronze-melting canal (8921) with fragments of bellow, charcoal, and metal object in situ from Mazar et. al. (2020 v. 3: Chapter 15)
Photo 15.34
Detail of bronze-melting canal (8921) with fragments of bellow, charcoal, and metal object in situ, looking west (2007)
Mazar et. al. (2020 v.3) - Photo 15.35 -
Square M/5 from Mazar et. al. (2020 v. 3: Chapter 15)
Photo 15.35
Square M/5, detail of Installation 8925 near bronze-melting canal (8921), looking south (2007)
Mazar et. al. (2020 v.3) - Photo 15.36 -
Square M/5 from Mazar et. al. (2020 v. 3: Chapter 15)
Photo 15.36
Square M/5, D-9b Installation 8936 and stone foundation of Wall 8943, looking west; left: D-10 Buttress 8938 (2007)
Mazar et. al. (2020 v.3) - Photo 15.37 -
Squares L–M/4 from Mazar et. al. (2020 v. 3: Chapter 15)
Photo 15.37
Squares L–M/4, looking north at foundations of D-9b Wall 2816 above D-10 Wall 2886 and Buttress 1903, with D-10 Wall 2890 at the bottom
Mazar et. al. (2020 v.3) - Photo 15.38 -
Square N/4 from Mazar et. al. (2020 v. 3: Chapter 15)
Photo 15.38
Square N/4, sloping striations in D-10 Locus 8939 below D-9 stone foundations of Walls 8943 and 1906, looking east; background: D-8–9a Wall 8932 (2010)
Mazar et. al. (2020 v.3) - Photo 15.39 -
Square N/4 from Mazar et. al. (2020 v. 3: Chapter 15)
Photo 15.39
Square N/4, Locus 8919, foundation deposit (basalt bowl and lamp) in corner of Walls 8943 and 1906, looking southeast (2010)
Mazar et. al. (2020 v.3) - Photo 15.40 -
Squares M–N/4–5 from Mazar et. al. (2020 v. 3: Chapter 15)
Photo 15.40
Squares M–N/4–5, looking east; left: backhoe trench into D-10 tufa fill near porcupine hole; D-9 to D-6b floors and installations in middle and upper steps (2005)
Mazar et. al. (2020 v.3) - Photo 15.41 -
Squares N/4–5 from Mazar et. al. (2020 v. 3: Chapter 15)
Photo 15.41
Squares N/4–5, looking east; D-8–9a Wall 8932 on D-9b Floor 9927, cut on the south by D-7b Pit 8916
Mazar et. al. (2020 v.3) - Photo 15.42 -
Squares L–N/4 from Mazar et. al. (2020 v. 3: Chapter 15)
Photo 15.42
Squares L–N/4, looking east; bottom: foundation of D-9b Wall 2816; center: D-9a stone floor 2855; above, right: D-7a Wall 1818 (1998)
Mazar et. al. (2020 v.3) - Photo 15.43 -
Square M/4 from Mazar et. al. (2020 v. 3: Chapter 15)
Photo 15.43
Square M/4, looking east at D-9a stone floor 2855 (1998)
Mazar et. al. (2020 v.3) - Photo 15.44 -
Square M/4 from Mazar et. al. (2020 v. 3: Chapter 15)
Photo 15.44
Square M/4, looking east at sloping layers 8939 (D-10) and 8919 (D-9b), sealed below D-9a stone Floor 2855 (2008)
Mazar et. al. (2020 v.3)
- Plans: Figs. 15.7–15.8
- Sections: Figs. 15.17, 15.18b, 15.19–15.21
- Photos 15.23–15.44
- Pottery: Figs. 16.9–16.15
- Table 15.1 -
Stratigraphy and chronology in Area D, with correlation to Area C from Mazar et. al. (2020 v. 3: Chapter 17)
Table 15.1
Stratigraphy and chronology in Area D, with correlation to Area C
Mazar et. al. (2020 v.3) - Table 15.2 -
Locus and basket numbers from Mazar et. al. (2020 v. 3: Chapter 17)
Table 15.2
Locus and basket numbers
Mazar et. al. (2020 v.3) - Figure 15.1 -
Location of section drawings on superimposed plan of Strata D-11–D-2 from Mazar et. al. (2020 v. 3: Chapter 17)
Figure 15.1
Location of section drawings on superimposed plan of Strata D-11–D-2
Mazar et. al. (2020 v.3) - Figure 15.2 -
Schematic section of Area D from Mazar et. al. (2020 v. 3: Chapter 17)
Figure 15.2
Schematic section of Area D
Mazar et. al. (2020 v.3) - Figure 15.9 -
Plan of Stratum D-8 from Mazar et. al. (2020 v. 3: Chapter 15)
Figure 15.9
Plan of Stratum D-8
Mazar et. al. (2020 v.3) - Figure 15.10 -
Plan of Stratum D-8' from Mazar et. al. (2020 v. 3: Chapter 15)
Figure 15.10
Plan of Stratum D-8'
Mazar et. al. (2020 v.3) - Figure 15.11 -
Plan of post Stratum D-8 fills from Mazar et. al. (2020 v. 3: Chapter 15)
Figure 15.11
Plan of post Stratum D-8 fills
Mazar et. al. (2020 v.3) - Figure 15.17a -
Section 1a from Mazar et. al. (2020 v. 3: Chapter 15)
Figure 15.17a
Section 1a (Squares G–L/5, looking north, showing probe in alluvial field)
Mazar et. al. (2020 v.3) - Figure 15.17b -
Section 1b from Mazar et. al. (2020 v. 3: Chapter 15)
Figure 15.17b
Section 1b (Squares J–M/5 and part of N/5, looking north)
Mazar et. al. (2020 v.3) - Figure 15.19 -
Section 3 from Mazar et. al. (2020 v. 3: Chapter 15)
Figure 15.19
Section 3 (Squares L–N/4, looking north)
Mazar et. al. (2020 v.3) - Figure 15.20 -
Section 4 from Mazar et. al. (2020 v. 3: Chapter 15)
Figure 15.20
Section 4 (Squares N–L/4, looking south)
Mazar et. al. (2020 v.3) - Figure 15.21 -
Section 5 from Mazar et. al. (2020 v. 3: Chapter 15)
Figure 15.21
Section 5 (Squares N/4–5, looking east)
Mazar et. al. (2020 v.3)
- Plans: Figs. 15.9–15.11
- Sections: Figs. 15.17b, 15.19–15.21
- Pottery: Figs. 16.16–16.23
In Stratum D-8, a large open area covered with a thick white beaten-earth floor replaced the halfopen spaces of Stratum D-9a, while the main wall line of the latter (8932 and row of pillar bases 1912) continued to be in use. The function of this spacious courtyard was hard to define, as only its eastern border was found within the excavated area and it was totally devoid of installations.
The white floor (2824 in Square M/4, 7944 in M/5, 8933 in N/4 and 9909 in N/5) extended over an area of ca. 70 sq. m and was cut by the erosion line in the west. The floor sloped in various directions at levels between 80.06 m–80.27 m, the former only 0.2–0.4 m above the floors that were attributed to Stratum D-9a, described above. It also covered the two rows of pillar bases of the previous stratum, as well as Wall 9922 in the southern part of Square N/4. The floor abutted Wall 8932 and perhaps also the wooden pillars that had stood on the stone bases 1912 (although the bases were now ca. 0.7 m lower than the new floor). The southeastern corner of the floor was cut by Stratum D-7b Pit 8916. A large complete krater (Fig. 16.18:4) was found leaning against Wall 8932 and a complete Mycenaean IIB stirrup jar (Fig. 16.22:5) was found on Floor 7944 (Square M/5). It should be noted that while the floor was clearly observed in most parts, the northern and northeastern portion of it, near the pillar bases (1912) and the northern section of Squares M–N/5, was harder to discern, possibly as the floor there was thinner or less well preserved.
In the narrow strip excavated east of Wall 8932 and pillar bases 1912, was a ca. 0.5 m-thick layer (1908, 1909) comprised mostly of brown layered sediments that might have been floors, with bones and sherds (Figs. 16.16–16.17, 16.19–16.22). An almost-complete small jug (Fig. 16.21:1) was found on top of a rather continuous thin whitish layer which might represent a floor level (79.73– 79.84 m).
The ceramic assemblage of Stratum D-8 that included several Mycenaean and Cypriot imports is typical of LB IIB and should be dated to the 13th century BCE.
- Table 15.1 -
Stratigraphy and chronology in Area D, with correlation to Area C from Mazar et. al. (2020 v. 3: Chapter 17)
Table 15.1
Stratigraphy and chronology in Area D, with correlation to Area C
Mazar et. al. (2020 v.3) - Table 15.2 -
Locus and basket numbers from Mazar et. al. (2020 v. 3: Chapter 17)
Table 15.2
Locus and basket numbers
Mazar et. al. (2020 v.3) - Figure 15.1 -
Location of section drawings on superimposed plan of Strata D-11–D-2 from Mazar et. al. (2020 v. 3: Chapter 17)
Figure 15.1
Location of section drawings on superimposed plan of Strata D-11–D-2
Mazar et. al. (2020 v.3) - Figure 15.2 -
Schematic section of Area D from Mazar et. al. (2020 v. 3: Chapter 17)
Figure 15.2
Schematic section of Area D
Mazar et. al. (2020 v.3) - Figure 15.10 -
Plan of Stratum D-8' from Mazar et. al. (2020 v. 3: Chapter 15)
Figure 15.10
Plan of Stratum D-8'
Mazar et. al. (2020 v.3)
- Plans: Figs. 15.10
The Stratum D-8 floor to the west of Wall 8932 was covered with a 0.3–0.4 m-thick layer of brick debris, containing compacted whitish brick fragments, which most probably originated from Wall 8932. In Square M/5, this debris layer was superimposed by a 0.01–0.02 m-thick pinkish clay layer (7938; Figs. 15.10, 15.17), which was covered by a thick (0.05–0.1 m) layer of dark gray ash. This layer sloped from west (80.40 m) to east (80.26 m); it extended into the northern section of the square, but faded away in its southern part, as well as in Square N/5 (9908; Fig. 15.10). On 7938 was a 0.15–0.2 m-thick accumulation, rich in sherds and animal bones, which may be explained as some kind of a localized ephemeral activity, post-dating Stratum D-8 and pre-dating Stratum D-7b; this phase was denoted D-8'. No evidence for this activity was found in Squares M–N/4.
Pottery from loci attributed to this layer is presented together with that of Stratum D-8 (Figs. 16.16–16.22), and is dated to LB IIB.
- Table 15.1 -
Stratigraphy and chronology in Area D, with correlation to Area C from Mazar et. al. (2020 v. 3: Chapter 17)
Table 15.1
Stratigraphy and chronology in Area D, with correlation to Area C
Mazar et. al. (2020 v.3) - Table 15.2 -
Locus and basket numbers from Mazar et. al. (2020 v. 3: Chapter 17)
Table 15.2
Locus and basket numbers
Mazar et. al. (2020 v.3) - Figure 15.1 -
Location of section drawings on superimposed plan of Strata D-11–D-2 from Mazar et. al. (2020 v. 3: Chapter 17)
Figure 15.1
Location of section drawings on superimposed plan of Strata D-11–D-2
Mazar et. al. (2020 v.3) - Figure 15.2 -
Schematic section of Area D from Mazar et. al. (2020 v. 3: Chapter 17)
Figure 15.2
Schematic section of Area D
Mazar et. al. (2020 v.3) - Figure 15.10 -
Plan of Stratum D-8' from Mazar et. al. (2020 v. 3: Chapter 15)
Figure 15.10
Plan of Stratum D-8'
Mazar et. al. (2020 v.3)
- Plans: Figs. 15.10
Covering the brick debris and walls related to Stratum D-8, a 0.35–0.6 m-thick layered accumulation was found all over the excavated area (2826 in Square M/4, 7915 and 7937 in M/5, 8927 and 8929 in N/4, 9904 in N/5) (Fig. 15.11). It was characterized by a soft brown layered matrix containing a few brick fragments, very rich in charred material (charcoal and grain), as well as sherds, bones, and fine plaster fragments of unknown origin. The layering of this accumulation was more pronounced in the eastern part, where the layers sloped down into the eastern section of Squares N/4–5. Several thin layers consisted of grayish material, possibly the remains of ash or decayed organics.
No architectural elements were noted in association with this thick accumulation. It clearly sealed the remains of Stratum D-8 and was superimposed by Stratum D-7b elements, most of which were pits dug into the aforementioned accumulation (see below). Therefore, it seems to belong to a post-D-8 and pre-D-7 phase. Nevertheless, it is difficult to suggest any clear explanation for such a thick accumulation, unless a gap in occupation enabled natural forces of sedimentation to operate undisrupted for an unknown time span. Another option is that this layer was a constructional fill related to the building of Stratum D-7b. Although no substantial architecture was found in the latter, the small size of the excavated area does not allow us to reach secure conclusions, and this option remains viable.
Pottery from loci attributed to this layer is presented together with that of Stratum D-8 in Figs. 16.16–16.23.
- Table 15.1 -
Stratigraphy and chronology in Area D, with correlation to Area C from Mazar et. al. (2020 v. 3: Chapter 17)
Table 15.1
Stratigraphy and chronology in Area D, with correlation to Area C
Mazar et. al. (2020 v.3) - Table 15.2 -
Locus and basket numbers from Mazar et. al. (2020 v. 3: Chapter 17)
Table 15.2
Locus and basket numbers
Mazar et. al. (2020 v.3) - Figure 15.1 -
Location of section drawings on superimposed plan of Strata D-11–D-2 from Mazar et. al. (2020 v. 3: Chapter 17)
Figure 15.1
Location of section drawings on superimposed plan of Strata D-11–D-2
Mazar et. al. (2020 v.3) - Figure 15.2 -
Schematic section of Area D from Mazar et. al. (2020 v. 3: Chapter 17)
Figure 15.2
Schematic section of Area D
Mazar et. al. (2020 v.3) - Figure 15.12 -
Plan of Stratum D-7b from Mazar et. al. (2020 v. 3: Chapter 15)
Figure 15.12
Plan of Stratum D-7b
Mazar et. al. (2020 v.3) - Figure 15.13 -
Plan of Stratum D-7a (encircled numbers denote foundation deposits as listed in the text) from Mazar et. al. (2020 v. 3: Chapter 15)
Figure 15.13
Plan of Stratum D-7a (encircled numbers denote foundation deposits as listed in the text)
Mazar et. al. (2020 v.3) - Figure 15.14 -
Plan of Stratum D-7a' from Mazar et. al. (2020 v. 3: Chapter 15)
Figure 15.14
Plan of Stratum D-7a'
Mazar et. al. (2020 v.3) - Figure 15.17a -
Section 1a from Mazar et. al. (2020 v. 3: Chapter 15)
Figure 15.17a
Section 1a (Squares G–L/5, looking north, showing probe in alluvial field)
Mazar et. al. (2020 v.3) - Figure 15.17b -
Section 1b from Mazar et. al. (2020 v. 3: Chapter 15)
Figure 15.17b
Section 1b (Squares J–M/5 and part of N/5, looking north)
Mazar et. al. (2020 v.3) - Figure 15.19 -
Section 3 from Mazar et. al. (2020 v. 3: Chapter 15)
Figure 15.19
Section 3 (Squares L–N/4, looking north)
Mazar et. al. (2020 v.3) - Figure 15.20 -
Section 4 from Mazar et. al. (2020 v. 3: Chapter 15)
Figure 15.20
Section 4 (Squares N–L/4, looking south)
Mazar et. al. (2020 v.3) - Figure 15.21 -
Section 5 from Mazar et. al. (2020 v. 3: Chapter 15)
Figure 15.21
Section 5 (Squares N/4–5, looking east)
Mazar et. al. (2020 v.3) - Photo 15.40 -
Squares M–N/4–5 from Mazar et. al. (2020 v. 3: Chapter 15)
Photo 15.40
Squares M–N/4–5, looking east; left: backhoe trench into D-10 tufa fill near porcupine hole; D-9 to D-6b floors and installations in middle and upper steps (2005)
Mazar et. al. (2020 v.3) - Photo 15.41 -
Squares N/4–5 from Mazar et. al. (2020 v. 3: Chapter 15)
Photo 15.41
Squares N/4–5, looking east; D-8–9a Wall 8932 on D-9b Floor 9927, cut on the south by D-7b Pit 8916
Mazar et. al. (2020 v.3) - Photo 15.42 -
Squares L–N/4 from Mazar et. al. (2020 v. 3: Chapter 15)
Photo 15.42
Squares L–N/4, looking east; bottom: foundation of D-9b Wall 2816; center: D-9a stone floor 2855; above, right: D-7a Wall 1818 (1998)
Mazar et. al. (2020 v.3) - Photo 15.45 -
Squares N–M/4–5 from Mazar et. al. (2020 v. 3: Chapter 15)
Photo 15.45
Squares N–M/4–5, looking southeast; center: D-7a' pillar bases; top: stone foundation of D-4 Wall 1883 (2007)
Mazar et. al. (2020 v.3) - Photo 15.46-
Northeast corner of Square M/5 from Mazar et. al. (2020 v. 3: Chapter 15)
Photo 15.46
Northeast corner of Square M/5, looking north; lamp-and-bowl foundation deposit below D-7a Wall 7906, cut into stone lining of D-7b Oven 7924 (2007)
Mazar et. al. (2020 v.3) - Photo 15.47-
Square M/5 from Mazar et. al. (2020 v. 3: Chapter 15)
Photo 15.47
Square M/5, looking south at section through D-7b Installation 7919 (2005); bowl: Fig. 16.26:2
Mazar et. al. (2020 v.3) - Photo 15.48-
Square N/4 from Mazar et. al. (2020 v. 3: Chapter 15)
Photo 15.48
Square N/4, looking northeast at D-7b Floor 8914, cut by D-7a Installation 8906 (2007)
Mazar et. al. (2020 v.3) - Photo 15.49-
Square M/5 from Mazar et. al. (2020 v. 3: Chapter 15)
Photo 15.49
Square M/5, looking north at stone foundation of D-7a Wall 7906 with floor striations in section; below the wall: ashy layer of D-7b Floor 7903 (2005)
Mazar et. al. (2020 v.3) - Photo 15.50-
Square N/5 from Mazar et. al. (2020 v. 3: Chapter 15)
Photo 15.50
Square N/5, looking north at D-7a stone floor 9906, pillar bases 9907 and Wall 8917 (2008)
Mazar et. al. (2020 v.3) - Photo 15.51-
Square N/5 from Mazar et. al. (2020 v. 3: Chapter 15)
Photo 15.51
Square N/5, looking west at D-7a stone floor 9906 and pillar bases 9907 (2008)
Mazar et. al. (2020 v.3) - Photo 15.52-
Square N/4 from Mazar et. al. (2020 v. 3: Chapter 15)
Photo 15.52
Square N/4, looking north; left: foundation of D-7a–6b Wall 2842; center: D-7a Floor 8907 and Installation 8906 (2007)
Mazar et. al. (2020 v.3) - Photo 15.53-
Square N/4 from Mazar et. al. (2020 v. 3: Chapter 15)
Photo 15.53
Square N/4, looking west; bottom left: D-7a Ovens 7946 and 8902; center: D-7b Pit 8916 (2007)
Mazar et. al. (2020 v.3) - Photo 15.54a-
Square M/4 from Mazar et. al. (2020 v. 3: Chapter 15)
Photo 15.54a
Square M/4; D-7a lamp and bowl deposits - deposit No. 2, looking southeast east (1997)
Mazar et. al. (2020 v.3) - Photo 15.54b-
Square M/4 from Mazar et. al. (2020 v. 3: Chapter 15)
Photo 15.54b
Square M/4; D-7a lamp and bowl deposits - deposit No. 3, looking east (1997)
Mazar et. al. (2020 v.3) - Photo 15.55-
Square N/5 from Mazar et. al. (2020 v. 3: Chapter 15)
Photo 15.55
Square N/5, looking west at D-7a' pillar bases 8944 and Walls 8904 and 4856 (2007)
Mazar et. al. (2020 v.3) - Photo 15.56-
Squares N/4–5 from Mazar et. al. (2020 v. 3: Chapter 15)
Photo 15.56
Squares N/4–5, looking east; left: D-6b Installations 7931 and 7939; right: D-7a Wall 8904, superimposed by D-6b Installation 2874 (2005)
Mazar et. al. (2020 v.3) - Photo 15.57-
Squares N/4–5 from Mazar et. al. (2020 v. 3: Chapter 15)
Photo 15.57
Squares N/4–5, looking south; bottom: D-6b Installations 7931 and 7939; center: D-7a Wall 8904, superimposed by D-6a–b Installation 2874 (2005)
Mazar et. al. (2020 v.3)
- Plans: Figs. 15.12–15.14
- Sections: Figs. 15.17b, 15.19–15.21
- Photos 15.40–15.42,15.45–15.57
- Pottery: Figs. 16.24–16.33
Stratum D-7 comprised two main and one local stratigraphic phases, denoted D-7b, D-7a and D-7a'.
- Table 15.1 -
Stratigraphy and chronology in Area D, with correlation to Area C from Mazar et. al. (2020 v. 3: Chapter 17)
Table 15.1
Stratigraphy and chronology in Area D, with correlation to Area C
Mazar et. al. (2020 v.3) - Table 15.2 -
Locus and basket numbers from Mazar et. al. (2020 v. 3: Chapter 17)
Table 15.2
Locus and basket numbers
Mazar et. al. (2020 v.3) - Figure 15.1 -
Location of section drawings on superimposed plan of Strata D-11–D-2 from Mazar et. al. (2020 v. 3: Chapter 17)
Figure 15.1
Location of section drawings on superimposed plan of Strata D-11–D-2
Mazar et. al. (2020 v.3) - Figure 15.2 -
Schematic section of Area D from Mazar et. al. (2020 v. 3: Chapter 17)
Figure 15.2
Schematic section of Area D
Mazar et. al. (2020 v.3) - Figure 15.15 -
Plan of Stratum D-6b from Mazar et. al. (2020 v. 3: Chapter 15)
Figure 15.15
Plan of Stratum D-6b
Mazar et. al. (2020 v.3) - Figure 15.16 -
Plan of Stratum D-6a from Mazar et. al. (2020 v. 3: Chapter 15)
Figure 15.16
Plan of Stratum D-6a
Mazar et. al. (2020 v.3) - Figure 15.19 -
Section 3 from Mazar et. al. (2020 v. 3: Chapter 15)
Figure 15.19
Section 3 (Squares L–N/4, looking north)
Mazar et. al. (2020 v.3) - Figure 15.20 -
Section 4 from Mazar et. al. (2020 v. 3: Chapter 15)
Figure 15.20
Section 4 (Squares N–L/4, looking south)
Mazar et. al. (2020 v.3) - Figure 15.21 -
Section 5 from Mazar et. al. (2020 v. 3: Chapter 15)
Figure 15.21
Section 5 (Squares N/4–5, looking east)
Mazar et. al. (2020 v.3) - Photo 15.56-
Squares N/4–5 from Mazar et. al. (2020 v. 3: Chapter 15)
Photo 15.56
Squares N/4–5, looking east; left: D-6b Installations 7931 and 7939; right: D-7a Wall 8904, superimposed by D-6b Installation 2874 (2005)
Mazar et. al. (2020 v.3) - Photo 15.57-
Squares N/4–5 from Mazar et. al. (2020 v. 3: Chapter 15)
Photo 15.57
Squares N/4–5, looking south; bottom: D-6b Installations 7931 and 7939; center: D-7a Wall 8904, superimposed by D-6a–b Installation 2874 (2005)
Mazar et. al. (2020 v.3) - Photo 15.58-
Square N/5 from Mazar et. al. (2020 v. 3: Chapter 15)
Photo 15.58
Square N/5, looking west; detail of D-6b Installations 7939 (bottom) and 7931 (top); top right: red clay patch 7925 above D-6a Wall 7926 (2005)
Mazar et. al. (2020 v.3) - Photo 15.59-
Square N/4 from Mazar et. al. (2020 v. 3: Chapter 15)
Photo 15.59
Square N/4, looking east; detail of D-6b Installation 2874 (2005)
Mazar et. al. (2020 v.3) - Photo 15.60-
Square N/4 from Mazar et. al. (2020 v. 3: Chapter 15)
Photo 15.60
Square N/4, southern section showing D-6 striations and ash layers (bird-nest holes in section).
Mazar et. al. (2020 v.3) - Photo 15.61-
Square N/4 from Mazar et. al. (2020 v. 3: Chapter 15)
Photo 15.61
Square N/4; D-6a Oven 2841 below D-4b Floor 1845 (1998)
Mazar et. al. (2020 v.3) - Photo 15.62-
Square P/4 from Mazar et. al. (2020 v. 3: Chapter 15)
Photo 15.62
Square P/4, section in D-6a Oven 2841
Mazar et. al. (2020 v.3)
- Plans: 15.15–15.16
- Sections: : Figs. 15.19–15.21
- Photos 15.56–15.62
- Pottery: Figs. 16.34–16.37
- Table 15.1 -
Stratigraphy and chronology in Area D, with correlation to Area C from Mazar et. al. (2020 v. 3: Chapter 17)
Table 15.1
Stratigraphy and chronology in Area D, with correlation to Area C
Mazar et. al. (2020 v.3) - Table 15.2 -
Locus and basket numbers from Mazar et. al. (2020 v. 3: Chapter 17)
Table 15.2
Locus and basket numbers
Mazar et. al. (2020 v.3) - Figure 15.1 -
Location of section drawings on superimposed plan of Strata D-11–D-2 from Mazar et. al. (2020 v. 3: Chapter 17)
Figure 15.1
Location of section drawings on superimposed plan of Strata D-11–D-2
Mazar et. al. (2020 v.3) - Figure 15.2 -
Schematic section of Area D from Mazar et. al. (2020 v. 3: Chapter 17)
Figure 15.2
Schematic section of Area D
Mazar et. al. (2020 v.3) - Figure 15.19 -
Section 3 from Mazar et. al. (2020 v. 3: Chapter 15)
Figure 15.19
Section 3 (Squares L–N/4, looking north)
Mazar et. al. (2020 v.3) - Figure 15.20 -
Section 4 from Mazar et. al. (2020 v. 3: Chapter 15)
Figure 15.20
Section 4 (Squares N–L/4, looking south)
Mazar et. al. (2020 v.3) - Figure 15.21 -
Section 5 from Mazar et. al. (2020 v. 3: Chapter 15)
Figure 15.21
Section 5 (Squares N/4–5, looking east)
Mazar et. al. (2020 v.3) - Figure 15.22 -
Plan of Stratum D-5 from Mazar et. al. (2020 v. 3: Chapter 15)
Figure 15.22
Plan of Stratum D-5
Mazar et. al. (2020 v.3) - Figure 15.32 -
Section 6 from Mazar et. al. (2020 v. 3: Chapter 15)
Figure 15.32
Section 6 (Squares P–Q/5, looking north)
Mazar et. al. (2020 v.3) - Figure 15.33 -
Section 7 from Mazar et. al. (2020 v. 3: Chapter 15)
Figure 15.33
Section 7 (Squares P–Q/4, looking north)
Mazar et. al. (2020 v.3) - Figure 15.34 -
Section 8 from Mazar et. al. (2020 v. 3: Chapter 15)
Figure 15.34
Section 8 (Squares Q–N/4, looking south)
Mazar et. al. (2020 v.3) - Figure 15.35 -
Section 9 from Mazar et. al. (2020 v. 3: Chapter 15)
Figure 15.35
Section 9 (Squares Q/4–5, looking east)
Mazar et. al. (2020 v.3) - Photo 15.45 -
Squares N–M/4–5 from Mazar et. al. (2020 v. 3: Chapter 15)
Photo 15.45
Squares N–M/4–5, looking southeast; center: D-7a' pillar bases; top: stone foundation of D-4 Wall 1883 (2007)
Mazar et. al. (2020 v.3) - Photo 15.56-
Squares N/4–5 from Mazar et. al. (2020 v. 3: Chapter 15)
Photo 15.56
Squares N/4–5, looking east; left: D-6b Installations 7931 and 7939; right: D-7a Wall 8904, superimposed by D-6b Installation 2874 (2005)
Mazar et. al. (2020 v.3) - Photo 15.57-
Squares N/4–5 from Mazar et. al. (2020 v. 3: Chapter 15)
Photo 15.57
Squares N/4–5, looking south; bottom: D-6b Installations 7931 and 7939; center: D-7a Wall 8904, superimposed by D-6a–b Installation 2874 (2005)
Mazar et. al. (2020 v.3) - Photo 15.61-
Square N/4 from Mazar et. al. (2020 v. 3: Chapter 15)
Photo 15.61
Square N/4; D-6a Oven 2841 below D-4b Floor 1845 (1998)
Mazar et. al. (2020 v.3) - Photo 15.63-
Squares N–Q/4–5 from Mazar et. al. (2020 v. 3: Chapter 15)
Photo 15.63
Squares N–Q/4–5 at end of 2007 season; center: north–south street (Photo: SkyView).
Mazar et. al. (2020 v.3) - Photo 15.64-
Square N–P/4 from Mazar et. al. (2020 v. 3: Chapter 15)
Photo 15.64
Square N–P/4, looking east; right: stone foundation of D-4 Wall 1811; center right: D-6a Oven 2841 (1998)
Mazar et. al. (2020 v.3) - Photo 15.65-
Probe in street, Square P/4 from Mazar et. al. (2020 v. 3: Chapter 15)
Photo 15.65
Probe in street, Square P/4; D-5 stone fill 9810, east of Wall 2882 (2008)
Mazar et. al. (2020 v.3) - Photo 15.66-
Squares P/4–5 from Mazar et. al. (2020 v. 3: Chapter 15)
Photo 15.66
Squares P/4–5, looking south, D-4b Street 8803, bordered by Wall 1883 (right) and Walls 8850, 1860, above 2881 (left); lower left: Installation 8810 (2007)
Mazar et. al. (2020 v.3) - Photo 15.67-
Squares P/4–5; fallen bricks (7847) along eastern face of Wall 1883 from Mazar et. al. (2020 v. 3: Chapter 15)
Photo 15.67
Squares P/4–5, same as Photo 15.66, looking north; fallen bricks (7847) along eastern face of Wall 1883 (2007)
Mazar et. al. (2020 v.3) - Photo 15.68-
Square P-5, looking west at Wall 1883; foreground: brick collapse in street from Mazar et. al. (2020 v. 3: Chapter 15)
Photo 15.68
Square P-5, looking west at Wall 1883; foreground: brick collapse in street (2005)
Mazar et. al. (2020 v.3) - Photo 15.69-
Squares P–Q/4–5 from Mazar et. al. (2020 v. 3: Chapter 15)
Photo 15.69
Squares P–Q/4–5, looking north at D-5 Buildings DD and DE, (2008)
Mazar et. al. (2020 v.3) - Photo 15.70-
Squares Q/4–5, looking north at D-5 Room 8867 from Mazar et. al. (2020 v. 3: Chapter 15)
Photo 15.70
Squares Q/4–5, looking north at D-5 Room 8867; bottom: Pit 8883 (2008)
Mazar et. al. (2020 v.3) - Photo 15.71-
Square Q/5, looking west at D-4 Building DG; lower right: brick collapse 8865 in D-5 Building DE from Mazar et. al. (2020 v. 3: Chapter 15)
Photo 15.71
Square Q/5, looking west at D-4 Building DG; lower right: brick collapse 8865 in D-5 Building DE (2007)
Mazar et. al. (2020 v.3) - Photo 15.72-
Square Q/5 from Mazar et. al. (2020 v. 3: Chapter 15)
Photo 15.72
Square Q/5, looking west; lower right: Room 8865 of D-5 Building DD; left: walls of D-4 Buildings DG and DH (2007)
Mazar et. al. (2020 v.3) - Photo 15.73-
Square P/5 from Mazar et. al. (2020 v. 3: Chapter 15)
Photo 15.73
Square P/5, looking west; center: D-5 Room 8874 with ‘steps’ 8879; D-4b Installation 8810 on top of D-5 Wall 8878 (2007).
Mazar et. al. (2020 v.3) - Photo 15.74-
Squares Q/4–5 from Mazar et. al. (2020 v. 3: Chapter 15)
Photo 15.74
Squares Q/4–5, looking east at D-5 Building DD; Installation 9805 on Floor 8867 (2008)
Mazar et. al. (2020 v.3) - Photo 15.75-
Square Q/4 from Mazar et. al. (2020 v. 3: Chapter 15)
Photo 15.75
Square Q/4, looking north at D-5 Building DD; Floor 8867, cut by Pit 8883 (2008)
Mazar et. al. (2020 v.3) - Photo 15.76-
Square P/4 from Mazar et. al. (2020 v. 3: Chapter 15)
Photo 15.76
Square P/4, looking southwest at D-5 Building DD; left: Floor 8871 and Pit 8876; top right: street between Walls 2881 and 2882 (2008)
Mazar et. al. (2020 v.3) - Photo 15.77-
Squares P–Q/4 from Mazar et. al. (2020 v. 3: Chapter 15)
Photo 15.77
Squares P–Q/4, looking southwest at D-5 Building DD; Floor 8871, cut by Pits 8876 (center) and 8880 (left); D-4 Wall 1884 floating above floor (2007)
Mazar et. al. (2020 v.3) - Photo 15.88-
Square Q/5 from Mazar et. al. (2020 v. 3: Chapter 15)
Photo 15.88
Square Q/5, looking east; D-4a Building DJ, with elements of D-4b Buildings DH and DG below (2007)
Mazar et. al. (2020 v.3)
- Plan: Fig. 15.22
- Sections: Figs. 15.19–15.21; 15.32–15.35
- Photos 15.45, 15.56–15.57, 15.61, 15.63–15.77, 15.88
- Pottery: Buildings: Figs. 16.38–16.40; Street: Figs. 16.41–16.47)
- Table 15.1 -
Stratigraphy and chronology in Area D, with correlation to Area C from Mazar et. al. (2020 v. 3: Chapter 17)
Table 15.1
Stratigraphy and chronology in Area D, with correlation to Area C
Mazar et. al. (2020 v.3) - Table 15.2 -
Locus and basket numbers from Mazar et. al. (2020 v. 3: Chapter 17)
Table 15.2
Locus and basket numbers
Mazar et. al. (2020 v.3) - Figure 15.1 -
Location of section drawings on superimposed plan of Strata D-11–D-2 from Mazar et. al. (2020 v. 3: Chapter 17)
Figure 15.1
Location of section drawings on superimposed plan of Strata D-11–D-2
Mazar et. al. (2020 v.3) - Figure 15.2 -
Schematic section of Area D from Mazar et. al. (2020 v. 3: Chapter 17)
Figure 15.2
Schematic section of Area D
Mazar et. al. (2020 v.3) - Figure 15.19 -
Section 3 from Mazar et. al. (2020 v. 3: Chapter 15)
Figure 15.19
Section 3 (Squares L–N/4, looking north)
Mazar et. al. (2020 v.3) - Figure 15.20 -
Section 4 from Mazar et. al. (2020 v. 3: Chapter 15)
Figure 15.20
Section 4 (Squares N–L/4, looking south)
Mazar et. al. (2020 v.3) - Figure 15.21 -
Section 5 from Mazar et. al. (2020 v. 3: Chapter 15)
Figure 15.21
Section 5 (Squares N/4–5, looking east)
Mazar et. al. (2020 v.3) - Figure 15.23 -
Plan of Stratum D-4b from Mazar et. al. (2020 v. 3: Chapter 15)
Figure 15.23
Plan of Stratum D-4b
Mazar et. al. (2020 v.3) - Figure 15.24 -
Plan of Stratum D-4a from Mazar et. al. (2020 v. 3: Chapter 15)
Figure 15.24
Plan of Stratum D-4a
Mazar et. al. (2020 v.3) - Figure 15.25a -
Iron IB remains in Areas D and C from Mazar et. al. (2020 v. 3: Chapter 15)
Figure 15.25a
Schematic plan of Iron IB remains in Areas D and C, showing possible correlation: Strata D-5 and C-3b
Mazar et. al. (2020 v.3) - Figure 15.25b -
Iron IB remains in Areas D and C from Mazar et. al. (2020 v. 3: Chapter 15)
Figure 15.25b
Schematic plan of Iron IB remains in Areas D and C, showing possible correlation: Strata D-4b and C-3a
Mazar et. al. (2020 v.3) - Figure 15.32 -
Section 6 from Mazar et. al. (2020 v. 3: Chapter 15)
Figure 15.32
Section 6 (Squares P–Q/5, looking north)
Mazar et. al. (2020 v.3) - Figure 15.33 -
Section 7 from Mazar et. al. (2020 v. 3: Chapter 15)
Figure 15.33
Section 7 (Squares P–Q/4, looking north)
Mazar et. al. (2020 v.3) - Figure 15.34 -
Section 8 from Mazar et. al. (2020 v. 3: Chapter 15)
Figure 15.34
Section 8 (Squares Q–N/4, looking south)
Mazar et. al. (2020 v.3) - Figure 15.35 -
Section 9 from Mazar et. al. (2020 v. 3: Chapter 15)
Figure 15.35
Section 9 (Squares Q/4–5, looking east)
Mazar et. al. (2020 v.3) - Photo 15.61-
Square N/4 from Mazar et. al. (2020 v. 3: Chapter 15)
Photo 15.61
Square N/4; D-6a Oven 2841 below D-4b Floor 1845 (1998)
Mazar et. al. (2020 v.3) - Photo 15.63-
Squares N–Q/4–5 from Mazar et. al. (2020 v. 3: Chapter 15)
Photo 15.63
Squares N–Q/4–5 at end of 2007 season; center: north–south street (Photo: SkyView).
Mazar et. al. (2020 v.3) - Photo 15.64-
Square N–P/4 from Mazar et. al. (2020 v. 3: Chapter 15)
Photo 15.64
Square N–P/4, looking east; right: stone foundation of D-4 Wall 1811; center right: D-6a Oven 2841 (1998)
Mazar et. al. (2020 v.3) - Photo 15.65-
Probe in street, Square P/4 from Mazar et. al. (2020 v. 3: Chapter 15)
Photo 15.65
Probe in street, Square P/4; D-5 stone fill 9810, east of Wall 2882 (2008)
Mazar et. al. (2020 v.3) - Photo 15.66-
Squares P/4–5 from Mazar et. al. (2020 v. 3: Chapter 15)
Photo 15.66
Squares P/4–5, looking south, D-4b Street 8803, bordered by Wall 1883 (right) and Walls 8850, 1860, above 2881 (left); lower left: Installation 8810 (2007)
Mazar et. al. (2020 v.3) - Photo 15.71-
Square Q/5, looking west at D-4 Building DG; lower right: brick collapse 8865 in D-5 Building DE from Mazar et. al. (2020 v. 3: Chapter 15)
Photo 15.71
Square Q/5, looking west at D-4 Building DG; lower right: brick collapse 8865 in D-5 Building DE (2007)
Mazar et. al. (2020 v.3) - Photo 15.72-
Square Q/5 from Mazar et. al. (2020 v. 3: Chapter 15)
Photo 15.72
Square Q/5, looking west; lower right: Room 8865 of D-5 Building DD; left: walls of D-4 Buildings DG and DH (2007)
Mazar et. al. (2020 v.3) - Photo 15.77-
Squares P–Q/4 from Mazar et. al. (2020 v. 3: Chapter 15)
Photo 15.77
Squares P–Q/4, looking southwest at D-5 Building DD; Floor 8871, cut by Pits 8876 (center) and 8880 (left); D-4 Wall 1884 floating above floor (2007)
Mazar et. al. (2020 v.3) - Photo 15.78-
General view of Area D from Mazar et. al. (2020 v. 3: Chapter 15)
Photo 15.78
General view, looking west, end of 2000 season
Mazar et. al. (2020 v.3) - Photo 15.79-
Squares N–P/4,from Mazar et. al. (2020 v. 3: Chapter 15)
Photo 15.79
Squares N–P/4, looking north at D-4 Building DF (2000)
Mazar et. al. (2020 v.3) - Photo 15.80-
Squares N–P/4 from Mazar et. al. (2020 v. 3: Chapter 15)
Photo 15.80
Squares N–P/4, looking east; Building DF; D-4b stone floor 1845 covered by pebbles (1842); D-4a brick collapse and stratified layers above (1997)
Mazar et. al. (2020 v.3) - Photo 15.81-
Square N/4 from Mazar et. al. (2020 v. 3: Chapter 15)
Photo 15.81
Square N/4, looking east; D-4b Building DF; background: Wall 1811; foreground: accumulation 1805 on Floor 1822; note two rows of bricks separated by a line in Wall 1811 (1997)
Mazar et. al. (2020 v.3) - Photo 15.82-
Squares N–P/4 from Mazar et. al. (2020 v. 3: Chapter 15)
Photo 15.82
Squares N–P/4, looking west; D-5 Building DF, stone floor 1845 (2000)
Mazar et. al. (2020 v.3) - Photo 15.83-
Square P/4 from Mazar et. al. (2020 v. 3: Chapter 15)
Photo 15.83
Square P/4, looking north; right: D-4a street surface 1873; meter stick on Wall 1883 (1997).
Mazar et. al. (2020 v.3) - Photo 15.84-
Square P/5 from Mazar et. al. (2020 v. 3: Chapter 15)
Photo 15.84
Square P/5, looking south at D-4a stone pavement (7805/7828) in street (2005)
Mazar et. al. (2020 v.3) - Photo 15.85-
Squares P–N/4–5 from Mazar et. al. (2020 v. 3: Chapter 15)
Photo 15.85
Squares P–N/4–5, looking west; D-4b Buildings DG and DH; center: D-4a Floor 8820, Building DJ (2007)
Mazar et. al. (2020 v.3) - Photo 15.86-
Square P/4 from Mazar et. al. (2020 v. 3: Chapter 15)
Photo 15.86
Square P/4, looking east; D-4b Building DG, Installation 8824 (2007)
Mazar et. al. (2020 v.3) - Photo 15.87-
Square Q/5 from Mazar et. al. (2020 v. 3: Chapter 15)
Photo 15.87
Square Q/5, looking north; D-4b Building DG, Room 8830; Installation 8837 in northeastern corner of room (2007)
Mazar et. al. (2020 v.3) - Photo 15.88-
Square Q/5 from Mazar et. al. (2020 v. 3: Chapter 15)
Photo 15.88
Square Q/5, looking east; D-4a Building DJ, with elements of D-4b Buildings DH and DG below (2007)
Mazar et. al. (2020 v.3) - Photo 15.89-
Square Q/5 from Mazar et. al. (2020 v. 3: Chapter 15)
Photo 15.89
Square Q/5, eastern section; D-4a Building DJ above elements of D-4b Buildings DH and DG (2007)
Mazar et. al. (2020 v.3) - Photo 15.90-
Square Q/5 from Mazar et. al. (2020 v. 3: Chapter 15)
Photo 15.90
Square Q/5, looking north; D-4b Building DH (2007)
Mazar et. al. (2020 v.3) - Photo 15.95 -
Square P/5 from Mazar et. al. (2020 v. 3: Chapter 15)
Photo 15.95
Square P/5, D-4a Building DJ, Rooms 4858 (bottom) and 4872 (top) (2000)
Mazar et. al. (2020 v.3) - Photo 15.96 -
Square P/5, looking west; D-4a Building DJ, debris and vessels in Room 4872 from Mazar et. al. (2020 v. 3: Chapter 15)
Photo 15.96
Square P/5, looking west; D-4a Building DJ, debris and vessels in Room 4872 (2000)
Mazar et. al. (2020 v.3) - Photo 15.97 -
Smashed Pottery in Square P/5 D-4a Building DJ, Room 4872 from Mazar et. al. (2020 v. 3: Chapter 15)
Photo 15.97
Square P/5, looking west; detail of D-4a Building DJ, Room 4872 (see Photo 15.96) (2000)
Mazar et. al. (2020 v.3) - Photo 15.98 -
Squares P–Q/4 from Mazar et. al. (2020 v. 3: Chapter 15)
Photo 15.98
Squares P–Q/4, looking south; D-4a Building DJ, Rooms 4863 (left) and 2869 (right) (2000)
Mazar et. al. (2020 v.3) - Photo 15.99 -
Square P/4 from Mazar et. al. (2020 v. 3: Chapter 15)
Photo 15.99
Square P/4, looking east at entrance from street to Room 2869, D-4a Building DJ; foreground: stones (2886) in D-4b street surface (1998)
Mazar et. al. (2020 v.3) - Photo 15.101 -
Square Q/4 from Mazar et. al. (2020 v. 3: Chapter 15)
Photo 15.101
Square Q/4, looking south at D-3 pits cutting into D-4 debris. Right: D-4 Wall 1860 (1998)
Mazar et. al. (2020 v.3) - Photo 15.102 -
Squares P–Q/4 from Mazar et. al. (2020 v. 3: Chapter 15)
Photo 15.102
Squares P–Q/4, looking north at lower D-3 pits, dug into D-4 architecture (2000)
Mazar et. al. (2020 v.3) - Photo 15.111 -
Square P/5, looking south at reed impressions (ceiling collapse?) on plaster layer from Mazar et. al. (2020 v. 3: Chapter 15)
Photo 15.111
Square P/5, looking south at reed impressions (ceiling collapse?) on plaster layer, below foundations of D-2 Wall 4808; foreground: D-4b basalt basin (8807) in Installation 8810 (2007)
Mazar et. al. (2020 v.3) - Photo 15.112 -
Closeup of layer in Photo 15.111 from Mazar et. al. (2020 v. 3: Chapter 15)
Photo 15.112
Closeup of layer in Photo 15.111
Mazar et. al. (2020 v.3) - Photo 15.113 -
Square Q/5 from Mazar et. al. (2020 v. 3: Chapter 15)
Photo 15.113
Square Q/5, looking north at D-2 Wall 4808, built into D-4a Building DJ (2007)
Mazar et. al. (2020 v.3) - Photo 15.114 -
Square Q/5 from Mazar et. al. (2020 v. 3: Chapter 15)
Photo 15.114
Square Q/5, looking north; eastern part of D-2 Wall 4808, built against Wall 7851 (2007)
Mazar et. al. (2020 v.3) - Photo 15.116 -
Square Q/5 from Mazar et. al. (2020 v. 3: Chapter 15)
Photo 15.116
Square Q/5, looking east; top and center: D-1 walls and layers; bottom: D-4 Rooms 4872 and 4858 (2005)
Mazar et. al. (2020 v.3)
- Plans: Figs. 15.23–15.25
- Sections: Figs. 15.19a–15.21, 15.32–15.35
- Photos 15.61, 15.63–15.66, 15.71–15.72, 15.77–15.90, 15.95–15.99, 15.101–15.102, 15.111–15.114, 15.116;
- Pottery: Buildings: Figs. 16.48–16.54; Street: Figs. 16.41–16.47
- Table 15.1 -
Stratigraphy and chronology in Area D, with correlation to Area C from Mazar et. al. (2020 v. 3: Chapter 17)
Table 15.1
Stratigraphy and chronology in Area D, with correlation to Area C
Mazar et. al. (2020 v.3) - Table 15.2 -
Locus and basket numbers from Mazar et. al. (2020 v. 3: Chapter 17)
Table 15.2
Locus and basket numbers
Mazar et. al. (2020 v.3) - Figure 15.1 -
Location of section drawings on superimposed plan of Strata D-11–D-2 from Mazar et. al. (2020 v. 3: Chapter 17)
Figure 15.1
Location of section drawings on superimposed plan of Strata D-11–D-2
Mazar et. al. (2020 v.3) - Figure 15.2 -
Schematic section of Area D from Mazar et. al. (2020 v. 3: Chapter 17)
Figure 15.2
Schematic section of Area D
Mazar et. al. (2020 v.3) - Figure 15.21 -
Section 5 from Mazar et. al. (2020 v. 3: Chapter 15)
Figure 15.21
Section 5 (Squares N/4–5, looking east)
Mazar et. al. (2020 v.3) - Figure 15.26 -
Plan of Stratum D-3, lower pits from Mazar et. al. (2020 v. 3: Chapter 15)
Figure 15.26
Plan of Stratum D-3, lower pits
Mazar et. al. (2020 v.3) - Figure 15.27 -
Plan of Stratum D-3, upper pits from Mazar et. al. (2020 v. 3: Chapter 15)
Figure 15.27
Plan of Stratum D-3, upper pits
Mazar et. al. (2020 v.3) - Figure 15.33 -
Section 7 from Mazar et. al. (2020 v. 3: Chapter 15)
Figure 15.33
Section 7 (Squares P–Q/4, looking north)
Mazar et. al. (2020 v.3) - Figure 15.34 -
Section 8 from Mazar et. al. (2020 v. 3: Chapter 15)
Figure 15.34
Section 8 (Squares Q–N/4, looking south)
Mazar et. al. (2020 v.3) - Figure 15.35 -
Section 9 from Mazar et. al. (2020 v. 3: Chapter 15)
Figure 15.35
Section 9 (Squares Q/4–5, looking east)
Mazar et. al. (2020 v.3) - Photo 15.100 -
Squares Q–P/4 from Mazar et. al. (2020 v. 3: Chapter 15)
Photo 15.100
Squares Q–P/4, looking west; upper D-3 pits (1998)
Mazar et. al. (2020 v.3) - Photo 15.101 -
Square Q/4 from Mazar et. al. (2020 v. 3: Chapter 15)
Photo 15.101
Square Q/4, looking south at D-3 pits cutting into D-4 debris. Right: D-4 Wall 1860 (1998)
Mazar et. al. (2020 v.3) - Photo 15.102 -
Squares P–Q/4 from Mazar et. al. (2020 v. 3: Chapter 15)
Photo 15.102
Squares P–Q/4, looking north at lower D-3 pits, dug into D-4 architecture (2000)
Mazar et. al. (2020 v.3) - Photo 15.103 -
Square Q/4 from Mazar et. al. (2020 v. 3: Chapter 15)
Photo 15.103
Square Q/4, looking south at D-3 Pits 4805 (bottom) and 4806 (top) (2000)
Mazar et. al. (2020 v.3) - Photo 15.104 -
Square Q/4, D-3 Pit 2808 from Mazar et. al. (2020 v. 3: Chapter 15)
Photo 15.104
Square Q/4, D-3 Pit 2808 (1998)
Mazar et. al. (2020 v.3) - Photo 15.105 -
Squares P–Q/4, looking west at upper D-3 pits from Mazar et. al. (2020 v. 3: Chapter 15)
Photo 15.105
Squares P–Q/4, looking west at upper D-3 pits (1998)
Mazar et. al. (2020 v.3) - Photo 15.106 -
Square Q/4, looking south at D-3 Pit 2872 from Mazar et. al. (2020 v. 3: Chapter 15)
Photo 15.106
Square Q/4, looking south at D-3 Pit 2872 (1998)
Mazar et. al. (2020 v.3) - Photo 15.107 -
Square Q/4, looking west at D-3 Pit 2850 from Mazar et. al. (2020 v. 3: Chapter 15)
Photo 15.107
Square Q/4, looking west at D-3 Pit 2850 (1998)
Mazar et. al. (2020 v.3)
- Plans: Figs. 15.26–15.27
- Sections: Figs. 15.21, 15.33–15.35
- Photos 15.100–15.107
- Pottery: Figs. 16.55–16.58
- Table 15.1 -
Stratigraphy and chronology in Area D, with correlation to Area C from Mazar et. al. (2020 v. 3: Chapter 17)
Table 15.1
Stratigraphy and chronology in Area D, with correlation to Area C
Mazar et. al. (2020 v.3) - Table 15.2 -
Locus and basket numbers from Mazar et. al. (2020 v. 3: Chapter 17)
Table 15.2
Locus and basket numbers
Mazar et. al. (2020 v.3) - Figure 15.1 -
Location of section drawings on superimposed plan of Strata D-11–D-2 from Mazar et. al. (2020 v. 3: Chapter 17)
Figure 15.1
Location of section drawings on superimposed plan of Strata D-11–D-2
Mazar et. al. (2020 v.3) - Figure 15.2 -
Schematic section of Area D from Mazar et. al. (2020 v. 3: Chapter 17)
Figure 15.2
Schematic section of Area D
Mazar et. al. (2020 v.3) - Figure 15.28 -
Plan of Stratum D-2 from Mazar et. al. (2020 v. 3: Chapter 15)
Figure 15.28
Plan of Stratum D-2
Mazar et. al. (2020 v.3) - Figure 15.32 -
Section 6 from Mazar et. al. (2020 v. 3: Chapter 15)
Figure 15.32
Section 6 (Squares P–Q/5, looking north)
Mazar et. al. (2020 v.3) - Figure 15.33 -
Section 7 from Mazar et. al. (2020 v. 3: Chapter 15)
Figure 15.33
Section 7 (Squares P–Q/4, looking north)
Mazar et. al. (2020 v.3) - Figure 15.34 -
Section 8 from Mazar et. al. (2020 v. 3: Chapter 15)
Figure 15.34
Section 8 (Squares Q–N/4, looking south)
Mazar et. al. (2020 v.3) - Figure 15.35 -
Section 9 from Mazar et. al. (2020 v. 3: Chapter 15)
Figure 15.35
Section 9 (Squares Q/4–5, looking east)
Mazar et. al. (2020 v.3) - Photo 15.108 -
Square P/4 from Mazar et. al. (2020 v. 3: Chapter 15)
Photo 15.108
Square P/4, looking east at D-2 Room 4826 (2000)
Mazar et. al. (2020 v.3) - Photo 15.109 -
Square P/5 from Mazar et. al. (2020 v. 3: Chapter 15)
Photo 15.109
Square P/5, looking west at D-2 Room 4828 (2000)
Mazar et. al. (2020 v.3) - Photo 15.110 -
Square P/5 from Mazar et. al. (2020 v. 3: Chapter 15)
Photo 15.110
Square P/5, looking east at D-2 Room 4828; right: trench cutting northern end of Floor 4825 (2000)
Mazar et. al. (2020 v.3) - Photo 15.111 -
Square P/5, looking south at reed impressions (ceiling collapse?) on plaster layer from Mazar et. al. (2020 v. 3: Chapter 15)
Photo 15.111
Square P/5, looking south at reed impressions (ceiling collapse?) on plaster layer, below foundations of D-2 Wall 4808; foreground: D-4b basalt basin (8807) in Installation 8810 (2007)
Mazar et. al. (2020 v.3) - Photo 15.112 -
Closeup of layer in Photo 15.111 from Mazar et. al. (2020 v. 3: Chapter 15)
Photo 15.112
Closeup of layer in Photo 15.111
Mazar et. al. (2020 v.3) - Photo 15.113 -
Square Q/5 from Mazar et. al. (2020 v. 3: Chapter 15)
Photo 15.113
Square Q/5, looking north at D-2 Wall 4808, built into D-4a Building DJ (2007)
Mazar et. al. (2020 v.3) - Photo 15.114 -
Square Q/5 from Mazar et. al. (2020 v. 3: Chapter 15)
Photo 15.114
Square Q/5, looking north; eastern part of D-2 Wall 4808, built against Wall 7851 (2007)
Mazar et. al. (2020 v.3) - Photo 15.115 -
Square Q/5 from Mazar et. al. (2020 v. 3: Chapter 15)
Photo 15.115
Square Q/5, looking west; D-1b–c walls above D-2 Wall 4808 (2005)
Mazar et. al. (2020 v.3)
- Plan: Fig. 15.28
- Sections: Figs. 15.32–15.35
- Photos 15.108–15.115
- Pottery: Fig. 16.59
- Table 15.1 -
Stratigraphy and chronology in Area D, with correlation to Area C from Mazar et. al. (2020 v. 3: Chapter 17)
Table 15.1
Stratigraphy and chronology in Area D, with correlation to Area C
Mazar et. al. (2020 v.3) - Table 15.2 -
Locus and basket numbers from Mazar et. al. (2020 v. 3: Chapter 17)
Table 15.2
Locus and basket numbers
Mazar et. al. (2020 v.3) - Figure 15.1 -
Location of section drawings on superimposed plan of Strata D-11–D-2 from Mazar et. al. (2020 v. 3: Chapter 17)
Figure 15.1
Location of section drawings on superimposed plan of Strata D-11–D-2
Mazar et. al. (2020 v.3) - Figure 15.2 -
Schematic section of Area D from Mazar et. al. (2020 v. 3: Chapter 17)
Figure 15.2
Schematic section of Area D
Mazar et. al. (2020 v.3) - Figure 15.29 -
Plan of Stratum D-1c from Mazar et. al. (2020 v. 3: Chapter 15)
Figure 15.29
Plan of Stratum D-1c
Mazar et. al. (2020 v.3) - Figure 15.30 -
Plan of Stratum D-1b from Mazar et. al. (2020 v. 3: Chapter 15)
Figure 15.30
Plan of Stratum D-1b
Mazar et. al. (2020 v.3) - Figure 15.31 -
Plan of Stratum D-1a from Mazar et. al. (2020 v. 3: Chapter 15)
Figure 15.31
Plan of Stratum D-1a
Mazar et. al. (2020 v.3) - Figure 15.32 -
Section 6 from Mazar et. al. (2020 v. 3: Chapter 15)
Figure 15.32
Section 6 (Squares P–Q/5, looking north)
Mazar et. al. (2020 v.3) - Figure 15.33 -
Section 7 from Mazar et. al. (2020 v. 3: Chapter 15)
Figure 15.33
Section 7 (Squares P–Q/4, looking north)
Mazar et. al. (2020 v.3) - Figure 15.34 -
Section 8 from Mazar et. al. (2020 v. 3: Chapter 15)
Figure 15.34
Section 8 (Squares Q–N/4, looking south)
Mazar et. al. (2020 v.3) - Figure 15.35 -
Section 9 from Mazar et. al. (2020 v. 3: Chapter 15)
Figure 15.35
Section 9 (Squares Q/4–5, looking east)
Mazar et. al. (2020 v.3) - Photo 15.115 -
Square Q/5 from Mazar et. al. (2020 v. 3: Chapter 15)
Photo 15.115
Square Q/5, looking west; D-1b–c walls above D-2 Wall 4808 (2005)
Mazar et. al. (2020 v.3) - Photo 15.116 -
Square Q/5 from Mazar et. al. (2020 v. 3: Chapter 15)
Photo 15.116
Square Q/5, looking east; top and center: D-1 walls and layers; bottom: D-4 Rooms 4872 and 4858 (2005)
Mazar et. al. (2020 v.3) - Photo 15.117 -
Square Q/5 from Mazar et. al. (2020 v. 3: Chapter 15)
Photo 15.117
Square Q/5, looking south at D-1b–c Wall 7803; Debris 7810 (in left section) on Floor 7837 (2005)
Mazar et. al. (2020 v.3) - Photo 15.118 -
Square Q/5 from Mazar et. al. (2020 v. 3: Chapter 15)
Photo 15.118
Square Q/5, looking west at Stratum D-1b–c elements (2005)
Mazar et. al. (2020 v.3) - Photo 15.119 -
Square Q/5 from Mazar et. al. (2020 v. 3: Chapter 15)
Photo 15.119
Square Q/5 looking north; D-2 Floor 7837 below D-1b–c walls (2005)
Mazar et. al. (2020 v.3) - Photo 15.120 -
Square Q/5 from Mazar et. al. (2020 v. 3: Chapter 15)
Photo 15.120
Square Q/5, eastern section with D-1c Debris 7826 above Floor 7830/7837 (1998)
Mazar et. al. (2020 v.3) - Photo 15.121 -
Square Q/4 from Mazar et. al. (2020 v. 3: Chapter 15)
Photo 15.121
Square Q/4, looking north at D-1a Wall 1816 (1997)
Mazar et. al. (2020 v.3) - Photo 15.122 -
Square Q/4 from Mazar et. al. (2020 v. 3: Chapter 15)
Photo 15.122
Square Q/4, looking north at D-1b Oven 1817 (center) and D-1a Wall 1808 (right) (1997)
Mazar et. al. (2020 v.3)
- Plans: Figs. 15.29–15.31
- Sections: Figs. 15.32–15.35
- Photos 15.115–15.122
- Pottery: Fig. 16.60
- Table 15.1 -
Stratigraphy and chronology in Area D, with correlation to Area C from Mazar et. al. (2020 v. 3: Chapter 17)
Table 15.1
Stratigraphy and chronology in Area D, with correlation to Area C
Mazar et. al. (2020 v.3) - Table 15.2 -
Locus and basket numbers from Mazar et. al. (2020 v. 3: Chapter 17)
Table 15.2
Locus and basket numbers
Mazar et. al. (2020 v.3) - Figure 15.1 -
Location of section drawings on superimposed plan of Strata D-11–D-2 from Mazar et. al. (2020 v. 3: Chapter 17)
Figure 15.1
Location of section drawings on superimposed plan of Strata D-11–D-2
Mazar et. al. (2020 v.3) - Figure 15.2 -
Schematic section of Area D from Mazar et. al. (2020 v. 3: Chapter 17)
Figure 15.2
Schematic section of Area D
Mazar et. al. (2020 v.3)
- Figure 15.1
Location of section drawings on superimposed plan of Strata D-11–D-2 from Mazar et. al. (2020 v. 3: Chapter 15)
Figure 15.1
Location of section drawings on superimposed plan of Strata D-11–D-2
Mazar et. al. (2020 v.3) - Figure 15.2
Schematic section of Area D from Mazar et. al. (2020 v. 3: Chapter 15)
Figure 15.2
Schematic section of Area D
Mazar et. al. (2020 v.3) - Figure 15.3
Plan of Stratum D-11b from Mazar et. al. (2020 v. 3: Chapter 15)
Figure 15.3
Plan of Stratum D-11b
Mazar et. al. (2020 v.3) - Figure 15.4
Plan of Stratum D-11a from Mazar et. al. (2020 v. 3: Chapter 15)
Figure 15.4
Plan of Stratum D-11a
Mazar et. al. (2020 v.3) - Figure 15.5
Plan of Stratum D-10 constructional fills from Mazar et. al. (2020 v. 3: Chapter 15)
Figure 15.5
Plan of Stratum D-10 constructional fills
Mazar et. al. (2020 v.3) - Figure 15.6
Plan of Stratum D-10 from Mazar et. al. (2020 v. 3: Chapter 15)
Figure 15.6
Plan of Stratum D-10
Mazar et. al. (2020 v.3) - Figure 15.7
Plan of Stratum D-9b from Mazar et. al. (2020 v. 3: Chapter 15)
Figure 15.7
Plan of Stratum D-9b
Mazar et. al. (2020 v.3) - Figure 15.8
Plan of Stratum D-9a from Mazar et. al. (2020 v. 3: Chapter 15)
Figure 15.8
Plan of Stratum D-9a
Mazar et. al. (2020 v.3) - Figure 15.9
Plan of Stratum D-8 from Mazar et. al. (2020 v. 3: Chapter 15)
Figure 15.9
Plan of Stratum D-8
Mazar et. al. (2020 v.3) - Figure 15.10
Plan of Stratum D-8' from Mazar et. al. (2020 v. 3: Chapter 15)
Figure 15.10
Plan of Stratum D-8'
Mazar et. al. (2020 v.3) - Figure 15.11
Plan of post Stratum D-8 fills from Mazar et. al. (2020 v. 3: Chapter 15)
Figure 15.11
Plan of post Stratum D-8 fills
Mazar et. al. (2020 v.3) - Figure 15.12
Plan of Stratum D-7b from Mazar et. al. (2020 v. 3: Chapter 15)
Figure 15.12
Plan of Stratum D-7b
Mazar et. al. (2020 v.3) - Figure 15.13
Plan of Stratum D-7a (encircled numbers denote foundation deposits as listed in the text) from Mazar et. al. (2020 v. 3: Chapter 15)
Figure 15.13
Plan of Stratum D-7a (encircled numbers denote foundation deposits as listed in the text)
Mazar et. al. (2020 v.3) - Figure 15.14
Plan of Stratum D-7a' from Mazar et. al. (2020 v. 3: Chapter 15)
Figure 15.14
Plan of Stratum D-7a'
Mazar et. al. (2020 v.3) - Figure 15.15
Plan of Stratum D-6b from Mazar et. al. (2020 v. 3: Chapter 15)
Figure 15.15
Plan of Stratum D-6b
Mazar et. al. (2020 v.3) - Figure 15.16
Plan of Stratum D-6a from Mazar et. al. (2020 v. 3: Chapter 15)
Figure 15.16
Plan of Stratum D-6a
Mazar et. al. (2020 v.3) - Figure 15.17a
Section 1a from Mazar et. al. (2020 v. 3: Chapter 15)
Figure 15.17a
Section 1a (Squares G–L/5, looking north, showing probe in alluvial field)
Mazar et. al. (2020 v.3) - Figure 15.17b
Section 1b from Mazar et. al. (2020 v. 3: Chapter 15)
Figure 15.17b
Section 1b (Squares J–M/5 and part of N/5, looking north)
Mazar et. al. (2020 v.3) - Figure 15.18a
Section 2a from Mazar et. al. (2020 v. 3: Chapter 15)
Figure 15.18a
Section 2a (Squares M/4–5, looking west in Probe III)
Mazar et. al. (2020 v.3) - Figure 15.18b
Section 2b from Mazar et. al. (2020 v. 3: Chapter 15)
Figure 15.18b
Section 2a (Squares M/4–5, looking west in Probe III)
Mazar et. al. (2020 v.3) - Figure 15.19
Section 3 from Mazar et. al. (2020 v. 3: Chapter 15)
Figure 15.19
Section 3 (Squares L–N/4, looking north)
Mazar et. al. (2020 v.3) - Figure 15.20
Section 4 from Mazar et. al. (2020 v. 3: Chapter 15)
Figure 15.20
Section 4 (Squares N–L/4, looking south)
Mazar et. al. (2020 v.3) - Figure 15.21
Section 5 from Mazar et. al. (2020 v. 3: Chapter 15)
Figure 15.21
Section 5 (Squares N/4–5, looking east)
Mazar et. al. (2020 v.3) - Figure 15.22
Plan of Stratum D-5 from Mazar et. al. (2020 v. 3: Chapter 15)
Figure 15.22
Plan of Stratum D-5
Mazar et. al. (2020 v.3) - Figure 15.23
Plan of Stratum D-4b from Mazar et. al. (2020 v. 3: Chapter 15)
Figure 15.23
Plan of Stratum D-4b
Mazar et. al. (2020 v.3) - Figure 15.24
Plan of Stratum D-4a from Mazar et. al. (2020 v. 3: Chapter 15)
Figure 15.24
Plan of Stratum D-4a
Mazar et. al. (2020 v.3) - Figure 15.25a
Iron IB remains in Areas D and C from Mazar et. al. (2020 v. 3: Chapter 15)
Figure 15.25a
Schematic plan of Iron IB remains in Areas D and C, showing possible correlation: Strata D-5 and C-3b
Mazar et. al. (2020 v.3) - Figure 15.25b
Iron IB remains in Areas D and C from Mazar et. al. (2020 v. 3: Chapter 15)
Figure 15.25b
Schematic plan of Iron IB remains in Areas D and C, showing possible correlation: Strata D-4b and C-3a
Mazar et. al. (2020 v.3) - Figure 15.26
Plan of Stratum D-3, lower pits from Mazar et. al. (2020 v. 3: Chapter 15)
Figure 15.26
Plan of Stratum D-3, lower pits
Mazar et. al. (2020 v.3) - Figure 15.27
Plan of Stratum D-3, upper pits from Mazar et. al. (2020 v. 3: Chapter 15)
Figure 15.27
Plan of Stratum D-3, upper pits
Mazar et. al. (2020 v.3) - Figure 15.28
Plan of Stratum D-2 from Mazar et. al. (2020 v. 3: Chapter 15)
Figure 15.28
Plan of Stratum D-2
Mazar et. al. (2020 v.3) - Figure 15.29
Plan of Stratum D-1c from Mazar et. al. (2020 v. 3: Chapter 15)
Figure 15.29
Plan of Stratum D-1c
Mazar et. al. (2020 v.3) - Figure 15.30
Plan of Stratum D-1b from Mazar et. al. (2020 v. 3: Chapter 15)
Figure 15.30
Plan of Stratum D-1b
Mazar et. al. (2020 v.3) - Figure 15.31
Plan of Stratum D-1a from Mazar et. al. (2020 v. 3: Chapter 15)
Figure 15.31
Plan of Stratum D-1a
Mazar et. al. (2020 v.3) - Figure 15.32
Section 6 from Mazar et. al. (2020 v. 3: Chapter 15)
Figure 15.32
Section 6 (Squares P–Q/5, looking north)
Mazar et. al. (2020 v.3) - Figure 15.33
Section 7 from Mazar et. al. (2020 v. 3: Chapter 15)
Figure 15.33
Section 7 (Squares P–Q/4, looking north)
Mazar et. al. (2020 v.3) - Figure 15.34
Section 8 from Mazar et. al. (2020 v. 3: Chapter 15)
Figure 15.34
Section 8 (Squares Q–N/4, looking south)
Mazar et. al. (2020 v.3) - Figure 15.35
Section 9 from Mazar et. al. (2020 v. 3: Chapter 15)
Figure 15.35
Section 9 (Squares Q/4–5, looking east)
Mazar et. al. (2020 v.3)
- Photo 15.1
Area D at the end of 1997 season from Mazar et. al. (2020 v. 3: Chapter 15)
Photo 15.1
General view, end of 1997 season, looking east; from top to bottom: Squares Q/4 to L/4
Mazar et. al. (2020 v.3) - Photo 15.2
Area D at the end of 1998 season from Mazar et. al. (2020 v. 3: Chapter 15)
Photo 15.2
General view, end of 1998 season, looking east; from top to bottom: Squares Q/4 to L/4
Mazar et. al. (2020 v.3) - Photo 15.3
Area D at the end of 2000 season from Mazar et. al. (2020 v. 3: Chapter 15)
Photo 15.3
General view, end of 2000 season, looking east; from top to bottom: Squares Q/4–5 to L/4
Mazar et. al. (2020 v.3) - Photo 15.4
Area D at the end of 2005 season from Mazar et. al. (2020 v. 3: Chapter 15)
Photo 15.4
General view, end of 2005 season, looking east; from top to bottom: Squares Q/4–5 to L/4–5
Mazar et. al. (2020 v.3) - Photo 15.5
Aerial view, end of 2008 season from Mazar et. al. (2020 v. 3: Chapter 15)
Photo 15.5
Aerial view, end of 2008 season
Mazar et. al. (2020 v.3) - Photo 15.6
General view, end of 2010 season from Mazar et. al. (2020 v. 3: Chapter 15)
Photo 15.6
General view, end of 2010 season, looking southwest; Squares L–N/4–5
Mazar et. al. (2020 v.3) - Photo 15.7
General view, with backhoe digging a trench in the alluvial plain west of the mound, end of 2008 season from Mazar et. al. (2020 v. 3: Chapter 15)
Photo 15.7
General view, with backhoe digging a trench in the alluvial plain west of the mound, end of 2008 season
Mazar et. al. (2020 v.3) - Photo 15.8
Probe III in Squares M/4–5 from Mazar et. al. (2020 v. 3: Chapter 15)
Photo 15.8
Probe III in Squares M/4–5; looking south at Stratum D-10 Buttress 2889 and Wall 2886; right: section in 2.0 m-high tufa fill, Stratum D-10; bottom left: D-11b Hearth 1926
Mazar et. al. (2020 v.3) - Photo 15.9
Probe III in Squares M/4–5 from Mazar et. al. (2020 v. 3: Chapter 15)
Photo 15.9
Probe III in Squares M/4–5; looking south at Buttress 2889 and Wall 2886, Stratum D-10; bottom: D-11b Hearths 1926 (left) and 1925 (right), Wall 1927 to their north
Mazar et. al. (2020 v.3) - Photo 15.10
Probe III in Squares M/4–5 from Mazar et. al. (2020 v. 3: Chapter 15)
Photo 15.10
Probe III in Squares M/4–5; looking north at Stratum D-10 Buttress 8938 and Wall 8942; bottom: D-11a Wall 1915 and ash pile (1919) to its north; northern and western sections: D-10 tufa fill
Mazar et. al. (2020 v.3) - Photo 15.11
Probe III in Squares M/4–5 from Mazar et. al. (2020 v. 3: Chapter 15)
Photo 15.11
Probe III in Squares M/4–5, looking north at D-11a Wall 1923 covered by layer (1907) and tufa fill (2814) of D-10
Mazar et. al. (2020 v.3) - Photo 15.12
Probe II in Square M/4 from Mazar et. al. (2020 v. 3: Chapter 15)
Photo 15.12
Probe II in Square M/4, looking east; D-11a stone floor (9917) covering D-11b layers; on top: successive D-10 fill layers (9914, 9905) and Floor 8939
Mazar et. al. (2020 v.3) - Photo 15.13
Backhoe trench in Square M/5 from Mazar et. al. (2020 v. 3: Chapter 15)
Photo 15.13
Backhoe trench in Square M/5, looking east; D-10 Wall 8942 with large stone below it at end of trench; thick tufa fill 2814 in trench sections
Mazar et. al. (2020 v.3) - Photo 15.14
Probe III in Squares M/4–5 from Mazar et. al. (2020 v. 3: Chapter 15)
Photo 15.14
Probe III in Squares M/4–5, looking south; left: stone foundation of D-9b Wall 8943 on top of D-10 Wall 8942 and Buttress 8938; background: D-10 Wall 2886 and Buttress 2889 (2010)
Mazar et. al. (2020 v.3) - Photo 15.15
Detail of Probe III from Mazar et. al. (2020 v. 3: Chapter 15)
Photo 15.15
Detail of Probe III, looking south at Wall 2886 and Buttress 2889 (2010)
Mazar et. al. (2020 v.3) - Photo 15.16
Detail of Probe III from Mazar et. al. (2020 v. 3: Chapter 15)
Photo 15.16
Detail of Probe III, looking east at Wall 8942 and Buttress 8938 (left) (2010)
Mazar et. al. (2020 v.3) - Photo 15.17
Backhoe trench in Square M/10 from Mazar et. al. (2020 v. 3: Chapter 15)
Photo 15.17
Backhoe trench in Square M/10, north of Area D, showing D-10 tufa fill, looking east (1998)
Mazar et. al. (2020 v.3) - Photo 15.18
Squares L–M/4 at end of 2010 season from Mazar et. al. (2020 v. 3: Chapter 15)
Photo 15.18
Squares L–M/4 at end of 2010 season, looking south at D-10 Walls 2886 and 2890 and Buttresses 2889, 1902, 1903; Probe II (9905) in Square M/4 east of Wall 2890
Mazar et. al. (2020 v.3) - Photo 15.19
Probe II in Square M/4 from Mazar et. al. (2020 v. 3: Chapter 15)
Photo 15.19
Probe II in Square M/4, looking east; D-10 constructional fill (9914, 9905) and Floor 8939 in section (1998)
Mazar et. al. (2020 v.3) - Photo 15.20
Probe II in Square M/4 from Mazar et. al. (2020 v. 3: Chapter 15)
Photo 15.20
Probe II in Square M/4, looking south; D-10 constructional fill (9914, 9905) and Floor 8939 in section (2008)
Mazar et. al. (2020 v.3) - Photo 15.21
Squares L–M/4 from Mazar et. al. (2020 v. 3: Chapter 15)
Photo 15.21
Squares L–M/4, looking east at corner of Wall 2890 and Buttresses 1902 and 1903; left: Courtyard 8934 (2010)
Mazar et. al. (2020 v.3) - Photo 15.22
Square M/5, Buttress 8938 and Wall 8942 abutted by D-10 Courtyard 8934 from Mazar et. al. (2020 v. 3: Chapter 15)
Photo 15.22
Square M/5, Buttress 8938 and Wall 8942 abutted by D-10 Courtyard 8934, looking northeast (2008)
Mazar et. al. (2020 v.3) - Photo 15.23
Squares L–N/4–5 from Mazar et. al. (2020 v. 3: Chapter 15)
Photo 15.23
Squares L–N/4–5, looking east; front: D-10 Courtyard 8934 and top of Buttresses 2889 (right) and 8938 (left); background: Strata D-9 to D-5 (2007)
Mazar et. al. (2020 v.3) - Photo 15.24
Squares L–N/4–5 from Mazar et. al. (2020 v. 3: Chapter 15)
Photo 15.24
Squares L–N/4–5, looking south; center: D-10 Courtyard 8934; left: Wall 8942 and Buttress 8938; top: Wall 2886 and Buttress 2889, partly superimposed by D-9b 2816 and 2892; in southern section: D-9 and D-8 layers (2007)
Mazar et. al. (2020 v.3) - Photo 15.25
Squares L–N/4–5 from Mazar et. al. (2020 v. 3: Chapter 15)
Photo 15.25
Squares L–N/4–5, looking north; center: D-10 Courtyard 8934; right: Buttress 8938; bottom: Wall 2886 and Buttress 2889 partly superimposed by D-9b Walls 2816 and 2892 (2007)
Mazar et. al. (2020 v.3) - Photo 15.26
Squares L–M/4 from Mazar et. al. (2020 v. 3: Chapter 15)
Photo 15.26
Squares L–M/4, looking south at section; bottom: D-9b Wall 2816; D-9a stone floor (2855) at top of meter stick, sealing D-10 and D-9b floors (bird-nest holes in section) (2007)
Mazar et. al. (2020 v.3) - Photo 15.27
Squares M–N/4 from Mazar et. al. (2020 v. 3: Chapter 15)
Photo 15.27
Squares M–N/4, looking southeast; D-10 Courtyard 8934 in corner of Walls 8942 and 2886; top left: stone foundation of D-9b Wall 8943 (2008).
Mazar et. al. (2020 v.3) - Photo 15.28
Squares M–N/4–5 from Mazar et. al. (2020 v. 3: Chapter 15)
Photo 15.28
Squares M–N/4–5, looking south at D-9a–b stone foundations (2010)
Mazar et. al. (2020 v.3) - Photo 15.29
Squares M–N/4–5, from Mazar et. al. (2020 v. 3: Chapter 15)
Photo 15.29
Squares M–N/4–5, looking south; left: D-9a Wall 8932 and Post-holes 1912; right: D-9b stone foundations (2010)
Mazar et. al. (2020 v.3) - Photo 15.30
Squares N/4–5 from Mazar et. al. (2020 v. 3: Chapter 15)
Photo 15.30
Squares N/4–5, looking west; top: D-9b stone foundations; bottom: D-9a Wall 8932 and Post-holes 1912; right: D-9a Wall 1916 (2010)
Mazar et. al. (2020 v.3) - Photo 15.31
Squares N/5 from Mazar et. al. (2020 v. 3: Chapter 15)
Photo 15.31
Square N/5, looking south; bottom: D-9a Wall 1916; right and top: D-9b Walls 8943 and 9923; left: D-9a Post-holes 1912 (2010)
Mazar et. al. (2020 v.3) - Photo 15.32
Squares N/4 from Mazar et. al. (2020 v. 3: Chapter 15)
Photo 15.32
Square N/4, looking south at D-9b Floor 9927, Oven 9918 and Installation 1905; right: Wall 8943; background: Wall 1904 (2010)
Mazar et. al. (2020 v.3) - Photo 15.33
Square M/5 from Mazar et. al. (2020 v. 3: Chapter 15)
Photo 15.33
Square M/5, looking south at D-9b bronze-melting canal (8921) and Installation 8925 (2007)
Mazar et. al. (2020 v.3) - Photo 15.34
Detail of bronze-melting canal (8921) with fragments of bellow, charcoal, and metal object in situ from Mazar et. al. (2020 v. 3: Chapter 15)
Photo 15.34
Detail of bronze-melting canal (8921) with fragments of bellow, charcoal, and metal object in situ, looking west (2007)
Mazar et. al. (2020 v.3) - Photo 15.35
Square M/5 from Mazar et. al. (2020 v. 3: Chapter 15)
Photo 15.35
Square M/5, detail of Installation 8925 near bronze-melting canal (8921), looking south (2007)
Mazar et. al. (2020 v.3) - Photo 15.36
Square M/5 from Mazar et. al. (2020 v. 3: Chapter 15)
Photo 15.36
Square M/5, D-9b Installation 8936 and stone foundation of Wall 8943, looking west; left: D-10 Buttress 8938 (2007)
Mazar et. al. (2020 v.3) - Photo 15.37
Squares L–M/4 from Mazar et. al. (2020 v. 3: Chapter 15)
Photo 15.37
Squares L–M/4, looking north at foundations of D-9b Wall 2816 above D-10 Wall 2886 and Buttress 1903, with D-10 Wall 2890 at the bottom
Mazar et. al. (2020 v.3) - Photo 15.38
Square N/4 from Mazar et. al. (2020 v. 3: Chapter 15)
Photo 15.38
Square N/4, sloping striations in D-10 Locus 8939 below D-9 stone foundations of Walls 8943 and 1906, looking east; background: D-8–9a Wall 8932 (2010)
Mazar et. al. (2020 v.3) - Photo 15.39
Square N/4 from Mazar et. al. (2020 v. 3: Chapter 15)
Photo 15.39
Square N/4, Locus 8919, foundation deposit (basalt bowl and lamp) in corner of Walls 8943 and 1906, looking southeast (2010)
Mazar et. al. (2020 v.3) - Photo 15.40
Squares M–N/4–5 from Mazar et. al. (2020 v. 3: Chapter 15)
Photo 15.40
Squares M–N/4–5, looking east; left: backhoe trench into D-10 tufa fill near porcupine hole; D-9 to D-6b floors and installations in middle and upper steps (2005)
Mazar et. al. (2020 v.3) - Photo 15.41
Squares N/4–5 from Mazar et. al. (2020 v. 3: Chapter 15)
Photo 15.41
Squares N/4–5, looking east; D-8–9a Wall 8932 on D-9b Floor 9927, cut on the south by D-7b Pit 8916
Mazar et. al. (2020 v.3) - Photo 15.42
Squares L–N/4 from Mazar et. al. (2020 v. 3: Chapter 15)
Photo 15.42
Squares L–N/4, looking east; bottom: foundation of D-9b Wall 2816; center: D-9a stone floor 2855; above, right: D-7a Wall 1818 (1998)
Mazar et. al. (2020 v.3) - Photo 15.43
Square M/4 from Mazar et. al. (2020 v. 3: Chapter 15)
Photo 15.43
Square M/4, looking east at D-9a stone floor 2855 (1998)
Mazar et. al. (2020 v.3) - Photo 15.44
Square M/4 from Mazar et. al. (2020 v. 3: Chapter 15)
Photo 15.44
Square M/4, looking east at sloping layers 8939 (D-10) and 8919 (D-9b), sealed below D-9a stone Floor 2855 (2008)
Mazar et. al. (2020 v.3) - Photo 15.45
Squares N–M/4–5 from Mazar et. al. (2020 v. 3: Chapter 15)
Photo 15.45
Squares N–M/4–5, looking southeast; center: D-7a' pillar bases; top: stone foundation of D-4 Wall 1883 (2007)
Mazar et. al. (2020 v.3) - Photo 15.46
Northeast corner of Square M/5 from Mazar et. al. (2020 v. 3: Chapter 15)
Photo 15.46
Northeast corner of Square M/5, looking north; lamp-and-bowl foundation deposit below D-7a Wall 7906, cut into stone lining of D-7b Oven 7924 (2007)
Mazar et. al. (2020 v.3) - Photo 15.47
Square M/5 from Mazar et. al. (2020 v. 3: Chapter 15)
Photo 15.47
Square M/5, looking south at section through D-7b Installation 7919 (2005); bowl: Fig. 16.26:2
Mazar et. al. (2020 v.3) - Photo 15.48
Square N/4 from Mazar et. al. (2020 v. 3: Chapter 15)
Photo 15.48
Square N/4, looking northeast at D-7b Floor 8914, cut by D-7a Installation 8906 (2007)
Mazar et. al. (2020 v.3) - Photo 15.49
Square M/5 from Mazar et. al. (2020 v. 3: Chapter 15)
Photo 15.49
Square M/5, looking north at stone foundation of D-7a Wall 7906 with floor striations in section; below the wall: ashy layer of D-7b Floor 7903 (2005)
Mazar et. al. (2020 v.3) - Photo 15.50
Square N/5 from Mazar et. al. (2020 v. 3: Chapter 15)
Photo 15.50
Square N/5, looking north at D-7a stone floor 9906, pillar bases 9907 and Wall 8917 (2008)
Mazar et. al. (2020 v.3) - Photo 15.51
Square N/5 from Mazar et. al. (2020 v. 3: Chapter 15)
Photo 15.51
Square N/5, looking west at D-7a stone floor 9906 and pillar bases 9907 (2008)
Mazar et. al. (2020 v.3) - Photo 15.52
Square N/4 from Mazar et. al. (2020 v. 3: Chapter 15)
Photo 15.52
Square N/4, looking north; left: foundation of D-7a–6b Wall 2842; center: D-7a Floor 8907 and Installation 8906 (2007)
Mazar et. al. (2020 v.3) - Photo 15.53
Square N/4 from Mazar et. al. (2020 v. 3: Chapter 15)
Photo 15.53
Square N/4, looking west; bottom left: D-7a Ovens 7946 and 8902; center: D-7b Pit 8916 (2007)
Mazar et. al. (2020 v.3) - Photo 15.54a
Square M/4 from Mazar et. al. (2020 v. 3: Chapter 15)
Photo 15.54a
Square M/4; D-7a lamp and bowl deposits - deposit No. 2, looking southeast east (1997)
Mazar et. al. (2020 v.3) - Photo 15.54b
Square M/4 from Mazar et. al. (2020 v. 3: Chapter 15)
Photo 15.54b
Square M/4; D-7a lamp and bowl deposits - deposit No. 3, looking east (1997)
Mazar et. al. (2020 v.3) - Photo 15.55
Square N/5 from Mazar et. al. (2020 v. 3: Chapter 15)
Photo 15.55
Square N/5, looking west at D-7a' pillar bases 8944 and Walls 8904 and 4856 (2007)
Mazar et. al. (2020 v.3) - Photo 15.56
Squares N/4–5 from Mazar et. al. (2020 v. 3: Chapter 15)
Photo 15.56
Squares N/4–5, looking east; left: D-6b Installations 7931 and 7939; right: D-7a Wall 8904, superimposed by D-6b Installation 2874 (2005)
Mazar et. al. (2020 v.3) - Photo 15.57
Squares N/4–5 from Mazar et. al. (2020 v. 3: Chapter 15)
Photo 15.57
Squares N/4–5, looking south; bottom: D-6b Installations 7931 and 7939; center: D-7a Wall 8904, superimposed by D-6a–b Installation 2874 (2005)
Mazar et. al. (2020 v.3) - Photo 15.58
Square N/5 from Mazar et. al. (2020 v. 3: Chapter 15)
Photo 15.58
Square N/5, looking west; detail of D-6b Installations 7939 (bottom) and 7931 (top); top right: red clay patch 7925 above D-6a Wall 7926 (2005)
Mazar et. al. (2020 v.3) - Photo 15.59
Square N/4 from Mazar et. al. (2020 v. 3: Chapter 15)
Photo 15.59
Square N/4, looking east; detail of D-6b Installation 2874 (2005)
Mazar et. al. (2020 v.3) - Photo 15.60
Square N/4 from Mazar et. al. (2020 v. 3: Chapter 15)
Photo 15.60
Square N/4, southern section showing D-6 striations and ash layers (bird-nest holes in section).
Mazar et. al. (2020 v.3) - Photo 15.61
Square N/4 from Mazar et. al. (2020 v. 3: Chapter 15)
Photo 15.61
Square N/4; D-6a Oven 2841 below D-4b Floor 1845 (1998)
Mazar et. al. (2020 v.3) - Photo 15.62
Square P/4 from Mazar et. al. (2020 v. 3: Chapter 15)
Photo 15.62
Square P/4, section in D-6a Oven 2841
Mazar et. al. (2020 v.3) - Photo 15.63
Squares N–Q/4–5 from Mazar et. al. (2020 v. 3: Chapter 15)
Photo 15.63
Squares N–Q/4–5 at end of 2007 season; center: north–south street (Photo: SkyView).
Mazar et. al. (2020 v.3) - Photo 15.64
Square N–P/4 from Mazar et. al. (2020 v. 3: Chapter 15)
Photo 15.64
Square N–P/4, looking east; right: stone foundation of D-4 Wall 1811; center right: D-6a Oven 2841 (1998)
Mazar et. al. (2020 v.3) - Photo 15.65
Probe in street, Square P/4 from Mazar et. al. (2020 v. 3: Chapter 15)
Photo 15.65
Probe in street, Square P/4; D-5 stone fill 9810, east of Wall 2882 (2008)
Mazar et. al. (2020 v.3) - Photo 15.66
Squares P/4–5 from Mazar et. al. (2020 v. 3: Chapter 15)
Photo 15.66
Squares P/4–5, looking south, D-4b Street 8803, bordered by Wall 1883 (right) and Walls 8850, 1860, above 2881 (left); lower left: Installation 8810 (2007)
Mazar et. al. (2020 v.3) - Photo 15.67
Squares P/4–5; fallen bricks (7847) along eastern face of Wall 1883 from Mazar et. al. (2020 v. 3: Chapter 15)
Photo 15.67
Squares P/4–5, same as Photo 15.66, looking north; fallen bricks (7847) along eastern face of Wall 1883 (2007)
Mazar et. al. (2020 v.3) - Photo 15.68
Square P-5, looking west at Wall 1883; foreground: brick collapse in street from Mazar et. al. (2020 v. 3: Chapter 15)
Photo 15.68
Square P-5, looking west at Wall 1883; foreground: brick collapse in street (2005)
Mazar et. al. (2020 v.3) - Photo 15.69
Squares P–Q/4–5 from Mazar et. al. (2020 v. 3: Chapter 15)
Photo 15.69
Squares P–Q/4–5, looking north at D-5 Buildings DD and DE, (2008)
Mazar et. al. (2020 v.3) - Photo 15.70
Squares Q/4–5, looking north at D-5 Room 8867 from Mazar et. al. (2020 v. 3: Chapter 15)
Photo 15.70
Squares Q/4–5, looking north at D-5 Room 8867; bottom: Pit 8883 (2008)
Mazar et. al. (2020 v.3) - Photo 15.71
Square Q/5, looking west at D-4 Building DG; lower right: brick collapse 8865 in D-5 Building DE from Mazar et. al. (2020 v. 3: Chapter 15)
Photo 15.71
Square Q/5, looking west at D-4 Building DG; lower right: brick collapse 8865 in D-5 Building DE (2007)
Mazar et. al. (2020 v.3) - Photo 15.72
Square Q/5 from Mazar et. al. (2020 v. 3: Chapter 15)
Photo 15.72
Square Q/5, looking west; lower right: Room 8865 of D-5 Building DD; left: walls of D-4 Buildings DG and DH (2007)
Mazar et. al. (2020 v.3) - Photo 15.73
Square P/5 from Mazar et. al. (2020 v. 3: Chapter 15)
Photo 15.73
Square P/5, looking west; center: D-5 Room 8874 with ‘steps’ 8879; D-4b Installation 8810 on top of D-5 Wall 8878 (2007).
Mazar et. al. (2020 v.3) - Photo 15.74
Squares Q/4–5 from Mazar et. al. (2020 v. 3: Chapter 15)
Photo 15.74
Squares Q/4–5, looking east at D-5 Building DD; Installation 9805 on Floor 8867 (2008)
Mazar et. al. (2020 v.3) - Photo 15.75
Square Q/4 from Mazar et. al. (2020 v. 3: Chapter 15)
Photo 15.75
Square Q/4, looking north at D-5 Building DD; Floor 8867, cut by Pit 8883 (2008)
Mazar et. al. (2020 v.3) - Photo 15.76
Square P/4 from Mazar et. al. (2020 v. 3: Chapter 15)
Photo 15.76
Square P/4, looking southwest at D-5 Building DD; left: Floor 8871 and Pit 8876; top right: street between Walls 2881 and 2882 (2008)
Mazar et. al. (2020 v.3) - Photo 15.77
Squares P–Q/4 from Mazar et. al. (2020 v. 3: Chapter 15)
Photo 15.77
Squares P–Q/4, looking southwest at D-5 Building DD; Floor 8871, cut by Pits 8876 (center) and 8880 (left); D-4 Wall 1884 floating above floor (2007)
Mazar et. al. (2020 v.3) - Photo 15.78
General view of Area D from Mazar et. al. (2020 v. 3: Chapter 15)
Photo 15.78
General view, looking west, end of 2000 season
Mazar et. al. (2020 v.3) - Photo 15.79
Squares N–P/4,from Mazar et. al. (2020 v. 3: Chapter 15)
Photo 15.79
Squares N–P/4, looking north at D-4 Building DF (2000)
Mazar et. al. (2020 v.3) - Photo 15.80
Squares N–P/4 from Mazar et. al. (2020 v. 3: Chapter 15)
Photo 15.80
Squares N–P/4, looking east; Building DF; D-4b stone floor 1845 covered by pebbles (1842); D-4a brick collapse and stratified layers above (1997)
Mazar et. al. (2020 v.3) - Photo 15.81
Square N/4 from Mazar et. al. (2020 v. 3: Chapter 15)
Photo 15.81
Square N/4, looking east; D-4b Building DF; background: Wall 1811; foreground: accumulation 1805 on Floor 1822; note two rows of bricks separated by a line in Wall 1811 (1997)
Mazar et. al. (2020 v.3) - Photo 15.82
Squares N–P/4 from Mazar et. al. (2020 v. 3: Chapter 15)
Photo 15.82
Squares N–P/4, looking west; D-5 Building DF, stone floor 1845 (2000)
Mazar et. al. (2020 v.3) - Photo 15.83
Square P/4 from Mazar et. al. (2020 v. 3: Chapter 15)
Photo 15.83
Square P/4, looking north; right: D-4a street surface 1873; meter stick on Wall 1883 (1997).
Mazar et. al. (2020 v.3) - Photo 15.84
Square P/5 from Mazar et. al. (2020 v. 3: Chapter 15)
Photo 15.84
Square P/5, looking south at D-4a stone pavement (7805/7828) in street (2005)
Mazar et. al. (2020 v.3) - Photo 15.85
Squares P–N/4–5 from Mazar et. al. (2020 v. 3: Chapter 15)
Photo 15.85
Squares P–N/4–5, looking west; D-4b Buildings DG and DH; center: D-4a Floor 8820, Building DJ (2007)
Mazar et. al. (2020 v.3) - Photo 15.86
Square P/4 from Mazar et. al. (2020 v. 3: Chapter 15)
Photo 15.86
Square P/4, looking east; D-4b Building DG, Installation 8824 (2007)
Mazar et. al. (2020 v.3) - Photo 15.87
Square Q/5 from Mazar et. al. (2020 v. 3: Chapter 15)
Photo 15.87
Square Q/5, looking north; D-4b Building DG, Room 8830; Installation 8837 in northeastern corner of room (2007)
Mazar et. al. (2020 v.3) - Photo 15.88
Square Q/5 from Mazar et. al. (2020 v. 3: Chapter 15)
Photo 15.88
Square Q/5, looking east; D-4a Building DJ, with elements of D-4b Buildings DH and DG below (2007)
Mazar et. al. (2020 v.3) - Photo 15.89
Square Q/5 from Mazar et. al. (2020 v. 3: Chapter 15)
Photo 15.89
Square Q/5, eastern section; D-4a Building DJ above elements of D-4b Buildings DH and DG (2007)
Mazar et. al. (2020 v.3) - Photo 15.90
Square Q/5 from Mazar et. al. (2020 v. 3: Chapter 15)
Photo 15.90
Square Q/5, looking north; D-4b Building DH (2007)
Mazar et. al. (2020 v.3) - Photo 15.91
Square Q/5 from Mazar et. al. (2020 v. 3: Chapter 15)
Photo 15.91
Square Q/5, looking south; D-4b Building DH, Room 8844; note pottery just below the floor (2007)
Mazar et. al. (2020 v.3) - Photo 15.92
Square P/5 from Mazar et. al. (2020 v. 3: Chapter 15)
Photo 15.92
Square P/5, looking south; D-4b Building DH, Room 8842; right: Installation 8810 covered by large stones 8856 to east of installation (2007)
Mazar et. al. (2020 v.3) - Photo 15.93
Squares Q–P/4–5 from Mazar et. al. (2020 v. 3: Chapter 15)
Photo 15.93
Squares Q–P/4–5, end of 2005 season, looking west; right: D-4a Building DJ, Rooms 7853, 4858 and 4872
Mazar et. al. (2020 v.3) - Photo 15.94
Square Q/5, looking east; D-4a Building DJ, brick collapse in Room 7853 from Mazar et. al. (2020 v. 3: Chapter 15)
Photo 15.94
Square Q/5, looking east; D-4a Building DJ, brick collapse in Room 7853 (2005)
Mazar et. al. (2020 v.3) - Photo 15.95
Square P/5 from Mazar et. al. (2020 v. 3: Chapter 15)
Photo 15.95
Square P/5, D-4a Building DJ, Rooms 4858 (bottom) and 4872 (top) (2000)
Mazar et. al. (2020 v.3) - Photo 15.96
Square P/5, looking west; D-4a Building DJ, debris and vessels in Room 4872 from Mazar et. al. (2020 v. 3: Chapter 15)
Photo 15.96
Square P/5, looking west; D-4a Building DJ, debris and vessels in Room 4872 (2000)
Mazar et. al. (2020 v.3) - Photo 15.97
Smashed Pottery in Square P/5 D-4a Building DJ, Room 4872 from Mazar et. al. (2020 v. 3: Chapter 15)
Photo 15.97
Square P/5, looking west; detail of D-4a Building DJ, Room 4872 (see Photo 15.96) (2000)
Mazar et. al. (2020 v.3) - Photo 15.98
Squares P–Q/4 from Mazar et. al. (2020 v. 3: Chapter 15)
Photo 15.98
Squares P–Q/4, looking south; D-4a Building DJ, Rooms 4863 (left) and 2869 (right) (2000)
Mazar et. al. (2020 v.3) - Photo 15.99
Square P/4 from Mazar et. al. (2020 v. 3: Chapter 15)
Photo 15.99
Square P/4, looking east at entrance from street to Room 2869, D-4a Building DJ; foreground: stones (2886) in D-4b street surface (1998)
Mazar et. al. (2020 v.3) - Photo 15.100
Squares Q–P/4 from Mazar et. al. (2020 v. 3: Chapter 15)
Photo 15.100
Squares Q–P/4, looking west; upper D-3 pits (1998)
Mazar et. al. (2020 v.3) - Photo 15.101
Square Q/4 from Mazar et. al. (2020 v. 3: Chapter 15)
Photo 15.101
Square Q/4, looking south at D-3 pits cutting into D-4 debris. Right: D-4 Wall 1860 (1998)
Mazar et. al. (2020 v.3) - Photo 15.102
Squares P–Q/4 from Mazar et. al. (2020 v. 3: Chapter 15)
Photo 15.102
Squares P–Q/4, looking north at lower D-3 pits, dug into D-4 architecture (2000)
Mazar et. al. (2020 v.3) - Photo 15.103
Square Q/4 from Mazar et. al. (2020 v. 3: Chapter 15)
Photo 15.103
Square Q/4, looking south at D-3 Pits 4805 (bottom) and 4806 (top) (2000)
Mazar et. al. (2020 v.3) - Photo 15.104
Square Q/4, D-3 Pit 2808 from Mazar et. al. (2020 v. 3: Chapter 15)
Photo 15.104
Square Q/4, D-3 Pit 2808 (1998)
Mazar et. al. (2020 v.3) - Photo 15.105
Squares P–Q/4, looking west at upper D-3 pits from Mazar et. al. (2020 v. 3: Chapter 15)
Photo 15.105
Squares P–Q/4, looking west at upper D-3 pits (1998)
Mazar et. al. (2020 v.3) - Photo 15.106
Square Q/4, looking south at D-3 Pit 2872 from Mazar et. al. (2020 v. 3: Chapter 15)
Photo 15.106
Square Q/4, looking south at D-3 Pit 2872 (1998)
Mazar et. al. (2020 v.3) - Photo 15.107
Square Q/4, looking west at D-3 Pit 2850 from Mazar et. al. (2020 v. 3: Chapter 15)
Photo 15.107
Square Q/4, looking west at D-3 Pit 2850 (1998)
Mazar et. al. (2020 v.3) - Photo 15.108
Square P/4 from Mazar et. al. (2020 v. 3: Chapter 15)
Photo 15.108
Square P/4, looking east at D-2 Room 4826 (2000)
Mazar et. al. (2020 v.3) - Photo 15.109
Square P/5 from Mazar et. al. (2020 v. 3: Chapter 15)
Photo 15.109
Square P/5, looking west at D-2 Room 4828 (2000)
Mazar et. al. (2020 v.3) - Photo 15.110
Square P/5 from Mazar et. al. (2020 v. 3: Chapter 15)
Photo 15.110
Square P/5, looking east at D-2 Room 4828; right: trench cutting northern end of Floor 4825 (2000)
Mazar et. al. (2020 v.3) - Photo 15.111
Square P/5, looking south at reed impressions (ceiling collapse?) on plaster layer from Mazar et. al. (2020 v. 3: Chapter 15)
Photo 15.111
Square P/5, looking south at reed impressions (ceiling collapse?) on plaster layer, below foundations of D-2 Wall 4808; foreground: D-4b basalt basin (8807) in Installation 8810 (2007)
Mazar et. al. (2020 v.3) - Photo 15.112
Closeup of layer in Photo 15.111 from Mazar et. al. (2020 v. 3: Chapter 15)
Photo 15.112
Closeup of layer in Photo 15.111
Mazar et. al. (2020 v.3) - Photo 15.113
Square Q/5 from Mazar et. al. (2020 v. 3: Chapter 15)
Photo 15.113
Square Q/5, looking north at D-2 Wall 4808, built into D-4a Building DJ (2007)
Mazar et. al. (2020 v.3) - Photo 15.114
Square Q/5 from Mazar et. al. (2020 v. 3: Chapter 15)
Photo 15.114
Square Q/5, looking north; eastern part of D-2 Wall 4808, built against Wall 7851 (2007)
Mazar et. al. (2020 v.3) - Photo 15.115
Square Q/5 from Mazar et. al. (2020 v. 3: Chapter 15)
Photo 15.115
Square Q/5, looking west; D-1b–c walls above D-2 Wall 4808 (2005)
Mazar et. al. (2020 v.3) - Photo 15.116
Square Q/5 from Mazar et. al. (2020 v. 3: Chapter 15)
Photo 15.116
Square Q/5, looking east; top and center: D-1 walls and layers; bottom: D-4 Rooms 4872 and 4858 (2005)
Mazar et. al. (2020 v.3) - Photo 15.117
Square Q/5 from Mazar et. al. (2020 v. 3: Chapter 15)
Photo 15.117
Square Q/5, looking south at D-1b–c Wall 7803; Debris 7810 (in left section) on Floor 7837 (2005)
Mazar et. al. (2020 v.3) - Photo 15.118
Square Q/5 from Mazar et. al. (2020 v. 3: Chapter 15)
Photo 15.118
Square Q/5, looking west at Stratum D-1b–c elements (2005)
Mazar et. al. (2020 v.3) - Photo 15.119
Square Q/5 from Mazar et. al. (2020 v. 3: Chapter 15)
Photo 15.119
Square Q/5 looking north; D-2 Floor 7837 below D-1b–c walls (2005)
Mazar et. al. (2020 v.3) - Photo 15.120
Square Q/5 from Mazar et. al. (2020 v. 3: Chapter 15)
Photo 15.120
Square Q/5, eastern section with D-1c Debris 7826 above Floor 7830/7837 (1998)
Mazar et. al. (2020 v.3) - Photo 15.121
Square Q/4 from Mazar et. al. (2020 v. 3: Chapter 15)
Photo 15.121
Square Q/4, looking north at D-1a Wall 1816 (1997)
Mazar et. al. (2020 v.3) - Photo 15.122
Square Q/4 from Mazar et. al. (2020 v. 3: Chapter 15)
Photo 15.122
Square Q/4, looking north at D-1b Oven 1817 (center) and D-1a Wall 1808 (right) (1997)
Mazar et. al. (2020 v.3) - Photo 15.123
Square Q/4 from Mazar et. al. (2020 v. 3: Chapter 15)
Photo 15.123
Square Q/4, looking north at D-1a Walls 1808 and 1816 (1997)
Mazar et. al. (2020 v.3)
- Table 17.1
Locus and basket numbers from Mazar et. al. (2020 v. 3: Chapter 17)
Table 17.1
Locus and basket numbers
Mazar et. al. (2020 v.3) - Table 17.2
Correlation of the Iron Age stratigraphic sequence in Areas C, D, E, and F from Mazar et. al. (2020 v. 3: Chapter 17)
Table 17.2
Correlation of the Iron Age stratigraphic sequence in Areas C, D, E, and F
Mazar et. al. (2020 v.3) - Figure 17.1
Schematic plan of Areas E and F; Iron IIA Stratum F-1 in black from Mazar et. al. (2020 v. 3: Chapter 17)
Figure 17.1
Schematic plan of Areas E and F; Iron IIA Stratum F-1 in black
Mazar et. al. (2020 v.3) - Figure 17.2a
Plan of Stratum E-3 (Square E/15) from Mazar et. al. (2020 v. 3: Chapter 17)
Figure 17.2a
Plan of Stratum E-3 (Square E/15)
Mazar et. al. (2020 v.3) - Figure 17.2b
Plan of Stratum E-2 from Mazar et. al. (2020 v. 3: Chapter 17)
Figure 17.2b
Plan of Stratum E-2
Mazar et. al. (2020 v.3) - Figure 17.3
Plan of Stratum E-1b in Squares D–F/13–16 from Mazar et. al. (2020 v. 3: Chapter 17)
Figure 17.3
Plan of Stratum E-1b in Squares D–F/13–16
Mazar et. al. (2020 v.3) - Figure 17.4
Schematic plan of Stratum E-1a, marked with location of sub-plans from Mazar et. al. (2020 v. 3: Chapter 17)
Figure 17.4
Schematic plan of Stratum E-1a, marked with location of sub-plans
Mazar et. al. (2020 v.3) - Figure 17.5
General plan of Stratum E-1a from Mazar et. al. (2020 v. 3: Chapter 17)
Figure 17.5
General plan of Stratum E-1a
Mazar et. al. (2020 v.3) - Figure 17.13
Location of section drawings marked on schematic plan of Stratum E-1a from Mazar et. al. (2020 v. 3: Chapter 17)
Figure 17.13
Location of section drawings marked on schematic plan of Stratum E-1a
Mazar et. al. (2020 v.3)
- Table 17.1 -
Locus and basket numbers from Mazar et. al. (2020 v. 3: Chapter 17)
Table 17.1
Locus and basket numbers
Mazar et. al. (2020 v.3) - Table 17.2 -
Correlation of the Iron Age stratigraphic sequence in Areas C, D, E, and F from Mazar et. al. (2020 v. 3: Chapter 17)
Table 17.2
Correlation of the Iron Age stratigraphic sequence in Areas C, D, E, and F
Mazar et. al. (2020 v.3) - Figure 17.1 -
Schematic plan of Areas E and F; Iron IIA Stratum F-1 in black from Mazar et. al. (2020 v. 3: Chapter 17)
Figure 17.1
Schematic plan of Areas E and F; Iron IIA Stratum F-1 in black
Mazar et. al. (2020 v.3) - Figure 17.2a -
Plan of Stratum E-3 (Square E/15) from Mazar et. al. (2020 v. 3: Chapter 17)
Figure 17.2a
Plan of Stratum E-3 (Square E/15)
Mazar et. al. (2020 v.3) - Figure 17.2b -
Plan of Stratum E-2 from Mazar et. al. (2020 v. 3: Chapter 17)
Figure 17.2b
Plan of Stratum E-2
Mazar et. al. (2020 v.3) - Figure 17.3 -
Plan of Stratum E-1b in Squares D–F/13–16 from Mazar et. al. (2020 v. 3: Chapter 17)
Figure 17.3
Plan of Stratum E-1b in Squares D–F/13–16
Mazar et. al. (2020 v.3) - Figure 17.4 -
Schematic plan of Stratum E-1a, marked with location of sub-plans from Mazar et. al. (2020 v. 3: Chapter 17)
Figure 17.4
Schematic plan of Stratum E-1a, marked with location of sub-plans
Mazar et. al. (2020 v.3) - Figure 17.5 -
General plan of Stratum E-1a from Mazar et. al. (2020 v. 3: Chapter 17)
Figure 17.5
General plan of Stratum E-1a
Mazar et. al. (2020 v.3) - Figure 17.13 -
Location of section drawings marked on schematic plan of Stratum E-1a from Mazar et. al. (2020 v. 3: Chapter 17)
Figure 17.13
Location of section drawings marked on schematic plan of Stratum E-1a
Mazar et. al. (2020 v.3)
Area E was located in the northeastern part of Tel Rehov in main grid square 16 (Chapter 3) at the highest point of the eastern part of the lower mound, although it was 13.5 m lower than the highest point in Area C in the northwestern part. The area was close to the northern and eastern edges of the mound, reaching the top of the steep northern slope in only one narrow probe (Squares E/20, E/1). The area included fourteen fully excavated squares and four half squares, a total of 400 sq m, and an additional narrow trench of 25 sq m north of the main area. The topsoil slightly descended southwards, creating an elevation difference of 0.82 m over a distance of 20 m between the northern and southern ends of the area.
The goal of the excavation was to determine the occupational history of the uppermost strata in this part of the mound. It turned out that most of this area can be interpreted as a sacred precinct or sanctuary during the Iron Age IIA, comprising a large open courtyard, a raised platform, several installations and two structural units which can be related to this sanctuary (Buildings EA and EB). On the western edge of the area, part of a dwelling was excavated (Building EC)
The excavation in Area E began in 1997 in six squares: E–F/13–15. During the 1998 season, the area was extended to the north (Squares D–E/15– 16, F/16). In 2000, the area was extended to Square D/14, the northern half of D/13, and 2.0 m-wide probes in Squares E/17–18 and G/16, intended to locate the edge of the open courtyard in the northern part of the area. In 2001, three new squares were opened (C/14–16) and a 2.5 m-wide probe was excavated in Squares E/20 and E/1 (in main grid square 20), intended to answer the question whether there were fortifications along the northern edge of the mound (Photos 17.1–17.3).
The excavations in Area E were supervised by Se Jin Koh (1997–1998, 2000) and James Paul Cowie, Diana Edelman and Naama Yahalom-Mack (2001).
Area F, located 5.0 m south of Area E, was directly related to the latter (Fig. 17.1; see Chapter 19).
Stratum E-3 (perhaps to be correlated with general Stratum VII) is known from only one debris layer in a narrow probe in Square E/15. Stratum E-2 (correlated with general Stratum VI) was examined in only a few probes in Squares D–F/15, E/13–14 and the nature of the area in that stratum remains virtually unknown. The few floors from this phase were 0.7–1.0 m below those of Stratum E-1b, at levels 71.07–71.30 m.
The main feature in this area was an architectural complex which we define as an open-air sanctuary, attributed to Strata E-1b and E-1a, correlated with general Strata V and IV. In Stratum E-1a, the heart of this complex was Building EB, containing a platform with masseboth at its northeastern corner. This building was preceded by Building ED of Stratum E-1b, although only one room and a few fragmentary walls of the latter were excavated. A spacious courtyard east and north of Buildings ED and EB was in use in both Strata E-1b and E-1a. Outer walls of this courtyard, located in Squares E/17–18 and G/16, appear to have been in use in both strata. In the courtyard, floors with an accumulation of debris that contained pottery, animal bones, various artifacts and installations, as well as ovens, circular clay bins and benches, were found in a total accumulation of almost 1.0 m. It was sometimes difficult to define which of these layers and installations belonged to Stratum E-1b and which to E-1a, as the courtyard continued to be in use throughout both these strata, with occasional alterations. Floors of Stratum E-1a seem to have been eroded in certain parts of the courtyard (in Squares E/17–18, F–G/16) but were well defined close to Building EB in Squares D–E/15–16. In certain cases, it was difficult to determine whether a certain installation was founded in E-1b or E-1a. Building EA in the southeastern part of the area was an auxiliary structure which, in fact, may have included parts of two or three different buildings. It was founded in Stratum E-1b and continued to be in use in Stratum E-1a, with a few changes and floor raisings.
Building EC in the western part of the area was a partly excavated dwelling located west of the sanctuary; it is known from Stratum E-1a, but was perhaps founded in E-1b.
- Table 17.1 -
Locus and basket numbers from Mazar et. al. (2020 v. 3: Chapter 17)
Table 17.1
Locus and basket numbers
Mazar et. al. (2020 v.3) - Table 17.2 -
Correlation of the Iron Age stratigraphic sequence in Areas C, D, E, and F from Mazar et. al. (2020 v. 3: Chapter 17)
Table 17.2
Correlation of the Iron Age stratigraphic sequence in Areas C, D, E, and F
Mazar et. al. (2020 v.3) - Figure 17.1 -
Schematic plan of Areas E and F; Iron IIA Stratum F-1 in black from Mazar et. al. (2020 v. 3: Chapter 17)
Figure 17.1
Schematic plan of Areas E and F; Iron IIA Stratum F-1 in black
Mazar et. al. (2020 v.3) - Figure 17.3 -
Plan of Stratum E-1b in Squares D–F/13–16 from Mazar et. al. (2020 v. 3: Chapter 17)
Figure 17.3
Plan of Stratum E-1b in Squares D–F/13–16
Mazar et. al. (2020 v.3) - Figure 17.4 -
Schematic plan of Stratum E-1a, marked with location of sub-plans from Mazar et. al. (2020 v. 3: Chapter 17)
Figure 17.4
Schematic plan of Stratum E-1a, marked with location of sub-plans
Mazar et. al. (2020 v.3) - Figure 17.5 -
General plan of Stratum E-1a from Mazar et. al. (2020 v. 3: Chapter 17)
Figure 17.5
General plan of Stratum E-1a
Mazar et. al. (2020 v.3) - Figure 17.6 -
Stratum E-1a in Squares D–F/13–15 from Mazar et. al. (2020 v. 3: Chapter 17)
Figure 17.6
Stratum E-1a in Squares D–F/13–15
Mazar et. al. (2020 v.3) - Figure 17.7 -
Squares C–E/13–16 in Stratum E-1a from Mazar et. al. (2020 v. 3: Chapter 17)
Figure 17.7
Squares C–E/13–16 in Stratum E-1a
Mazar et. al. (2020 v.3) - Figure 17.8 -
Detailed plan and elevations of Platform 2654 and standing stones from Mazar et. al. (2020 v. 3: Chapter 17)
Figure 17.8
Detailed plan and elevations of Platform 2654 and standing stones
Mazar et. al. (2020 v.3) - Figure 17.9 -
Stratum E-1a in Squares E/15–16 and Stratum E-1a–b (or just E-1b) in Squares E/17–18 and G/16 from Mazar et. al. (2020 v. 3: Chapter 17)
Figure 17.9
Stratum E-1a in Squares E/15–16 and Stratum E-1a–b (or just E-1b) in Squares E/17–18 and G/16
Mazar et. al. (2020 v.3) - Figure 17.14a -
Section 1 from Mazar et. al. (2020 v. 3: Chapter 17)
Figure 17.14a
Section 1 (Squares E/13–15, looking west)
Mazar et. al. (2020 v.3) - Figure 17.14b -
Section 1 from Mazar et. al. (2020 v. 3: Chapter 17)
Figure 17.14b
Section 1 (Squares E/13–15, looking west)
Mazar et. al. (2020 v.3) - Figure 17.15a -
Section 2 from Mazar et. al. (2020 v. 3: Chapter 17)
Figure 17.15a
Section 2 (Squares F/14–15, looking west)
Mazar et. al. (2020 v.3) - Figure 17.15b -
Section 2 from Mazar et. al. (2020 v. 3: Chapter 17)
Figure 17.15b
Section 2 (Squares F/14–15, looking west)
Mazar et. al. (2020 v.3) - Figure 17.16a -
Section 3 from Mazar et. al. (2020 v. 3: Chapter 17)
Figure 17.16a
Section 3 (Squares F/13–16, looking east)
Mazar et. al. (2020 v.3) - Figure 17.16b -
Section 3 from Mazar et. al. (2020 v. 3: Chapter 17)
Figure 17.16b
Section 3 (Squares F/13–16, looking east)
Mazar et. al. (2020 v.3) - Figure 17.17 -
Section 4 from Mazar et. al. (2020 v. 3: Chapter 17)
Figure 17.17
Section 4 (Squares D–E/15, looking north)
Mazar et. al. (2020 v.3) - Figure 17.18a -
Section 5 from Mazar et. al. (2020 v. 3: Chapter 17)
Figure 17.18a
Section 5 (Squares D–F/15, looking south)
Mazar et. al. (2020 v.3) - Figure 17.18b -
Section 5 from Mazar et. al. (2020 v. 3: Chapter 17)
Figure 17.18b
Section 5 (Squares D–F/15, looking south)
Mazar et. al. (2020 v.3) - Figure 17.19 -
Section 6 from Mazar et. al. (2020 v. 3: Chapter 17)
Figure 17.19
Section 6 (Squares E–F/14, looking north)
Mazar et. al. (2020 v.3) - Figure 17.20 -
Section 7 from Mazar et. al. (2020 v. 3: Chapter 17)
Figure 17.20
Section 7 (Square E/13, looking north)
Mazar et. al. (2020 v.3) - Figure 17.21 -
Section 8 from Mazar et. al. (2020 v. 3: Chapter 17)
Figure 17.21
Section 8 (Squares E–F/13, looking south)
Mazar et. al. (2020 v.3) - Figure 17.22 -
Section 9 from Mazar et. al. (2020 v. 3: Chapter 17)
Figure 17.22
Section 9 (Squares E/20–21, looking west)
Mazar et. al. (2020 v.3)
- Schematic plans: Figs. 17.1, 17.4
- Detailed plans: Figs. 17.3, 17.5–17.9
- Sections: Figs. 17.14–17.22;
- Pottery: Figs. 18.3–18.21
Five architectural units were defined:
- Building EA in Squares E–F/13–1 4, Strata E-1b and E-1a.
- Building ED in Squares D–E/15. This building preceded Building EB; only one room and parts of additional walls were excavated.
- Building EB in Squares C–D/13–16 and E/15, Stratum E-1a.
- Open area/courtyard in Squares E–F/14–16, D/16, E/17–18, Strata E-1b and E-1a.
- Building EC in Squares C/13–16, Stratum E-1a.
In the following discussion, the stratigraphic development and architectural features of both Strata E-1a and E-1b in each architectural unit are described according to the order of the main units defined above.
- Table 17.1 -
Locus and basket numbers from Mazar et. al. (2020 v. 3: Chapter 17)
Table 17.1
Locus and basket numbers
Mazar et. al. (2020 v.3) - Table 17.2 -
Correlation of the Iron Age stratigraphic sequence in Areas C, D, E, and F from Mazar et. al. (2020 v. 3: Chapter 17)
Table 17.2
Correlation of the Iron Age stratigraphic sequence in Areas C, D, E, and F
Mazar et. al. (2020 v.3) - Figure 17.3 -
Plan of Stratum E-1b in Squares D–F/13–16 from Mazar et. al. (2020 v. 3: Chapter 17)
Figure 17.3
Plan of Stratum E-1b in Squares D–F/13–16
Mazar et. al. (2020 v.3) - Figure 17.4 -
Schematic plan of Stratum E-1a, marked with location of sub-plans from Mazar et. al. (2020 v. 3: Chapter 17)
Figure 17.4
Schematic plan of Stratum E-1a, marked with location of sub-plans
Mazar et. al. (2020 v.3) - Figure 17.5 -
General plan of Stratum E-1a from Mazar et. al. (2020 v. 3: Chapter 17)
Figure 17.5
General plan of Stratum E-1a
Mazar et. al. (2020 v.3) - Figure 17.6 -
Stratum E-1a in Squares D–F/13–15 from Mazar et. al. (2020 v. 3: Chapter 17)
Figure 17.6
Stratum E-1a in Squares D–F/13–15
Mazar et. al. (2020 v.3) - Photo 17.1 -
General view of Area E, end of 1997 season, looking east from Mazar et. al. (2020 v. 3: Chapter 17)
Photo 17.1
General view of Area E, end of 1997 season, looking east; Building EA and courtyard to its north
Mazar et. al. (2020 v.3) - Photo 17.2 -
General view of Area E, end of 2000 season, looking east from Mazar et. al. (2020 v. 3: Chapter 17)
Photo 17.2
General view of Area E, end of 2000 season, looking east; Buildings EA and EB and courtyard to their north; lower center: E-1b–2 Room 4653 of Building ED
Mazar et. al. (2020 v.3) - Photo 17.9 -
Building EA, general view, end of 1998 season, looking east from Mazar et. al. (2020 v. 3: Chapter 17)
Photo 17.9
Building EA, general view, end of 1998 season, looking east
Mazar et. al. (2020 v.3) - Photo 17.10 -
Building EA, Square F/14, looking south from Mazar et. al. (2020 v. 3: Chapter 17)
Photo 17.10
Building EA, Square F/14, looking south (1998)
Mazar et. al. (2020 v.3) - Photo 17.11 -
Building EA, Square F/14, looking south from Mazar et. al. (2020 v. 3: Chapter 17)
Photo 17.11
Building EA, Square F/14, looking south; bottom left: E-1a Wall 1688; center: E-1b Wall 1687; right: E-1b-1a Wall 1669 (1998)
Mazar et. al. (2020 v.3) - Photo 17.12 -
Building EA, Square F/14, looking north from Mazar et. al. (2020 v. 3: Chapter 17)
Photo 17.12
Building EA, Square F/14, looking north; lower left: Walls 1661 and 1619; right center: Room 1704 of E-1b and Wall 1687; left: E-1a Floor 1670 and Installation 1668 (1998)
Mazar et. al. (2020 v.3) - Photo 17.13 -
Building EA, Square F/14, looking west; E-1a Floor 1677 with pottery in destruction debris from Mazar et. al. (2020 v. 3: Chapter 17)
Photo 17.13
Building EA, Square F/14, looking west; E-1a Floor 1677 with pottery in destruction debris (1997)
Mazar et. al. (2020 v.3) - Photo 17.14 -
Building EA, detail of Room 1701 and compartments 1666 and 1700 from Mazar et. al. (2020 v. 3: Chapter 17)
Photo 17.14
Building EA, detail of Room 1701 and compartments 1666 and 1700, looking southwest (1997)
Mazar et. al. (2020 v.3) - Photo 17.15 -
Building EA, detail of compartments 1666 and 1700 and double wall 1618/1612 from Mazar et. al. (2020 v. 3: Chapter 17)
Photo 17.15
Building EA, detail of compartments 1666 and 1700 and double wall 1618/1612, looking north (1997)
Mazar et. al. (2020 v.3) - Photo 17.16 -
Building EA, Square E/13, looking east, E-1b Room 2651 from Mazar et. al. (2020 v. 3: Chapter 17)
Photo 17.16
Building EA, Square E/13, looking east, E-1b Room 2651 (1998)
Mazar et. al. (2020 v.3) - Photo 17.17 -
Building EA, Square E/13, looking east; right: E-1a–b Wall 1629 from Mazar et. al. (2020 v. 3: Chapter 17)
Photo 17.17
Building EA, Square E/13, looking east; right: E-1a–b Wall 1629 (1998)
Mazar et. al. (2020 v.3) - Photo 17.18 -
Building EA, Square E/13, looking southeast from Mazar et. al. (2020 v. 3: Chapter 17)
Photo 17.18
Building EA, Square E/13, looking southeast; E-1b Room 1699, Platform 2657 below floating level of Wall 1672 (1998)
Mazar et. al. (2020 v.3) - Photo 17.19 -
Squares E/13–14, Building EA, looking south from Mazar et. al. (2020 v. 3: Chapter 17)
Photo 17.19
Squares E/13–14, Building EA, looking south; E-1b Floors 1699 and 2651 (1998)
Mazar et. al. (2020 v.3) - Photo 17.20 -
Room 4653, Square D/15 from Mazar et. al. (2020 v. 3: Chapter 17)
Photo 17.20
Room 4653, Square D/15, looking west; left: Wall 4650; center: Wall 4658, disturbed by a later trench (2000)
Mazar et. al. (2020 v.3)
- Plans: Figs. 17.3–17.6
- Photos 17.1–17.2, 17.9–17.20
- Pottery: Figs. 18.3–18.5
- Table 17.1 -
Locus and basket numbers from Mazar et. al. (2020 v. 3: Chapter 17)
Table 17.1
Locus and basket numbers
Mazar et. al. (2020 v.3) - Table 17.2 -
Correlation of the Iron Age stratigraphic sequence in Areas C, D, E, and F from Mazar et. al. (2020 v. 3: Chapter 17)
Table 17.2
Correlation of the Iron Age stratigraphic sequence in Areas C, D, E, and F
Mazar et. al. (2020 v.3) - Figure 17.2b -
Plan of Stratum E-2 from Mazar et. al. (2020 v. 3: Chapter 17)
Figure 17.2b
Plan of Stratum E-2
Mazar et. al. (2020 v.3) - Figure 17.3 -
Plan of Stratum E-1b in Squares D–F/13–16 from Mazar et. al. (2020 v. 3: Chapter 17)
Figure 17.3
Plan of Stratum E-1b in Squares D–F/13–16
Mazar et. al. (2020 v.3) - Photo 17.2 -
General view of Area E, end of 2000 season, looking east from Mazar et. al. (2020 v. 3: Chapter 17)
Photo 17.2
General view of Area E, end of 2000 season, looking east; Buildings EA and EB and courtyard to their north; lower center: E-1b–2 Room 4653 of Building ED
Mazar et. al. (2020 v.3) - Photo 17.20 -
Room 4653, Square D/15 from Mazar et. al. (2020 v. 3: Chapter 17)
Photo 17.20
Room 4653, Square D/15, looking west; left: Wall 4650; center: Wall 4658, disturbed by a later trench (2000)
Mazar et. al. (2020 v.3) - Photo 17.22 -
General view of Stratum E-1a Buildings EB and EC from Mazar et. al. (2020 v. 3: Chapter 17)
Photo 17.22
General view of Stratum E-1a Buildings EB and EC, looking east, after dismantling Platform 2654 and Room 2629 (2001)
Mazar et. al. (2020 v.3) - Photo 17.59 -
Buildings EB and EC from Mazar et. al. (2020 v. 3: Chapter 17)
Photo 17.59
Right: Building EC, looking south; left: Building EB; lower left: E-1b–2 Room 4653 (2001)
Mazar et. al. (2020 v.3)
- Plans: Figs. 17.2b – 17.3
- Photos 17.2, 17.20, 17.22, 17.59
- Table 17.1 -
Locus and basket numbers from Mazar et. al. (2020 v. 3: Chapter 17)
Table 17.1
Locus and basket numbers
Mazar et. al. (2020 v.3) - Table 17.2 -
Correlation of the Iron Age stratigraphic sequence in Areas C, D, E, and F from Mazar et. al. (2020 v. 3: Chapter 17)
Table 17.2
Correlation of the Iron Age stratigraphic sequence in Areas C, D, E, and F
Mazar et. al. (2020 v.3) - Figure 17.5 -
General plan of Stratum E-1a from Mazar et. al. (2020 v. 3: Chapter 17)
Figure 17.5
General plan of Stratum E-1a
Mazar et. al. (2020 v.3) - Figure 17.7 -
Squares C–E/13–16 in Stratum E-1a from Mazar et. al. (2020 v. 3: Chapter 17)
Figure 17.7
Squares C–E/13–16 in Stratum E-1a
Mazar et. al. (2020 v.3) - Photo 17.2 -
General view of Area E, end of 2000 season, looking east from Mazar et. al. (2020 v. 3: Chapter 17)
Photo 17.2
General view of Area E, end of 2000 season, looking east; Buildings EA and EB and courtyard to their north; lower center: E-1b–2 Room 4653 of Building ED
Mazar et. al. (2020 v.3) - Photo 17.3 -
General view of Area E, end of 2001 season, looking south from Mazar et. al. (2020 v. 3: Chapter 17)
Photo 17.3
General view of Area E, end of 2001 season, looking south; right: Building EC; center: Buildings EB and ED, left: courtyard and Building EA
Mazar et. al. (2020 v.3) - Photo 17.22 -
General view of Stratum E-1a Buildings EB and EC from Mazar et. al. (2020 v. 3: Chapter 17)
Photo 17.22
General view of Stratum E-1a Buildings EB and EC, looking east, after dismantling Platform 2654 and Room 2629 (2001)
Mazar et. al. (2020 v.3) - Photo 17.23a -
Destruction debris in Locus 5621 in the western part of Space 2641 in Building EB from Mazar et. al. (2020 v. 3: Chapter 17)
Photo 17.23a
Building EB, western part of Space 2641, looking north, destruction debris with pottery in Locus 5621 (2001)
Mazar et. al. (2020 v.3) - Photo 17.23b -
Detail of cooking amphora in Locus 4630 from Mazar et. al. (2020 v. 3: Chapter 17)
Photo 17.23b
detail of cooking amphora (Fig. 18.10:4), Locus 4630 (2001)
Mazar et. al. (2020 v.3) - Photo 17.24 -
Building EB, Floor 4654 from Mazar et. al. (2020 v. 3: Chapter 17)
Photo 17.24
Building EB, Floor 4654 (Square D/14), looking north, before dismantling balks (2000)
Mazar et. al. (2020 v.3) - Photo 17.25 -
Building EB, Floor 4654 from Mazar et. al. (2020 v. 3: Chapter 17)
Photo 17.25
Building EB, Floor 4654, looking west (2000)
Mazar et. al. (2020 v.3) - Photo 17.26 -
E-1a Building EB, Room 2629 from Mazar et. al. (2020 v. 3: Chapter 17)
Photo 17.26
E-1a Building EB, Room 2629, looking east (1998)
Mazar et. al. (2020 v.3) - Photo 17.27 -
E-1a Building EB, Room 2629 from Mazar et. al. (2020 v. 3: Chapter 17)
Photo 17.27
E-1a Building EB, Room 2629, looking north; note two stones attached to Walls 2632 and 2634 (1998)
Mazar et. al. (2020 v.3) - Photo 17.28 -
E-1a Building EB, Room 2629, destruction debris and fallen roof material from Mazar et. al. (2020 v. 3: Chapter 17)
Photo 17.28
E-1a Building EB, Room 2629, destruction debris and fallen roof material (1998)
Mazar et. al. (2020 v.3) - Photo 17.29 -
E-1a Building EB, Room 4616 from Mazar et. al. (2020 v. 3: Chapter 17)
Photo 17.29
E-1a Building EB, Room 4616, looking east (2001)
Mazar et. al. (2020 v.3) - Photo 17.30 -
Destruction debris in eastern part of E-1a Building EB, Room 4616 from Mazar et. al. (2020 v. 3: Chapter 17)
Photo 17.30
E-1a Building EB, Room 4616, destruction debris in eastern part, looking east (2000)
Mazar et. al. (2020 v.3) - Photo 17.31 -
Grinding stone leaning on wall 5609 in E-1a Building EB from Mazar et. al. (2020 v. 3: Chapter 17)
Photo 17.31
E-1a Building EB, lower grinding stone leaning on Wall 5609 in front of entrance to southern room, looking south (2001)
Mazar et. al. (2020 v.3) - Photo 17.32 -
Destruction debris in southeastern corner of E-1a Building EB from Mazar et. al. (2020 v. 3: Chapter 17)
Photo 17.32
Building EB, Stratum E-1a, Room 4616; destruction debris in southeastern corner; note plaster on Wall 4614 (2000)
Mazar et. al. (2020 v.3) - Photo 17.33 -
Seal impressions on plaster of Room 4616 in E-1a Building EB from Mazar et. al. (2020 v. 3: Chapter 17)
Photo 17.33
E-1a Building EB, Room 4616, seal impressions on plaster (2000)
Mazar et. al. (2020 v.3) - Photo 17.34 -
E-1a Building EB, Platform 2654, looking south; below platform: E-1b Walls 4634 and 4623 from Mazar et. al. (2020 v. 3: Chapter 17)
Photo 17.34
E-1a Building EB, Platform 2654, looking south; below platform: E-1b Walls 4634 and 4623 (1998)
Mazar et. al. (2020 v.3) - Photo 17.35 -
Brick platform (2654) and stone platform with standing stones (1624) from Mazar et. al. (2020 v. 3: Chapter 17)
Photo 17.35
Brick platform (2654) and stone platform with standing stones (1624), looking east; note posthole (2000)
Mazar et. al. (2020 v.3) - Photo 17.36 -
Detail of stone platform (1624) and standing stones, on top of brick platform (2654) from Mazar et. al. (2020 v. 3: Chapter 17)
Photo 17.36
Detail of stone platform (1624) and standing stones, on top of brick platform (2654), looking south (1998)
Mazar et. al. (2020 v.3) - Photo 17.37 -
Section below Platform 2654 from Mazar et. al. (2020 v. 3: Chapter 17)
Photo 17.37
Section below Platform 2654, looking west (1999)
Mazar et. al. (2020 v.3)
- Plans: Figs. 17.5, 17.7,
- Photos 17.2–17.3, 17.22–17.37
- Pottery: Figs. 18.6–18.14
- Table 17.1 -
Locus and basket numbers from Mazar et. al. (2020 v. 3: Chapter 17)
Table 17.1
Locus and basket numbers
Mazar et. al. (2020 v.3) - Table 17.2 -
Correlation of the Iron Age stratigraphic sequence in Areas C, D, E, and F from Mazar et. al. (2020 v. 3: Chapter 17)
Table 17.2
Correlation of the Iron Age stratigraphic sequence in Areas C, D, E, and F
Mazar et. al. (2020 v.3) - Figure 17.3 -
Plan of Stratum E-1b in Squares D–F/13–16 from Mazar et. al. (2020 v. 3: Chapter 17)
Figure 17.3
Plan of Stratum E-1b in Squares D–F/13–16
Mazar et. al. (2020 v.3) - Figure 17.4 -
Schematic plan of Stratum E-1a, marked with location of sub-plans from Mazar et. al. (2020 v. 3: Chapter 17)
Figure 17.4
Schematic plan of Stratum E-1a, marked with location of sub-plans
Mazar et. al. (2020 v.3) - Figure 17.5 -
General plan of Stratum E-1a from Mazar et. al. (2020 v. 3: Chapter 17)
Figure 17.5
General plan of Stratum E-1a
Mazar et. al. (2020 v.3) - Figure 17.6 -
Stratum E-1a in Squares D–F/13–15 from Mazar et. al. (2020 v. 3: Chapter 17)
Figure 17.6
Stratum E-1a in Squares D–F/13–15
Mazar et. al. (2020 v.3) - Figure 17.7 -
Squares C–E/13–16 in Stratum E-1a from Mazar et. al. (2020 v. 3: Chapter 17)
Figure 17.7
Squares C–E/13–16 in Stratum E-1a
Mazar et. al. (2020 v.3) - Figure 17.8 -
Detailed plan and elevations of Platform 2654 and standing stones from Mazar et. al. (2020 v. 3: Chapter 17)
Figure 17.8
Detailed plan and elevations of Platform 2654 and standing stones
Mazar et. al. (2020 v.3) - Figure 17.9 -
Stratum E-1a in Squares E/15–16 and Stratum E-1a–b (or just E-1b) in Squares E/17–18 and G/16 from Mazar et. al. (2020 v. 3: Chapter 17)
Figure 17.9
Stratum E-1a in Squares E/15–16 and Stratum E-1a–b (or just E-1b) in Squares E/17–18 and G/16
Mazar et. al. (2020 v.3) - Figure 17.15a -
Section 2 from Mazar et. al. (2020 v. 3: Chapter 17)
Figure 17.15a
Section 2 (Squares F/14–15, looking west)
Mazar et. al. (2020 v.3) - Figure 17.15b -
Section 2 from Mazar et. al. (2020 v. 3: Chapter 17)
Figure 17.15b
Section 2 (Squares F/14–15, looking west)
Mazar et. al. (2020 v.3) - Figure 17.16a -
Section 3 from Mazar et. al. (2020 v. 3: Chapter 17)
Figure 17.16a
Section 3 (Squares F/13–16, looking east)
Mazar et. al. (2020 v.3) - Figure 17.16b -
Section 3 from Mazar et. al. (2020 v. 3: Chapter 17)
Figure 17.16b
Section 3 (Squares F/13–16, looking east)
Mazar et. al. (2020 v.3) - Figure 17.18a -
Section 5 from Mazar et. al. (2020 v. 3: Chapter 17)
Figure 17.18a
Section 5 (Squares D–F/15, looking south)
Mazar et. al. (2020 v.3) - Figure 17.18b -
Section 5 from Mazar et. al. (2020 v. 3: Chapter 17)
Figure 17.18b
Section 5 (Squares D–F/15, looking south)
Mazar et. al. (2020 v.3) - Photo 17.2 -
General view of Area E, end of 2000 season, looking east from Mazar et. al. (2020 v. 3: Chapter 17)
Photo 17.2
General view of Area E, end of 2000 season, looking east; Buildings EA and EB and courtyard to their north; lower center: E-1b–2 Room 4653 of Building ED
Mazar et. al. (2020 v.3) - Photo 17.5 -
South section of probe in Square F/15, with E-1b–2 layers from Mazar et. al. (2020 v. 3: Chapter 17)
Photo 17.5
South section of probe in Square F/15, with E-1b–2 layers (1998)
Mazar et. al. (2020 v.3) - Photo 17.9 -
Building EA, general view, end of 1998 season, looking east from Mazar et. al. (2020 v. 3: Chapter 17)
Photo 17.9
Building EA, general view, end of 1998 season, looking east
Mazar et. al. (2020 v.3) - Photo 17.38 -
Probe in Squares E/17–18 from Mazar et. al. (2020 v. 3: Chapter 17)
Photo 17.38
Probe in Squares E/17–18, looking south (2000)
Mazar et. al. (2020 v.3) - Photo 17.39 -
Probe in Square E/18 from Mazar et. al. (2020 v. 3: Chapter 17)
Photo 17.39
Probe in Square E/18, looking east (2000)
Mazar et. al. (2020 v.3) - Photo 17.40 -
Probe in Square E/18 from Mazar et. al. (2020 v. 3: Chapter 17)
Photo 17.40
Probe in Square E/18, looking west (2000)
Mazar et. al. (2020 v.3) - Photo 17.41 -
Oven 4608, Square E/17 from Mazar et. al. (2020 v. 3: Chapter 17)
Photo 17.41
Oven 4608, Square E/17, looking east (2000)
Mazar et. al. (2020 v.3) - Photo 17.42 -
Courtyard in Squares D–F/15–16 from Mazar et. al. (2020 v. 3: Chapter 17)
Photo 17.42
Courtyard in Squares D–F/15–16, looking south; Platform 2654 partly exposed (1998)
Mazar et. al. (2020 v.3) - Photo 17.43 -
E-1b Floor 2618 with pits in 4665 from Mazar et. al. (2020 v. 3: Chapter 17)
Photo 17.43
Probe in Square E/16, looking north; E-1b Floor 2618 with pits in 4665 in the north (2000)
Mazar et. al. (2020 v.3) - Photo 17.44 -
Buildings EB and EA from Mazar et. al. (2020 v. 3: Chapter 17)
Photo 17.44
Squares D–F/13–15, looking east; bottom: eastern part of Building EB; center: floors of the courtyard; upper right: Building EA (1998)
Mazar et. al. (2020 v.3) - Photo 17.45 -
Square E/15 from Mazar et. al. (2020 v. 3: Chapter 17)
Photo 17.45
Square E/15, looking south; upper left: E-1b circular bins on Floor 1647; upper right: Platform 2654 (2000)
Mazar et. al. (2020 v.3) - Photo 17.46 -
Square E/15 from Mazar et. al. (2020 v. 3: Chapter 17)
Photo 17.46
Square E/15, detail of circular bins, looking east (2000) (2000)
Mazar et. al. (2020 v.3) - Photo 17.47 -
Square E/15 detail from Mazar et. al. (2020 v. 3: Chapter 17)
Photo 17.47
Square E/15, detail of Bin 1671 (2000) (2000)
Mazar et. al. (2020 v.3) - Photo 17.48 -
Square E/15 detail from Mazar et. al. (2020 v. 3: Chapter 17)
Photo 17.48
Square E/15, detail of clay floor and walls of Bin 1685 (2000)
Mazar et. al. (2020 v.3) - Photo 17.49 -
Square E/15 with debris from Mazar et. al. (2020 v. 3: Chapter 17)
Photo 17.49
Square E/15, looking west; left: E-1b Floor 1647; right: E-1a debris 1611with stone 1623 and Oven 1614 (1997)
Mazar et. al. (2020 v.3) - Photo 17.50 -
Detail of stone 1623 from Mazar et. al. (2020 v. 3: Chapter 17)
Photo 17.50
Detail of stone 1623 (1997)
Mazar et. al. (2020 v.3) - Photo 17.51 -
Square E/15, foundation stones under stone 1623 from Mazar et. al. (2020 v. 3: Chapter 17)
Photo 17.51
Square E/15, foundation stones under stone 1623, looking west (1997)
Mazar et. al. (2020 v.3) - Photo 17.52 -
Squares E–F/15–16 from Mazar et. al. (2020 v. 3: Chapter 17)
Photo 17.52
Squares E–F/15–16, looking north; right: Benches 1674 and 1673; center: courtyard (1998)
Mazar et. al. (2020 v.3) - Photo 17.53 -
Square F/15 from Mazar et. al. (2020 v. 3: Chapter 17)
Photo 17.53
Square F/15, looking north; Benches 1674 and 1673; Floor 1659 (E-1a) in back (1998)
Mazar et. al. (2020 v.3)
- Plans: Figs. 17.3–17.9
- Photos 17.2, 17.38–17.53
- Pottery: Figs. 18.17–18.19
- Table 17.1 -
Locus and basket numbers from Mazar et. al. (2020 v. 3: Chapter 17)
Table 17.1
Locus and basket numbers
Mazar et. al. (2020 v.3) - Table 17.2 -
Correlation of the Iron Age stratigraphic sequence in Areas C, D, E, and F from Mazar et. al. (2020 v. 3: Chapter 17)
Table 17.2
Correlation of the Iron Age stratigraphic sequence in Areas C, D, E, and F
Mazar et. al. (2020 v.3) - Figure 17.5 -
General plan of Stratum E-1a from Mazar et. al. (2020 v. 3: Chapter 17)
Figure 17.5
General plan of Stratum E-1a
Mazar et. al. (2020 v.3) - Figure 17.7 -
Squares C–E/13–16 in Stratum E-1a from Mazar et. al. (2020 v. 3: Chapter 17)
Figure 17.7
Squares C–E/13–16 in Stratum E-1a
Mazar et. al. (2020 v.3) - Photo 17.55 -
Squares C–D/15–16, Building EC (right) from Mazar et. al. (2020 v. 3: Chapter 17)
Photo 17.55
Squares C–D/15–16, Building EC (right), looking south (2001)
Mazar et. al. (2020 v.3) - Photo 17.56 -
E-1a Building EC, circular installations in Room 5637 from Mazar et. al. (2020 v. 3: Chapter 17)
Photo 17.56
E-1a Building EC, circular installations in Room 5637, looking north; post-E-1a Bin 5611 in center (2001)
Mazar et. al. (2020 v.3) - Photo 17.57 -
E-1a Building EC, Room 5637, detail of Bin 5630 from Mazar et. al. (2020 v. 3: Chapter 17)
Photo 17.57
E-1a Building EC, Room 5637, detail of Bin 5630 (2001)
Mazar et. al. (2020 v.3) - Photo 17.58 -
Building EC, Room 5637, detail of Oven 5632 from Mazar et. al. (2020 v. 3: Chapter 17)
Photo 17.58
Building EC, Room 5637, detail of Oven 5632 (2001)
Mazar et. al. (2020 v.3) - Photo 17.59 -
Buildings EB and EC from Mazar et. al. (2020 v. 3: Chapter 17)
Photo 17.59
Right: Building EC, looking south; left: Building EB; lower left: E-1b–2 Room 4653 (2001)
Mazar et. al. (2020 v.3)
- Plans: Figs. 17.5, 17.7
- Photos 17.55–17.59
- Pottery: Figs. 18.15–18.16
- Figure 17.18a -
Section 5 from Mazar et. al. (2020 v. 3: Chapter 17)
Figure 17.18a
Section 5 (Squares D–F/15, looking south)
Mazar et. al. (2020 v.3)
- Figure 17.10 -
Plan of Post-E-1a phase in Square C/16 from Mazar et. al. (2020 v. 3: Chapter 17)
Figure 17.10
Plan of Post-E-1a phase in Square C/16
Mazar et. al. (2020 v.3)
- Table 17.1 -
Locus and basket numbers from Mazar et. al. (2020 v. 3: Chapter 17)
Table 17.1
Locus and basket numbers
Mazar et. al. (2020 v.3) - Table 17.2 -
Correlation of the Iron Age stratigraphic sequence in Areas C, D, E, and F from Mazar et. al. (2020 v. 3: Chapter 17)
Table 17.2
Correlation of the Iron Age stratigraphic sequence in Areas C, D, E, and F
Mazar et. al. (2020 v.3) - Figure 17.11 -
Plan of probe in Squares E/20, E/1 from Mazar et. al. (2020 v. 3: Chapter 17)
Figure 17.11
Plan of probe in Squares E/20, E/1
Mazar et. al. (2020 v.3) - Photo 17.60 -
Probe in Squares E/20, E/1 from Mazar et. al. (2020 v. 3: Chapter 17)
Photo 17.60
Probe in Squares E/20, E/1, looking east (2001)
Mazar et. al. (2020 v.3) - Photo 17.61 -
Probe in Square E/1 with Oven 5903 and large stone from Mazar et. al. (2020 v. 3: Chapter 17)
Photo 17.61
Probe in Square E/1 with Oven 5903 and large stone, looking east (2001)
Mazar et. al. (2020 v.3)
- Schematic plans: Fig. 17.11
- Photos 17.60–17.61
The probe was located on the upper part of the northern slope of the mound, whose top was at level 72.30 m in the southwestern corner of Square E/20 and descended to 70.77 m in the northeastern corner of Square E/1, 10 m to the north. The loose topsoil contained Iron IIA and Early Islamic pottery sherds. A layer of yellowish-white brick debris (5902) was uncovered, although no individual bricks were discernible. In the southern end of Square E/20, the probe revealed that the brick debris continued to a depth of 0.85 m, until level 71.42 m, which may correspond with Stratum E-1b in the northern part of Area E.
In Square E/1, fragmentary remains of an oven (5903) were found on top of this debris layer at level 71.05 m (Photo 17.61), although no floor could be discerned. The walls of this oven were only partly preserved to a height of 0.03–0.06 m; the interior diameter was ca. 0.65 m. A few Iron IIA pottery sherds were found inside the oven, which appears to post-date the brick debris layer and thus, may signify a post E-1a activity, like Oven 5611 in Building EC, although it could be that the brick debris layer marked the top of Stratum E-1b and the oven was constructed in Stratum E-1a; this was impossible to determine due to the limited excavation.
An exceptionally large stone, 0.57×0.87×1.6 m, was found protruding from the floor in the northeastern corner of the probe, where the slope of the mound began (Photo 17.61). A probe dug along the faces of this stone indicated that it was isolated and not part of a wall line, although it seemed to be deliberately positioned on a foundation of five small stones (0.2–0.3 m in length) underneath it. The top of these smaller stones was at level 70.40 m. Since stones are generally lacking in the architecture of the Iron IIA city at Tel Rehov, this large stone may have had a special significance that eludes us. This may be compared to several large stones found in Area F, just south of Area E (Chapter 19).
- Table 17.1 -
Locus and basket numbers from Mazar et. al. (2020 v. 3: Chapter 17)
Table 17.1
Locus and basket numbers
Mazar et. al. (2020 v.3) - Table 17.2 -
Correlation of the Iron Age stratigraphic sequence in Areas C, D, E, and F from Mazar et. al. (2020 v. 3: Chapter 17)
Table 17.2
Correlation of the Iron Age stratigraphic sequence in Areas C, D, E, and F
Mazar et. al. (2020 v.3) - Figure 17.1 -
Schematic plan of Areas E and F; Iron IIA Stratum F-1 in black from Mazar et. al. (2020 v. 3: Chapter 17)
Figure 17.1
Schematic plan of Areas E and F; Iron IIA Stratum F-1 in black
Mazar et. al. (2020 v.3) - Figure 17.2a -
Plan of Stratum E-3 (Square E/15) from Mazar et. al. (2020 v. 3: Chapter 17)
Figure 17.2a
Plan of Stratum E-3 (Square E/15)
Mazar et. al. (2020 v.3) - Figure 17.2b -
Plan of Stratum E-2 from Mazar et. al. (2020 v. 3: Chapter 17)
Figure 17.2b
Plan of Stratum E-2
Mazar et. al. (2020 v.3) - Figure 17.3 -
Plan of Stratum E-1b in Squares D–F/13–16 from Mazar et. al. (2020 v. 3: Chapter 17)
Figure 17.3
Plan of Stratum E-1b in Squares D–F/13–16
Mazar et. al. (2020 v.3) - Figure 17.4 -
Schematic plan of Stratum E-1a, marked with location of sub-plans from Mazar et. al. (2020 v. 3: Chapter 17)
Figure 17.4
Schematic plan of Stratum E-1a, marked with location of sub-plans
Mazar et. al. (2020 v.3) - Figure 17.5 -
General plan of Stratum E-1a from Mazar et. al. (2020 v. 3: Chapter 17)
Figure 17.5
General plan of Stratum E-1a
Mazar et. al. (2020 v.3) - Figure 17.13 -
Location of section drawings marked on schematic plan of Stratum E-1a from Mazar et. al. (2020 v. 3: Chapter 17)
Figure 17.13
Location of section drawings marked on schematic plan of Stratum E-1a
Mazar et. al. (2020 v.3)
The open space, Building EB, and perhaps Building EA, can be interpreted as belonging to a sanctuary or high place (the biblical bamah) that served the neighborhood. The platform and standing stones, that can be interpreted as masseboth, were the focal point of this sanctuary in Stratum E-1a. In the spacious courtyard to the north and east of this platform, ovens and the circular bins were perhaps used in relation to feasting. Although they were attributed to late Stratum E-1b, they possibly continued to be in use in Stratum E-1a. The flat stone in front of the platform can be explained as an offering table and the pottery altar could have been used for burning offerings, including incense or small animals, such as pigeons. The rectangular area with benches in Squares F–E/14–15 could have been used for public feasting.
It could not be securely determined whether the area served as a sanctuary in Stratum E-1b, as it did in Stratum E-1a. Yet, the architectural continuity in the courtyard and surrounding buildings alludes to a similar function in both phases. Alterations in Stratum E-1a were needed due to the rise of floor levels in the courtyard. This may explain the need to rebuild Building ED of Stratum E-1b (of which only one room was exposed) as Building EB in Stratum E-1a. The continuity between these two buildings was demonstrated in the similar plan and location of Rooms 4653 (E-1b) and 2629 (E-1a). The platform and standing stones, which were the focal point of cult in Stratum E-1a, were preceded by an earlier structure defined by Walls 4624 and 4623, yet its nature could not be clarified. Building EA in the southeastern part of the area appears to have been founded in Stratum E-1b and continued to be in use in E-1a, with only minor modifications.
This is a rare example of an Iron Age II openair sanctuary. The concept of a small cult place which served a local neighborhood is known from approximately the same time at Lachish (Stratum V Cult Room 49), Megiddo (Stratum VA–IVB Building 2081) and perhaps at Ta'anach (Dever 1983; Holladay 1987: 249–299; Zevit 2001: 213– 266). Yet, all three differ from our sanctuary in many aspects; they are either an independent cult room (Lachish),1 a cult room in a large building (Megiddo), or a cult corner in a dwelling (Ta'anach). None of these sites have standing stones (masseboth) and a platform (bamah). Platforms and standing stones are known from several Iron Age public cult places, such as at Bethsaida (Zevit 2001: 149–152) and the 9th century BCE temple at Khirbet 'Atarus ('Atarot) in Moab (Ji 2012).2 Standing stones of a similar rough shape and small size as ours are known from the city gate area at Dan (Biran 1994: 244, Photos 203–204; Zevit 2001: 191–196). Our sanctuary, if correctly identified, is the most complete example in Israel of an open-air sanctuary with a platform, standing stones, a spacious courtyard with cooking and food-preparation facilities, and auxiliary rooms. The cultic paraphernalia included a pottery altar, an offering table, and artifacts such as clay figurines. Other special objects included the impressed plaster and the painted Phoenician-style storage jar. The evidence of metal and flint-scraper production in the center of the open courtyard (although attributed to Stratum E-1b) is striking, since the combination of industry with a cult place is known in other cases as well, such as the copper industry at Timna' (Rothenberg 1988: 276–278) and at Kition in Cyprus (Karageorghis 1985: 253), the olive oil industry at Tel Miqne-Ekron (Gitin 2003), and the apiary in Area C at Tel Rehov (Chapters 12, 14A). The large quantity of animal bones found in the open area in front and east of the platform may be taken as evidence for sacrifices and sacred meals (marzeah) that took place in this sanctuary (see Chapter 49; cf., Greer 2013).
- Table 17.1
Locus and basket numbers from Mazar et. al. (2020 v. 3: Chapter 17)
Table 17.1
Locus and basket numbers
Mazar et. al. (2020 v.3) - Table 17.2
Correlation of the Iron Age stratigraphic sequence in Areas C, D, E, and F from Mazar et. al. (2020 v. 3: Chapter 17)
Table 17.2
Correlation of the Iron Age stratigraphic sequence in Areas C, D, E, and F
Mazar et. al. (2020 v.3) - Figure 17.1
Schematic plan of Areas E and F; Iron IIA Stratum F-1 in black from Mazar et. al. (2020 v. 3: Chapter 17)
Figure 17.1
Schematic plan of Areas E and F; Iron IIA Stratum F-1 in black
Mazar et. al. (2020 v.3) - Figure 17.2a
Plan of Stratum E-3 (Square E/15) from Mazar et. al. (2020 v. 3: Chapter 17)
Figure 17.2a
Plan of Stratum E-3 (Square E/15)
Mazar et. al. (2020 v.3) - Figure 17.2b
Plan of Stratum E-2 from Mazar et. al. (2020 v. 3: Chapter 17)
Figure 17.2b
Plan of Stratum E-2
Mazar et. al. (2020 v.3) - Figure 17.3
Plan of Stratum E-1b in Squares D–F/13–16 from Mazar et. al. (2020 v. 3: Chapter 17)
Figure 17.3
Plan of Stratum E-1b in Squares D–F/13–16
Mazar et. al. (2020 v.3) - Figure 17.4
Schematic plan of Stratum E-1a, marked with location of sub-plans from Mazar et. al. (2020 v. 3: Chapter 17)
Figure 17.4
Schematic plan of Stratum E-1a, marked with location of sub-plans
Mazar et. al. (2020 v.3) - Figure 17.5
General plan of Stratum E-1a from Mazar et. al. (2020 v. 3: Chapter 17)
Figure 17.5
General plan of Stratum E-1a
Mazar et. al. (2020 v.3) - Figure 17.6
Stratum E-1a in Squares D–F/13–15 from Mazar et. al. (2020 v. 3: Chapter 17)
Figure 17.6
Stratum E-1a in Squares D–F/13–15
Mazar et. al. (2020 v.3) - Figure 17.7
Squares C–E/13–16 in Stratum E-1a from Mazar et. al. (2020 v. 3: Chapter 17)
Figure 17.7
Squares C–E/13–16 in Stratum E-1a
Mazar et. al. (2020 v.3) - Figure 17.8
Detailed plan and elevations of Platform 2654 and standing stones from Mazar et. al. (2020 v. 3: Chapter 17)
Figure 17.8
Detailed plan and elevations of Platform 2654 and standing stones
Mazar et. al. (2020 v.3) - Figure 17.9
Stratum E-1a in Squares E/15–16 and Stratum E-1a–b (or just E-1b) in Squares E/17–18 and G/16 from Mazar et. al. (2020 v. 3: Chapter 17)
Figure 17.9
Stratum E-1a in Squares E/15–16 and Stratum E-1a–b (or just E-1b) in Squares E/17–18 and G/16
Mazar et. al. (2020 v.3) - Figure 17.10
Plan of Post-E-1a phase in Square C/16 from Mazar et. al. (2020 v. 3: Chapter 17)
Figure 17.10
Plan of Post-E-1a phase in Square C/16
Mazar et. al. (2020 v.3) - Figure 17.11
Plan of probe in Squares E/20, E/1 from Mazar et. al. (2020 v. 3: Chapter 17)
Figure 17.11
Plan of probe in Squares E/20, E/1
Mazar et. al. (2020 v.3) - Figure 17.12
Plan of Stratum E-0 and topsoil loci from Mazar et. al. (2020 v. 3: Chapter 17)
Figure 17.12
Plan of Stratum E-0 and topsoil loci
Mazar et. al. (2020 v.3) - Figure 17.13
Location of section drawings marked on schematic plan of Stratum E-1a from Mazar et. al. (2020 v. 3: Chapter 17)
Figure 17.13
Location of section drawings marked on schematic plan of Stratum E-1a
Mazar et. al. (2020 v.3) - Figure 17.14a
Section 1 from Mazar et. al. (2020 v. 3: Chapter 17)
Figure 17.14a
Section 1 (Squares E/13–15, looking west)
Mazar et. al. (2020 v.3) - Figure 17.14b
Section 1 from Mazar et. al. (2020 v. 3: Chapter 17)
Figure 17.14b
Section 1 (Squares E/13–15, looking west)
Mazar et. al. (2020 v.3) - Figure 17.15a
Section 2 from Mazar et. al. (2020 v. 3: Chapter 17)
Figure 17.15a
Section 2 (Squares F/14–15, looking west)
Mazar et. al. (2020 v.3) - Figure 17.15b
Section 2 from Mazar et. al. (2020 v. 3: Chapter 17)
Figure 17.15b
Section 2 (Squares F/14–15, looking west)
Mazar et. al. (2020 v.3) - Figure 17.16a
Section 3 from Mazar et. al. (2020 v. 3: Chapter 17)
Figure 17.16a
Section 3 (Squares F/13–16, looking east)
Mazar et. al. (2020 v.3) - Figure 17.16b
Section 3 from Mazar et. al. (2020 v. 3: Chapter 17)
Figure 17.16b
Section 3 (Squares F/13–16, looking east)
Mazar et. al. (2020 v.3) - Figure 17.17
Section 4 from Mazar et. al. (2020 v. 3: Chapter 17)
Figure 17.17
Section 4 (Squares D–E/15, looking north)
Mazar et. al. (2020 v.3) - Figure 17.18a
Section 5 from Mazar et. al. (2020 v. 3: Chapter 17)
Figure 17.18a
Section 5 (Squares D–F/15, looking south)
Mazar et. al. (2020 v.3) - Figure 17.18b
Section 5 from Mazar et. al. (2020 v. 3: Chapter 17)
Figure 17.18b
Section 5 (Squares D–F/15, looking south)
Mazar et. al. (2020 v.3) - Figure 17.19
Section 6 from Mazar et. al. (2020 v. 3: Chapter 17)
Figure 17.19
Section 6 (Squares E–F/14, looking north)
Mazar et. al. (2020 v.3) - Figure 17.20
Section 7 from Mazar et. al. (2020 v. 3: Chapter 17)
Figure 17.20
Section 7 (Square E/13, looking north)
Mazar et. al. (2020 v.3) - Figure 17.21
Section 8 from Mazar et. al. (2020 v. 3: Chapter 17)
Figure 17.21
Section 8 (Squares E–F/13, looking south)
Mazar et. al. (2020 v.3) - Figure 17.22
Section 9 from Mazar et. al. (2020 v. 3: Chapter 17)
Figure 17.22
Section 9 (Squares E/20–21, looking west)
Mazar et. al. (2020 v.3)
- Photo 17.1
General view of Area E, end of 1997 season, looking east from Mazar et. al. (2020 v. 3: Chapter 17)
Photo 17.1
General view of Area E, end of 1997 season, looking east; Building EA and courtyard to its north
Mazar et. al. (2020 v.3) - Photo 17.2
General view of Area E, end of 2000 season, looking east from Mazar et. al. (2020 v. 3: Chapter 17)
Photo 17.2
General view of Area E, end of 2000 season, looking east; Buildings EA and EB and courtyard to their north; lower center: E-1b–2 Room 4653 of Building ED
Mazar et. al. (2020 v.3) - Photo 17.3
General view of Area E, end of 2001 season, looking south from Mazar et. al. (2020 v. 3: Chapter 17)
Photo 17.3
General view of Area E, end of 2001 season, looking south; right: Building EC; center: Buildings EB and ED, left: courtyard and Building EA
Mazar et. al. (2020 v.3) - Photo 17.4
Squares D–E/15, excavated to level of Strata E-2–E-1b from Mazar et. al. (2020 v. 3: Chapter 17)
Photo 17.4
Squares D–E/15, excavated to level of Strata E-2–E-1b; left: E-2 Floor 4661; center: E-1a Platform 2654; right: Room 4653 of E-1b-2 Building ED (2001)
Mazar et. al. (2020 v.3) - Photo 17.5
South section of probe in Square F/15, with E-1b–2 layers from Mazar et. al. (2020 v. 3: Chapter 17)
Photo 17.5
South section of probe in Square F/15, with E-1b–2 layers (1998)
Mazar et. al. (2020 v.3) - Photo 17.6
Probe in Square F/15, looking north; E-2 Floor 2662 from Mazar et. al. (2020 v. 3: Chapter 17)
Photo 17.6
Probe in Square F/15, looking north; E-2 Floor 2662 (1998)
Mazar et. al. (2020 v.3) - Photo 17.7
Southeastern corner of Square E/14 from Mazar et. al. (2020 v. 3: Chapter 17)
Photo 17.7
Southeastern corner of Square E/14, looking east; E-2 Oven 4662 and E-1b Wall 1657 (left) (2000)
Mazar et. al. (2020 v.3) - Photo 17.8
Building EA, general view, end of 1997 season, looking north from Mazar et. al. (2020 v. 3: Chapter 17)
Photo 17.8
Building EA, general view, end of 1997 season, looking north
Mazar et. al. (2020 v.3) - Photo 17.9
Building EA, general view, end of 1998 season, looking east from Mazar et. al. (2020 v. 3: Chapter 17)
Photo 17.9
Building EA, general view, end of 1998 season, looking east
Mazar et. al. (2020 v.3) - Photo 17.10
Building EA, Square F/14, looking south from Mazar et. al. (2020 v. 3: Chapter 17)
Photo 17.10
Building EA, Square F/14, looking south (1998)
Mazar et. al. (2020 v.3) - Photo 17.11
Building EA, Square F/14, looking south from Mazar et. al. (2020 v. 3: Chapter 17)
Photo 17.11
Building EA, Square F/14, looking south; bottom left: E-1a Wall 1688; center: E-1b Wall 1687; right: E-1b-1a Wall 1669 (1998)
Mazar et. al. (2020 v.3) - Photo 17.12
Building EA, Square F/14, looking north from Mazar et. al. (2020 v. 3: Chapter 17)
Photo 17.12
Building EA, Square F/14, looking north; lower left: Walls 1661 and 1619; right center: Room 1704 of E-1b and Wall 1687; left: E-1a Floor 1670 and Installation 1668 (1998)
Mazar et. al. (2020 v.3) - Photo 17.13
Building EA, Square F/14, looking west; E-1a Floor 1677 with pottery in destruction debris from Mazar et. al. (2020 v. 3: Chapter 17)
Photo 17.13
Building EA, Square F/14, looking west; E-1a Floor 1677 with pottery in destruction debris (1997)
Mazar et. al. (2020 v.3) - Photo 17.14
Building EA, detail of Room 1701 and compartments 1666 and 1700 from Mazar et. al. (2020 v. 3: Chapter 17)
Photo 17.14
Building EA, detail of Room 1701 and compartments 1666 and 1700, looking southwest (1997)
Mazar et. al. (2020 v.3) - Photo 17.15
Building EA, detail of compartments 1666 and 1700 and double wall 1618/1612 from Mazar et. al. (2020 v. 3: Chapter 17)
Photo 17.15
Building EA, detail of compartments 1666 and 1700 and double wall 1618/1612, looking north (1997)
Mazar et. al. (2020 v.3) - Photo 17.16
Building EA, Square E/13, looking east, E-1b Room 2651 from Mazar et. al. (2020 v. 3: Chapter 17)
Photo 17.16
Building EA, Square E/13, looking east, E-1b Room 2651 (1998)
Mazar et. al. (2020 v.3) - Photo 17.17
Building EA, Square E/13, looking east; right: E-1a–b Wall 1629 from Mazar et. al. (2020 v. 3: Chapter 17)
Photo 17.17
Building EA, Square E/13, looking east; right: E-1a–b Wall 1629 (1998)
Mazar et. al. (2020 v.3) - Photo 17.18
Building EA, Square E/13, looking southeast from Mazar et. al. (2020 v. 3: Chapter 17)
Photo 17.18
Building EA, Square E/13, looking southeast; E-1b Room 1699, Platform 2657 below floating level of Wall 1672 (1998)
Mazar et. al. (2020 v.3) - Photo 17.19
Squares E/13–14, Building EA, looking south from Mazar et. al. (2020 v. 3: Chapter 17)
Photo 17.19
Squares E/13–14, Building EA, looking south; E-1b Floors 1699 and 2651 (1998)
Mazar et. al. (2020 v.3) - Photo 17.20
Room 4653, Square D/15 from Mazar et. al. (2020 v. 3: Chapter 17)
Photo 17.20
Room 4653, Square D/15, looking west; left: Wall 4650; center: Wall 4658, disturbed by a later trench (2000)
Mazar et. al. (2020 v.3) - Photo 17.21
Squares D–E/15, section through E-1a Platform 2654 with brick collapse below platform from Mazar et. al. (2020 v. 3: Chapter 17)
Photo 17.21
Squares D–E/15, section through E-1a Platform 2654, looking south; above meter scale: single brick course of platform and stone platform above; brick collapse/fill 5623 below platform (2001)
Mazar et. al. (2020 v.3) - Photo 17.22
General view of Stratum E-1a Buildings EB and EC from Mazar et. al. (2020 v. 3: Chapter 17)
Photo 17.22
General view of Stratum E-1a Buildings EB and EC, looking east, after dismantling Platform 2654 and Room 2629 (2001)
Mazar et. al. (2020 v.3) - Photo 17.23a
Destruction debris in Locus 5621 in the western part of Space 2641 in Building EB from Mazar et. al. (2020 v. 3: Chapter 17)
Photo 17.23a
Building EB, western part of Space 2641, looking north, destruction debris with pottery in Locus 5621 (2001)
Mazar et. al. (2020 v.3) - Photo 17.23b
Detail of cooking amphora in Locus 4630 from Mazar et. al. (2020 v. 3: Chapter 17)
Photo 17.23b
detail of cooking amphora (Fig. 18.10:4), Locus 4630 (2001)
Mazar et. al. (2020 v.3) - Photo 17.24
Building EB, Floor 4654 from Mazar et. al. (2020 v. 3: Chapter 17)
Photo 17.24
Building EB, Floor 4654 (Square D/14), looking north, before dismantling balks (2000)
Mazar et. al. (2020 v.3) - Photo 17.25
Building EB, Floor 4654 from Mazar et. al. (2020 v. 3: Chapter 17)
Photo 17.25
Building EB, Floor 4654, looking west (2000)
Mazar et. al. (2020 v.3) - Photo 17.26
E-1a Building EB, Room 2629 from Mazar et. al. (2020 v. 3: Chapter 17)
Photo 17.26
E-1a Building EB, Room 2629, looking east (1998)
Mazar et. al. (2020 v.3) - Photo 17.27
E-1a Building EB, Room 2629 from Mazar et. al. (2020 v. 3: Chapter 17)
Photo 17.27
E-1a Building EB, Room 2629, looking north; note two stones attached to Walls 2632 and 2634 (1998)
Mazar et. al. (2020 v.3) - Photo 17.28
E-1a Building EB, Room 2629, destruction debris and fallen roof material from Mazar et. al. (2020 v. 3: Chapter 17)
Photo 17.28
E-1a Building EB, Room 2629, destruction debris and fallen roof material (1998)
Mazar et. al. (2020 v.3) - Photo 17.29
E-1a Building EB, Room 4616 from Mazar et. al. (2020 v. 3: Chapter 17)
Photo 17.29
E-1a Building EB, Room 4616, looking east (2001)
Mazar et. al. (2020 v.3) - Photo 17.30
Destruction debris in eastern part of E-1a Building EB, Room 4616 from Mazar et. al. (2020 v. 3: Chapter 17)
Photo 17.30
E-1a Building EB, Room 4616, destruction debris in eastern part, looking east (2000)
Mazar et. al. (2020 v.3) - Photo 17.31
Grinding stone leaning on wall 5609 in E-1a Building EB from Mazar et. al. (2020 v. 3: Chapter 17)
Photo 17.31
E-1a Building EB, lower grinding stone leaning on Wall 5609 in front of entrance to southern room, looking south (2001)
Mazar et. al. (2020 v.3) - Photo 17.32
Destruction debris in southeastern corner of E-1a Building EB from Mazar et. al. (2020 v. 3: Chapter 17)
Photo 17.32
Building EB, Stratum E-1a, Room 4616; destruction debris in southeastern corner; note plaster on Wall 4614 (2000)
Mazar et. al. (2020 v.3) - Photo 17.33
Seal impressions on plaster of Room 4616 in E-1a Building EB from Mazar et. al. (2020 v. 3: Chapter 17)
Photo 17.33
E-1a Building EB, Room 4616, seal impressions on plaster (2000)
Mazar et. al. (2020 v.3) - Photo 17.34
E-1a Building EB, Platform 2654, looking south; below platform: E-1b Walls 4634 and 4623 from Mazar et. al. (2020 v. 3: Chapter 17)
Photo 17.34
E-1a Building EB, Platform 2654, looking south; below platform: E-1b Walls 4634 and 4623 (1998)
Mazar et. al. (2020 v.3) - Photo 17.35
Brick platform (2654) and stone platform with standing stones (1624) from Mazar et. al. (2020 v. 3: Chapter 17)
Photo 17.35
Brick platform (2654) and stone platform with standing stones (1624), looking east; note posthole (2000)
Mazar et. al. (2020 v.3) - Photo 17.36
Detail of stone platform (1624) and standing stones, on top of brick platform (2654) from Mazar et. al. (2020 v. 3: Chapter 17)
Photo 17.36
Detail of stone platform (1624) and standing stones, on top of brick platform (2654), looking south (1998)
Mazar et. al. (2020 v.3) - Photo 17.37
Section below Platform 2654 from Mazar et. al. (2020 v. 3: Chapter 17)
Photo 17.37
Section below Platform 2654, looking west (1999)
Mazar et. al. (2020 v.3) - Photo 17.38
Probe in Squares E/17–18 from Mazar et. al. (2020 v. 3: Chapter 17)
Photo 17.38
Probe in Squares E/17–18, looking south (2000)
Mazar et. al. (2020 v.3) - Photo 17.39
Probe in Square E/18 from Mazar et. al. (2020 v. 3: Chapter 17)
Photo 17.39
Probe in Square E/18, looking east (2000)
Mazar et. al. (2020 v.3) - Photo 17.40
Probe in Square E/18 from Mazar et. al. (2020 v. 3: Chapter 17)
Photo 17.40
Probe in Square E/18, looking west (2000)
Mazar et. al. (2020 v.3) - Photo 17.41
Oven 4608, Square E/17 from Mazar et. al. (2020 v. 3: Chapter 17)
Photo 17.41
Oven 4608, Square E/17, looking east (2000)
Mazar et. al. (2020 v.3) - Photo 17.42
Courtyard in Squares D–F/15–16 from Mazar et. al. (2020 v. 3: Chapter 17)
Photo 17.42
Courtyard in Squares D–F/15–16, looking south; Platform 2654 partly exposed (1998)
Mazar et. al. (2020 v.3) - Photo 17.43
E-1b Floor 2618 with pits in 4665 from Mazar et. al. (2020 v. 3: Chapter 17)
Photo 17.43
Probe in Square E/16, looking north; E-1b Floor 2618 with pits in 4665 in the north (2000)
Mazar et. al. (2020 v.3) - Photo 17.44
Buildings EB and EA from Mazar et. al. (2020 v. 3: Chapter 17)
Photo 17.44
Squares D–F/13–15, looking east; bottom: eastern part of Building EB; center: floors of the courtyard; upper right: Building EA (1998)
Mazar et. al. (2020 v.3) - Photo 17.45
Square E/15 from Mazar et. al. (2020 v. 3: Chapter 17)
Photo 17.45
Square E/15, looking south; upper left: E-1b circular bins on Floor 1647; upper right: Platform 2654 (2000)
Mazar et. al. (2020 v.3) - Photo 17.46
Square E/15 from Mazar et. al. (2020 v. 3: Chapter 17)
Photo 17.46
Square E/15, detail of circular bins, looking east (2000) (2000)
Mazar et. al. (2020 v.3) - Photo 17.47
Square E/15 detail from Mazar et. al. (2020 v. 3: Chapter 17)
Photo 17.47
Square E/15, detail of Bin 1671 (2000) (2000)
Mazar et. al. (2020 v.3) - Photo 17.48
Square E/15 detail from Mazar et. al. (2020 v. 3: Chapter 17)
Photo 17.48
Square E/15, detail of clay floor and walls of Bin 1685 (2000)
Mazar et. al. (2020 v.3) - Photo 17.49
Square E/15 with debris from Mazar et. al. (2020 v. 3: Chapter 17)
Photo 17.49
Square E/15, looking west; left: E-1b Floor 1647; right: E-1a debris 1611with stone 1623 and Oven 1614 (1997)
Mazar et. al. (2020 v.3) - Photo 17.50
Detail of stone 1623 from Mazar et. al. (2020 v. 3: Chapter 17)
Photo 17.50
Detail of stone 1623 (1997)
Mazar et. al. (2020 v.3) - Photo 17.51
Square E/15, foundation stones under stone 1623 from Mazar et. al. (2020 v. 3: Chapter 17)
Photo 17.51
Square E/15, foundation stones under stone 1623, looking west (1997)
Mazar et. al. (2020 v.3) - Photo 17.52
Squares E–F/15–16 from Mazar et. al. (2020 v. 3: Chapter 17)
Photo 17.52
Squares E–F/15–16, looking north; right: Benches 1674 and 1673; center: courtyard (1998)
Mazar et. al. (2020 v.3) - Photo 17.53
Square F/15 from Mazar et. al. (2020 v. 3: Chapter 17)
Photo 17.53
Square F/15, looking north; Benches 1674 and 1673; Floor 1659 (E-1a) in back (1998)
Mazar et. al. (2020 v.3) - Photo 17.54
Square E/14 from Mazar et. al. (2020 v. 3: Chapter 17)
Photo 17.54
Square E/14, looking east; bottom: Floor 1653; center right: entrance to Building EA (2001)
Mazar et. al. (2020 v.3) - Photo 17.55
Squares C–D/15–16, Building EC (right) from Mazar et. al. (2020 v. 3: Chapter 17)
Photo 17.55
Squares C–D/15–16, Building EC (right), looking south (2001)
Mazar et. al. (2020 v.3) - Photo 17.56
E-1a Building EC, circular installations in Room 5637 from Mazar et. al. (2020 v. 3: Chapter 17)
Photo 17.56
E-1a Building EC, circular installations in Room 5637, looking north; post-E-1a Bin 5611 in center (2001)
Mazar et. al. (2020 v.3) - Photo 17.57
E-1a Building EC, Room 5637, detail of Bin 5630 from Mazar et. al. (2020 v. 3: Chapter 17)
Photo 17.57
E-1a Building EC, Room 5637, detail of Bin 5630 (2001)
Mazar et. al. (2020 v.3) - Photo 17.58
Building EC, Room 5637, detail of Oven 5632 from Mazar et. al. (2020 v. 3: Chapter 17)
Photo 17.58
Building EC, Room 5637, detail of Oven 5632 (2001)
Mazar et. al. (2020 v.3) - Photo 17.59
Buildings EB and EC from Mazar et. al. (2020 v. 3: Chapter 17)
Photo 17.59
Right: Building EC, looking south; left: Building EB; lower left: E-1b–2 Room 4653 (2001)
Mazar et. al. (2020 v.3) - Photo 17.60
Probe in Squares E/20, E/1 from Mazar et. al. (2020 v. 3: Chapter 17)
Photo 17.60
Probe in Squares E/20, E/1, looking east (2001)
Mazar et. al. (2020 v.3) - Photo 17.61
Probe in Square E/1 with Oven 5903 and large stone from Mazar et. al. (2020 v. 3: Chapter 17)
Photo 17.61
Probe in Square E/1 with Oven 5903 and large stone, looking east (2001)
Mazar et. al. (2020 v.3)
- Table 20.1
Correlation of strata – Areas G and C from Mazar et. al. (2020 v. 3: Chapter 20)
Table 20.1
Correlation of strata – Areas G and C
Mazar et. al. (2020 v.3) - Table 20.2
Locus and basket numbers of Area G from Mazar et. al. (2020 v. 3: Chapter 20)
Table 20.2
Locus and basket numbers [of Area G]
Mazar et. al. (2020 v.3) - Figure 20.1
Plan of Stratum G-2b from Mazar et. al. (2020 v. 3: Chapter 20)
Figure 20.1
Plan of Stratum G-2b
Mazar et. al. (2020 v.3) - Figure 20.2a
Plan of Stratum G-2a from Mazar et. al. (2020 v. 3: Chapter 20)
Figure 20.2a
Plan of Stratum G-2a
Mazar et. al. (2020 v.3) - Figure 20.2b
Plan of Stratum G-2a' from Mazar et. al. (2020 v. 3: Chapter 20)
Figure 20.2a
Plan of Stratum G-2a'
Mazar et. al. (2020 v.3) - Figure 20.3
Plan of wooden beams in the foundations of Stratum G-1 walls from Mazar et. al. (2020 v. 3: Chapter 20)
Figure 20.3
Plan of wooden beams in the foundations of Stratum G-1 walls
Mazar et. al. (2020 v.3) - Figure 20.4
Plan of Stratum G-1b from Mazar et. al. (2020 v. 3: Chapter 20)
Figure 20.4
Plan of Stratum G-1b
Mazar et. al. (2020 v.3) - Figure 20.5
Plan of Stratum G-1a from Mazar et. al. (2020 v. 3: Chapter 20)
Figure 20.5
Plan of Stratum G-1a
Mazar et. al. (2020 v.3)
- Table 20.1 -
Correlation of strata – Areas G and C from Mazar et. al. (2020 v. 3: Chapter 20)
Table 20.1
Correlation of strata – Areas G and C
Mazar et. al. (2020 v.3) - Table 20.2 -
Locus and basket numbers of Area G from Mazar et. al. (2020 v. 3: Chapter 20)
Table 20.2
Locus and basket numbers [of Area G]
Mazar et. al. (2020 v.3) - Figure 20.17 -
Section 10 from Mazar et. al. (2020 v. 3: Chapter 20)
Figure 20.17
Section 10 (Square Q/3, section below Wall 5018, looking north)
Mazar et. al. (2020 v.3) - Photo 20.1 -
Area G at the end of 2000 season, looking west from Mazar et. al. (2020 v. 3: Chapter 20)
Photo 20.1
Area G at the end of 2000 season, looking west
Mazar et. al. (2020 v.3)
Area G was located at the western edge of the lower mound, near the foot of the upper mound. The area occupies a small hillock, bordered on the north and the south by small ravines which presently serve as approach roads to the tell. The goals of excavating this area were:
- to examine the prominent small hill in that area in order to determine architectural or other features that caused this element, such as a city gate
- to examine the stratigraphic sequence and nature of settlement in this part of the tell.
The supervisors were Adi-Ziv Esudri (2000) and Naama Yahalom-Mack (2001, 2007).
The excavation in Area G uncovered an Iron Age IIA domestic area with two major strata, each divided into two sub-phases. Table 20.1 shows the stratigraphic correlation to Area C and to the general strata numbers in Tel Rehov. Table 20.2 specifies the locus and basket numbers given in the three seasons.
The large architectural units revealed in Stratum G-2 were part of larger buildings of unknown plans. An open courtyard in the eastern and northern parts of the area included many installations and storage pits; the walls were preserved to a height of up to 1.0 m and in Square Q/3, up to 2.0 m. The buildings of Stratum G-2 were abandoned in a similar way as those of Stratum VI in Areas B and C and the floors were found almost empty of finds. One possibility is that the buildings suffered from an earthquake; possible evidence for this can be seen in the severe tilt eastwards of Wall 5063 in Square Q/3 (Fig. 20.17). In Stratum G-1b, new buildings were constructed, which continued to be in use in Stratum G-1a with slight changes. Here too, only parts of buildings were excavated and no complete plan of a single building is known. In all strata, brick walls without stone foundations were the common building practice; only one wall attributed to Stratum G-1b (5040) had a stone foundation. Extensive use of wooden beams was made in the foundations of Stratum G-1b walls and floors, similar to the situation in Areas B and C. Stratum G-1a (Stratum IV) ended in violent destruction, evidenced in particular in Building GG in Squares P–Q/3.
- Table 20.1 -
Correlation of strata – Areas G and C from Mazar et. al. (2020 v. 3: Chapter 20)
Table 20.1
Correlation of strata – Areas G and C
Mazar et. al. (2020 v.3) - Figure 20.1 -
Plan of Stratum G-2b from Mazar et. al. (2020 v. 3: Chapter 20)
Figure 20.1
Plan of Stratum G-2b
Mazar et. al. (2020 v.3) - Figure 20.2a -
Plan of Stratum G-2a from Mazar et. al. (2020 v. 3: Chapter 20)
Figure 20.2a
Plan of Stratum G-2a
Mazar et. al. (2020 v.3) - Figure 20.2b -
Plan of Stratum G-2a' from Mazar et. al. (2020 v. 3: Chapter 20)
Figure 20.2a
Plan of Stratum G-2a'
Mazar et. al. (2020 v.3)
- Plans: Figs. 20.1–20.2
- Table 20.1 -
Correlation of strata – Areas G and C from Mazar et. al. (2020 v. 3: Chapter 20)
Table 20.1
Correlation of strata – Areas G and C
Mazar et. al. (2020 v.3) - Figure 20.1 -
Plan of Stratum G-2b from Mazar et. al. (2020 v. 3: Chapter 20)
Figure 20.1
Plan of Stratum G-2b
Mazar et. al. (2020 v.3) - Figure 20.2a -
Plan of Stratum G-2a from Mazar et. al. (2020 v. 3: Chapter 20)
Figure 20.2a
Plan of Stratum G-2a
Mazar et. al. (2020 v.3) - Figure 20.2b -
Plan of Stratum G-2a' from Mazar et. al. (2020 v. 3: Chapter 20)
Figure 20.2a
Plan of Stratum G-2a'
Mazar et. al. (2020 v.3) - Photo 20.1 -
Area G at the end of 2000 season, looking west from Mazar et. al. (2020 v. 3: Chapter 20)
Photo 20.1
Area G at the end of 2000 season, looking west
Mazar et. al. (2020 v.3) - Photo 20.2 -
Area G at the end of 2007 season, looking northwest from Mazar et. al. (2020 v. 3: Chapter 20)
Photo 20.2
Area G at the end of 2007 season, looking northwest
Mazar et. al. (2020 v.3) - Photo 20.3 -
Squares P–Q/4–5, looking north from Mazar et. al. (2020 v. 3: Chapter 20)
Photo 20.3
Squares P–Q/4–5, looking north.
- Left: Stratum G2a Building GB
- center left:Room 8045
-
upper left:
- Room 4039
- balk between Squares P–Q/5 and P–Q/4 in center
- bottom left: Wall 4070 of Stratum G-1
(2007)
Mazar et. al. (2020 v.3) - Photo 20.4 -
Collapsed mudbricks on left corner in G-2b Building GA from Mazar et. al. (2020 v. 3: Chapter 20)
Photo 20.4
Square P/5, looking north. Wall 5044 of G-2b Building GA
- to its left: Locus 8052 with loomweights
- right: Wall 5061 of G-2a Building GB (bird nest holes in section)
(2007)
JW: Collapsed mudbricks in left corner of room
Mazar et. al. (2020 v.3)
Floor 8052 and the various debris layers above it are attributed to Phase G-2b. It seems that Building GA went out of use in Phase G-2a, since an upper floor (4039, level 86.20 m) covered Wall 5044 and possibly also Wall 5061, although this could not be securely determined.
- Table 20.1 -
Correlation of strata – Areas G and C from Mazar et. al. (2020 v. 3: Chapter 20)
Table 20.1
Correlation of strata – Areas G and C
Mazar et. al. (2020 v.3) - Figure 20.1 -
Plan of Stratum G-2b from Mazar et. al. (2020 v. 3: Chapter 20)
Figure 20.1
Plan of Stratum G-2b
Mazar et. al. (2020 v.3) - Figure 20.2a -
Plan of Stratum G-2a from Mazar et. al. (2020 v. 3: Chapter 20)
Figure 20.2a
Plan of Stratum G-2a
Mazar et. al. (2020 v.3) - Figure 20.2b -
Plan of Stratum G-2a' from Mazar et. al. (2020 v. 3: Chapter 20)
Figure 20.2a
Plan of Stratum G-2a'
Mazar et. al. (2020 v.3)
- Table 20.1 -
Correlation of strata – Areas G and C from Mazar et. al. (2020 v. 3: Chapter 20)
Table 20.1
Correlation of strata – Areas G and C
Mazar et. al. (2020 v.3) - Figure 20.1 -
Plan of Stratum G-2b from Mazar et. al. (2020 v. 3: Chapter 20)
Figure 20.1
Plan of Stratum G-2b
Mazar et. al. (2020 v.3) - Figure 20.2a -
Plan of Stratum G-2a from Mazar et. al. (2020 v. 3: Chapter 20)
Figure 20.2a
Plan of Stratum G-2a
Mazar et. al. (2020 v.3) - Figure 20.2b -
Plan of Stratum G-2a' from Mazar et. al. (2020 v. 3: Chapter 20)
Figure 20.2a
Plan of Stratum G-2a'
Mazar et. al. (2020 v.3) - Photo 20.3 -
Squares P–Q/4–5, looking north from Mazar et. al. (2020 v. 3: Chapter 20)
Photo 20.3
Squares P–Q/4–5, looking north.
- Left: Stratum G2a Building GB
- center left:Room 8045
-
upper left:
- Room 4039
- balk between Squares P–Q/5 and P–Q/4 in center
- bottom left: Wall 4070 of Stratum G-1
(2007)
Mazar et. al. (2020 v.3) - Photo 20.8 -
G-2 Building GB from Mazar et. al. (2020 v. 3: Chapter 20)
Photo 20.8
Squares P–Q/4–5 looking west. G-2 Building GB with circular installations
(2007)
Mazar et. al. (2020 v.3) - Photo 20.10 -
G-2b and G-2a circular bins from Mazar et. al. (2020 v. 3: Chapter 20)
Photo 20.10
Square Q/4, detail of G-2b and G-2a circular bins
(2007)
Mazar et. al. (2020 v.3) - Photo 20.25 -
Square P/4 from Mazar et. al. (2020 v. 3: Chapter 20)
Photo 20.25
Square P/4, looking south at wooden beams 4071. Wall 5012 and projection to north; meter stick on G2a Locus 8023
(2000)
Mazar et. al. (2020 v.3)
In Square P/5, just east of Wall 5061, the top of a large completely preserved oven (8063) was exposed at 84.90 m, surrounded by a layer of black ash and brick debris (8062) excavated until level 84.84 m; the bottom of the oven and the related floor were not reached Above the accumulation in 8062 was a layer of brick debris (8036), sealed by a Phase G-2a floor (8035). In Square P/4, a floor (8054) was detected at level 85.50 m in the area enclosed by G-2a Walls 8055 and 8056. This was a reddish-brown clay floor with pottery and bones found on it. A layer of brick debris and chunks of collapsed bricks (8028) above this floor separated it from a higher floor (8023) attributed to Stratum G2a (Photo 20.25).
In the southern part of Square Q/4 was a beaten-earth floor (8041) which tilted drastically from east to west (85.34–85.74 m). Near the center of this area was a unique installation (8048) built of plastered bricks with a rounded hollow (Photos 20.3, 20.8). In the east, the floor had been disturbed and so it is not possible to determine whether or not it initially abutted Wall 8030. The attribution of this floor to either G-2b or G-2a, or to both, remains enigmatic. In the northern part of Square Q/4, a series of floors was found between levels 85.71– 86.27 m. The upper three were attributed to Phase G-2a (see below), while the lowest (8044 at level 85.71 m) was tentatively attributed to G-2b, although the separation between these two phases was not certain. Floor 8044 was made of clay, which differed from the matrix of Floor 8041 to its south, although they are at the same height and no architectural feature separated them. A plastered circular bin (8047), 0.55 m in diameter and 0.37 m deep, was related to this floor (Photo 20.10). It was perhaps the earliest in a series of such installations, mostly attributed to Phase G-2a, described below.
- Table 20.1 -
Correlation of strata – Areas G and C from Mazar et. al. (2020 v. 3: Chapter 20)
Table 20.1
Correlation of strata – Areas G and C
Mazar et. al. (2020 v.3) - Figure 20.1 -
Plan of Stratum G-2b from Mazar et. al. (2020 v. 3: Chapter 20)
Figure 20.1
Plan of Stratum G-2b
Mazar et. al. (2020 v.3) - Figure 20.2a -
Plan of Stratum G-2a from Mazar et. al. (2020 v. 3: Chapter 20)
Figure 20.2a
Plan of Stratum G-2a
Mazar et. al. (2020 v.3) - Figure 20.2b -
Plan of Stratum G-2a' from Mazar et. al. (2020 v. 3: Chapter 20)
Figure 20.2a
Plan of Stratum G-2a'
Mazar et. al. (2020 v.3) - Figure 20.3 -
Plan of wooden beams in the foundations of Stratum G-1 walls from Mazar et. al. (2020 v. 3: Chapter 20)
Figure 20.3
Plan of wooden beams in the foundations of Stratum G-1 walls
Mazar et. al. (2020 v.3) - Photo 20.2 -
Area G at the end of 2007 season, looking northwest from Mazar et. al. (2020 v. 3: Chapter 20)
Photo 20.2
Area G at the end of 2007 season, looking northwest
Mazar et. al. (2020 v.3) - Photo 20.5 -
Tilted Wall from Mazar et. al. (2020 v. 3: Chapter 20)
Photo 20.5
Squares P–Q/4–5, looking east.
- Right: G-1 Wall 5012
- center: balk
- center, right of balk: G-2a Walls 8055 and 8056
- meter stick on G-2a Floor 8023
(2007)
JW: Tilted wall just up frame from Wall 5044 G-2
Mazar et. al. (2020 v.3) - Photo 20.6 -
G-2 Building GB from Mazar et. al. (2020 v. 3: Chapter 20)
Photo 20.6
Square P/4 looking south. G-2 Building GB
- Wall 5061 (right)
- Wall 8055 (center)
- G-1 Wall 5012 (top)
- meter stick on G-2a Floor 8023
(2007)
Mazar et. al. (2020 v.3) - Photo 20.7 -
Building GA, G-2 Building GB, and Building GC from Mazar et. al. (2020 v. 3: Chapter 20)
Photo 20.7
Squares P–Q/5-6, looking northwest.
- Center: Wall 5064 of G-2 Building GB
- far left: Building GA
- right: installations and floor in courtyard
- upper right: Building GC
(2007)
Mazar et. al. (2020 v.3) - Photo 20.8 -
G-2 Building GB from Mazar et. al. (2020 v. 3: Chapter 20)
Photo 20.8
Squares P–Q/4–5 looking west. G-2 Building GB with circular installations
(2007)
Mazar et. al. (2020 v.3) - Photo 20.9 -
Wall 5064 and G-2a courtyard from Mazar et. al. (2020 v. 3: Chapter 20)
Photo 20.9
Square Q/5, looking west. Top: Wall 5064 and G-2a courtyard with ovens and installations
Mazar et. al. (2020 v.3) - Photo 20.10 -
G-2b and G-2a circular bins from Mazar et. al. (2020 v. 3: Chapter 20)
Photo 20.10
Square Q/4, detail of G-2b and G-2a circular bins
(2007)
Mazar et. al. (2020 v.3) - Photo 20.16 -
Squares Q–P/3–4 from Mazar et. al. (2020 v. 3: Chapter 20)
Photo 20.16
Squares Q–P/3–4, looking west.
- Right: G-2a circular installations
- front left: G-2b Floor 8046 (deepest excavated point)
- front center: G-2 Building GD
(2007)
Mazar et. al. (2020 v.3)
Room 8035, bounded by Walls 5061, 8064, 5064 and 8055, had inner dimensions of 2.35×6.55 m (Photo 20.7). The floor (8035) was at level 85.60 m, at least 0.75 m (and perhaps more) above the assumed floor of G-2b in the same place.
In Square P/4, a corner of two short walls (8055 and 8056; Photos 20.5–20.6) created a small room with an entrance leading from Room 8035 to its north. A floor in this room (8023), located at level 85.64 m, was sealed by the brick platform (5069) of Stratum G-1b. Wooden beams (4071) found close to the top of the walls of this room at levels 85.82– 85.92 m (Fig. 20.3) were related to the construction of Stratum G-1b.
The area east of Wall 5064, bounded on the south by Wall 8039 in Squares P–Q/3 and on the east by Wall 8030 in Square Q/4, served as a spacious courtyard, ca. 4.0–4.5 m wide and up to 13 m long (if continuing until Wall 4029 in Square Q/6 on the north). In fact, in Square Q/6, this open area continued to the west, thus creating an L-shaped open space.
In Squares Q/4–5, several plastered surfaces were identified, alongside other floor types, with some 13 related installations that were not all used contemporaneously; note an additional one (8047) that was attributed to Phase G-2b (see above). The installations comprise mainly two types: plastered circular or oval bins and clay ovens (Table 20.3; Photos 20.2, 20.7–20.10, 20.16).
In Square Q/4, three superimposed plaster floors (8053 at level 85.76 m, 8024 at level 86.07 m and 8008 at level 86.27 m) were exposed above the earlier floor (8044) attributed to Phase G-2b. The floors were exposed mainly in the northern half of the square, with three related plastered bins (8060, 8051, 8059) and a single poorly preserved oven (8025). The plastered bins were exposed between 85.99 and 85.88 m, while the oven was exposed at level 86.19 m (Photos 20.8, 20.10). In the southern half of the square, only one floor was detected (8041), sloping from east to west; it was attributed to Stratum G-2b, yet probably continued to be in use in G-2a.
In Square Q-5, two superimposed plaster floors were exposed between levels 86.28 and 85.98 m. Related to these floors were four circular bins and two superimposed ovens (Table 20.3; Photos 20.7– 20.9). None of the floors clearly abutted the poorly preserved Wall 5064.
Small circular bins of the type found here (as well as in Squares P–Q/6; see below) were also found in Areas B (Chapter 8) and E (Chapter 17). Their capacity was ca. 10 liters or slightly more; thus, the seven bins found in these two squares may have been used for storing ca. 70–100 liters, perhaps of grain used for baking in the three ovens found nearby. However, it was difficult to attribute these installations to each of the several floor surfaces found here and thus, it remains unknown whether all of them served at the same time. At least in one instance, it seems that there was subphasing here, where Oven 4074 cut Oven 4084. In any case, this appears to have been an area used for intensive baking.
- Table 20.1 -
Correlation of strata – Areas G and C from Mazar et. al. (2020 v. 3: Chapter 20)
Table 20.1
Correlation of strata – Areas G and C
Mazar et. al. (2020 v.3) - Figure 20.1 -
Plan of Stratum G-2b from Mazar et. al. (2020 v. 3: Chapter 20)
Figure 20.1
Plan of Stratum G-2b
Mazar et. al. (2020 v.3) - Figure 20.2a -
Plan of Stratum G-2a from Mazar et. al. (2020 v. 3: Chapter 20)
Figure 20.2a
Plan of Stratum G-2a
Mazar et. al. (2020 v.3) - Figure 20.2b -
Plan of Stratum G-2a' from Mazar et. al. (2020 v. 3: Chapter 20)
Figure 20.2a
Plan of Stratum G-2a'
Mazar et. al. (2020 v.3) - Photo 20.12 -
G-2a courtyard, G-2 Building GC, and G-1 Building GF from Mazar et. al. (2020 v. 3: Chapter 20)
Photo 20.12
- Right: Squares P–Q/5–6, looking east.
- Lower left: G-2a courtyard with related circular bins in Square P/6
- background left: G-2 Building GC, Room 4050
- right: G-1 Building GF Walls 4014 and 4017
(2000)
Mazar et. al. (2020 v.3) - Photo 20.13 -
Stratum G-2a Square P/6 and Building GC from Mazar et. al. (2020 v. 3: Chapter 20)
Photo 20.13
Square P/6, looking down at floors and circular bins attributed to Stratum G-2a; lower left: Building GC
(2000)
Mazar et. al. (2020 v.3) - Photo 20.14 -
Stratum G-2a Floors 4016 and 5004 from Mazar et. al. (2020 v. 3: Chapter 20)
Photo 20.14
Square P/6, looking east at Floors 4016 and 5004 and circular bins attributed to Stratum G-2a
(2000)
Mazar et. al. (2020 v.3)
The lowest floor found here in Square P/6 was a clay floor (5050) at level 85.46 m. It was covered by a 0.15 m-deep accumulation containing sherds and bones (5036); the latter was covered by a brick debris layer (5043). These layers were all attributed to Stratum G-2b, since they were lower than Floors 5026 and 5004 and the installations of Phase G-2a.
In the eastern part of the square, a floor comprised of striations (5004 and 5026 to its north) was found above G-2b layer 5021, between levels 85.92–86.28 m; the top of this layer (4016) appeared to be a continuation of Floor 4022 in Square Q/6 (level 86.28 m). No floor could be identified in the western part of the square (4011, 4012).
In Square Q/6, excavation stopped at the level of the uppermost floor (4022) (level 86.30 m); the floor was exposed over most of the square, comprising patches of grayish-white plaster and beaten earth with pottery sherds mixed with small stones.
Eleven bins of various sizes were found in this area, four in Square Q/6 and seven in Square P/6 (Table 20.4, Photos 20.12–20.14). Most of these were exposed along one line in the central part of Square P/6, while the others were scattered along the southern part of Squares P–Q/6 and one was located in Building GC. The definition of these installations as bins is the most reasonable one, although they could have been used for other purposes as well, such as for some industrial activity that was conducted in the courtyard.
These plaster-lined installations were cut into the floor. They were oval to round, with a diameter of 0.45–0.70 m (except 4018, which was 1.2 in diameter) and a depth of 0.30–0.38 m, although the state of preservation does not allow an exact measurement. Thus, the average capacity of the smaller bins was ca. 33 liters (based on an average diameter of 0.55 m and depth of 0.35 m). All were lined with a very friable greyish-white plaster. The thickness of the walls was 0.02–0.04 m, aside from reinforcements which were added where two neighboring bins were close together. These installations contained grayish earth mixed with light-colored brick debris, as well as a few sherds, flint fragments and bones; no grain or organic materials were recovered.
Like in Squares Q/4–5, the bins marked several successive construction phases and thus, not all of them were in use at the same time. Three (4008, 4009, 5009) appear to be contemporary and earlier than the others (Photos 20.12–20.14). They were all exposed at approximately level 86.20 m; Bins 4008 and 4009 share a wall. Bin 4008 appears to cut into a very poorly preserved wall or built installation (5014, not on the plan), chipped along its southern face, of which only one course was preserved.
Bin 4010 abutted 4019 on the west and appears to be contemporary with it, while 4019 cut into 4009 and thus replaced it. Bin 4018 was the largest (diameter 1.2 m) and latest of all, as it cut into 4010; it was 0.96 m deep. Its walls were plastered and it contained crumbly grayish-brown earth mixed with pieces of brick, as well as many sherds, flint, bones, shells and some charcoal. In the eastern side of Square P/6, Bin 4032 (Fig. 20.8) was 0.9 m wide; it may have been contemporary with the large bin (4018).
At least two successive floors were located in Square P/6 (5004, 4016) above Floor 5050 of Phase G-2b. They were difficult to trace, but were identifiable by their related plastered installations. Contemporary Bins 5009, 4008 and 4009 apparently were related to the earliest floor. Installations 4019, 4010 and 4032 were possibly contemporary and related to a later floor. Bin 4018, which was larger than the others, apparently coexisted with the similar installation (4032) near the eastern balk of the square and was related to the latest floor.
The attribution of these installations and floors to Stratum G-2a was based on their levels compared to similar remains in Square Q/5. However, it should be noted that the building remains and installations in Squares P–Q/6 were exposed below topsoil, with no stratigraphic elements above them. Their attribution to Stratum G-2a means that Stratum G-1 was completely eroded away in Squares P–Q/6. Indeed, Wall 4014 of G-1a–b in Square P/5 was founded at its northern end at level 86.48 m, which was higher than the bins and Building GC. The continuation of Wall 4014 and other elements of G-1a in Squares P–Q/6 were eroded away and thus, Squares P–Q/6 are not shown on the plans of Stratum G-1a–b.
- Table 20.1 -
Correlation of strata – Areas G and C from Mazar et. al. (2020 v. 3: Chapter 20)
Table 20.1
Correlation of strata – Areas G and C
Mazar et. al. (2020 v.3) - Figure 20.1 -
Plan of Stratum G-2b from Mazar et. al. (2020 v. 3: Chapter 20)
Figure 20.1
Plan of Stratum G-2b
Mazar et. al. (2020 v.3) - Figure 20.2a -
Plan of Stratum G-2a from Mazar et. al. (2020 v. 3: Chapter 20)
Figure 20.2a
Plan of Stratum G-2a
Mazar et. al. (2020 v.3) - Figure 20.2b -
Plan of Stratum G-2a' from Mazar et. al. (2020 v. 3: Chapter 20)
Figure 20.2a
Plan of Stratum G-2a'
Mazar et. al. (2020 v.3) - Photo 20.1 -
Area G at the end of 2000 season, looking west from Mazar et. al. (2020 v. 3: Chapter 20)
Photo 20.1
Area G at the end of 2000 season, looking west
Mazar et. al. (2020 v.3) - Photo 20.13 -
Stratum G-2a Square P/6 and Building GC from Mazar et. al. (2020 v. 3: Chapter 20)
Photo 20.13
Square P/6, looking down at floors and circular bins attributed to Stratum G-2a; lower left: Building GC
(2000)
Mazar et. al. (2020 v.3) - Photo 20.15 -
Building GC from Mazar et. al. (2020 v. 3: Chapter 20)
Photo 20.15
Square Q/6, looking east at Building GC
(2000)
Mazar et. al. (2020 v.3)
Like the open space and installations to the west and south in Squares P–Q/6, Building GC was exposed immediately below topsoil, with no later stratigraphic features, and its attribution to Stratum G-2 was based on its relation to the open space to its south.
- Table 20.1 -
Correlation of strata – Areas G and C from Mazar et. al. (2020 v. 3: Chapter 20)
Table 20.1
Correlation of strata – Areas G and C
Mazar et. al. (2020 v.3) - Figure 20.1 -
Plan of Stratum G-2b from Mazar et. al. (2020 v. 3: Chapter 20)
Figure 20.1
Plan of Stratum G-2b
Mazar et. al. (2020 v.3) - Figure 20.2a -
Plan of Stratum G-2a from Mazar et. al. (2020 v. 3: Chapter 20)
Figure 20.2a
Plan of Stratum G-2a
Mazar et. al. (2020 v.3) - Figure 20.2b -
Plan of Stratum G-2a' from Mazar et. al. (2020 v. 3: Chapter 20)
Figure 20.2a
Plan of Stratum G-2a'
Mazar et. al. (2020 v.3)
- Table 20.1 -
Correlation of strata – Areas G and C from Mazar et. al. (2020 v. 3: Chapter 20)
Table 20.1
Correlation of strata – Areas G and C
Mazar et. al. (2020 v.3) - Figure 20.1 -
Plan of Stratum G-2b from Mazar et. al. (2020 v. 3: Chapter 20)
Figure 20.1
Plan of Stratum G-2b
Mazar et. al. (2020 v.3) - Figure 20.2a -
Plan of Stratum G-2a from Mazar et. al. (2020 v. 3: Chapter 20)
Figure 20.2a
Plan of Stratum G-2a
Mazar et. al. (2020 v.3) - Figure 20.2b -
Plan of Stratum G-2a' from Mazar et. al. (2020 v. 3: Chapter 20)
Figure 20.2a
Plan of Stratum G-2a'
Mazar et. al. (2020 v.3) - Photo 20.20 -
Tilted G-2 Wall 4081 from Mazar et. al. (2020 v. 3: Chapter 20)
Photo 20.20
Square P/3, looking east. Meter stick leaning on G-2 Wall 4081; upper left: G-1 Wall 4047; note two phases in this wall
(2007)
JW: Also note that G-2 Wall 4081 is strongly tilted
Mazar et. al. (2020 v.3) - Photo 20.21 -
Closeup on Tilted G-2 Wall 4081 from Mazar et. al. (2020 v. 3: Chapter 20)
Photo 20.21
Square P/3, looking south. Meter stick leaning on G-2 Wall 4081; right: G-2a Floor 4087
(2007)
JW: G-2 Wall 4081 is tilted
Mazar et. al. (2020 v.3)
Inside this room was a layer of brick collapse (8038) that was exposed down to level 85.28 m. This locus was attributed to Stratum G-2b, although a floor was not reached. A higher patchy floor in this room (4090) at level 85.66 m is attributed to Stratum G-2a.
- Table 20.1 -
Correlation of strata – Areas G and C from Mazar et. al. (2020 v. 3: Chapter 20)
Table 20.1
Correlation of strata – Areas G and C
Mazar et. al. (2020 v.3) - Figure 20.1 -
Plan of Stratum G-2b from Mazar et. al. (2020 v. 3: Chapter 20)
Figure 20.1
Plan of Stratum G-2b
Mazar et. al. (2020 v.3) - Figure 20.2a -
Plan of Stratum G-2a from Mazar et. al. (2020 v. 3: Chapter 20)
Figure 20.2a
Plan of Stratum G-2a
Mazar et. al. (2020 v.3) - Figure 20.2b -
Plan of Stratum G-2a' from Mazar et. al. (2020 v. 3: Chapter 20)
Figure 20.2a
Plan of Stratum G-2a'
Mazar et. al. (2020 v.3) - Photo 20.20 -
Tilted G-2 Wall 4081 from Mazar et. al. (2020 v. 3: Chapter 20)
Photo 20.20
Square P/3, looking east. Meter stick leaning on G-2 Wall 4081; upper left: G-1 Wall 4047; note two phases in this wall
(2007)
JW: Also note that G-2 Wall 4081 is strongly tilted
Mazar et. al. (2020 v.3) - Photo 20.21 -
Closeup on Tilted G-2 Wall 4081 from Mazar et. al. (2020 v. 3: Chapter 20)
Photo 20.21
Square P/3, looking south. Meter stick leaning on G-2 Wall 4081; right: G-2a Floor 4087
(2007)
JW: G-2 Wall 4081 is tilted
Mazar et. al. (2020 v.3)
A new floor (4087), beaten-earth and ash, was laid at 85.61 m; it did not clearly abut Wall 4081. This floor is attributed to Stratum G-2a, but might be related to Stratum G-1 Building GG, since destruction layer 4065 of that building is directly above it.
- Table 20.1 -
Correlation of strata – Areas G and C from Mazar et. al. (2020 v. 3: Chapter 20)
Table 20.1
Correlation of strata – Areas G and C
Mazar et. al. (2020 v.3) - Figure 20.1 -
Plan of Stratum G-2b from Mazar et. al. (2020 v. 3: Chapter 20)
Figure 20.1
Plan of Stratum G-2b
Mazar et. al. (2020 v.3) - Figure 20.2a -
Plan of Stratum G-2a from Mazar et. al. (2020 v. 3: Chapter 20)
Figure 20.2a
Plan of Stratum G-2a
Mazar et. al. (2020 v.3) - Figure 20.2b -
Plan of Stratum G-2a' from Mazar et. al. (2020 v. 3: Chapter 20)
Figure 20.2a
Plan of Stratum G-2a'
Mazar et. al. (2020 v.3) - Figure 20.7 -
Superposition of walls in Area G with location of section drawings from Mazar et. al. (2020 v. 3: Chapter 20)
Figure 20.7
Superposition of walls in Area G with location of section drawings
Mazar et. al. (2020 v.3) - Figure 20.17 -
Section 10 from Mazar et. al. (2020 v. 3: Chapter 20)
Figure 20.17
Section 10 (Square Q/3, section below Wall 5018, looking north)
Mazar et. al. (2020 v.3) - Figure 20.18 -
Section 11 from Mazar et. al. (2020 v. 3: Chapter 20)
Figure 20.18
Section 11 (Square Q/3, looking east; wall above Wall 5062 was seen only in section, attributed to G-1b, unnumbered)
Mazar et. al. (2020 v.3) - Photo 20.1 -
Area G at the end of 2000 season, looking west from Mazar et. al. (2020 v. 3: Chapter 20)
Photo 20.1
Area G at the end of 2000 season, looking west
Mazar et. al. (2020 v.3) - Photo 20.2 -
Area G at the end of 2007 season, looking northwest from Mazar et. al. (2020 v. 3: Chapter 20)
Photo 20.2
Area G at the end of 2007 season, looking northwest
Mazar et. al. (2020 v.3) - Photo 20.16 -
Squares Q–P/3–4 from Mazar et. al. (2020 v. 3: Chapter 20)
Photo 20.16
Squares Q–P/3–4, looking west.
- Right: G-2a circular installations
- front left: G-2b Floor 8046 (deepest excavated point)
- front center: G-2 Building GD
(2007)
Mazar et. al. (2020 v.3) - Photo 20.17 -
Squares Q–P/3–4 from Mazar et. al. (2020 v. 3: Chapter 20)
Photo 20.17
Squares Q–P/3–4, looking north. Center: G-1 Wall 5012
(2007)
Mazar et. al. (2020 v.3) - Photo 20.18 -
Square Q/3 from Mazar et. al. (2020 v. 3: Chapter 20)
Photo 20.18
Square Q/3, northeastern corner, looking north. Upper left: G-1a Wall 5008 with brick debris (5011) above layer of charred wood (5029); G-2a–b layers below the G-1a destruction debris
(2007)
Mazar et. al. (2020 v.3)
In the northern room, a clear distinction between Strata G-2b and G-2a could be made (Figs. 20.17–20.18; Photo 20.18). The lowest layer reached was a beaten-earth floor (8046) exposed in a small area at level 84.16 m, which appeared to abut the foundation of Walls 5062 and 5063. This floor was covered by a layer of small chunks of brick debris (8040) and a higher layer of large collapsed bricks (8018). Note that the floor in Room 8046 was much lower than the surrounding floors of the same phase, 8041/8044 in Square Q/4 west of Wall 8030, as well as Floor 8017 to the south. Thus, it may be suggested that Room 8046 was, to some extent, subterranean.
In Phase G-2a, new floor composed of soft red and gray striations (5053) accumulated between levels 85.00–85.68 m, sloping to the north and sealing the earlier brick collapse (Figs. 20.17– 20.18; Photo 20.18). Many pottery sherds (some restorable) were found here (Figs. 21.6–21.7), as well as three clay loomweights.
In the southern room, a series of at least three successive floors (8017) attributed to Stratum G-2b was found at levels 84.95–85.35 m; a soft brown floor, a reddish floor and a grey floor with bits of plaster and ash, all containing many sherds, bones and olive pits. The highest floor was covered by a layer of brick debris (8004). A patchy clay floor (5047) at level 85.69 m covering the brick debris layer was attributed to Stratum G-2a. Its relation to Walls 5063 and 5062 was insecure, although very likely.
- Table 20.1 -
Correlation of strata – Areas G and C from Mazar et. al. (2020 v. 3: Chapter 20)
Table 20.1
Correlation of strata – Areas G and C
Mazar et. al. (2020 v.3) - Figure 20.1 -
Plan of Stratum G-2b from Mazar et. al. (2020 v. 3: Chapter 20)
Figure 20.1
Plan of Stratum G-2b
Mazar et. al. (2020 v.3) - Figure 20.2a -
Plan of Stratum G-2a from Mazar et. al. (2020 v. 3: Chapter 20)
Figure 20.2a
Plan of Stratum G-2a
Mazar et. al. (2020 v.3) - Figure 20.2b -
Plan of Stratum G-2a' from Mazar et. al. (2020 v. 3: Chapter 20)
Figure 20.2a
Plan of Stratum G-2a'
Mazar et. al. (2020 v.3) - Photo 20.22 -
Squares P–Q/5 from Mazar et. al. (2020 v. 3: Chapter 20)
Photo 20.22
Squares P–Q/5, looking south at remains in G-1 Building GF; center: G-1 Walls 4014 and 4017 and wooden beams (4031, 4020)
(2000)
Mazar et. al. (2020 v.3) - Photo 20.23 -
Squares P–Q/5 from Mazar et. al. (2020 v. 3: Chapter 20)
Photo 20.23
Squares P–Q/5, looking southwest, detail of Photo 20.22
(2000)
Mazar et. al. (2020 v.3)
- Table 20.1 -
Correlation of strata – Areas G and C from Mazar et. al. (2020 v. 3: Chapter 20)
Table 20.1
Correlation of strata – Areas G and C
Mazar et. al. (2020 v.3) - Figure 20.3 -
Plan of wooden beams in the foundations of Stratum G-1 walls from Mazar et. al. (2020 v. 3: Chapter 20)
Figure 20.3
Plan of wooden beams in the foundations of Stratum G-1 walls
Mazar et. al. (2020 v.3) - Figure 20.4 -
Plan of Stratum G-1b from Mazar et. al. (2020 v. 3: Chapter 20)
Figure 20.4
Plan of Stratum G-1b
Mazar et. al. (2020 v.3) - Figure 20.5 -
Plan of Stratum G-1a from Mazar et. al. (2020 v. 3: Chapter 20)
Figure 20.5
Plan of Stratum G-1a
Mazar et. al. (2020 v.3)
- Plans: Figs. Figs. 20.3–20.5
Two major architectural units were detected: Building GF in the central and northern part of the area and Building GG in the southern part, separated by a double wall (4047/5012). The eastern wall of the northern building (5017) was attached to another wall (5018), which probably belonged to an adjacent building to the east, beyond the limits of the excavation area. In the southwestern part of Area G, erosion destroyed much of Building GG.
In Building GG, very few changes were made between Strata G-1a and G-1b. The building was destroyed in G-1a by heavy fire, probably corresponding to the destruction of Stratum C-1a in Area C and E-1a in Area E. In Building GF, distinctions between the two strata could be observed in several cases, but since no violent destruction layer was detected, it might be conjectured that most of the Stratum G-1a floors in this building were eroded away, although this remains an open question. As noted above, building remains of Stratum G-1 were eroded away in Squares P–Q/6, the floors were almost completely eroded away in Squares P–Q/5, and erosion also destroyed the G-1 structures in the southwestern corner of the area in Square P/3.
- Table 20.1 -
Correlation of strata – Areas G and C from Mazar et. al. (2020 v. 3: Chapter 20)
Table 20.1
Correlation of strata – Areas G and C
Mazar et. al. (2020 v.3) - Figure 20.3 -
Plan of wooden beams in the foundations of Stratum G-1 walls from Mazar et. al. (2020 v. 3: Chapter 20)
Figure 20.3
Plan of wooden beams in the foundations of Stratum G-1 walls
Mazar et. al. (2020 v.3) - Figure 20.4 -
Plan of Stratum G-1b from Mazar et. al. (2020 v. 3: Chapter 20)
Figure 20.4
Plan of Stratum G-1b
Mazar et. al. (2020 v.3) - Figure 20.5 -
Plan of Stratum G-1a from Mazar et. al. (2020 v. 3: Chapter 20)
Figure 20.5
Plan of Stratum G-1a
Mazar et. al. (2020 v.3) - Photo 20.22 -
Squares P–Q/5 from Mazar et. al. (2020 v. 3: Chapter 20)
Photo 20.22
Squares P–Q/5, looking south at remains in G-1 Building GF; center: G-1 Walls 4014 and 4017 and wooden beams (4031, 4020)
(2000)
Mazar et. al. (2020 v.3) - Photo 20.23 -
Squares P–Q/5 from Mazar et. al. (2020 v. 3: Chapter 20)
Photo 20.23
Squares P–Q/5, looking southwest, detail of Photo 20.22
(2000)
Mazar et. al. (2020 v.3) - Photo 20.24 -
Square P/5 from Mazar et. al. (2020 v. 3: Chapter 20)
Photo 20.24
Square P/5, looking east at detail of wooden beams 4020, east of Wall 4014 and below Wall 4017
(2000)
Mazar et. al. (2020 v.3) - Photo 20.25 -
Square P/4 from Mazar et. al. (2020 v. 3: Chapter 20)
Photo 20.25
Square P/4, looking south at wooden beams 4071. Wall 5012 and projection to north; meter stick on G2a Locus 8023
(2000)
Mazar et. al. (2020 v.3) - Photo 20.26 -
Square P/4 from Mazar et. al. (2020 v. 3: Chapter 20)
Photo 20.26
Square P/4, looking west at double wall 5012/4047, with wooden beams 4066 to its north
(2007)
Mazar et. al. (2020 v.3) - Photo 20.27 -
Squares Q–P/4 from Mazar et. al. (2020 v. 3: Chapter 20)
Photo 20.27
Squares Q–P/4, looking south at Wall 5012 and section below it. Note thick layer of wooden beams below the wall; foreground: G-2b Installation 8048
(2007)
Mazar et. al. (2020 v.3) - Photo 20.28 -
Square P/4 from Mazar et. al. (2020 v. 3: Chapter 20)
Photo 20.28
Square P/4, looking south at G-1 Wall 5012 and section below it. Note thick layer of wooden beams below the wall; foreground: G-2b Floor 8054 (2007)
(2007)
Mazar et. al. (2020 v.3) - Photo 20.29 -
Square Q/4 from Mazar et. al. (2020 v. 3: Chapter 20)
Photo 20.29
Square Q/4, looking east at G-1 Wall 5017, with wooden beams in its foundation
Mazar et. al. (2020 v.3) - Photo 20.30 -
Square P/5 from Mazar et. al. (2020 v. 3: Chapter 20)
Photo 20.30
Square P/5, looking east at G-1 Wall 4014, with wooden beams in its foundation
(2000)
Mazar et. al. (2020 v.3)
- Table 20.1 -
Correlation of strata – Areas G and C from Mazar et. al. (2020 v. 3: Chapter 20)
Table 20.1
Correlation of strata – Areas G and C
Mazar et. al. (2020 v.3) - Figure 20.3 -
Plan of wooden beams in the foundations of Stratum G-1 walls from Mazar et. al. (2020 v. 3: Chapter 20)
Figure 20.3
Plan of wooden beams in the foundations of Stratum G-1 walls
Mazar et. al. (2020 v.3) - Figure 20.4 -
Plan of Stratum G-1b from Mazar et. al. (2020 v. 3: Chapter 20)
Figure 20.4
Plan of Stratum G-1b
Mazar et. al. (2020 v.3) - Figure 20.5 -
Plan of Stratum G-1a from Mazar et. al. (2020 v. 3: Chapter 20)
Figure 20.5
Plan of Stratum G-1a
Mazar et. al. (2020 v.3) - Figure 20.10 -
Section 3 from Mazar et. al. (2020 v. 3: Chapter 20)
Figure 20.10
Section 3 (Square P/5, Walls 5044 and 4014, looking east)
Mazar et. al. (2020 v.3) - Photo 20.22 -
Squares P–Q/5 from Mazar et. al. (2020 v. 3: Chapter 20)
Photo 20.22
Squares P–Q/5, looking south at remains in G-1 Building GF; center: G-1 Walls 4014 and 4017 and wooden beams (4031, 4020)
(2000)
Mazar et. al. (2020 v.3) - Photo 20.23 -
Squares P–Q/5 from Mazar et. al. (2020 v. 3: Chapter 20)
Photo 20.23
Squares P–Q/5, looking southwest, detail of Photo 20.22
(2000)
Mazar et. al. (2020 v.3) - Photo 20.24 -
Square P/5 from Mazar et. al. (2020 v. 3: Chapter 20)
Photo 20.24
Square P/5, looking east at detail of wooden beams 4020, east of Wall 4014 and below Wall 4017
(2000)
Mazar et. al. (2020 v.3) - Photo 20.30 -
Square P/5 from Mazar et. al. (2020 v. 3: Chapter 20)
Photo 20.30
Square P/5, looking east at G-1 Wall 4014, with wooden beams in its foundation
(2000)
Mazar et. al. (2020 v.3)
It should be noted that when the poorly preserved bricks of Wall 4014 were dismantled, a 0.5 m-thick layer of burnt orange brick debris was revealed, separating the wall from the wooden beams described above (Fig. 20.10). This raised questions as to the relationship of the wooden beams to the construction of the wall; however, since the connection of the beams to other G-1 walls was established with great certainty, we maintain that Wall 4014 was supported by the wooden beams and that this crumbly brick layer was created during the heavy conflagration which strongly affected the lowest brick courses of the wall, because of its proximity to the wood.
- Table 20.1 -
Correlation of strata – Areas G and C from Mazar et. al. (2020 v. 3: Chapter 20)
Table 20.1
Correlation of strata – Areas G and C
Mazar et. al. (2020 v.3) - Figure 20.3 -
Plan of wooden beams in the foundations of Stratum G-1 walls from Mazar et. al. (2020 v. 3: Chapter 20)
Figure 20.3
Plan of wooden beams in the foundations of Stratum G-1 walls
Mazar et. al. (2020 v.3) - Figure 20.4 -
Plan of Stratum G-1b from Mazar et. al. (2020 v. 3: Chapter 20)
Figure 20.4
Plan of Stratum G-1b
Mazar et. al. (2020 v.3) - Figure 20.5 -
Plan of Stratum G-1a from Mazar et. al. (2020 v. 3: Chapter 20)
Figure 20.5
Plan of Stratum G-1a
Mazar et. al. (2020 v.3) - Photo 20.11 -
Squares Q–P/3–4 looking southwest from Mazar et. al. (2020 v. 3: Chapter 20)
Photo 20.11
Squares Q–P/3–4 looking southwest. Right: Wall 4083 (with bucket) and G-1b Platform 5069
(2007)
Mazar et. al. (2020 v.3)
- Table 20.1 -
Correlation of strata – Areas G and C from Mazar et. al. (2020 v. 3: Chapter 20)
Table 20.1
Correlation of strata – Areas G and C
Mazar et. al. (2020 v.3) - Figure 20.3 -
Plan of wooden beams in the foundations of Stratum G-1 walls from Mazar et. al. (2020 v. 3: Chapter 20)
Figure 20.3
Plan of wooden beams in the foundations of Stratum G-1 walls
Mazar et. al. (2020 v.3) - Figure 20.4 -
Plan of Stratum G-1b from Mazar et. al. (2020 v. 3: Chapter 20)
Figure 20.4
Plan of Stratum G-1b
Mazar et. al. (2020 v.3) - Figure 20.5 -
Plan of Stratum G-1a from Mazar et. al. (2020 v. 3: Chapter 20)
Figure 20.5
Plan of Stratum G-1a
Mazar et. al. (2020 v.3) - Figure 20.16 -
Section 9 from Mazar et. al. (2020 v. 3: Chapter 20)
Figure 20.16
Section 9 (Squares P–Q/3, Wall 4047 with wooden beams, looking north)
Mazar et. al. (2020 v.3) - Photo 20.25 -
Square P/4 from Mazar et. al. (2020 v. 3: Chapter 20)
Photo 20.25
Square P/4, looking south at wooden beams 4071. Wall 5012 and projection to north; meter stick on G2a Locus 8023
(2000)
Mazar et. al. (2020 v.3) - Photo 20.26 -
Square P/4 from Mazar et. al. (2020 v. 3: Chapter 20)
Photo 20.26
Square P/4, looking west at double wall 5012/4047, with wooden beams 4066 to its north
(2007)
Mazar et. al. (2020 v.3) - Photo 20.31 -
Tilted G-1b Wall 4047 from Mazar et. al. (2020 v. 3: Chapter 20)
Photo 20.31
Squares P–Q/3, looking north. Top: Wall 4047 with wooden beams in its foundation; note two possible phases in this wall; bottom: G-1 Installation 4064 on top of G-2 Wall 4081
(2007)
JW: G-1b Wall 4047 is tilted. Wall 5008 also looks tilted.
Mazar et. al. (2020 v.3)
In the northeastern corner of the square was a layer of beams laid at a northeastern–southeastern orientation (4071, between 86.53–86.29 m) that was the continuation of the southern group of beams (4020) in Square P/5, described above (Photo 20.25). Two elongated beams were located just on top of G-2 Wall 5061 at levels 86.03–86.28 m, serving as a foundation for the new wall (4070) built on the same line. West of this wall was a group of five beams which were perpendicular to the wall at level 86.00 m, probably serving as foundation for a floor that was not preserved in the small area that was excavated.
Wooden beams were also found in the foundation of Wall 4047, which created a double wall with Wall 5012, mentioned above (Fig. 20.16; Photo 20.31).
- Table 20.1 -
Correlation of strata – Areas G and C from Mazar et. al. (2020 v. 3: Chapter 20)
Table 20.1
Correlation of strata – Areas G and C
Mazar et. al. (2020 v.3) - Figure 20.3 -
Plan of wooden beams in the foundations of Stratum G-1 walls from Mazar et. al. (2020 v. 3: Chapter 20)
Figure 20.3
Plan of wooden beams in the foundations of Stratum G-1 walls
Mazar et. al. (2020 v.3) - Figure 20.4 -
Plan of Stratum G-1b from Mazar et. al. (2020 v. 3: Chapter 20)
Figure 20.4
Plan of Stratum G-1b
Mazar et. al. (2020 v.3) - Figure 20.5 -
Plan of Stratum G-1a from Mazar et. al. (2020 v. 3: Chapter 20)
Figure 20.5
Plan of Stratum G-1a
Mazar et. al. (2020 v.3) - Figure 20.13 -
Section 6 from Mazar et. al. (2020 v. 3: Chapter 20)
Figure 20.13
Section 6 (Square Q/4, Wall 5018 and wooden beams, looking east)
Mazar et. al. (2020 v.3)
- Table 20.1 -
Correlation of strata – Areas G and C from Mazar et. al. (2020 v. 3: Chapter 20)
Table 20.1
Correlation of strata – Areas G and C
Mazar et. al. (2020 v.3) - Figure 20.3 -
Plan of wooden beams in the foundations of Stratum G-1 walls from Mazar et. al. (2020 v. 3: Chapter 20)
Figure 20.3
Plan of wooden beams in the foundations of Stratum G-1 walls
Mazar et. al. (2020 v.3) - Figure 20.4 -
Plan of Stratum G-1b from Mazar et. al. (2020 v. 3: Chapter 20)
Figure 20.4
Plan of Stratum G-1b
Mazar et. al. (2020 v.3) - Figure 20.5 -
Plan of Stratum G-1a from Mazar et. al. (2020 v. 3: Chapter 20)
Figure 20.5
Plan of Stratum G-1a
Mazar et. al. (2020 v.3) - Figure 20.17 -
Section 10 from Mazar et. al. (2020 v. 3: Chapter 20)
Figure 20.17
Section 10 (Square Q/3, section below Wall 5018, looking north)
Mazar et. al. (2020 v.3) - Photo 20.17 -
Squares Q–P/3–4 from Mazar et. al. (2020 v. 3: Chapter 20)
Photo 20.17
Squares Q–P/3–4, looking north. Center: G-1 Wall 5012
(2007)
Mazar et. al. (2020 v.3) - Photo 20.18 -
Square Q/3 from Mazar et. al. (2020 v. 3: Chapter 20)
Photo 20.18
Square Q/3, northeastern corner, looking north. Upper left: G-1a Wall 5008 with brick debris (5011) above layer of charred wood (5029); G-2a–b layers below the G-1a destruction debris
(2007)
Mazar et. al. (2020 v.3) - Photo 20.34 -
Squares P–Q/3–4 – from Mazar et. al. (2020 v. 3: Chapter 20)
Photo 20.34
Squares P–Q/3–4, looking west, Stratum G-1
(2001)
Mazar et. al. (2020 v.3) - Photo 20.35 -
Square Q/3 – from Mazar et. al. (2020 v. 3: Chapter 20)
Photo 20.35
Square Q/3, northeastern corner. G-1 Wall 5008 (left) abutting Wall 4047; right: section through wooden beam in the foundation of Wall 5017/5018, continuing south into Locus 5029
(2001)
Mazar et. al. (2020 v.3) - Photo 20.40 -
General view of Area G – from Mazar et. al. (2020 v. 3: Chapter 20)
Photo 20.40
General view of Area G, looking north. Foreground: G-1 Building GG and Space 5011 to its east; background: Area C
(2000)
Mazar et. al. (2020 v.3)
It should be noted that in several places there was a considerable gap of up to 0.5 m between the uppermost beams and the lowest brick course of the wall above (i.e., the case of Wall 4014, noted above) while in other places (such as the foundations of Walls 5012 and 4047), it was clear that the beams served as a foundation for the wall, as was the case in Area C. It appears that even where there was a gap, the wood served as such a foundation and the gap was created by seismic activity or the burning of the lowest bricks until melting point during the destruction.
- Table 20.1 -
Correlation of strata – Areas G and C from Mazar et. al. (2020 v. 3: Chapter 20)
Table 20.1
Correlation of strata – Areas G and C
Mazar et. al. (2020 v.3) - Figure 20.3 -
Plan of wooden beams in the foundations of Stratum G-1 walls from Mazar et. al. (2020 v. 3: Chapter 20)
Figure 20.3
Plan of wooden beams in the foundations of Stratum G-1 walls
Mazar et. al. (2020 v.3) - Figure 20.4 -
Plan of Stratum G-1b from Mazar et. al. (2020 v. 3: Chapter 20)
Figure 20.4
Plan of Stratum G-1b
Mazar et. al. (2020 v.3) - Figure 20.5 -
Plan of Stratum G-1a from Mazar et. al. (2020 v. 3: Chapter 20)
Figure 20.5
Plan of Stratum G-1a
Mazar et. al. (2020 v.3) - Figure 20.15 -
Section 8 from Mazar et. al. (2020 v. 3: Chapter 20)
Figure 20.15
Section 8 (Square P/4, section through Platform 5069 and wooden beams, looking east)
Mazar et. al. (2020 v.3) - Photo 20.1 -
Area G at the end of 2000 season, looking west from Mazar et. al. (2020 v. 3: Chapter 20)
Photo 20.1
Area G at the end of 2000 season, looking west
Mazar et. al. (2020 v.3) - Photo 20.11 -
Squares Q–P/3–4 looking southwest from Mazar et. al. (2020 v. 3: Chapter 20)
Photo 20.11
Squares Q–P/3–4 looking southwest. Right: Wall 4083 (with bucket) and G-1b Platform 5069
(2007)
Mazar et. al. (2020 v.3) - Photo 20.12 -
G-2a courtyard, G-2 Building GC, and G-1 Building GF from Mazar et. al. (2020 v. 3: Chapter 20)
Photo 20.12
- Right: Squares P–Q/5–6, looking east.
- Lower left: G-2a courtyard with related circular bins in Square P/6
- background left: G-2 Building GC, Room 4050
- right: G-1 Building GF Walls 4014 and 4017
(2000)
Mazar et. al. (2020 v.3) - Photo 20.22 -
Squares P–Q/5 from Mazar et. al. (2020 v. 3: Chapter 20)
Photo 20.22
Squares P–Q/5, looking south at remains in G-1 Building GF; center: G-1 Walls 4014 and 4017 and wooden beams (4031, 4020)
(2000)
Mazar et. al. (2020 v.3) - Photo 20.23 -
Squares P–Q/5 from Mazar et. al. (2020 v. 3: Chapter 20)
Photo 20.23
Squares P–Q/5, looking southwest, detail of Photo 20.22
(2000)
Mazar et. al. (2020 v.3) - Photo 20.30 -
Square P/5 from Mazar et. al. (2020 v. 3: Chapter 20)
Photo 20.30
Square P/5, looking east at G-1 Wall 4014, with wooden beams in its foundation
(2000)
Mazar et. al. (2020 v.3) - Photo 20.32 -
Squares P/4–5 from Mazar et. al. (2020 v. 3: Chapter 20)
Photo 20.32
Squares P/4–5, looking east. Right: G-1 Platform 5069 related to Walls 5012, 4070 and 4083; background: stone wall/bench 5040; left: wooden beams in the foundation of Wall 4014 after partial removal of brick superstructure
(2001)
Mazar et. al. (2020 v.3) - Photo 20.33 -
Square Q/5 – from Mazar et. al. (2020 v. 3: Chapter 20)
Photo 20.33
Square Q/5, looking east at G-1a Floor 4049
(2000)
Mazar et. al. (2020 v.3) - Photo 20.34 -
Squares P–Q/3–4 – from Mazar et. al. (2020 v. 3: Chapter 20)
Photo 20.34
Squares P–Q/3–4, looking west, Stratum G-1
(2001)
Mazar et. al. (2020 v.3)
In Square Q/5, no floors of Stratum G-1b were preserved above the constructional beams. In the eastern part of the square, a stone floor (4049), 3.5 m long and ca. 0.5–1.3 m wide, was exposed just below topsoil at levels 86.90–86.97 m, unrelated to any other feature (Photos 20.22, 20.33); this floor was attributed to Stratum G-1a. It is possible that this part of the building was an open courtyard. In the rest of the square, brick debris mixed with collapsed burnt bricks and grayish-brown and black ash (4007, 4013) found below topsoil, appeared to be related to the destruction of the building.
In Squares P–Q/4, Walls 4083 and 5019 were two segments of partition walls that comprised the southern border of the space described above, although they appeared to belong to two subsequent phases: Wall 4083 was founded in Stratum G1b, built on top of a wooden-beam foundation that separated it from the earlier wall (8055) of Stratum G-2 (Photo 20.11). Wall 5019 in the eastern part of Q/4 was narrower and higher; its foundation was 0.33 m higher than that of Wall 4083 and fit the level of the plaster floor (5023) to its north and was thus attributed to Stratum G-1a. It seems that in Squares Q–P/4–5 in Stratum G-1b, we may reconstruct a large space (inner dimensions 3.2×7.0 m) enclosed by Walls 4014, 4017, 4083 and an extension of Wall 5018 to the north (Photo 20.34). An element found in this space that remained enigmatic was Wall 5040, a 3.5 m-long and ca. 0.7 m wide stone foundation in the northern part of Square Q/4 (Photos 20.1, 20.32, 20.34), which was architecturally detached from the other walls of the building. It was attributed to Stratum G-1b, since it was covered by G-1a plaster floor 5023, which covered much of the northern part of Square Q/4. The nature of Wall 5040 was even more enigmatic in light of the lack of stone foundations in the Iron IIA levels at Tel Rehov. This element remains architecturally unexplained, although perhaps it served as a bench.
Plaster Floor 5023 in the northern part of Square Q/4 (levels 86.65–86.72 m) was composed of two thin superimposed layers of plaster; it did not clearly abut any wall, although it most likely did reach Wall 5019. Although it was somewhat lower than the stone floor (4049) in Square Q/5, it appears that both these floors were contemporary and belonged to Stratum G-1a.
In Square P/4, a single-course brick platform or floor (5069, 1.3×1.8 m), covered with a thick layer of plaster, was built above the wooden beams in the space between the short segment of Wall 4083 on the north and Wall 5012 on the south (Fig. 20.15; Photos 20.1, 20.11, 20.32, 20.34). Approach to this platform/floor could be through a possible opening in Wall 4083 to the north, where the bricks of this wall were found at the same level as the top of the platform (86.10 m). Note that the lowest brick course of Wall 5012 south of the platform was at level 86.26 m, 0.18 m above the top of the brick platform, but the wooden foundations of this wall started at level 85.72 m, which fit the wooden beams under the platform. It thus appears that the platform/floor and Wall 5012 were constructed at the same time. Brick debris with some small pebbles (4055, 4088) had accumulated on top of the platform. It appears that the platform/floor went out of use in Stratum G-1a, although no clear stratigraphic element was found above it, except for a small segment of an unnumbered wall, which made a corner with Wall 5012 and may be attributed to Stratum G-1a. The function of this brick platform/floor remained obscure.
- Table 20.1 -
Correlation of strata – Areas G and C from Mazar et. al. (2020 v. 3: Chapter 20)
Table 20.1
Correlation of strata – Areas G and C
Mazar et. al. (2020 v.3) - Figure 20.3 -
Plan of wooden beams in the foundations of Stratum G-1 walls from Mazar et. al. (2020 v. 3: Chapter 20)
Figure 20.3
Plan of wooden beams in the foundations of Stratum G-1 walls
Mazar et. al. (2020 v.3) - Figure 20.4 -
Plan of Stratum G-1b from Mazar et. al. (2020 v. 3: Chapter 20)
Figure 20.4
Plan of Stratum G-1b
Mazar et. al. (2020 v.3) - Figure 20.5 -
Plan of Stratum G-1a from Mazar et. al. (2020 v. 3: Chapter 20)
Figure 20.5
Plan of Stratum G-1a
Mazar et. al. (2020 v.3)
- Table 20.1 -
Correlation of strata – Areas G and C from Mazar et. al. (2020 v. 3: Chapter 20)
Table 20.1
Correlation of strata – Areas G and C
Mazar et. al. (2020 v.3) - Figure 20.3 -
Plan of wooden beams in the foundations of Stratum G-1 walls from Mazar et. al. (2020 v. 3: Chapter 20)
Figure 20.3
Plan of wooden beams in the foundations of Stratum G-1 walls
Mazar et. al. (2020 v.3) - Figure 20.4 -
Plan of Stratum G-1b from Mazar et. al. (2020 v. 3: Chapter 20)
Figure 20.4
Plan of Stratum G-1b
Mazar et. al. (2020 v.3) - Figure 20.5 -
Plan of Stratum G-1a from Mazar et. al. (2020 v. 3: Chapter 20)
Figure 20.5
Plan of Stratum G-1a
Mazar et. al. (2020 v.3) - Figure 20.16 -
Section 9 from Mazar et. al. (2020 v. 3: Chapter 20)
Figure 20.16
Section 9 (Squares P–Q/3, Wall 4047 with wooden beams, looking north)
Mazar et. al. (2020 v.3) - Photo 20.18 -
Square Q/3 from Mazar et. al. (2020 v. 3: Chapter 20)
Photo 20.18
Square Q/3, northeastern corner, looking north. Upper left: G-1a Wall 5008 with brick debris (5011) above layer of charred wood (5029); G-2a–b layers below the G-1a destruction debris
(2007)
Mazar et. al. (2020 v.3) - Photo 20.31 -
Tilted G-1b Wall 4047 from Mazar et. al. (2020 v. 3: Chapter 20)
Photo 20.31
Squares P–Q/3, looking north. Top: Wall 4047 with wooden beams in its foundation; note two possible phases in this wall; bottom: G-1 Installation 4064 on top of G-2 Wall 4081
(2007)
JW: G-1b Wall 4047 is tilted. Wall 5008 also looks tilted.
Mazar et. al. (2020 v.3) - Photo 20.34 -
Squares P–Q/3–4 – from Mazar et. al. (2020 v. 3: Chapter 20)
Photo 20.34
Squares P–Q/3–4, looking west, Stratum G-1
(2001)
Mazar et. al. (2020 v.3) - Photo 20.35 -
Square Q/3 – from Mazar et. al. (2020 v. 3: Chapter 20)
Photo 20.35
Square Q/3, northeastern corner. G-1 Wall 5008 (left) abutting Wall 4047; right: section through wooden beam in the foundation of Wall 5017/5018, continuing south into Locus 5029
(2001)
Mazar et. al. (2020 v.3)
- Table 20.1 -
Correlation of strata – Areas G and C from Mazar et. al. (2020 v. 3: Chapter 20)
Table 20.1
Correlation of strata – Areas G and C
Mazar et. al. (2020 v.3) - Figure 20.3 -
Plan of wooden beams in the foundations of Stratum G-1 walls from Mazar et. al. (2020 v. 3: Chapter 20)
Figure 20.3
Plan of wooden beams in the foundations of Stratum G-1 walls
Mazar et. al. (2020 v.3) - Figure 20.4 -
Plan of Stratum G-1b from Mazar et. al. (2020 v. 3: Chapter 20)
Figure 20.4
Plan of Stratum G-1b
Mazar et. al. (2020 v.3) - Figure 20.5 -
Plan of Stratum G-1a from Mazar et. al. (2020 v. 3: Chapter 20)
Figure 20.5
Plan of Stratum G-1a
Mazar et. al. (2020 v.3) - Photo 20.6 -
G-2 Building GB from Mazar et. al. (2020 v. 3: Chapter 20)
Photo 20.6
Square P/4 looking south. G-2 Building GB
- Wall 5061 (right)
- Wall 8055 (center)
- G-1 Wall 5012 (top)
- meter stick on G-2a Floor 8023
(2007)
Mazar et. al. (2020 v.3) - Photo 20.34 -
Squares P–Q/3–4 – from Mazar et. al. (2020 v. 3: Chapter 20)
Photo 20.34
Squares P–Q/3–4, looking west, Stratum G-1
(2001)
Mazar et. al. (2020 v.3) - Photo 20.36 -
Squares P–Q/3, G-1 Installation 5031 – from Mazar et. al. (2020 v. 3: Chapter 20)
Photo 20.36
Squares P–Q/3, G-1 Installation 5031, looking down
(2001)
Mazar et. al. (2020 v.3) - Photo 20.37 -
Squares P–Q/3 – from Mazar et. al. (2020 v. 3: Chapter 20)
Photo 20.37
Squares P–Q/3, looking west, Stratum G-1; four large stones north of Installation 5031 (the latter not yet uncovered) and a stone mortar (upside down); back: Installation 4064
(2001)
Mazar et. al. (2020 v.3) - Photo 20.40 -
General view of Area G – from Mazar et. al. (2020 v. 3: Chapter 20)
Photo 20.40
General view of Area G, looking north. Foreground: G-1 Building GG and Space 5011 to its east; background: Area C
(2000)
Mazar et. al. (2020 v.3)
A reddish-brown beaten-earth floor (4089) was exposed west of Installation 5031 at level 85.92 m. A 1.0 m-long charred wooden beam was found on the floor, perhaps part of a loom that stood nearby (see below). Floor 5038 was a pinkish clay surface with small ash patches that abutted Installation 5031 on its west and Wall 5008 on its east at level 85.87 m. The remains of an orange-clay oven were exposed near Wall 4047 to the north (not shown on the plan). No floor was found south of Installation 5031, where only extremely decayed debris was found due to the intense erosion.
Installation 5031 in the middle of this space was an oval of standing bricks coated inside and outside with white plaster (Fig. 20.6; Photos 20.34, 20.36, 20.40). Four open channels were carved in the upper part of the northern and southern walls of the installation, with plaster preserved inside three of these channels. The floor of the installation was composed of stones of various types and sizes, including a grinding stone fragment. A deep krater (Fig. 21.8:8) was embedded in the southwestern corner of the installation, its rim more or less flush with the stone floor and possibly used to collect liquid (olive oil?) that was processed or gathered inside the installation. Inside the installation, a layer of soft dark ashy earth contained two cooking jugs, a bowl and a krater (Figs. 21.8:7–8; 21.9:1–2).
An elongated plastered open channel north of the installation was covered by four large hard limestones (5071; Photos 20.34, 20.37, 20.40); the stones were chipped and cracked as a result of extensive heat. The largest one measured 0.38× 0.51×0.73 m. The bottom of these large stones were ca. 0.15 m above the top of the open channel and chips from these stones were found in the accumulation above Floor 4089 to the west. The stones appeared to be related to the installation and perhaps were used as weights, possibly hung on the wooden beam found lying in the destruction debris to the west of the installation. A roughly worked stone mortar was found close the large stones (Photo 20.37).
The elongated plastered channel to the north of the installation, the four open channels carved into the top of the installation’s walls and the sunken vessel, all indicate that this installation was used in the processing of liquid, perhaps olive oil. The four sunken depressions on top of the installation’s wall were perhaps intended to hold two wooden beams, which somehow were used in the operation. However the exact identification of the function and operation of this installation remains elusive.
The second installation (4064), just 0.4 m to the west of 5031, was an elongated, almost elliptical semi-circle (Photos 20.34; 20.37–20.40, 20.42), built against Wall 4060 and on top of Floor 4089, just on top of Wall 4081 of the previous stratum. It was constructed of small bricks that were covered inside and outside with a thick gray plaster; the center of the installation apparently also had been plastered, although none of this plaster was preserved. Two stones were set at the southern edge of the installation, which may be explained as a grinding installation with a mud-plastered parapet of the type found in Area C (Chapters 12, 43). This suggestion is supported by the find of an upper and a lower grinding stone in the destruction layer (4059) east and north of this installation (Photo 20.39).1
The room was destroyed in a heavy conflagration, creating a layer of burnt bricks and black ash. The thick destruction layer on top of Floor 4089 in the western part of the room (4059) included vessels (Figs. 21.8–21.13) and upper and lower grindstones. A few loomweights found near Installation 5031 were perhaps related to the cache of loomweights found to the west of the entranceway in Wall 4060 (see below). The wooden beam found on the floor could be related to Installation 5031 or to a loom that stood near the entrance to Room 5037. No separate floor that could be attributed to a later phase was found in this room and thus, it appears in identical form in the plans of both Strata G-1b and G-1a (Figs. 20.4–20.5).
- Table 20.1 -
Correlation of strata – Areas G and C from Mazar et. al. (2020 v. 3: Chapter 20)
Table 20.1
Correlation of strata – Areas G and C
Mazar et. al. (2020 v.3) - Figure 20.3 -
Plan of wooden beams in the foundations of Stratum G-1 walls from Mazar et. al. (2020 v. 3: Chapter 20)
Figure 20.3
Plan of wooden beams in the foundations of Stratum G-1 walls
Mazar et. al. (2020 v.3) - Figure 20.4 -
Plan of Stratum G-1b from Mazar et. al. (2020 v. 3: Chapter 20)
Figure 20.4
Plan of Stratum G-1b
Mazar et. al. (2020 v.3) - Figure 20.5 -
Plan of Stratum G-1a from Mazar et. al. (2020 v. 3: Chapter 20)
Figure 20.5
Plan of Stratum G-1a
Mazar et. al. (2020 v.3) - Photo 20.41 -
Smashed pottery in G-1a destruction layer (4052) – from Mazar et. al. (2020 v. 3: Chapter 20)
Photo 20.41
Square P/3, Building GG, looking north. G-1a destruction layer (4052) with restorable pottery in Room 4088; right: Installation 4064, partly exposed
(2000)
Mazar et. al. (2020 v.3) - Photo 20.42 -
Smashed pottery in G-1a destruction layer (4052) – from Mazar et. al. (2020 v. 3: Chapter 20)
Photo 20.42
Square P/3, G-1a Building GG, looking east. G-1a destruction layer with restorable pottery in Room 4088; note Walls 4067 and 4060 and concentration of loomweights at the entrance (see Photo 20.44)
(2000)
Mazar et. al. (2020 v.3) - Photo 20.43 -
Closeup of Smashed pottery in G-1a destruction layer (4052) – from Mazar et. al. (2020 v. 3: Chapter 20)
Photo 20.43
Square P/3, G-1 Building GG, looking east; detail of G-1a destruction debris (4052) in Room 4088
Mazar et. al. (2020 v.3) - Photo 20.44 -
Closeup of Smashed pottery and loomweights in G-1a destruction layer (4052) – from Mazar et. al. (2020 v. 3: Chapter 20)
Photo 20.44
Squares P–Q/3, G-1 Building GG, looking north; detail of destruction layer (4052) in Room 4088 with concentration of loomweights at the entrance to the room; right: large stones 5071 in Square Q/3
(2000)
Mazar et. al. (2020 v.3)
A higher floor (4088) made of hard gray plaster was identified in the central and northern parts of the room, between levels 85.91–86.00 m, ca. 0.1– 0.2 m higher than the earlier floor. This higher floor is related to Stratum G-1a and appears to have abutted all four walls of the room, although this was not clearly seen.
Destruction debris (4052) that covered the floor consisted of burnt bricks, light gray ash, charcoal pieces and burnt earth that contained 47 restorable vessels (Photos 20.41–2.44; Figs. 21.8–21.14). A large number of these vessels were sunk into the floor against Wall 4067. Over 80 gypsum loomweights were found in the northeastern corner of the room, near the entranceway. They were piled up, covering an area 1.5 m long and 0.65 m wide. Their configuration and dimensions apparently indicate the size and shape of the loom that stood here. Note the abovementioned possibility that the wooden beam in the room to the east might have belonged to this loom. The location of a loom at the entrance of a room recalls a similar situation at Tell Qasile Stratum X, where concentrations of about 80 loomweights each were found at the entrances of several rooms (Mazar 2008).
In the southern part of Square P/3, Loci 4065 and 4069 contain the same destruction layer, although it is slightly lower due to the topography and damaged by the erosion line.
- Table 20.1 -
Correlation of strata – Areas G and C from Mazar et. al. (2020 v. 3: Chapter 20)
Table 20.1
Correlation of strata – Areas G and C
Mazar et. al. (2020 v.3) - Figure 20.1 -
Plan of Stratum G-2b from Mazar et. al. (2020 v. 3: Chapter 20)
Figure 20.1
Plan of Stratum G-2b
Mazar et. al. (2020 v.3) - Figure 20.2a -
Plan of Stratum G-2a from Mazar et. al. (2020 v. 3: Chapter 20)
Figure 20.2a
Plan of Stratum G-2a
Mazar et. al. (2020 v.3) - Figure 20.2b -
Plan of Stratum G-2a' from Mazar et. al. (2020 v. 3: Chapter 20)
Figure 20.2a
Plan of Stratum G-2a'
Mazar et. al. (2020 v.3) - Figure 20.3 -
Plan of wooden beams in the foundations of Stratum G-1 walls from Mazar et. al. (2020 v. 3: Chapter 20)
Figure 20.3
Plan of wooden beams in the foundations of Stratum G-1 walls
Mazar et. al. (2020 v.3) - Figure 20.4 -
Plan of Stratum G-1b from Mazar et. al. (2020 v. 3: Chapter 20)
Figure 20.4
Plan of Stratum G-1b
Mazar et. al. (2020 v.3) - Figure 20.5 -
Plan of Stratum G-1a from Mazar et. al. (2020 v. 3: Chapter 20)
Figure 20.5
Plan of Stratum G-1a
Mazar et. al. (2020 v.3)
As elsewhere in Tel Rehov, no violent destruction was observed at the end of Stratum G-2, yet hints at an earthquake which caused considerable damage were found in the form of tilted and split walls. Such damages may have been the reason for abandoning the Stratum G-2 structures and for the foundation of the new buildings of Stratum G-1. The construction of Stratum G-1 was accompanied by laying wooden foundations for both walls and floors, as was detected also in Areas C and B. About half of this wood was composed of olive tree branches (Chapter 52).
Architectural continuity between Strata G-2 and G-1 was found in several places (i.e., Wall 4014 on top of Wall 5061, Wall 8030 on top of Wall 5018, Wall 5008 on top of Wall 5063), while the general plan of the structures differed from that of Stratum G-1. The new double wall 5012/4047 was a major feature, separating Building GG on the south from Building GF on the north. Both of these buildings are only partly known. Building GF continued the tradition of Building GB of the previous period in its being composed of large open spaces, although no food processing or storage installations were found in it and thus, its function may have changed. Architectural changes between Strata G-1b and G-1a were also observed. A unique feature was the brick platform/floor (5069), which perhaps served as a base for storage facilities. The preserved part of Building GG contained two installations of particular interest: a possible grinding installation with a plaster parapet and perhaps an oil-extracting installation with stone weights, which was rather rare in this period. A loom with some 80 gypsum weights apparently stood at the entrance to the small chamber (5037) and a wooden beam found outside this room might have belonged to the loom.
The dramatic destruction of Stratum G-1a yielded a rich pottery assemblage and other finds. This can be correlated to the general destruction of the city of Stratum IV in the 9th century BCE, as evidenced in other areas at Tel Rehov.
- Figure 20.1
Plan of Stratum G-2b from Mazar et. al. (2020 v. 3: Chapter 20)
Figure 20.1
Plan of Stratum G-2b
Mazar et. al. (2020 v.3) - Figure 20.2a
Plan of Stratum G-2a from Mazar et. al. (2020 v. 3: Chapter 20)
Figure 20.2a
Plan of Stratum G-2a
Mazar et. al. (2020 v.3) - Figure 20.2b
Plan of Stratum G-2a' from Mazar et. al. (2020 v. 3: Chapter 20)
Figure 20.2a
Plan of Stratum G-2a'
Mazar et. al. (2020 v.3) - Figure 20.3
Plan of wooden beams in the foundations of Stratum G-1 walls from Mazar et. al. (2020 v. 3: Chapter 20)
Figure 20.3
Plan of wooden beams in the foundations of Stratum G-1 walls
Mazar et. al. (2020 v.3) - Figure 20.4
Plan of Stratum G-1b from Mazar et. al. (2020 v. 3: Chapter 20)
Figure 20.4
Plan of Stratum G-1b
Mazar et. al. (2020 v.3) - Figure 20.5
Plan of Stratum G-1a from Mazar et. al. (2020 v. 3: Chapter 20)
Figure 20.5
Plan of Stratum G-1a
Mazar et. al. (2020 v.3) - Figure 20.7
Superposition of walls in Area G with location of section drawings from Mazar et. al. (2020 v. 3: Chapter 20)
Figure 20.7
Superposition of walls in Area G with location of section drawings
Mazar et. al. (2020 v.3) - Figure 20.8
Section 1 from Mazar et. al. (2020 v. 3: Chapter 20)
Figure 20.8
Section 1 (Square P/6, looking east)
Mazar et. al. (2020 v.3) - Figure 20.9
Section 2 from Mazar et. al. (2020 v. 3: Chapter 20)
Figure 20.9
Section 2: (Square P/5, looking north)
Mazar et. al. (2020 v.3) - Figure 20.10
Section 3 from Mazar et. al. (2020 v. 3: Chapter 20)
Figure 20.10
Section 3 (Square P/5, Walls 5044 and 4014, looking east)
Mazar et. al. (2020 v.3) - Figure 20.11
Section 4 from Mazar et. al. (2020 v. 3: Chapter 20)
Figure 20.11
Section 4 (Square Q/5, looking east)
Mazar et. al. (2020 v.3) - Figure 20.12
Section 5 from Mazar et. al. (2020 v. 3: Chapter 20)
Figure 20.12
Section 5 (Square Q/4, looking north)
Mazar et. al. (2020 v.3) - Figure 20.13
Section 6 from Mazar et. al. (2020 v. 3: Chapter 20)
Figure 20.13
Section 6 (Square Q/4, Wall 5018 and wooden beams, looking east)
Mazar et. al. (2020 v.3) - Figure 20.14
Section 7 from Mazar et. al. (2020 v. 3: Chapter 20)
Figure 20.14
Section 7 (Square P/4, Wall 5012 and wooden beams, looking south)
Mazar et. al. (2020 v.3) - Figure 20.15
Section 8 from Mazar et. al. (2020 v. 3: Chapter 20)
Figure 20.15
Section 8 (Square P/4, section through Platform 5069 and wooden beams, looking east)
Mazar et. al. (2020 v.3) - Figure 20.16
Section 9 from Mazar et. al. (2020 v. 3: Chapter 20)
Figure 20.16
Section 9 (Squares P–Q/3, Wall 4047 with wooden beams, looking north)
Mazar et. al. (2020 v.3) - Figure 20.17
Section 10 from Mazar et. al. (2020 v. 3: Chapter 20)
Figure 20.17
Section 10 (Square Q/3, section below Wall 5018, looking north)
Mazar et. al. (2020 v.3) - Figure 20.18
Section 11 from Mazar et. al. (2020 v. 3: Chapter 20)
Figure 20.18
Section 11 (Square Q/3, looking east; wall above Wall 5062 was seen only in section, attributed to G-1b, unnumbered)
Mazar et. al. (2020 v.3)
- Photo 20.1
Area G at the end of 2000 season, looking west from Mazar et. al. (2020 v. 3: Chapter 20)
Photo 20.1
Area G at the end of 2000 season, looking west
Mazar et. al. (2020 v.3) - Photo 20.2
Area G at the end of 2007 season, looking northwest from Mazar et. al. (2020 v. 3: Chapter 20)
Photo 20.2
Area G at the end of 2007 season, looking northwest
Mazar et. al. (2020 v.3) - Photo 20.3
Squares P–Q/4–5, looking north from Mazar et. al. (2020 v. 3: Chapter 20)
Photo 20.3
Squares P–Q/4–5, looking north.
- Left: Stratum G2a Building GB
- center left:Room 8045
-
upper left:
- Room 4039
- balk between Squares P–Q/5 and P–Q/4 in center
- bottom left: Wall 4070 of Stratum G-1
(2007)
Mazar et. al. (2020 v.3) - Photo 20.4
Collapsed mudbricks on left corner in G-2b Building GA from Mazar et. al. (2020 v. 3: Chapter 20)
Photo 20.4
Square P/5, looking north. Wall 5044 of G-2b Building GA
- to its left: Locus 8052 with loomweights
- right: Wall 5061 of G-2a Building GB (bird nest holes in section)
(2007)
JW: Collapsed mudbricks in left corner of room
Mazar et. al. (2020 v.3) - Photo 20.5
Tilted Wall from Mazar et. al. (2020 v. 3: Chapter 20)
Photo 20.5
Squares P–Q/4–5, looking east.
- Right: G-1 Wall 5012
- center: balk
- center, right of balk: G-2a Walls 8055 and 8056
- meter stick on G-2a Floor 8023
(2007)
JW: Tilted wall just up frame from Wall 5044 G-2
Mazar et. al. (2020 v.3) - Photo 20.6
G-2 Building GB from Mazar et. al. (2020 v. 3: Chapter 20)
Photo 20.6
Square P/4 looking south. G-2 Building GB
- Wall 5061 (right)
- Wall 8055 (center)
- G-1 Wall 5012 (top)
- meter stick on G-2a Floor 8023
(2007)
Mazar et. al. (2020 v.3) - Photo 20.7
Building GA, G-2 Building GB, and Building GC from Mazar et. al. (2020 v. 3: Chapter 20)
Photo 20.7
Squares P–Q/5-6, looking northwest.
- Center: Wall 5064 of G-2 Building GB
- far left: Building GA
- right: installations and floor in courtyard
- upper right: Building GC
(2007)
Mazar et. al. (2020 v.3) - Photo 20.8
G-2 Building GB from Mazar et. al. (2020 v. 3: Chapter 20)
Photo 20.8
Squares P–Q/4–5 looking west. G-2 Building GB with circular installations
(2007)
Mazar et. al. (2020 v.3) - Photo 20.9
Wall 5064 and G-2a courtyard from Mazar et. al. (2020 v. 3: Chapter 20)
Photo 20.9
Square Q/5, looking west. Top: Wall 5064 and G-2a courtyard with ovens and installations
Mazar et. al. (2020 v.3) - Photo 20.10
G-2b and G-2a circular bins from Mazar et. al. (2020 v. 3: Chapter 20)
Photo 20.10
Square Q/4, detail of G-2b and G-2a circular bins
(2007)
Mazar et. al. (2020 v.3) - Photo 20.11
Squares Q–P/3–4 looking southwest from Mazar et. al. (2020 v. 3: Chapter 20)
Photo 20.11
Squares Q–P/3–4 looking southwest. Right: Wall 4083 (with bucket) and G-1b Platform 5069
(2007)
Mazar et. al. (2020 v.3) - Photo 20.12
G-2a courtyard, G-2 Building GC, and G-1 Building GF from Mazar et. al. (2020 v. 3: Chapter 20)
Photo 20.12
- Right: Squares P–Q/5–6, looking east.
- Lower left: G-2a courtyard with related circular bins in Square P/6
- background left: G-2 Building GC, Room 4050
- right: G-1 Building GF Walls 4014 and 4017
(2000)
Mazar et. al. (2020 v.3) - Photo 20.13
Stratum G-2a Square P/6 and Building GC from Mazar et. al. (2020 v. 3: Chapter 20)
Photo 20.13
Square P/6, looking down at floors and circular bins attributed to Stratum G-2a; lower left: Building GC
(2000)
Mazar et. al. (2020 v.3) - Photo 20.14
Stratum G-2a Floors 4016 and 5004 from Mazar et. al. (2020 v. 3: Chapter 20)
Photo 20.14
Square P/6, looking east at Floors 4016 and 5004 and circular bins attributed to Stratum G-2a
(2000)
Mazar et. al. (2020 v.3) - Photo 20.15
Building GC from Mazar et. al. (2020 v. 3: Chapter 20)
Photo 20.15
Square Q/6, looking east at Building GC
(2000)
Mazar et. al. (2020 v.3) - Photo 20.16
Squares Q–P/3–4 from Mazar et. al. (2020 v. 3: Chapter 20)
Photo 20.16
Squares Q–P/3–4, looking west.
- Right: G-2a circular installations
- front left: G-2b Floor 8046 (deepest excavated point)
- front center: G-2 Building GD
(2007)
Mazar et. al. (2020 v.3) - Photo 20.17
Squares Q–P/3–4 from Mazar et. al. (2020 v. 3: Chapter 20)
Photo 20.17
Squares Q–P/3–4, looking north. Center: G-1 Wall 5012
(2007)
Mazar et. al. (2020 v.3) - Photo 20.18
Square Q/3 from Mazar et. al. (2020 v. 3: Chapter 20)
Photo 20.18
Square Q/3, northeastern corner, looking north. Upper left: G-1a Wall 5008 with brick debris (5011) above layer of charred wood (5029); G-2a–b layers below the G-1a destruction debris
(2007)
Mazar et. al. (2020 v.3) - Photo 20.19
Square Q/3 from Mazar et. al. (2020 v. 3: Chapter 20)
Photo 20.19
Square Q/3, looking south. Section through successive G-2a–2b Floors 8017 and 5047
(2007)
Mazar et. al. (2020 v.3) - Photo 20.20
Tilted G-2 Wall 4081 from Mazar et. al. (2020 v. 3: Chapter 20)
Photo 20.20
Square P/3, looking east. Meter stick leaning on G-2 Wall 4081; upper left: G-1 Wall 4047; note two phases in this wall
(2007)
JW: Also note that G-2 Wall 4081 is strongly tilted
Mazar et. al. (2020 v.3) - Photo 20.21
Closeup on Tilted G-2 Wall 4081 from Mazar et. al. (2020 v. 3: Chapter 20)
Photo 20.21
Square P/3, looking south. Meter stick leaning on G-2 Wall 4081; right: G-2a Floor 4087
(2007)
JW: G-2 Wall 4081 is tilted
Mazar et. al. (2020 v.3) - Photo 20.22
Squares P–Q/5 from Mazar et. al. (2020 v. 3: Chapter 20)
Photo 20.22
Squares P–Q/5, looking south at remains in G-1 Building GF; center: G-1 Walls 4014 and 4017 and wooden beams (4031, 4020)
(2000)
Mazar et. al. (2020 v.3) - Photo 20.23
Squares P–Q/5 from Mazar et. al. (2020 v. 3: Chapter 20)
Photo 20.23
Squares P–Q/5, looking southwest, detail of Photo 20.22
(2000)
Mazar et. al. (2020 v.3) - Photo 20.24
Square P/5 from Mazar et. al. (2020 v. 3: Chapter 20)
Photo 20.24
Square P/5, looking east at detail of wooden beams 4020, east of Wall 4014 and below Wall 4017
(2000)
Mazar et. al. (2020 v.3) - Photo 20.25
Square P/4 from Mazar et. al. (2020 v. 3: Chapter 20)
Photo 20.25
Square P/4, looking south at wooden beams 4071. Wall 5012 and projection to north; meter stick on G2a Locus 8023
(2000)
Mazar et. al. (2020 v.3) - Photo 20.26
Square P/4 from Mazar et. al. (2020 v. 3: Chapter 20)
Photo 20.26
Square P/4, looking west at double wall 5012/4047, with wooden beams 4066 to its north
(2007)
Mazar et. al. (2020 v.3) - Photo 20.27
Squares Q–P/4 from Mazar et. al. (2020 v. 3: Chapter 20)
Photo 20.27
Squares Q–P/4, looking south at Wall 5012 and section below it. Note thick layer of wooden beams below the wall; foreground: G-2b Installation 8048
(2007)
Mazar et. al. (2020 v.3) - Photo 20.28
Square P/4 from Mazar et. al. (2020 v. 3: Chapter 20)
Photo 20.28
Square P/4, looking south at G-1 Wall 5012 and section below it. Note thick layer of wooden beams below the wall; foreground: G-2b Floor 8054 (2007)
(2007)
Mazar et. al. (2020 v.3) - Photo 20.29
Square Q/4 from Mazar et. al. (2020 v. 3: Chapter 20)
Photo 20.29
Square Q/4, looking east at G-1 Wall 5017, with wooden beams in its foundation
Mazar et. al. (2020 v.3) - Photo 20.30
Square P/5 from Mazar et. al. (2020 v. 3: Chapter 20)
Photo 20.30
Square P/5, looking east at G-1 Wall 4014, with wooden beams in its foundation
(2000)
Mazar et. al. (2020 v.3) - Photo 20.31
Tilted G-1b Wall 4047 from Mazar et. al. (2020 v. 3: Chapter 20)
Photo 20.31
Squares P–Q/3, looking north. Top: Wall 4047 with wooden beams in its foundation; note two possible phases in this wall; bottom: G-1 Installation 4064 on top of G-2 Wall 4081
(2007)
JW: G-1b Wall 4047 is tilted. Wall 5008 also looks tilted.
Mazar et. al. (2020 v.3) - Photo 20.32
Squares P/4–5 from Mazar et. al. (2020 v. 3: Chapter 20)
Photo 20.32
Squares P/4–5, looking east. Right: G-1 Platform 5069 related to Walls 5012, 4070 and 4083; background: stone wall/bench 5040; left: wooden beams in the foundation of Wall 4014 after partial removal of brick superstructure
(2001)
Mazar et. al. (2020 v.3) - Photo 20.33
Square Q/5 – from Mazar et. al. (2020 v. 3: Chapter 20)
Photo 20.33
Square Q/5, looking east at G-1a Floor 4049
(2000)
Mazar et. al. (2020 v.3) - Photo 20.34
Squares P–Q/3–4 – from Mazar et. al. (2020 v. 3: Chapter 20)
Photo 20.34
Squares P–Q/3–4, looking west, Stratum G-1
(2001)
Mazar et. al. (2020 v.3) - Photo 20.35
Square Q/3 – from Mazar et. al. (2020 v. 3: Chapter 20)
Photo 20.35
Square Q/3, northeastern corner. G-1 Wall 5008 (left) abutting Wall 4047; right: section through wooden beam in the foundation of Wall 5017/5018, continuing south into Locus 5029
(2001)
Mazar et. al. (2020 v.3) - Photo 20.36
Squares P–Q/3, G-1 Installation 5031 – from Mazar et. al. (2020 v. 3: Chapter 20)
Photo 20.36
Squares P–Q/3, G-1 Installation 5031, looking down
(2001)
Mazar et. al. (2020 v.3) - Photo 20.37
Squares P–Q/3 – from Mazar et. al. (2020 v. 3: Chapter 20)
Photo 20.37
Squares P–Q/3, looking west, Stratum G-1; four large stones north of Installation 5031 (the latter not yet uncovered) and a stone mortar (upside down); back: Installation 4064
(2001)
Mazar et. al. (2020 v.3) - Photo 20.38
Square P/3 – from Mazar et. al. (2020 v. 3: Chapter 20)
Photo 20.38
Square P/3, looking west at G-1 Installation 4064, Wall 4060 and Floor 4089
(2000)
Mazar et. al. (2020 v.3) - Photo 20.39
Square P/3 – from Mazar et. al. (2020 v. 3: Chapter 20)
Photo 20.39
Square P/3, G-1 Installation 4064 and Wall 4060, looking north. Note grinding stone in the right corner
(2000)
Mazar et. al. (2020 v.3) - Photo 20.40
General view of Area G – from Mazar et. al. (2020 v. 3: Chapter 20)
Photo 20.40
General view of Area G, looking north. Foreground: G-1 Building GG and Space 5011 to its east; background: Area C
(2000)
Mazar et. al. (2020 v.3) - Photo 20.41
Smashed pottery in G-1a destruction layer (4052) – from Mazar et. al. (2020 v. 3: Chapter 20)
Photo 20.41
Square P/3, Building GG, looking north. G-1a destruction layer (4052) with restorable pottery in Room 4088; right: Installation 4064, partly exposed
(2000)
Mazar et. al. (2020 v.3) - Photo 20.42
Smashed pottery in G-1a destruction layer (4052) – from Mazar et. al. (2020 v. 3: Chapter 20)
Photo 20.42
Square P/3, G-1a Building GG, looking east. G-1a destruction layer with restorable pottery in Room 4088; note Walls 4067 and 4060 and concentration of loomweights at the entrance (see Photo 20.44)
(2000)
Mazar et. al. (2020 v.3) - Photo 20.43
Closeup of Smashed pottery in G-1a destruction layer (4052) – from Mazar et. al. (2020 v. 3: Chapter 20)
Photo 20.43
Square P/3, G-1 Building GG, looking east; detail of G-1a destruction debris (4052) in Room 4088
Mazar et. al. (2020 v.3) - Photo 20.44
Closeup of Smashed pottery and loomweights in G-1a destruction layer (4052) – from Mazar et. al. (2020 v. 3: Chapter 20)
Photo 20.44
Squares P–Q/3, G-1 Building GG, looking north; detail of destruction layer (4052) in Room 4088 with concentration of loomweights at the entrance to the room; right: large stones 5071 in Square Q/3
(2000)
Mazar et. al. (2020 v.3) - Photo 20.45
Room 4088 floor below G-1a destruction layer (4052) – from Mazar et. al. (2020 v. 3: Chapter 20)
Photo 20.45
Square P/3, Room 4088, floor after removal of destruction debris, looking north
(2000)
Mazar et. al. (2020 v.3)
The earth’s magnetic field and its elements (after Ben-Yosef et al. 2008)
Ben-Yosef and Ron in Mazar et. al. (2020 v. 5)
Fig. 54.2
Schematic illustration of the paleomagnetic fold test as applied
to mudbricks walls from Tel Rehov, Stratum C-1b (V)
Ben-Yosef and Ron in Mazar et. al. (2020 v. 5)
Fig. 54.3
Sampling locations in Buildings CE and CG
Ben-Yosef and Ron in Mazar et. al. (2020 v. 5)
Photo 54.1
Location of samples from Wall 2454
(eastern wall of Building CE, Square Y/4, looking east). The intense fire of Stratum C-1b is
indicated by the color of the mud bricks.
Ben-Yosef and Ron in Mazar et. al. (2020 v. 5)
Photo 54.2
Location of samples from Wall 2411 (eastern
wall of Building CG, Square Y/3 looking west). The
strong tilt to the south is clearly visible.
Ben-Yosef and Ron in Mazar et. al. (2020 v. 5)
Table 54.1
Mean geomagnetic direction for each of the tilted walls in Area C
Ben-Yosef and Ron in Mazar et. al. (2020 v. 5)
Fig. 54.4
Zijderveld diagrams (or vector end-point diagrams; see Tauxe 2010: 172)
of the AF demagnetization of samples from Tel Rehov
All samples, except C3 and C6, present one component stable magnetization.
Ben-Yosef and Ron in Mazar et. al. (2020 v. 5)
Fig. 54.5
Equal area projection (lower hemisphere) of measured
directions from Buildings CE (squares) and CG (diamonds). The mean direction is represented
by circles and is statistically the same for both buildings.
Ben-Yosef and Ron in Mazar et. al. (2020 v. 5)
Fig. 54.6
Equal area projection (lower hemisphere) of measured
directions from Buildings CE (squares) and CG (diamonds) after tilt correction.
Ben-Yosef and Ron in Mazar et. al. (2020 v. 5)
The earth’s magnetic field and its elements (after Ben-Yosef et al. 2008)
Ben-Yosef and Ron in Mazar et. al. (2020 v. 5)
Fig. 54.2
Schematic illustration of the paleomagnetic fold test as applied
to mudbricks walls from Tel Rehov, Stratum C-1b (V)
Ben-Yosef and Ron in Mazar et. al. (2020 v. 5)
Fig. 54.3
Sampling locations in Buildings CE and CG
Ben-Yosef and Ron in Mazar et. al. (2020 v. 5)
Photo 54.1
Location of samples from Wall 2454
(eastern wall of Building CE, Square Y/4, looking east). The intense fire of Stratum C-1b is
indicated by the color of the mud bricks.
Ben-Yosef and Ron in Mazar et. al. (2020 v. 5)
Photo 54.2
Location of samples from Wall 2411 (eastern
wall of Building CG, Square Y/3 looking west). The
strong tilt to the south is clearly visible.
Ben-Yosef and Ron in Mazar et. al. (2020 v. 5)
The archaeomagnetic study was designed to provide conclusive evidence for one of the two following possible scenarios:2
- An earthquake is the main cause for the partial destruction of Stratum C-lb and the tilting of the buildings' walls, and is also responsible for the fire.
- A fire is the main cause for the destruction of the Stratum C-lb buildings; after this, during a period in which the site was abandoned, an earthquake tilted the walls.
We collected ten samples of burnt mudbricks from the two opposing tilted walls (Fig. 54.3): six samples from the western (inner) face of Wall 2454, which served as the eastern wall of Building CE (Photo 54.1; Chapter 12; Fig. 12.27), and four from the eastern (outer) face of Wall 2411, the eastern wall of Building CG (Photo 54.2; Figs. 12.39-12.40). The sampling was done by cutting out oriented chunks of clay bricks into small (~8 cm3) plastic boxes using a Brunton compass.3 The tilting direction of the walls (their dip) was measured on flat surfaces in various locations and an average was calculated. The paleomagnetic experiments were done using alternating field (AF) demagnetization (Tauxe 2010: 127) in steps of 5µT to 40µT or 10µT to 90µT. As the signal was consistent and stable, the samples were not fully demagnetized.
Both walls are tilted at approximately 18°, the wall of Building CE towards the north and the wall of Building CG towards the south (dips 18°±3/360°±10 [n=5], 18°±1/175°±15 [n=4] respectively), demonstrating a symmetrical anticlinal fold.
The demagnetization data are presented in Fig. 54.4. Two samples (C3 and C6) from Wall 2454 were rejected, as they demonstrated an unstable magnetization (Fig. 54.4). The mean vectorial direction was calculated for the two clusters of samples using Fisher statistics. The results are presented in Table 54.1 and Fig. 54.5; Fig. 54.6 presents the results after tilt correction.
Table 54.1Mean geomagnetic direction for each of the tilted walls in Area C
Ben-Yosef and Ron in Mazar et. al. (2020 v. 5)
- Modified by JW from Mazar et. al. (2020 v.2)
Stratum C-2 Deformation Mapmodified by JW from Fig. 12.7 of Mazar et. al. (2020 v.2)
- Fig. 12.7 - Plan of Stratum
C-2 from Mazar et. al. (2020 v.2)
Fig. 12.7
Plan of Stratum C-2 (1:250); for the continuation of this stratum in Area D, see Fig. 15.28
Mazar et. al. (2020 v.2)
| Building | Room(s) | Wall(s) | Plan(s) | Collapse Direction |
Image (s) | Destruction Type |
Notes |
|---|---|---|---|---|---|---|---|
| Square R/4 | 1555 | 1562, 4458, and 1563 |
Figure 12.9 Plan of Stratum C-2, west; area in Squares Y/1–2 cut by apiary (1:125) Panitz-Cohen and Mazar in Mazar et. al. (2020 v.2) |
apparently southward |
Photo 12.24 Square R/4, looking southeast at Wall 1563 (left) and its corner with Wall 1572 (right) (2010) Panitz-Cohen and Mazar in Mazar et. al. (2020 v.2) |
All walls tilted - esp. 4458 |
|
| Square R/4 | 1555 |
Figure 12.9 Plan of Stratum C-2, west; area in Squares Y/1–2 cut by apiary (1:125) Panitz-Cohen and Mazar in Mazar et. al. (2020 v.2) |
Photo 12.25 Square R/4, looking south at smashed vessels in Locus 1555b (2010) Panitz-Cohen and Mazar in Mazar et. al. (2020 v.2) |
Debris |
|
||
| CA | 4420 | 4439 |
Figure 12.10 Plan of Buildings CA and CB, Stratum C-2 (1:75) Panitz-Cohen and Mazar in Mazar et. al. (2020 v.2) |
northward |
Photo 12.28 Southeastern part of C-2 Building CA, looking south; C-1b Wall 1448 above repair line covering Wall 4439 (2000) JW: Walls 4439 is bulging Panitz-Cohen and Mazar in Mazar et. al. (2020 v.2)
Photo 12.27View of C-2 Building CA, looking south; C-2 Building CB on the south (2000) Panitz-Cohen and Mazar in Mazar et. al. (2020 v.2) |
Bulged Wall |
|
| Just east of CA | 1506 |
Figure 12.10 Plan of Buildings CA and CB, Stratum C-2 (1:75) Panitz-Cohen and Mazar in Mazar et. al. (2020 v.2) |
eastward |
Figure 12.68 Section 14 (Square T/3, looking north) Panitz-Cohen and Mazar in Mazar et. al. (2020 v.2) |
Support Wall ? |
|
|
| CA | All rooms |
Figure 12.10 Plan of Buildings CA and CB, Stratum C-2 (1:75) Panitz-Cohen and Mazar in Mazar et. al. (2020 v.2) |
Debris |
|
|||
| CB | 1520 | 1442 and 1483 |
Figure 12.10 Plan of Buildings CA and CB, Stratum C-2 (1:75) Panitz-Cohen and Mazar in Mazar et. al. (2020 v.2) |
probably southward |
Photo 12.35 C-2 Building CB, northern wall; note possible earthquake damage (1998) JW: The earthquake damage alluded to is the split between walls 1442 and 1483 Panitz-Cohen and Mazar in Mazar et. al. (2020 v.2) |
Split Wall |
|
| CB | 1520 |
Figure 12.10 Plan of Buildings CA and CB, Stratum C-2 (1:75) Panitz-Cohen and Mazar in Mazar et. al. (2020 v.2) |
Debris |
|
|||
| CB | 1520 |
Figure 12.10 Plan of Buildings CA and CB, Stratum C-2 (1:75) Panitz-Cohen and Mazar in Mazar et. al. (2020 v.2) |
Excavators suggested it fell eastward or northward. Due to it's size and weight, I suggest it did not fall far and likely fell to the south from the split walls which probably split in a southerly direction due to a force from the north. |
Photo 12.37 C-2 Building CB; large stone south of entrance in Wall 1483, looking north (1998) Panitz-Cohen and Mazar in Mazar et. al. (2020 v.2)
Photo 12.35C-2 Building CB, northern wall; note possible earthquake damage (1998) JW: The earthquake damage alluded to is the split between walls 1442 and 1483 Panitz-Cohen and Mazar in Mazar et. al. (2020 v.2) |
Fallen stone |
|
|
| CE | 6464 |
Figure 12.12 Plan of Stratum C-2, northeast (1:125) Panitz-Cohen and Mazar in Mazar et. al. (2020 v.2) |
Photo 12.42 C-2 Building CE, looking east; fallen bricks and debris in Room 6464 (2003) Panitz-Cohen and Mazar in Mazar et. al. (2020 v.2) |
Debris |
|
||
| CE | Spaces north of Room 6464 in Squares Y/5-6 |
Figure 12.12 Plan of Stratum C-2, northeast (1:125) Panitz-Cohen and Mazar in Mazar et. al. (2020 v.2) |
Figure 12.62 Section 8 (Square Y/5, looking north) Panitz-Cohen and Mazar in Mazar et. al. (2020 v.2)
Figure 12.63Section 9 (Square Y/5, looking west) Panitz-Cohen and Mazar in Mazar et. al. (2020 v.2)
Figure 12.64Section 10 (Square T/4, looking east) Panitz-Cohen and Mazar in Mazar et. al. (2020 v.2) |
Debris |
|
||
| CY | 6506, 7512, and 8488 (?) | 7511 |
Figure 12.14 Plan of Building CY, Stratum C-2 (1:75) Panitz-Cohen and Mazar in Mazar et. al. (2020 v.2)
Figure 12.12Plan of Stratum C-2, northeast (1:125) Panitz-Cohen and Mazar in Mazar et. al. (2020 v.2) |
eastward - tilt most pronounced on W end of the wall |
Photo 12.59 C-2 Building CY, looking south at Wall 7511, covered by wood in foundation of C-1 Wall 6444 (2007) Panitz-Cohen and Mazar in Mazar et. al. (2020 v.2)
Photo 12.60Detail of Wall 7511 (see Photo 12.59), looking southwest (2007) Panitz-Cohen and Mazar in Mazar et. al. (2020 v.2) |
Tilted Wall |
|
| CY | Central courtyard 7512 |
Figure 12.14 Plan of Building CY, Stratum C-2 (1:75) Panitz-Cohen and Mazar in Mazar et. al. (2020 v.2)
Figure 12.12Plan of Stratum C-2, northeast (1:125) Panitz-Cohen and Mazar in Mazar et. al. (2020 v.2) |
Figure 12.55 Section 1 (Squares A/6–C/6, looking north) Panitz-Cohen and Mazar in Mazar et. al. (2020 v.2) |
Debris |
|
||
| CY | 8470 and 6506 |
Figure 12.14 Plan of Building CY, Stratum C-2 (1:75) Panitz-Cohen and Mazar in Mazar et. al. (2020 v.2)
Figure 12.12Plan of Stratum C-2, northeast (1:125) Panitz-Cohen and Mazar in Mazar et. al. (2020 v.2) |
Figure 12.55 Section 1 (Squares A/6–C/6, looking north) Panitz-Cohen and Mazar in Mazar et. al. (2020 v.2)
Figure 12.56Section 2 (Squares B/5–6, section below C-1 Walls 6420 and 6476, and below C-2 Wall 7506, looking west) Panitz-Cohen and Mazar in Mazar et. al. (2020 v.2) |
Debris |
|
||
| CY | 8488 |
Figure 12.14 Plan of Building CY, Stratum C-2 (1:75) Panitz-Cohen and Mazar in Mazar et. al. (2020 v.2)
Figure 12.12Plan of Stratum C-2, northeast (1:125) Panitz-Cohen and Mazar in Mazar et. al. (2020 v.2) |
Figure 12.55 Section 1 (Squares A/6–C/6, looking north) Panitz-Cohen and Mazar in Mazar et. al. (2020 v.2)
Photo 12.58C-2 Building CY, looking west; meter stick on Floor 7512 (2007) Panitz-Cohen and Mazar in Mazar et. al. (2020 v.2)
Photo 12.62C-2 Building CY, looking east; note blocked entrance to Room 8479; meter stick on Floor 7512 (2007) Panitz-Cohen and Mazar in Mazar et. al. (2020 v.2)
Photo 12.63. Eastern part of C-2 Building CY, looking south; note blockage of Room 8479 in center; meter stick on Floor 8488 (2007) Panitz-Cohen and Mazar in Mazar et. al. (2020 v.2) |
Debris |
|
| Effect | Plan(s) | Location(s) + Image(s) | Description(s) |
|---|---|---|---|
| Damaged and tilted walls + Debris including smashed vessels |
Figure 12.9 Plan of Stratum C-2, west; area in Squares Y/1–2 cut by apiary (1:125) Panitz-Cohen and Mazar in Mazar et. al. (2020 v.2) |
|
|
| Bulged Wall + Debris |
Figure 12.10 Plan of Buildings CA and CB, Stratum C-2 (1:75) Panitz-Cohen and Mazar in Mazar et. al. (2020 v.2) |
|
|
| Support Wall ? |
Figure 12.10 Plan of Buildings CA and CB, Stratum C-2 (1:75) Panitz-Cohen and Mazar in Mazar et. al. (2020 v.2) |
|
|
| Split Wall |
Figure 12.10 Plan of Buildings CA and CB, Stratum C-2 (1:75) Panitz-Cohen and Mazar in Mazar et. al. (2020 v.2) |
|
|
| Fallen stone |
Figure 12.10 Plan of Buildings CA and CB, Stratum C-2 (1:75) Panitz-Cohen and Mazar in Mazar et. al. (2020 v.2) |
|
|
| Fallen bricks in debris |
Figure 12.12 Plan of Stratum C-2, northeast (1:125) Panitz-Cohen and Mazar in Mazar et. al. (2020 v.2) |
|
|
| Debris |
Figure 12.12 Plan of Stratum C-2, northeast (1:125) Panitz-Cohen and Mazar in Mazar et. al. (2020 v.2) |
|
|
| Tilted Wall |
Figure 12.14 Plan of Building CY, Stratum C-2 (1:75) Panitz-Cohen and Mazar in Mazar et. al. (2020 v.2)
Figure 12.12Plan of Stratum C-2, northeast (1:125) Panitz-Cohen and Mazar in Mazar et. al. (2020 v.2) |
|
|
| Fallen bricks in debris |
Figure 12.14 Plan of Building CY, Stratum C-2 (1:75) Panitz-Cohen and Mazar in Mazar et. al. (2020 v.2)
Figure 12.12Plan of Stratum C-2, northeast (1:125) Panitz-Cohen and Mazar in Mazar et. al. (2020 v.2) |
|
|
| Fallen bricks in debris |
Figure 12.14 Plan of Building CY, Stratum C-2 (1:75) Panitz-Cohen and Mazar in Mazar et. al. (2020 v.2)
Figure 12.12Plan of Stratum C-2, northeast (1:125) Panitz-Cohen and Mazar in Mazar et. al. (2020 v.2) |
|
|
| Fallen bricks in debris |
Figure 12.14 Plan of Building CY, Stratum C-2 (1:75) Panitz-Cohen and Mazar in Mazar et. al. (2020 v.2)
Figure 12.12Plan of Stratum C-2, northeast (1:125) Panitz-Cohen and Mazar in Mazar et. al. (2020 v.2) |
|
|
- Modified by JW from Mazar et. al. (2020 v.3)
Stratum G2 Deformation Mapmodified by JW from Fig. 20.1 of Mazar et. al. (2020 v.3)
- Figure 20.1 - Plan of Stratum G-2b
from Mazar et. al. (2020 v. 3: Chapter 20)
Figure 20.1
Plan of Stratum G-2b
Mazar et. al. (2020 v.3) - Figure 20.2a - Plan of Stratum G-2a
from Mazar et. al. (2020 v. 3: Chapter 20)
Figure 20.2a
Plan of Stratum G-2a
Mazar et. al. (2020 v.3) - Figure 20.2b - Plan of Stratum G-2a'
from Mazar et. al. (2020 v. 3: Chapter 20)
Figure 20.2a
Plan of Stratum G-2a'
Mazar et. al. (2020 v.3) - Figure 20.7 - Superposition of walls in Area G
with location of section drawings from Mazar et. al. (2020 v. 3: Chapter 20)
Figure 20.7
Superposition of walls in Area G with location of section drawings
Mazar et. al. (2020 v.3)
| Building [Square(s)] |
Room(s) | Wall(s) | Plan(s) | Collapse Direction |
Image (s) | Destruction Type |
Notes |
|---|---|---|---|---|---|---|---|
| GD (Q/3) | 5047 | 5063 |
Figure 20.1 Plan of Stratum G-2b Mazar et. al. (2020 v.3)
Figure 20.2aPlan of Stratum G-2a Mazar et. al. (2020 v.3) |
Eastward |
|
Tilted Wall |
|
| GB and GA | 5061 and 5044 |
Figure 20.1 Plan of Stratum G-2b Mazar et. al. (2020 v.3)
Figure 20.2aPlan of Stratum G-2a Mazar et. al. (2020 v.3) |
5061 tilts E 5044 tilts W |
|
Separated and titled Walls |
|
|
| GA | 8052 | W of G2-b Wall 5044 |
Figure 20.1 Plan of Stratum G-2b Mazar et. al. (2020 v.3)
Figure 20.2aPlan of Stratum G-2a Mazar et. al. (2020 v.3) |
Eastward |
|
Debris - Collapsed mudbricks |
|
| GB (G2-b) | 8062 |
Figure 20.1 Plan of Stratum G-2b Mazar et. al. (2020 v.3)
Figure 20.2aPlan of Stratum G-2a Mazar et. al. (2020 v.3) |
probably westward |
|
Debris - Collapsed mudbricks |
|
|
| GB (G-2b or G-2a) | Floor 8041 |
Figure 20.1 Plan of Stratum G-2b Mazar et. al. (2020 v.3)
Figure 20.2aPlan of Stratum G-2a Mazar et. al. (2020 v.3) |
tilts east to west |
|
Tilted Floor |
|
|
| Open Area Squares P-Q/6 |
5050 (G2-b) |
Figure 20.1 Plan of Stratum G-2b Mazar et. al. (2020 v.3)
Figure 20.2aPlan of Stratum G-2a Mazar et. al. (2020 v.3) |
a 0.15 m- deep accumulation containing sherds and bones (5036)which in turn was covered by a brick debris layer (5043) |
|
|||
| GC | 4050 |
Figure 20.1 Plan of Stratum G-2b Mazar et. al. (2020 v.3)
Figure 20.2aPlan of Stratum G-2a Mazar et. al. (2020 v.3) |
|
Debris (not necessarily with a seismic origin) |
|
||
| E of GD | 4081 |
Figure 20.1 Plan of Stratum G-2b Mazar et. al. (2020 v.3)
Figure 20.2aPlan of Stratum G-2a Mazar et. al. (2020 v.3) |
Southward |
|
Tilted Wall (Phases G2-b and G2-a tilted) |
|
|
| E of GD | 8038 and 8061 |
Figure 20.1 Plan of Stratum G-2b Mazar et. al. (2020 v.3)
Figure 20.2aPlan of Stratum G-2a Mazar et. al. (2020 v.3) |
|
Debris - brick collapse in Rooms 8038 and 8061 (both attributed to G-2b) |
|
||
| GD | 8046 and 8017 |
Figure 20.1 Plan of Stratum G-2b Mazar et. al. (2020 v.3)
Figure 20.2aPlan of Stratum G-2a Mazar et. al. (2020 v.3) |
|
Debris (brick collapse) attributed to G2-b |
|
| Effect | Plan(s) | Location(s) + Image(s) | Description(s) |
|---|---|---|---|
| General Comments on possible earthquake at end of Stratum G-2 |
Figure 20.1 Plan of Stratum G-2b Mazar et. al. (2020 v.3)
Figure 20.2aPlan of Stratum G-2a Mazar et. al. (2020 v.3) |
Area G - no violent destruction was observed at the end of Stratum G-2, yet hints at an earthquake which caused considerable damage were found in the form of tilted and split walls. |
|
| Tilted Wall 5063 (eastward) |
Figure 20.1 Plan of Stratum G-2b Mazar et. al. (2020 v.3)
Figure 20.2aPlan of Stratum G-2a Mazar et. al. (2020 v.3) |
|
|
| Separated and titled Walls |
Figure 20.1 Plan of Stratum G-2b Mazar et. al. (2020 v.3)
Figure 20.2aPlan of Stratum G-2a Mazar et. al. (2020 v.3) |
|
|
| Debris - Collapsed mudbricks |
Figure 20.1 Plan of Stratum G-2b Mazar et. al. (2020 v.3)
Figure 20.2aPlan of Stratum G-2a Mazar et. al. (2020 v.3) |
|
|
| Debris - Collapsed mudbricks |
Figure 20.1 Plan of Stratum G-2b Mazar et. al. (2020 v.3)
Figure 20.2aPlan of Stratum G-2a Mazar et. al. (2020 v.3) |
|
|
| Tilted Floor 8041 - tilts east to west |
Figure 20.1 Plan of Stratum G-2b Mazar et. al. (2020 v.3)
Figure 20.2aPlan of Stratum G-2a Mazar et. al. (2020 v.3) |
|
|
| Debris |
Figure 20.1 Plan of Stratum G-2b Mazar et. al. (2020 v.3)
Figure 20.2aPlan of Stratum G-2a Mazar et. al. (2020 v.3) |
open area with bins continued in Squares P– Q/6, creating an L-shaped area surrounding Buildings GA and GB
and bounded on the north by Building GC - Floor 5050 was covered by two layers attributed to Stratum G2-b;
a 0.15 m- deep accumulation containing sherds and bones (5036)which in turn was covered by a brick debris layer (5043). |
|
| Debris (not necessarily with a seismic origin) |
Figure 20.1 Plan of Stratum G-2b Mazar et. al. (2020 v.3)
Figure 20.2aPlan of Stratum G-2a Mazar et. al. (2020 v.3) |
|
|
| Tilted Wall + Debris (brick collapse in Rooms 8038 and 8061) |
Figure 20.1 Plan of Stratum G-2b Mazar et. al. (2020 v.3)
Figure 20.2aPlan of Stratum G-2a Mazar et. al. (2020 v.3) |
|
|
| Debris (brick collapse) in Bldg. GD |
Figure 20.1 Plan of Stratum G-2b Mazar et. al. (2020 v.3)
Figure 20.2aPlan of Stratum G-2a Mazar et. al. (2020 v.3) |
|
|
- Modified by JW from Mazar et. al. (2020 v.2)
Stratum C1-b and D1-c Deformation Mapmodified by JW from Fig. 12.18 of Mazar et. al. (2020 v.2)
- Fig. 12.18 - Plan of
Stratum C-1b from Mazar et. al. (2020 v.2)
Fig. 12.18
Plan of Stratum C-1b (1:200)
Mazar et. al. (2020 v.2)
| Building | Room(s) | Wall | Plan(s) | Collapse Direction |
Image (s) | Destruction Type |
Notes |
|---|---|---|---|---|---|---|---|
| CR | 6491 | 6512 |
Figure 12.34 Plan of Stratum C-1b, northeast (1:125) Panitz-Cohen and Mazar in Mazar et. al. (2020 v.2) |
east-west strike-slip |
Photo 12.88 Building CR, late phase of C-1b; bricks of 6512, looking east (2005) JW: Note fractured and displaced blocks Panitz-Cohen and Mazar in Mazar et. al. (2020 v.2) |
displaced blocks |
|
| CE | 2489 | 2454 |
Figure 12.27 Plan of Stratum C-1b, north-center (1:125) Panitz-Cohen and Mazar in Mazar et. al. (2020 v.2) |
northward |
Photo 12.40 Building CE, looking at eastern wall (2003) Mazar et. al. (2020 v.2) |
tilted wall |
|
| CG | 2441 | 2439 |
Figure 12.40 Plan of Buildings CG, CH, CM and apiary, Stratum C-1b (1:75) Panitz-Cohen and Mazar in Mazar et. al. (2020 v.2) |
eastward |
Photo 12.133 Building CG, Room 2411, looking south at collapse of Wall 2439 above wooden beams, below floor of Room 2441 (2000) Panitz-Cohen and Mazar in Mazar et. al. (2020 v.2)
Photo 12.135Square Y/2, looking northeast; right: Wall 4443 of C-1a Building CL; left: Fill 5430 above brick collapse from C-1b Building CG (2001) Panitz-Cohen and Mazar in Mazar et. al. (2020 v.2) |
wall collapse | Square Y/2 - The wall collapsed into the Apiary |
| CG | 2441 | 2439 |
Figure 12.40 Plan of Buildings CG, CH, CM and apiary, Stratum C-1b (1:75) Panitz-Cohen and Mazar in Mazar et. al. (2020 v.2) |
eastward |
Photo 12.129 Detail of additional layers of wood under Wall 2439 (see Photo 12.128), looking south; note C-1b brick collapse on left (south); entrance in C-2 Wall 2505 on right (2000) Panitz-Cohen and Mazar in Mazar et. al. (2020 v.2)
Photo 12.128Building CG, detail of corner of Walls 2439 (left) and 1416 (right), with wooden beams in foundations, looking south (2000) Panitz-Cohen and Mazar in Mazar et. al. (2020 v.2) |
tilted wall |
|
| CG | 2460 and 2444 | 2411 |
Figure 12.40 Plan of Buildings CG, CH, CM and apiary, Stratum C-1b (1:75) Panitz-Cohen and Mazar in Mazar et. al. (2020 v.2) |
southward |
Photo 12.39 Square Y/3,looking west at C-1 Building CG; C-2 walls below wood in foundation (2008) Mazar et. al. (2020 v.2) |
tilted wall |
|
| CG | 2441 | 2411 |
Figure 12.40 Plan of Buildings CG, CH, CM and apiary, Stratum C-1b (1:75) Panitz-Cohen and Mazar in Mazar et. al. (2020 v.2) |
eastward |
Photo 12.131 C-1b Building CG, Room 2441, looking north at destruction and slippage of lower brick courses in Wall 2411 (2000) Panitz-Cohen and Mazar in Mazar et. al. (2020 v.2)
Photo 12.132Same view as Photo 12.131, looking north, after excavation of destruction debris in southern part; wooden beams appearing just under floor level (2000) Panitz-Cohen and Mazar in Mazar et. al. (2020 v.2) |
wall collapse and folding | |
| CH | 2455 | 1437 |
Figure 12.40 Plan of Buildings CG, CH, CM and apiary, Stratum C-1b (1:75) Panitz-Cohen and Mazar in Mazar et. al. (2020 v.2) |
eastward |
Photo 12.144 Squares T–Y/1–2, northern part of C-1b Building CH, looking north; lower right: northwestern corner of C-1a Building CL, Stratum C-1a (2000) JW: Note the axis of deformation and slumping from foreground to background Panitz-Cohen and Mazar in Mazar et. al. (2020 v.2) |
wall collapse and folding | Squares T–Y/1–2 |
| CH | 2455 | 2426 |
Figure 12.40 Plan of Buildings CG, CH, CM and apiary, Stratum C-1b (1:75) Panitz-Cohen and Mazar in Mazar et. al. (2020 v.2) |
eastward |
Photo 12.146 Square Y/1, C-1b Building CH, looking east ; wooden construction and collapsed Wall 2426 (right) cut by Wall 2413 of Building CL, Stratum C-1a (1998) Panitz-Cohen and Mazar in Mazar et. al. (2020 v.2)
Photo 12.147Square Y/1, C-1b Building CH, looking south; detail of eastern end of collapsed Wall 2426, cut by foundation trench of Wall 2413 of C-1a Building CL (2000) Panitz-Cohen and Mazar in Mazar et. al. (2020 v.2)
Photo 12.129Detail of additional layers of wood under Wall 2439 (see Photo 12.128), looking south; note C-1b brick collapse on left (south); entrance in C-2 Wall 2505 on right (2000) Panitz-Cohen and Mazar in Mazar et. al. (2020 v.2)
Figure 12.74Section 20 (Squares T–Y/1, looking south at Wall 2426) Panitz-Cohen and Mazar in Mazar et. al. (2020 v.2) |
wall collapse and folding |
|
| The Apiary | 8469 |
Figure 12.40 Plan of Buildings CG, CH, CM and apiary, Stratum C-1b (1:75) Panitz-Cohen and Mazar in Mazar et. al. (2020 v.2) |
southward |
Photo 12.154 Squares Y/2– 3; collapsed western part of Wall 8469 abutting Wall 2411 of Building CG, looking west; note wood in foundation of both walls (2007) Panitz-Cohen and Mazar in Mazar et. al. (2020 v.2)
Photo 12.155Square Y/2, looking north at collapsed bricks in western end of Wall 8469, near corner with Wall 2411 (2007) Panitz-Cohen and Mazar in Mazar et. al. (2020 v.2)
Photo 12.157Western row of hives abutting Wall 8469, looking west (2007) Panitz-Cohen and Mazar in Mazar et. al. (2020 v.2) |
wall collapse | Squares Y/2 | |
| The Apiary |
Figure 12.40 Plan of Buildings CG, CH, CM and apiary, Stratum C-1b (1:75) Panitz-Cohen and Mazar in Mazar et. al. (2020 v.2) |
appears mostly southward |
Photo 12.235 Square Y/1, C-1a Building CL, western wing, looking north; walls in section above apiary destruction debris (2000) Panitz-Cohen and Mazar in Mazar et. al. (2020 v.2) |
collapsed wall debris | Square Y/1 | ||
| The Apiary |
Figure 12.40 Plan of Buildings CG, CH, CM and apiary, Stratum C-1b (1:75) Panitz-Cohen and Mazar in Mazar et. al. (2020 v.2) |
Figure 12.83 Section 29 (Squares Z/1–2, looking east) Panitz-Cohen and Mazar in Mazar et. al. (2020 v.2) |
debris |
|
|||
| CZ | 11457, 11449, 11426, 11408, and 11404 are described - debris was probably present in all rooms |
Figure 12.48 Plan of Building CZ, Stratum C-1b (1:75) Panitz-Cohen and Mazar in Mazar et. al. (2020 v.2) |
Photo 12.166 C-1b Building CZ, looking west at C-1a Wall 10464 sealing the fallen bricks and debris on Floor 11426 (2012) Panitz-Cohen and Mazar in Mazar et. al. (2020 v.2)
Photo 12.167C-1b Building CZ, central courtyard, looking south; pillar bases of C-1a Building CX set directly on top of fallen bricks (2012) Panitz-Cohen and Mazar in Mazar et. al. (2020 v.2)
Figure 12.94Section 40 (Square A/3, looking east) Panitz-Cohen and Mazar in Mazar et. al. (2020 v.2) |
debris |
|
| Effect | Plan(s) | Location(s) + Image(s) | Description(s) |
|---|---|---|---|
| Collapsed Walls |
Plan of Bldgs. CL and others in C1-b
Figure 12.40 Plan of Buildings CG, CH, CM and apiary, Stratum C-1b (1:75) Panitz-Cohen and Mazar in Mazar et. al. (2020 v.2) Plan of Bldg. CL in overlying C1-a showing location of Fill 5430
Figure 12.53Plan of Building CL, Stratum C-1a (1:75) Panitz-Cohen and Mazar in Mazar et. al. (2020 v.2) Wider view of Plan of Bldgs. around CL in overlying C1-a - shows location of Fill 5430
Figure 12.50Plan of Stratum C-1a, south-center and southeast (1:125) Panitz-Cohen and Mazar in Mazar et. al. (2020 v.2) |
|
|
| Collapsed Wall |
Figure 12.40 Plan of Buildings CG, CH, CM and apiary, Stratum C-1b (1:75) Panitz-Cohen and Mazar in Mazar et. al. (2020 v.2) |
|
|
| Collapsed Walls |
Figure 12.40 Plan of Buildings CG, CH, CM and apiary, Stratum C-1b (1:75) Panitz-Cohen and Mazar in Mazar et. al. (2020 v.2) |
|
|
| Collapsed Wall |
Figure 12.40 Plan of Buildings CG, CH, CM and apiary, Stratum C-1b (1:75) Panitz-Cohen and Mazar in Mazar et. al. (2020 v.2) |
|
|
| Collapsed Wall |
Figure 12.40 Plan of Buildings CG, CH, CM and apiary, Stratum C-1b (1:75) Panitz-Cohen and Mazar in Mazar et. al. (2020 v.2) |
|
|
| Collapsed Walls |
Figure 12.19 Plan of Stratum C-1a (1:200) Panitz-Cohen and Mazar in Mazar et. al. (2020 v.2)
Figure 12.53Plan of Building CL, Stratum C-1a (1:75) Panitz-Cohen and Mazar in Mazar et. al. (2020 v.2) |
|
|
| Tilted Wall |
Figure 12.40 Plan of Buildings CG, CH, CM and apiary, Stratum C-1b (1:75) Panitz-Cohen and Mazar in Mazar et. al. (2020 v.2) |
|
|
| Tilted Walls |
Fig. 54.3 Sampling locations in Buildings CE and CG Ben-Yosef and Ron in Mazar et. al. (2020 v. 5)
Fig. 12.40Plan of Buildings CG, CH, CM and apiary, Stratum C-1b (1:75) Mazar et. al. (2020 v.2)
Figure 12.27Plan of Stratum C-1b, north-center (1:125) Panitz-Cohen and Mazar in Mazar et. al. (2020 v.2) |
|
|
| Fractured and Displaced Blocks (mudbricks) - Steps (?) or a wall remnant |
Figure 12.34 Plan of Stratum C-1b, northeast (1:125) Panitz-Cohen and Mazar in Mazar et. al. (2020 v.2) |
|
|
| Debris |
Figure 12.40 Plan of Buildings CG, CH, CM and apiary, Stratum C-1b (1:75) Panitz-Cohen and Mazar in Mazar et. al. (2020 v.2) |
|
|
| Debris |
Figure 12.18 Plan of Stratum C-1b (1:200) Panitz-Cohen and Mazar in Mazar et. al. (2020 v.2)
Figure 12.48Plan of Building CZ, Stratum C-1b (1:75) Panitz-Cohen and Mazar in Mazar et. al. (2020 v.2) |
|
|
- Modified by JW from Mazar et. al. (2020 v.2)
Stratum C1-b and D1-c Deformation Mapmodified by JW from Fig. 12.18 of Mazar et. al. (2020 v.2)
| Building [Square(s)] |
Room(s) | Wall(s) | Plan(s) | Collapse Direction |
Image (s) | Destruction Type |
Notes |
|---|---|---|---|---|---|---|---|
| Square Q/5 | 7837 | 7803 |
Figure 15.29 Plan of Stratum D-1c Mazar et. al. (2020 v.3) |
northward |
|
Tilted Wall |
|
| Square Q/5 | 7837 |
Figure 15.29 Plan of Stratum D-1c Mazar et. al. (2020 v.3) |
? |
|
Wall Collapse Debris |
|
| Effect | Plan(s) | Location(s) + Image(s) | Description(s) |
|---|---|---|---|
|
Figure 15.29 Plan of Stratum D-1c Mazar et. al. (2020 v.3) |
|
|
- Modified by JW from Mazar et. al. (2020 v.3)
Stratum E1-b Deformation Mapmodified by JW from Fig. 17.3 of Mazar et. al. (2020 v.3)
| Building [Square(s)] |
Room(s) | Wall(s) | Plan(s) | Collapse Direction |
Image (s) | Destruction Type |
Notes |
|---|---|---|---|---|---|---|---|
| EA | Room 1704 |
Figure 17.3 Plan of Stratum E-1b in Squares D–F/13–16 Mazar et. al. (2020 v.3) |
|
Brick Debris (not necessarily of seismic origin) |
|
||
| EA | Rooms 1699 and 2651 |
Figure 17.3 Plan of Stratum E-1b in Squares D–F/13–16 Mazar et. al. (2020 v.3)
Figure 17.12Plan of Stratum E-0 and topsoil loci Mazar et. al. (2020 v.3) |
|
Brick Debris |
|
||
| EA | Room 2663 |
Figure 17.3 Plan of Stratum E-1b in Squares D–F/13–16 Mazar et. al. (2020 v.3) |
|
Brick Debris |
|
||
| Courtyard | throughout |
Figure 17.3 Plan of Stratum E-1b in Squares D–F/13–16 Mazar et. al. (2020 v.3)
Figure 17.4Schematic plan of Stratum E-1a, marked with location of sub-plans Mazar et. al. (2020 v.3)
Figure 17.5General plan of Stratum E-1a Mazar et. al. (2020 v.3)
Figure 17.6Stratum E-1a in Squares D–F/13–15 Mazar et. al. (2020 v.3)
Figure 17.7Squares C–E/13–16 in Stratum E-1a Mazar et. al. (2020 v.3)
Figure 17.8Detailed plan and elevations of Platform 2654 and standing stones Mazar et. al. (2020 v.3)
Figure 17.9Stratum E-1a in Squares E/15–16 and Stratum E-1a–b (or just E-1b) in Squares E/17–18 and G/16 Mazar et. al. (2020 v.3) |
|
Debris (not necessarily of a seismic origin) found throughout the courtyard |
|
||
| Squares E/20, E/1 |
Figure 17.11 Plan of probe in Squares E/20, E/1 Mazar et. al. (2020 v.3) |
|
Debris - (not necessarily due to seismic activity and with unresolved stratigraphic relationships) found in a probe in Squares E/20, E/1 |
|
| Effect | Plan(s) | Location(s) + Image(s) | Description(s) |
|---|---|---|---|
| Debris (not necessarily of seismic origin) |
Figure 17.3 Plan of Stratum E-1b in Squares D–F/13–16 Mazar et. al. (2020 v.3) |
|
|
| Brick Debris |
Figure 17.3 Plan of Stratum E-1b in Squares D–F/13–16 Mazar et. al. (2020 v.3)
Figure 17.12Plan of Stratum E-0 and topsoil loci Mazar et. al. (2020 v.3) |
|
|
| Brick Debris |
Figure 17.3 Plan of Stratum E-1b in Squares D–F/13–16 Mazar et. al. (2020 v.3) |
|
|
|
Figure 17.3 Plan of Stratum E-1b in Squares D–F/13–16 Mazar et. al. (2020 v.3)
Figure 17.4Schematic plan of Stratum E-1a, marked with location of sub-plans Mazar et. al. (2020 v.3)
Figure 17.5General plan of Stratum E-1a Mazar et. al. (2020 v.3)
Figure 17.6Stratum E-1a in Squares D–F/13–15 Mazar et. al. (2020 v.3)
Figure 17.7Squares C–E/13–16 in Stratum E-1a Mazar et. al. (2020 v.3)
Figure 17.8Detailed plan and elevations of Platform 2654 and standing stones Mazar et. al. (2020 v.3)
Figure 17.9Stratum E-1a in Squares E/15–16 and Stratum E-1a–b (or just E-1b) in Squares E/17–18 and G/16 Mazar et. al. (2020 v.3) |
|
|
| Debris - (not necessarily due to seismic activity and with unresolved stratigraphic relationships) found in a probe in Squares E/20, E/1 |
Figure 17.11 Plan of probe in Squares E/20, E/1 Mazar et. al. (2020 v.3) |
|
|
- Modified by JW from Mazar et. al. (2020 v.2)
Stratum C1-a and D1-a Deformation Mapmodified by JW from Fig. 12.19 of Mazar et. al. (2020 v.2)
- Fig. 12.19 - Plan of
Stratum C-1a from Mazar et. al. (2020 v.2)
Fig. 12.19
Plan of Stratum C-1a (1:200)
Mazar et. al. (2020 v.2)
| Building | Room | Wall | Plan(s) | Collapse Direction |
Image (s) | Destruction Type |
Notes |
|---|---|---|---|---|---|---|---|
| CF | 5498, 6435, and 5460 |
Figure 12.28 Plan of Stratum C-1a, north-center (1:125) Panitz-Cohen and Mazar in Mazar et. al. (2020 v.2) |
Photo 12.96 C-1a Building CF, southern part of Room 5498, looking north; center: top of pottery model shrine, wooden beam (loom?) to its north (2001) Panitz-Cohen and Mazar in Mazar et. al. (2020 v.2)
Photo 12.106Building CF, looking south; top of destruction debris 6401 in C-1a; right: Room 6435 with grinding stone Installation 6406 (2003) Panitz-Cohen and Mazar in Mazar et. al. (2020 v.2)
Photo 12.107Building CF, grinding installation 6406 and destruction debris 6401 in Room 6435, looking south (2003) Panitz-Cohen and Mazar in Mazar et. al. (2020 v.2)
Photo 12.111Building CF, looking south at western wing; front; smashed vessels on floor of Room 5460; note bricks 5458 in Room 5445 to south (2001) Panitz-Cohen and Mazar in Mazar et. al. (2020 v.2) |
debris |
|
||
| CL | 5449, 5482, and to the west and north of Bldg. CL |
Figure 12.53 Plan of Building CL, Stratum C-1a (1:75) Panitz-Cohen and Mazar in Mazar et. al. (2020 v.2) |
Photo 12.239 C-1a Building CL, eastern wing, looking south; Floor 5446 (2007) Panitz-Cohen and Mazar in Mazar et. al. (2020 v.2)
Photo 12.237Square Z/20, C-1a Building CL, looking south; burnt material (9432) on Floor 9435 (2008) Panitz-Cohen and Mazar in Mazar et. al. (2020 v.2)
Photo 12.238C-1a Building CL, burnt oily material (5435) on Floor 5482, looking west (2001) Panitz-Cohen and Mazar in Mazar et. al. (2020 v.2)
Figure 12.84Section 30 (Square Z/20, looking east) Panitz-Cohen and Mazar in Mazar et. al. (2020 v.2) |
debris |
|
||
| CL | 4435 | 4443 |
Figure 12.53 Plan of Building CL, Stratum C-1a (1:75) Panitz-Cohen and Mazar in Mazar et. al. (2020 v.2) |
Photo 12.236 Squares Y–Z/1, C-1a Building CL, Wall 4443 with layer of black oily material; Wall 2504 on the left (north); looking east (2001) Panitz-Cohen and Mazar in Mazar et. al. (2020 v.2)
Figure 12.80Section 26 (Square Z/1, western end, looking south) Panitz-Cohen and Mazar in Mazar et. al. (2020 v.2)
Figure 12.86Section 32 (Square Y/1, looking east along Wall 4443) Panitz-Cohen and Mazar in Mazar et. al. (2020 v.2) |
debris + collapsed walls (?) |
|
|
| CW | 6411 and Courtyard Area |
Figure 12.38 Plan of Buildings CW, CQ1 and CQ3, Stratum C-1a (1:75) Panitz-Cohen and Mazar in Mazar et. al. (2020 v.2) |
Photo 12.117 C-1a Building CW, looking south; destruction debris and vessels in Room 6411 (2003) Panitz-Cohen and Mazar in Mazar et. al. (2020 v.2)
Photo 12.115C-1a Building CW, eastern part, looking west (2007) JW:Debris on 8430 Panitz-Cohen and Mazar in Mazar et. al. (2020 v.2) |
debris |
|
||
| Square C/6 east of Wall 8424 of C-1a Building CW |
Figure 12.38 Plan of Buildings CW, CQ1 and CQ3, Stratum C-1a (1:75) Panitz-Cohen and Mazar in Mazar et. al. (2020 v.2) |
Photo 12.119 Square C/6, skeleton (8472) east of Wall 8424 of C-1a Building CW, looking west (2007) Panitz-Cohen and Mazar in Mazar et. al. (2020 v.2) |
collapsed wall (fell on a human) |
|
|||
| CQ1 | 6483 and 6436 |
Figure 12.35 Plan of Stratum C-1a, northeast (1:125) Panitz-Cohen and Mazar in Mazar et. al. (2020 v.2) |
Photo 12.121 C-1a Building CQ1, looking west; destruction debris in western rooms (2007) Panitz-Cohen and Mazar in Mazar et. al. (2020 v.2)
Photo 12.122C-1a Building CQ1, looking west; floors of western rooms (see Photo 12.121) (2007) Panitz-Cohen and Mazar in Mazar et. al. (2020 v.2) |
debris |
|
||
| CQ2 | All rooms - 7500, 7490, and 8431 |
Figure 12.35 Plan of Stratum C-1a, northeast (1:125) Panitz-Cohen and Mazar in Mazar et. al. (2020 v.2) |
Photo 12.126 C-1a Building CQ2, looking west; destruction debris (7442) in western half of Room 7500 (2005) Panitz-Cohen and Mazar in Mazar et. al. (2020 v.2)
Photo 12.124C-1a Building CQ2, looking west; destruction debris in Room 7490 (2005) Panitz-Cohen and Mazar in Mazar et. al. (2020 v.2) |
debris |
|
||
| CQ2 | 7500 | 7413 |
Figure 12.35 Plan of Stratum C-1a, northeast (1:125) Panitz-Cohen and Mazar in Mazar et. al. (2020 v.2) |
southward |
Photo 12.125 C-1a Building CQ2, wood in foundation of Walls 7413 and 7459 (2007) Panitz-Cohen and Mazar in Mazar et. al. (2020 v.2)
Photo 12.123C-1a Building CQ2, looking west; meter stick on Floor 7500 (2007) Panitz-Cohen and Mazar in Mazar et. al. (2020 v.2)
Photo 12.120C-1a Buildings CQ1 and CQ2 and street (Squares Z, A–C/4) to their south, looking southwest (2007) Panitz-Cohen and Mazar in Mazar et. al. (2020 v.2) |
tilted wall |
|
| CQ3 | 10452 and 10460 |
Figure 12.51 Plan of Buildings CQ3 and CX, Stratum C-1a (1:75) Panitz-Cohen and Mazar in Mazar et. al. (2020 v.2) |
Photo 12.178 C-1a Building CQ3, Room 10452, looking south; smashed pottery and destruction debris against southern wall, on plastered installation (see Photo 12.179) (2010) Panitz-Cohen and Mazar in Mazar et. al. (2020 v.2)
Figure 12.88Section 34 (A–C/2, looking north) 2504, looking south) Panitz-Cohen and Mazar in Mazar et. al. (2020 v.2) |
debris |
|
||
| CQ3 | 10460 | 10482 and the section of Wall 10409 that was attached to it on the south |
Figure 12.51 Plan of Buildings CQ3 and CX, Stratum C-1a (1:75) Panitz-Cohen and Mazar in Mazar et. al. (2020 v.2) |
wall stumps - collapsed wall ? |
|
||
| CQ3 | 10494 |
Figure 12.51 Plan of Buildings CQ3 and CX, Stratum C-1a (1:75) Panitz-Cohen and Mazar in Mazar et. al. (2020 v.2) |
Photo 12.170 General view of southeastern part of Area C, looking west (2010) Panitz-Cohen and Mazar in Mazar et. al. (2020 v.2) |
damaged wall + debris |
|
||
| CX | All rooms |
Figure 12.51 Plan of Buildings CQ3 and CX, Stratum C-1a (1:75) Panitz-Cohen and Mazar in Mazar et. al. (2020 v.2) |
Photo 12.185 C-1a Building CX, vessels in destruction debris in center of Room 10507, against Bench 10502, looking north (2010) Panitz-Cohen and Mazar in Mazar et. al. (2020 v.2)
Photo 12.186C-1a Building CX, Locus 10431, vessels in burnt destruction debris, looking west (2010) Panitz-Cohen and Mazar in Mazar et. al. (2020 v.2)
Figure 12.88Section 34 (A–C/2, looking north) 2504, looking south) Panitz-Cohen and Mazar in Mazar et. al. (2020 v.2) |
debris |
|
||
| CP | 11451, 9449, 9450, 10458, 10476, 10506, 10510, and 11441 |
Figure 12.52a Plan of Building CP, Stratum C-1a (1:75) Panitz-Cohen and Mazar in Mazar et. al. (2020 v.2) |
Photo 12.205 C-1a Building CP, Room 11451, looking east; right: destruction debris with fallen grinding stone and loom weights; left foreground: plastered Bench 11452 attached to Wall 11417 (2012) Panitz-Cohen and Mazar in Mazar et. al. (2020 v.2)
Photo 12.228C-1a Building CP, Room 9450, pottery altar (Chapter 35, No. 2) in destruction debris (9420), looking east (2008) Panitz-Cohen and Mazar in Mazar et. al. (2020 v.2)
Photo 12.226C-1a Building CP, Bin 9434 in Room 9450, looking south (2008) Panitz-Cohen and Mazar in Mazar et. al. (2020 v.2)
Photo 12.211C-1a Building CP, southwestern corner of Room 10458, looking south at krater-pithos and Oven 10430, with concentration of vessels to their north (2010) Panitz-Cohen and Mazar in Mazar et. al. (2020 v.2)
Photo 12.212As Photo 12.211, detail of vessels, grinding stone and stand with petals, before exposure of the mortar seen in Photo 12.213 (2010) Panitz-Cohen and Mazar in Mazar et. al. (2020 v.2)
Photo 12.213C-1a Building CP, southwestern corner of Room 10458, looking south at krater-pithos with cooking pot inside, mortar embedded in floor, Oven 10430 and large stone to its east; woman sitting on Bench 10454 (2010) Panitz-Cohen and Mazar in Mazar et. al. (2020 v.2)
Photo 12.217C-1a Building CP, looking north at Room 10458 (top) and Room 10476 (bottom); note vessels on Bench 10466 (2010) Panitz-Cohen and Mazar in Mazar et. al. (2020 v.2)
Photo 12.218Building CP, Stratum C-1a, Room 10476, looking west at Bench 10467 and entrance into Room 9450 (2010) Panitz-Cohen and Mazar in Mazar et. al. (2020 v.2)
Photo 12.221C-1a Building CP, looking south at destruction debris in Room 10476, with loom weights, stones and smashed top of kraterpithos (Fig. 13.146:4), east of Bin 10488 (2010) Panitz-Cohen and Mazar in Mazar et. al. (2020 v.2)
Photo 12.222As Photo 12.228, detail of Bin 10488 and krater-pithos (Fig. 12.146:4) to its east (2010) Panitz-Cohen and Mazar in Mazar et. al. (2020 v.2)
Photo 12.224C-1a Building CP, detail of grain in bottom of Bin 10488 (2010) Panitz-Cohen and Mazar in Mazar et. al. (2020 v.2)
Photo 12.232Bin 10501 restored Panitz-Cohen and Mazar in Mazar et. al. (2020 v.2)
Photo 12.220Large mortar from Building CP, Room 10476 (2010) Panitz-Cohen and Mazar in Mazar et. al. (2020 v.2)
Photo 12.198C-1a Building CP, Room 10510 (northeastern room), looking north (2010) Panitz-Cohen and Mazar in Mazar et. al. (2020 v.2)
Photo 12.199C-1a Building CP, Room 10510; incense burner (Fig. 13.158:5) and other finds (2010) Panitz-Cohen and Mazar in Mazar et. al. (2020 v.2)
Photo 12.201C-1a Building CP, destruction debris (11418) in Room 11441, looking west (2012) Panitz-Cohen and Mazar in Mazar et. al. (2020 v.2) |
debris |
|
||
| CP | 10476 |
Figure 12.52a Plan of Building CP, Stratum C-1a (1:75) Panitz-Cohen and Mazar in Mazar et. al. (2020 v.2) |
Photo 12.219 C-1a Building CP, Room 10476, sub-floor construction 11468, looking north (2012) Panitz-Cohen and Mazar in Mazar et. al. (2020 v.2)
Photo 12.189C-1a Building CP, with sub-floor construction in Room 10476 (top center) (2012) (photo: David Silverman) Panitz-Cohen and Mazar in Mazar et. al. (2020 v.2)
Photo 12.194Building CP, looking south at C-1b Wall 11477 and C-1a Wall 10457; center: C-1a sub-floor construction 11468 (2012) Panitz-Cohen and Mazar in Mazar et. al. (2020 v.2)
Photo 12.221C-1a Building CP, looking south at destruction debris in Room 10476, with loom weights, stones and smashed top of krater-pithos (Fig. 13.146:4), east of Bin 10488 (2010) Panitz-Cohen and Mazar in Mazar et. al. (2020 v.2)
Figure 12.52cPlan of sub-floor brick construction in Building CP, Stratum C-1a (1:100) Panitz-Cohen and Mazar in Mazar et. al. (2020 v.2) |
fractured floor |
|
||
| CP | 10458 |
Figure 12.52a Plan of Building CP, Stratum C-1a (1:75) Panitz-Cohen and Mazar in Mazar et. al. (2020 v.2) |
collapsed wall ? |
|
|||
| CP | 9449 | 9406 |
Figure 12.52a Plan of Building CP, Stratum C-1a (1:75) Panitz-Cohen and Mazar in Mazar et. al. (2020 v.2) |
Photo 12.192 Wall 9406, dividing Building CL (mostly removed, left) and Building CP (right), looking north; lower left: eastern row of beehives, C-1b apiary (2008) Panitz-Cohen and Mazar in Mazar et. al. (2020 v.2)
Photo 12.234Walls 9406, 5418 and 5453 of C-1a Building CL above C-1b Wall 9453 and apiary destruction debris (2010) Panitz-Cohen and Mazar in Mazar et. al. (2020 v.2) |
damaged wall |
|
| Effect | Plan(s) | Location(s) + Image(s) | Description(s) |
|---|---|---|---|
| Collapsed Walls, Fallen Ceilings, and Broken Pottery in Destruction Debris |
Figure 12.28 Plan of Stratum C-1a, north-center (1:125) Panitz-Cohen and Mazar in Mazar et. al. (2020 v.2) |
|
|
| Collapsed Walls, Fallen Ceilings, and Broken Pottery in Destruction Debris |
Figure 12.35 Plan of Stratum C-1a, northeast (1:125) Panitz-Cohen and Mazar in Mazar et. al. (2020 v.2) |
|
|
| Collapsed Walls, Fallen Ceilings, and Broken Pottery in Destruction Debris |
Figure 12.35 Plan of Stratum C-1a, northeast (1:125) Panitz-Cohen and Mazar in Mazar et. al. (2020 v.2) |
|
|
| Collapsed Walls and Broken Pottery in Destruction Debris |
Figure 12.19 Plan of Stratum C-1a (1:200) Panitz-Cohen and Mazar in Mazar et. al. (2020 v.2)
Figure 12.52aPlan of Building CP, Stratum C-1a (1:75) Panitz-Cohen and Mazar in Mazar et. al. (2020 v.2)
Figure 12.52bIsometric reconstruction, Building CP, Stratum C-1a, looking northwest Panitz-Cohen and Mazar in Mazar et. al. (2020 v.2) |
|
|
| Collapsed Walls, Fallen Ceilings, and Broken Pottery in Destruction Debris |
Figure 12.19 Plan of Stratum C-1a (1:200) Panitz-Cohen and Mazar in Mazar et. al. (2020 v.2)
Figure 12.53Plan of Building CL, Stratum C-1a (1:75) Panitz-Cohen and Mazar in Mazar et. al. (2020 v.2) |
|
|
| Collapsed Walls and Broken Pottery in Destruction Debris |
Figure 12.38 Plan of Buildings CW, CQ1 and CQ3, Stratum C-1a (1:75) Panitz-Cohen and Mazar in Mazar et. al. (2020 v.2) |
Bldg. CW - Courtyard Area |
|
| Collapsed Walls and Broken Pottery in Destruction Debris |
Figure 12.35 Plan of Stratum C-1a, northeast (1:125) Panitz-Cohen and Mazar in Mazar et. al. (2020 v.2) |
Bldg. CQ2 - Room 8431 - Phase C-1a |
|
| Collapsed Walls and Broken Pottery in Destruction Debris |
Figure 12.19 Plan of Stratum C-1a (1:200) Panitz-Cohen and Mazar in Mazar et. al. (2020 v.2)
Figure 12.51Plan of Buildings CQ3 and CX, Stratum C-1a (1:75) Panitz-Cohen and Mazar in Mazar et. al. (2020 v.2) |
|
|
| Collapsed Walls and Broken Pottery in Destruction Debris |
Figure 12.19 Plan of Stratum C-1a (1:200) Panitz-Cohen and Mazar in Mazar et. al. (2020 v.2)
Figure 12.52aPlan of Building CP, Stratum C-1a (1:75) Panitz-Cohen and Mazar in Mazar et. al. (2020 v.2)
Figure 12.52bIsometric reconstruction, Building CP, Stratum C-1a, looking northwest Panitz-Cohen and Mazar in Mazar et. al. (2020 v.2) |
Bldg. CP - Deep layer of burnt destruction debris (10484) in Room 10506, including complete fallen bricks, charcoal and ash, as well as 29 pottery vessels |
|
| Collapsed Walls and Broken Pottery in Destruction Debris |
Figure 12.19 Plan of Stratum C-1a (1:200) Panitz-Cohen and Mazar in Mazar et. al. (2020 v.2)
Figure 12.53Plan of Building CL, Stratum C-1a (1:75) Panitz-Cohen and Mazar in Mazar et. al. (2020 v.2) |
|
|
| Smashed Vessels in Destruction Debris |
Figure 12.28 Plan of Stratum C-1a, north-center (1:125) Panitz-Cohen and Mazar in Mazar et. al. (2020 v.2) |
|
|
| Smashed Vessels in Destruction Debris |
Figure 12.28 Plan of Stratum C-1a, north-center (1:125) Panitz-Cohen and Mazar in Mazar et. al. (2020 v.2) |
|
|
| Smashed Vessels in Destruction Debris |
Figure 12.38 Plan of Buildings CW, CQ1 and CQ3, Stratum C-1a (1:75) Panitz-Cohen and Mazar in Mazar et. al. (2020 v.2) |
|
|
| Smashed Vessels in Destruction Debris |
Figure 12.19 Plan of Stratum C-1a (1:200) Panitz-Cohen and Mazar in Mazar et. al. (2020 v.2)
Figure 12.51Plan of Buildings CQ3 and CX, Stratum C-1a (1:75) Panitz-Cohen and Mazar in Mazar et. al. (2020 v.2) |
|
|
| Smashed Vessels in Destruction Debris |
Figure 12.19 Plan of Stratum C-1a (1:200) Panitz-Cohen and Mazar in Mazar et. al. (2020 v.2)
Figure 12.52aPlan of Building CP, Stratum C-1a (1:75) Panitz-Cohen and Mazar in Mazar et. al. (2020 v.2)
Figure 12.52bIsometric reconstruction, Building CP, Stratum C-1a, looking northwest Panitz-Cohen and Mazar in Mazar et. al. (2020 v.2) |
|
|
| Fractured stones of sub-floor construction |
Figure 12.19 Plan of Stratum C-1a (1:200) Panitz-Cohen and Mazar in Mazar et. al. (2020 v.2)
Figure 12.52aPlan of Building CP, Stratum C-1a (1:75) Panitz-Cohen and Mazar in Mazar et. al. (2020 v.2)
Figure 12.52bIsometric reconstruction, Building CP, Stratum C-1a, looking northwest Panitz-Cohen and Mazar in Mazar et. al. (2020 v.2) |
|
|
| Tilted Walls |
Figure 12.35 Plan of Stratum C-1a, northeast (1:125) Panitz-Cohen and Mazar in Mazar et. al. (2020 v.2) |
|
|
| Collapsed Walls ? |
Figure 12.19 Plan of Stratum C-1a (1:200) Panitz-Cohen and Mazar in Mazar et. al. (2020 v.2)
Figure 12.52aPlan of Building CP, Stratum C-1a (1:75) Panitz-Cohen and Mazar in Mazar et. al. (2020 v.2)
Figure 12.52bIsometric reconstruction, Building CP, Stratum C-1a, looking northwest Panitz-Cohen and Mazar in Mazar et. al. (2020 v.2) |
Bldg. CP - Room 10458 |
|
| Wall Stumps - Collapsed Walls ? |
Figure 12.19 Plan of Stratum C-1a (1:200) Panitz-Cohen and Mazar in Mazar et. al. (2020 v.2)
Figure 12.51Plan of Buildings CQ3 and CX, Stratum C-1a (1:75) Panitz-Cohen and Mazar in Mazar et. al. (2020 v.2) |
Bldg. CQ3 - Wall 10482 in Room 10460 and the section of Wall 10409 that was attached to it on the south in Bldg. CP |
|
| Damaged Wall |
Figure 12.19 Plan of Stratum C-1a (1:200) Panitz-Cohen and Mazar in Mazar et. al. (2020 v.2)
Figure 12.52aPlan of Building CP, Stratum C-1a (1:75) Panitz-Cohen and Mazar in Mazar et. al. (2020 v.2)
Figure 12.52bIsometric reconstruction, Building CP, Stratum C-1a, looking northwest Panitz-Cohen and Mazar in Mazar et. al. (2020 v.2) |
|
|
| Debris and burnt and damaged walls |
Figure 12.19 Plan of Stratum C-1a (1:200) Panitz-Cohen and Mazar in Mazar et. al. (2020 v.2)
Figure 12.51Plan of Buildings CQ3 and CX, Stratum C-1a (1:75) Panitz-Cohen and Mazar in Mazar et. al. (2020 v.2) |
|
|
| Debris |
Figure 12.38 Plan of Buildings CW, CQ1 and CQ3, Stratum C-1a (1:75) Panitz-Cohen and Mazar in Mazar et. al. (2020 v.2) |
|
|
| Debris |
Figure 12.19 Plan of Stratum C-1a (1:200) Panitz-Cohen and Mazar in Mazar et. al. (2020 v.2)
Figure 12.51Plan of Buildings CQ3 and CX, Stratum C-1a (1:75) Panitz-Cohen and Mazar in Mazar et. al. (2020 v.2) |
|
|
| Debris |
Figure 12.19 Plan of Stratum C-1a (1:200) Panitz-Cohen and Mazar in Mazar et. al. (2020 v.2)
Figure 12.53Plan of Building CL, Stratum C-1a (1:75) Panitz-Cohen and Mazar in Mazar et. al. (2020 v.2) |
|
|
| Human Remains |
Figure 12.38 Plan of Buildings CW, CQ1 and CQ3, Stratum C-1a (1:75) Panitz-Cohen and Mazar in Mazar et. al. (2020 v.2) |
|
|
- Modified by JW from Mazar et. al. (2020 v.2)
Stratum C1-a and D1-a Deformation Mapmodified by JW from Fig. 12.19 of Mazar et. al. (2020 v.2)
| Building [Square(s)] |
Room(s) | Wall(s) | Plan(s) | Collapse Direction |
Image (s) | Destruction Type |
Notes |
|---|---|---|---|---|---|---|---|
| Square Q/4 | 1804 |
Figure 15.31 Plan of Stratum D-1a Mazar et. al. (2020 v.3) |
possibly east (downslope) |
|
Collapsed and Burnt Bricks |
|
| Effect | Plan(s) | Location(s) + Image(s) | Description(s) |
|---|---|---|---|
| Collapsed and Burnt Bricks |
Figure 15.31 Plan of Stratum D-1a Mazar et. al. (2020 v.3) |
|
|
- Modified by JW from Mazar et. al. (2020 v.3)
Stratum E1-a Deformation Mapmodified by JW from Fig. 17.5 of Mazar et. al. (2020 v.3)
| Building [Square(s)] |
Room(s) | Wall(s) | Plan(s) | Collapse Direction |
Image (s) | Destruction Type |
Notes |
|---|---|---|---|---|---|---|---|
| EA (Square F/14) | Room 1677 and Locus 1670 |
Figure 17.6 Stratum E-1a in Squares D–F/13–15 Mazar et. al. (2020 v.3) |
|
Smashed pottery in destruction debris |
|
||
| EA | Loci 1626, 1605, and 1635 of Rooms 1701, 1605, and 1635 respectively |
Figure 17.6 Stratum E-1a in Squares D–F/13–15 Mazar et. al. (2020 v.3)
Figure 17.13Location of section drawings marked on schematic plan of Stratum E-1a Mazar et. al. (2020 v.3) |
|
Collapse Debris |
|
||
| EB | Space 2641 |
Figure 17.7 Squares C–E/13–16 in Stratum E-1a Mazar et. al. (2020 v.3) |
|
Collapse Debris |
|
||
| EB | Room 4654 |
Figure 17.7 Squares C–E/13–16 in Stratum E-1a Mazar et. al. (2020 v.3) |
|
Collapse Debris |
|
||
| EB | Room 2629 |
Figure 17.7 Squares C–E/13–16 in Stratum E-1a Mazar et. al. (2020 v.3)
Figure 17.13Location of section drawings marked on schematic plan of Stratum E-1a Mazar et. al. (2020 v.3) |
|
Collapse Debris |
|
||
| EB | Room 4616 |
Figure 17.7 Squares C–E/13–16 in Stratum E-1a Mazar et. al. (2020 v.3) |
|
Collapse Debris |
|
||
| EB | Platform 2654 and environs |
Figure 17.7 Squares C–E/13–16 in Stratum E-1a Mazar et. al. (2020 v.3)
Figure 17.13Location of section drawings marked on schematic plan of Stratum E-1a Mazar et. al. (2020 v.3) |
|
Damaged Corner of a Platform (not necessarily due to seismic activity) and surrounding brick collapse |
|
||
| Courtyard | throughout but particularly in the southern end, in Squares E/15, F/15, and the N part of E-F/14 |
Figure 17.3 Plan of Stratum E-1b in Squares D–F/13–16 Mazar et. al. (2020 v.3)
Figure 17.4Schematic plan of Stratum E-1a, marked with location of sub-plans Mazar et. al. (2020 v.3)
Figure 17.5General plan of Stratum E-1a Mazar et. al. (2020 v.3)
Figure 17.6Stratum E-1a in Squares D–F/13–15 Mazar et. al. (2020 v.3)
Figure 17.7Squares C–E/13–16 in Stratum E-1a Mazar et. al. (2020 v.3)
Figure 17.8Detailed plan and elevations of Platform 2654 and standing stones Mazar et. al. (2020 v.3)
Figure 17.9Stratum E-1a in Squares E/15–16 and Stratum E-1a–b (or just E-1b) in Squares E/17–18 and G/16 Mazar et. al. (2020 v.3) |
|
|
|
||
| EC | Space 5637 and Room 5613 |
Figure 17.7 Squares C–E/13–16 in Stratum E-1a Mazar et. al. (2020 v.3) |
|
Debris (Fallen Bricks) |
|
||
| Squares E/20, E/1 |
Figure 17.11 Plan of probe in Squares E/20, E/1 Mazar et. al. (2020 v.3) |
|
Debris - (not necessarily due to seismic activity and with unresolved stratigraphic relationships) found in a probe in Squares E/20, E/1 |
|
| Effect | Plan(s) | Location(s) + Image(s) | Description(s) |
|---|---|---|---|
| General comments on destruction of Stratum E-1a |
Figure 17.5 General plan of Stratum E-1a Mazar et. al. (2020 v.3)
Figure 17.13Location of section drawings marked on schematic plan of Stratum E-1a Mazar et. al. (2020 v.3) |
|
|
| Smashed pottery in destruction debris |
Figure 17.6 Stratum E-1a in Squares D–F/13–15 Mazar et. al. (2020 v.3) |
|
|
| Collapse Debris |
Figure 17.6 Stratum E-1a in Squares D–F/13–15 Mazar et. al. (2020 v.3)
Figure 17.13Location of section drawings marked on schematic plan of Stratum E-1a Mazar et. al. (2020 v.3) |
|
|
| Collapse Debris |
Figure 17.7 Squares C–E/13–16 in Stratum E-1a Mazar et. al. (2020 v.3) |
|
|
| Collapse Debris |
Figure 17.7 Squares C–E/13–16 in Stratum E-1a Mazar et. al. (2020 v.3) |
|
|
| Collapse Debris |
Figure 17.7 Squares C–E/13–16 in Stratum E-1a Mazar et. al. (2020 v.3)
Figure 17.13Location of section drawings marked on schematic plan of Stratum E-1a Mazar et. al. (2020 v.3) |
|
|
| Collapse Debris |
Figure 17.7 Squares C–E/13–16 in Stratum E-1a Mazar et. al. (2020 v.3) |
|
|
| Damaged Corner of a Platform (not necessarily due to seismic activity) |
Figure 17.7 Squares C–E/13–16 in Stratum E-1a Mazar et. al. (2020 v.3)
Figure 17.13Location of section drawings marked on schematic plan of Stratum E-1a Mazar et. al. (2020 v.3) |
|
|
|
Figure 17.3 Plan of Stratum E-1b in Squares D–F/13–16 Mazar et. al. (2020 v.3)
Figure 17.4Schematic plan of Stratum E-1a, marked with location of sub-plans Mazar et. al. (2020 v.3)
Figure 17.5General plan of Stratum E-1a Mazar et. al. (2020 v.3)
Figure 17.6Stratum E-1a in Squares D–F/13–15 Mazar et. al. (2020 v.3)
Figure 17.7Squares C–E/13–16 in Stratum E-1a Mazar et. al. (2020 v.3)
Figure 17.8Detailed plan and elevations of Platform 2654 and standing stones Mazar et. al. (2020 v.3)
Figure 17.9Stratum E-1a in Squares E/15–16 and Stratum E-1a–b (or just E-1b) in Squares E/17–18 and G/16 Mazar et. al. (2020 v.3) |
|
|
| Debris (Fallen Bricks) in Space 5637 and Room 5613 of Building EC |
Figure 17.7 Squares C–E/13–16 in Stratum E-1a Mazar et. al. (2020 v.3) |
|
|
| Debris - (not necessarily due to seismic activity and with unresolved stratigraphic relationships) found in a probe in Squares E/20, E/1 |
Figure 17.11 Plan of probe in Squares E/20, E/1 Mazar et. al. (2020 v.3) |
|
|
- Modified by JW from Mazar et. al. (2020 v.3)
Stratum G1 Deformation Mapmodified by JW from Fig. 20.4 of Mazar et. al. (2020 v.3)
- Figure 20.3 - Plan of wooden beams
in the foundations of Stratum G-1 walls from Mazar et. al. (2020 v. 3: Chapter 20)
Figure 20.3
Plan of wooden beams in the foundations of Stratum G-1 walls
Mazar et. al. (2020 v.3) - Figure 20.4 - Plan of Stratum G-1b
from Mazar et. al. (2020 v. 3: Chapter 20)
Figure 20.4
Plan of Stratum G-1b
Mazar et. al. (2020 v.3) - Figure 20.5 - Plan of Stratum G-1a
from Mazar et. al. (2020 v. 3: Chapter 20)
Figure 20.5
Plan of Stratum G-1a
Mazar et. al. (2020 v.3) - Figure 20.7 - Superposition of walls in Area G
with location of section drawings from Mazar et. al. (2020 v. 3: Chapter 20)
Figure 20.7
Superposition of walls in Area G with location of section drawings
Mazar et. al. (2020 v.3)
| Building [Square(s)] |
Room(s) | Wall(s) | Plan(s) | Collapse Direction |
Image (s) | Destruction Type |
Notes |
|---|---|---|---|---|---|---|---|
| Square P/5 | E of and abutting Wall 4014 |
Figure 20.3 Plan of wooden beams in the foundations of Stratum G-1 walls Mazar et. al. (2020 v.3)
Figure 20.4Plan of Stratum G-1b Mazar et. al. (2020 v.3)
Figure 20.5Plan of Stratum G-1a Mazar et. al. (2020 v.3) |
|
Burnt Brick debris below wood foundations |
|
||
| Square Q/4 | 5018 |
Figure 20.3 Plan of wooden beams in the foundations of Stratum G-1 walls Mazar et. al. (2020 v.3)
Figure 20.4Plan of Stratum G-1b Mazar et. al. (2020 v.3)
Figure 20.5Plan of Stratum G-1a Mazar et. al. (2020 v.3) |
|
Brick Debris below wood beam foundation at bottom of Wall 5018 |
|
||
| Square Q/3 |
Figure 20.3 Plan of wooden beams in the foundations of Stratum G-1 walls Mazar et. al. (2020 v.3)
Figure 20.4Plan of Stratum G-1b Mazar et. al. (2020 v.3)
Figure 20.5Plan of Stratum G-1a Mazar et. al. (2020 v.3) |
|
Disordered wood beam foundation |
|
|||
| GF Square Q/5 |
Figure 20.4 Plan of Stratum G-1b Mazar et. al. (2020 v.3)
Figure 20.5Plan of Stratum G-1a Mazar et. al. (2020 v.3) |
|
Burning and destruction of Building GF |
|
|||
| GG | 4047 and 5008 |
Figure 20.4 Plan of Stratum G-1b Mazar et. al. (2020 v.3)
Figure 20.5Plan of Stratum G-1a Mazar et. al. (2020 v.3) |
Wall 4047 is folded and bowed in Phases G1-b and G1-a Wall 5008 is tilted E |
|
Wall 4047 is folded and bowed in Phases G1-b and G1-a Wall 5008 is tilted E |
|
|
| GG | 4089 |
Figure 20.4 Plan of Stratum G-1b Mazar et. al. (2020 v.3)
Figure 20.5Plan of Stratum G-1a Mazar et. al. (2020 v.3) |
|
Destruction layer in Room 4089 |
|
||
| GG | 5037 + Loci 4065 and 4069 (all G1-b) |
Figure 20.4 Plan of Stratum G-1b Mazar et. al. (2020 v.3)
Figure 20.5Plan of Stratum G-1a Mazar et. al. (2020 v.3) |
|
Destruction layers including smashed pottery and fallen objects |
|
| Effect | Plan(s) | Location(s) + Image(s) | Description(s) |
|---|---|---|---|
| General comments on destruction of Stratum G-1a |
Figure 20.4 Plan of Stratum G-1b Mazar et. al. (2020 v.3)
Figure 20.5Plan of Stratum G-1a Mazar et. al. (2020 v.3) |
The dramatic destruction of Stratum G-1a yielded a rich pottery assemblage and other finds. This can be correlated to the general destruction of the city of Stratum IV in the 9th century BCE, as evidenced in other areas at Tel Rehov. |
|
| Burnt Brick debris below wood foundations and abutting Wall 4014 in Square P/5 |
Figure 20.3 Plan of wooden beams in the foundations of Stratum G-1 walls Mazar et. al. (2020 v.3)
Figure 20.4Plan of Stratum G-1b Mazar et. al. (2020 v.3)
Figure 20.5Plan of Stratum G-1a Mazar et. al. (2020 v.3) |
|
|
| Brick Debris below wood beam foundation at bottom of Wall 5018 in Square Q/4 |
Figure 20.3 Plan of wooden beams in the foundations of Stratum G-1 walls Mazar et. al. (2020 v.3)
Figure 20.4Plan of Stratum G-1b Mazar et. al. (2020 v.3)
Figure 20.5Plan of Stratum G-1a Mazar et. al. (2020 v.3) |
|
|
| Disordered wood beam foundation in Square Q/3 |
Figure 20.3 Plan of wooden beams in the foundations of Stratum G-1 walls Mazar et. al. (2020 v.3)
Figure 20.4Plan of Stratum G-1b Mazar et. al. (2020 v.3)
Figure 20.5Plan of Stratum G-1a Mazar et. al. (2020 v.3) |
|
|
| Burning and destruction of Building GF |
Figure 20.4 Plan of Stratum G-1b Mazar et. al. (2020 v.3)
Figure 20.5Plan of Stratum G-1a Mazar et. al. (2020 v.3) |
|
|
| Folded and bowed walls in Building GG |
Figure 20.4 Plan of Stratum G-1b Mazar et. al. (2020 v.3)
Figure 20.5Plan of Stratum G-1a Mazar et. al. (2020 v.3) |
|
|
| Destruction layer in Room 4089 of Building GG |
Figure 20.4 Plan of Stratum G-1b Mazar et. al. (2020 v.3)
Figure 20.5Plan of Stratum G-1a Mazar et. al. (2020 v.3) |
|
|
| Destruction layer in Room 5037 of Building GG |
Figure 20.4 Plan of Stratum G-1b Mazar et. al. (2020 v.3)
Figure 20.5Plan of Stratum G-1a Mazar et. al. (2020 v.3) |
|
|
- Modified by JW from Mazar et. al. (2020 v.2)
Stratum C-2 Deformation Mapmodified by JW from Fig. 12.7 of Mazar et. al. (2020 v.2)
- Modified by JW from Mazar et. al. (2020 v.3)
Stratum G2 Deformation Mapmodified by JW from Fig. 20.1 of Mazar et. al. (2020 v.3)
- Modified by JW from Mazar et. al. (2020 v.2)
Stratum C1-b and D1-c Deformation Mapmodified by JW from Fig. 12.18 of Mazar et. al. (2020 v.2)
- Modified by JW from Mazar et. al. (2020 v.3)
Stratum E1-b Deformation Mapmodified by JW from Fig. 17.3 of Mazar et. al. (2020 v.3)
- Modified by JW from Mazar et. al. (2020 v.2)
Stratum C1-a and D1-a Deformation Mapmodified by JW from Fig. 12.19 of Mazar et. al. (2020 v.2)
- Modified by JW from Mazar et. al. (2020 v.3)
Stratum E1-a Deformation Mapmodified by JW from Fig. 17.5 of Mazar et. al. (2020 v.3)
- Modified by JW from Mazar et. al. (2020 v.3)
Stratum G1 Deformation Mapmodified by JW from Fig. 20.4 of Mazar et. al. (2020 v.3)
- Fig. 12.7 - Plan of Stratum C-2
from Mazar et. al. (2020 v.2)
Fig. 12.7
Plan of Stratum C-2 (1:250); for the continuation of this stratum in Area D, see Fig. 15.28
Mazar et. al. (2020 v.2) - Figure 20.1 - Plan of Stratum G-2b
from Mazar et. al. (2020 v. 3: Chapter 20)
Figure 20.1
Plan of Stratum G-2b
Mazar et. al. (2020 v.3) - Figure 20.2a - Plan of Stratum G-2a
from Mazar et. al. (2020 v. 3: Chapter 20)
Figure 20.2a
Plan of Stratum G-2a
Mazar et. al. (2020 v.3) - Figure 20.2b - Plan of Stratum G-2a'
from Mazar et. al. (2020 v. 3: Chapter 20)
Figure 20.2a
Plan of Stratum G-2a'
Mazar et. al. (2020 v.3)
- See Seismic Effects for descriptions of damage and/or photos
- Earthquake Archeological Effects chart
of Rodríguez-Pascua et al (2013: 221-224)
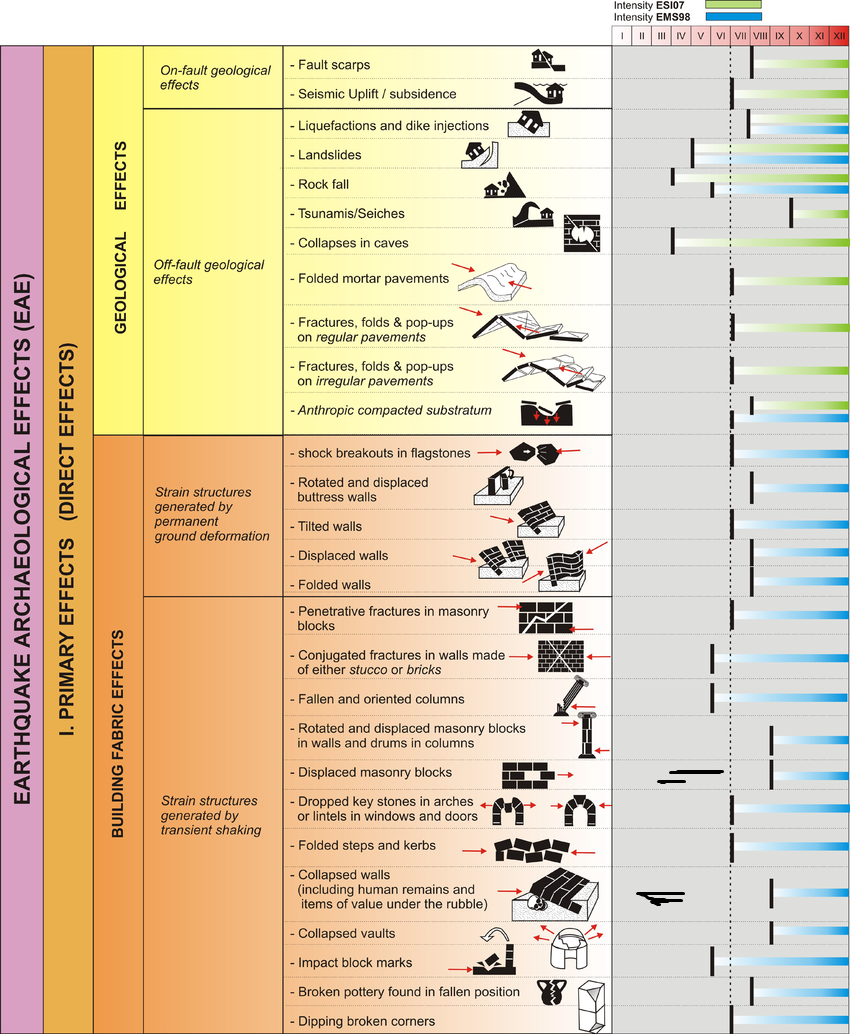 Earthquake Archeological Effects (EAE)
Rodríguez-Pascua et al (2013: 221-224)
| Effect | Location | Comments | Intensity |
|---|---|---|---|
| Collapsed Walls |
|
VIII+ | |
| Broken Pottery found in fallen position |
|
VII+ | |
| Tilted Walls |
|
VI+ | |
| Folded Walls |
|
Bulged Wall in Area C | VII+ |
| Displaced Walls |
|
Split Wall in Area C, Separated Walls in Area G | VII+ |
| Seismic Uplift/Subsidence |
|
VI+ |
- Fig. 12.18 - Plan of Stratum C-1b
from Mazar et. al. (2020 v.2)
Fig. 12.18
Plan of Stratum C-1b (1:200)
Mazar et. al. (2020 v.2) - Figure 15.29 - Plan of Stratum D-1c
from Mazar et. al. (2020 v. 3: Chapter 15)
Figure 15.29
Plan of Stratum D-1c
Mazar et. al. (2020 v.3) - Figure 17.3 - Plan of Stratum E-1b
in Squares D–F/13–16 from Mazar et. al. (2020 v. 3: Chapter 17)
Figure 17.3
Plan of Stratum E-1b in Squares D–F/13–16
Mazar et. al. (2020 v.3)
- See Seismic Effects for descriptions of damage and/or photos
- Earthquake Archeological Effects chart
of Rodríguez-Pascua et al (2013: 221-224)
Earthquake Archeological Effects (EAE)
Rodríguez-Pascua et al (2013: 221-224)
| Effect | Building(s) | Comments | Intensity |
|---|---|---|---|
| Collapsed Walls |
|
VIII+ | |
| Tilted Walls |
|
VI+ | |
| Displaced Blocks |
|
Intensity Estimate downgraded from VIII+ to VI+ since the displacement in Bldg. CR of Area C was in mudbricks rather than stones (masonry) as specified in the EAE Chart | VI+ |
- Fig. 12.19 - Plan of Stratum C-1a
from Mazar et. al. (2020 v.2)
Fig. 12.19
Plan of Stratum C-1a (1:200)
Mazar et. al. (2020 v.2) - Figure 15.31 - Plan of Stratum D-1a
from Mazar et. al. (2020 v. 3: Chapter 15)
Figure 15.31
Plan of Stratum D-1a
Mazar et. al. (2020 v.3) - Figure 17.5 - General plan of Stratum E-1a
from Mazar et. al. (2020 v. 3: Chapter 17)
Figure 17.5
General plan of Stratum E-1a
Mazar et. al. (2020 v.3) - Figure 20.3 - Plan of wooden beams in the
foundations of Stratum G-1 walls from Mazar et. al. (2020 v. 3: Chapter 20)
Figure 20.3
Plan of wooden beams in the foundations of Stratum G-1 walls
Mazar et. al. (2020 v.3) - Figure 20.4 - Plan of Stratum G-1b
from Mazar et. al. (2020 v. 3: Chapter 20)
Figure 20.4
Plan of Stratum G-1b
Mazar et. al. (2020 v.3) - Figure 20.5 - Plan of Stratum G-1a
from Mazar et. al. (2020 v. 3: Chapter 20)
Figure 20.5
Plan of Stratum G-1a
Mazar et. al. (2020 v.3)
- See Seismic Effects for descriptions of damage and/or photos
- Earthquake Archeological Effects chart
of Rodríguez-Pascua et al (2013: 221-224)
Earthquake Archeological Effects (EAE)
Rodríguez-Pascua et al (2013: 221-224)
| Effect | Building(s) | Comments | Intensity |
|---|---|---|---|
| Collapsed Walls |
|
VIII+ | |
| Tilted Walls |
|
VI+ | |
| Folded Walls |
|
VII+ | |
| Broken Pottery (some apparently in fallen position) |
|
VII+ |
- Fig. 12.7
Plan of Stratum C-2 from Mazar et. al. (2020 v.2)
Fig. 12.7
Plan of Stratum C-2 (1:250); for the continuation of this stratum in Area D, see Fig. 15.28
Mazar et. al. (2020 v.2) - Fig. 12.18
Plan of Stratum C-1b from Mazar et. al. (2020 v.2)
Fig. 12.18
Plan of Stratum C-1b (1:200)
Mazar et. al. (2020 v.2) - Fig. 12.19
Plan of Stratum C-1a from Mazar et. al. (2020 v.2)
Fig. 12.19
Plan of Stratum C-1a (1:200)
Mazar et. al. (2020 v.2) - Fig. 12.23
Isometric view of Area C, Stratum C-1a, looking northwest from Mazar et. al. (2020 v.2)
Fig. 12.23
Isometric view of Area C, Stratum C-1a, looking northwest
Mazar et. al. (2020 v.2)
- Table 20.1
Correlation of strata – Areas G and C from Yahalom-Mack, Ziv-Esudri, and Mazar et. al. (2020 v.3)
Table 20.1
Correlation of strata – Areas G and C
Mazar et. al. (2020 v.3) - Figure 20.1
Plan of Stratum G-2b from Yahalom-Mack, Ziv-Esudri, and Mazar et. al. (2020 v.3)
Fig. 20.1
Plan of Stratum G-2b
Mazar et. al. (2020 v.3) - Figure 20.2a
Plan of Stratum G-2a from Yahalom-Mack, Ziv-Esudri, and Mazar et. al. (2020 v.3)
Fig. 20.2a
Plan of Stratum G-2a
Mazar et. al. (2020 v.3) - Figure 20.3
Plan of wooden beams in the foundations of Stratum G-1 walls from Mazar et. al. (2020 v. 3: Chapter 20)
Figure 20.3
Plan of wooden beams in the foundations of Stratum G-1 walls
Mazar et. al. (2020 v.3) - Figure 20.4
Plan of Stratum G-1b from Mazar et. al. (2020 v. 3: Chapter 20)
Figure 20.4
Plan of Stratum G-1b
Mazar et. al. (2020 v.3) - Figure 20.5
Plan of Stratum G-1a from Mazar et. al. (2020 v. 3: Chapter 20)
Figure 20.5
Plan of Stratum G-1a
Mazar et. al. (2020 v.3) - Figure 20.7
Superposition of walls in Area G with location of section drawings from Mazar et. al. (2020 v. 3: Chapter 20)
Figure 20.7
Superposition of walls in Area G with location of section drawings
Mazar et. al. (2020 v.3)
| Effect | Image(s) | Location | Description |
|---|---|---|---|
| Collapsed and folded wall | Collapsed and folded wall Collapsed and folded wall on the west side of Area G
Photo by Jefferson Williams - 11 June 2023 Collapsed and folded wall - Digital Theodolite  Digital Theodolite view of Collapsed and folded wall on the west side of Area G
Photo by Jefferson Williams - 11 June 2023 Link to Lidar 3D scan of Collapsed and Folded Western Wall in Area G |
Western Wall of Area G | |
| Anticline limb (mostly north limb) |

Click on image to open a new tab with a high resolution magnifiable image Photo by Jefferson Williams - 11 June 2023 |
Area C | |
| Parted Walls | 
Click on image to open a new tab with a high resolution magnifiable image Photo by Jefferson Williams - 11 June 2023 |
Area C | Wall to the right tilts |
| Warped E-W Wall | 
Click on image to open a new tab with a high resolution magnifiable image Photo by Jefferson Williams - 11 June 2023 |
Area C | |
| Anticlinal folding | 
Click on image to open a new tab with a high resolution magnifiable image Photo by Jefferson Williams - 11 June 2023 |
Area C | |
| Tilted Wall | 
Click on image to open a new tab with a high resolution magnifiable image Photo by Jefferson Williams - 11 June 2023 |
Area C | |
| Downdropped block |  Down dropped block in Area C - a mini graben
Click on image to open a new tab with a high resolution magnifiable image Photo by Jefferson Williams - 11 June 2023 |
Area C | possibly a blocked entrance |
 Orthophoto of Tel Rehov (entire Tel)
Click on Image for high resolution magnifiable image
From Drone Survey by Jefferson Williams 11 June 2023
 Orthophoto of Area C at Tel Rehov
Click on Image for high resolution magnifiable image
From Drone Survey by Jefferson Williams 11 June 2023