en-Nabratein
 en-Nabratein
click on image to explore this site on a new tab in govmap.gov.il
| Transliterated Name | Source | Name |
|---|---|---|
| en-Nabratein | Hebrew | נבוריה |
| Kefar Neburaya | Arabic | |
| Khirbet Neburaya | Arabic | |
| Naburiya | Hebrew | |
| Nevoraya | Hebrew |
- Fig. 1- Location Map from
Meyers, Strange, and Groh (1978)
 Fig. 1
Map of sites surveyed with other important sites
Meyers, Strange, and Groh (1978)
- Annotated Satellite Image (google) of
en-Nabratein (Naburiya) area from biblewalks.com
 Annotated Satellite Image (google) of en-Nabratein (Naburiya) area
Used with permission from BibleWalks.com - en-Nabratein in Google Earth
 en-Nabratein
click on image to explore this site on a new tab in Google Earth - en-Nabratein on govmap.gov.il
en-Nabratein
click on image to explore this site on a new tab in govmap.gov.il
- Fig. 4 - Excavation Areas from
Meyers et al (2009)
 Fig. 4
Key to excavations, showing fields and areas and indicating location of sections A—A, B—B, C—C, D—D, F—F, G—G, J—J, and K—K. Although all these sections were recorded, only those salient for the stratigraphic discussion are published.
Meyers et al (2009) - Fig. 5 - Stone-for-stone plan
of all excavated areas from Meyers et al (2009)
 Fig. 5
Stone-for-stone plan of all excavated areas; see Figure 6 for identification of major loci.
Meyers et al (2009) - Fig. 6 - Annotated
Stone-for-stone plan with major loci indicated from Meyers et al (2009)
 Fig. 6
Annotated Stone-for-stone plan major loci indicated.
Meyers et al (2009)
- Fig. 5 - Stone-for-stone plan
of all excavated areas from Meyers et al (2009)
Fig. 5
Stone-for-stone plan of all excavated areas; see Figure 6 for identification of major loci.
Meyers et al (2009) - Fig. 6 - Annotated
Stone-for-stone plan with major loci indicated from Meyers et al (2009)
Fig. 6
Annotated Stone-for-stone plan major loci indicated.
Meyers et al (2009)
- Fig. 7 - Block plan
of Period II remains showing Synagogue 1 from Meyers et al (2009)
 Fig. 7
Block plan (with selected locus numbers) of Period II remains showing Synagogue 1 (Middle Roman) in the lower right and the building complex in Field IV on the left.
Meyers et al (2009) - Fig. 8 - Interior view of Synagogue 1
from Meyers et al (2009)
 Fig. 8
Interior view of Synagogue 1 (Middle Roman), four-column broadhouse, looking south. The Ark is shown on the western bema to the right of the major entrance on the south wall.
Meyers et al (2009)
- Fig. 7 - Block plan
of Period II remains showing Synagogue 1 from Meyers et al (2009)
Fig. 7
Block plan (with selected locus numbers) of Period II remains showing Synagogue 1 (Middle Roman) in the lower right and the building complex in Field IV on the left.
Meyers et al (2009)
- Fig. 9 - Block plan
of Period III remains showing Synagogue 2 from Meyers et al (2009)
 Fig. 9
Block plan (with selected locus numbers) of Period III remains showing Synagogue 2 (Late Roman) and adjacent areas.
Meyers et al (2009) - Fig. 11 - Perspective
drawing of Synagogue 2 from Meyers et al (2009)
 Fig. 11
Perspective drawing of Synagogue 2 (Late Roman).
Meyers et al (2009) - Fig. 12 - Interior
view of Synagogue 2 from Meyers et al (2009)
 Fig. 12
Interior view of Synagogue 2 (Late Roman), six-column basilica, looking south. The Ark is shown on the western bema, to the right of the major entrance on the south wall. Note the steps leading up to the Ark.
Meyers et al (2009) - Fig. 23 - Plan of
south end of Synagogue 2 from Meyers et al (2009)
 Fig. 23
Plan of south end of Synagogue 2 showing reconstructed bemas flanking southern portal. The Torah Shrine is depicted as a niche on the western bema.
Meyers et al (2009) - Fig. 24 - Block plan
of Synagogue 2 from Meyers et al (2009)
 Fig. 24
Block plan of Synagogue 2, showing the Torah Shrine against the southern wall, without a niche.
Meyers et al (2009)
- Fig. 9 - Block plan
of Period III remains showing Synagogue 2 from Meyers et al (2009)
Fig. 9
Block plan (with selected locus numbers) of Period III remains showing Synagogue 2 (Late Roman) and adjacent areas.
Meyers et al (2009) - Fig. 23 - Plan of
south end of Synagogue 2 from Meyers et al (2009)
Fig. 23
Plan of south end of Synagogue 2 showing reconstructed bemas flanking southern portal. The Torah Shrine is depicted as a niche on the western bema.
Meyers et al (2009) - Fig. 24 - Block plan
of Synagogue 2 from Meyers et al (2009)
Fig. 24
Block plan of Synagogue 2, showing the Torah Shrine against the southern wall, without a niche.
Meyers et al (2009)
- Fig. 10 - Plans of
Synagogue 3 published by Kohl and Watzinger (1916) from Meyers et al (2009)
 Fig. 10
Plans (of Synagogue 3) published by Kohl and Watzinger (1916: fig 14). On the left is their stone-for-stone drawing showing the site as surveyed in 1905, and on the right is their rendition of the synagogue's plan.
Meyers et al (2009) - Fig. 15 - Block
plan of Period IV remains showing Synagogue 3 from Meyers et al (2009)
 Fig. 15
Block plan (with selected locus numbers) of Period IV remains showing Synagogue 3, with associated passageway and courtyard to the west and associated structure on the south-southwest. Remains of earlier periods appear in faint lines.
Meyers et al (2009) - Fig. 17 - Isometric
drawing of Synagogue 3 from Meyers et al (2009)
 Fig. 17
Isometric drawing of Synagogue 3 (Byzantine—Early Arab, Period IV), looking northeast
Meyers et al (2009) - Fig. 16 - Perspective
drawing of Synagogue 3 from Meyers et al (2009)
 Fig. 16
Perspective drawing of Synagogue 3 (Byzantine—Early Arab, Period IV), looking northwest
Meyers et al (2009) - Fig. 30 - Annotated
stone-for-stone plan of Field IV from Meyers et al (2009)
 Fig. 30
Annotated stone-for-stone plan (with selected locus numbers) of Field IV at the western edge of the site.
Meyers et al (2009)
- Fig. 10 - Plans of
Synagogue 3 published by Kohl and Watzinger (1916) from Meyers et al (2009)
Fig. 10
Plans (of Synagogue 3) published by Kohl and Watzinger (1916: fig 14). On the left is their stone-for-stone drawing showing the site as surveyed in 1905, and on the right is their rendition of the synagogue's plan.
Meyers et al (2009) - Fig. 15 - Block
plan of Period IV remains showing Synagogue 3 from Meyers et al (2009)
Fig. 15
Block plan (with selected locus numbers) of Period IV remains showing Synagogue 3, with associated passageway and courtyard to the west and associated structure on the south-southwest. Remains of earlier periods appear in faint lines.
Meyers et al (2009) - Fig. 30 - Annotated
stone-for-stone plan of Field IV from Meyers et al (2009)
Fig. 30
Annotated stone-for-stone plan (with selected locus numbers) of Field IV at the western edge of the site.
Meyers et al (2009)
- Photo 3 View of site during
excavation from Meyers et al (2009)
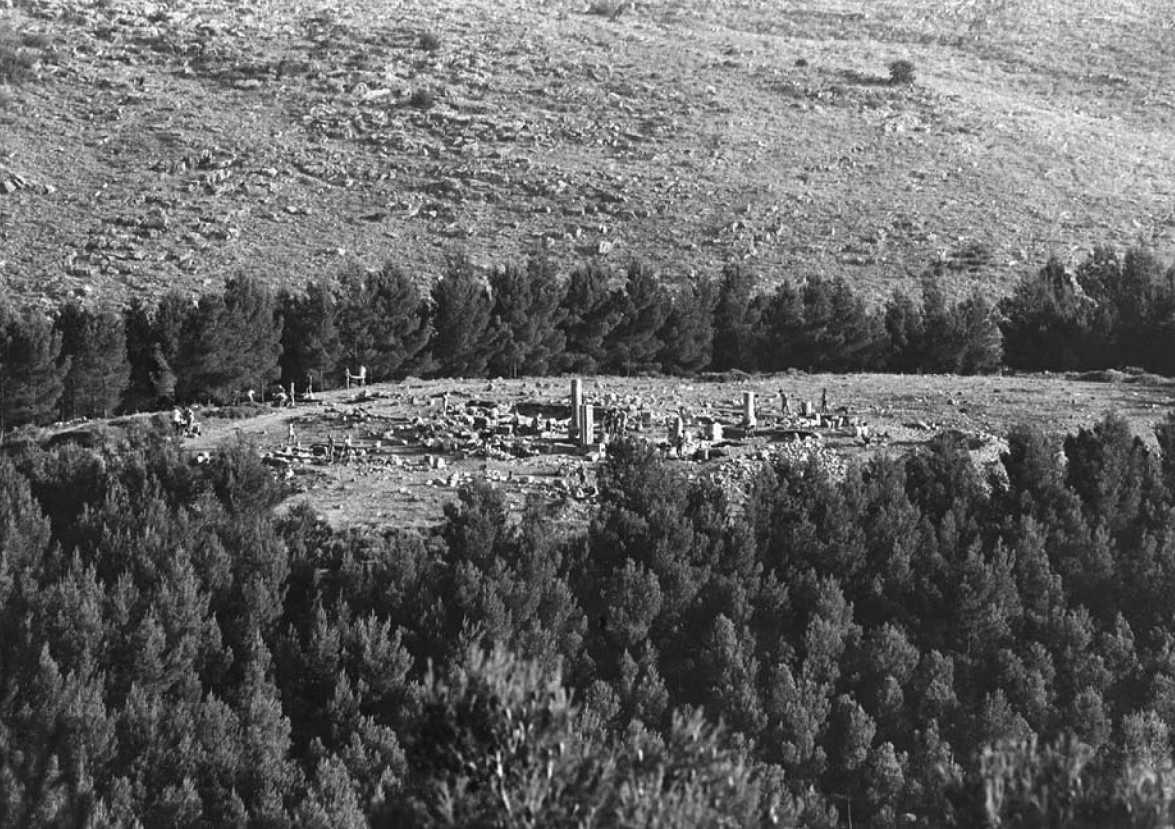 Photo 3
View of site during excavation and restoration work taken on July 4, 1980, looking north-northwest, at edge of Nahal Dalton.
Meyers et al (2009)